Birthday Cake Cheesecake Truffles Delightful Treats

Are you ready to make Birthday Cake Cheesecake Truffles that will wow everyone? These sweet bites blend creamy cheesecake with the joy of birthday cake. You’ll love how easy they are to create, and I’ll share tips to ensure your truffles are a hit! From fun flavors to storage tips, I’ve got you covered. Let’s dive into making these delightful treats that will add magic to any celebration!

- 8 oz cream cheese, softened - 1 cup powdered sugar - 1 cup vanilla cake mix (dry) - 1 cup sprinkles (rainbow or themed) - 1/2 cup vanilla extract - 1 cup white chocolate chips - 1 tablespoon coconut oil (for melting chocolate) When measuring ingredients, use dry measuring cups for the cake mix and sugar. For the cream cheese, use a scale or standard measuring cup. Liquid ingredients like vanilla extract should be measured with a liquid measuring cup. This ensures you get the right amount for perfect truffles. You will need a few key tools: - Large mixing bowl - Hand mixer - Baking sheet - Parchment paper - Microwave-safe bowl - Fork or toothpick for dipping These tools help make the process smooth and fun. First, grab a large mixing bowl. Place 8 oz of softened cream cheese inside. Use a hand mixer to beat it until it's smooth and creamy. This step makes your base rich and tasty. Gradually add 1 cup of powdered sugar. Keep mixing until you see no lumps. Next, add 1 cup of dry vanilla cake mix. This gives the truffles their cake flavor. Stir well to combine everything evenly. Now, pour in 1/2 cup of vanilla extract. This adds sweetness and depth. Finally, mix in half of the 1 cup of sprinkles. These will bring a festive touch to your mixture. Once your mixture is well mixed, it’s time to shape it. Use your hands to scoop out small balls, about 1 inch wide. Place these balls on a baking sheet lined with parchment paper. Make sure they are spaced out so they don’t stick together. After shaping the truffles, place the baking sheet in the freezer. Let them chill for about 30 minutes. This helps them firm up and makes them easier to coat in chocolate. While your truffles chill, it's time to melt the chocolate. In a microwave-safe bowl, add 1 cup of white chocolate chips and 1 tablespoon of coconut oil. Heat this mixture in 30-second bursts. Stir in between until it's completely smooth. Once melted, take each truffle out of the freezer. Dip each one into the melted chocolate, fully coating it. Use a fork or toothpick to lift the truffle out. Tap off any extra chocolate before placing it back on the baking sheet. Now, sprinkle the remaining sprinkles on top while the chocolate is still wet. This makes them look fun and festive. Finally, return the dipped truffles to the fridge for 15-20 minutes to let the chocolate harden completely. Now, your birthday cake cheesecake truffles are ready to enjoy! Mixing is key to great truffles. Start with room-temperature cream cheese. This helps it blend smoothly. Use a hand mixer for the best results. Beat the cream cheese until it’s creamy. Then, add the powdered sugar and cake mix slowly. This way, you avoid lumps. Mix until smooth, then add the vanilla extract. Fold in the sprinkles gently. You want them evenly spread in the mix. You can make these truffles your own! Try using chocolate cake mix instead of vanilla for a different flavor. You could also swap out the white chocolate for dark chocolate. Want a fun twist? Add a splash of almond extract. You can change the sprinkles too. Use holiday-themed sprinkles for a festive touch. You can even roll the truffles in crushed nuts or cookies for extra crunch. Watch out for these common mistakes. Don’t skip chilling the truffles before dipping. If they are too soft, they won’t hold their shape. Also, don’t rush melting the chocolate. Heat it slowly and stir often. If the chocolate gets too hot, it can seize. Lastly, sprinkle the truffles right after dipping. If the chocolate sets, the sprinkles won’t stick. {{image_2}} You can play with flavors to make these truffles even more fun. Try using chocolate cake mix instead of vanilla for a chocolate twist. You can also add peanut butter or caramel for a richer taste. Want something fruity? Toss in some lemon or orange zest to brighten up the flavor. Each variation offers a new taste that can make your truffles special for any celebration. If you want gluten-free truffles, just use a gluten-free cake mix. This change keeps the same great taste while ensuring everyone can enjoy them. For a vegan option, swap the cream cheese with a vegan cream cheese. Use powdered sugar and vegan chocolate chips too. These simple swaps keep the truffles delicious and friendly for different diets. Decorating your truffles can be a blast! Depending on the theme, you can use colored sprinkles to match any party. For a holiday, use red and green sprinkles for Christmas or pastel colors for Easter. You can even drizzle colored chocolate on top for a fun look. Get creative! The right decor can turn your truffles into a show-stopping treat. To keep your Birthday Cake Cheesecake Truffles fresh, store them in an airtight container. Place parchment paper between layers to prevent sticking. You can keep them in the fridge for up to one week. This helps maintain their creamy texture and delicious taste. You can freeze these truffles for longer storage. First, chill them in the fridge for about 30 minutes. Then, place them in a single layer on a baking sheet and freeze until solid. Once frozen, transfer them to a freezer-safe bag. They can stay frozen for up to three months. Thaw them in the fridge before serving. These truffles taste best when fresh but can last a while. If stored properly, they remain good for about a week in the fridge. Check for any off smells or changes in texture before eating. Enjoy your treats while they are at their best! Yes, you can! You may use dark or milk chocolate instead of white chocolate. Each type brings a unique taste. Dark chocolate adds a rich flavor. Milk chocolate is sweeter and creamier. Just remember to melt it the same way as white chocolate. These truffles can stay fresh for about one week. Keep them in an airtight container. Store them in the fridge for the best taste. If you want to keep them longer, you can freeze them. They can last up to three months in the freezer. If your mixture is too soft, chill it in the fridge. This helps it firm up for easier shaping. You can also add a bit more dry cake mix if needed. Just mix until it all comes together. Then, shape the truffles and freeze them again before dipping in chocolate. This blog post covered all you need to know about making cheesecake truffles. We explored ingredients, measurements, and essential tools first. Then, I shared a clear step-by-step guide to help you create delicious truffles. Tips on mixing, customization, and common mistakes will ensure your success. You can try different flavors, adjust for diets, and even get creative with decor. With proper storage, your truffles will stay fresh and tasty. Enjoy making these sweet treats and impress everyone around you!

Ingredients

List of Ingredients

– 8 oz cream cheese, softened

– 1 cup powdered sugar

– 1 cup vanilla cake mix (dry)

– 1 cup sprinkles (rainbow or themed)

– 1/2 cup vanilla extract

– 1 cup white chocolate chips

– 1 tablespoon coconut oil (for melting chocolate)

Measurement Guide

When measuring ingredients, use dry measuring cups for the cake mix and sugar. For the cream cheese, use a scale or standard measuring cup. Liquid ingredients like vanilla extract should be measured with a liquid measuring cup. This ensures you get the right amount for perfect truffles.

Essential Equipment

You will need a few key tools:

– Large mixing bowl

– Hand mixer

– Baking sheet

– Parchment paper

– Microwave-safe bowl

– Fork or toothpick for dipping

These tools help make the process smooth and fun.

Step-by-Step Instructions

Preparing the Cheesecake Mixture

First, grab a large mixing bowl. Place 8 oz of softened cream cheese inside. Use a hand mixer to beat it until it’s smooth and creamy. This step makes your base rich and tasty. Gradually add 1 cup of powdered sugar. Keep mixing until you see no lumps. Next, add 1 cup of dry vanilla cake mix. This gives the truffles their cake flavor. Stir well to combine everything evenly. Now, pour in 1/2 cup of vanilla extract. This adds sweetness and depth. Finally, mix in half of the 1 cup of sprinkles. These will bring a festive touch to your mixture.

Forming the Truffles

Once your mixture is well mixed, it’s time to shape it. Use your hands to scoop out small balls, about 1 inch wide. Place these balls on a baking sheet lined with parchment paper. Make sure they are spaced out so they don’t stick together. After shaping the truffles, place the baking sheet in the freezer. Let them chill for about 30 minutes. This helps them firm up and makes them easier to coat in chocolate.

Melting the Chocolate and Dipping

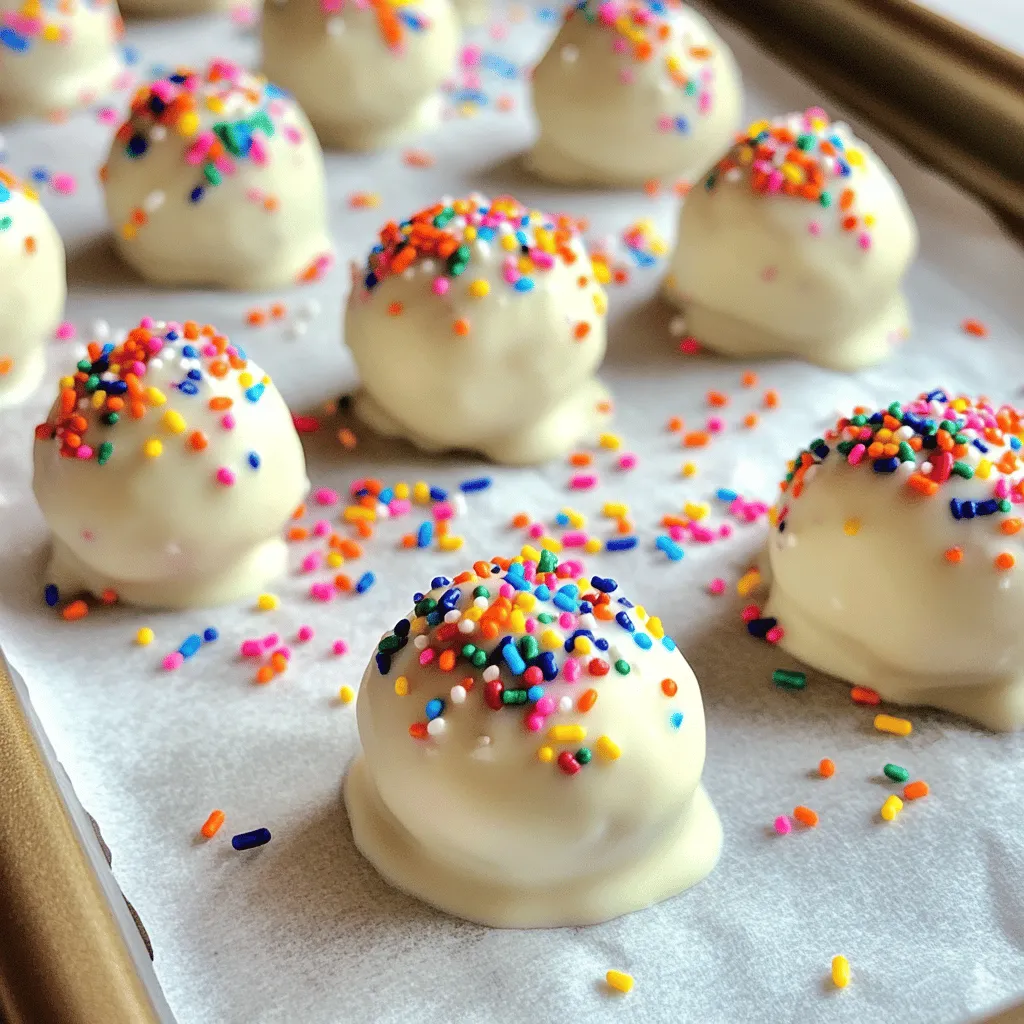
While your truffles chill, it’s time to melt the chocolate. In a microwave-safe bowl, add 1 cup of white chocolate chips and 1 tablespoon of coconut oil. Heat this mixture in 30-second bursts. Stir in between until it’s completely smooth. Once melted, take each truffle out of the freezer. Dip each one into the melted chocolate, fully coating it. Use a fork or toothpick to lift the truffle out. Tap off any extra chocolate before placing it back on the baking sheet. Now, sprinkle the remaining sprinkles on top while the chocolate is still wet. This makes them look fun and festive. Finally, return the dipped truffles to the fridge for 15-20 minutes to let the chocolate harden completely. Now, your birthday cake cheesecake truffles are ready to enjoy!

Tips & Tricks

Best Practices for Mixing

Mixing is key to great truffles. Start with room-temperature cream cheese. This helps it blend smoothly. Use a hand mixer for the best results. Beat the cream cheese until it’s creamy. Then, add the powdered sugar and cake mix slowly. This way, you avoid lumps. Mix until smooth, then add the vanilla extract. Fold in the sprinkles gently. You want them evenly spread in the mix.

Ideas for Customizing Truffles

You can make these truffles your own! Try using chocolate cake mix instead of vanilla for a different flavor. You could also swap out the white chocolate for dark chocolate. Want a fun twist? Add a splash of almond extract. You can change the sprinkles too. Use holiday-themed sprinkles for a festive touch. You can even roll the truffles in crushed nuts or cookies for extra crunch.

Common Mistakes to Avoid

Watch out for these common mistakes. Don’t skip chilling the truffles before dipping. If they are too soft, they won’t hold their shape. Also, don’t rush melting the chocolate. Heat it slowly and stir often. If the chocolate gets too hot, it can seize. Lastly, sprinkle the truffles right after dipping. If the chocolate sets, the sprinkles won’t stick.

Variations

Alternative Flavors to Try

You can play with flavors to make these truffles even more fun. Try using chocolate cake mix instead of vanilla for a chocolate twist. You can also add peanut butter or caramel for a richer taste. Want something fruity? Toss in some lemon or orange zest to brighten up the flavor. Each variation offers a new taste that can make your truffles special for any celebration.

Dietary Adjustments (Gluten-Free, Vegan)

If you want gluten-free truffles, just use a gluten-free cake mix. This change keeps the same great taste while ensuring everyone can enjoy them. For a vegan option, swap the cream cheese with a vegan cream cheese. Use powdered sugar and vegan chocolate chips too. These simple swaps keep the truffles delicious and friendly for different diets.

Themed Decor Ideas for Truffles

Decorating your truffles can be a blast! Depending on the theme, you can use colored sprinkles to match any party. For a holiday, use red and green sprinkles for Christmas or pastel colors for Easter. You can even drizzle colored chocolate on top for a fun look. Get creative! The right decor can turn your truffles into a show-stopping treat.

Storage Info

How to Store Truffles

To keep your Birthday Cake Cheesecake Truffles fresh, store them in an airtight container. Place parchment paper between layers to prevent sticking. You can keep them in the fridge for up to one week. This helps maintain their creamy texture and delicious taste.

Freezing Instructions

You can freeze these truffles for longer storage. First, chill them in the fridge for about 30 minutes. Then, place them in a single layer on a baking sheet and freeze until solid. Once frozen, transfer them to a freezer-safe bag. They can stay frozen for up to three months. Thaw them in the fridge before serving.

Shelf Life Tips

These truffles taste best when fresh but can last a while. If stored properly, they remain good for about a week in the fridge. Check for any off smells or changes in texture before eating. Enjoy your treats while they are at their best!

FAQs

Can I use different types of chocolate?

Yes, you can! You may use dark or milk chocolate instead of white chocolate. Each type brings a unique taste. Dark chocolate adds a rich flavor. Milk chocolate is sweeter and creamier. Just remember to melt it the same way as white chocolate.

How long do these truffles stay fresh?

These truffles can stay fresh for about one week. Keep them in an airtight container. Store them in the fridge for the best taste. If you want to keep them longer, you can freeze them. They can last up to three months in the freezer.

What should I do if my mixture is too soft?

If your mixture is too soft, chill it in the fridge. This helps it firm up for easier shaping. You can also add a bit more dry cake mix if needed. Just mix until it all comes together. Then, shape the truffles and freeze them again before dipping in chocolate.

This blog post covered all you need to know about making cheesecake truffles. We explored ingredients, measurements, and essential tools first. Then, I shared a clear step-by-step guide to help you create delicious truffles.

Tips on mixing, customization, and common mistakes will ensure your success. You can try different flavors, adjust for diets, and even get creative with decor.

With proper storage, your truffles will stay fresh and tasty. Enjoy making these sweet treats and impress everyone around you!

- 8 oz cream cheese, softened - 1 cup powdered sugar - 1 cup vanilla cake mix (dry) - 1 cup sprinkles (rainbow or themed) - 1/2 cup vanilla extract - 1 cup white chocolate chips - 1 tablespoon coconut oil (for melting chocolate) When measuring ingredients, use dry measuring cups for the cake mix and sugar. For the cream cheese, use a scale or standard measuring cup. Liquid ingredients like vanilla extract should be measured with a liquid measuring cup. This ensures you get the right amount for perfect truffles. You will need a few key tools: - Large mixing bowl - Hand mixer - Baking sheet - Parchment paper - Microwave-safe bowl - Fork or toothpick for dipping These tools help make the process smooth and fun. First, grab a large mixing bowl. Place 8 oz of softened cream cheese inside. Use a hand mixer to beat it until it's smooth and creamy. This step makes your base rich and tasty. Gradually add 1 cup of powdered sugar. Keep mixing until you see no lumps. Next, add 1 cup of dry vanilla cake mix. This gives the truffles their cake flavor. Stir well to combine everything evenly. Now, pour in 1/2 cup of vanilla extract. This adds sweetness and depth. Finally, mix in half of the 1 cup of sprinkles. These will bring a festive touch to your mixture. Once your mixture is well mixed, it’s time to shape it. Use your hands to scoop out small balls, about 1 inch wide. Place these balls on a baking sheet lined with parchment paper. Make sure they are spaced out so they don’t stick together. After shaping the truffles, place the baking sheet in the freezer. Let them chill for about 30 minutes. This helps them firm up and makes them easier to coat in chocolate. While your truffles chill, it's time to melt the chocolate. In a microwave-safe bowl, add 1 cup of white chocolate chips and 1 tablespoon of coconut oil. Heat this mixture in 30-second bursts. Stir in between until it's completely smooth. Once melted, take each truffle out of the freezer. Dip each one into the melted chocolate, fully coating it. Use a fork or toothpick to lift the truffle out. Tap off any extra chocolate before placing it back on the baking sheet. Now, sprinkle the remaining sprinkles on top while the chocolate is still wet. This makes them look fun and festive. Finally, return the dipped truffles to the fridge for 15-20 minutes to let the chocolate harden completely. Now, your birthday cake cheesecake truffles are ready to enjoy! Mixing is key to great truffles. Start with room-temperature cream cheese. This helps it blend smoothly. Use a hand mixer for the best results. Beat the cream cheese until it’s creamy. Then, add the powdered sugar and cake mix slowly. This way, you avoid lumps. Mix until smooth, then add the vanilla extract. Fold in the sprinkles gently. You want them evenly spread in the mix. You can make these truffles your own! Try using chocolate cake mix instead of vanilla for a different flavor. You could also swap out the white chocolate for dark chocolate. Want a fun twist? Add a splash of almond extract. You can change the sprinkles too. Use holiday-themed sprinkles for a festive touch. You can even roll the truffles in crushed nuts or cookies for extra crunch. Watch out for these common mistakes. Don’t skip chilling the truffles before dipping. If they are too soft, they won’t hold their shape. Also, don’t rush melting the chocolate. Heat it slowly and stir often. If the chocolate gets too hot, it can seize. Lastly, sprinkle the truffles right after dipping. If the chocolate sets, the sprinkles won’t stick. {{image_2}} You can play with flavors to make these truffles even more fun. Try using chocolate cake mix instead of vanilla for a chocolate twist. You can also add peanut butter or caramel for a richer taste. Want something fruity? Toss in some lemon or orange zest to brighten up the flavor. Each variation offers a new taste that can make your truffles special for any celebration. If you want gluten-free truffles, just use a gluten-free cake mix. This change keeps the same great taste while ensuring everyone can enjoy them. For a vegan option, swap the cream cheese with a vegan cream cheese. Use powdered sugar and vegan chocolate chips too. These simple swaps keep the truffles delicious and friendly for different diets. Decorating your truffles can be a blast! Depending on the theme, you can use colored sprinkles to match any party. For a holiday, use red and green sprinkles for Christmas or pastel colors for Easter. You can even drizzle colored chocolate on top for a fun look. Get creative! The right decor can turn your truffles into a show-stopping treat. To keep your Birthday Cake Cheesecake Truffles fresh, store them in an airtight container. Place parchment paper between layers to prevent sticking. You can keep them in the fridge for up to one week. This helps maintain their creamy texture and delicious taste. You can freeze these truffles for longer storage. First, chill them in the fridge for about 30 minutes. Then, place them in a single layer on a baking sheet and freeze until solid. Once frozen, transfer them to a freezer-safe bag. They can stay frozen for up to three months. Thaw them in the fridge before serving. These truffles taste best when fresh but can last a while. If stored properly, they remain good for about a week in the fridge. Check for any off smells or changes in texture before eating. Enjoy your treats while they are at their best! Yes, you can! You may use dark or milk chocolate instead of white chocolate. Each type brings a unique taste. Dark chocolate adds a rich flavor. Milk chocolate is sweeter and creamier. Just remember to melt it the same way as white chocolate. These truffles can stay fresh for about one week. Keep them in an airtight container. Store them in the fridge for the best taste. If you want to keep them longer, you can freeze them. They can last up to three months in the freezer. If your mixture is too soft, chill it in the fridge. This helps it firm up for easier shaping. You can also add a bit more dry cake mix if needed. Just mix until it all comes together. Then, shape the truffles and freeze them again before dipping in chocolate. This blog post covered all you need to know about making cheesecake truffles. We explored ingredients, measurements, and essential tools first. Then, I shared a clear step-by-step guide to help you create delicious truffles. Tips on mixing, customization, and common mistakes will ensure your success. You can try different flavors, adjust for diets, and even get creative with decor. With proper storage, your truffles will stay fresh and tasty. Enjoy making these sweet treats and impress everyone around you!

Birthday Cake Cheesecake Truffles

Indulge in the deliciousness of Birthday Cake Cheesecake Truffles that are perfect for any celebration! These no-bake treats combine creamy cheesecake and vanilla cake flavors, all wrapped in a delightful coating of white chocolate and sprinkles. With just a few simple ingredients and easy-to-follow steps, you can create a batch of 24 delectable truffles. Click through now to explore the full recipe and make your birthday celebrations extra sweet!

Ingredients
  

8 oz cream cheese, softened

1 cup powdered sugar

1 cup vanilla cake mix (dry)

1 cup sprinkles (rainbow or themed)

1/2 cup vanilla extract

1 cup white chocolate chips

1 tablespoon coconut oil (for melting chocolate)

Instructions
 

In a large mixing bowl, beat the softened cream cheese until smooth and creamy using a hand mixer.

    Gradually add in the powdered sugar and dry cake mix, ensuring everything is well combined.

      Stir in the vanilla extract and half of the sprinkles until evenly distributed throughout the mixture.

        Shape the mixture into small balls (about 1 inch in diameter) and place them on a baking sheet lined with parchment paper.

          Pop the baking sheet in the freezer for about 30 minutes, or until the truffles are firm.

            While the truffles are chilling, melt the white chocolate chips and coconut oil together in a microwave-safe bowl in 30-second increments, stirring in between until completely smooth.

              Dip each truffle into the melted white chocolate, making sure it’s fully coated. Use a fork or a toothpick to lift it out and tap off the excess chocolate.

                Immediately sprinkle the remaining sprinkles on top of the coated truffles before the chocolate sets.

                  Return the dipped truffles to the baking sheet and refrigerate them for 15-20 minutes, allowing the chocolate to harden completely.

                    Serve cold or at room temperature; enjoy your festive treats!

                      Prep Time: 15 minutes | Total Time: 1 hour 15 minutes | Servings: 24 truffles