FREE DINNER EBOOK! Get your copy!
  • Cookie Policy
  • GDPR Policy
  • Disclaimer
  • Terms Of Use
  • Visit my other site: Fun Cookie Recipes
secrets pice kitchen
  • Home
  • Dinner
  • Desserts
  • Drinks
  • Appetizers
  • Contact
  • About
  • Privacy Policy
  • Home
  • Dinner
  • Desserts
  • Drinks
  • Appetizers
  • Contact
  • About
  • Privacy Policy
  • Cookie Policy
  • GDPR Policy
  • Disclaimer
  • Terms Of Use
Visit my other site: Fun Cookie Recipes

HOME / CATEGORIES /

Latest

- Apples: Use 2 large apples, like Granny Smith or Honeycrisp. Granny Smith gives a nice tart taste. Honeycrisp is sweet and juicy. Choose firm apples for the best crunch. - Sweeteners: You can use 1 tablespoon of coconut sugar or regular sugar. Coconut sugar has a rich flavor, while regular sugar is classic. Both work well. - Seasoning: Add 1 teaspoon of ground cinnamon for warmth. You can use nutmeg or cardamom if you want new flavors. - Optional ingredients: Use lemon juice to prevent browning. Brush apple slices lightly to keep them fresh and bright. 1. First, wash and dry the apples. This step cleans off any dirt. If you want, brush them lightly with lemon juice. This keeps them from turning brown. 2. Next, core the apples. Slice them thinly, about 1/8 inch thick. A mandoline slicer helps make even slices. 3. In a small bowl, mix together the ground cinnamon, coconut sugar, and a pinch of salt. This mix gives the chips a sweet, spicy flavor. 1. Preheat the air fryer to 160°F (70°C). This low heat helps dry the apples slowly. 2. Arrange the apple slices in a single layer in the air fryer basket. Avoid overcrowding. You may need to work in batches. 3. Cook the apple slices for about 10–12 minutes. Flip them halfway through cooking. Check them at 10 minutes to avoid burning. 1. Once the chips are crispy and golden, remove them from the air fryer. Let them cool for a few minutes. 2. For extra crispiness, you can return them to the air fryer for an extra 1-2 minutes. This step makes your chips crunchier. To make great apple chips, choose the right apples. I like using Granny Smith or Honeycrisp apples. They have a nice balance of tartness and sweetness. Look for apples that feel firm and smell fresh. Seasonal apples often taste better. In fall, many apple varieties are at their peak. Try to pick local apples when you can. They taste better and support local farms. Uniform slicing is key to crispy chips. I use a mandoline slicer to get even slices. Aim for about 1/8 inch thick. If the slices are too thick, they won’t crisp up well. Air fryers cook quickly, so keep an eye on the time. I set my air fryer to 160°F (70°C) and cook for 10 to 12 minutes. Flip the chips halfway through to help them cook evenly. You can make your apple chips more exciting with spices. Try adding nutmeg or cardamom for a twist. You can also change the sweetener. Coconut sugar gives a nice hint of caramel. Regular sugar works too, but experiment to find what you like best. Adding these flavors makes your snack special and unique! {{image_2}} You can make apple chips even more exciting! Try adding herbs for a savory twist. Rosemary or thyme goes well with apple. Just sprinkle a bit on top before cooking. For a spicy kick, add cayenne or chili powder. This makes the chips hot and tasty. Adjust the spice level to fit your taste buds. You can cook apple chips in different ways. Air frying is quick and easy. The chips get crispy without much oil. Baking in the oven is another choice. Just set your oven to a lower temperature and keep an eye on them. Dried apple chips are a fun DIY method too. Use a food dehydrator or your oven on low heat. This method makes chewy, sweet snacks. Apple chips pair well with many dips and toppings. Try them with yogurt for a healthy snack. You can also use them in salads for added crunch. Another great idea is to serve them with nut butter. The mix of flavors makes a tasty treat. Don't be afraid to get creative with your pairings! To keep your apple chips fresh, use airtight containers. These containers block air and keep chips crunchy. You can also vacuum seal them for longer freshness. If stored properly, apple chips last for up to two weeks. Keep them in a cool, dry place away from sunlight. If your apple chips lose their crispness, don’t worry! You can easily restore them. Place the chips back in the air fryer at 160°F for about 2-3 minutes. Keep an eye on them to avoid burning. This quick method brings back that delightful crunch. Freezing your apple chips is a great way to save them. First, ensure they are fully cooled. Then, place them in a single layer on a baking sheet. Freeze them for about 1-2 hours until solid. After that, transfer the chips to a freezer bag. They can stay in the freezer for up to three months. When you're ready to enjoy them, simply take out the amount you want and let them thaw at room temperature. Air fryer apple chips can last about one week when stored properly. Keep them in an airtight container at room temperature. If you want them fresh for longer, consider freezing them. Yes, you can use many fruits! Some great options include pears, bananas, and peaches. Just slice them thinly and adjust the cooking time as needed. A good air fryer for apple chips should have a spacious basket. Look for one with adjustable temperature settings and a timer. Brands like Philips and Ninja have great options for even cooking. To prevent browning, you can lightly brush the apple slices with lemon juice before cooking. This helps keep the color nice and bright during cooking. No, peeling is not necessary. The skin adds flavor and nutrients. If you prefer a smoother chip, feel free to peel them. Making air fryer apple chips is easy and fun. You choose the right apples, select sweeteners, and spice them up with cinnamon. I shared step-by-step instructions, from washing to air frying, and offered tips for the best results. You can even customize flavors and pair your chips with dips. In summary, enjoy the process, experiment with ingredients, and store your chips well. With a little practice, you'll create tasty snacks that everyone loves. Happy air frying!

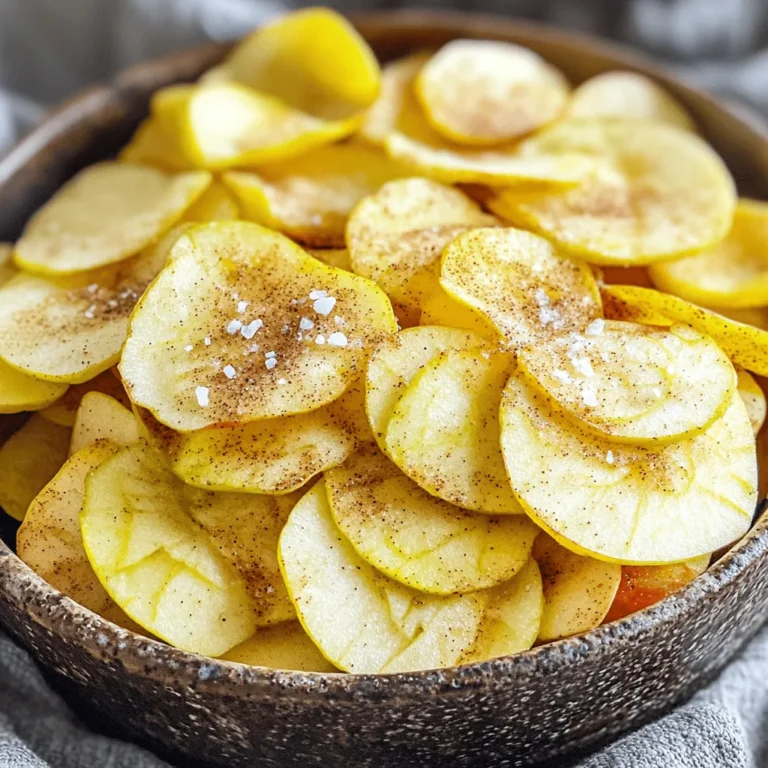
Air Fryer Apple Chips Crispy and Delicious Snack

- 2 cups pretzel sticks - 1 cup granulated sugar - 1/2 cup unsalted butter - 1/4 cup heavy cream - 1 teaspoon vanilla extract - 1/2 teaspoon sea salt - 1 cup semi-sweet chocolate chips - 1/4 cup flaky sea salt for garnish Gathering the right ingredients is key to making salted caramel pretzel bark. The first ingredient is pretzel sticks. You want them to be crunchy for that perfect bite. Next, get granulated sugar. This will create a rich caramel flavor. Unsalted butter is next. It adds creaminess to the sauce. Heavy cream also helps make the caramel smooth. Don't forget the vanilla extract. This adds a sweet and warm flavor. You will need sea salt, too, for that perfect salty touch. Semi-sweet chocolate chips are great for melting and spreading. Finally, use flaky sea salt for that finishing touch. This will make your bark look and taste amazing! - Baking sheet - Parchment paper - Medium saucepan - Spatula Having the right tools makes the process easier. A baking sheet will hold all your pretzels. Parchment paper keeps the bark from sticking. You need a medium saucepan to melt the sugar and make the caramel. Lastly, a spatula helps spread the caramel and chocolate evenly. With these tools, you will create a delicious treat! - Preheat the oven to 350°F (175°C). - Line a baking sheet with parchment paper and spread the pretzel sticks evenly. Start by making your pretzel base. Preheating the oven ensures even cooking. Lining the baking sheet keeps clean-up easy. Spread those pretzels out so they have space. This step is key for a crunchy bark. - Melt granulated sugar over medium heat until amber. - Add butter, whisk until combined, then incorporate cream, vanilla, and sea salt. Next, it's time for the caramel. Melt granulated sugar in a medium saucepan. Stir it constantly to avoid burning. Watch for a deep amber color; it means you're close! Then, add in butter and whisk until smooth. Slowly stir in cream, vanilla, and sea salt. This mixture will be rich and creamy. - Pour caramel over pretzels and bake for 8-10 minutes. - Add chocolate chips, return to oven, and spread melted chocolate. - Top with flaky sea salt and cool completely. Now, pour that luscious caramel over the pretzels. Make sure each pretzel gets some love! Bake for 8-10 minutes until it's bubbly. After removing it from the oven, sprinkle chocolate chips on top. Return to the oven for just a few minutes to soften them. Spread the melted chocolate out evenly. Finally, sprinkle flaky sea salt on top while it's still warm. Let it cool completely before breaking it into pieces. This bark is a treat you won't want to miss! To avoid grainy caramel, use a heavy saucepan. Heat the sugar slowly over medium heat. Stir constantly until the sugar melts and turns amber. If you stop stirring, the sugar can clump. Once melted, add the butter. Whisk until fully mixed. Then, slowly pour in the heavy cream, vanilla, and sea salt. This will keep the caramel smooth. Choosing the right chocolate is key. I recommend using semi-sweet chocolate chips for their rich taste. They melt well and blend nicely with the caramel. When you spread melted chocolate, use a spatula. Start from the center and move outwards. This helps create an even layer over the bark. To package bark as gifts, break it into nice pieces. Place them in clear bags tied with ribbons. This adds a fun touch. For drinks, pair the bark with coffee or hot chocolate. It also goes well with vanilla ice cream. These pairings enhance the sweet and salty flavors. {{image_2}} You can take your salted caramel pretzel bark to the next level. Adding nuts like pecans or almonds gives a nice crunch. The nuts blend well with the sweet and salty flavor. You might also try flavors like sea salt caramel or almond extract. These flavors add depth and interest to each bite. Mixing in a bit of almond extract can enhance the nutty taste, making it even more delightful. If you want a different chocolate experience, use dark or white chocolate instead of semi-sweet chocolate chips. Dark chocolate will give a rich taste, while white chocolate adds a creamy sweetness. For those with dietary needs, gluten-free pretzel options are available. Look for gluten-free pretzel sticks to keep this treat accessible for everyone. Make your bark visually appealing by adding toppings like crushed candy or sprinkles. This adds color and fun to your dessert. You can also drizzle chocolate in artistic patterns over the top. Use a fork or squeeze bottle to create swirls. This extra touch makes the bark look fancy and inviting. To keep your salted caramel pretzel bark fresh, store it in an airtight container. This helps to prevent moisture from ruining its crunch. You can keep the bark at room temperature for about one week. If it's hot or humid, I suggest putting it in the fridge. This keeps it firm and tasty. If you want to save some for later, you can freeze the bark. Cut it into pieces first and place them in a single layer on a baking sheet. Freeze until solid, then transfer the pieces to a freezer bag. This way, they won’t stick together. You can freeze the bark for up to three months. When you're ready to enjoy the bark, take it out of the freezer. Let it sit at room temperature for about 15 minutes before serving. This brings back its great texture. Enjoy your sweet treat at any time! To make salted caramel, start with granulated sugar. Heat the sugar in a medium saucepan over medium heat. Stir constantly until the sugar melts and turns a deep amber color, about 4-6 minutes. Then, carefully add unsalted butter and whisk until it melts. Slowly mix in heavy cream, vanilla extract, and sea salt. This will give you a rich, creamy caramel. Yes, you can use different pretzels. Thin pretzel sticks work well, but you can also try pretzel crisps or even chocolate-covered pretzels. Each type will change the flavor and texture of your bark. Just make sure they are sturdy enough to hold the caramel and chocolate. One common mistake is not stirring the sugar enough while it melts. This can cause it to burn or turn grainy. Another mistake is adding the butter too quickly after the sugar melts. Always wait until the sugar reaches the right color before adding the butter. Lastly, make sure to let the bark cool completely before breaking it into pieces. You can store salted caramel pretzel bark in an airtight container for up to two weeks. Keep it in a cool, dry place. If you live in a warm area, you may want to store it in the fridge to prevent the chocolate from melting. Yes, you can make this recipe dairy-free. Use dairy-free butter and substitute heavy cream with coconut cream or almond milk. Choose dairy-free chocolate chips for the topping. This way, you can enjoy the treat without dairy! This recipe for salted caramel pretzel bark blends sweet and salty. You learned to prepare a crunchy pretzel base and a rich caramel sauce. I shared tips to perfect your caramel and melt chocolate evenly. You can get creative with flavors and toppings. Store your bark properly to enjoy it longer. With these steps, you can impress friends and family with a tasty treat. Now, it’s time to make your own bark and enjoy every bite!

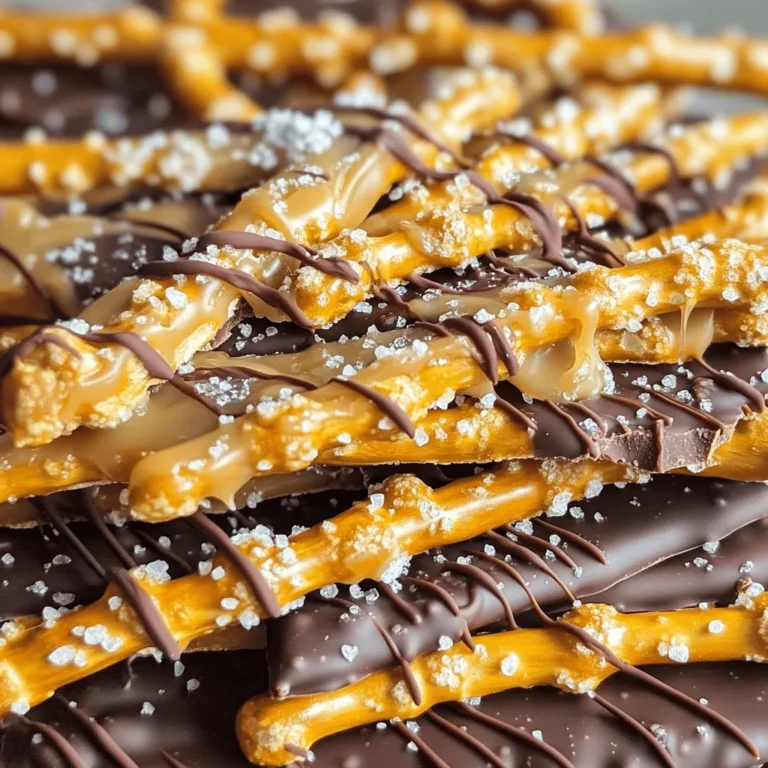
Salted Caramel Pretzel Bark Irresistible Sweet Treat

- 1 cup long-grain white rice - 2 cups vegetable broth - 1 tablespoon olive oil - 1 small onion, finely chopped - 2 cloves garlic, minced - Zest of 1 lime - Juice of 2 limes - 1/2 cup fresh cilantro, chopped - 1/2 teaspoon cumin - Salt and pepper to taste - Calories per serving: About 210 calories - Macronutrient breakdown: - Carbohydrates: 40g - Protein: 4g - Fats: 4g This dish is not only tasty but also healthy. Each serving packs a punch with great flavor and nutrition. You get a good amount of carbs from the rice, plus a bit of protein. The healthy fats come from the olive oil. Overall, it’s a dish that fits well into a balanced meal plan. - Rinse the rice under cold water until it runs clear. This step washes off extra starch. - Drain the rice thoroughly in a fine mesh strainer. Ensuring it's dry helps the rice cook well. - In a medium saucepan, heat the olive oil over medium heat. This gives the rice a nice flavor. - Add the finely chopped onion and sauté for about 3-4 minutes. You want it soft and translucent. - Stir in the minced garlic and cook for one more minute. This makes your kitchen smell amazing. - Add the rinsed rice to the saucepan. Stir to coat each grain with oil and flavor. - Toast the rice for 2-3 minutes. This adds a nutty taste to the dish. - Pour in the vegetable broth, lime zest, cumin, and a pinch of salt. This is where the magic happens. - Bring the mixture to a boil. Once boiling, reduce the heat to low and cover. Let it simmer for 15-18 minutes. The rice will absorb all the flavors. - After simmering, remove the saucepan from heat. Let it sit, covered, for an extra 5 minutes. This helps the rice finish cooking. - Fluff the rice with a fork. Then, stir in the lime juice and chopped cilantro. This adds zing and freshness. - Season with additional salt and pepper to taste. Adjust it to your liking, and enjoy your zesty rice! To avoid soggy rice, rinse the rice under cold water. Rinsing removes excess starch. This helps the grains stay separate. Drain the rice well after rinsing. The ideal cooking time for this rice is 15 to 18 minutes. Keep the heat low once it boils. Cover the pot tightly to keep steam in. Let it sit for an extra 5 minutes after cooking. This step helps the rice absorb any remaining moisture. You can add spices like paprika or chili powder for more heat. Fresh herbs, like mint, can also brighten the dish. For a richer taste, use vegetable broth instead of water. Broth adds depth and flavor to your rice. Mix in some veggies, like peas or corn, for extra color and nutrition. These add-ins make the dish pop and feel more filling. To store leftovers, let the rice cool completely. Transfer it to an airtight container. It will keep in the fridge for up to 4 days. When reheating, add a splash of water or broth. This helps the rice regain its moisture. Heat it in the microwave or on the stove until warm. Fluff it with a fork before serving again to keep the texture light. {{image_2}} You can easily swap ingredients in this recipe to suit your taste. - Using brown rice instead of white: Brown rice adds more fiber and a nutty taste. It takes longer to cook, so adjust the broth and time. Use 2.5 cups of broth and simmer for about 40-45 minutes. - Adding vegetables like peas or bell peppers: Peas add sweetness, while bell peppers give crunch. Stir in these veggies during the last 5 minutes of cooking. This adds color and nutrients to your dish. Get creative with flavors to make this rice even more exciting. - Spicy lime cilantro rice with jalapeños: Add finely chopped jalapeños when you sauté the onion. This gives the dish a nice kick. Adjust the amount based on how spicy you like it. - Coconut lime cilantro rice: Replace vegetable broth with coconut milk for a creamy twist. The coconut adds richness and pairs well with lime. Use a mix of coconut milk and water for balance. This zesty rice pairs well with many dishes. - Pairing with proteins: Serve it alongside grilled chicken, shrimp, or beef. The bright flavors enhance the meal and make it feel special. - Serving with salads or as a side dish: This rice is a great base for salads. It adds flavor and texture. You can also serve it as a side dish to your favorite entrees. It complements many flavors and makes a perfect addition to your table. For this recipe, I recommend using long-grain white rice. Long-grain rice cooks fluffy and separates well. It gives the dish a nice texture. Short-grain rice, on the other hand, tends to be stickier. It may not absorb the flavors as well. If you prefer, you can use jasmine rice for a subtle floral note. Just remember to adjust the cooking time based on your choice. Yes, you can make this rice dish ahead of time. To prep, follow the cooking steps and let the rice cool. Place it in an airtight container. Store it in the fridge for up to three days. When you are ready to eat, just reheat it on the stove or microwave. Add a splash of water to help it steam. This keeps the rice moist and fresh. This recipe is already vegan-friendly! All the ingredients are plant-based. The vegetable broth, olive oil, and fresh herbs are perfect for a vegan meal. If you want more protein, consider adding black beans or chickpeas. They pair well with lime and cilantro, adding extra flavor and nutrition. Enjoy customizing it to fit your taste! If you enjoy Zesty Lime Cilantro Rice, you might like these other flavored rice recipes: - Garlic Butter Rice: This dish adds rich garlic flavor with a hint of butter. - Mexican Rice: A spiced rice with tomatoes and peppers, perfect for tacos. - Herbed Rice: A mix of fresh herbs like basil and parsley for a fresh taste. For side dishes that pair well with Zesty Lime Cilantro Rice, consider: - Grilled Chicken: The lime flavor matches well with juicy grilled chicken. - Black Beans: These add protein and a rich taste to your meal. - Guacamole: The creaminess balances the zesty rice nicely. Here are some recommended tools for making Zesty Lime Cilantro Rice: - Medium saucepan: For cooking the rice evenly. - Wooden spoon: To stir the rice without scratching your pan. - Measuring cups and spoons: For precise ingredient amounts. Measuring tools are key in cooking. They help ensure your rice turns out just right every time. Want to see how this rice comes together? Check out these resources: - Cooking demonstration videos: YouTube has great videos showing the rice-making process step by step. - Photos of the cooking process: Look for step-by-step images online to guide you as you cook. Seeing each step can help you feel more confident in the kitchen. In this article, we explored how to make Zesty Lime Cilantro Rice. We discussed key ingredients like rice, lime, and herbs. The step-by-step instructions helped you prepare and cook the rice perfectly. We also covered tips for great texture and flavor. Consider variations to keep your dish exciting. Whether you make it ahead or adapt it for dietary needs, this recipe is flexible. Simple and fresh, this rice can serve as a great side or main dish. Enjoy cooking and savor your delicious creation.

Zesty Lime Cilantro Rice Flavorful and Quick Recipe

To make delicious Spinach Feta Turkey Meatballs, you need these key ingredients: - 1 pound ground turkey - 1 cup fresh spinach, finely chopped - 1/2 cup crumbled feta cheese - 1/4 cup breadcrumbs - 1/4 cup grated Parmesan cheese - 1 clove garlic, minced - 1/2 teaspoon onion powder - 1/2 teaspoon dried oregano - 1/2 teaspoon salt - 1/4 teaspoon black pepper - 1 large egg, beaten - 1 tablespoon olive oil These ingredients work together to create a tasty and healthy meal. Ground turkey is lean and full of protein. The spinach adds color and nutrients. Feta cheese offers a salty, creamy flavor. Breadcrumbs help bind the meatballs and keep them from being too dry. You can add a few optional ingredients to enhance the flavor of your meatballs: - Fresh herbs like parsley or basil - A pinch of red pepper flakes for heat - A splash of lemon juice for brightness - Chopped onions for extra sweetness These additions can make your meatballs even more delicious. Experiment with different flavors to find your favorite mix. If you have dietary needs, here are some great substitutes: - Use ground chicken instead of turkey for a different taste. - Swap breadcrumbs for almond flour for a gluten-free option. - Replace feta with goat cheese or a dairy-free cheese for a lactose-free meal. - Use egg replacer if you're vegan or allergic to eggs. These substitutions keep the meatballs tasty while meeting your dietary needs. You can enjoy this dish no matter your restrictions! Start by preheating your oven to 400°F (200°C). This step is key for even cooking. Line a baking sheet with parchment paper. The paper helps keep the meatballs from sticking. It also makes cleanup easier, which you will appreciate later. In a large bowl, combine the ground turkey, finely chopped spinach, and crumbled feta cheese. Next, add the breadcrumbs and grated Parmesan cheese. Then, mix in the minced garlic, onion powder, oregano, salt, and black pepper. These ingredients create a tasty flavor profile. After that, pour in the beaten egg. Use your hands to mix everything together. Be gentle and avoid overworking the meat. This keeps the meatballs tender and juicy. Now it's time to shape the mixture. Grab a small amount and roll it into a ball about 1.5 inches wide. Place each meatball on the prepared baking sheet. Make sure to space them evenly. This allows them to cook properly. Once all the meatballs are shaped, drizzle olive oil over them. This helps them brown nicely in the oven. Now, they are ready to bake for 20-25 minutes. Keep an eye on them until they reach an internal temperature of 165°F (75°C). Enjoy the delicious aroma that fills your kitchen! To keep your meatballs moist, you need to balance the ingredients. Use fresh spinach and feta cheese. The moisture from these ingredients keeps the meatballs tender. Make sure not to overmix the turkey. Overworking the meat can lead to dry meatballs. Instead, mix until just combined. This keeps your meatballs light and fluffy. Store leftover meatballs in an airtight container. They will stay fresh for up to three days in the fridge. For longer storage, freeze them. Place the cooled meatballs in a single layer on a baking sheet. Once frozen, transfer them to a freezer bag. When reheating, bake them in the oven at 350°F (175°C) until warm. This helps to maintain their texture. Presentation makes your dish more inviting. Serve the meatballs on a large platter. Garnish with fresh parsley for a pop of color. A squeeze of lemon juice adds brightness and flavor. Pair the meatballs with a creamy yogurt dip or warm marinara sauce. This not only elevates the dish but also offers tasty options for dipping. {{image_2}} You can swap turkey for chicken or beef in this recipe. Both meats work well. Ground chicken gives a lighter flavor, while ground beef adds richness. Adjust spices to suit the meat. Ground chicken may need a bit more seasoning, as it is milder. Beef often yields a richer taste, balancing well with spinach and feta. If you want a vegetarian option, use plant-based ground meat. This will keep the dish flavorful. You can also use mashed chickpeas or lentils as a base. They provide protein and a nice texture. Crumbled tofu works too; just squeeze out excess water first. Add extra spices, as plant-based proteins can be bland on their own. Feel free to mix in your favorite herbs and spices. Fresh herbs like basil or parsley add a bright taste. You can also use spices like cumin or paprika for a kick. A touch of red pepper flakes brings heat, while lemon zest adds freshness. Experiment with your favorite flavors to make these meatballs truly your own! After you cook your spinach feta turkey meatballs, let them cool down. Place them in an airtight container. This keeps them fresh. Store them in the fridge for up to three days. If you want to keep them longer, freezing is a great option. To freeze your meatballs, first cool them completely. Lay them on a baking sheet in a single layer. Freeze them for about an hour until firm. Then, transfer the meatballs to a freezer-safe bag or container. Make sure to remove as much air as possible. They can last for up to three months in the freezer. When you are ready to enjoy your meatballs, take them out of the freezer. Thaw them overnight in the fridge for safety. If you need them fast, use the microwave. Heat them in 30-second intervals until warm. You can also reheat them in the oven at 350°F (175°C) for about 15 minutes. Ensure they reach an internal temperature of 165°F (75°C) before serving. You can tell the meatballs are done when they reach 165°F (75°C). Use a meat thermometer to check this. The outside should be golden brown. This means they cooked well. If they look firm and juicy, they are ready to eat. Yes, you can make these meatballs ahead of time. Prepare them, then store them in the fridge. They stay fresh for up to two days. You can also freeze them for longer storage. Just make sure to cool them first before freezing. These meatballs go well with many sides. You can serve them with pasta and marinara sauce. They also pair nicely with a fresh salad or rice. For a tasty dip, try a creamy yogurt sauce. A squeeze of lemon adds a nice touch too! We covered a lot about making Spinach Feta Turkey Meatballs. You learned about key ingredients, how to prep and cook, and tips for great texture. I shared variations for dietary needs and storage info. These meatballs are not just tasty but also easy to make. Experiment with flavors and enjoy. You can use this guide to create meals that everyone loves. Happy cooking!

Savory Spinach Feta Turkey Meatballs Easy Recipe

For a great roasted red pepper hummus, you need: - 1 cup canned chickpeas, drained and rinsed - 1 large roasted red pepper, peeled and chopped - 2 tablespoons tahini - 2 tablespoons olive oil - 2 cloves garlic, minced - 2 tablespoons lemon juice - 1/2 teaspoon ground cumin - Salt and pepper to taste - Water as needed for desired consistency These ingredients come together to create a smooth and tasty dip. The chickpeas give it a creamy base. The roasted red pepper adds a sweet, smoky flavor. Tahini and olive oil add richness. Garlic and lemon juice brighten the taste. Cumin gives it a warm, earthy note. You can make your hummus even better with a few garnishes: - Paprika - Fresh parsley These add color and a little extra flavor. A drizzle of olive oil on top also looks nice. If you don’t have something on hand, here are some swaps: - Use fresh roasted red peppers if you can’t find canned. - Swap tahini for sunflower seed butter for a nut-free option. - Use lime juice instead of lemon juice for a different taste. - If you want a spicier kick, add a pinch of cayenne pepper. These substitutions can help you customize the hummus to fit your taste or what you have. Experiment and have fun with it! To make great hummus, start with the roasted red pepper. You can roast one at home or use jarred ones. If roasting, preheat your oven to 400°F (200°C). Place the whole red pepper on a baking sheet. Roast it for 25 to 30 minutes. Turn it every so often to get an even char. The skin should blister and darken. After roasting, put the pepper in a bowl and cover it with plastic wrap. Let it steam for about 10 minutes. This makes peeling easy. Once cooled, peel off the skin and chop the pepper. Now it's time to blend! Take a food processor and add the chickpeas, roasted red pepper, tahini, olive oil, minced garlic, lemon juice, and ground cumin. Blend these together until the mixture is smooth. If it feels too thick, add water gradually, one tablespoon at a time. Keep blending until you reach your desired creaminess. This step is key for a nice, silky texture. Taste your hummus and season it with salt and pepper. You can also adjust the lemon juice or garlic for more flavor. Transfer your hummus to a serving bowl. Drizzle some olive oil on top. For a pop of color, sprinkle paprika and chopped parsley as a garnish. Serve it with pita bread, veggie sticks, or crackers. Arrange these around the bowl for a lovely presentation. Don't forget to add an extra drizzle of olive oil for a finishing touch! Enjoy your fresh and flavorful dip. To make your hummus super creamy, blend it well. Use a food processor for the best result. If it feels thick, add water slowly. Mix well after each addition. This keeps the texture smooth and rich. Remember, the secret is to blend long enough to whip air into it. Want to jazz up your hummus? Consider adding spices like smoked paprika or cayenne pepper. These add a kick! You can also mix in some fresh herbs. Basil or cilantro can give a fresh twist. For a tangy touch, try more lemon juice or zest. Each addition makes it unique. Store leftover hummus in an airtight container. It stays fresh in the fridge for about a week. If it thickens, just stir in a bit of water or olive oil before serving. You can also freeze hummus. Just put it in a freezer-safe container. It lasts for up to three months. When ready to eat, thaw it overnight in the fridge. {{image_2}} To make your hummus spicy, add a pinch of cayenne pepper or red pepper flakes. Start with a small amount; you can always add more. Blend it in with the other ingredients. This gives a nice heat without overpowering the dish. Serve it with cool veggies to balance the spice. For a smoky taste, use smoked paprika instead of regular paprika. Just one teaspoon will add depth and warmth. Mix it in while blending the hummus. You can garnish with a sprinkle of smoked paprika on top. This twist is great for those who love a rich flavor. This hummus is already vegan, but you can enhance it further. Try adding avocado for creaminess. You can also mix in fresh herbs like cilantro or basil for extra flavor. Serve with whole grain pita or veggie sticks. This makes for a healthy and tasty snack! Roasted red pepper hummus packs a healthy punch. It combines protein, fiber, and vitamins. Each serving offers chickpeas, a great source of plant protein. They help in muscle repair and growth. Roasted red peppers bring vitamin C, boosting your immune system. Tahini, made from sesame seeds, adds healthy fats and calcium. Olive oil contributes more healthy fats, which support heart health. Garlic has anti-inflammatory properties, enhancing overall health. This dip is not just tasty; it supports a balanced diet. A typical serving is about 2 tablespoons. This size is perfect for dipping or spreading. Each serving contains around 70-100 calories. This depends on how much olive oil you use. If you pair it with veggies or pita, the calories may rise. But, this dip remains a light choice. It can fit well into a snack or meal without guilt. Homemade hummus is fresher and healthier. You control the ingredients when you make it. Store-bought hummus often has preservatives and more salt. Homemade hummus tastes better since you can adjust flavors. You can also add more roasted peppers or spices. Making hummus at home is simple and fun. It takes just 10 minutes, plus roasting time for the pepper. You’ll feel proud serving a dip made by you. Homemade hummus stays fresh for about five to seven days. Store it in an airtight container in your fridge. Always check for signs of spoilage before eating. If it looks or smells off, throw it away. Yes, you can freeze roasted red pepper hummus! Place it in a freezer-safe container. Make sure to leave some space at the top for expansion. It can last up to three months in the freezer. When ready to eat, thaw it in the fridge overnight. Stir well before serving. Roasted red pepper hummus pairs well with many foods. Here are some great options: - Pita bread - Vegetable sticks like carrots or celery - Crackers - Toasted baguette slices - Chips You can also use it as a spread in wraps or sandwiches for added flavor. This article covered how to make roasted red pepper hummus with key ingredients and steps. You learned about optional garnishes, ingredient substitutions, and tips for the best texture. We explored tasty variations and the nutritional benefits, plus answers to common questions. As you try this recipe, remember the fun of making hummus at home. Enjoy experimenting with flavors and sharing it with friends!

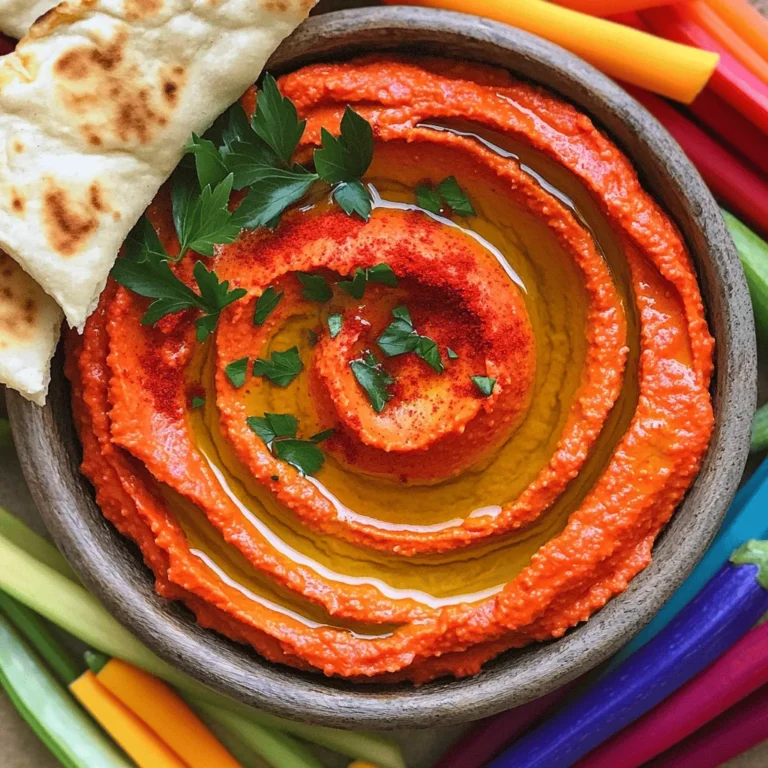
Roasted Red Pepper Hummus Fresh and Flavorful Dip

- 2 cups plain Greek yogurt - 1/4 cup honey or maple syrup - 1 teaspoon vanilla extract These main ingredients form the base of your chocolate-dipped frozen yogurt bites. Greek yogurt gives a creamy texture and tangy flavor. Honey or maple syrup sweetens the mix just right. Vanilla extract adds a lovely aroma and depth. - 1 cup fresh berries (strawberries, blueberries, or raspberries) - 1 cup dark chocolate chips (dairy-free if desired) - 1 tablespoon coconut oil Adding fresh berries gives bursts of flavor and color. You can choose strawberries, blueberries, or raspberries, depending on what you love. Dark chocolate chips coat the bites in rich sweetness. Coconut oil helps the chocolate melt smoothly, making it easy to dip. 1. Mixing the yogurt base: Start with a mixing bowl. Add 2 cups of plain Greek yogurt. Pour in 1/4 cup of honey or maple syrup. Add 1 teaspoon of vanilla extract. Stir all these together until smooth and creamy. 2. Dropping dollops onto the baking sheet: Line a baking sheet with parchment paper. Take a small cookie scoop or a spoon. Drop dollops of the yogurt mixture onto the sheet. Space them about an inch apart. 3. Incorporating berries into the mixture: Take 1 cup of fresh berries, like strawberries, blueberries, or raspberries. Press one berry into the center of each yogurt dollop. This adds a sweet surprise inside. 1. Freezing duration and tips: Place the baking sheet in the freezer. Freeze for about 2 to 3 hours. Make sure the yogurt bites are completely frozen before moving on. 2. Melting chocolate correctly: In a microwave-safe bowl, add 1 cup of dark chocolate chips and 1 tablespoon of coconut oil. Microwave in 30-second intervals. Stir after each interval until the chocolate is smooth and melted. 3. Dipping and setting the chocolate coating: Remove the frozen yogurt bites from the freezer. Dip each one into the melted chocolate using a fork. Coat them evenly. Place the chocolate-dipped bites back on the parchment paper. Sprinkle a tiny pinch of sea salt on each one. Return them to the freezer for another 30 minutes. This will set the chocolate nicely. - Achieving the right yogurt consistency: Use full-fat Greek yogurt for a creamy texture. Mix it well with honey and vanilla. The yogurt should be smooth, not runny. This helps the bites hold their shape when frozen. - Perfectly melting chocolate without burning: Use a microwave-safe bowl. Add dark chocolate chips and coconut oil together. Heat for 30 seconds, then stir. Repeat until smooth. Stirring helps avoid burnt chocolate. - Spacing on the baking sheet for even freezing: Place yogurt dollops about an inch apart on the lined baking sheet. This space allows air to flow and helps them freeze evenly. Avoid overcrowding to keep them from sticking together. - Presentation ideas for parties: Serve the frozen yogurt bites on a colorful platter. Add fresh berries around them for a bright look. This makes them fun and appealing for guests. - Flavor pairings with other toppings: Try adding crushed nuts, shredded coconut, or drizzled honey on top. These toppings add texture and flavor. You can mix and match to find your favorite combinations. - Individual packaging tips for snacks: Wrap each yogurt bite in parchment paper. This makes them easy to grab and go. You can also use small snack bags for a neat presentation. {{image_2}} You can have fun with different yogurt flavors. Use vanilla, berry, or even peach yogurt. Each flavor brings its own twist to the bites. You can also swap out the sweetener. Try honey or maple syrup for different tastes. If you want a crunch, mix in some nuts or seeds. Chopped almonds or sunflower seeds add texture and nutrients. Chocolate is key, but you can mix it up! Instead of dark chocolate, use white chocolate or carob. Both options create a sweet and creamy bite. Want something fresh? Experiment with flavored chocolate. Try mint or orange chocolate for a fun twist. If you prefer no chocolate, make yogurt-only bites. They are just as tasty and still cool and creamy. Store your chocolate dipped frozen yogurt bites in an airtight container. I recommend using a container that is specifically made for freezing. This keeps out air and moisture, which can affect taste and texture. You can also use freezer bags if they are sealed well. When using bags, try to remove as much air as possible before sealing. For long-term storage, make sure to label your container. Write the date you made them. This helps you keep track of freshness. If you plan to keep them for more than a month, consider wrapping each bite in parchment paper. This prevents them from sticking together and makes it easy to grab a snack. These yogurt bites can last up to three months in the freezer. After that, they may lose flavor or texture. To check for spoilage, look for ice crystals on the surface. This means they have freezer burn. If they look dry or icy, it is best to toss them out. Keep an eye on any off smells or changes in color. If they smell funny or look strange, don’t eat them. Enjoy your frozen yogurt bites while they are fresh! Can I use non-dairy yogurt? Yes, you can use non-dairy yogurt. Look for options like almond or coconut yogurt. These work well in this recipe. Just ensure the texture is creamy for best results. How can I make this recipe vegan? To make it vegan, use non-dairy yogurt and maple syrup. This way, you skip the honey. Also, choose dairy-free chocolate chips to keep it fully vegan. What other fruits can be used? You can use many fruits! Try bananas, peaches, or kiwi. Just make sure they are bite-sized for easy eating. Can I use Greek yogurt alternatives? Yes, you can use regular yogurt instead of Greek yogurt. Just know that regular yogurt may be thinner. This can affect how well the bites hold together. Adjusting sweetness levels for preferences You can adjust the sweetness by adding less honey or maple syrup. Taste the yogurt mix before freezing. This way, you find the perfect level for your taste. How to reduce calories in the recipe To cut calories, use low-fat yogurt or reduce the amount of chocolate. You can also use less sweetener. These small changes make a big difference. You now know how to make tasty frozen yogurt bites. Start with Greek yogurt and sweeteners. Mix in your favorite flavors and add-ins like berries or chocolate. Follow the steps for preparation and freezing. Use tips for great results and creative serving ideas. Don’t forget the variations to keep things fun! Proper storage ensures your treats last longer. Enjoy every bite of this delicious snack!

Chocolate Dipped Frozen Yogurt Bites Easy Snack Treat

To make Coconut Curry Meatballs, gather these main ingredients: - 1 lb ground chicken or turkey - 1/2 cup breadcrumbs - 1/4 cup grated Parmesan cheese - 1/4 cup fresh cilantro, chopped - 1 egg, lightly beaten - 2 cloves garlic, minced - 1 tablespoon fresh ginger, grated - Salt and pepper to taste - 2 tablespoons coconut oil (or vegetable oil) - 1 can (13.5 oz) coconut milk - 2 tablespoons red curry paste - 1 tablespoon soy sauce - 1 tablespoon lime juice These ingredients create a tasty mix. The meatballs stay juicy and flavorful. Consider these optional garnishes to enhance your dish: - Fresh cilantro for garnish - Lime wedges for a burst of freshness - Steamed rice or quinoa as a base These add color and flavor. They also make your meal look beautiful. Key seasonings make this dish shine: - Red curry paste gives a rich, spicy flavor. - Coconut milk adds creaminess and sweetness. - Lime juice brightens the dish. These flavors blend well. The curry sauce and meatballs create a warm and inviting taste. To start, grab a large mixing bowl. Add 1 pound of ground chicken or turkey. Next, sprinkle in 1/2 cup of breadcrumbs and 1/4 cup of grated Parmesan cheese. Chop 1/4 cup of fresh cilantro and toss it in. Then, crack 1 egg and beat it lightly before adding it to the bowl. Mince 2 cloves of garlic and grate 1 tablespoon of fresh ginger, then combine everything. Don't forget to season with salt and pepper to your liking. Mix well until everything is blended. Now, roll the mixture into 1-inch meatballs. Place them on a plate as you go. In a large skillet, heat 2 tablespoons of coconut oil over medium heat. Once hot, add the meatballs carefully. Cook them in batches if needed to keep them from crowding. Sear the meatballs for about 5 to 6 minutes until they turn golden brown. Once done, remove the meatballs from the skillet and set them aside. In the same skillet, it's time to make the sauce. Add 2 tablespoons of red curry paste. Cook it for about 1 minute, stirring often to let the flavors come alive. Slowly pour in 1 can of coconut milk while stirring. Add 1 tablespoon of soy sauce and 1 tablespoon of lime juice. Bring this mixture to a gentle simmer. Carefully return the meatballs to the skillet. Make sure they are fully submerged in the coconut curry sauce. Simmer for 10 to 12 minutes, until the meatballs are cooked through. Taste the sauce and adjust the seasoning if needed. If it’s too thick, add a little water to get the right consistency. Finally, serve the meatballs topped with fresh cilantro and enjoy them over steamed rice or quinoa. To make the best meatballs, start with moist ingredients. Use ground chicken or turkey for a lighter dish. The breadcrumbs help hold the meatballs together. Parmesan cheese adds flavor and keeps them tender. Adding an egg binds everything. Don't overmix the meat. Roll the meatballs gently to keep them soft. For a rich flavor, use coconut oil for cooking. The red curry paste gives the sauce its kick. Stir it well in the pan to release its aroma. Then, slowly mix in the coconut milk. This creates a creamy base. Add soy sauce for umami and lime juice for brightness. Adjust seasoning to your taste. If it’s too thick, add a splash of water. Presentation matters! Serve the meatballs on a bed of rice or quinoa. Drizzle the coconut curry sauce generously over the meatballs. Top with fresh cilantro for color and flavor. Use a wide plate to show off the sauce. This makes the dish look appetizing and inviting. Enjoy the compliments from your guests! {{image_2}} You can easily adapt this dish for different diets. If you want it gluten-free, use gluten-free breadcrumbs. For a vegetarian version, swap ground chicken or turkey for lentils or chickpeas. Just mash them, and blend with the other ingredients. This makes tasty meatballs, too! You can add more flavor with extra veggies. Try bell peppers, carrots, or spinach. Just chop them small and mix them into your meatball mixture. You can also use different meats. Ground pork or lamb works well with the spices of curry. Each meat gives a unique taste to your dish. Serving is fun with coconut curry meatballs! They go great over rice or quinoa. You can also serve them with noodles for a different twist. For a fresh touch, add a side salad with lime vinaigrette. This adds crunch and brightness to your meal. To keep your leftover meatballs fresh, place them in an airtight container. Make sure they cool down first. You can store them in the fridge for up to three days. Layer parchment paper between meatballs to prevent sticking. This simple step helps keep them intact for your next meal. When reheating meatballs, use the stovetop or microwave. For stovetop, place them in a pan over low heat. Add a splash of coconut milk to keep them moist. Heat for about 5-7 minutes until warm. In the microwave, cover them with a damp paper towel. Heat in short bursts of 30 seconds until they reach the right temperature. If you want to freeze the meatballs, set them on a baking sheet first. Make sure they do not touch each other. Freeze for about an hour. Once firm, transfer them to a freezer bag or container. Label it with the date. They can last up to three months in the freezer. When ready to use, thaw them overnight in the fridge before cooking. Yes, you can use ground beef instead of chicken or turkey. Ground beef adds a rich flavor. The key is to adjust cooking time. Beef may need a few extra minutes to cook through. Ensure the meatballs reach an internal temperature of 165°F. If you need a substitute for coconut milk, use almond milk or soy milk. These options change the flavor slightly. You can also mix equal parts of cream and water for a thicker texture. For a coconut flavor, try adding a bit of coconut extract. This recipe has a mild spice level due to red curry paste. If you like it spicier, add more curry paste. You can also include sliced fresh chili peppers. For less heat, use less curry paste or a milder version. Adjust to match your taste. We explored how to make tasty coconut curry meatballs. You learned about key ingredients, including spices and garnishes. We covered each step, from mixing meatballs to making sauce. Tips helped you get the texture and flavor just right. You also saw ways to adapt the recipe for different diets or tastes. Finally, we shared storage tips for leftovers and FAQs about substitutions. Enjoy your cooking journey, and let these meatballs bring joy to your table!

Coconut Curry Meatballs Flavorful and Simple Dish

- 1 lb large shrimp, peeled and deveined - 6 tablespoons unsalted butter - 4 cloves garlic, minced - 1 teaspoon red pepper flakes (adjust to taste) - 1 lemon (zested and juiced) - 1 cup chicken or vegetable broth - 1 cup cherry tomatoes, halved - 8 oz linguine or spaghetti - Salt and pepper to taste - Fresh parsley, chopped for garnish The main ingredients are quite simple. Large shrimp bring a sweet taste and a nice texture. Butter adds a rich flavor that makes the dish shine. Garlic gives it a lovely aroma and depth. You can add red pepper flakes for some heat. Just a little bit can make a big difference. The lemon zest and juice brighten the dish with a fresh taste. For accompaniments, chicken or vegetable broth helps create a tasty sauce. Cherry tomatoes add sweetness and color. Linguine or spaghetti serves as the perfect base. Don’t forget salt and pepper to enhance flavors. Fresh parsley adds a pop of color and freshness as a garnish. With these ingredients, you create a simple yet flavorful meal that impresses. To start, cook 8 oz of linguine or spaghetti in a large pot. Use salted boiling water for the best flavor. Follow the package instructions for cooking time. Once cooked, drain the pasta but save some pasta water. This water helps thicken the sauce later. Next, take a large skillet and melt 4 tablespoons of unsalted butter over medium heat. Once the butter is melted, add 4 cloves of minced garlic. Sauté the garlic for about 1 minute. You want it fragrant, not browned. Then, stir in 1 teaspoon of red pepper flakes. This adds a nice kick. After 30 seconds, add 1 lb of peeled and deveined shrimp. Season with salt and pepper. Cook the shrimp until they turn pink and opaque. This takes about 2 to 3 minutes on each side. After cooking the shrimp, remove them from the skillet and set them aside. In the same skillet, pour in 1 cup of chicken or vegetable broth and the juice from 1 lemon. Bring this to a simmer and let it reduce by half. This should take about 5 minutes. Then, add 1 cup of halved cherry tomatoes. Cook them for another 2 to 3 minutes until they soften. Return the shrimp to the skillet. Add the zest of the lemon and the remaining 2 tablespoons of butter. Mix everything well. Finally, toss in the cooked pasta. If the sauce seems too thick, add a little reserved pasta water. Adjust the seasoning with more salt and pepper to taste. Serve hot, garnished with chopped fresh parsley for a fresh touch. - How to tell when shrimp are perfectly cooked Shrimp are done when they turn pink and opaque. This usually takes about 2-3 minutes per side. Overcooking makes them tough. Keep an eye on them! - The role of pasta water in sauce consistency Reserve some pasta water before draining. This starchy water helps thicken the sauce. Add a little at a time to get your desired sauce texture. - Adding herbs or spices for extra flavor Fresh herbs like parsley or basil can brighten the dish. You can also try adding a pinch of thyme or oregano. They add depth to the sauce. - Alternative ingredients for customization Swap shrimp for chicken or scallops if you like. You can also add vegetables like spinach or bell peppers for color and nutrition. - Best pairings for Garlic Butter Shrimp Scampi Serve this dish with a crisp white wine like Sauvignon Blanc. The wine’s acidity balances the rich butter sauce nicely. - Ideas for side dishes or salads Pair with a simple green salad or garlic bread. Both add freshness and texture to your meal. A side of steamed veggies also works well. {{image_2}} If you want a gluten-free meal, try using gluten-free pasta. Many brands make great options that taste delicious. You can also use zucchini noodles or spaghetti squash. These veggies add flavor and keep it light. If shrimp isn’t your thing, you can swap it for chicken or even tofu. Chicken cooks well with garlic and butter, just like shrimp. If you want a veggie option, use mushrooms or bell peppers. These add great texture and flavor to the dish. To spice things up, add more red pepper flakes. You can also toss in some diced jalapeños for a bold kick. For a smoky flavor, try adding smoked paprika. Adjust the heat to your taste for the perfect spicy dish. To store your cooked Garlic Butter Shrimp Scampi, cool it first. Use an airtight container to keep it fresh. Place the shrimp and pasta in the container together. This helps keep the flavors blended. Use it within 2-3 days for the best taste. Always label the container with the date. To reheat, use a skillet over medium-low heat. Add a splash of broth or water to keep it moist. Heat gently, stirring often. This way, the shrimp won’t overcook. Check if they are warm, not chewy. If you prefer, you can also microwave it. Just cover it lightly and heat in short bursts. Yes, you can freeze Garlic Butter Shrimp Scampi. However, the shrimp may change texture. To freeze, place the dish in a freezer-safe container. Leave space for expansion. Label it with the date and use it within 2 months. To thaw, move it to the fridge overnight. Reheat it slowly as mentioned above. Cooking Garlic Butter Shrimp Scampi takes about 25 minutes. Here’s the breakdown: - Prep time: 10 minutes - Cooking time: 15 minutes This quick meal is perfect for busy evenings or last-minute dinners. Yes, you can make Garlic Butter Shrimp Scampi ahead of time. Here are some tips: - Cook the linguine and shrimp but keep them separate. - Prepare the sauce and store it in the fridge. - When ready to serve, reheat the sauce and add the shrimp and pasta. This helps keep the shrimp tender and juicy. Garlic Butter Shrimp Scampi pairs well with these options: - Wine: A crisp white wine like Sauvignon Blanc works great. - Side dish: A simple green salad or garlic bread adds freshness. These choices enhance the meal and make it feel special. This blog post covers everything you need for Garlic Butter Shrimp Scampi. We looked at key ingredients, cooking steps, and helpful tips. You learned about flavor options and variations. Plus, I shared best practices for storage and reheating. Now, you have the tools to create a tasty dish. Make it your own with various swaps or spice levels. Enjoy your cooking and impress your guests with this simple and delicious recipe.

Garlic Butter Shrimp Scampi Simple and Flavorful Meal

To make these delicious raspberry cheesecake bars, you will need: - 1 ½ cups graham cracker crumbs - ½ cup unsalted butter, melted - 1 tablespoon sugar (for the crust) - 16 oz cream cheese, softened - 1 cup sugar (for the cheesecake filling) - 2 large eggs - 1 teaspoon vanilla extract - 1 cup fresh raspberries (plus extra for topping) - 2 tablespoons cornstarch - 1 tablespoon lemon juice - A pinch of salt These ingredients create a rich and creamy texture. The graham cracker crust adds a nice crunch. The fresh raspberries bring a lovely tartness. You can dress up your bars with fun toppings like: - Extra fresh raspberries - A raspberry reduction (simmer raspberries with sugar) - Whipped cream - Mint leaves These options add color and flavor. They can make your dessert look stunning for guests. If you need to make swaps, here are some ideas: - Use coconut oil instead of butter for a dairy-free option. - Replace cream cheese with a vegan cream cheese for a plant-based treat. - Substitute sugar with honey or maple syrup, but adjust the amounts. These substitutions keep the essence but change the flavor. It's great to customize based on your needs! To start, preheat your oven to 325°F (160°C). You need a baking dish that is 8x8 inches. Line it with parchment paper, letting it hang over the edges. This helps you lift the bars out later. In a medium bowl, mix 1 ½ cups of graham cracker crumbs, ½ cup of melted unsalted butter, and 1 tablespoon of sugar. Stir until the crumbs look wet and stick together. Press the mixture firmly into the bottom of the dish. You want an even layer. Bake it for 10 minutes, then remove it and let it cool completely. Now, let’s make the cheesecake filling. In a large bowl, beat 16 oz of softened cream cheese until it is smooth. Gradually add 1 cup of sugar while mixing. Make sure it blends well. Next, add 2 large eggs, one at a time. Mix until just combined. Then, stir in 1 teaspoon of vanilla extract, 2 tablespoons of cornstarch, 1 tablespoon of lemon juice, and a pinch of salt. Mix until smooth. Gently fold in 1 cup of fresh raspberries. Be careful not to mash them too much; you want some whole berries. Pour the cheesecake mixture over the cooled crust. Spread it out evenly in the dish. Bake it in your preheated oven for 30-35 minutes. The center should be set but still jiggle a little. After baking, let the bars cool at room temperature. Once cooled, transfer them to the fridge. Chill for at least 3 hours, or even overnight. This helps the texture. When you are ready to serve, lift the cheesecake out of the pan using the parchment paper. Slice it into bars and top with extra raspberries for a pretty touch. To get a creamy texture in your raspberry cheesecake bars, start with room-temperature cream cheese. Cold cream cheese can mix unevenly, causing lumps. Beat the cream cheese until it’s smooth before adding other ingredients. Mix slowly when adding sugar, eggs, and vanilla. Overmixing can add air and lead to cracks. Treat your mixture gently to keep it silky. Cracks can spoil the look of your cheesecake. To avoid this, do not overbake. The center should jiggle slightly when you take it out. A water bath can also help. Place the baking dish in a larger pan filled with water. This keeps the heat even and moist. Lastly, let the cheesecake cool slowly. Rapid temperature changes can cause cracks. Chill your raspberry cheesecake bars for at least three hours. For the best texture and flavor, overnight chilling is best. This allows the flavors to meld and the texture to set properly. Cover your dish with plastic wrap to prevent any odors from the fridge. When ready to serve, slice and enjoy the creamy goodness! {{image_2}} You can swap raspberries for other fruits. Try strawberries, blueberries, or peaches. Each fruit adds its own flavor. For strawberries, slice them thin. Blueberries can be folded in whole. Peaches need dicing. Adjust sugar based on sweetness. This makes every bite unique. Your guests will love these fruity twists. To make these bars gluten-free, use gluten-free graham cracker crumbs. They work just like regular crumbs. You can also use almond flour for a nutty taste. Combine almond flour with melted butter and sugar. Press it into the dish like the original crust. This way, everyone can enjoy these treats! You can change the crust for fun. Try using Oreo cookies instead of graham crackers. Crush the cookies and mix with melted butter. Press this mixture into the baking dish. Another option is using nuts. Ground pecans or walnuts can add a rich flavor. Just mix them with butter and press firmly. This gives your bars a new character. To keep your Raspberry Cheesecake Bars fresh, place them in an airtight container. Store them in the fridge for up to five days. Make sure to separate layers with parchment paper to avoid sticking. This keeps the bars nice and neat for serving. You can freeze these bars for longer storage. Cut them into squares and wrap each piece tightly in plastic wrap. Then, place them in a freezer-safe container. They will stay good for up to three months. To thaw, transfer the bars to the fridge overnight before serving. If you want to enjoy your bars warm, preheat the oven to 325°F. Place the bars in an oven-safe dish and heat for about 10 minutes. This helps to soften the cheesecake without cooking it further. Enjoy them with a fresh raspberry topping for added flavor! Yes, you can use frozen raspberries. They work well in this recipe. Just remember, frozen raspberries can be a bit mushy. This could make the cheesecake a little wetter. If you want a firmer texture, try to drain any extra liquid after thawing. The cheesecake is done when the edges are set, but the center still jiggles slightly. This means it will firm up as it cools. A good way to check is to gently shake the pan. If the center wobbles just a bit, it’s ready. Yes, you can double the recipe. Just use a larger baking dish. Make sure to adjust the baking time too. A larger batch may need more time in the oven. Keep an eye on it to avoid over-baking. This blog post covered everything you need to make delicious raspberry cheesecake bars. We talked about the key ingredients, the step-by-step process, and tips for the best texture. You can try different fruit or crust options to mix it up. Remember to store these treats properly for maximum freshness. I hope you feel ready to bake and enjoy your cheesecake bars! Happy baking!

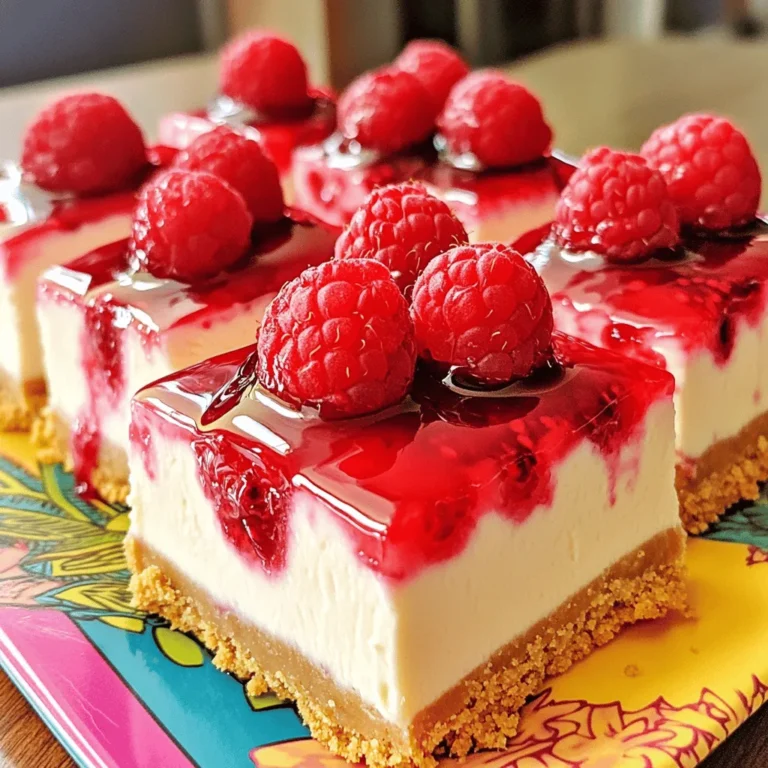
Raspberry Cheesecake Bars Creamy and Tempting Treat

- 4 chicken thighs, bone-in, skin-on - 2 cups mushrooms, sliced (such as cremini or shiitake) - 1 cup heavy cream - 1 medium onion, finely chopped - 3 cloves garlic, minced - 1 teaspoon dried thyme - 1 teaspoon paprika - Salt and pepper to taste - 1 tablespoon olive oil - 1 tablespoon butter - Fresh parsley for garnish When I make Creamy Mushroom Chicken Thighs, I focus on fresh, quality ingredients. The chicken thighs are my favorite because they stay juicy and tender. I like using bone-in, skin-on thighs for the best flavor. Mushrooms bring an earthy taste. I often choose cremini or shiitake for their rich flavor and great texture. Heavy cream adds a luxurious touch, making the sauce rich and creamy. Onions and garlic are essential for depth. They create a strong base for the sauce. For seasoning, I use dried thyme and paprika. They add warmth and a hint of spice. Olive oil and butter help with cooking. They create a nice sear on the chicken and enhance the sauce. Fresh parsley is perfect for garnish, adding color and brightness to the dish. By using these ingredients, you can create a meal that feels gourmet but is easy to make at home. 1. Preheat your oven to 375°F (190°C). 2. Season the chicken thighs with salt, pepper, thyme, and paprika. Make sure to coat both sides. 3. In a large oven-safe skillet, heat olive oil and butter over medium heat. 4. Place the chicken thighs skin-side down in the hot skillet. Sear for about 5-7 minutes until the skin turns golden brown. 5. Flip the chicken and cook for another 5 minutes. Remove the chicken from the skillet and set it aside. 1. In the same skillet, add the chopped onion. Sauté until it turns translucent, about 3-4 minutes. 2. Add the minced garlic and cook for 1 minute until you can smell its aroma. 3. Toss in the sliced mushrooms. Sauté until they soften and the liquid evaporates, around 5-6 minutes. 1. Pour in the heavy cream, stirring it into the mushrooms and onions. 2. Bring the mixture to a gentle simmer to let it thicken slightly. 3. Return the seared chicken thighs to the skillet, skin-side up. Spoon some creamy sauce over the chicken. 1. Transfer the skillet to the preheated oven. 2. Bake for 25-30 minutes until the chicken is cooked through. The internal temperature should reach 165°F (74°C). 3. Once done, let the dish rest for a few minutes before serving. To achieve a golden brown skin on your chicken thighs, start with a hot skillet. Heat the olive oil and butter over medium heat until shimmering. Place the chicken skin-side down and don’t rush it. Let it sear for about 5-7 minutes without moving it. This forms a nice crust. When you flip it, cook for another 5 minutes. Use a meat thermometer to check the internal temperature. Aim for 165°F (74°C) to ensure it's safe to eat. To boost the flavor of your creamy sauce, consider adding a splash of white wine. It adds a fresh zing that complements the mushrooms well. You can also toss in some grated Parmesan cheese for extra richness. If you want a thicker sauce, let it simmer longer after adding the cream. Stir often to avoid sticking. For side dishes, fluffy mashed potatoes or rice pair perfectly with the chicken. They soak up the creamy sauce nicely. For a gourmet look, serve the chicken on a large plate. Drizzle the sauce generously over the top. Sprinkle freshly chopped parsley for a pop of color. This not only looks great but adds a fresh taste too. {{image_2}} You can change the main protein in this dish. - Use boneless chicken thighs or breasts for a leaner option. - Substitute with pork or turkey for a different flavor. Using boneless pieces cuts down on cooking time. You still get that juicy, tender meat. Pork adds a sweet, hearty touch, while turkey keeps it light and healthy. For a meatless version, focus on the mushroom sauce. - Use plant-based cream for a rich consistency. - Replace chicken with hearty vegetables like zucchini or eggplant. This way, you keep the creamy texture while making it vegetarian. The mushrooms provide umami, giving depth to the dish. You can even add spinach for extra nutrition. Changing herbs and spices can create new flavors. - Add fresh rosemary or oregano for a Mediterranean twist. - Incorporate a splash of white wine or broth for added richness. Herbs can brighten up the dish. A splash of wine gives it a gourmet feel. Experiment with flavors that excite your taste buds. Try different combinations to find your favorite! To keep your creamy mushroom chicken thighs fresh, store them in the fridge. Place the cooled chicken in an airtight container. It will stay good for up to three days. If you want to keep it longer, freezing is also an option. Wrap each thigh tightly in plastic wrap, then place them in a freezer bag. You can freeze them for up to three months. Just remember to label your bags with the date. When you’re ready to enjoy your leftovers, reheating them in the oven works best. Preheat your oven to 350°F (175°C). Place the chicken in a baking dish and cover it with foil. Heat for about 20-25 minutes or until it’s warm all the way through. Make sure to check the internal temperature. It should reach 165°F (74°C). If you prefer the stovetop, heat a skillet over medium heat. Add a splash of water or broth to the pan. Once it’s warm, add the chicken thighs. Cover and heat for about 10-15 minutes. Stir occasionally to keep the sauce from sticking. This method helps keep the chicken moist and tasty. Bake chicken thighs for 25 to 30 minutes at 375°F (190°C). This helps cook them evenly and keeps them juicy. Always check the internal temperature. It should reach 165°F (74°C). This ensures the chicken is safe to eat. Yes, you can prep this dish in advance. Cook the chicken and sauce as directed. After cooling, store them in the fridge for up to two days. When ready, reheat it gently on the stove or in the oven until hot. If you need a substitute for heavy cream, try these options: - Full-fat coconut milk - Greek yogurt - Silken tofu blended until smooth These choices work well and keep the dish creamy. This recipe is gluten-free as written. Just be cautious with any additional ingredients. Always check labels on packaged items, like broth or seasonings, for hidden gluten. Enjoy this dish without worries! In this blog post, we covered a delicious creamy mushroom chicken thighs recipe. We discussed main ingredients, helpful tips, and variations for everyone. You can choose different proteins or make it vegetarian. Storing and reheating leftovers is easy with our simple guidelines. This dish offers great flavors and easy steps for fun cooking. Whether you’re a pro or a beginner, you can impress anyone with this meal. Enjoy your cooking adventure!

Creamy Mushroom Chicken Thighs Irresistible Flavor Dish

PREV 1 … 3 4 5 … 8 NEXT
secrets pice kitchen

explore

DessertsDinnerAppetizersDrinks

Our Policies

  • Cookie Policy
  • Copyright Policy
  • Disclaimer
  • GDPR Policy
  • Terms Of Use
Back to Top
  • About
  • Contact Us
  • Privacy Policy
© 2025 secrets pice kitchen