FREE DINNER EBOOK! Get your copy!
  • Cookie Policy
  • GDPR Policy
  • Disclaimer
  • Terms Of Use
  • Visit my other site: Fun Cookie Recipes
secrets pice kitchen
  • Home
  • Dinner
  • Desserts
  • Drinks
  • Appetizers
  • Contact
  • About
  • Privacy Policy
  • Home
  • Dinner
  • Desserts
  • Drinks
  • Appetizers
  • Contact
  • About
  • Privacy Policy
  • Cookie Policy
  • GDPR Policy
  • Disclaimer
  • Terms Of Use
Visit my other site: Fun Cookie Recipes

HOME / CATEGORIES /

Latest

- 1 lb ground chicken - 1 red bell pepper, diced - 2 green onions, sliced - 1 carrot, shredded - 3 cloves garlic, minced - 1 inch ginger, grated - 1 tablespoon vegetable oil - Peanut sauce ingredients: - 1/3 cup creamy peanut butter - 2 tablespoons soy sauce - 1 tablespoon maple syrup or honey - 1 tablespoon lime juice - 1 teaspoon sriracha - 2 tablespoons water You need these main ingredients for the Thai Peanut Chicken Lettuce Wraps. Ground chicken gives the dish protein and flavor. Fresh veggies add crunch and color. The peanut sauce ties everything together with its creamy goodness. - 1 cup cooked quinoa - 1/4 cup fresh cilantro, chopped Quinoa adds a nice texture and is a great source of fiber. Fresh cilantro brings a burst of freshness and flavor. You can mix these in for extra taste and health benefits. - Salt and pepper, to taste - Sriracha and lime juice Salt and pepper enhance the flavors. You can adjust the spiciness with sriracha. Lime juice adds a tangy kick that balances the dish. Use these to fit your taste. This recipe is simple and packed with nutrition. You can enjoy it as a light meal or snack anytime. - Prepping the chicken and vegetables: Start by gathering your ground chicken and fresh veggies. Chop the red bell pepper, slice the green onions, and shred the carrot. Have everything ready. This makes the cooking fast and easy. - Making the peanut sauce: In a bowl, mix together the peanut butter, soy sauce, maple syrup, lime juice, sriracha, and water. Whisk until smooth. This sauce adds great flavor to your dish. - Sautéing garlic and ginger: Heat vegetable oil in a large skillet over medium heat. Add minced garlic and grated ginger. Sauté for about one minute until fragrant. This step fills your kitchen with a lovely smell. - Browning the chicken: Add the ground chicken to the pan. Break it up with a spatula. Cook for about five to seven minutes. The chicken should turn brown and be fully cooked. - Adding vegetables and sauce: Stir in the diced red bell pepper, shredded carrot, and green onions. Cook for another three to four minutes. The veggies should become tender. Then pour the peanut sauce over the chicken mix. Stir well and cook for two more minutes. - Serving in lettuce leaves: Remove the skillet from heat and stir in chopped cilantro. Season with salt and pepper to taste. Spoon the chicken mixture into lettuce leaves. Each person can make their own wraps. - Presentation tips: Arrange the lettuce cups on a platter. Serve with lime wedges and extra peanut sauce for drizzling. This makes your dish look fresh and inviting. - How to properly sauté garlic: Start with a cold skillet. Add vegetable oil and the minced garlic. Heat on medium until the garlic is golden brown, about one minute. Stir often to avoid burning. - Ensuring chicken is evenly cooked: Break the ground chicken into small pieces as it cooks. Use a spatula to stir and flip the chicken. Look for a nice golden color with no pink spots. This takes about five to seven minutes. - Adjusting spice level with sriracha: Start with one teaspoon of sriracha for a mild kick. Taste the sauce, then add more if you like it spicy. Mix well after each addition. - Thinning sauce if needed: If your sauce is too thick, add water a tablespoon at a time. Whisk until you reach the desired consistency. This makes the sauce easier to drizzle. - Arranging wraps for serving: Use a large platter to display the lettuce cups. Place the chicken mixture in the center. This invites everyone to build their own wraps. - Adding garnishes for visual appeal: Sprinkle chopped cilantro over the wraps for a pop of color. You can also add lime wedges for extra zest. This makes the dish look fresh and vibrant. {{image_2}} You can switch the ground chicken for ground turkey or beef. Ground turkey works great and is leaner than chicken. If you prefer beef, use a lean cut to keep it healthy. For a vegetarian option, try firm tofu. Just crumble it like the chicken and cook until golden. Add your favorite spices to change the flavor. A pinch of cumin or a dash of paprika can add warmth. You can also try different sauces, like teriyaki or sweet chili, for a twist. Want more crunch? Toss in extra veggies like sliced cucumbers or shredded cabbage. They add texture and freshness. These wraps pair well with sides like brown rice or a light salad. A crunchy Asian slaw would also make a great match. For meal prep, make the chicken mix ahead of time. Store it in the fridge and assemble the wraps when you're ready to eat. This keeps the lettuce crisp and the meal fresh! To keep your chicken mixture fresh, place it in an airtight container. This will lock in the flavors and keep it safe. Store the mixture in the fridge for up to four days. For the lettuce leaves, wrap them in a damp paper towel. Then, place them in a plastic bag. This keeps them crisp and fresh. The best way to reheat the chicken mixture is on the stove. Use low heat to warm it gently. Stir often to prevent sticking. If you want to use a microwave, place it in a bowl. Cover the bowl with a damp paper towel to maintain moisture. Reheat in short bursts, stirring in between. This keeps the texture nice. Your wraps will last in the fridge for about four days. After that, the flavors may fade. You can freeze the chicken mixture for up to three months. Just make sure to use a freezer-safe container. When ready to eat, thaw it overnight in the fridge before reheating. Enjoy your meal later! Yes, you can make the peanut sauce ahead of time. Store it in an airtight container in the fridge. It stays good for about a week. When you are ready to use it, just stir it well. If it is too thick, add a little water to thin it out. This makes it easy to enjoy your wraps quickly. If you want alternatives to lettuce wraps, try these options: - Cabbage leaves - Rice paper wraps - Whole grain tortillas These options work well and give you different flavors and textures. Choose what you like best! Yes, this recipe can be gluten-free. To ensure it is safe, use gluten-free soy sauce. Check the labels on all your ingredients. Maple syrup is also gluten-free, making it a safe choice. Enjoy this healthy dish worry-free! This blog shared a simple and tasty chicken lettuce wrap recipe. You learned about key ingredients, steps to cook, and storage tips. These wraps are easy to customize with different proteins and flavors. Trying new variations can make meals fun. Remember to store any leftovers properly to keep them fresh. Enjoy your cooking, and let these wraps impress your family and friends. Get ready to savor your homemade dish!

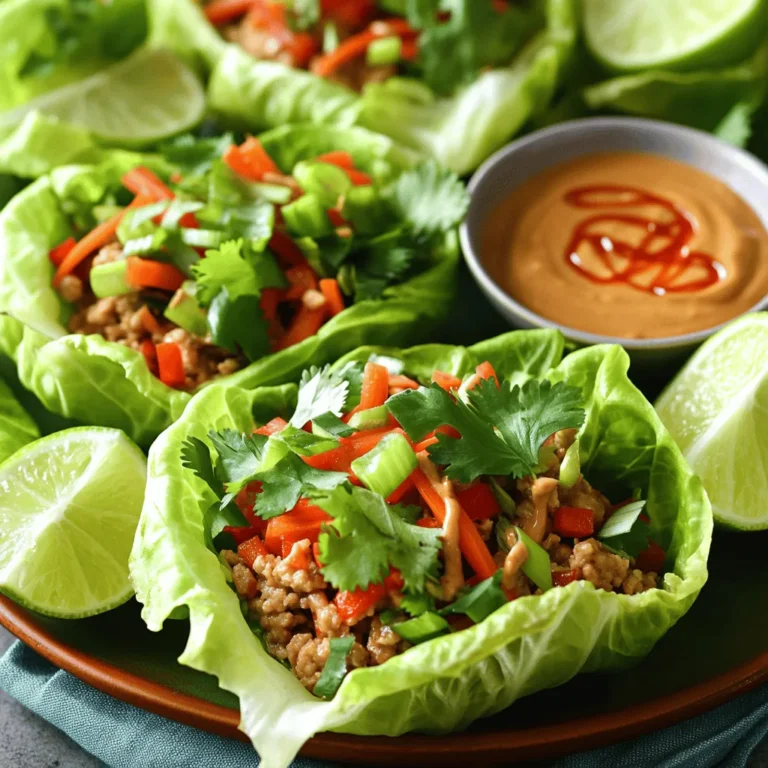
Thai Peanut Chicken Lettuce Wraps Healthy Recipe Delight

- 12 ounces cheese tortellini (fresh or frozen) - 1 cup basil pesto - 1 cup heavy cream The main ingredients create a rich and tasty base for this dish. Cheese tortellini makes it filling. I love using fresh tortellini when I can, but frozen works too. Basil pesto adds a burst of flavor. It gives the dish a lovely green color and a fresh taste. Heavy cream brings the whole mix together. It makes the dish creamy and smooth, perfect for coating the pasta. - 1 cup cherry tomatoes, halved - 1 cup mozzarella cheese, shredded - 1/2 cup Parmesan cheese, grated Next, we add some extras to enhance flavor and texture. Cherry tomatoes add a sweet touch. Their juicy bites balance the creaminess of the dish. Mozzarella cheese melts beautifully. It creates a gooey layer on top that everyone loves. Grated Parmesan cheese adds a salty kick. This cheese also browns nicely in the oven, giving that golden look. - 2 tablespoons olive oil - 1 teaspoon garlic powder - Salt and black pepper to taste Seasoning is key to making this dish shine. Olive oil helps blend the flavors together. Garlic powder gives an aromatic touch without overpowering the other tastes. Don't forget salt and black pepper! They enhance every bite. I suggest tasting as you season. Adjust the amounts until it fits your taste. This way, your creamy pesto tortellini bake will be just right for your family. - Preheat your oven to 375°F (190°C). This step is key for even cooking. - If your tortellini is frozen, cook it first. Follow the package instructions until it is al dente. Drain the water and set the tortellini aside. - In a large mixing bowl, combine 1 cup of basil pesto with 1 cup of heavy cream. Stir until the mix is creamy and smooth. - Add the halved cherry tomatoes, cooked tortellini, 2 tablespoons of olive oil, 1 teaspoon of garlic powder, salt, and black pepper. Gently fold everything together until the tortellini is well coated in the sauce. - Transfer the tortellini mixture into a greased 9x13 inch baking dish. Spread it out evenly so it cooks well. - Top the mixture with 1 cup of shredded mozzarella and 1/2 cup of grated Parmesan cheese. This will create a tasty, cheesy crust. - Bake in the preheated oven for about 25 to 30 minutes. Watch for the cheese to bubble and turn golden brown. - Once done, remove the dish from the oven. Let it cool for a few minutes before serving. This lets the flavors settle. - Garnish with fresh basil leaves for a vibrant touch before serving. Achieving creamy sauce To make your sauce creamy, mix the basil pesto with heavy cream. Stir well until smooth. This mix gives the dish a rich flavor. You can adjust the cream amount for your taste. Ensuring even baking Spread the tortellini mix evenly in the baking dish. This helps it bake evenly. Check the dish halfway through cooking. If you see uneven browning, gently rotate it. Serving suggestions You can serve the tortellini hot from the oven. Use a large spoon to scoop it into bowls. This makes it easy for guests to enjoy. Garnishing ideas Add fresh basil leaves on top for color. A sprinkle of Parmesan cheese also adds a nice touch. This makes the dish look more inviting. Alternative proteins or veggies You can add cooked chicken or shrimp for extra protein. If you prefer veggies, try spinach or bell peppers. They mix well with the tortellini. Dairy-free options For a dairy-free version, use coconut cream instead of heavy cream. Also, look for dairy-free cheese options. This keeps the dish creamy without dairy. {{image_2}} You can switch up the flavors by using different pestos. One great choice is sun-dried tomato pesto. It adds a rich, tangy taste that pairs well with the creamy sauce. You might also try spinach and walnut pesto. This adds a fresh spin and a nice crunch. Both options create unique twists on your creamy pesto tortellini bake. Want to make your dish heartier? You can add proteins like chicken or shrimp. Just cook them before mixing them in. This gives you a tasty and filling meal. For vegetarians, consider adding chickpeas or tofu. Both options add great protein and taste without meat. Cheese can change the whole dish. Instead of just mozzarella, why not use feta or goat cheese? These cheeses bring a tangy flavor that works well with the pesto. You can also mix different cheeses together. Combining mozzarella, Parmesan, and even cheddar gives you a creamy and rich topping. Each cheese adds its own unique touch to the dish. After enjoying your creamy pesto tortellini bake, store leftovers in an airtight container. Let the dish cool completely before sealing. Refrigerate it for up to 3 days. If you want to save it longer, consider freezing. Portion the leftovers into smaller containers. This way, you can thaw only what you need. Use frozen leftovers within 2 months for the best taste. To reheat your tortellini bake, the oven is the best choice. Preheat your oven to 350°F (175°C). Place the dish in the oven for about 15 minutes. This keeps the cheese nice and creamy. You can also use the microwave for quick reheating. Heat in short bursts, stirring in between. This helps maintain the creaminess and prevents drying out. The creamy pesto tortellini bake lasts about 3 days in the fridge. Look for signs of spoilage, like a sour smell or discoloration. If you see mold, it’s time to toss it. When frozen, it can last for 2 months, but for the best flavor, eat it sooner. Always trust your senses to decide if it’s still good. To make tortellini bake, start by cooking the tortellini. If using frozen tortellini, cook it until tender. Then, mix the basil pesto with heavy cream in a bowl. Add the cooked tortellini, cherry tomatoes, olive oil, garlic powder, salt, and pepper. Stir gently until the tortellini is well coated. Transfer this mix into a greased baking dish. Top it with mozzarella and Parmesan cheese. Bake at 375°F for 25-30 minutes until bubbly. Key techniques to remember: - Use fresh or frozen tortellini for ease. - Mix pesto and cream well for a smooth sauce. - Bake until the cheese is golden brown for best results. Yes, you can use other types of pasta. Options include penne, fusilli, or even gluten-free pasta. Just remember that cooking times may differ. Adjust the cooking time based on the pasta you choose. For best results, cook pasta until al dente before mixing with the sauce. This dish is great for meal prep! You can make it ahead and store it in the fridge. Keep the portions in airtight containers for easy access. Meal prepping tips and tricks: - Prepare the tortellini bake a day or two in advance. - Store leftovers in the fridge for up to three days. - You can freeze it for longer storage, up to three months. Storing portions for the week: - Divide the bake into single-serving containers. - Label each container with the date for easy tracking. - Reheat in the microwave or oven when ready to eat. This article covered all you need for a tasty tortellini bake. We explored the main and extra ingredients, walked through simple steps, and shared tips for great results. Adding variations and storage info ensures you can enjoy this dish anytime. You can impress friends and families with this easy yet delicious meal. Experiment with different flavors to make it your own. Transform this recipe into a family favorite that everyone will love!

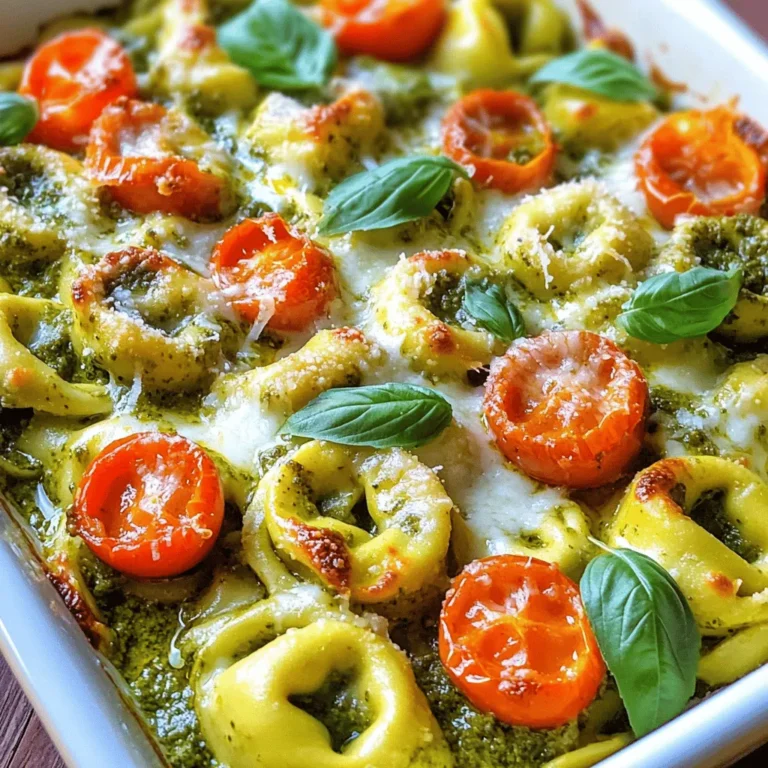
Creamy Pesto Tortellini Bake Flavorful Family Dish

- 4 large russet potatoes - 4 tablespoons olive oil - 4 cloves garlic - 1 cup grated Parmesan cheese - 1 teaspoon dried oregano - 1 teaspoon smoked paprika - Salt and pepper to taste - Fresh parsley for garnish When making Garlic Parmesan Air Fryer Fries, start with the main ingredients. I use 4 large russet potatoes for their great texture. They crisp up nicely in the air fryer. Next, I add 4 tablespoons of olive oil. This helps the fries crisp and adds flavor. Garlic is key in this recipe. I use 4 cloves of minced garlic. It gives the fries a bold taste. The star of the show, though, is 1 cup of grated Parmesan cheese. This makes the fries cheesy and delicious. Now, let’s talk about seasonings. I use 1 teaspoon of dried oregano for a touch of earthiness. I also add 1 teaspoon of smoked paprika to give a nice depth of flavor. Salt and pepper are needed to taste. Finally, I like to garnish with fresh parsley. It adds color and a fresh note to the dish. These ingredients come together to create a tasty snack or side dish. You can easily adjust them based on your tastes. Want more garlic? Go for it! Prefer a spicier kick? Add some chili flakes. The options are endless. 1. Start by preheating your air fryer to 400°F (200°C). This takes about 5 minutes. A hot fryer helps the fries become crispy. 2. Rinse the cut potato strips in cold water. This step washes away extra starch, which helps with crispiness. After rinsing, use a kitchen towel to pat them dry. Make sure they are not wet. 1. In a large mixing bowl, toss the potato strips with 4 tablespoons of olive oil. This makes sure each fry gets coated well. 2. Next, add 4 minced garlic cloves, 1 cup of grated Parmesan cheese, 1 teaspoon of dried oregano, 1 teaspoon of smoked paprika, and salt and pepper to taste. Mix everything well until the fries are evenly coated. 1. Place the seasoned potato strips in a single layer in the air fryer basket. If you have too many fries, fry them in batches. Overcrowding makes it hard for the hot air to circulate. 2. Air fry the fries for 15 to 20 minutes. Remember to shake the basket halfway through. This helps them cook evenly. They should be golden brown and crispy when done. 3. Once they are done, take out the fries carefully. Let them cool for a minute. You can add chopped fresh parsley and more Parmesan cheese on top for extra flavor. Enjoy these tasty fries as a side or snack! To get fries that are crispy, avoid overcrowding the basket. When you pack too many fries in, they can steam instead of fry. This makes them soggy. It’s best to cook in batches. Next, set the proper cooking time and temperature. I recommend air frying at 400°F (200°C) for 15 to 20 minutes. This high heat helps give you that golden brown crisp. Remember to shake the basket halfway through cooking. This step helps the fries cook evenly. For more flavor, try different seasonings. You can add some cayenne pepper for heat or garlic powder for extra garlic flavor. Experimenting with spices can make your fries unique. You can also top your fries with extras. Consider adding crumbled bacon, feta cheese, or even a squeeze of lemon juice. Fresh herbs can also elevate the dish. A sprinkle of green onions or basil can add a nice touch. {{image_2}} You can switch up the type of potato for your fries. Sweet potatoes give a sweet twist. They add a nice color and flavor. Yukon Gold potatoes are another great choice. They are creamy and tender. Both options can bring new tastes to your dish. Want a kick? Try a spicy garlic parmesan version. Add some red pepper flakes for heat. It will make your fries pop! You can also infuse herbs into your fries. Use rosemary or thyme for a fresh taste. These flavors brighten the dish and make it more exciting. If you prefer a dairy-free option, you can swap out the Parmesan cheese. Pecorino Romano gives a similar salty taste. Nutritional yeast is another great choice for a vegan option. It adds a cheesy flavor without any dairy. This way, everyone can enjoy these tasty fries! To store your leftover Garlic Parmesan Air Fryer Fries, let them cool first. Place the fries in an airtight container. They will stay fresh in the refrigerator for up to three days. You can also layer parchment paper between fries to keep them from sticking. To keep your fries crispy when reheating, the best method is the air fryer. Preheat the air fryer to 350°F (175°C). Arrange the fries in a single layer and heat for about 5-7 minutes. This method revives their crunch and flavor. You can also use a regular oven. Set it to 400°F (200°C) and bake for 10 minutes. Either way, avoid the microwave, as it makes fries soggy. To make your fries extra crispy, follow these tips: - Rinse the potatoes: Rinse cut potatoes in cold water. This removes starch and helps them crisp. - Dry them well: Use a kitchen towel to pat them dry. Moisture leads to soggy fries. - Don’t overcrowd: Cook fries in a single layer. This allows air to circulate and crisps all sides. - Shake halfway: Shake the basket during cooking. This helps fries cook evenly and become crispier. - Adjust cooking time: Keep an eye on them. If you want more crunch, add a few extra minutes. Yes, you can make garlic parmesan fries in the oven, but they may not be as crispy. Here's how they compare: - Cooking method: In the oven, you will bake at 425°F (220°C). This is hotter than the air fryer. - Time: Oven fries take about 25-30 minutes. You'll need to flip them halfway through for even cooking. - Texture: Air fryer fries are crispier due to hot air circulation. Oven fries can be softer. - Oil usage: You might need more oil in the oven to achieve a similar crisp. These fries taste great with various dipping sauces. Here are some tasty options: - Marinara sauce: The tomato flavor balances the garlic. - Ranch dressing: Creamy and herb-filled, it complements the fries well. - Aioli: A garlic aioli adds a rich flavor that matches perfectly. - Ketchup: A classic choice that everyone loves. - Chipotle mayo: If you like spice, this adds a nice kick! Feel free to experiment with different sauces to find your favorite! This blog post showed you how to make garlic parmesan fries in the air fryer. We covered the main ingredients like potatoes, olive oil, and cheese. You learned about preparing, cooking, and achieving the perfect crisp. Plus, we explored fun variations and storage tips. With these steps, you can enjoy tasty fries anytime. Experiment with flavors and enjoy your creations!

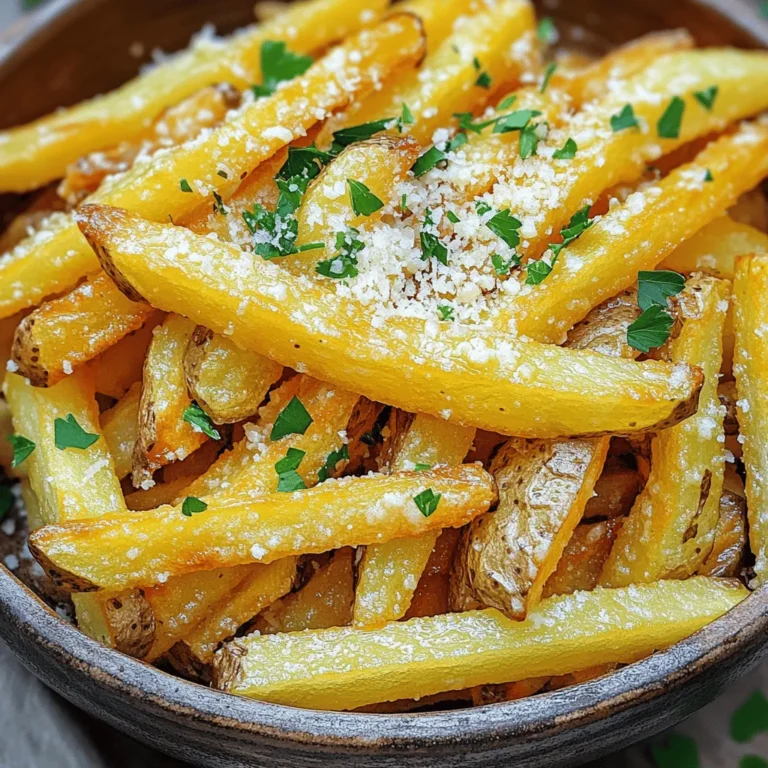
Garlic Parmesan Air Fryer Fries Crispy and Delicious

To make the Gooey S’mores Cookie Skillet, you will need the following items: - 1 cup all-purpose flour - 1/2 teaspoon baking soda - 1/4 teaspoon salt - 1/2 cup unsalted butter, melted - 1/2 cup brown sugar, packed - 1/4 cup granulated sugar - 1 teaspoon vanilla extract - 1 large egg - 1 cup mini chocolate chips - 1 cup mini marshmallows - 1/2 cup crushed graham crackers - Extra chocolate chips and marshmallows for topping You can easily swap some ingredients if needed: - All-purpose flour: Use gluten-free flour for a gluten-free option. - Unsalted butter: Coconut oil or vegetable oil works well too. - Brown sugar: White sugar can replace brown sugar, but the flavor might change. - Mini chocolate chips: Use regular chocolate chips or chunks for a richer taste. - Mini marshmallows: You can use large marshmallows, just cut them in half. This recipe serves 6 to 8 people. If you want to make more or less, adjust the ingredients as follows: - For 4 servings: Use 2/3 of each ingredient. - For 10 servings: Use 1.5 times each ingredient. Keep an eye on baking time if you change the size! First, preheat your oven to 350°F (175°C). This step is key for even baking. While the oven warms up, take a 10-inch cast-iron skillet. Grease it with cooking spray or butter. This will help the cookie come out easily later. In a medium bowl, add 1 cup of all-purpose flour. Then, mix in 1/2 teaspoon of baking soda and 1/4 teaspoon of salt. Whisk these ingredients together until they are fully combined. Set this bowl aside. This mixture will give your cookie the right rise and flavor. Now, grab a large mixing bowl. In it, pour in 1/2 cup of melted unsalted butter. Add 1/2 cup of packed brown sugar and 1/4 cup of granulated sugar. Mix these until smooth. Then, add 1 teaspoon of vanilla extract and 1 large egg. Whisk again until everything blends nicely. This creates a sweet and rich base for your cookie. Next, take your dry mixture and slowly add it to the wet ingredients. Stir until just combined. Be careful not to overmix, as this can affect the texture. Now, fold in 1 cup of mini chocolate chips and 1/2 cup of crushed graham crackers. These ingredients give the cookie that classic s'mores taste. Spread the cookie dough evenly in your greased skillet. Press mini marshmallows and a few extra chocolate chips on top. This adds a fun, gooey layer. Now, place the skillet in your preheated oven. Bake for about 20-25 minutes. Look for golden edges and a gooey center. Once it's ready, let it cool for a few minutes before serving. Enjoy your delicious creation! To get that perfect gooey texture, you need to focus on timing. Bake your skillet for 20 to 25 minutes. Check the edges; they should be golden brown. The center should still look soft. This is key for that gooey feel. If you bake it too long, it will become hard. Also, use mini marshmallows. They melt quickly and blend well with the cookie. You can even add a few marshmallows on top during the last few minutes of baking. This will give you a nice toasted look and extra gooeyness. If you don’t have a cast-iron skillet, don’t worry! You can use a regular oven-safe pan. Just make sure it’s the same size. You might need to adjust the baking time slightly. Keep an eye on the edges for doneness. You can also make individual portions. Use small ramekins or muffin tins. These will cook faster, so start checking them after about 15 minutes. To make your s’mores skillet even better, add some fun extras! Try mixing in crushed nuts like walnuts or pecans for texture. You can also swap out some chocolate chips for peanut butter chips. For a more decadent treat, drizzle caramel sauce on top before serving. This adds a nice sweet touch. You can even sprinkle some sea salt to enhance the flavors. The salt balances the sweetness perfectly and makes every bite amazing! {{image_2}} To make a gluten-free version, swap the all-purpose flour for a gluten-free blend. Look for one that works well for baking. Most blends will work fine, but check the label. You may need to add a bit of xanthan gum to help bind the dough. This small change keeps the cookie just as gooey and delicious. If you want a vegan Gooey S’mores Cookie Skillet, replace the butter with coconut oil or a vegan butter substitute. For the egg, use a flax egg. To make a flax egg, mix one tablespoon of ground flaxseed with three tablespoons of water. Let it sit for five minutes to thicken. These swaps keep the dish plant-based without losing flavor. You can jazz up your cookie skillet with some add-ins. Consider adding chopped nuts like walnuts or pecans for crunch. Different types of chocolate can change the taste. Try dark chocolate or white chocolate chips for a twist. You can also mix in peanut butter chips for a fun flavor. Get creative and make it your own! To keep your leftover Gooey S’mores Cookie Skillet fresh, cover it tightly. Use plastic wrap or aluminum foil. You can also place it in an airtight container. Store it at room temperature for up to two days. If you want to keep it longer, put it in the fridge. This way, it stays good for about a week. Remember to let it cool completely before storing. When you're ready to enjoy leftovers, reheating is key. Preheat your oven to 350°F (175°C). Place the skillet in the oven for about 10 minutes. This warms it up without drying it out. Another option is to use the microwave. Heat a slice for about 20-30 seconds. If you like extra gooey marshmallows, add a few more on top before reheating. Freezing can help if you want to save some for later. Cut the cookie into slices. Wrap each slice in plastic wrap. Then, place the slices in a freezer bag. Make sure to squeeze out the air to avoid freezer burn. You can freeze it for up to three months. When you’re ready to eat, thaw it in the fridge overnight. Reheat as mentioned for that tasty gooey goodness. Yes, you can use different types of chocolate. Dark chocolate gives a rich taste. Milk chocolate adds sweetness. You can even mix them for a fun twist. Try using white chocolate for a creamy touch. Feel free to experiment with your favorite chocolate bars, too. To keep the center gooey, don’t bake it too long. Check it at 20 minutes. The edges should be golden, but the middle should look soft. If you want extra gooeyness, add more mini marshmallows on top before baking. This helps create that melty, decadent center. Serve it warm straight from the skillet. Drizzle melted chocolate on top for extra flavor. Add toasted marshmallows to make it look fancy. You can also serve it with ice cream for a cool contrast. Don't forget to provide spoons for easy digging! You can make this recipe gluten-free by using gluten-free flour. For a vegan option, swap the egg with flaxseed meal or applesauce. Use vegan butter and dairy-free chocolate chips. These changes keep the flavor while meeting different dietary needs. Enjoy your delicious treat no matter your diet! This blog post covered how to make a delicious Gooey S’mores Cookie Skillet. We listed ingredients, offered substitutions, and shared tips for that perfect texture. You learned simple steps from prep to baking. We explored variations for gluten-free and vegan diets. Plus, we discussed storing and reheating your leftovers. Enjoy this fun treat and make it a family favorite! You can customize it any way you want. Happy baking!

Gooey S’mores Cookie Skillet Decadent Dessert Delight

- 2 large salmon fillets - 1 cup fresh spinach, chopped - 1/2 cup feta cheese, crumbled - 1/4 cup cream cheese, softened - 1 garlic clove, minced - 1 tablespoon olive oil - 1 teaspoon lemon juice - 1/2 teaspoon dried dill (or 1 teaspoon fresh dill) - Salt and pepper to taste - Lemon wedges for serving You need fresh salmon for this dish. It is the star of the meal. The spinach adds a nice green touch and a healthy crunch. Feta cheese brings a salty flavor that pairs well with salmon. Cream cheese gives a smooth texture to the stuffing. For seasoning, garlic adds depth. A splash of lemon juice brightens the dish. Dill adds a hint of herbiness. Salt and pepper enhance all the other flavors. When serving, lemon wedges give a fresh zing. You can squeeze them over the salmon for extra flavor. This dish looks great on the plate and tastes even better. - Preheat the oven to 375°F (190°C). - In a skillet, heat 1 tablespoon of olive oil over medium heat. - Add 1 minced garlic clove and sauté for about 30 seconds until fragrant. - Add 1 cup of chopped spinach and cook for 2-3 minutes until wilted. - In a bowl, mix the sautéed spinach with 1/2 cup of crumbled feta cheese, 1/4 cup of softened cream cheese, 1 teaspoon of lemon juice, 1/2 teaspoon of dried dill, salt, and pepper. - Place 2 large salmon fillets skin side down on a cutting board. - Carefully cut pockets into each fillet without cutting all the way through. - Stuff each salmon pocket with the spinach and feta mixture. - Place the stuffed fillets on a lined baking tray. - Drizzle olive oil on top and season with salt and pepper. - Bake for 15-20 minutes, or until the salmon flakes easily with a fork. This process leads to a delightful meal that is both healthy and tasty. Enjoy the flavors! - How to check for doneness: The best way to know if your salmon is done is to use a fork. Gently flake the thickest part of the salmon. If it flakes easily, it is ready. You can also use a meat thermometer. The inside should reach 145°F (63°C). - Avoiding dry salmon: To keep your salmon moist, use a timer. Bake it for just 15-20 minutes. If it sits too long, it can dry out. Also, avoid high heat, as it cooks too fast. - Alternatives to feta cheese: If you don’t have feta, try goat cheese or ricotta. Both add creaminess and taste good with spinach. - Herbs and spices to use: Fresh herbs like parsley or basil can brighten the dish. You can also add a pinch of red pepper flakes for a kick. - Plating suggestions for serving: Serve your stuffed salmon on a nice plate. Add a slice of lemon on the side for a pop of color. You can garnish with fresh herbs for a touch of green. A sprinkle of cracked pepper adds a nice finish. {{image_2}} You can change the cheese in this recipe. Try goat cheese or ricotta instead of feta. Each cheese adds a unique flavor. You can also add more veggies to the stuffing. Try artichokes or bell peppers for added crunch. You have options when cooking the stuffed salmon. Grilling gives a nice smoky flavor. Baking is simple and allows for even cooking. If you prefer, you can also pan-sear the salmon. This method gives a crispy surface while keeping the inside tender. If you need gluten-free options, the recipe is already safe. Just check any condiments for hidden gluten. For a dairy-free version, swap the cream cheese and feta with cashew cheese or tofu. These options work well and still taste great. After enjoying your spinach feta stuffed salmon, let it cool. Store leftovers in an airtight container. Place it in the fridge. This keeps it fresh for up to three days. To maintain flavor, eat it sooner rather than later. Avoid leaving it out for more than two hours. You can freeze stuffed salmon if you want to save some for later. Wrap each piece tightly in plastic wrap. Then, place them in a freezer bag. This helps prevent freezer burn. It will stay good for up to three months. To use, just take it out and let it thaw in the fridge overnight. For reheating, the oven is your best friend. Preheat it to 350°F (175°C). Place the salmon in a baking dish. Cover it with foil to keep it moist. Heat for about 15-20 minutes. You can also use the microwave, but it may dry it out. If you do, heat in short bursts and check often. How long to bake stuffed salmon? Bake the stuffed salmon for 15 to 20 minutes. Check it at 15 minutes. The salmon should flake easily when done. Can I use frozen salmon fillets? Yes, you can use frozen salmon. Just thaw them completely before cooking. This ensures even cooking. Is this recipe healthy? Yes! Spinach and salmon are both healthy. Spinach adds vitamins and minerals, while salmon provides healthy fats. What to serve with spinach feta stuffed salmon? Pair it with a fresh salad or steamed veggies. Quinoa or brown rice also complements this dish nicely. Can I make this ahead of time? You can prepare the filling in advance. Stuff the salmon just before cooking for the best flavor. Why is my salmon sticking to the pan? Salmon may stick if the pan is not hot enough. Make sure to preheat your pan and add oil before cooking. What to do if the salmon is not cooked through? If the salmon is undercooked, return it to the oven. Cook in 2-3 minute intervals until it's done. In this post, we explored making a tasty spinach and feta stuffed salmon. We covered the main ingredients, step-by-step instructions, and helpful tips. You learned about ingredient swaps, cooking methods, and storage options. Stuffed salmon is versatile and easy to prepare. It can fit many diets and preferences. Enjoy this dish for a healthy meal or impress guests. With these tips, you’ll create a tasty dish every time.

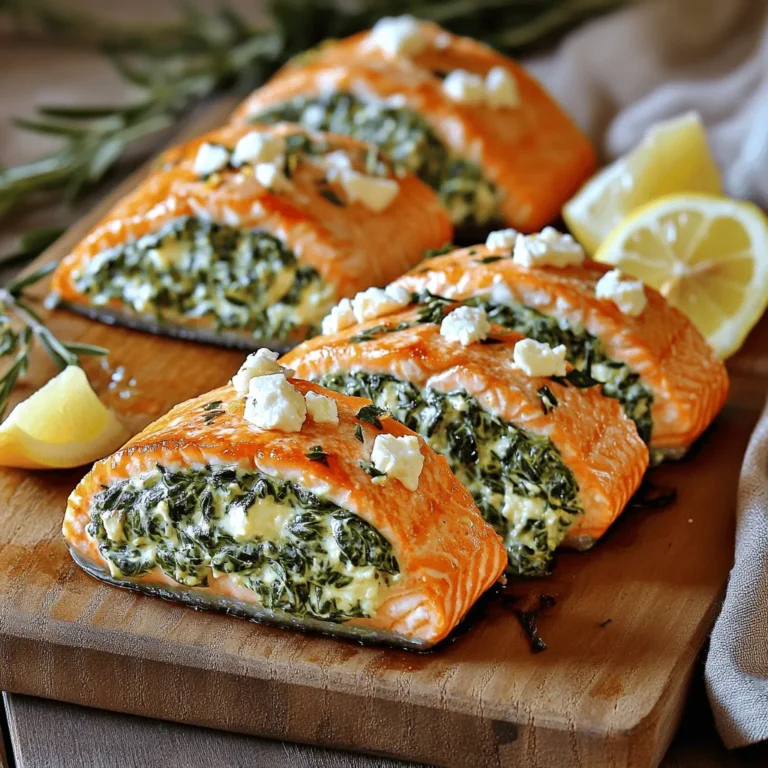
Spinach Feta Stuffed Salmon Flavorful Seafood Delight

To make Sweet Potato Black Bean Burrito Bowls, gather these main ingredients: - 2 medium sweet potatoes, diced - 1 can (15 oz) black beans, rinsed and drained - 1 cup quinoa, rinsed - 2 cups vegetable broth - 1 avocado, sliced - 1 red bell pepper, sliced - ½ red onion, diced - 2 cloves garlic, minced - 1 tablespoon ground cumin - 1 tablespoon chili powder - Salt and pepper to taste - 2 tablespoons olive oil You can add extra flavors and colors with these optional garnishes and toppings: - Fresh cilantro, for garnish - Lime wedges, for serving If you have dietary needs, try these substitutions: - Use brown rice instead of quinoa for a different grain. - Swap black beans for pinto or kidney beans if preferred. - For a nut-free option, skip the avocado or use sunflower seeds instead. - Use vegetable broth or water to cook quinoa if you need a low-sodium option. Start by preheating your oven to 425°F (220°C). While it heats, take two medium sweet potatoes and dice them into small cubes. Place the diced sweet potatoes in a bowl. Add two tablespoons of olive oil, one tablespoon of ground cumin, one tablespoon of chili powder, and a pinch of salt and pepper. Toss everything together until the sweet potatoes are well coated. Spread them out on a baking sheet. Roast for 25-30 minutes. Flip them halfway through to ensure even cooking. While the sweet potatoes roast, it’s time to cook the quinoa. Rinse one cup of quinoa under cold water. In a medium saucepan, combine the rinsed quinoa and two cups of vegetable broth. Bring this mixture to a boil over high heat. Once boiling, reduce the heat to low, cover the pan, and let it simmer for about 15 minutes. When the liquid absorbs, remove it from heat. Fluff the quinoa with a fork to make it light and airy. Now let's make the black bean mix. Heat a small amount of olive oil in a skillet over medium heat. Add half a diced red onion and two cloves of minced garlic. Sauté for about 3-4 minutes until the onion turns translucent and fragrant. Next, stir in one can of rinsed and drained black beans and one sliced red bell pepper. Add a pinch of salt. Cook this mixture for about 5-7 minutes. You want the bell pepper to soften and the beans to heat through. Now, you’re ready to assemble your bowls with the roasted sweet potatoes, fluffy quinoa, and savory black bean mix! Enjoy! To roast sweet potatoes well, start with the right temperature. Preheat your oven to 425°F (220°C). Dice the sweet potatoes into even pieces. This helps them cook at the same rate. Toss them in olive oil, ground cumin, and chili powder. This step adds great flavor. Spread them out on a baking sheet. Make sure they are not crowded. Roast for 25-30 minutes. Flip them halfway for even browning. You want them tender and caramelized. The outside should be crispy, and the inside soft. Meal prep makes weeknight dinners easy. Start by roasting extra sweet potatoes. Store them in an airtight container. Cook a large batch of quinoa at the same time. Quinoa keeps well in the fridge. You can also prepare the black bean mix ahead of time. Just heat it when ready to serve. Assemble your bowls fresh each day. This keeps the flavors bright and tasty. Add your favorite toppings just before eating. This keeps everything fresh and crunchy. To enhance flavors, use fresh herbs. Cilantro adds a bright touch. Squeeze lime juice on top for zestiness. You can also try adding hot sauce for spice. If you like smoky flavors, consider smoked paprika. This adds depth without overwhelming the dish. Taste as you go. Adjust salt and pepper to your liking. For a creamier texture, add more avocado slices. Experiment with toppings like cheese or sour cream. Make the bowl your own! {{image_2}} You can add meat to your burrito bowls for extra protein. Chicken or ground beef works well. Just cook the meat in the skillet after the onion and garlic. Mix it in with the black beans and bell peppers. This adds flavor and heartiness to your meal. This recipe is already vegan and gluten-free! The sweet potatoes, black beans, and quinoa are perfect for those diets. You can enjoy it with no worries. Just skip any non-vegan toppings, like sour cream, and stick to fresh vegetables and avocado. You can change up the veggies to suit your taste. Try adding corn, zucchini, or spinach. These options bring in new flavors and colors. You can also use frozen veggies for convenience. Just cook them in with the beans for a quick mix. Each bowl can be unique based on your choices! After enjoying your Sweet Potato Black Bean Burrito Bowls, let them cool. Use airtight containers to store leftovers. This keeps them fresh and tasty. I recommend keeping each component separate. This way, the sweet potatoes stay crunchy, and the quinoa stays fluffy. To reheat, use a microwave or a stovetop. If using the microwave, place your bowl in for 1-2 minutes. Stir halfway through for even heating. If you prefer the stovetop, warm them in a pan over low heat. Add a splash of water to prevent sticking. Cover the pan to steam the ingredients. You can freeze these bowls for later. Just make sure to cool everything first. Then, pack them in freezer-safe containers. Use wax paper between layers to avoid sticking. They will last up to three months. When ready to eat, thaw overnight in the fridge before reheating. This makes meal prep easy and fun. Yes, you can use other beans. Pinto beans or kidney beans work well too. Each type adds its own flavor and texture. You can even mix different beans for fun. Just make sure to rinse and drain them first. These burrito bowls last about 3-4 days in the fridge. Store them in an airtight container. If you want the best taste, eat them within two days. The longer they sit, the more the flavors blend. You can serve a fresh salad on the side. A simple avocado salad pairs nicely. You might also like tortilla chips with salsa. For a drink, try a refreshing limeade or water with mint. Enjoy your meal! This blog post covered how to make tasty Sweet Potato Black Bean Burrito Bowls. You learned about the key ingredients and how to prep each part. We shared tips for perfect roasting and meal prep ideas. You now know how to store leftovers and reheat them. Don't forget, you can customize this dish for any taste. Enjoy the flavors and get creative with your bowls!

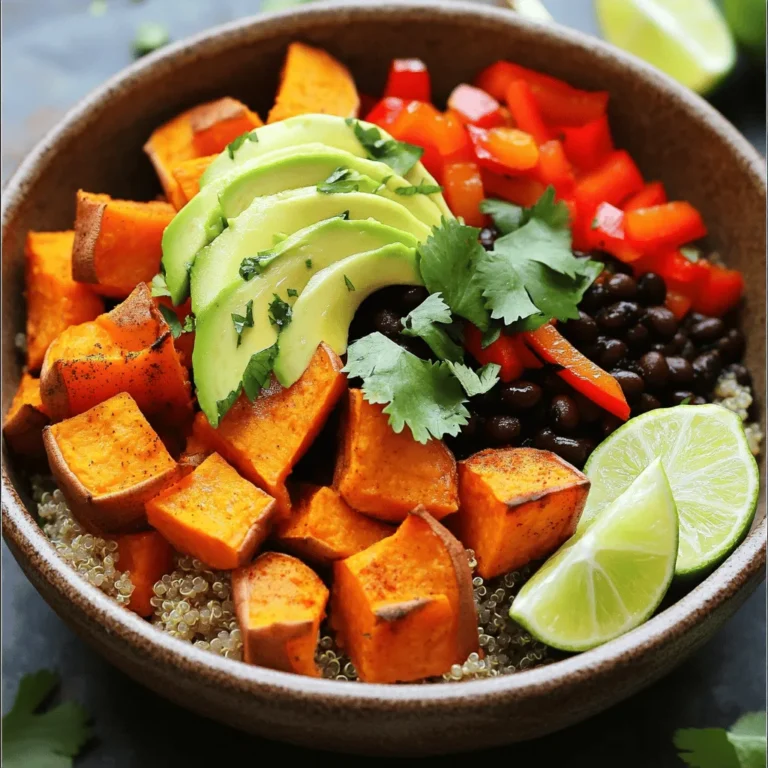
Sweet Potato Black Bean Burrito Bowls Delightful Meal

To make Nutella Swirl Banana Muffins, you need a few simple ingredients. Here’s what you will need: - 2 ripe bananas, mashed - 1/3 cup melted coconut oil - 1/2 cup sugar (or coconut sugar) - 1 large egg - 1 teaspoon vanilla extract - 1 teaspoon baking soda - Pinch of salt - 1 cup all-purpose flour - 1/4 cup Nutella (plus extra for swirling) - Optional: Chopped walnuts or chocolate chips for added texture Each ingredient plays a role. The ripe bananas add sweetness and moisture. Coconut oil gives a rich flavor and keeps the muffins soft. Sugar sweetens the mix, while the egg binds everything together. Vanilla adds a nice aroma, and baking soda helps the muffins rise. The flour gives structure. Nutella adds that delightful swirl and chocolate taste. You can use walnuts or chocolate chips for extra crunch or sweetness. Using these ingredients, you can create a treat that is not just tasty but also fun to make! Start by preheating your oven to 350°F (175°C). This step is crucial. A hot oven helps the muffins rise and bake evenly. While the oven heats up, you can prepare the muffin tin. In a large bowl, mash the two ripe bananas. Then, add 1/3 cup of melted coconut oil. Mix these well until they are smooth. Next, add 1/2 cup of sugar and one large egg. Pour in 1 teaspoon of vanilla extract. Stir until everything is well combined. Sprinkle 1 teaspoon of baking soda and a pinch of salt over the mixture. Stir again until it is mixed in. Gradually add 1 cup of all-purpose flour to the bowl. Use a spatula to fold it in gently. Be careful not to overmix. It is okay if there are a few lumps. If you want a crunch, fold in some chopped walnuts or chocolate chips at this point. Line a muffin tin with paper liners or lightly grease it. This will keep the muffins from sticking. Use a scoop to fill each muffin cup about two-thirds full with batter. Leave space for the muffins to rise. Now comes the fun part! Drop a teaspoon of Nutella on top of each muffin batter. Take a toothpick or a knife and swirl the Nutella into the batter. Aim for a marbled look, but don’t mix it too much. Place the muffin tin in the preheated oven. Bake for 18-20 minutes. Check for doneness by inserting a toothpick in the center of a muffin. If it comes out clean, the muffins are ready! Let them cool in the pan for a few minutes before moving them to a wire rack. Enjoy your warm treats! To create that perfect Nutella swirl, use a toothpick or knife. Drop a teaspoon of Nutella on top of the batter. Then, gently swirl it into the batter. Don’t mix too much; you want to see swirls, not just brown. Practice makes perfect, so have fun with it! If you need to make changes for dietary reasons, you can easily adapt this recipe. Use gluten-free flour instead of all-purpose flour for a gluten-free option. You can replace the egg with a flax egg for a vegan twist. Simply mix one tablespoon of flaxseed meal with three tablespoons of water, and let it sit for five minutes. Want to add extra flavor? Chopped walnuts or chocolate chips make great additions. They add texture and a bit of crunch. You can also try adding a dash of cinnamon or a splash of almond extract. These small tweaks can elevate the muffins and make them even more special. {{image_2}} You can mix Nutella with peanut butter for a tasty twist. Start by adding 1/4 cup of creamy peanut butter to the Nutella. Swirl both into your muffin batter for a rich flavor. The peanut butter adds a nutty taste that pairs well with bananas. This combo makes each bite extra special. If you want a healthier muffin, try using whole wheat flour. Replace all-purpose flour with the same amount of whole wheat flour. This change gives your muffins more fiber and nutrients. The taste is still great, and it helps you feel full longer. You might also cut back on sugar or use honey instead. For a vegan twist, swap the egg for a flax egg. To make a flax egg, mix 1 tablespoon of ground flaxseed with 3 tablespoons of water. Let it sit for about five minutes until it thickens. This option keeps your muffins fluffy while being egg-free. You can also replace the coconut oil with a light vegetable oil. To keep Nutella swirl banana muffins fresh, store them in an airtight container. This helps keep them moist. Place a piece of parchment paper or a paper towel at the bottom to absorb extra moisture. You can store them at room temperature for up to three days. If you want them to last longer, the fridge is a good option, but they may dry out a bit. Freezing is a great way to save your muffins for later. First, let them cool completely. Then, wrap each muffin tightly in plastic wrap or aluminum foil. Place the wrapped muffins in a freezer-safe bag. You can freeze them for up to three months. When you’re ready to eat, just pull one out! To reheat your muffins, I recommend using the oven. Preheat it to 350°F (175°C). Place the muffins on a baking sheet and warm them for about 10 minutes. This method helps restore their soft texture. If you're in a hurry, you can use the microwave. Heat each muffin for 15-20 seconds. Just be careful not to overheat, or they may become tough. Enjoy your warm, gooey Nutella swirl banana muffins! Yes, you can use frozen bananas. Just let them thaw first. Once they are soft, mash them as you would with fresh bananas. This works great and adds natural sweetness to the muffins. To make these muffins gluten-free, use a gluten-free flour blend. Many stores sell these blends. Make sure the blend has xanthan gum in it. This helps the muffins hold together. Serve these muffins warm for the best taste. You can sprinkle powdered sugar on top for a nice touch. A small bowl of extra Nutella for dipping makes it even better! Enjoy these treats as a snack or for breakfast. You learned about making Nutella Swirl Banana Muffins from start to finish. We covered the key ingredients, step-by-step instructions, and tips for success. You can try different variations to suit your taste. Remember to store your muffins properly for the best results. With these recipes and hints, you can enjoy delicious muffins any time. Baking can be fun and easy with the right guidance. Enjoy your muffin-making journey!

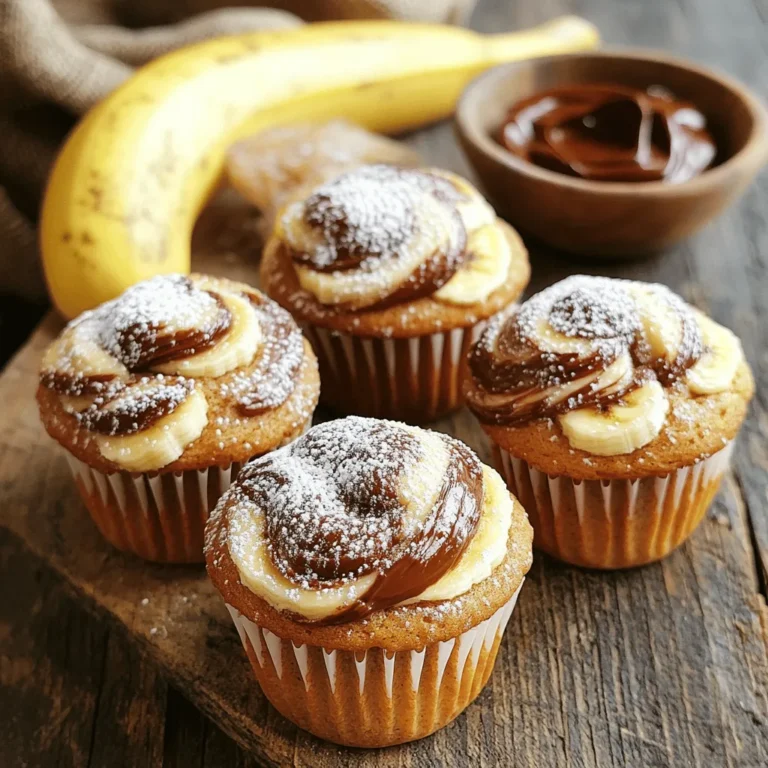
Nutella Swirl Banana Muffins Irresistible Treats

- 2 ripe avocados, halved and pitted - 1 cup quinoa, rinsed - 2 cups vegetable broth or water - 1 cup cherry tomatoes, diced - 1 small red onion, finely chopped - 1 cup canned black beans, rinsed and drained - 1 cup corn kernels (fresh or frozen) - 1/4 cup fresh cilantro, chopped - Juice of 2 limes - 1 teaspoon garlic powder - Salt and pepper to taste - Optional: Crumbled feta cheese for topping Using high-quality ingredients makes a big difference. Fresh avocados give the best taste. Rinse the quinoa well to remove bitterness. You can swap quinoa for rice if needed. If you're vegan, skip the feta cheese or use a plant-based option. To start, you need to boil the broth or water. Pour 2 cups of vegetable broth or water into a medium saucepan. Bring it to a boil over medium heat. Once boiling, add 1 cup of rinsed quinoa. Cover the pot and reduce the heat to low. Let it simmer for 15 minutes. The liquid should absorb completely. Fluff the quinoa with a fork and set it aside to cool. For perfect quinoa, rinse it well before cooking. This helps remove the saponins, which can taste bitter. Make sure to keep an eye on the pot. If it runs dry, the quinoa may burn. Next, it’s time to mix the filling. In a large mixing bowl, add the cooled quinoa. Then, add 1 cup of diced cherry tomatoes, 1 small finely chopped red onion, 1 cup of rinsed and drained black beans, and 1 cup of corn kernels. Don’t forget to add 1/4 cup of chopped fresh cilantro. Now, to evenly distribute the lime juice, squeeze the juice of 2 limes over the mixture. Sprinkle in 1 teaspoon of garlic powder, along with salt and pepper to taste. Use a spoon to mix everything well. This ensures each bite is packed with flavor. Now, let’s stuff the avocados. First, halve the 2 ripe avocados and remove the pit. If you want, scoop out a little flesh to make space for the filling. Be careful not to break the skin. Spoon the quinoa mixture generously into each avocado half. Pack it well so it stays in place. If you like, sprinkle crumbled feta cheese on top for added flavor. Your avocados are now ready to serve! To make your cilantro lime quinoa stuffed avocado pop, try these seasoning tips: - Add a pinch of cumin for warmth. - Swap lime juice for lemon juice for a different zing. - Mix in jalapeños for a spicy kick. Balancing flavors is key. You can do this by: - Adding diced bell peppers for sweetness. - Using more fresh herbs like parsley or basil. - Including a drizzle of olive oil to round out the taste. A beautiful plate makes your dish even more inviting. Here are some plating tips: - Use a colorful plate to contrast the green avocado. - Arrange the stuffed halves neatly, with the filling visible. - Serve with a lime wedge on the side for a fresh touch. For garnishing ideas, consider: - Sprinkling extra cilantro on top. - Adding a few cherry tomato halves for color. - Crumbling feta over the filling for a nice finish. Using the right tools makes cooking easier. Here are some must-haves: - A medium saucepan for cooking quinoa. - A good knife for cutting avocados. A sharp knife helps you slice cleanly. - A mixing bowl for combining ingredients. A good knife is vital. It helps you safely and easily cut through the avocado’s skin. Plus, it lets you scoop out the flesh without damage. {{image_2}} You can easily switch up the protein in your Cilantro Lime Quinoa Stuffed Avocado. If you don't want to use black beans, try these options: - Chickpeas: They add a nice texture and protein boost. - Grilled chicken: This adds a savory flavor and makes it heartier. - Shrimp: Lightly grilled shrimp will add a touch of elegance to the dish. These proteins mix well with the quinoa and enhance the taste. You can customize based on your mood or what you have at home. If you want a vegetarian or vegan twist, there are simple ideas to try. Use dairy-free cheese options like cashew cheese or nutritional yeast for a cheesy flavor without dairy. Want a heartier dish? Add more veggies! Here are some great choices: - Bell peppers: These add crunch and color. - Zucchini: Grated zucchini blends well in the mix. - Spinach: Adding fresh spinach boosts nutrients and flavor. These changes keep it fresh and fun while making it suitable for everyone. You can take your stuffed avocado to new places with different herbs and spices. For a Mexican flair, add cumin or chili powder. If you crave an Italian vibe, try basil or oregano. Here are a few ideas to infuse global cuisine: - Curry powder: This gives a warm, unique flavor. - Fresh dill: A great way to add a bright, fresh taste. - Sriracha: For a spicy kick, drizzle some Sriracha on top. These flavors will surprise your taste buds and keep every bite exciting! To store leftover stuffed avocados, first, cover them with plastic wrap. This helps keep them fresh. Place them in the fridge. Eat them within one day for the best taste. If you have leftover quinoa, store it in an airtight container. Place it in the fridge for up to three days. To keep ingredients fresh, store avocados at room temperature until ripe. Once ripe, use them right away or place them in the fridge. To reheat quinoa without losing texture, add a splash of water. Place it in a microwave-safe bowl and cover it with a damp paper towel. Microwave for one minute, then fluff it with a fork. You can also reheat it on the stove. Just warm it on low heat, stirring often. For serving leftovers, you can add fresh lime juice or extra cilantro. This gives the dish a bright taste. You can also mix in diced veggies for added crunch. To keep avocados fresh, use these tips: - Lemon or lime juice: Squeeze some juice on cut avocado. This slows browning. - Olive oil: Brush the flesh with olive oil for a barrier against air. - Plastic wrap: Wrap the avocado tightly to limit exposure to air. - Onion method: Store avocado with a slice of onion in a sealed container. Yes, you can make the quinoa filling in advance. Here are some tips: - Store in the fridge: Keep the mixture in a sealed container. It stays fresh for up to three days. - Mix just before serving: This keeps the flavors sharp and vibrant. Add lime juice right before you fill the avocados. You can enjoy stuffed avocados in many ways: - Side salad: Pair with a simple green salad for a light meal. - Tortilla chips: Serve with chips for a crunchy side. - Salsa: Add some fresh salsa or pico de gallo for extra flavor. - Grains: Serve over a bed of brown rice or quinoa for a heartier dish. For the complete recipe of Cilantro Lime Quinoa Stuffed Avocado, click [here](#). In this blog post, we explored how to make cilantro lime quinoa stuffed avocados. We covered key ingredients, preparation steps, and helpful tips to make this dish a hit. You can enhance flavors and adapt recipes to fit your taste. Make sure to follow storage advice to keep your avocados fresh. Eating well can be simple and fun. Enjoy your cooking journey and try new flavor twists!

Cilantro Lime Quinoa Stuffed Avocado Delight

- 1 pound ground beef (or turkey for a lighter option) - 1/2 cup breadcrumbs - 1/4 cup grated Parmesan cheese - 1/4 cup finely chopped onion - 2 cloves garlic, minced - 1 egg - 1 teaspoon salt - 1/2 teaspoon black pepper - 1/4 teaspoon red pepper flakes (optional for heat) - 1/3 cup honey - 1/4 cup soy sauce (or tamari for gluten-free) - 1 tablespoon rice vinegar - 1 teaspoon ginger, minced - 1 tablespoon sesame seeds (for garnish) - Chopped green onions (for garnish) You can swap the ground beef for ground turkey if you want a lighter meatball. For a gluten-free option, use tamari instead of soy sauce. You can also use gluten-free breadcrumbs. If you prefer a meat-free dish, try using lentils or chickpeas. These options keep the dish tasty while fitting your needs. To make these meatballs, you will need: - A large mixing bowl - A baking sheet lined with parchment paper - A small saucepan for the glaze - A spatula or wooden spoon for mixing - A skillet for tossing the meatballs in the glaze - Measuring cups and spoons for precise measurements These items help make the cooking process smooth and fun. Enjoy crafting these honey garlic glazed meatballs that will delight your taste buds! Start by grabbing a large mixing bowl. Add one pound of ground beef or turkey. Next, toss in a half cup of breadcrumbs. Follow that with a quarter cup of grated Parmesan cheese. Then, add a quarter cup of finely chopped onion. Don’t forget two cloves of minced garlic. Crack in one egg, then sprinkle one teaspoon of salt. Add half a teaspoon of black pepper and a quarter teaspoon of red pepper flakes if you like heat. Mix everything with your hands or a spoon until well blended. Now, preheat your oven to 400°F (200°C). While you wait, line a baking sheet with parchment paper. This helps with cleanup later. Once the oven is ready, roll the meat mixture into small balls, about one inch wide. Place them on the prepared baking sheet, giving each ball some space. Bake these in the oven for 15 to 20 minutes. You will know they are done when they are cooked through and browned nicely. While the meatballs bake, let’s make that tasty honey garlic glaze. In a small saucepan, combine one-third cup of honey and a quarter cup of soy sauce. Add one tablespoon of rice vinegar and one teaspoon of minced ginger. Heat this mixture over medium-low heat. Stir it occasionally until it warms up and thickens slightly. Once the meatballs finish baking, transfer them to a large skillet. Pour the honey garlic glaze over the meatballs. Use a spatula to gently toss them, making sure they are well coated. Cook for an extra 2 to 3 minutes to heat the glaze fully. After that, take the skillet off the heat and let the meatballs rest for a minute. Now, they are ready to serve! Garnish with sesame seeds and chopped green onions for a nice touch. To get meatballs just right, mix well but don't overdo it. If you mix too much, they turn tough. Use ground beef or turkey, whichever you like. Add breadcrumbs to help them hold shape. The egg also helps bind everything. The sauce is key to this dish. If you want it sweeter, add more honey. For a saltier taste, increase the soy sauce. A splash of rice vinegar can add a nice zing. If you want heat, throw in some red pepper flakes. Mix and taste as you go! These meatballs shine on their own, but you can pair them with rice or noodles. Serve them on a bed of steamed veggies for a healthy twist. Add a sprinkle of sesame seeds and chopped green onions as a garnish. They add flavor and a nice crunch! {{image_2}} You can switch the ground beef for ground turkey or chicken. These options make the dish lighter. They taste great with the honey glaze. For a vegetarian choice, use lentils or chickpeas. Mash them and mix with breadcrumbs. This gives you a tasty meatless meatball. Spices can change the taste of your meatballs. Add garlic powder for more flavor. Try adding dried oregano or basil for a fresh twist. If you like heat, increase the red pepper flakes. You can also mix in fresh herbs like parsley or cilantro for added freshness. Experiment with flavors to find your favorite blend. You can cook meatballs in many ways. If you want a quick meal, use the stovetop. Just brown them in a skillet and add the glaze. For a slow, rich flavor, use a slow cooker. Cook on low for a few hours. You can even grill them for a smoky taste. Just make sure to baste them with the glaze while grilling. Each method gives a unique flavor and texture. Let the meatballs cool for about 10 to 15 minutes after cooking. This helps them hold their shape. Once they are cool, place them in an airtight container. Make sure to separate layers with parchment paper to avoid sticking. Store them in the fridge for up to three days. The honey garlic glaze will add flavor to the meatballs as they sit. To reheat, place the meatballs in a skillet over medium heat. Add a splash of water or broth to keep them moist. Heat for about 5 to 8 minutes, stirring occasionally. You can also reheat them in the microwave. Use a microwave-safe dish and cover it with a lid. Heat in 30-second bursts until warm. To freeze, let the meatballs cool completely. Place them on a baking sheet in a single layer. Freeze them for about 1 hour until firm. Then, transfer the meatballs to a freezer-safe bag. Label the bag with the date. They will last for up to three months. When ready to enjoy, thaw in the fridge overnight and reheat as needed. You can check if the meatballs are cooked by using a meat thermometer. Insert it into the center of a meatball. It should read 160°F (71°C) for beef or turkey. If you don't have a thermometer, cut one open. The meat should be brown and no pink should show. Yes, you can make these meatballs ahead. Prepare them, form the meatballs, and store them in the fridge. They can stay fresh for up to two days. You can also freeze them for later. Just bake them directly from the freezer, adding a few extra minutes to the cook time. These meatballs are great with many sides. Try serving them with rice or noodles. Steamed veggies also pair well. You can even serve them as appetizers with toothpicks. They are tasty on their own or with extra glaze. To thicken the glaze, you can simmer it longer. Just heat it on medium-low until it reduces. If you want a quick fix, mix cornstarch with cold water, then stir it into the glaze. Heat until it thickens. This will give you that perfect sticky glaze. We covered key parts to make tasty honey garlic glazed meatballs. I shared ingredient lists and cooking steps to guide you. You learned tips for the perfect texture and flavor. We explored variations, storage tips, and answered your common questions. Try these meatballs for your next meal. Enjoy the simple joy they bring to your table. Happy cooking!

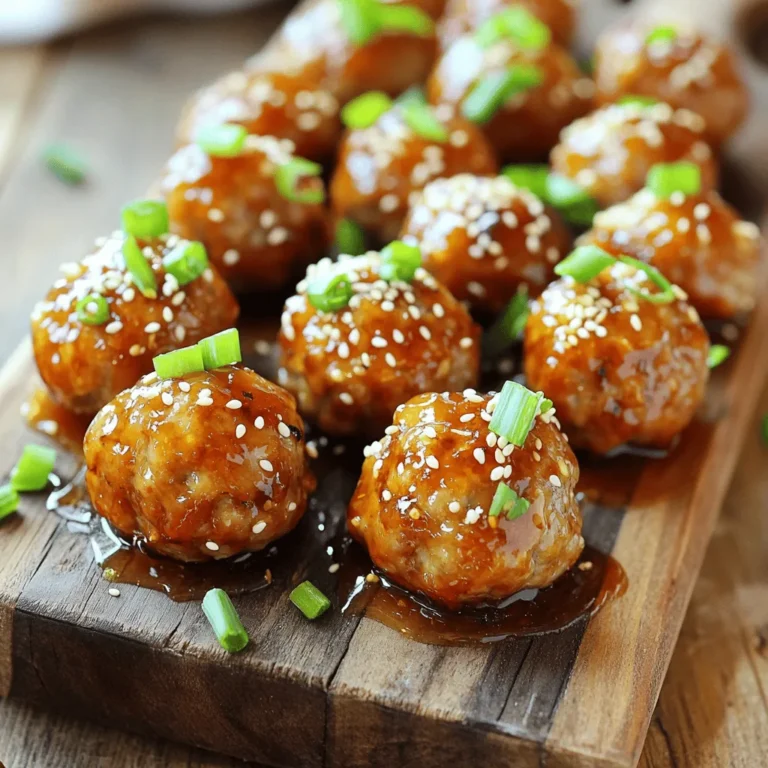
Honey Garlic Glazed Meatballs Simple and Tasty Recipe

- Sweet potatoes and their preparation For this recipe, you need 2 large sweet potatoes. Slice them thinly. This helps them cook evenly and become crispy. I like to use a sharp knife or a mandoline for this task. - Vegetables to include The heart of these nachos is the colorful veggies. Use 1 cup of black beans that are drained and rinsed. They add protein and fiber. Add 1 cup of corn kernels, fresh or frozen, for sweetness. Cherry tomatoes are a must! Halve 1 cup of them for juicy bursts of flavor. You can also add 1 sliced jalapeño for a little heat. Remove the seeds if you want less spice. - Optional toppings and garnishes After baking, top your nachos with 1 diced avocado for creaminess. Fresh cilantro adds a bright flavor; use it generously. Don't forget lime wedges! They brighten the dish and add a zesty kick. These ingredients combine to create a veggie-loaded dish that is both healthy and delicious. Each bite offers a mix of flavors and textures. Enjoy customizing your nachos with your favorite toppings! 1. Start by preheating your oven to 425°F (220°C). This step is key for crispiness. 2. Take two large sweet potatoes and slice them thinly. Place them in a large bowl. 3. Add 1 tablespoon of olive oil, 1 teaspoon of smoked paprika, 1 teaspoon of garlic powder, salt, and pepper to the bowl. Toss until all slices are coated well. 4. Spread the sweet potato slices on a baking sheet lined with parchment paper. Make sure they are in a single layer. 5. Bake the slices in the oven for 20-25 minutes. Flip them halfway through. Look for a crispy, golden brown color. 6. After the sweet potatoes bake, reduce the oven temperature to 375°F (190°C). 7. Layer the baked sweet potato slices on your serving platter. Add black beans, corn, cherry tomatoes, jalapeño slices, and shredded cheese. 8. Return the nachos to the oven. Bake for 10 minutes more, until the cheese is melted and bubbly. 9. Once out of the oven, top with diced avocado and fresh cilantro. This adds color and taste. 10. Serve warm with lime wedges on the side. Squeeze lime over nachos for extra zing. This process gives you tasty, veggie-loaded sweet potato nachos. Enjoy! To get crispy sweet potatoes, cut them thin. About 1/4 inch works best. Toss them well in olive oil. This helps them crisp up in the oven. Spread them out on the baking sheet. Make sure they are not overlapping. This allows hot air to circulate. Bake at 425°F for 20 to 25 minutes. Flip them halfway through for even browning. For flavor, try adding smoked paprika and garlic powder. These spices bring depth to the dish. You can add a pinch of cayenne for heat. A touch of cumin also adds a warm flavor. Adjust the seasoning based on your taste. For parties, serve these nachos on a large platter. Layer them high for a fun display. Place toppings like avocado and cilantro on top. This makes them look fresh and colorful. Pair these nachos with lime wedges. A squeeze of lime adds brightness. You can also serve them with salsa or guacamole. These dips bring extra flavor and creaminess. Consider adding a cool yogurt dip to balance the heat from jalapeños. {{image_2}} You can easily customize your veggie loaded sweet potato nachos. If you want a dairy-free option, try using vegan cheese. It melts well and adds a nice creaminess. You can also swap out the regular cheese for cashew cheese. For extra flavor and color, think about other vegetables. Bell peppers add crunch and sweetness. Spinach gives a nice pop of green. You can even mix in some roasted zucchini or mushrooms. The options are endless! Switching up your cooking method can change the texture of your nachos. An air fryer gives you a crispier finish. Just layer the sweet potatoes in the fryer basket and cook until golden. It requires less oil, making it a healthier choice. Grilling is another fun option. It adds a smoky flavor and nice char marks. Just toss the sweet potatoes in a grill basket and watch them sizzle. If you’re short on time, you can also cook everything on the stovetop. Just sauté the sweet potatoes in a pan until they’re tender and slightly crispy. This method is quick and easy! To store leftover nachos, let them cool first. Place them in an airtight container. This keeps them fresh and tasty. You can also layer them with parchment paper to avoid sticking. When reheating, use the oven for the best results. Preheat it to 350°F (175°C). Spread the nachos on a baking sheet. Bake for about 10 minutes. This way, they stay crispy and warm. You can keep these nachos in the fridge for up to three days. If you want to save them longer, consider freezing. Just freeze the nachos before adding toppings like avocado and cheese. To thaw, place them in the fridge overnight. Then, reheat them in the oven for the best texture. Enjoy your tasty snacks! Can I make this recipe ahead of time? Yes, you can prep some parts ahead. Slice the sweet potatoes and store them in water to prevent browning. You can also cook the sweet potatoes and store them in the fridge. Just layer and bake them when ready to serve. What can I use instead of sweet potatoes? If you want a swap, use regular potatoes or even zucchini slices. Both can provide a tasty base. Just remember that cooking times may change, especially for softer veggies like zucchini. Are these nachos suitable for meal prep? Absolutely! They store well. Just keep the toppings separate. This keeps the nachos crispy. When ready to eat, reheat the sweet potato base and add toppings fresh. Caloric content and health benefits These nachos are a healthy choice. On average, one serving has about 400 calories. They offer fiber from sweet potatoes and beans, plus vitamins from fresh veggies. Avocado adds healthy fats, making them nutritious and filling. Gluten-free options for those with dietary restrictions Good news! Sweet potatoes are naturally gluten-free. All the ingredients in this recipe do not contain gluten. Just ensure your cheese and any extras are also gluten-free for safe eating. These veggie-loaded sweet potato nachos are a great mix of taste and health. We covered the ingredients, preparation steps, and tips for serving them. You can create tasty variations to fit your needs. Remember to store leftovers well for later enjoyment. Enjoy this dish at your next gathering or as a fun weeknight meal. You’ll delight in its flavors while feeling good about what you’re eating. Try these nachos, and you won’t be disappointed!

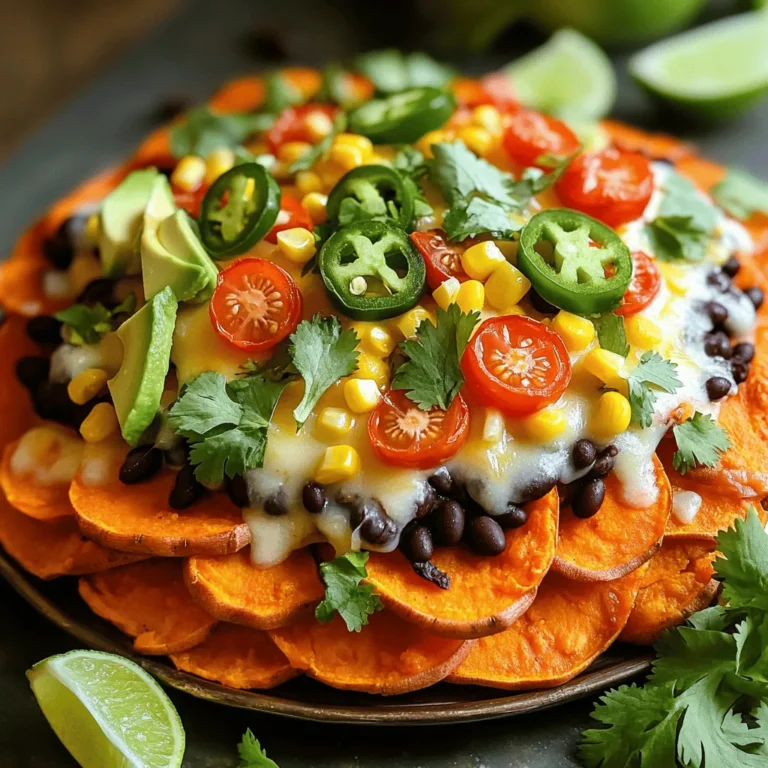
Veggie Loaded Sweet Potato Nachos Flavorful Delight

PREV 1 … 5 6 7 8 NEXT
secrets pice kitchen

explore

DessertsDinnerAppetizersDrinks

Our Policies

  • Cookie Policy
  • Copyright Policy
  • Disclaimer
  • GDPR Policy
  • Terms Of Use
Back to Top
  • About
  • Contact Us
  • Privacy Policy
© 2025 secrets pice kitchen