FREE DINNER EBOOK! Get your copy!
  • Cookie Policy
  • GDPR Policy
  • Disclaimer
  • Terms Of Use
  • Visit my other site: Fun Cookie Recipes
secrets pice kitchen
  • Home
  • Dinner
  • Desserts
  • Drinks
  • Appetizers
  • Contact
  • About
  • Privacy Policy
  • Home
  • Dinner
  • Desserts
  • Drinks
  • Appetizers
  • Contact
  • About
  • Privacy Policy
  • Cookie Policy
  • GDPR Policy
  • Disclaimer
  • Terms Of Use
Visit my other site: Fun Cookie Recipes

HOME / CATEGORIES /

Latest

Here’s what you need for cilantro lime shrimp skewers: - 1 lb large shrimp, peeled and deveined - 1/4 cup fresh cilantro, finely chopped - 2 tablespoons olive oil - Zest and juice of 2 limes - 2 cloves garlic, minced - 1 teaspoon ground cumin - 1/2 teaspoon red pepper flakes - Salt and pepper to taste - Bamboo skewers (soaked in water for 30 minutes) These ingredients come together to make a fresh and tasty meal. The large shrimp absorb the bright flavors of lime and cilantro. Olive oil adds a nice richness. Garlic gives the dish depth, while cumin adds warmth. Red pepper flakes add a kick, but you can adjust them to your taste. Don’t forget to soak the bamboo skewers! This step keeps them from burning on the grill. Each ingredient plays a key role in creating a balanced flavor. You can find all these items at your local grocery store. In a medium bowl, gather your ingredients. Combine 1/4 cup of finely chopped cilantro, 2 tablespoons of olive oil, the zest and juice of 2 limes, and 2 minced garlic cloves. Add 1 teaspoon of ground cumin and 1/2 teaspoon of red pepper flakes. Finish with salt and pepper to taste. Mix these well until you have a smooth marinade. This mix gives the shrimp a fresh and zesty flavor. Take 1 pound of large peeled and deveined shrimp. Toss them in the bowl with the marinade. Make sure each shrimp gets coated nicely. Cover the bowl and place it in the fridge for at least 30 minutes. This step helps the shrimp soak up all the flavors. While the shrimp marinates, soak bamboo skewers in water for 30 minutes. Preheat your grill to medium-high heat. Once ready, thread about 4 to 5 marinated shrimp onto each skewer. Leave a little space between each shrimp. This space helps them cook evenly. Place the skewers on the grill. Grill the shrimp for 2 to 3 minutes on each side. You will know they are done when they turn pink and opaque. Be careful, as overcooking can make them tough. After grilling, let them rest for a minute before serving. To cook shrimp evenly on skewers, space them well. I recommend placing 4-5 shrimp on each skewer. Leave a small gap between each shrimp. This helps heat circulate and cook them properly. If they touch, some may cook faster than others. Know the signs of doneness to avoid overcooking. Shrimp turn pink and opaque when done. They curl up slightly, which is normal. If they turn rubbery, they are overcooked. Watch closely while grilling. It usually takes 2-3 minutes per side. For more flavor, let the shrimp marinate longer. An hour or more makes a big difference. You can also use leftover marinade. Just remember to bring it to a boil first if you plan to drizzle it over the cooked shrimp. This kills any bacteria from the raw shrimp. {{image_2}} To make the skewers spicy, you can add more red pepper flakes or slice up a jalapeño. Start by increasing the red pepper flakes to one teaspoon. If you like heat, add sliced jalapeño to the marinade. Adjust the spice level to fit your taste. The heat will enhance the bright flavors of the lime and cilantro. If you want to switch up the herbs, try using parsley or dill instead of cilantro. Both herbs add a fresh taste. Parsley gives a mild flavor, while dill offers a unique twist. Replace the cilantro with the same amount of either herb. This change makes a great option for those who may not enjoy cilantro. You can swap shrimp for other proteins or vegetables. Chicken works well if you cut it into bite-sized pieces. For a vegetarian option, try zucchini, bell peppers, or mushrooms. Just make sure to adjust cooking times accordingly. Each swap opens a new way to enjoy this dish. To store leftovers of your cilantro lime shrimp skewers, place them in an airtight container. Make sure the skewers cool down to room temperature before sealing them. This helps keep them fresh. You can store them in the fridge for up to three days. When you are ready to eat them, check for any off smells before reheating. You can freeze cooked or uncooked shrimp skewers. For cooked skewers, let them cool completely. Then, wrap them tightly in plastic wrap and place them in a freezer bag. They can last up to three months in the freezer. For uncooked skewers, simply place them in a freezer bag after marinating. This way, they hold onto their flavors. When you want to use them, defrost them in the fridge overnight. To reheat shrimp skewers without drying them out, use a skillet on low heat. Add a splash of olive oil to the pan. Cook them for about 2-3 minutes, turning them gently. This keeps them moist and tasty. You can also use the microwave. Place the skewers on a plate, cover with a damp paper towel, and heat for 30 seconds at a time. Check often to avoid overcooking. You can tell when shrimp are cooked by looking for a few signs. First, they will turn pink. Next, they will become opaque. Finally, they will curl into a C shape. If they stay straight or look gray, they need more time. Cooking shrimp takes about 2-3 minutes on each side on the grill. Be careful not to overcook them, as they can become tough. Yes, you can use frozen shrimp for this recipe. To thaw them, place the shrimp in a bowl of cold water for about 15-20 minutes. Change the water a couple of times to speed up the process. Once thawed, pat them dry with a paper towel before marinating. This helps the marinade stick better and ensures even cooking. Many sauces work well with cilantro lime shrimp skewers. Here are some tasty options: - Garlic Aioli: Creamy and rich, it adds depth. - Chili Lime Sauce: Sweet and spicy, perfect for a kick. - Avocado Cream: Smooth and fresh, enhances the dish. - Salsa Verde: Bright and tangy, complements the shrimp. You can also serve these skewers with a fresh salad or rice for a full meal. This shrimp skewer recipe is simple and tasty. You learned how to marinate shrimp, grill them, and avoid overcooking. Adding herbs or changing proteins makes it fun. Store leftovers properly, and reheating them is easy. Remember the key tips I shared for the best results. Enjoy this dish at your next meal or gathering. Try it out and impress your friends! It’s a great way to enjoy fresh flavors.

Cilantro Lime Shrimp Skewers Fresh and Flavorful Meal

To make tasty chocolate covered pretzel bark, you need a few simple items. Gather these ingredients: - 2 cups pretzel sticks - 1 cup semi-sweet chocolate chips - 1 cup white chocolate chips - 1/2 cup crushed nuts (like almonds or pecans) - 1/2 cup mini M&M's or sprinkles (optional) - Sea salt for sprinkling Each ingredient plays a key role. The pretzel sticks give a nice crunch. The semi-sweet and white chocolate chips add rich, sweet flavors. Nuts bring extra texture and taste. You can even add mini M&M's or sprinkles for fun colors. Finally, a pinch of sea salt balances the sweetness. These ingredients work together to create a delightful treat! Start by taking a baking sheet. Line it with parchment paper. This makes it easy to lift off the bark later. It also helps with cleaning up. Next, grab a microwave-safe bowl. Add 1 cup of semi-sweet chocolate chips to it. Heat the chocolate in the microwave. Do this in 30-second bursts. Stir after each round. Keep doing this until the chocolate is smooth and melted. Now, take half of your pretzel sticks. Add them to the melted chocolate. Gently stir until every pretzel is covered. Then, pour the pretzels onto the lined baking sheet. Spread them out evenly so they have space. In another bowl, repeat the melting process with 1 cup of white chocolate chips. Once melted, use a spoon or a piping bag. Drizzle the white chocolate in a zig-zag pattern over the pretzel mix. This adds a nice look and flavor. While the white chocolate is warm, it’s time to add some fun toppings. Sprinkle the crushed nuts over the bark. If you want, add mini M&M's or colorful sprinkles too. Finish by lightly sprinkling sea salt on top for a sweet and salty taste. Place the baking sheet in the fridge. Let it chill for about 30 to 45 minutes. You want the chocolate to harden completely. Once set, take the bark out and break it into pieces. You can choose the size you like. Enjoy your chocolate-covered pretzel bark! To melt chocolate well, use a microwave-safe bowl. Heat the chocolate chips in short bursts. Start with 30 seconds, then stir. Repeat until the chocolate is smooth. This keeps the chocolate from burning. You can also use a double boiler for more control. Just make sure the water does not touch the bowl. For an even coating, work in small batches. Add pretzels to the melted chocolate a few at a time. Gently stir them to coat each one fully. Use a fork to lift them out and let excess chocolate drip off. Spread them out on the baking sheet without crowding. This helps the chocolate set nicely. Store the chocolate-covered pretzel bark in an airtight container. A cool, dry place is best. You can also keep it in the fridge if it’s warm outside. Just remember to let it sit out for a few minutes before eating. This keeps the texture nice and crunchy. Chocolate covered pretzel bark is perfect for parties! Cut it into bite-sized pieces for easy serving. You can place it on a nice platter or in small bags as party favors. Add some colorful sprinkles for fun. This treat looks great and tastes even better. {{image_2}} You can use many kinds of chocolate for this treat. Semi-sweet chocolate is a classic choice. Milk chocolate gives a sweeter flavor. Dark chocolate adds a rich taste. If you like white chocolate, it’s a fun option too. Each type changes the bark’s taste. You can mix chocolates for a unique flavor. Try different blends to find your favorite! Toppings can make your pretzel bark special. You can use crushed nuts like almonds or pecans. Dried fruits like cranberries or cherries add a nice chew. Shredded coconut gives a tropical twist. Mini M&M's add color and crunch. Sprinkles can brighten up your bark for any event. You can also use crushed cookies for extra flavor. Get creative with your toppings! You can make your pretzel bark fit the season. For Halloween, use orange and black sprinkles. In winter, try red and green toppings for the holidays. Valentine’s Day can feature pink sprinkles or heart-shaped candies. For summer, consider fresh fruit or bright colors. This treat can match any celebration. Seasonal toppings keep it fresh and fun! To keep your chocolate covered pretzel bark fresh, store it in an airtight container. Use parchment paper between layers to prevent sticking. This helps maintain its crunch. Keep the container in a cool, dry place. Avoid sunlight, as heat can melt the chocolate. When stored properly, chocolate covered pretzel bark lasts about 1 to 2 weeks. You can enjoy it longer if you freeze it. Check for any signs of moisture or mold before eating. If the bark looks good, it should taste great! Freezing is a great way to make your bark last. First, break the bark into pieces. Then wrap each piece in plastic wrap. Place them in a freezer-safe bag or container. You can freeze it for up to 3 months. When ready to eat, thaw it in the fridge to keep it crisp. Yes, you can use various pretzels. I love using pretzel sticks, but you can try pretzel squares or even pretzel crisps. Each type gives a different crunch and taste. Just remember to adjust the amount as needed to fit your bark. Absolutely! You can leave out the nuts entirely. Use seeds like sunflower or pumpkin seeds instead. They add crunch without nuts. If you want more flavor, try adding coconut flakes or dried fruit for extra sweetness. To make a perfect chocolate drizzle, melt your chocolate slowly. Use a microwave in short bursts, stirring often. This keeps the chocolate smooth. For a nice drizzle, use a spoon or a piping bag to create thin lines over the bark. You can find pre-made chocolate-covered pretzel bark at many stores. Check local candy shops, supermarkets, or online retailers. They often have a variety of flavors, so you can find one that suits your taste. You can mix flavors easily with this recipe. Try using dark chocolate or milk chocolate instead of semi-sweet. Add fun toppings like crushed candy canes or toffee bits. You can also season with spices like cinnamon for a unique twist. This blog post covers a tasty treat: chocolate-covered pretzel bark. We reviewed the key ingredients and the easy steps to make it. I shared tips for melting chocolate and ideas for fun variations. You can explore ways to store your bark and answered common questions, like how to customize it. Enjoying this treat is simple and fun. Get creative with your ingredients and toppings! You’ll impress your friends with this delicious snack.

Chocolate Covered Pretzel Bark Simple and Tasty Treat

To make Everything Bagel Cucumber Bites, you need: - 1 medium cucumber, sliced into 1-inch rounds - 4 ounces cream cheese, softened - 1 tablespoon sour cream - 1 teaspoon garlic powder - 1 teaspoon onion powder - 1 tablespoon fresh dill, finely chopped - 2 tablespoons everything bagel seasoning - Cherry tomatoes, halved (for garnish) - Fresh chives, chopped (for garnish) When choosing ingredients, I recommend using quality brands for the best taste. For cream cheese, try Philadelphia or Kite Hill for a vegan option. For sour cream, Daisy or Tofutti work well. Everything bagel seasoning can be found from Trader Joe's or your local grocery store. Fresh herbs are best from your local farmer’s market or store. You can make these bites your own with some simple swaps. Try adding diced bell peppers for crunch. You could also swap dill for chives. If you like a kick, add some red pepper flakes. Want a bit of sweetness? Try a drizzle of honey on top. These tweaks make each bite unique! To make Everything Bagel Cucumber Bites, start with a medium cucumber. Slice it into 1-inch rounds. Next, take 4 ounces of softened cream cheese and put it in a bowl. Add 1 tablespoon of sour cream. Mix until smooth and creamy. Then, add 1 teaspoon of garlic powder and 1 teaspoon of onion powder. Toss in 1 tablespoon of fresh dill, finely chopped. Stir everything until well combined. Now, grab a spoon or a piping bag. Use it to dollop or pipe the cream cheese mixture onto each cucumber round. Be generous! After that, sprinkle everything bagel seasoning on top of each bite. This gives them that amazing flavor. To finish, add a half cherry tomato on each bite. Top with chopped chives for color. Arrange your cucumber bites on a platter. Chill them in the fridge for 15-20 minutes. This helps the flavors blend nicely. Soggy cucumbers can spoil your snack. To keep them crisp, slice the cucumber just before serving. If you need to prep ahead, salt the slices lightly. Let them sit for 10 minutes, then pat dry with a paper towel. This draws out excess moisture. You can also serve the cream cheese mixture in a small bowl. Let guests spoon it onto the cucumber slices right before eating. For a fun presentation, use a colorful platter. Arrange the cucumber bites in a circle or a line. Add extra cherry tomatoes around the edges for color. You can also sprinkle more everything bagel seasoning on the platter for a nice touch. If you want a casual vibe, use small cups for individual servings. This way, each person can enjoy their bites without sharing. You can prepare these cucumber bites a few hours in advance. Mix the cream cheese and sour cream, then add the spices and dill. Store this mix in the fridge until you're ready. Slice the cucumber right before serving. This keeps everything fresh and crisp. If you have any cucumber bites left, store them in an airtight container. Place parchment paper between layers to avoid sogginess. Keep them in the fridge and enjoy within a day. After that, the cucumbers may lose their crunch. Get creative with your toppings! Instead of cherry tomatoes, try sliced radishes for a spicy crunch. You can also add capers for a briny kick. For a twist, sprinkle crumbled bacon or smoked salmon on top. These changes can give your bites a new flavor. {{image_2}} You can switch up the flavors in your cucumber bites. Try adding smoked salmon for a rich taste. You can also mix in some crumbled feta cheese for a tangy twist. For spice lovers, add a pinch of cayenne pepper to the cream cheese mix. A touch of lemon zest can brighten the bites, giving a fresh flavor. If you want a sweet touch, drizzle some honey on top before serving. Each of these options brings a new life to the original recipe. If you have dietary needs, don’t worry! You can use dairy-free cream cheese if you are lactose intolerant. For a lighter option, Greek yogurt works well instead of sour cream. If you need gluten-free options, ensure your everything bagel seasoning is certified gluten-free. You can also skip the seasoning and just use herbs like basil or parsley for a fresh taste. These swaps keep the bites delicious and accessible for everyone. Think beyond just a plate! Arrange your cucumber bites on a wooden board for a rustic look. You can also stack them in a tall glass for a fun display. For a party, serve them on a tiered stand for a touch of elegance. Pair these bites with a light dip or spread, like tzatziki or hummus, for an extra treat. Adding colorful veggies around the platter can make it pop! These small changes can turn simple bites into a stunning centerpiece. To keep your Everything Bagel Cucumber Bites fresh, store them in the fridge. Place them in an airtight container. This helps avoid moisture loss and keeps them crisp. You can layer the bites with parchment paper between each layer. This way, they don’t stick together. Freezing cucumber bites is not a great idea. Cucumbers have a high water content. When frozen, they become mushy once thawed. I suggest preparing them fresh for the best taste and texture. When stored properly in the fridge, these bites last about 2-3 days. After that, the cucumbers start to lose their crunch. Enjoy them within this time frame for the best flavor. If you notice any moisture or wilting, it’s best to toss them out. Always check for freshness before serving! You can use Greek yogurt or a dairy-free cream cheese. Greek yogurt adds a nice tang. It keeps the bites creamy and light. You can also try silken tofu blended until smooth. This option keeps your snack vegan and rich in protein. These bites last about two days in the fridge. After that, the cucumber may get soggy. Keep them in an airtight container to keep them fresh. If you notice any moisture, use a paper towel to absorb it. Yes, you can easily make these bites vegan. Use vegan cream cheese instead of regular cream cheese. Replace sour cream with a plant-based yogurt. This way, you still get a tasty snack without any animal products. In this blog post, we covered key steps to make Everything Bagel Cucumber Bites. You learned about essential ingredients, preparation tips, and how to customize flavors. Storing leftovers and variations were also discussed. These bites are easy and fun to make. They make a great snack or appetizer. Now, you have all the tools to impress your guests. Enjoy crafting your perfect cucumber bites!

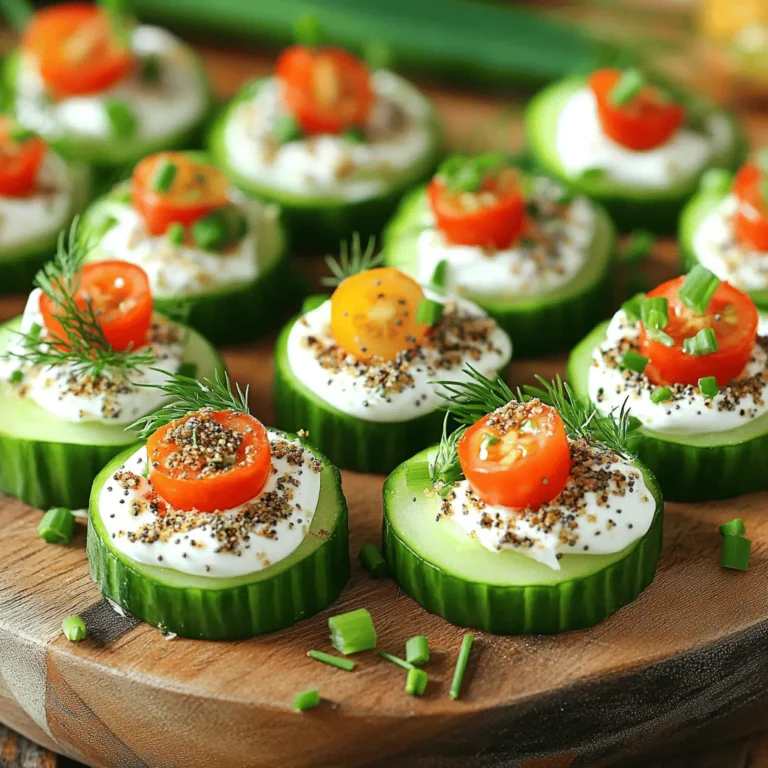
Everything Bagel Cucumber Bites Easy and Tasty Snack

- 1 pound sirloin steak, cut into 1-inch cubes - 4 tablespoons unsalted butter - 4 cloves garlic, minced - 1 tablespoon fresh rosemary, finely chopped - 1 tablespoon fresh thyme, finely chopped - Salt and pepper to taste - 1 teaspoon olive oil - Fresh parsley, chopped (for garnish) The main ingredients for Garlic Herb Butter Steak Bites are simple yet delicious. Sirloin steak is a great choice because it is tender and flavorful. Cutting it into 1-inch cubes makes it easy to cook quickly. You'll need unsalted butter, which adds richness to the dish. The garlic should be minced finely to release its strong flavor. Fresh rosemary and thyme bring a lovely herbal note to the steak bites. For seasoning, salt and pepper are essential. They enhance the natural taste of the steak. A teaspoon of olive oil helps to prevent sticking and adds a little extra flavor. Finally, fresh parsley is perfect for garnishing your dish. It adds a bright color and fresh taste. This combination of ingredients leads to a rich and savory treat that is both easy to make and delicious. First, season the steak cubes with salt and pepper. This step is key for flavor. I like to use a bowl for this. After seasoning, let the cubes sit for about 15 minutes. This allows the flavors to soak in. Next, heat a large skillet on medium-high heat. Add the olive oil once the pan is hot. Carefully place the steak cubes in a single layer. It is important not to overcrowd the pan. Cook the steak cubes for about 3-4 minutes without moving them. This helps create a nice crust. After that, flip the cubes and cook for another 2-3 minutes. You want them to be medium-rare if you can. Now, it’s time to add the garlic herb butter. First, lower the heat to medium. Push the steak to one side of the skillet. Add the butter, minced garlic, rosemary, and thyme to the empty side. Stir these together until the butter melts and the smell is amazing. Use a spoon to drizzle the garlic herb butter over the steak bites. Toss them gently to coat the cubes evenly. Cook for one more minute to heat through. For steak bites, I recommend using sirloin. It’s tender and flavorful. Look for cuts with good marbling. Marbling means fat runs through the meat. This fat melts during cooking, adding moisture and taste. You can also try ribeye for a richer flavor. Avoid overcrowding the pan. If you add too many steak cubes, they won’t sear well. This leads to steaming instead of browning. Cook the steak in batches to get a nice crust. For perfect doneness, use a meat thermometer. Aim for 130°F for medium-rare. You can swap herbs to fit your taste. Try parsley or oregano instead of rosemary or thyme. For a zesty kick, add lemon zest to the butter mix. This change brightens the flavor and adds freshness. Adjust the butter by mixing in a bit of garlic powder for extra garlic taste. {{image_2}} You can switch up the proteins in this recipe. If you want a lighter option, try chicken. For a seafood twist, shrimp works great too. Each protein has its own cooking times. - Chicken: Cook for about 5-7 minutes until golden. - Shrimp: Only needs about 3-4 minutes until pink. These swaps keep the dish fun and tasty. Want to make it more exciting? Add chili flakes for heat. A touch of lemon zest can brighten the flavors too. You can mix different herbs like basil or oregano. This gives your dish a new vibe every time. Pair your steak bites with sides like roasted vegetables or fluffy rice. Both add color and balance to the meal. For a fun presentation, serve them on skewers. Or, try placing them on a bed of greens for a fresh look. Enjoy experimenting with these ideas! To store leftover steak bites, place them in an airtight container. Make sure they cool down first. Seal the container tightly to keep moisture in. These steak bites stay fresh in the fridge for about 3 to 4 days. If you want to enjoy them later, proper storage is key. To freeze cooked steak bites, allow them to cool completely. Then, place them in a freezer-safe bag or container. Remove as much air as possible before sealing. This helps prevent freezer burn. You can keep them frozen for up to 3 months. When you're ready to eat, thaw them overnight in the fridge for best results. For reheating, you can use the oven or a skillet. If using the oven, set it to 350°F (175°C). Place the steak bites on a baking sheet and cover with foil. Heat for about 10-15 minutes. If using a skillet, add a bit of butter over medium heat. This helps keep the bites moist and flavorful. Avoid high heat, as it can dry them out. Enjoy your tasty bites just like when they were fresh! To cook steak bites medium-rare, aim for a total of about 6-7 minutes. Start with 3-4 minutes on the first side to form a nice crust. Then flip them over and cook for 2-3 more minutes. Use a meat thermometer for best results; it should read 130-135°F. This way, your steak bites will be juicy and tender. Let them rest for a couple of minutes after cooking. This helps keep all those tasty juices inside. Yes, you can use frozen steak bites, but there are a few steps. First, thaw the steak in the fridge overnight for best results. If you're in a hurry, you can use the microwave's defrost function. Once thawed, cut the steak into cubes and follow the same steps in the recipe. Keep in mind that frozen steak may need a bit longer to cook. Check for doneness carefully, so you don’t overcook them. Garlic herb butter steak bites pair well with many sides. Here are some tasty ideas: - Mashed potatoes: Creamy and comforting. - Roasted vegetables: Carrots, broccoli, or asparagus add color and nutrition. - Rice: Flavored or plain, it absorbs all the buttery goodness. - Salad: A fresh green salad balances the rich steak bites. - Crusty bread: Perfect for soaking up the garlic herb butter. Feel free to mix and match these sides for a delicious meal! You learned how to make delicious garlic herb butter steak bites. We covered the main ingredients, preparation, and cooking methods. I shared helpful tips for choosing the right steak and avoiding common mistakes. You can also explore variations with different proteins and flavor boosts. Plus, I provided storage and reheating information for freshness. Enjoy crafting this dish, and don’t be afraid to experiment with flavors and sides! By following these steps, you will impress your friends and family with your cooking skills.

Garlic Herb Butter Steak Bites Savory and Simple Treat

To make salted caramel apple dip, gather these fresh items: - 1 cup heavy cream - 1 cup granulated sugar - 1/4 cup unsalted butter - 1 teaspoon sea salt - 1 teaspoon vanilla extract - 3 large apples (Granny Smith or Honeycrisp), sliced - Optional: Chopped nuts (such as pecans or walnuts) for topping You can swap some ingredients if needed. Use light cream instead of heavy cream for a lighter dip. Brown sugar can replace granulated sugar for a richer flavor. If you lack unsalted butter, use salted butter, but reduce the sea salt. Also, any variety of apples works. Try Fuji, Gala, or Braeburn if you prefer. Chopped almonds or cashews can replace nuts for a different crunch. Choose apples that are firm and crisp. Look for bright colors and smooth skin. Granny Smith apples offer a tart taste that pairs well with sweet caramel. Honeycrisp apples are sweet and juicy, perfect for kids. Always smell the apples; they should smell fresh and fruity. If you buy pre-packaged apples, check for bruises and soft spots. Fresh apples make the dip even better! To make the perfect caramel, start with a saucepan. Place one cup of granulated sugar and a quarter cup of unsalted butter in the pan. Turn the heat to medium. Stir the mix often. You want the sugar to dissolve. Keep stirring until it turns a light amber color. This should take about 5 to 7 minutes. Next, carefully add one cup of heavy cream to the pan. Watch out! The mixture may bubble up. Keep whisking the caramel until it becomes smooth and creamy. This will take about 2 minutes. After that, take the pan off the heat. Add one teaspoon of vanilla extract and one teaspoon of sea salt. Stir until they blend well. Let the caramel cool for a bit before you serve it. If you want, you can sprinkle some chopped nuts on top for extra crunch. This salted caramel dip pairs great with sliced apples. I recommend using Granny Smith or Honeycrisp apples. Their tartness balances the sweet dip perfectly. You can also serve it with other fruits like pears or bananas. For a fun twist, include pretzels or graham crackers for dipping too. You can create a beautiful platter. Arrange the apples and dips for a lovely presentation. I suggest taking pictures of each step. This helps you see what to expect. You can create a video too. Show how the caramel changes color and texture. A visual guide makes it easier for others to follow. Share your pictures online, and inspire others to try making this dip! To get the best caramel, watch the heat. Use medium heat and stir well. The sugar should melt slowly. When it changes to a light amber color, it is ready. If it is too dark, it can taste bitter. After adding heavy cream, whisk until smooth. This step is key for a creamy dip. If the caramel is too thick, add a bit more cream. If it is too thin, cook it a little longer. If you have extra caramel dip, store it well. Place it in a clean jar or bowl. Cover it tightly with plastic wrap or a lid. It will stay fresh in the fridge for up to one week. When you want to eat it again, simply reheat it gently. Use a microwave or a small pot on low heat. Stir it well to keep the texture nice. Choose apples that will shine with this dip. I love using Granny Smith apples for their tartness. Honeycrisp apples are also a great choice because they are sweet and crunchy. You can also try Fuji apples for a sweeter flavor. If you want a mix, use a combo of these apples. Their different tastes make each bite fun and exciting. {{image_2}} You can boost the flavor of your salted caramel apple dip. Try adding spices like cinnamon or nutmeg. A dash of these spices gives warmth to the dip. You can also use almond or maple extract instead of vanilla. These small changes create a new taste experience. Feel free to experiment with what you love. Just remember, a little goes a long way. While apples are classic, many other treats work well with this dip. Pear slices offer a sweet and juicy option. Bananas also pair nicely with the caramel. You can dip pretzels or graham crackers for a crunchy twist. Even cookies can make a fun choice. The dip is versatile, so use whatever you have on hand. This way, everyone can enjoy their favorites. Make your salted caramel apple dip the star of a dessert platter. Start with fresh fruits like apples, pears, and strawberries. Then add a few nuts for crunch, like pecans or walnuts. You can also include small cookies or chocolate pieces. Arrange everything on a nice plate for a colorful display. This platter is perfect for parties or family gatherings. It invites people to share and enjoy the flavors. To keep your salted caramel apple dip fresh, store it in an airtight container. This prevents air from getting in and keeps the dip tasty. Place the container in the fridge. It will stay good for about four days. Before serving, give it a stir to mix any separation. You can freeze the caramel if you have leftovers. Pour the cooled caramel into a freezer-safe container. Leave some space at the top, as it will expand when frozen. Seal the container tightly and label it with the date. You can freeze it for up to three months. When you want to enjoy your dip again, thaw it in the fridge overnight. After thawing, pour the caramel into a saucepan. Heat it over low heat. Stir gently until it warms up and becomes smooth again. If it seems too thick, add a splash of cream to bring it back to life. To make salted caramel from scratch, start with sugar and butter. In a saucepan, heat 1 cup of granulated sugar with 1/4 cup of unsalted butter over medium heat. Stir until the sugar melts and turns light amber. This takes about 5 to 7 minutes. Next, carefully add 1 cup of heavy cream. The mixture will bubble up, so whisk it continuously for 2 minutes until it is smooth. Finally, mix in 1 teaspoon of vanilla extract and 1 teaspoon of sea salt. This creates a rich, tasty caramel with a hint of salt. Yes, you can use pre-made caramel for this dip. This saves time and effort. Just heat it gently in a saucepan or microwave to make it smooth. If you want, you can still add sea salt and vanilla for extra flavor. This way, you get a quick and easy dip that tastes great. For caramel dip, I recommend using Granny Smith or Honeycrisp apples. Granny Smith apples are tart and crisp, which pairs well with sweet caramel. Honeycrisp apples are sweet with a nice crunch. Both choices add a refreshing bite to the dip. Feel free to mix apple types for more flavor! This blog post covered everything you need for a great caramel dip. We explored the right ingredients and how to make a perfect caramel. You learned helpful tips for choosing the best apples and how to serve your dip. Remember, experimenting with flavors or pairings can make your dip even better. Enjoy your dipping experience, and have fun with leftovers or variations. Happy dipping!

Salted Caramel Apple Dip Irresistible and Easy Treat

PREV 1 … 6 7
secrets pice kitchen

explore

DessertsDinnerAppetizersDrinks

Our Policies

  • Cookie Policy
  • Copyright Policy
  • Disclaimer
  • GDPR Policy
  • Terms Of Use
Back to Top
  • About
  • Contact Us
  • Privacy Policy
© 2025 secrets pice kitchen