FREE DINNER EBOOK! Get your copy!
  • Cookie Policy
  • GDPR Policy
  • Disclaimer
  • Terms Of Use
  • Visit my other site: Fun Cookie Recipes
secrets pice kitchen
  • Home
  • Dinner
  • Desserts
  • Drinks
  • Appetizers
  • Contact
  • About
  • Privacy Policy
  • Home
  • Dinner
  • Desserts
  • Drinks
  • Appetizers
  • Contact
  • About
  • Privacy Policy
  • Cookie Policy
  • GDPR Policy
  • Disclaimer
  • Terms Of Use
Visit my other site: Fun Cookie Recipes

HOME / CATEGORIES /

Latest

To make Air Fryer Ranch Parmesan Wings, you need simple and fresh ingredients. Here is what you'll need: - 2 pounds chicken wings - 1 tablespoon olive oil - 1 teaspoon garlic powder - 1 teaspoon onion powder - 1 teaspoon smoked paprika - 1 teaspoon dried oregano - 1 teaspoon salt - ½ teaspoon black pepper - ½ cup ranch dressing - ½ cup grated Parmesan cheese - Fresh parsley, chopped (for garnish) Each ingredient plays a key role in the flavor and texture of the wings. The chicken wings are the star of the dish. They get crispy in the air fryer with just a bit of olive oil. The spices bring warmth and depth, while the ranch dressing and Parmesan cheese add rich creaminess. Fresh parsley gives a pop of color and a hint of freshness. Make sure you have everything ready before you start cooking! Start by patting the chicken wings dry with paper towels. This step helps to make the skin crispy. If the wings are wet, they will not crisp up well. After that, grab a large bowl. Toss the wings in the bowl with olive oil. Add garlic powder, onion powder, smoked paprika, dried oregano, salt, and black pepper. Mix everything until the wings are well coated. Next, preheat your air fryer to 400°F (200°C). This step is key for getting crispy wings. Once preheated, place the seasoned wings in a single layer in the basket. Be careful not to overcrowd them. If your air fryer is small, you may need to cook in batches. Cook the wings for about 25 to 30 minutes. Flip the wings halfway through cooking. This ensures even crispness and color. After cooking, transfer the wings to a mixing bowl. Pour the ranch dressing over the wings. Next, sprinkle on the grated Parmesan cheese. Toss the wings again until they are fully coated. Now, return the wings to the air fryer for an extra 5 minutes at 400°F (200°C). This final cook melts the cheese and gives it a slight crisp. To get crispy wings, start by patting them dry. Use paper towels to soak up any moisture. This step is key for that perfect crunch. Next, set your air fryer to 400°F (200°C). This high heat cooks the wings fast and helps crisp the skin. Cook them in a single layer. If your air fryer is small, work in batches. Flip the wings halfway through cooking. This tip ensures even browning. Want to boost the flavor? You can add extra spices. Try cayenne pepper for heat or garlic powder for more depth. If you love herbs, add fresh thyme or basil. Adjust the spice levels to fit your taste. A little spice can make your wings pop. Experiment until you find the right mix for you. Pair your wings with dips and sides. Extra ranch dressing is a must for dipping. Serve them with celery sticks or carrot sticks for crunch. For a fun look, arrange the wings on a platter with fresh parsley. This adds color and makes your dish inviting. Friends and family will love the tasty wings and their beautiful presentation. {{image_2}} You can easily make your wings spicy. Just add hot sauce or cayenne pepper to the seasoning mix. Use about one tablespoon of hot sauce for a nice kick. If you like it hotter, add more cayenne pepper. This gives the wings a great flavor and heat. The ranch dressing cools down the spice, making each bite balanced and tasty. You can also use different herbs to change the flavor. Try adding thyme, basil, or rosemary. Just chop the fresh herbs and mix them into the seasoning. Fresh herbs add a bright taste and aroma. You can use one tablespoon of fresh herbs or one teaspoon of dried herbs. This twist makes your wings unique and delicious. Want a vegetarian option? You can use cauliflower instead of chicken. Cut the cauliflower into bite-sized pieces. Follow the same steps for seasoning and cooking. These cauliflower wings will still get crispy and tasty in the air fryer. You can also try this method with other meats like turkey or pork. This way, you can please everyone at your table. To keep your wings fresh, store them in an airtight container. Place a piece of parchment paper between layers to absorb moisture. This helps them stay crispy. You can keep the wings in the fridge for up to three days. After that, they may lose their taste and texture. To reheat wings and keep them crispy, the air fryer works best. Preheat it to 375°F. Heat the wings for about 5 to 7 minutes. Check them often to ensure they do not burn. You can also use a microwave, but it may make the wings soggy. If you use the microwave, cover the wings with a paper towel. This helps reduce moisture. If you want to save wings for later, freezing works great. First, let the wings cool completely. Then, place them in a freezer bag. Remove as much air as possible before sealing. They can last up to three months in the freezer. When you're ready to eat, thaw them in the fridge overnight. Reheat in the air fryer for the best results. Cook wings in an air fryer for 25 to 30 minutes at 400°F (200°C). Flip them halfway through cooking. This ensures they cook evenly and turn crispy. Yes, you can use frozen wings. Increase the cooking time by about 5 to 10 minutes. Check that the wings reach an internal temperature of 165°F (74°C). You may want to thaw them first for better seasoning. Serve Ranch Parmesan wings with fresh veggie sticks like carrots and celery. You can also pair them with dips like extra ranch or blue cheese. For sides, try potato wedges or a crisp salad. This blog post offered a simple guide for making tasty Ranch Parmesan chicken wings. We covered ingredients, preparation, cooking methods, tips for crispiness, and variations for personalizing your wings. In addition, we explored storage and reheating options. Whether you're a seasoned cook or just starting, these wings can be a hit. Experiment with flavors to find your favorite twist. Enjoy sharing this fun dish with friends and family!

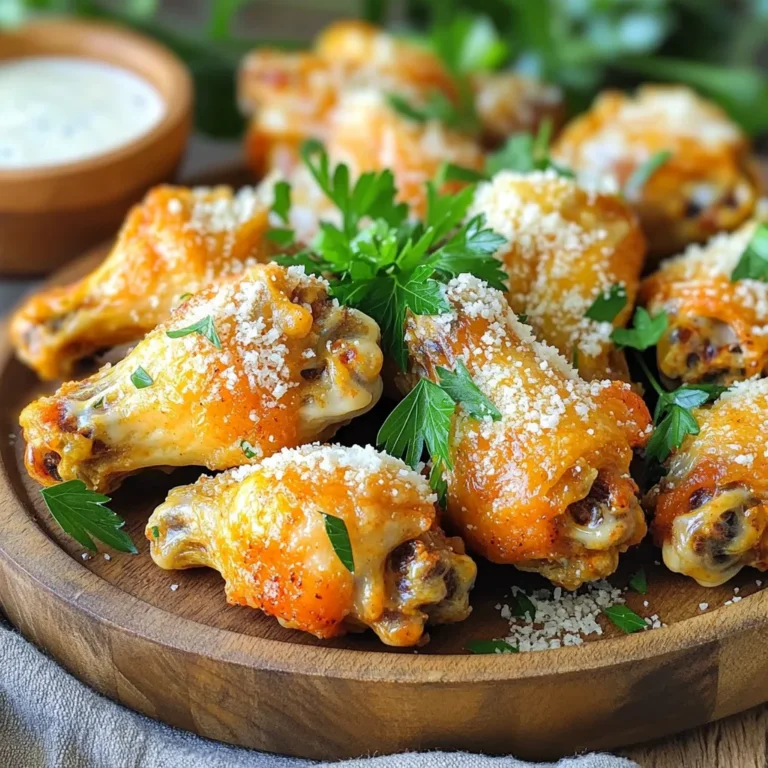
Air Fryer Ranch Parmesan Wings Simple and Delicious

- 1 can of crescent roll dough - 2 medium apples, peeled, cored, and diced - 1/4 cup brown sugar - 1 teaspoon ground cinnamon - 1 tablespoon all-purpose flour - 1 tablespoon lemon juice - 1 egg, beaten (for egg wash) - 1 tablespoon granulated sugar (for sprinkling) - Caramel sauce (for drizzling) To make Apple Pie Crescent Bites, you need a few key ingredients. Start with a can of crescent roll dough. This dough gives the bites a nice, flaky texture. You will also need two medium apples. Make sure to peel, core, and dice them. This adds the sweet and tart flavor that makes apple pie so good. Next, grab 1/4 cup of brown sugar. This sugar adds a rich, sweet taste. You will need one teaspoon of ground cinnamon for that warm spice flavor. A tablespoon of all-purpose flour helps thicken the apple filling. One tablespoon of lemon juice adds brightness and balances the sweetness. For the finishing touch, use an egg, beaten, for the egg wash. This gives the bites a golden color when baked. You will sprinkle them with one tablespoon of granulated sugar for added sweetness and crunch. Finally, don't forget the caramel sauce for drizzling on top. It makes each bite even more delicious! Gather these ingredients, and you are ready to make a tasty treat that everyone will love. 1. Preheat your oven to 375°F (190°C) and line a baking sheet with parchment paper. This helps the bites bake evenly and not stick. 2. In a mixing bowl, combine the diced apples, brown sugar, cinnamon, flour, and lemon juice. Stir until the apples are well coated. This mix gives a sweet and zesty flavor to the bites. 3. Unroll the crescent roll dough and separate it into triangles. Keep the dough cold for easier handling. 1. Place a spoonful of the apple mixture at the wide end of each crescent dough triangle. Don’t overfill, or they might burst! 2. Carefully roll the crescent dough over the apple filling, starting from the wide end. Seal the edges to keep the filling from leaking. A tight seal makes a big difference. 1. Brush the tops of the bites with the beaten egg and sprinkle with granulated sugar. This step adds a nice shine and crunch. 2. Bake in the preheated oven for about 12-15 minutes, or until golden brown. Keep an eye on them to avoid burning. 3. Once baked, remove from the oven and let cool slightly. Drizzle with caramel sauce for a sweet finish! To ensure even baking, spread the crescent bites apart on the baking sheet. This allows airflow around each piece. Also, try to keep the dough at room temperature. Chilled dough can bake unevenly. For a golden crust, brush the tops with the beaten egg wash. This gives them a shiny, crispy finish. You can sprinkle granulated sugar on top for added sweetness and crunch. To elevate the taste, consider adding chopped nuts or raisins to the apple filling. Walnuts or pecans add a nice crunch. Raisins bring a chewy sweetness that pairs well with apples. If you want to switch up the spices, try nutmeg or ginger instead of cinnamon. They add unique flavors that can surprise your taste buds. For a beautiful presentation, arrange the crescent bites on a colorful platter. You can dust powdered sugar over them for a touch of elegance. Pair your apple pie crescent bites with a scoop of vanilla ice cream. The warm bites and cold ice cream create a delightful contrast. You can also serve them with a drizzle of caramel sauce for extra sweetness. {{image_2}} You can mix things up by using different fruits. Try pears or berries for a fun twist. These fruits also pair well with cinnamon. You can also add cream cheese to the filling. This makes the bites rich and creamy. Just mix the cream cheese with sugar and spices for extra flavor. If you need a gluten-free option, look for gluten-free crescent roll dough. Many brands offer this now. You can also make these bites vegan. Instead of an egg wash, use a mixture of almond milk and maple syrup. This gives the bites a nice shine without eggs. For a fall twist, add spices like nutmeg or allspice to your apple filling. These spices boost the warm flavors of the apples. You can also change the toppings for different holidays. Try adding a sprinkle of powdered sugar for Christmas, or a drizzle of chocolate for birthdays. Each season can bring a new flavor to your crescent bites! To store leftover Apple Pie Crescent Bites, let them cool first. Place them in an airtight container. This keeps them fresh for up to three days. If you want to enjoy them warm, just pop them in the microwave for about 10-15 seconds. Check them often so they don’t get too hot. You can also cover them with foil to keep the crust soft. For long-term storage, you can freeze the crescent bites. First, let them cool completely. Then, wrap each bite in plastic wrap. Place the wrapped bites in a freezer-safe bag. They can last for up to two months in the freezer. When you are ready to eat, thaw them in the fridge overnight. Reheat them in the oven at 350°F (175°C) for about 10 minutes. This way, they will taste fresh and crispy! Yes, you can use store-bought apple pie filling. Just skip the step of mixing apples with sugar and spices. It saves time and works well. However, homemade filling adds a special touch. These bites take about 12 to 15 minutes to bake. You want them golden brown and puffed up. Keep an eye on them to avoid burning. You can use white sugar mixed with a bit of molasses. Use one tablespoon of molasses for every cup of white sugar. This mix gives a similar taste and color. Yes, you can make these bites in advance. Prepare them, but don’t bake them yet. Store them in the fridge for up to a day. When ready, bake them fresh for the best taste. This recipe shows how to make tasty crescent apple bites with just a few steps. You learned about the ingredients, how to prepare, assemble, and bake them. Remember to explore different fillings and topping options to suit your taste. These bites are easy to customize and fun to serve. Enjoy your sweet treats fresh or stored for later. Whether for a party or a cozy night in, they are sure to impress. Happy baking!

Apple Pie Crescent Bites Tasty and Easy Dessert

- 2 large sweet potatoes, peeled and diced - 1 can (15 oz) black beans, drained and rinsed - 1 cup corn kernels (fresh, frozen, or canned) Sweet potatoes bring a sweet, earthy taste to the dish. Black beans add protein and a creamy texture. Corn gives a nice crunch and sweetness. - 1 teaspoon cumin - 1 teaspoon smoked paprika - 1/2 teaspoon chili powder Cumin adds warmth and depth. Smoked paprika gives a rich, smoky flavor. Chili powder offers a hint of spice that enhances the dish. - 8 small whole wheat tortillas - 1 cup salsa (your choice of heat level) - 1 cup shredded cheese (cheddar or Mexican blend) - Fresh cilantro, chopped (for garnish) - Avocado slices (optional, for serving) - Lime wedges (for serving) Whole wheat tortillas are hearty and filling. Salsa brings moisture and flavor. Shredded cheese melts beautifully on top. Garnishes like cilantro and avocado add freshness and creaminess. Lime wedges provide a zesty kick. 1. Preheat your oven to 400°F (200°C). Lightly grease a large baking sheet or line it with parchment paper. This helps the enchiladas not stick. 2. Peel and dice the sweet potatoes into small cubes. In a medium bowl, toss them with olive oil, cumin, smoked paprika, chili powder, and a pinch of salt. Make sure each piece is coated well. Spread the sweet potatoes evenly on one side of the prepared sheet pan. 3. Roast the sweet potatoes in the oven for about 20 minutes. They should turn tender and caramelized. Remember to flip them halfway for even cooking. 4. While the sweet potatoes are cooking, prepare the filling. In a large bowl, mix the black beans, corn, half of the salsa, and half of the shredded cheese. Stir until everything combines well. 5. Once the sweet potatoes are done, add them to the filling mixture. Stir gently until all the ingredients blend nicely. 6. Take each tortilla and fill it with the sweet potato-black bean mixture. Roll them up tightly and place them seam-side down on the other side of the sheet pan. 7. Pour the remaining salsa over the rolled tortillas. Make sure to cover each one well. Then, sprinkle the rest of the shredded cheese on top for a cheesy finish. 8. Return the baking sheet to the oven and bake for an additional 15 minutes. The cheese should be bubbly and golden when done. 9. Take the baking sheet out and let it cool slightly. Garnish with fresh cilantro and serve with avocado slices and lime wedges for extra flavor. To ensure even roasting, cut sweet potatoes to similar sizes. This helps them cook at the same rate. Toss them with olive oil and spices to coat well. Spread them out on the sheet pan, leaving space between pieces. This allows hot air to circulate. If you want to adjust spice levels, you can change the chili powder amount. For less heat, use less chili powder. For more kick, add diced jalapeños or a pinch of cayenne. You can also choose a spicier salsa to boost the flavor. The best garnishes for serving are fresh cilantro and avocado slices. Cilantro adds a bright taste. Avocado gives creaminess, which balances the dish. Lime wedges are also great. Squeezing fresh lime juice over enchiladas adds a zing. For serving suggestions, try pairing these enchiladas with a simple salad. A corn salad or a side of black beans works well. You can also serve with rice for a filling meal. Preparing ingredients in advance makes cooking easier. You can peel and dice sweet potatoes a day ahead. You can also mix the filling and store it in the fridge. Just fill the tortillas when you are ready to bake. For storing leftovers, let them cool first. Place them in an airtight container. These enchiladas last up to four days in the fridge. You can also freeze them for longer storage. Just wrap them tightly and label the date. {{image_2}} You can change up the beans and veggies in this recipe. Try pinto beans or kidney beans instead of black beans. For veggies, consider adding bell peppers or zucchini. You can also switch to corn tortillas for a different flavor and texture. They are softer and easier to roll. This recipe can easily fit into vegan diets. Just use vegan cheese or skip the cheese altogether. For gluten-free eaters, look for corn tortillas that are certified gluten-free. They will hold the filling well and taste great. Want some heat? Add sliced jalapeños to the filling or on top before baking. You can also mix in different cheeses. Queso fresco brings a nice tang, while a spicy pepper jack adds a kick. Feel free to experiment with your favorite flavors! To store your enchiladas, cool them down first. Place them in an airtight container. This helps keep them fresh and tasty. You can store them in the fridge for up to four days. If you want to save them longer, they freeze well too. Wrap each enchilada in plastic wrap or foil. Place them in a freezer-safe bag. This keeps them safe from freezer burn. They can last up to three months in the freezer. Reheating your enchiladas is easy. You can use the oven or the microwave. For the oven, preheat it to 350°F (175°C). Place the enchiladas in a baking dish and cover with foil. Heat for about 20 minutes. This helps keep them moist. If you’re in a hurry, use the microwave. Place one enchilada on a plate and cover it with a damp paper towel. Heat for 1-2 minutes until hot. This method helps maintain the texture and flavor. In the fridge, these enchiladas stay fresh for about four days. Make sure the container is sealed well. When frozen, they can last up to three months. For the best taste, eat them sooner rather than later. After that, they might lose flavor and texture. Can I make these enchiladas ahead of time? Yes, you can! Prepare the enchiladas up to the baking step. Cover them and store in the fridge for up to 24 hours. When ready to eat, just bake them as directed. This saves time and makes dinner easy. How do I make them spicier? To add heat, use a hotter salsa. You can also mix in diced jalapeños or add more chili powder. Taste as you go to find your perfect spice level. Are these enchiladas healthy? Yes, these enchiladas are packed with nutrients. Sweet potatoes provide fiber and vitamins. Black beans add protein, and using whole wheat tortillas boosts the health factor. Serving size and calorie count One serving is about two enchiladas. Each serving has approximately 350 calories, depending on the cheese and toppings you choose. Can I use sweet potatoes with other fillings? Absolutely! You can substitute sweet potatoes for other veggies like zucchini or bell peppers. Just make sure to cook them until tender before filling the tortillas. Substituting for canned items in the recipe If you prefer fresh, you can use cooked black beans instead of canned. Just make sure to rinse them well. For corn, fresh or frozen works great as a swap. You learned how to make tasty sweet potato enchiladas. We covered the key ingredients, from sweet potatoes to spices. I shared easy steps for roasting, filling, and baking. Tips helped you serve and store leftovers well. You can try variations for different diets and flavors. These enchiladas offer fun and healthy meal options. Enjoy trying these recipes and sharing them with friends and family. Your next dinner could be a hit!

Sheet Pan Sweet Potato Black Bean Enchiladas Recipe

- 4 tilapia fillets - 1 cup breadcrumbs (panko for extra crunch) - 1/2 cup grated Parmesan cheese - 1 teaspoon garlic powder - 1 teaspoon onion powder - 1/2 teaspoon paprika - 1/4 teaspoon black pepper - 2 tablespoons olive oil - Salt to taste - Fresh parsley, chopped (for garnish) You can swap tilapia for other mild fish like cod or haddock. If you want a gluten-free option, use crushed cornflakes instead of breadcrumbs. For a dairy-free choice, try nutritional yeast instead of Parmesan cheese. You can also mix in herbs like dill or thyme for a flavor boost. Each serving of this crispy air fryer Parmesan tilapia has about: - Calories: 320 - Protein: 28g - Carbohydrates: 18g - Fat: 16g - Fiber: 1g - Sodium: 480mg This meal is a great source of protein and is low in carbs, making it perfect for many diets. Enjoy this tasty dish while keeping your nutrition in mind! First, preheat your air fryer to 400°F (200°C). This step takes about 5 minutes. While it heats, gather your ingredients. You will need: - 4 tilapia fillets - 1 cup breadcrumbs (panko for extra crunch) - 1/2 cup grated Parmesan cheese - 1 teaspoon garlic powder - 1 teaspoon onion powder - 1/2 teaspoon paprika - 1/4 teaspoon black pepper - 2 tablespoons olive oil - Salt to taste - Fresh parsley, chopped (for garnish) Make sure to pat the tilapia fillets dry with paper towels. This helps the coating stick better. In a shallow bowl, mix the breadcrumbs, grated Parmesan cheese, garlic powder, onion powder, paprika, black pepper, and salt. Stir until everything is well combined. Next, brush both sides of each tilapia fillet with olive oil. This step is important for that crispy texture. Now, take each fillet and dredge it in the breadcrumb mixture. Press firmly to ensure an even coating. Shake off any excess crumbs. Place the coated tilapia fillets in the air fryer basket in a single layer. Make sure they don’t overlap. Depending on your air fryer size, you might need to cook in batches. Cook the fillets for 10 to 12 minutes. Flip them halfway through. They should turn golden brown and reach an internal temperature of 145°F (63°C). Once done, remove the tilapia from the air fryer. Let them rest for a couple of minutes. Don’t forget to garnish with fresh chopped parsley before serving! To make your air fryer Parmesan tilapia extra crispy, follow these tips: - Use panko breadcrumbs. They add more crunch than regular breadcrumbs. - Pat the tilapia fillets dry. Removing moisture helps the coating stick better. - Brush the fish with olive oil. This step helps the breadcrumbs crisp up. - Don’t overcrowd the air fryer basket. Give the fillets space to cook evenly. Here are some common mistakes to watch out for: - Skipping the drying step. Moist fish won’t get crispy. - Not preheating the air fryer. This step ensures even cooking from the start. - Overcooking the fillets. Keep an eye on the time to prevent dryness. - Forgetting to flip the fillets. Flipping helps both sides cook evenly and get crispy. Pair your crispy tilapia with these tasty sides: - Fresh green salad. It adds a nice crunch and balance. - Lemon wedges. A squeeze of lemon brightens the dish. - Steamed vegetables like broccoli or asparagus. They add color and nutrition. - Couscous or quinoa. These grains complement the fish well and are filling. {{image_2}} If you love heat, add spice to your tilapia! Start by mixing in cayenne pepper or red pepper flakes with the breadcrumb mix. Just a pinch can make a big difference. You can also use a spicy seasoning blend. This gives a zesty kick, making your meal exciting. Adjust the spice level to your taste. Enjoy the extra flavor that heat brings to the dish! Herbs can transform the taste of your tilapia. Try adding dried herbs like oregano, thyme, or basil to the breadcrumb mix. Fresh herbs like dill or cilantro also work well. They add freshness and depth. You can also squeeze lemon juice over the fillets before cooking. This adds a bright, tangy flavor that complements the Parmesan. Mix and match to find your favorite combination! While tilapia is great, other fish can work too! Cod, haddock, or even salmon can be good substitutes. Each fish has a unique flavor and texture. Cooking times may vary, so keep an eye on your fish. Aim for an internal temperature of 145°F. This way, you ensure it's safe to eat. Explore various fish to keep your meals interesting and delicious! To store leftover tilapia, let it cool first. Place the fillets in an airtight container. You can keep them in the fridge for up to three days. Make sure to cover them well. This keeps the fish fresh and prevents odors from the fridge. When it's time to eat the leftovers, preheat your air fryer to 350°F (175°C). Place the tilapia in the basket. Reheat for about 5 to 7 minutes. This helps to keep the fish crispy. You can also use an oven if you want. Just cover the fillets with foil to keep moisture in. If you want to save tilapia for later, freezing is great. Wrap each fillet tightly in plastic wrap. Then, place them in a freezer bag. This will keep them fresh for up to three months. When you're ready to cook, thaw them in the fridge overnight. Then, follow your air fryer steps for a tasty meal! Yes, you can use frozen tilapia fillets. Just remember to thaw them first. You can place them in the fridge overnight or run cold water over them for a quick thaw. Once thawed, pat them dry with paper towels. This step helps the coating stick better. Tilapia should be cooked to an internal temperature of 145°F (63°C). This ensures it is safe to eat. Use a meat thermometer to check the temperature. When cooked, the fish will flake easily with a fork. It should look opaque and white. You can tell when tilapia is done by checking its color and texture. It should be opaque and firm. If you gently poke it with a fork, it should flake easily. Use a meat thermometer to confirm it reached 145°F (63°C). This is the best way to ensure it’s safe and tasty. This article covered how to make tasty air fryer tilapia. We explored key ingredients, cooking steps, and tips for crispiness. I shared fun variations and how to store leftovers. In my final thoughts, remember that cooking is fun. Don’t hesitate to try new flavors or other fish types. Enjoy your delicious meal!

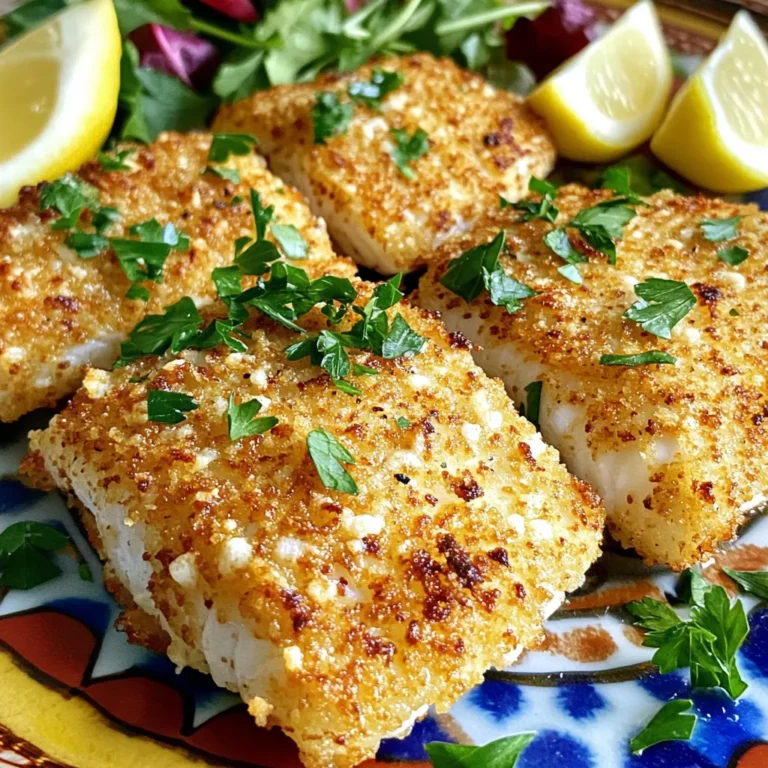
Air Fryer Parmesan Tilapia Simple and Tasty Meal

- 1 cup crushed graham crackers - 4 tablespoons unsalted butter, melted - 1 cup cream cheese, softened - 1 cup Nutella or hazelnut spread - 1/2 cup powdered sugar - 1 teaspoon vanilla extract - 1 cup heavy whipping cream - 1/2 cup chopped hazelnuts (for garnish) - Dark chocolate shavings (for garnish) When measuring ingredients, use dry measuring cups for solids. Use liquid measuring cups for liquids. For sticky items like Nutella, lightly coat the cup with oil for easy pouring. Always level off dry ingredients with a spatula for accuracy. You can swap graham crackers for digestive biscuits if needed. If you want a lighter option, use low-fat cream cheese. For a nut-free version, try sunflower seed butter instead of hazelnut spread. If you do not have powdered sugar, blend granulated sugar until fine. To start, gather your ingredients. You need 1 cup of crushed graham crackers and 4 tablespoons of melted butter. In a mixing bowl, combine the crushed graham crackers with the melted butter. Mix them until the crumbs are well coated. This gives your base a rich flavor. Next, take serving cups or glasses. Spoon about 2 tablespoons of this mixture into each cup. Press down firmly to form a solid base. This step is key; it keeps your cheesecake filling from sinking. Now, let’s make the filling! You will need 1 cup of softened cream cheese. Place it in a bowl and beat it with an electric mixer until smooth. This makes the base creamy. Add 1 cup of Nutella, 1/2 cup of powdered sugar, and 1 teaspoon of vanilla extract to the cream cheese. Mix until everything is creamy and well combined. In another bowl, whip 1 cup of heavy cream until stiff peaks form. This means the cream should hold its shape. Gently fold this whipped cream into the Nutella mixture. Be careful here! You want to keep it light and fluffy. Now, it’s time to assemble! Spoon the chocolate hazelnut cheesecake filling over the graham cracker base in each cup. Smooth the tops with a spatula for a nice finish. Cover the cups with plastic wrap. Place them in the fridge for at least 4 hours or until set. This chilling time helps the flavors meld and the cheesecake firm up. Before you serve, garnish each cup with chopped hazelnuts and dark chocolate shavings. This adds a nice touch and extra crunch. Enjoy your delicious no-bake treat! To get the best texture in your cheesecake cups, focus on the cream cheese. Make sure it is softened. If it's too cold, it will clump up. Beat it well until it's smooth before adding any other ingredients. When you mix in the Nutella, it should be creamy and well-blended. The heavy cream is key too. When whipped, it must reach stiff peaks, which means it holds its shape well. This will make your cheesecake light and fluffy. Whipping cream is simple but needs some care. Start with cold heavy cream for better results. Use a clean bowl and beaters to avoid any unwanted flavors. Beat the cream on medium speed until it thickens. Switch to high speed to form stiff peaks. This means the cream should stand tall when you lift the whisk. Be gentle when you fold it into the Nutella mix. Use a spatula and fold slowly to keep the air in the cream. Garnishing adds a nice touch to your cheesecake cups. Chopped hazelnuts give a great crunch and nutty flavor. Dark chocolate shavings make it look fancy. You can sprinkle them on top before serving. For a bit of color, consider adding a sprig of mint. This will brighten up the dessert. Just remember to keep the garnishes simple and fresh for the best taste. {{image_2}} You can easily change the flavor of your cheesecake cups. For a fruity twist, try adding raspberry or strawberry puree to the filling. Just mix in 1/4 cup of the puree before folding in the whipped cream. This gives a nice balance to the rich chocolate. If you like coffee, add 1 tablespoon of instant coffee or espresso powder to the Nutella mix. It will enhance the chocolate flavor. You can also swap the Nutella for a peanut butter spread for a nutty spin. Toppings can make your cheesecake cups more special. Instead of chopped hazelnuts, try crushed cookies or candy bars. Crushed Oreos or toffee bits work well. You can also add fresh fruit like berries or banana slices on top. For a more decadent touch, drizzle melted chocolate or caramel over the finished cups. You could even add a dollop of whipped cream on top for extra creaminess. Making these cheesecake cups vegan is simple. Use dairy-free cream cheese and coconut cream instead of heavy cream. Look for a nut-free spread if you want to avoid nuts. You can also use maple syrup or agave syrup in place of powdered sugar. This way, you get to enjoy a tasty dessert while sticking to your dietary needs. To keep your no bake chocolate hazelnut cheesecake cups fresh, store them in the fridge. Use a covered container to protect them from other smells and flavors. This helps maintain their rich taste. If you made them in cups, you can leave them in their original cups. Just cover them tightly with plastic wrap. These cheesecake cups will stay fresh for about five days in the fridge. After that, the texture may change. If you notice any off smells, it's best to toss them. Always check for freshness before serving. You can freeze these cheesecake cups for later enjoyment. To freeze, wrap each cup tightly in plastic wrap. Then, place them in a freezer-safe bag or container. They can last up to two months in the freezer. When you're ready to eat, move the cups to the fridge for about four hours to thaw. This keeps the texture smooth and creamy. Avoid using the microwave, as it can change the consistency. Yes, you can use other nut spreads. Almond, cashew, or even peanut butter work well. Each spread brings a unique flavor to the cheesecake cups. Almond spread gives a sweet, nutty taste. Cashew spread adds creaminess, while peanut butter gives a classic flavor. You can even mix spreads for fun flavors. Just make sure you like the taste of the spread you choose. The cheesecake cups need at least four hours in the fridge. They should feel firm but still a bit soft. You can gently press the top with your finger. If it holds its shape, it’s ready. If it's still too wobbly, let it chill longer. After chilling, the cheesecake will hold well when you serve it. These cups are great for parties or special events. You can serve them in clear glasses for a pretty look. Add fresh berries on top for a splash of color. Whipped cream can add a fluffy touch. For a crunchy bite, sprinkle extra hazelnuts on top. You can also drizzle chocolate sauce for extra sweetness. These ideas make your dessert even more delightful! In this article, we explored how to make tasty chocolate hazelnut cheesecake cups. We covered important ingredients, measurement tips, and fun substitutes. You learned step-by-step instructions for the graham cracker base, the chocolate hazelnut filling, and assembly. We also shared tips for the perfect texture and creative variations. As you try this recipe, remember that great desserts come with practice. Enjoy being creative in the kitchen!

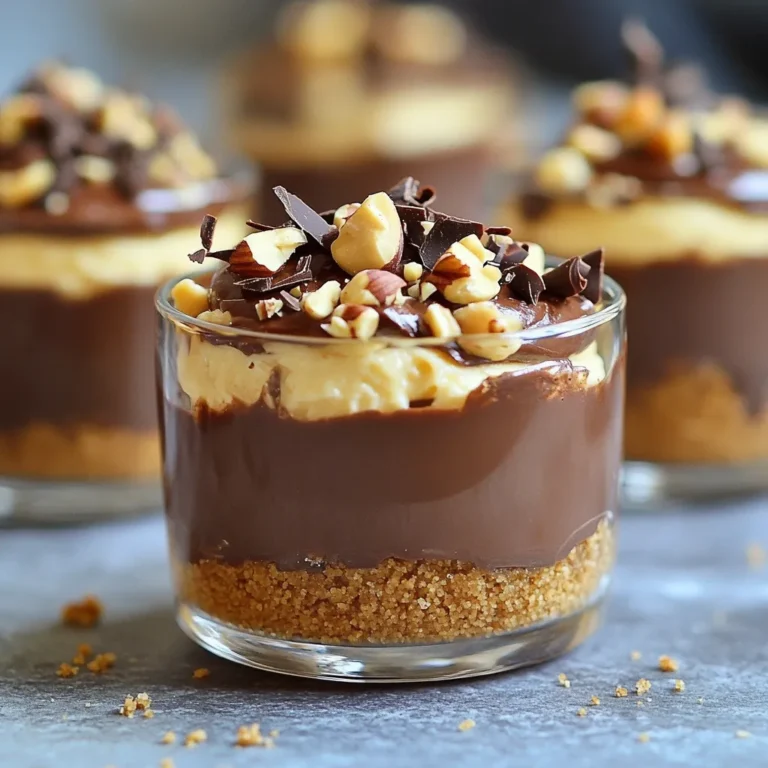
No Bake Chocolate Hazelnut Cheesecake Cups Delight

- Shrimp and Marinade Components - 1 pound large shrimp, peeled and deveined - 3 tablespoons olive oil - Zest and juice of 2 limes - 2 garlic cloves, minced - Spices and Seasonings - 1 teaspoon chili powder - 1 teaspoon cumin - ½ teaspoon cayenne pepper (adjust to taste) - Salt and pepper to taste - Optional Garnishes - Fresh cilantro, chopped (for garnish) - Wooden or metal skewers For these chili lime shrimp skewers, I love using fresh, large shrimp. They soak up the marinade well and cook quickly. The marinade is key. It blends olive oil, lime zest, lime juice, and minced garlic. This mix gives the shrimp a tangy and rich flavor. Spices like chili powder and cumin add warmth. Cayenne pepper brings heat. Adjust this spice based on your taste. Salt and pepper enhance the flavors too. For the finishing touch, chopped cilantro makes the dish pop. It adds color and freshness. Choose between wooden or metal skewers. If using wooden ones, soak them first. This step helps prevent burning on the grill. Gather these ingredients, and you are ready to create a zesty grilled delight! To make the marinade, start by whisking together the ingredients in a bowl. Combine 3 tablespoons of olive oil, the zest and juice of 2 limes, 2 minced garlic cloves, 1 teaspoon chili powder, 1 teaspoon cumin, ½ teaspoon cayenne pepper, and salt and pepper to taste. Mix this well until it is smooth. Marination time is key to flavor. Let the shrimp soak in this mixture for 30 minutes in the fridge. This allows the shrimp to absorb all the zesty goodness from the marinade. When you’re ready to skewer, choose between wooden or metal skewers. If you use wooden skewers, soak them in water for 20-30 minutes to stop them from burning. Metal skewers do not need soaking, and they can be reused. To thread the shrimp properly, take a skewer and push it through the shrimp. Aim for 4-5 shrimp per skewer. This keeps them from falling apart on the grill. Preheat your grill over medium-high heat. A hot grill sears the shrimp quickly, making them juicy. Grill the shrimp skewers for about 2-3 minutes on each side. Watch for the shrimp to turn pink and opaque, which means they are done. Do not overcook; this can make them rubbery. After grilling, let the skewers rest for a minute. Then, garnish with fresh chopped cilantro before serving. Enjoy the fresh, zesty flavors! Ideal Grill Temperature For great grill marks, heat your grill to medium-high. This means around 400°F to 450°F. If it's too low, the shrimp will not sear well. Too hot, and they may burn. Tips for Avoiding Overcooking Shrimp cook quickly. Grill them for just 2-3 minutes on each side. Look for a pink and opaque color. If they are overcooked, they become rubbery. Take them off the grill as soon as they are done. Marinade Variations You can change the marinade to suit your taste. Try adding honey for sweetness or switching lime for lemon. Each change brings a new flavor to the shrimp. Adding Extra Spices Feel free to add more spices. A touch of smoked paprika or garlic powder works well. You can also try different herbs, like oregano or thyme, to boost the flavor. Accompaniments for Chili Lime Shrimp Skewers Serve your skewers with a fresh salad or rice. A zesty slaw can also balance the spices. Pair with a lime wedge for more zest. Best Sides and Dips Serve with guacamole or a creamy cilantro dip. Rice or corn on the cob are perfect sides. These choices make your meal more exciting and flavorful. {{image_2}} You can swap shrimp for chicken or tofu. Chicken offers a hearty bite, while tofu adds a nice texture. For chicken, cut it into bite-sized pieces. Marinate the same way as shrimp. Adjust cooking time to ensure it cooks through. For tofu, use firm tofu and press it to remove moisture. This helps it absorb the flavors better. You can change the flavor of your skewers easily. A Southwest blend adds spices like paprika and oregano. This gives a smoky taste. A citrus blend uses orange or lemon zest for a bright twist. Want heat? Add jalapeños or serrano peppers to the marinade. This gives your dish a spicy kick. If you're going meatless, try vegetable skewers. Bell peppers, zucchini, and mushrooms work great together. You can also add cherry tomatoes for sweetness. Adapt the marinade by skipping the shrimp. Use the same lime and spices for flavor. This way, you still get a zesty dish that everyone will love. Best Practices for Refrigeration Store your leftover shrimp skewers in an airtight container. Make sure they cool to room temperature first. Place them in the fridge within two hours of cooking. They will stay fresh for up to three days this way. Freezing Tips for Shrimp Skewers If you want to keep them longer, freezing works well. Wrap each skewer tightly in plastic wrap. Then, place them in a freezer bag. This will help prevent freezer burn. They can last for up to three months in the freezer. When ready to eat, thaw them in the fridge overnight before reheating. Best Methods for Keeping Shrimp Juicy The best way to reheat shrimp is on the stove. Heat a skillet over medium heat. Add a splash of olive oil to keep them moist. Cook for just a few minutes. This will warm them through without drying them out. Avoiding Rubberiness Do not microwave the shrimp. Microwaving often makes them rubbery and tough. Instead, focus on gentle heating methods. Keep an eye on the time, and remove them when they are just warm. This keeps their tender texture intact. Marinate shrimp for about 30 minutes. This time helps the shrimp absorb the flavors. If you marinate too long, the shrimp may become mushy. Always keep marinated shrimp in the fridge. Yes, you can use frozen shrimp. First, thaw them in the fridge overnight. If you're short on time, place them in cold water for 15-20 minutes. After thawing, pat them dry before marinating. This step helps the marinade stick better. Chili lime shrimp skewers pair well with many sides. Here are some ideas: - Rice: Cilantro lime rice adds a fresh touch. - Salad: A light salad with avocado and corn is great. - Veggies: Grilled veggies or a veggie platter work well too. - Dips: Serve with a zesty salsa or creamy avocado dip. These pairings make for a colorful and tasty meal! In this post, we covered the essential ingredients for making chili lime shrimp skewers. I also shared step-by-step instructions to help you perfect the grilling process. You learned valuable tips for flavor enhancement and how to make various delicious adjustments. Remember, grilling can be simple and fun. With practice, you can impress anyone with your tasty skewers. Enjoy cooking and share your creations with friends and family!

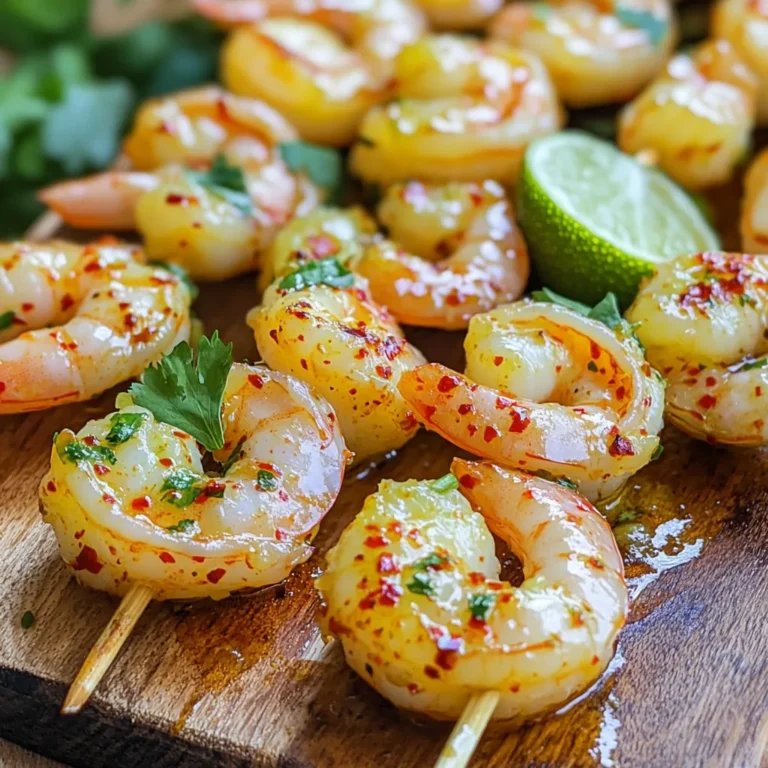
Chili Lime Shrimp Skewers Zesty Grilled Delight

- 8 oz (225g) whole grain noodles (or your choice of noodles) - 1/4 cup creamy peanut butter - 3 tablespoons soy sauce (or tamari for a gluten-free option) - 2 tablespoons sesame oil - 1 tablespoon maple syrup or honey - 2 tablespoons rice vinegar - 1 teaspoon freshly grated ginger - 1-2 cloves garlic, minced - 1/4 cup water (to thin the sauce) - 1 cup shredded carrots - 1 cup cucumber, julienned - 4 green onions, sliced - 1 tablespoon sesame seeds - Fresh cilantro leaves for garnish (optional) - Alternative sweeteners like agave or coconut sugar - Thickeners such as cornstarch or arrowroot powder - Additional toppings like crushed peanuts or chili flakes - Garnishes like lime wedges or sesame oil drizzle - For gluten-free options, use rice noodles or gluten-free pasta - To make it vegan, use maple syrup instead of honey - Nut-free? Substitute peanut butter with sunflower seed butter First, cook the noodles according to the package instructions. Aim for al dente, which means they should still have a slight bite. This step keeps the noodles from becoming mushy. After cooking, drain the noodles and rinse them under cold water. Rinsing stops the cooking process and cools the noodles down. It also helps remove excess starch, so they won't stick together. Set the cooled noodles aside while you prepare the sauce. In a medium bowl, mix together the peanut butter, soy sauce, sesame oil, maple syrup, rice vinegar, ginger, garlic, and water. Whisk until smooth and creamy. If the sauce is too thick, add a little more water to reach your desired consistency. Fresh ingredients like ginger and garlic give the sauce its bright flavor. Always use freshly grated ginger for the best taste. In a large bowl, toss the cooked noodles with the peanut sauce. Make sure every noodle gets coated evenly for maximum flavor. Next, add the shredded carrots, julienned cucumber, and sliced green onions. Gently mix all the ingredients together. This step adds color and crunch to your dish. Finally, sprinkle sesame seeds on top for added texture and garnish with fresh cilantro if you like. Serve right away or chill for a refreshing taste! To make a perfect sauce, start with the right thickness. Mix peanut butter with soy sauce and sesame oil. If it’s too thick, add more water, one tablespoon at a time. Aim for a creamy but pourable consistency. Taste your sauce as you go. Balance the flavors with sweetness from maple syrup or honey. Adjust to your liking until it has a rich and satisfying taste. To keep noodles from sticking together, rinse them after cooking. Use cold water to stop the cooking process. This helps keep them firm and separates them. Cooking times vary by noodle type. Whole grain noodles may need a little more time than regular ones. Always taste a noodle before draining to ensure it’s al dente. For a creative presentation, serve sesame peanut noodles in individual bowls. Drizzle with extra sesame oil for a glossy finish. Top with additional green onions and sesame seeds for a pop of color. You can pair these noodles with proteins like grilled chicken or shrimp. Fresh veggies like a side salad add a great crunch and balance to your meal. {{image_2}} You can turn Sesame Peanut Noodles into a cool salad. Start by chilling the cooked noodles in the fridge. This makes the dish refreshing, perfect for warm days. Add fresh veggies like: - Shredded cabbage - Sliced bell peppers - Cherry tomatoes You can also toss in some crunchy nuts for a fun texture. A sprinkle of sesame seeds on top adds a nice touch. If you like heat, try adding chili oil or fresh peppers. Start with a small amount of chili oil in the sauce. You can also mix in sliced jalapeños or red pepper flakes. This extra heat enhances the flavors. Balance the spice with a bit of sweetness from honey or maple syrup. For a heartier meal, add protein like tofu, chicken, or shrimp. Cook the protein separately and add it to the noodles. If using tofu, press it first to remove extra water. For chicken, grill or sauté it until golden brown. For shrimp, cook until they turn pink and opaque. This step makes your meal filling and nutritious. To store leftovers, place the noodles and sauce in an airtight container. This keeps them fresh and prevents drying out. The shelf life of prepared noodles and sauce is about 3 to 5 days in the fridge. If you wait longer, the texture and flavor may change. You can freeze the noodles and peanut sauce separately. For the noodles, cool them first. Then, place them in a freezer-safe bag. For the sauce, pour it into a container and leave some space for expansion. To thaw, place them in the fridge overnight. If you're in a hurry, you can also use the microwave. To reheat, warm the noodles and sauce together on low heat. For the best taste, reheat the noodles gently on the stove. If they seem dry, add a splash of water to help them soften. After refrigeration or freezing, the texture may change slightly. Toss in some fresh veggies or a drizzle of sesame oil to bring back the dish's freshness. Yes, you can make Sesame Peanut Noodles ahead of time. This dish keeps well in the fridge. Here are some tips for meal prepping: - Cook the noodles and sauce separately. This keeps the noodles from getting soggy. - Mix the sauce and noodles just before serving. This ensures freshness. - Store the veggies in a separate container. They stay crisp longer. - You can prepare the sauce a day in advance. Just store it in the fridge. I recommend using whole grain noodles for this recipe. They add more fiber and flavor. You can also try: - Rice noodles for a gluten-free option. - Soba noodles for a nutty taste. - Egg noodles for a richer flavor. Each type gives a unique texture and taste. Choose what you like best! To make Sesame Peanut Noodles healthier, consider these suggestions: - Use less peanut butter or a light version to cut calories. - Add more veggies like bell peppers or broccoli. They boost nutrients. - Swap soy sauce for a low-sodium version to reduce salt intake. - Use a natural sweetener like stevia instead of maple syrup or honey. These changes keep the flavor but add health benefits. Yes, this recipe is suitable for a vegan diet. All the ingredients are plant-based: - Use tamari instead of soy sauce for gluten-free. - Choose maple syrup instead of honey for a vegan sweetener. - The peanut butter is also vegan. Enjoy this dish knowing it fits a vegan lifestyle! Sesame peanut noodles are simple to make and easy to customize. We covered the main ingredients, tips for cooking, and how to add your personal touch. You can make it spicy or protein-packed with ease. Don’t forget about storage tips for leftovers. This dish offers many tasty options and variations. You can enjoy it any way you like. Dive in and create your version; it will delight your taste buds!

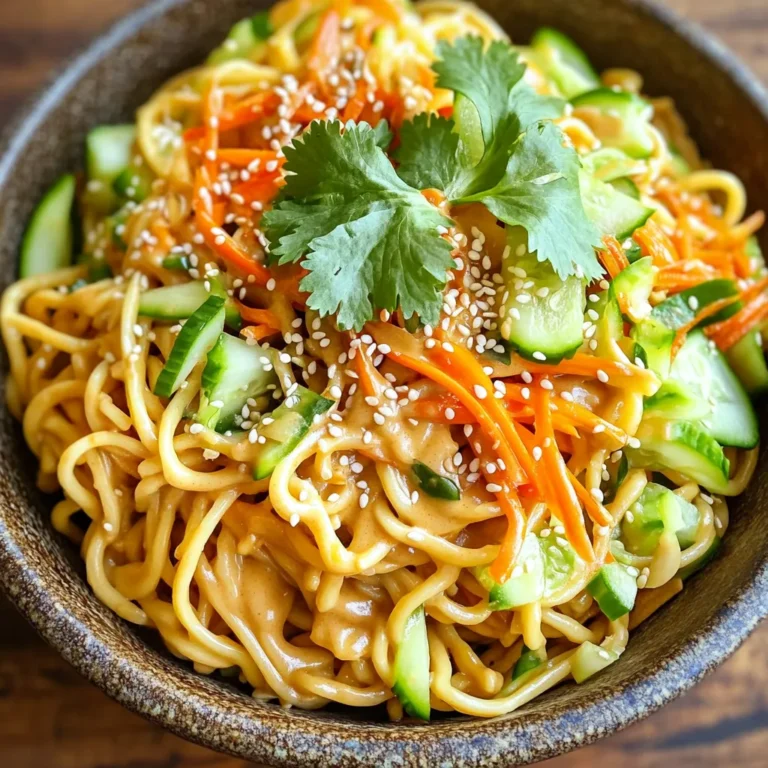
Savory Sesame Peanut Noodles Quick and Easy Recipe

To make delicious caramel apple crumble bars, gather these ingredients: - 2 cups all-purpose flour - 1 cup rolled oats - 1/2 cup brown sugar, packed - 1/2 cup granulated sugar - 1 teaspoon cinnamon - 1/4 teaspoon salt - 3/4 cup unsalted butter, melted - 4 medium apples, peeled, cored, and diced - 1/2 cup caramel sauce (store-bought or homemade) - 1 tablespoon lemon juice - 1/2 teaspoon vanilla extract You can also add a few optional items for extra flavor. Consider using: - Chopped nuts like walnuts or pecans for crunch. - Dried fruit, like raisins or cranberries, for a sweet touch. - A pinch of nutmeg for warmth alongside cinnamon. These extras will give your bars a unique twist, making them even more enjoyable! First, set your oven to 350°F (175°C). This step is key for even baking. Next, grab a 9x9-inch baking pan. You can grease it or line it with parchment paper. Both methods help with easy removal later. In a large bowl, mix the dry crust ingredients. Combine 2 cups of all-purpose flour, 1 cup of rolled oats, 1/2 cup of brown sugar, 1/2 cup of granulated sugar, 1 teaspoon of cinnamon, and 1/4 teaspoon of salt. This blend creates a nice flavor base. Pour in 3/4 cup of melted butter. Stir until crumbly. Now, press half of this mixture firmly into the bottom of your baking pan. It should cover the bottom evenly. This forms a tasty crust for your bars. Take 4 medium apples and peel, core, and dice them. In a separate bowl, toss these apple pieces with 1 tablespoon of lemon juice and 1/2 teaspoon of vanilla extract. This step adds brightness to the apples. Spread the apple mixture evenly over the crust layer. Then, drizzle 1/2 cup of caramel sauce over the apples. Make sure to cover them well. The caramel adds sweetness and richness. Now, crumble the remaining oat mixture on top of the caramel and apples. Press it down lightly to hold it in place. This creates a nice topping. Bake your bars in the preheated oven for 30 to 35 minutes. Check for a golden top and bubbling apples. Once done, let the bars cool in the pan for at least 15 minutes. If you used parchment paper, lift them out easily. Cut into squares, and enjoy your delicious treat! To get the best texture for your crumble, use cold butter. This keeps the mixture crumbly instead of mushy. When mixing, stop when the ingredients look like coarse crumbs. Substitutes for oats and flour: If you need a swap, try almond flour for a nutty taste. You can also use coconut flour, but use less as it absorbs more moisture. For oats, you can use crushed nuts or seeds. This gives a different crunch and flavor. For a lovely presentation, dust your bars with powdered sugar. It adds a sweet touch. You can also drizzle extra caramel sauce over the top. These bars pair well with a scoop of vanilla ice cream. The warm crumble and cold ice cream create a delightful mix. Whipped cream is another great option for topping. It adds creaminess and lightness to each bite. {{image_2}} You can add nuts or dried fruit to your bars. Walnuts or pecans add a nice crunch. Dried cranberries or raisins give a sweet touch. Try mixing in a half-cup of your favorite nuts or fruits for added flavor. Using different fruit combinations can also change things up. Pears, for example, work well with apples. You can even try berries for a fresh twist. Mixing fruits can make your bars unique and fun. If you need gluten-free options, swap the all-purpose flour. Use a gluten-free flour blend instead. Oats are often gluten-free, but check the label to be sure. This way, everyone can enjoy these tasty bars. For vegan options, replace the butter with coconut oil or vegan butter. You can also use plant-based caramel sauce. There are many brands available that are dairy-free. This keeps the flavor rich without using animal products. To keep your caramel apple crumble bars fresh, store them in an airtight container. Place a layer of parchment paper between layers if you stack them. This helps avoid sticking. Keep them at room temperature for up to three days. If you live in a humid area, you may want to store them in the fridge. Just remember, cold air can make the bars a bit less soft. If you want to save some bars for later, freezing is a great option. First, let the bars cool completely. Then cut them into squares. Wrap each square tightly in plastic wrap. Place the wrapped bars in a freezer-safe bag. You can freeze them for up to three months. To thaw, take the bars out of the freezer. Leave them in the fridge overnight. For a quicker thaw, you can set them out at room temperature for about 1-2 hours. Enjoy them as a tasty treat whenever you like! Yes, you can use store-bought caramel sauce. It saves time and is easy to find. Look for a good quality sauce for the best flavor. If you have time, making your own caramel is great too. Homemade caramel can add a special touch to your bars. You can tell the bars are done when the top is golden brown. Also, check if the apples are bubbling around the edges. The smell will fill your kitchen, making it hard to wait! If you tap the top lightly, it should feel firm, not soft. The best apples for baking are Granny Smith and Honeycrisp. Granny Smith gives a tart flavor, while Honeycrisp adds sweetness. Other good options include Fuji and Braeburn. Always choose firm apples for the best texture in your bars. In this blog post, I covered the key ingredients and simple steps to make delicious apple bars. You learned how to prepare the crust, layer the filling, and bake to perfection. I also shared handy tips for texture and serving. Remember, you can customize the recipe with different fruits or dietary needs. Store your bars properly and enjoy them fresh or frozen. With these techniques, your apple bars will impress anyone who tries them. Happy baking!

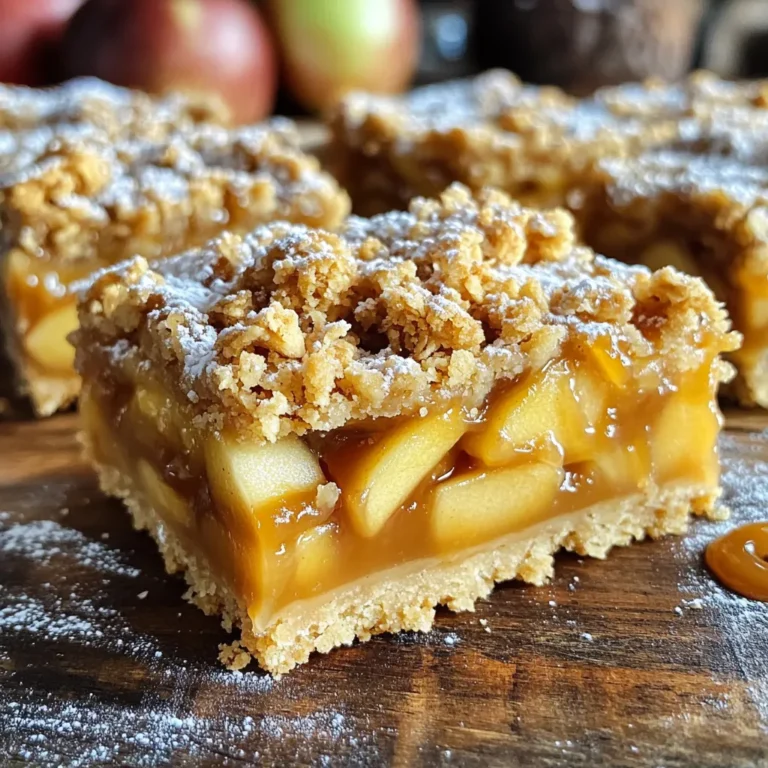
Caramel Apple Crumble Bars Tasty Autumn Treat

To make One Pot Spicy Sausage Tomato Pasta, you need the following ingredients: - 2 tablespoons olive oil - 1 pound spicy Italian sausage, casing removed - 1 medium onion, diced - 4 cloves garlic, minced - 1 red bell pepper, diced - 1 teaspoon red pepper flakes (adjust to taste) - 1 can (28 ounces) crushed tomatoes - 4 cups chicken broth - 12 ounces pasta (penne or rigatoni work well) - 1 cup cherry tomatoes, halved - 1 teaspoon dried oregano - Salt and pepper to taste - 1/2 cup fresh basil, chopped - Grated Parmesan cheese for serving Each ingredient plays a key role in the dish. The spicy Italian sausage brings a bold flavor. The onion and garlic add depth and aroma. Red bell pepper adds sweetness and color. Crushed tomatoes form a rich base, while chicken broth gives the pasta a savory touch. The pasta absorbs all the flavors, making every bite delicious. Cherry tomatoes add a burst of freshness, and basil gives a fragrant finish. Lastly, grated Parmesan cheese adds creaminess and richness when served. Start by heating 2 tablespoons of olive oil in a large pot over medium heat. Add 1 pound of spicy Italian sausage, breaking it apart with a wooden spoon. Sauté the sausage until it is browned, which takes about 5 to 7 minutes. Browning the sausage adds flavor and depth to the dish. After browning, it’s important to drain any excess grease. This helps keep the dish from becoming too oily. Next, add 1 medium onion, diced, 4 cloves of minced garlic, and 1 diced red bell pepper to the pot. Sauté these vegetables for about 3 to 4 minutes. This step softens them and enhances their flavors. If you prefer a crunchier texture, you can sauté them for a shorter time. Now, stir in 1 teaspoon of red pepper flakes. This spice brings heat to the dish, so adjust it to your taste. After mixing it well, pour in a 28-ounce can of crushed tomatoes and 4 cups of chicken broth. Stir to combine everything. Bring the mixture to a boil, which helps meld all the flavors together. Once boiling, add 12 ounces of pasta, such as penne or rigatoni, and 1 cup of halved cherry tomatoes. Reduce the heat to low and cover the pot. Let it simmer for about 12 to 15 minutes. This allows the pasta to cook and absorb some liquid. Be sure to check the doneness and stir occasionally to prevent sticking. After the pasta is cooked, season it with salt and pepper to taste. Then, stir in ½ cup of chopped fresh basil. This adds a lovely aroma and fresh flavor to your dish. You can serve it hot, topped with grated Parmesan cheese for extra richness. Using a large pot is key for even cooking. It allows all the ingredients to heat up properly. When you sauté the sausage, ensure it browns well. This adds depth to the flavor. Stirring the pasta often prevents it from sticking together. This simple act will keep your dish smooth and enjoyable. To boost the taste, try adding more spices. A dash of smoked paprika can add a nice touch. Fresh herbs like thyme or parsley also work great. You can switch up your cheese toppings too. Instead of Parmesan, try crumbled feta or shredded mozzarella. Each choice will give a new flavor twist. Different pasta types need different cooking times. If you use thin pasta, check it after 8 minutes. For thicker shapes like rigatoni, stick with the full simmer time. Always ensure your pasta is al dente. It should have a slight bite. This texture makes every bite satisfying and keeps your dish from becoming mushy. {{image_2}} You can change the protein in this dish easily. Chicken or turkey sausage works well. Both give a lighter taste while still packing flavor. Simply swap the spicy Italian sausage for your choice. You can also try vegetarian options. Plant-based sausage gives you a similar taste and texture without meat. These swaps keep the dish tasty and fun. Pasta can change the whole vibe of your dish. You can use fusilli or spaghetti instead of penne or rigatoni. Fusilli holds sauce well, while spaghetti offers a classic feel. If you're gluten-free, there are many options too. Gluten-free pasta is now easy to find in stores. Just pick your favorite type and follow the same cooking steps. Adding veggies boosts flavor and nutrition. Seasonal veggies like zucchini and spinach are great choices. Zucchini adds a nice crunch, and spinach gives a fresh taste. You can toss them in when you add the other vegetables. This way, they cook just right and blend well with the pasta. Incorporating greens makes your meal healthier and more colorful. To keep your One Pot Spicy Sausage Tomato Pasta fresh, store it in an airtight container. It’s best to let the pasta cool before sealing it. This helps prevent condensation and keeps it from getting mushy. In the fridge, it lasts about 3 to 4 days. Make sure to label the container with the date you made it. If you want to freeze this dish, it’s easy! Portion it into freezer-safe containers. Leave some space at the top, as the pasta will expand when frozen. The pasta can stay in the freezer for up to 2 months. To reheat, thaw it in the fridge overnight. Then, warm it on the stove over low heat. Add a splash of chicken broth to keep it moist and tasty. This pasta is a great choice for meal prep. You can make a big batch on the weekend for busy weeknights. Portion it into single servings for easy lunches or dinners. Use clear containers so you can see what’s inside. This way, you’ll always have a delicious meal ready to go! Yes, you can make One Pot Spicy Sausage Tomato Pasta ahead of time. Prepare it fully and let it cool. Store it in an airtight container in the fridge for up to three days. To reheat, warm it on the stove over low heat. Add a splash of broth if needed to bring back moisture. To change the spice level, adjust the red pepper flakes. For less heat, use half a teaspoon. For more heat, add more flakes. You can also swap spicy sausage for mild sausage. This way, you control the spice based on your taste. This pasta dish pairs well with simple salads. A Caesar salad or a mixed greens salad works great. Garlic bread is also a popular side. You can serve it with a light, zesty salad to balance the dish's rich flavors. Yes, this recipe is great for meal prepping. Prepare the dish and let it cool. Portion it into containers for easy lunches or dinners. It keeps well in the fridge and reheats nicely. Just make sure to store it properly to maintain flavor. This blog post covered a delicious and simple recipe for One Pot Spicy Sausage Tomato Pasta. We explored key ingredients, step-by-step cooking instructions, and helpful tips to enhance flavor. I shared ways to modify the dish with different proteins and vegetables. Proper storage tips ensure your meal stays fresh, whether in the fridge or freezer. With this knowledge, you can create a tasty meal that suits your needs. Enjoy cooking and making this dish your own!

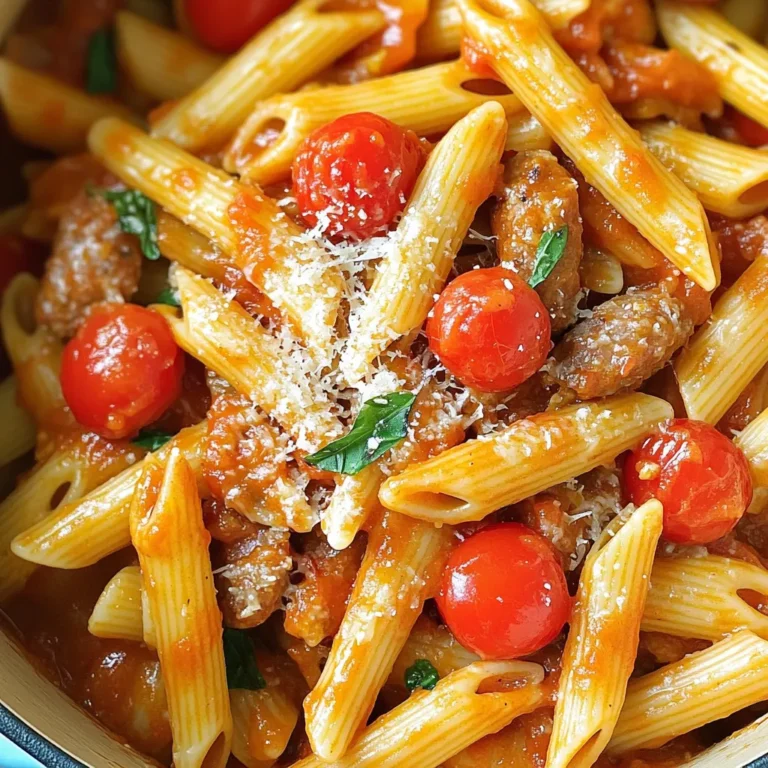
One Pot Spicy Sausage Tomato Pasta Flavorful Delight

To make the dough for these sticky buns, you need: - 4 cups all-purpose flour - 1/4 cup granulated sugar - 1 packet (2 1/4 teaspoons) active dry yeast - 1 teaspoon salt - 1/2 cup milk, warmed - 1/2 cup water, warmed - 1/2 cup unsalted butter, melted - 2 large eggs - 1 teaspoon vanilla extract The warm milk and water help activate the yeast. The flour provides the main structure. The sugar adds sweetness, and the eggs make the dough rich and fluffy. For the caramel, gather these ingredients: - 1 cup brown sugar - 1/2 cup unsalted butter (for caramel) - 1/3 cup maple syrup - 1 teaspoon cinnamon - Pinch of salt This caramel brings a rich flavor and sticky texture. The maple syrup adds a nice depth to the sweetness. Feel free to get creative with these extras: - 1 cup pecans, chopped Pecans add crunch and a nutty flavor. You can also try different nuts or even chocolate chips for a fun twist. To start, mix the warm milk, warm water, and active dry yeast in a large bowl. Let it rest for five minutes until it gets frothy. This shows the yeast is active. In another bowl, combine the all-purpose flour, granulated sugar, and salt. Gradually mix in the melted butter, eggs, and vanilla extract with the yeast mixture. Then, stir in the dry ingredients until a dough forms. Knead the dough on a floured surface for five to seven minutes until it feels smooth. Place it in a greased bowl, cover it with a cloth, and let it rise in a warm spot for about one hour, or until it doubles in size. While your dough rises, it’s time for the caramel. In a small saucepan, melt the unsalted butter for the caramel. After it melts, add the brown sugar, maple syrup, and a pinch of salt. Cook this mixture over medium heat. Stir it well until it thickens slightly, then take it off the heat. Pour the caramel into a greased 9x13-inch baking dish. Evenly sprinkle the chopped pecans over the caramel. Once your dough has risen, roll it out on a lightly floured surface into a rectangle, about 12x18 inches. Brush the remaining melted butter over the dough. In a small bowl, mix the brown sugar and cinnamon together. Sprinkle this mixture evenly over the buttered dough. Roll the dough tightly from the long edge into a log shape. Cut the log into 12 equal pieces. Place these cut rolls in the baking dish on top of the caramel, leaving a little space between each roll. Cover them and let them rise for another 30 minutes. Preheat your oven to 350°F (175°C). Bake the sticky buns for 25 to 30 minutes. They should turn golden brown. If they brown too quickly, cover them with foil. When done, remove them from the oven. Invert the baking dish onto a large serving platter so the caramel is on top. Enjoy every delicious bite! To make great dough, start with warm liquids. This helps activate the yeast. I recommend using a thermometer to ensure the milk and water are around 110°F (43°C). Next, knead the dough well. A good knead makes the dough smooth and elastic. Let it rise in a warm spot. A cozy, draft-free area helps it grow. Cover it with a cloth to keep it warm. The caramel should be thick but pourable. Cook it over medium heat. Stir constantly to prevent burning. If you want a deeper flavor, add a splash of vanilla or a hint of bourbon. The maple syrup adds a nice touch, but feel free to use honey for a different taste. A pinch of salt brings out the sweetness. Preheat your oven to 350°F (175°C) before placing the buns inside. This ensures even baking. Bake for 25-30 minutes until they are golden brown. If they brown too fast, cover them with foil. Let them cool for a few minutes before flipping them over. This helps the caramel set nicely on top. {{image_2}} If you want to make nut-free sticky buns, skip the pecans. You can use seeds instead. Sunflower seeds or pumpkin seeds add great crunch. Just sprinkle them on top of the caramel. This swap keeps the taste rich and delicious. Mix up the flavors to suit your taste! You can add different spices. Try nutmeg or allspice for a warm twist. You can also change the vanilla extract. Almond extract gives a lovely hint of flavor. Just use a teaspoon, as it’s stronger than vanilla. Want to prep ahead? Make the sticky buns the night before! After cutting the rolls, place them in the baking dish. Cover and chill them in the fridge overnight. In the morning, let them rise for about an hour. Then bake as usual. It’s an easy way to enjoy fresh buns with less morning stress. To keep your leftover caramel pecan sticky buns fresh, place them in an airtight container. You can also wrap them tightly in plastic wrap. This helps prevent them from drying out. Store the buns at room temperature for up to two days. If you want to keep them longer, refrigeration is an option, but it may change the texture slightly. Freezing is a great way to save your sticky buns for later. Allow the buns to cool completely first. Then, wrap each bun in plastic wrap. Place them in a freezer-safe bag or container. They will stay fresh for up to three months in the freezer. Label the bag with the date to keep track of freshness. To reheat your sticky buns, take them out of the fridge or freezer. If frozen, let them thaw in the fridge overnight. Preheat your oven to 350°F (175°C). Place the buns on a baking sheet, covering them with foil. Heat for about 10-15 minutes until warmed through. You can also microwave them for 15-20 seconds if you prefer a quicker method. Enjoy them warm for the best taste! Yes, you can use instant yeast. It works well too. Instant yeast does not need to be dissolved in liquid first. You can mix it directly into your dry ingredients. Use the same amount as active dry yeast. This can save time in your prep. To reduce sweetness, cut back on brown sugar. You can use less in the filling. Also, try adding more cinnamon for flavor. This will balance the sweet taste. Consider using dark chocolate chips instead of sweet toppings. They will give a richer flavor and less sweetness. If you need a substitute for pecans, try walnuts or almonds. Both will add a nice crunch. You can also use sunflower seeds for a nut-free option. Each alternative will change the flavor slightly but still taste great. Yes, you can make these buns dairy-free. Use plant-based milk like almond or oat milk. Replace unsalted butter with dairy-free margarine or coconut oil. Many dairy-free options work well in this recipe. You won’t lose any of the delicious flavors. Making sticky buns involves a few key steps and some yummy ingredients. You mix the dough, create a rich caramel, and put it all together for a delightful treat. Remember the tips to perfect your buns, like baking times and ingredient swaps. You can store leftovers or freeze them for later. Experiment with flavors and variations, like nut-free options or different spices. Enjoy the fun of baking these sticky buns! Happy baking!

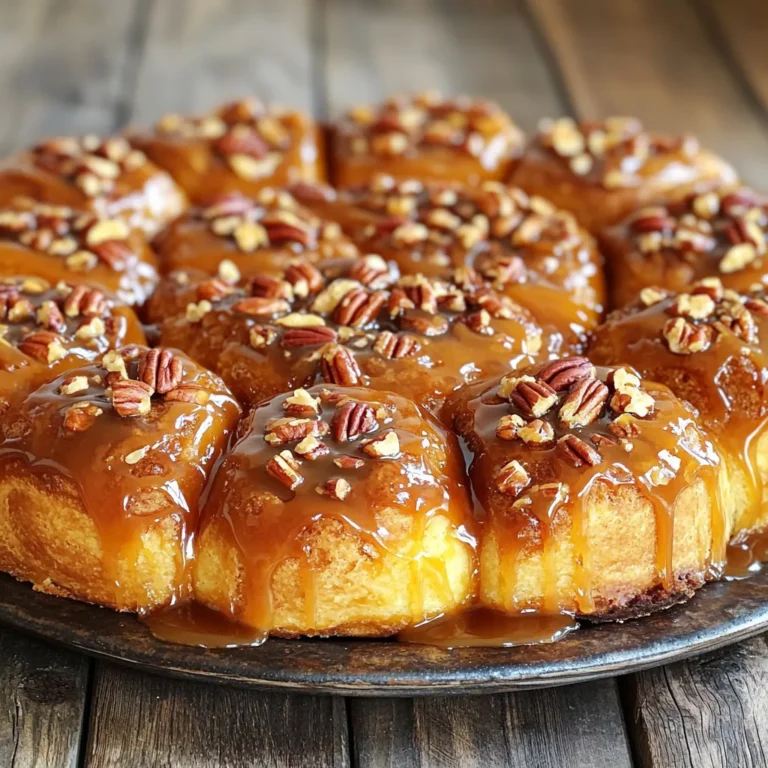
Caramel Pecan Sticky Buns Irresistible Sweet Treat

PREV 1 … 10 11 12 … 56 NEXT
secrets pice kitchen

explore

DessertsDinnerAppetizersDrinks

Our Policies

  • Cookie Policy
  • Copyright Policy
  • Disclaimer
  • GDPR Policy
  • Terms Of Use
Back to Top
  • About
  • Contact Us
  • Privacy Policy
© 2025 secrets pice kitchen