FREE DINNER EBOOK! Get your copy!
  • Cookie Policy
  • GDPR Policy
  • Disclaimer
  • Terms Of Use
  • Visit my other site: Fun Cookie Recipes
secrets pice kitchen
  • Home
  • Dinner
  • Desserts
  • Drinks
  • Appetizers
  • Contact
  • About
  • Privacy Policy
  • Home
  • Dinner
  • Desserts
  • Drinks
  • Appetizers
  • Contact
  • About
  • Privacy Policy
  • Cookie Policy
  • GDPR Policy
  • Disclaimer
  • Terms Of Use
Visit my other site: Fun Cookie Recipes

HOME / CATEGORIES /

Latest

- 4 cups Rice Krispies cereal - 1 cup mini marshmallows - 1/4 cup unsalted butter - 1 cup caramel sauce (store-bought or homemade) - 1 medium apple, diced (I love using Honeycrisp) - 1/2 teaspoon cinnamon - 1/2 cup chopped nuts (like walnuts or pecans, optional) - 1/4 cup additional caramel sauce for drizzling You can swap Rice Krispies with a gluten-free cereal for a gluten-free treat. If you can't find mini marshmallows, use regular marshmallows. Just chop them into smaller pieces. For the caramel, homemade sauce adds a rich taste, but store-bought works well too. Try sweet apples like Fuji or Gala if you can't find Honeycrisp. You can leave out the nuts for a nut-free version. Want to make these treats even better? Add in chocolate chips for a sweet twist. Dried cranberries or raisins can add a nice chew. Try a pinch of nutmeg for a warm flavor. You can also drizzle melted chocolate on top for extra fun. First, grab a 9x13 inch baking dish. Line it with parchment paper, leaving some paper hanging over the edges. This makes it easy to lift out the treats later. Next, take a large saucepan. Place it over low heat and add 1/4 cup of unsalted butter. Let it melt completely. Once the butter melts, add 1 cup of mini marshmallows. Stir them together until they melt and become smooth. Now, remove the saucepan from the heat. It’s time to add 1 cup of caramel sauce. Pour it into the melted marshmallow mixture. Stir until everything is mixed well. In a big bowl, combine 4 cups of Rice Krispies cereal, 1 medium diced apple, and 1/2 teaspoon of cinnamon. If you want some crunch, add 1/2 cup of chopped nuts. Pour the warm marshmallow-caramel mixture over the dry ingredients. Mix gently, making sure everything is coated. Pour your mixture into the prepared baking dish. To prevent sticking, wet your hands a little. Press the mixture firmly and evenly into the pan. Let your treats cool at room temperature for about 30 minutes. Once set, lift them out using the parchment paper. Drizzle with 1/4 cup of extra caramel sauce. Now, cut them into squares or rectangles. Enjoy your yummy treats! To stop the mixture from sticking to your hands or the pan, wet your hands with water. This simple step helps to keep the treats from clinging. Also, make sure to line the baking pan with parchment paper. Leave some paper hanging over the edges. This makes it easy to lift out the treats later. Mix the Rice Krispies, apples, and nuts in a large bowl first. This helps evenly spread the flavors. When you pour the melted marshmallow and caramel mixture over the dry mix, stir gently but thoroughly. Use a spatula to fold everything together. This ensures every bite is tasty and has a good mix of flavors. Let the treats cool at room temperature for about 30 minutes. This helps them set properly and makes cutting easier. Avoid putting them in the fridge, as this can make them too hard. Once set, use the parchment paper to lift them out of the pan. Drizzle with caramel on top for a sweet finish! {{image_2}} You can change the nuts in your treats for more taste. I love using walnuts or pecans for crunch. If you want a sweeter flavor, go for hazelnuts or almonds. You can also skip the nuts if you want a nut-free treat. Just remember to adjust your ratios to keep the same texture. If you want to switch things up, try maple syrup instead of caramel. This option adds a rich flavor and is a bit healthier too. You can mix it in with the melted marshmallows. Honey also works well if you prefer it. Just make sure to use a bit less, as it is sweeter than caramel. You can mix in other fruits for a fun twist. Diced pears or bananas can add sweetness and moisture. Peaches or berries can also work, but they may change the texture a little. You can also add some dried fruits like raisins or cranberries for a tasty surprise. Just aim for a good balance of flavors to keep it delicious. To keep your Caramel Apple Rice Krispie Treats fresh, place them in an airtight container. You can store them at room temperature for up to three days. If you want to keep them longer, refrigeration is a good option. Just be sure to wrap them tightly to avoid drying out. If you want to freeze these treats, cut them into squares first. Wrap each piece in plastic wrap, then place them in a freezer-safe bag. They can last for up to three months in the freezer. To enjoy later, simply pull out a piece and let it thaw at room temperature. If you need to reheat your Rice Krispie Treats, the microwave is the best choice. Place a square on a microwave-safe plate and heat it for about 10-15 seconds. This helps soften them without making them too chewy. Enjoy your treats warm for a delightful experience! Yes, you can use regular marshmallows. Just cut them into smaller pieces. This helps them melt evenly. You will need about 10 ounces of regular marshmallows to match one cup of mini ones. The texture of the treats will still be chewy and sweet. To make easy homemade caramel sauce, follow these steps: - Ingredients: - 1 cup granulated sugar - 6 tablespoons unsalted butter - 1/2 cup heavy cream - Instructions: 1. In a saucepan, heat sugar over medium heat. Stir it until it melts and turns golden brown. 2. Add butter and stir until melted. 3. Slowly pour in heavy cream, stirring constantly. Be careful, as the mixture may bubble up. 4. Remove from heat and let it cool slightly. Store in a jar or use right away. This sauce adds a rich flavor to your treats! You can serve these treats in many fun ways: - On a Platter: Stack them on a decorative plate. - With Extras: Add apple slices and drizzle with extra caramel. - In Bags: Wrap individual pieces in cellophane bags for gifts. - On Sticks: Insert popsicle sticks for easy eating at parties. These ideas make your treats even more fun and appealing! This post covered key steps to make tasty Caramel Apple Rice Krispie Treats. We discussed the ingredients and useful swaps, plus tips to avoid sticking. You learned how to store leftovers and freeze your treats. Remember to try different nuts or sweeteners for new flavors. Making these treats is fun and rewarding. Enjoy your tasty creations!

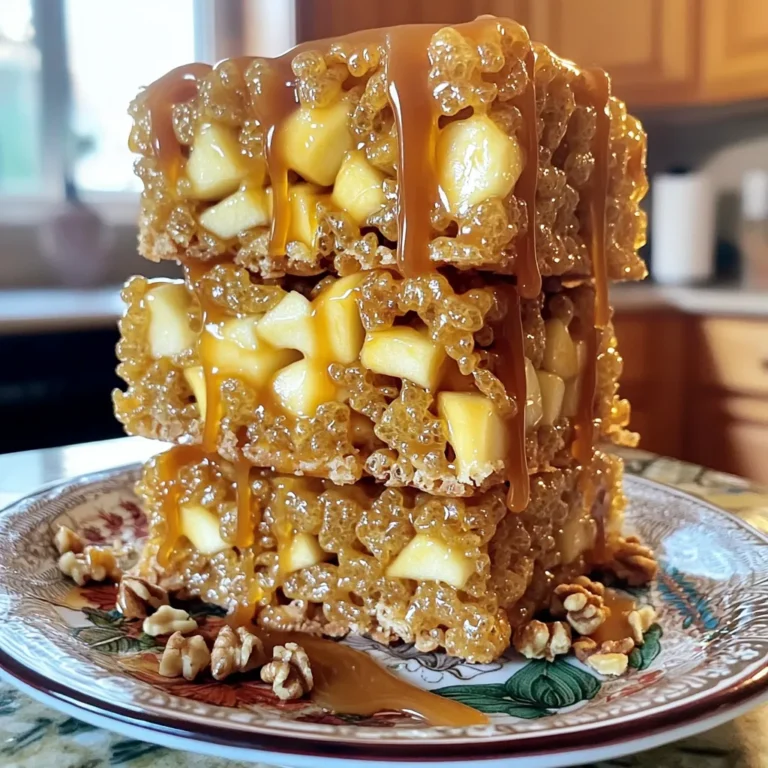
Caramel Apple Rice Krispie Treats Delightful and Fun

- 2 cups cooked jasmine rice - 2 large eggs - 3 tablespoons chili crisp oil - 1 cup mixed vegetables (peas, carrots, corn) - 2 green onions, chopped - 2 cloves garlic, minced - 1 tablespoon soy sauce - 1 teaspoon sesame oil - Salt and pepper to taste - Fresh cilantro for garnish (optional) In this dish, the main ingredients shine through. The cooked jasmine rice works best if it's day-old. This rice is fluffy and has a great texture. The large eggs bring richness and flavor. Chili crisp oil gives it a spicy kick, making each bite exciting. For complementary ingredients, I like to use a mix of peas, carrots, and corn. These veggies add color and crunch. Green onions offer a fresh taste, and minced garlic brings a lovely aroma. Finally, seasonings are key. Soy sauce adds umami, while sesame oil gives depth. Salt and pepper balance the flavors. You can top your dish with fresh cilantro for a bright finish. This mix of ingredients makes chili crisp fried rice a quick and tasty meal. First, heat a large skillet or wok over medium heat. The heat should be just right. Add 3 tablespoons of chili crisp oil and let it shimmer. This oil brings a nice spice to your dish. Next, add 2 cloves of minced garlic. Sauté it for about 30 seconds. You want the garlic to smell great, but be careful not to let it burn. Then, stir in 1 cup of mixed vegetables like peas, carrots, and corn. Cook these for 2-3 minutes until they soften. Now, push the veggies to one side of the pan. Crack 2 large eggs into the empty space. Scramble them gently until they are fully cooked. Mixing the eggs with the veggies adds flavor. Once the eggs are cooked, combine them with the veggies. Add in 2 cups of cooked jasmine rice, breaking up any clumps. Next, drizzle 1 tablespoon of soy sauce and 1 teaspoon of sesame oil over the rice. Add salt and pepper to taste to make it just right. Stir everything together well. Cook for an extra 3-4 minutes. This helps the rice fry a little and get crispy. If you want more spice, add a bit more chili crisp oil at this stage. Finally, remove the skillet from heat. Stir in 2 chopped green onions for freshness. Serve the fried rice hot, and if you like, add fresh cilantro on top for a tasty garnish. Enjoy your meal! Using day-old rice is key for fried rice. It dries out a bit in the fridge, which helps it fry better. Fresh rice may clump or turn mushy. If you don’t have day-old rice, you can cook fresh rice and spread it on a tray to cool. This helps dry it out a bit, too. You can use jasmine rice or any long-grain rice. Brown rice adds more texture and nutrients, but it takes longer to cook. Chili crisp oil is your friend! Start with three tablespoons and taste as you go. You can always add more if you want more heat. If you love spice, try adding chili flakes or fresh chilies. Slicing fresh jalapeños or serranos gives a nice kick. Just remember to balance the heat with the other flavors in the dish. To get crispy fried rice, use high heat. This helps the rice fry instead of steam. Stir the rice less often as it cooks. Let it sit for a minute before stirring. This gives it a chance to crisp up. If your rice is soggy, it’s likely from too much moisture. Make sure to use dry, cold rice and keep the heat steady. {{image_2}} You can make this dish even more vibrant with vegetables. Try adding bell peppers or zucchini to your fried rice. These veggies bring a nice crunch and color. If you want more protein, consider adding tofu or tempeh. Both options absorb flavors well. They work great with chili crisp oil too. Want to make it a hearty meal? You can add protein like chicken, shrimp, or beef. Each option brings a unique taste. - Chicken: It pairs well with the chili crisp oil and adds a juicy texture. - Shrimp: This brings a sweet and savory flavor. Cook them until just pink for best results. - Beef: Use thin slices for quick cooking. It gives a rich, meaty taste. Boost your dish’s flavor with different sauces. Try hoisin or oyster sauce for a deeper taste. These sauces add a hint of sweetness and umami. You can also sprinkle in optional spices like ginger or five-spice powder. These spices add warmth and depth to your fried rice. Don't be afraid to experiment! To keep your chili crisp fried rice fresh, store it properly. Use an airtight container. This helps prevent moisture loss and keeps flavors intact. Make sure to cool the rice before placing it in the fridge. It can last for about 3 to 4 days in the refrigerator. Always check for any signs of spoilage before eating. Reheat your fried rice gently for the best texture. Use a skillet over medium heat. Add a splash of water or broth to keep it moist. Stir often to avoid sticking. You can also use a microwave, but cover the bowl to trap steam. Heat in short bursts and stir in between. This method helps keep the rice soft and not dry. Freezing chili crisp fried rice is a great way to save it for later. Let the rice cool completely before freezing. Use a freezer-safe container or bag. Squeeze out as much air as possible to prevent freezer burn. It can stay fresh for up to 2 months. When you're ready to eat it, thaw it overnight in the fridge. Reheat it in a skillet for the best results. Yes, you can use different types of rice. Here are some good options: - Brown rice for a nutty flavor - Basmati rice for a fragrant twist - Short-grain rice for a sticky texture All of these work well, but jasmine rice gives the best taste and texture. Making chili crisp is simple! You need a few basic ingredients: - Dried chili flakes for heat - Oil, like vegetable or sesame - Garlic for flavor - Optional: onion flakes and spices like salt Just heat the oil, add the other ingredients, and let it cook until fragrant. If you're allergic to some vegetables, here are safe alternatives: - Spinach or kale for greens - Bell peppers for sweetness - Zucchini or squash for a mild flavor Feel free to mix and match based on what you like! This dish has about 400-500 calories per serving. It depends on the amount of oil and egg used. Keep in mind your portion size to manage your intake. Absolutely! To make it vegan, you can: - Replace eggs with scrambled tofu or chickpea flour - Use vegetable oil instead of chili crisp oil - Skip the soy sauce if it contains fish sauce These swaps keep the flavor while making it plant-based and delicious! To sum up, this chili crisp fried rice is simple and delicious. You need cooked jasmine rice, eggs, and chili crisp oil. Add mixed veggies and seasonings for extra flavor. Remember to use cold, day-old rice for the best texture. Experiment with proteins and sauces to tailor the dish to your taste. Enjoying and sharing this meal can bring joy. With these tips, you can make a tasty and satisfying dish every time. Happy cooking!

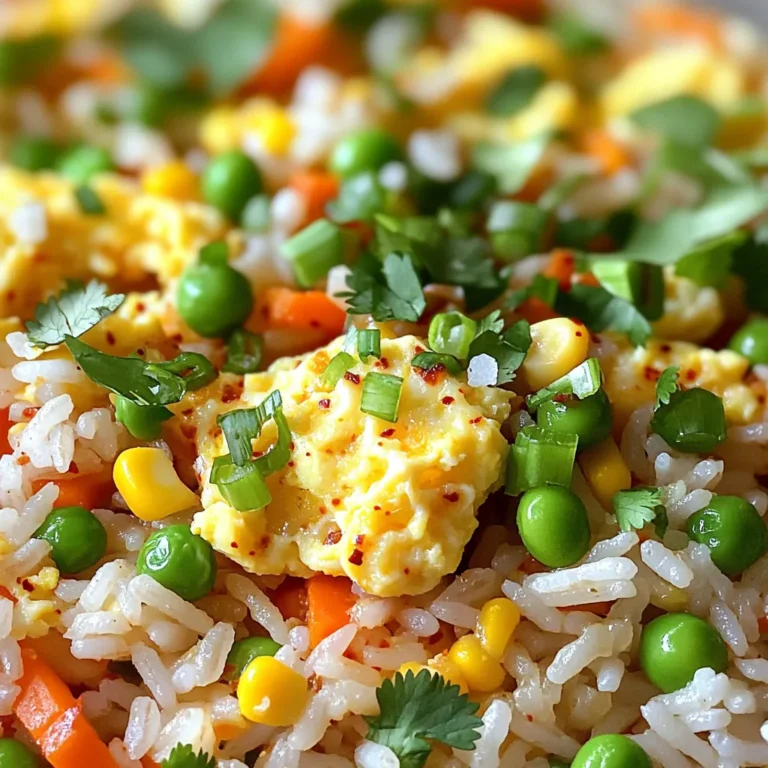
Chili Crisp Fried Rice with Egg Quick and Tasty Meal

To make a tasty broccoli cheddar soup, you need these key ingredients: - 1 large head of broccoli, chopped - 1 medium onion, diced - 2 cloves garlic, minced - 4 cups vegetable broth - 2 cups shredded sharp cheddar cheese - 1 cup heavy cream - 3 tablespoons olive oil - 3 tablespoons unsalted butter - 1/4 cup all-purpose flour - Salt and pepper, to taste Each of these ingredients brings its own flavor. Broccoli gives a fresh taste, while cheddar adds richness. The cream balances the flavors, making the soup smooth. For the bread bowls, you can choose between sourdough or whole wheat. Sourdough has a tangy taste and a chewy texture. It pairs well with the rich soup. Whole wheat is heartier and adds a nutty flavor. It also offers more fiber. Both options work great, so pick what you like best! Garnishing your soup adds color and crunch. I suggest using croutons for a crispy bite. They bring a nice texture to the creamy soup. Fresh parsley also brightens the dish. It adds a pop of green and a hint of freshness. You can sprinkle both on top before serving for a beautiful finish. Start by heating olive oil and butter in a large pot over medium heat. When the oil is warm, add the diced onion. Cook the onion for about 5 minutes until it turns clear. This step helps build a strong flavor base. Next, add the minced garlic. Stir it in and cook for 1 to 2 minutes until you smell its wonderful aroma. This will make your kitchen smell amazing! Now it’s time to add the chopped broccoli. Stir the broccoli into the pot and sauté for about 5 minutes. This softens the broccoli a bit and enhances the taste. Next, sprinkle the flour over the mixture. Keep stirring for about 1 minute. This helps thicken the soup later. Then, gradually pour in the vegetable broth while stirring. This keeps lumps from forming. Bring the soup to a boil and then lower the heat. Let it simmer for about 15 minutes, or until the broccoli is tender and bright green. Once the broccoli is cooked, take an immersion blender and blend the soup until it is smooth. If you don’t have one, you can transfer the soup to a blender in batches. Be careful with hot soup! After blending, return the soup to the pot. Now, stir in the heavy cream and shredded cheddar cheese. Keep cooking on low heat until the cheese melts completely. Don’t forget to taste and add salt and pepper as needed. While the soup is cooking, let’s prepare the bread bowls. Carefully cut a circle at the top of each bread bowl. Scoop out the insides, but leave enough to hold the soup. This makes it fun to eat! Once the soup is ready, ladle it into each bread bowl. For a nice touch, add some croutons on top and sprinkle fresh parsley for color and flavor. Enjoy your delicious broccoli cheddar soup bread bowls! To thicken your broccoli cheddar soup, use flour or cornstarch. When you add flour, sprinkle it over the sautéed veggies and stir for one minute. This helps absorb the oil and creates a nice base. If you prefer cornstarch, mix it with cold water first, then add it to the soup while stirring. Let it cook for a few minutes until it thickens. This method keeps your soup creamy and rich. The best cheese for this soup is sharp cheddar. It adds a strong, nutty flavor that blends well with broccoli. You can also mix in Gruyère or Monterey Jack for a twist. Using a blend of cheeses gives depth to the taste. Make sure to shred the cheese yourself for the best melt. Pre-shredded cheese often contains anti-caking agents that can affect the texture. To make perfect bread bowls, choose large, round loaves. Sourdough works great for its sturdy crust. Whole wheat is a good option too, but check for thickness. Cut a circle on top and scoop out the insides carefully. Leave enough bread on the sides to hold the soup. Lightly toast the bread bowls in the oven for a few minutes before serving. This adds crunch and keeps them from getting soggy. Enjoy the soup in a warm, edible bowl for a fun twist! {{image_2}} You can make your broccoli cheddar soup even heartier by adding protein. Chicken is a great choice. Use cooked, shredded chicken for a nice texture. Cook the chicken in the pot with the onions and garlic. This adds flavor and makes the soup filling. Bacon is another tasty option. Cook the bacon until crisp, then crumble it on top of the soup. You can also stir it into the soup for a smoky flavor. Both options pair well with the creamy soup and give you more nutrients. For a vegan twist, swap the heavy cream with coconut cream or cashew cream. These options keep the soup creamy without dairy. Use a plant-based cheese or nutritional yeast instead of cheddar cheese. Nutritional yeast adds a cheesy flavor without any animal products. Choose vegetable broth to keep it vegan-friendly. You can enjoy a rich, flavorful soup without animal ingredients. This way, everyone can savor the dish. Feel free to mix in other veggies for more flavor. Carrots add sweetness and color. Chop them finely and sauté with the onions. Cauliflower is another option. It blends well and adds creaminess. Peas can bring a touch of freshness and sweetness. You can also add spinach for a burst of green. Just toss them in during the last few minutes of cooking. These variations make your soup unique and nutritious. To store leftover broccoli cheddar soup, let it cool first. Then, pour it into an airtight container. Seal it tightly and place it in the fridge. The soup stays fresh for about 3 to 4 days. If you want to keep it longer, consider freezing it. If you want to freeze the soup, use freezer-safe containers. Leave some space at the top for expansion. You can freeze the soup for up to 3 months. However, do not freeze the bread bowls. They do not freeze well and can become soggy when thawed. Instead, store them in a cool, dry place. To reheat the soup, pour it into a pot over low heat. Stir occasionally to warm it evenly. If it seems too thick, add a splash of broth or cream. For microwave reheating, use a microwave-safe bowl. Heat in short bursts, stirring in between. Once hot, ladle the soup into your bread bowls and enjoy! Yes, you can make this soup ahead of time. Just store it in the fridge. Reheat it on the stove when you are ready to serve. You can use whole milk or half-and-half as a lighter option. For a dairy-free choice, try coconut milk or cashew cream. These will give a rich taste too. To keep your bread bowls firm, scoop out the inside gently. You can also brush the inside with olive oil. This adds flavor and creates a barrier. Serve the soup hot but not boiling to help too. Yes, frozen broccoli works well. Just thaw it before cooking. It may take a little less time to cook than fresh broccoli. Broccoli cheddar soup is a simple, delicious dish to make at home. We covered key ingredients like broccoli, cheese, and bread bowls. You learned how to build flavor, blend the soup, and prepare the bowls. Remember, you can add protein or veggies for variety. Store leftovers properly for tasty meals later. With these tips, you can enjoy a tasty soup that warms you up. Dive in and savor each spoonful. You're ready to impress your family and friends!

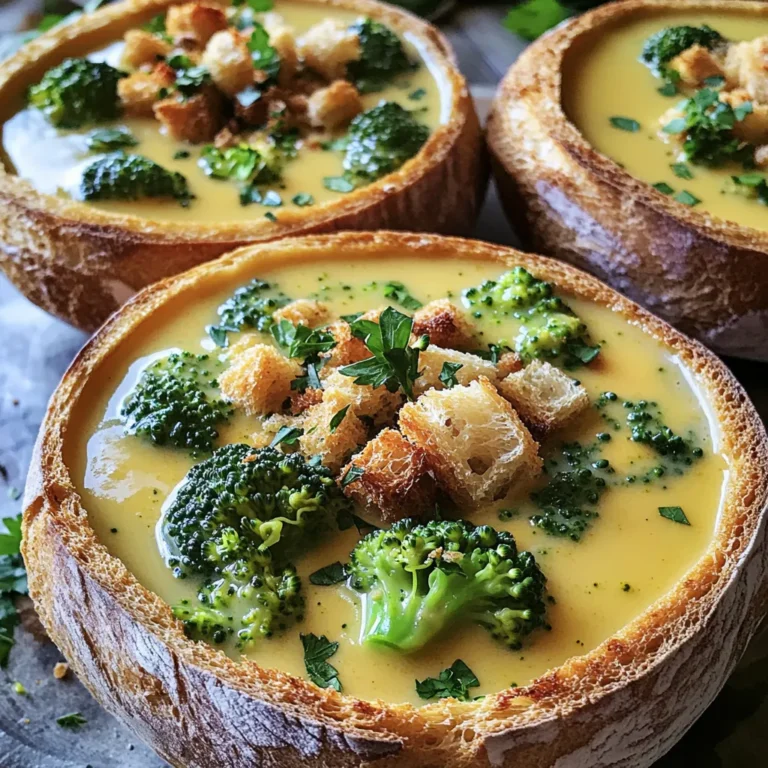
Satisfying Broccoli Cheddar Soup Bread Bowls Recipe

For the dry mix, you will need: - 1 ½ cups all-purpose flour - 1 teaspoon baking soda - ½ teaspoon baking powder - 1 teaspoon ground cinnamon - ½ teaspoon ground ginger - ¼ teaspoon ground nutmeg - ¼ teaspoon salt These dry ingredients give the muffins structure and flavor. For the wet mix, gather: - 1 cup pumpkin puree (canned or fresh) - ½ cup granulated sugar - ½ cup brown sugar, packed - ½ cup vegetable oil - 2 large eggs - 1 teaspoon vanilla extract These ingredients add moisture and sweetness to the muffins. To make the cream cheese filling, you'll need: - 8 oz cream cheese, softened - 2 tablespoons powdered sugar - 1 tablespoon lemon juice This filling adds a rich, creamy layer to each muffin. First, you need to preheat your oven to 375°F (190°C). This step is key to baking the muffins evenly. Next, take a muffin pan and line it with paper liners or spray it lightly with cooking spray. This helps the muffins come out easily and keeps them from sticking. Now, let’s make the cream cheese filling. In a medium bowl, mix together 8 oz of softened cream cheese, 2 tablespoons of powdered sugar, and 1 tablespoon of lemon juice. Stir this mixture until it is smooth and creamy. Set this aside. In a separate large bowl, combine your dry ingredients. Whisk together 1 ½ cups of all-purpose flour, 1 teaspoon of baking soda, ½ teaspoon of baking powder, 1 teaspoon of ground cinnamon, ½ teaspoon of ground ginger, ¼ teaspoon of ground nutmeg, and ¼ teaspoon of salt. This mix adds great flavor! In another bowl, mix your wet ingredients. Combine 1 cup of pumpkin puree, ½ cup of granulated sugar, ½ cup of brown sugar, ½ cup of vegetable oil, 2 large eggs, and 1 teaspoon of vanilla extract. Mix this until everything is well blended. Now, it’s time to fill the muffin cups. Spoon a little muffin batter into each cup, filling them about 1/3 full. Then, add a dollop of your cream cheese mixture on top of the batter. Cover this with more muffin batter until each cup is about ¾ full. This layering creates a delicious surprise in every bite! Place the muffin pan in the preheated oven and bake for 18-20 minutes. Check if they are done by inserting a toothpick into the center. It should come out clean, though it might be slightly sticky due to the cream cheese. After baking, let the muffins cool in the pan for 5 minutes. Then, transfer them to a wire rack to cool completely. Enjoy the warm, inviting smell as they cool! To keep your muffins light and fluffy, mix carefully. When you combine the wet and dry ingredients, stir just until you see no dry flour. A few lumps in the batter are okay. Overmixing makes muffins tough. Remember, the goal is a soft and tender texture. For the cream cheese filling, make sure the cream cheese is soft. This helps it blend well with powdered sugar and lemon juice. Mix until smooth, but don’t overbeat it. If you whip it too much, it can become runny. The filling should be thick and creamy, ready to add to your muffins. Presentation makes a big difference. Once your muffins cool, sprinkle them with powdered sugar. This adds a nice touch. If you want to impress, add a dollop of whipped cream on top. Serve them warm for the best taste and look. A beautiful plate can make your muffins even more inviting. {{image_2}} You can make these muffins even more special by adding chocolate chips. Mix in about 1 cup of semi-sweet chocolate chips into your batter. The sweet chocolate pairs well with the pumpkin and cream cheese. It adds a nice burst of flavor in each bite. Try using mini chocolate chips for a fun twist. Nuts or seeds add texture and crunch. You can use chopped walnuts, pecans, or sunflower seeds. About ½ cup of your choice will work well. Stir them into the batter before filling the muffin cups. This gives the muffins a satisfying bite and a nutty flavor that complements the pumpkin. Want a gluten-free option? Swap out all-purpose flour for gluten-free flour. You can find blends made for baking that work well in muffins. Make sure your baking powder and baking soda are also gluten-free. This way, you can enjoy the same great taste without gluten. To keep your pumpkin cream cheese muffins fresh, store them in an airtight container. Place a paper towel at the bottom to absorb moisture. This helps prevent sogginess. Seal the container and keep it at room temperature. These muffins will stay tasty for about three days. If you want them to last longer, consider freezing. Freezing is a great way to save muffins for later. First, let the muffins cool completely. Wrap each muffin in plastic wrap. This keeps them from getting freezer burn. Then, place the wrapped muffins in a freezer-safe bag or container. Be sure to squeeze out any air. They can last up to three months in the freezer. When you are ready to eat them, just thaw them at room temperature. To enjoy your muffins warm, reheating is key. You can use the microwave or the oven. If you use a microwave, heat for about 15-20 seconds. Check if they are warm enough. If using the oven, preheat it to 350°F (175°C). Place the muffins on a baking sheet and warm them for about 5-10 minutes. This will make them taste fresh and delicious again. Yes, you can use fresh pumpkin. Just cook and puree it first. Make sure it’s smooth. Fresh pumpkin has a rich flavor. It can add a lovely touch to your muffins. To lower the sugar, cut the granulated and brown sugar in half. You can also use a sugar substitute. Applesauce or mashed banana can replace some sugar too. This change still keeps the muffins tasty. If you need a substitute for cream cheese, try Greek yogurt. It gives a nice tang and keeps the muffins moist. You can also use ricotta cheese. Both options work well in the filling. These muffins stay fresh for about three days at room temperature. Keep them in an airtight container. For longer storage, you can freeze them. They last up to three months in the freezer. Just thaw when ready to enjoy! You now know how to make delicious pumpkin cream cheese muffins from scratch. We covered key ingredients, simple steps, helpful tips, tasty variations, and smart storage methods. With these insights, you can create perfect muffins every time. Don't hesitate to experiment with flavors or options! The joy of baking lies in trying new things. Enjoy sharing your tasty creations with family and friends. Happy baking!

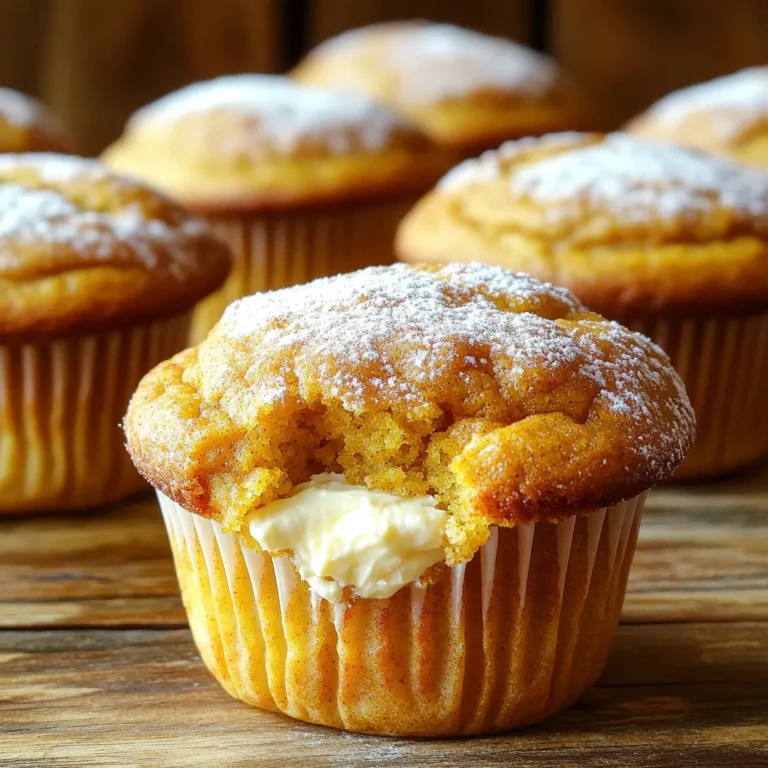
Pumpkin Cream Cheese Bakery Muffins Flavorful Treat

- 1 cup orzo pasta - 2 cups vegetable broth - 1 tablespoon olive oil - 2 cloves garlic, minced - 4 cups fresh spinach, chopped - 1 cup cherry tomatoes, halved - 1 teaspoon lemon zest - 2 tablespoons lemon juice - 1 cup ricotta cheese - 1 cup shredded mozzarella cheese - Salt and pepper to taste - Fresh basil, for garnish Each ingredient plays a key role in making this dish tasty. The orzo pasta gives it a nice texture. Using vegetable broth adds depth to the flavor. Olive oil helps sauté the garlic and spinach. Fresh spinach brings color and nutrition. Cherry tomatoes add sweetness and brightness. Lemon zest and juice bring a fresh zing. Ricotta cheese makes it creamy, while mozzarella gives that gooey finish. This dish serves four people. Each serving has about: - Calories: 400 - Protein: 15g - Carbs: 45g - Fat: 20g - Fiber: 3g This orzo dish is filling and balanced. It has good protein from cheese and some fiber from spinach. It’s a great choice for a quick meal. You can swap some ingredients if you like. For a gluten-free option, use rice or quinoa instead of orzo. If you want a lighter cheese, try cottage cheese. You can use frozen spinach if fresh isn’t available. For added flavor, try different herbs like thyme or oregano instead of basil. {{ingredient_image_1}} Start by bringing 2 cups of vegetable broth to a boil. I use a medium pot for this. Once it boils, add 1 cup of orzo pasta. Cook it for 8 to 10 minutes. You want it al dente, so check it often. After cooking, drain the orzo and set it aside. Next, grab a large skillet. Heat 1 tablespoon of olive oil over medium heat. Add 2 cloves of minced garlic and sauté for 1 minute. The smell will fill your kitchen! Then, toss in 4 cups of chopped spinach. Cook it for about 3 to 4 minutes. You want it to be wilted and vibrant. Now it's time to bring everything together. Stir in 1 cup of halved cherry tomatoes, 1 teaspoon of lemon zest, and 2 tablespoons of lemon juice. Cook this mix for another 2 minutes. Reduce the heat to low and add the cooked orzo, 1 cup of ricotta cheese, and half of 1 cup of shredded mozzarella cheese. Stir well until the cheeses melt. Season with salt and pepper to taste. Finally, sprinkle the remaining mozzarella on top. Cover the skillet for 2 to 3 minutes to let the cheese melt. Don't forget to garnish with fresh basil before serving! To get perfect orzo, cook it in boiling vegetable broth. This adds flavor. Stir it often to prevent sticking. Aim for al dente, which means it should be firm but tender. Drain the orzo well, but keep a little broth. This will help later when mixing with other ingredients. For the best cheese melt, add the cheeses when the heat is low. This helps them melt slowly and evenly. Stir the mix gently. This avoids clumps and ensures every bite is cheesy goodness. Covering the skillet with a lid helps the cheese melt faster. It creates steam that makes it soft and gooey. You can boost flavor with simple tricks. Add more lemon juice or zest for a fresh kick. Fresh herbs like basil or parsley add color and taste. A pinch of red pepper flakes brings heat without overpowering the dish. Try different veggies like bell peppers or zucchini for a twist. Pro Tips Fresh Spinach is Key: Use fresh spinach for the best flavor and texture. Frozen spinach can become mushy and watery when cooked. Adjust Lemon to Taste: The amount of lemon juice can be adjusted based on your personal preference for acidity. Start with less and add more gradually. Cheese Variations: Experiment with different cheeses! Feta or goat cheese can add a tangy flavor that complements the spinach and lemon. Herb Enhancements: Fresh herbs like dill or parsley can be added for extra flavor. Toss them in just before serving for a burst of freshness. {{image_2}} This dish shines as a vegetarian delight. You can add more veggies to boost nutrition. Try bell peppers, zucchini, or mushrooms. They add color and flavor. You can also swap in whole wheat orzo for extra fiber. Consider using a mix of herbs like parsley or dill. They make each bite fresh and bright. If you want to add protein, there are many options. Grilled chicken or shrimp pairs well with this orzo. You can also use chickpeas for a plant-based boost. Sauté them with garlic for extra taste. If you prefer meat, use diced turkey or sausage. They can add heartiness to your meal. Explore different cuisines by changing flavors. For Italian vibes, add basil and oregano. A dash of red pepper flakes can spice it up. If you crave Greek flavors, try feta cheese and olives. For a touch of Asian cuisine, add soy sauce and sesame oil. Each variation gives you a new taste experience. After enjoying your cheesy spinach and lemon orzo delight, store any leftovers right away. Place the orzo in an airtight container. It keeps well in the fridge for up to 3 days. Make sure to let it cool to room temperature first. This helps keep the texture nice. When you're ready to eat your leftovers, reheating is easy. You can microwave the orzo in a bowl. Add a splash of broth or water to keep it moist. Heat in 30-second bursts until warm. Stir between heating to ensure even warmth. If using a stovetop, place it in a pan over low heat. Stir often until it’s hot. Want to save your orzo for later? You can freeze it! Place cooled orzo in a freezer-safe container. It can last up to 3 months in the freezer. For best results, divide it into single portions. This makes it easy to thaw just what you need. When ready to use, thaw it in the fridge overnight. Reheat as mentioned for the best taste. Orzo takes about 8 to 10 minutes to cook. You want it to be al dente. Start by boiling vegetable broth in a pot. Then, add the orzo and stir. Once it’s cooked, drain it and set it aside. This step is quick and easy, making orzo a great choice for busy nights. Yes, you can make this orzo dish ahead of time. Prepare the orzo and sauce, then store them separately. This helps keep the orzo from getting too soft. When you’re ready to eat, just combine them in a skillet. Heat it up and enjoy a quick meal that tastes fresh. Orzo is very versatile! You can use it in many dishes. For example, you can add it to soups for extra texture. It also works well in salads, mixed with veggies and dressing. You can even bake it with cheese and vegetables for a hearty casserole. Explore these ideas to enjoy orzo in different ways! This blog covers all you need to know about orzo dishes. We talked about key ingredients, how to cook orzo, and clever tips for perfect texture. You learned tasty variations and smart ways to store leftovers. Orzo offers great options for meals. With simple steps, you can create delicious dishes that fit your taste. Now, you’re ready to enjoy orzo in many fun ways!

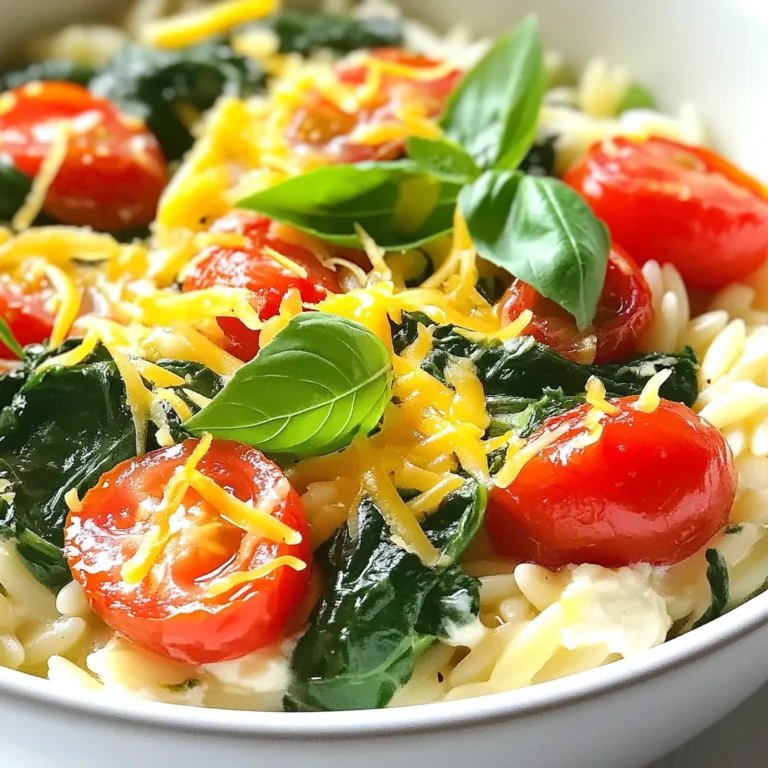
Best Orzo Dinner Delight Quick and Flavorful Recipe

- 2 boneless, skinless chicken breasts - 1 cup uncooked quinoa - 2 cups chicken broth The chicken breasts form the heart of this bowl. They soak up the zesty lime flavor and stay juicy. Quinoa gives a nice texture and packs protein. Using chicken broth adds depth to the quinoa. - 1 large lime (juiced and zested) - 1/4 cup fresh cilantro, chopped (plus extra for garnish) - 1 tablespoon olive oil - 1 teaspoon ground cumin - 1 teaspoon garlic powder - Salt and pepper to taste Lime juice and zest brighten the dish. Fresh cilantro provides a fresh burst of flavor. Olive oil keeps the chicken moist while adding richness. Cumin and garlic powder bring warmth and depth. Salt and pepper round it all out. - 1 cup cherry tomatoes, halved - 1/2 cup black beans, rinsed and drained - 1 avocado, sliced - 1/2 cup corn (fresh, frozen, or canned) Cherry tomatoes offer sweetness and color. Black beans add protein and fiber. Creamy avocado enhances the bowl's richness. Corn adds a lovely crunch and sweetness. Together, these toppings create a colorful and tasty meal. {{ingredient_image_1}} To start, I mix the marinade in a bowl. I add lime juice, lime zest, olive oil, cumin, garlic powder, salt, and pepper. Stir it well to blend the flavors. Next, I add the chicken breasts and coat them evenly. For the best flavor, I let the chicken marinate for at least 30 minutes. If I have more time, I put it in the fridge for up to 2 hours. I rinse the quinoa under cold water to remove any bitterness. In a pot, I combine the rinsed quinoa with chicken broth. I bring it to a boil over medium heat. Once it boils, I reduce the heat to low, cover the pot, and let it simmer for about 15 minutes. After the liquid is absorbed, I fluff the quinoa with a fork. This gives it a nice, light texture. I heat a grill pan or skillet over medium-high heat. I remove the chicken from the marinade and discard the marinade. I cook the chicken for 6-7 minutes on each side. To be sure it's done, I check that the internal temperature reaches 165°F (75°C). After cooking, I let the chicken rest for 5 minutes. This step helps the chicken stay juicy and flavorful. For each serving, I start with a base of fluffy quinoa. Then, I slice the rested chicken and arrange it on top. I add cherry tomatoes, black beans, corn, and sliced avocado. For a lovely touch, I drizzle some lime juice over the bowl and sprinkle fresh cilantro on top. This not only adds flavor but also makes the dish look beautiful. Marinating chicken adds great flavor. I recommend marinating for at least 30 minutes. For even more taste, try marinating up to 2 hours. The lime juice helps tenderize the chicken, making it juicy. If you need a substitute for lime, use lemon juice. You can also swap the olive oil for avocado oil. These changes keep the dish fresh and exciting. To cook perfect quinoa, rinse it under cold water first. This helps prevent it from being gummy. Use chicken broth instead of water for extra flavor. For larger servings, increase the quinoa and broth in a 1:2 ratio. This keeps the texture light and fluffy. Remember, quinoa cooks quickly. Keep an eye on it to avoid overcooking. This bowl pairs well with a side salad or roasted veggies. You can add a dollop of yogurt for creaminess. To keep components fresh, store toppings separately until serving. This way, everything retains its crunch. Drizzle with extra lime juice right before eating for a zesty kick. Enjoy the burst of flavors in every bite! Pro Tips Marinate Longer for More Flavor: If time allows, marinate the chicken for up to 2 hours in the refrigerator. This enhances the flavor and tenderness of the chicken. Use Fresh Ingredients: Opt for fresh cilantro and ripe avocados for the best taste and texture in your bowl. Fresh ingredients elevate the overall dish. Fluff the Quinoa: After cooking, make sure to fluff the quinoa with a fork to prevent it from becoming clumpy. This will give your bowl a light and airy base. Customize Your Bowl: Feel free to add or substitute other veggies like bell peppers or spinach, or swap the black beans for chickpeas for a different flavor profile! {{image_2}} You can switch the chicken for tofu or shrimp. Tofu gives a nice texture, while shrimp adds a seafood twist. Use firm tofu for the best results. For shrimp, cook them until they turn pink and curl. For cooking methods, grill or pan-sear your protein. For tofu, press it to remove water, then marinate and grill it. Shrimp cooks fast, so watch it closely. Feel free to add any veggies you love. Seasonal vegetables like bell peppers or zucchini work well. You can also include leafy greens like spinach or kale for extra nutrients. Try adding roasted sweet potatoes or broccoli for a hearty touch. These options not only boost flavor but also add vitamins and fiber. If you like heat, add jalapeños or your favorite spicy sauce. Slice fresh jalapeños and sprinkle them on top for a fresh bite. For sauce, drizzle some hot sauce or sriracha over the bowl. Adjust spice levels based on your taste. Start with a little, then add more if you want it spicier. This way, everyone can enjoy their meal just how they like it! To keep your chicken bowls fresh, store them in the fridge. Use airtight containers to avoid moisture loss. Glass or BPA-free plastic containers work best. Make sure to cool the bowls before sealing them. This helps prevent condensation. Label the containers with the date. You should eat leftovers within three days for the best taste. Reheat your chicken bowls with care. The microwave is a quick option. Use a microwave-safe dish and cover it to keep moisture. Heat in short bursts of 30 seconds, stirring in between. This helps restore flavor and texture. If you prefer, you can also use a skillet. Heat it on low and add a splash of broth. This keeps the chicken juicy. You can freeze your chicken bowls for later. It’s best to freeze individual components. Store the quinoa, chicken, and veggies in separate bags. This way, you can mix and match later. Use freezer-safe bags and remove as much air as possible. Thaw in the fridge overnight for the best flavor. To maintain taste, avoid thawing in the microwave. Reheat gently on the stove or in the oven. To keep the chicken juicy, marinate it well. Use lime juice, olive oil, cumin, and garlic powder. Let the chicken soak in the marinade for at least 30 minutes. If you have more time, marinate for up to 2 hours. This adds flavor and moisture. When you cook the chicken, use medium-high heat. Grill each side for 6-7 minutes. Check the internal temperature; it should reach 165°F (75°C). After cooking, let the chicken rest for 5 minutes. This helps keep the juices inside. Yes, you can make this recipe gluten-free. The quinoa in this bowl is naturally gluten-free. Just ensure your chicken broth is gluten-free too. Many brands offer gluten-free options. If you use canned corn or beans, check the labels. They should also be gluten-free. Many sides go well with this chicken bowl. Here are some great options: - Grilled veggies: Zucchini or bell peppers add a nice touch. - A fresh salad: Consider a simple green salad with a light dressing. - Tortilla chips: These add a fun crunch. - A fruit salsa: Mango or pineapple salsa can brighten the meal. You can store leftovers in the fridge for up to 3 days. Use an airtight container to keep them fresh. Label the container with the date. When you reheat, make sure the chicken reaches 165°F (75°C) again. This keeps the food safe to eat. This article covered how to make a zesty cilantro lime chicken bowl. We talked about the main ingredients, flavor enhancers, and tasty toppings. I explained how to marinate the chicken and cook perfect quinoa. You learned tips for serving and storing leftovers. In closing, this dish is versatile and packed with flavor. You can easily adjust it to fit your taste. Enjoy making your bowl and experimenting with different ingredients!

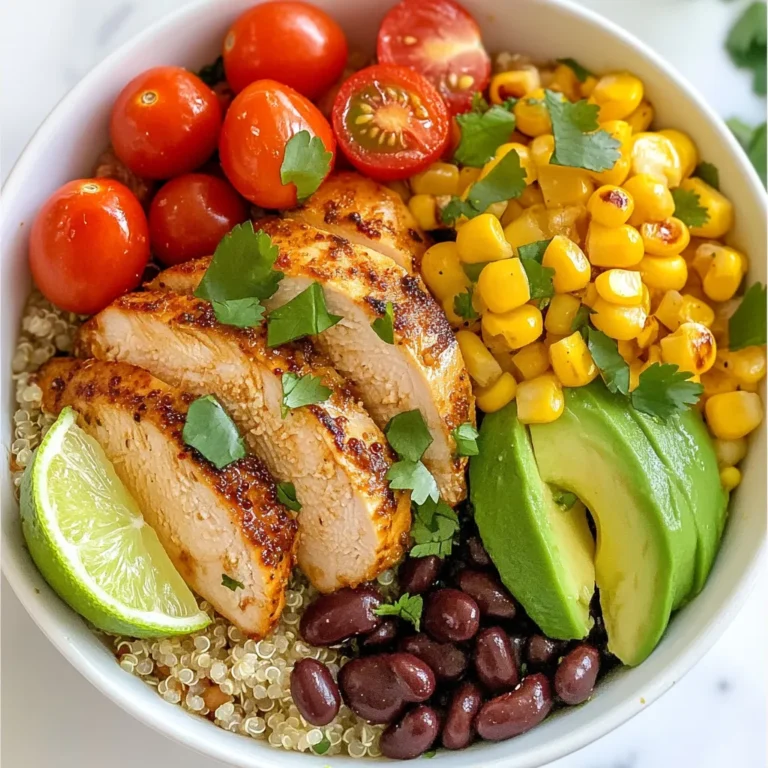
Zesty Cilantro Lime Chicken Bowl Flavorful Meal Idea

- 400g beef steak, thinly sliced - 250g rice noodles - 2 tablespoons soy sauce - 1 tablespoon hoisin sauce - 1 tablespoon oyster sauce - 2 cloves garlic, minced - 1-inch piece of ginger, grated - 1 red bell pepper, thinly sliced - 2 spring onions, chopped - 2 tablespoons honey - 1 tablespoon sesame oil - Salt and pepper to taste - Sesame seeds and fresh cilantro for garnish For Sticky Beef Noodles, you need fresh and tasty ingredients. The beef steak brings rich flavor and protein. Rice noodles add a nice chewy texture that soaks up the sauce. The sauces—soy, hoisin, and oyster—mix together for a sweet and salty kick. Honey joins the party, making the dish sticky and sweet. Sesame oil gives a nutty finish. Don’t forget the veggies! Garlic and ginger add zest. The red bell pepper adds color and crunch, while spring onions provide a fresh bite. Finally, sesame seeds and cilantro make your dish pop. They add not just taste but a nice look too. With these ingredients, you’re set for a delightful meal. {{ingredient_image_1}} Boil a pot of water. Add the rice noodles and cook until al dente. This usually takes about 4-6 minutes, but check the package for exact times. Drain the noodles and rinse them under cold water. This keeps them from sticking together. Set the noodles aside for later. In a small bowl, whisk together the following ingredients: - 2 tablespoons soy sauce - 1 tablespoon hoisin sauce - 1 tablespoon oyster sauce - 2 tablespoons honey - 1 tablespoon sesame oil - 2 cloves garlic, minced - 1-inch piece of ginger, grated This sauce adds flavor and depth to your dish. Make sure everything mixes well to create a tasty blend. Heat a large frying pan or wok over medium-high heat. Add a little oil to the pan. Sauté the sliced beef for about 2-3 minutes. You want the beef to brown and cook through. Season it with salt and pepper to taste. Once done, remove the beef from the pan and set it aside. In the same pan, add the sliced red bell pepper and chopped spring onions. Stir-fry these for about 2 minutes. You want the vegetables to be bright and slightly tender. This adds a nice crunch and color to the dish. Return the cooked beef to the pan with the vegetables. Pour in the sauce mixture you prepared earlier. Stir everything well to coat all the ingredients. Let it cook for an additional 1-2 minutes until everything is hot. Now, add the cooked rice noodles to the pan. Toss them together with the beef and sauce until well mixed. If it feels too thick, add a splash of water to loosen it up. Finally, sprinkle sesame seeds and fresh cilantro over the noodles before serving. Enjoy your meal! To make the best sticky beef noodles, always cook your noodles al dente. This means they should be firm yet tender. Boil them according to the package instructions. Once done, drain and rinse with cold water. This step is key to prevent sticking. Cold water stops the cooking process and keeps the noodles separate. Adjust the sauce ingredients to fit your taste. If you like it sweeter, add more honey. For a salty kick, increase the soy sauce. You can also use marinated beef. Marinating adds depth to the flavor. Try marinating the beef for at least 30 minutes before cooking. This will make your dish even tastier. For a beautiful presentation, serve the sticky beef noodles in bowls. Garnish with extra spring onions and sesame seeds. This makes the dish look inviting. Using chopsticks adds an authentic touch. It makes eating these noodles more fun and traditional. Enjoy each bite! Pro Tips Beef Selection: Choose a tender cut of beef like sirloin or flank steak for the best texture and flavor. Noodle Cooking: Make sure to rinse the rice noodles under cold water after cooking to prevent them from sticking together. Customize Veggies: Feel free to add other vegetables like broccoli or snap peas for added nutrition and color. Sauce Adjustments: Taste the sauce before adding it to the dish; adjust sweetness or saltiness to suit your preference. {{image_2}} You can switch the beef for other proteins. Chicken works well and cooks quickly. Shrimp adds a nice taste and texture. Tofu is great for a vegetarian option. Each protein brings its own flavor, so feel free to mix it up! For a vegan or vegetarian dish, replace the beef with plant-based options. Use tempeh or seitan for a hearty meal. You can also add more veggies like broccoli, snap peas, or carrots. This makes the dish colorful and packed with nutrients. If you need gluten-free options, use rice noodles and tamari instead of soy sauce. For low-calorie versions, cut back on sauces and use less oil. You can also add more veggies to make it filling without extra calories. These tweaks help you enjoy the dish while sticking to your diet. Store your sticky beef noodles in the fridge right after cooling them down. This keeps them fresh and tasty. Use airtight containers to prevent moisture loss. Glass or plastic containers work well. Make sure to leave some space in the container. This helps the noodles breathe and stay firm. When it’s time to reheat, choose methods that keep the noodles nice. For the microwave, heat for 1-2 minutes. Stir halfway for even warmth. On the stove, heat in a pan over medium heat for about 3-5 minutes, stirring often. If using the oven, preheat it to 350°F. Bake for 10-15 minutes, covered with foil to trap steam. Cooked sticky beef noodles can last about 3-4 days in the fridge. Keep them in a sealed container for best results. For longer storage, you can freeze them. Place in freezer-safe bags, removing as much air as possible. When ready to eat, thaw in the fridge overnight. Then reheat using your favorite method. Sticky beef noodles are a tasty dish made with beef, noodles, and a sweet and savory sauce. This dish has roots in Asian cuisine, especially in Chinese cooking. The noodles soak up the sauce, making them sticky and full of flavor. The beef is tender and cooked fast, adding a nice texture. It often features colorful veggies like bell peppers and spring onions, making it both beautiful and delicious. To spice up your sticky beef noodles, add some chili flakes or fresh chili peppers to the sauce. You can also use spicy sauces like sriracha or chili oil. Start with a small amount and taste as you go. You can always add more heat, but you can't take it away! Yes, you can prepare sticky beef noodles ahead of time. Cook the beef and noodles, then store them in the fridge. Keep the sauce separate until you are ready to eat. When reheating, add a splash of water to keep everything moist. This way, your dish stays tasty and fresh. For side dishes, consider serving steamed broccoli or bok choy for a crunchy contrast. A simple cucumber salad can add a refreshing touch. You could also serve spring rolls or dumplings for a complete meal. These sides complement the flavors of the sticky beef noodles nicely. Sticky beef noodles are packed with flavor and easy to make. You learned about the main ingredients, simple steps, and tasty variations. Remember to cook the noodles just right and use fresh veggies for the best taste. Don't be afraid to try different proteins or tweak the sauce to suit your taste. With the right storage tips, leftovers can still shine. Enjoy creating this delicious dish! I'm sure you’ll impress family and friends with your skills in the kitchen.

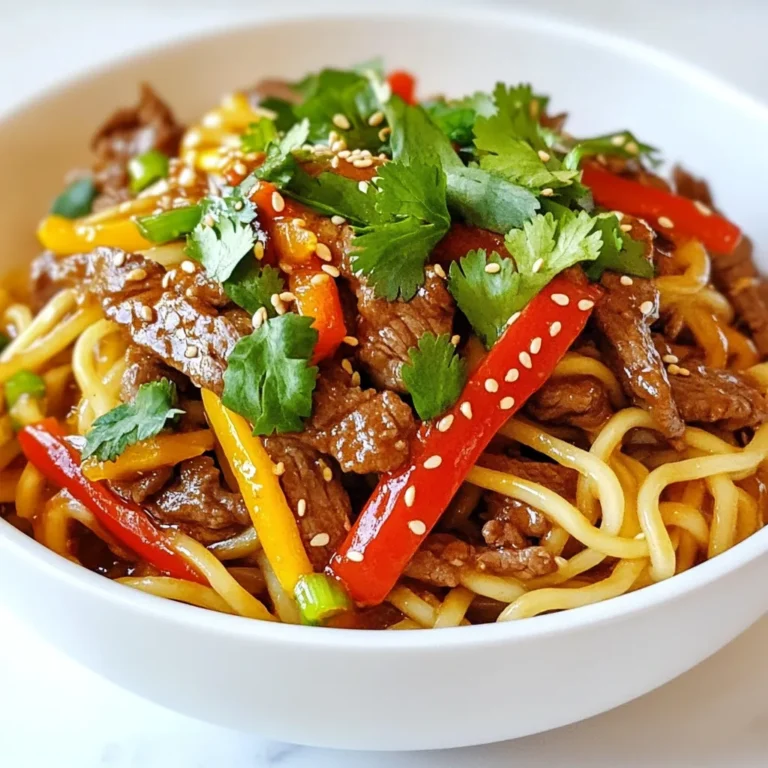
Sticky Beef Noodles Flavorful and Easy Recipe Guide

- 2 medium apples (Fuji or Honeycrisp recommended) - 1 tablespoon ground cinnamon - 1 tablespoon granulated sugar (to taste) - 1 teaspoon lemon juice - Pinch of salt - Air fryer - Knife and cutting board - Mixing bowls - Measuring spoons Using the right ingredients is key to making tasty apple chips. I love using Fuji or Honeycrisp apples. They are sweet and crisp, which makes them perfect for this recipe. You will need ground cinnamon and granulated sugar. These add flavor and make the chips sweet and fun to eat. Adjust the sugar to your taste. If you want less sweetness, use less sugar. A pinch of salt adds balance to the flavor. Lemon juice helps keep the apples from turning brown. It also adds a bit of tang, which is nice. Gather your tools. You will need an air fryer, a knife, and a cutting board. Mixing bowls and measuring spoons are also important. These tools will help you make your apple chips easily and quickly. - Wash and dry the apples. - Core and slice apples into thin rounds. Start by washing your apples under cold water. Make sure to dry them well. This helps the cinnamon-sugar stick better. Next, core each apple. I like to use a small knife for this. Then, slice the apples into thin rounds, about 1/8 inch thick. Thin slices cook evenly in the air fryer. You want them crispy, not chewy! - Mix cinnamon, sugar, and salt. - Toss apple slices with lemon juice and cinnamon-sugar mixture. In a small bowl, mix together the ground cinnamon, sugar, and a pinch of salt. This blend adds a sweet and spicy touch to your chips. In another bowl, toss the apple slices with lemon juice. This stops them from turning brown. Then, sprinkle the cinnamon-sugar mix over the apples. Toss them gently to coat every slice. This ensures each bite is full of flavor. - Preheat air fryer to 300°F (150°C). - Arrange apple slices in the air fryer basket. - Air fry for 15-20 minutes, flipping halfway. Now, it's time to preheat your air fryer. Set it to 300°F (150°C) and let it warm up for about three minutes. This step is key for crispy chips. Once preheated, arrange the apple slices in a single layer in the basket. Avoid overcrowding to let the hot air flow. Air fry the slices for 15 to 20 minutes. Flip them halfway through for even cooking. When they are lightly golden and crispy, they are ready to enjoy! To make apple chips crispy, slice the apples thinly. Aim for about 1/8 inch thick. Thin slices cook evenly and give you that satisfying crunch. Preheating your air fryer is also key. Set it to 300°F (150°C) for about three minutes before cooking. This step helps the chips crisp up faster and more evenly. You can adjust the sugar to match your taste. If you like it sweeter, add a bit more sugar. For a twist, consider adding a pinch of nutmeg or a drop of vanilla extract. These options can elevate the flavor and make your apple chips even more delightful. After air frying, let your chips cool for a few minutes. Cooling helps them get crunchier. You can enjoy these chips as a snack or use them as a topping for yogurt. They also add a sweet crunch to salads. {{image_2}} You can try different apple types to change the taste. Fuji and Honeycrisp are sweet and crisp. Other great options include: - Granny Smith for a tart kick - Gala for a mild sweetness - Pink Lady for a balance of sweet and tart Each apple type gives a unique flavor and texture. Experiment with what you like best! Want to spice things up? Adding different spices can make your apple chips pop. Here are some ideas: - Nutmeg adds warmth and depth. - Ginger gives a zesty twist. If you want to swap the sugar, consider these alternatives: - Honey for a natural touch. - Maple syrup for a unique flavor. These options can help you find your perfect blend. You can also make apple chips in the oven. Here’s how: 1. Preheat your oven to 200°F (93°C). 2. Arrange the apple slices on a baking sheet lined with parchment paper. 3. Bake for about 2-3 hours, flipping halfway through. Oven-baking takes longer than air frying but works well if you don't have an air fryer. Traditional frying is not recommended for apple chips. It adds extra oil and calories, which you can avoid with air frying. Air frying keeps the chips light and crunchy! To keep your air fryer apple chips fresh, store them at room temperature. Place the chips in a container that is airtight. This helps keep them crispy. I recommend using a glass jar or a zip-top bag. Avoid letting them sit out in the open air. Your apple chips will stay fresh for about one week. After that, they may lose their crunch. Watch for signs of spoilage, like a soft texture or a change in color. If they feel chewy, it’s time to toss them out. If your apple chips lose their crunch, you can revive them! Place the chips back in the air fryer. Air fry them at 300°F for about 3-5 minutes. This will help them regain their crispiness. Enjoy your chips while they are fresh and crispy for the best taste! Yes, you can use many different fruits. Here are some great options: - Pears - Bananas - Peaches - Pineapple Slice these fruits thin, just like apples. Adjust cooking times for each fruit. For example, bananas may need less time. Check them often to avoid burning. To keep apple chips from turning brown, use lemon juice. Here’s how: - Toss the apple slices with 1 teaspoon of lemon juice. - Make sure all slices get coated well. The acid in the lemon juice slows browning. You can also soak the slices for a few minutes. This step helps keep your chips looking fresh and tasty. Yes, you can make apple chips in other ways. Here are two common methods: - Oven: Preheat your oven to 225°F (107°C). Arrange apple slices on a baking sheet in a single layer. Bake for about 1 to 2 hours. Flip the slices halfway for even crispiness. - Dehydrator: If you have a dehydrator, set it to 135°F (57°C). Place the apple slices on the trays and dry for 6 to 8 hours. Both methods work well, but they may take longer than an air fryer. Choose the method that fits your kitchen best. In this article, we covered how to make tasty air fryer apple chips using simple ingredients. You learned about essential tools and step-by-step instructions for preparing, seasoning, and cooking. We discussed tips for crispiness, fun flavor variations, and storage info to keep your chips fresh. Remember, making apple chips can be fun and healthy. Feel free to experiment with different fruits and spices. Enjoy your crunchy snacks!

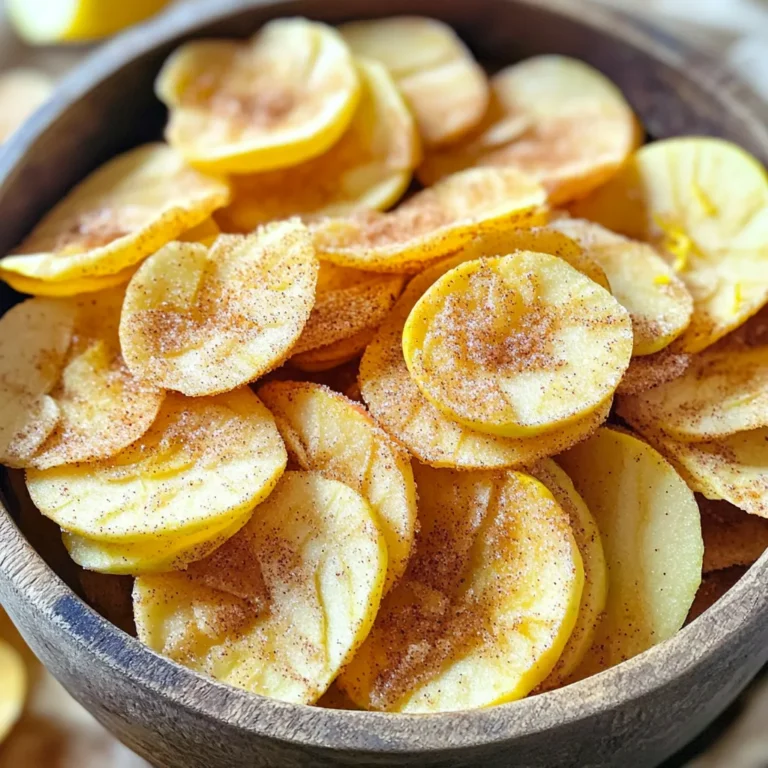
Air Fryer Cinnamon Sugar Apple Chips Simple Delight

- 8 oz fettuccine pasta - 1 lb shrimp, peeled and deveined - 4 cloves garlic, minced - 1 cup heavy cream - 1 tablespoon olive oil - 1 tablespoon butter - Salt and pepper to taste - 1 teaspoon paprika - 1/2 teaspoon red pepper flakes (optional) - 1/2 cup grated Parmesan cheese - Fresh parsley, chopped (for garnish) For this dish, I love using fettuccine pasta. It holds the creamy sauce well. Use fresh shrimp, peeled and deveined for the best taste. If you can't find fettuccine, any pasta will work. Just adjust the cooking time. Next, let's talk about the garlic. Fresh garlic gives a great flavor. Mince it fine to release those strong flavors. The heavy cream adds a rich and smooth texture. If you prefer a lighter dish, you can use half-and-half or a plant-based cream. For seasonings, olive oil and butter create a nice base. Salt and pepper bring out the flavors. Paprika adds warmth, while red pepper flakes give a kick if you like spice. Finally, don't forget the Parmesan cheese! It melts beautifully into the dish, making it extra delicious. Fresh parsley adds a pop of color and freshness on top. Gather these ingredients, and you're ready to make a quick and tasty meal. - Bring a large pot of salted water to a boil. - Add 8 oz of fettuccine and cook until al dente. - Reserve 1/2 cup of pasta water, then drain the pasta. Cooking the pasta well is key. The salt helps flavor the noodles. Al dente means they should still have a slight bite. This gives the pasta a nice texture when you mix it with the sauce. - Heat 1 tablespoon of olive oil and 1 tablespoon of butter in a large skillet. - Add 4 cloves of minced garlic and sauté for about 30 seconds. - Add 1 lb of shrimp and season with 1 teaspoon of paprika, 1/2 teaspoon of red pepper flakes (if using), salt, and pepper. Cook until the shrimp are pink and opaque, about 2-3 minutes on each side. The oil and butter create a tasty base. Garlic adds a lovely aroma. When the shrimp turn pink, they are ready to eat. Do not overcook them, as they can become rubbery. - Reduce the heat to medium-low. - Pour in 1 cup of heavy cream, stirring to combine with the shrimp and garlic. - Let the sauce simmer for about 2 minutes until it thickens slightly. Simmering allows the flavors to meld. The heavy cream makes the sauce rich and smooth. If it seems too thick, you can always add a splash of reserved pasta water. - Stir in 1/2 cup of grated Parmesan cheese until melted and creamy. - Taste and adjust seasoning with salt and pepper to your liking. - Garnish with freshly chopped parsley before serving. The cheese adds depth to the sauce. Adjusting the seasoning makes sure it fits your taste. The parsley gives a fresh touch and bright color to the dish. Enjoy your meal! How to achieve al dente texture To get that perfect al dente texture, cook your fettuccine in boiling salted water. Check the package for the right time but usually, it takes about 8-10 minutes. Taste a piece before draining. It should be firm but not hard. Importance of reserving pasta water Always reserve some pasta water before draining. This starchy water helps the sauce stick and can thin out the sauce if it becomes too thick. Use about half a cup for a great texture. Tips for garlic sautéing Sauté your minced garlic in olive oil and butter over medium heat. Cook for only about 30 seconds until fragrant. If you cook it too long, it can burn and taste bitter. Suggestions on seasoning adjustments Feel free to adjust the spices! Add more paprika for heat or toss in fresh herbs like basil or thyme for extra flavor. Always taste as you go to find what you love. How to avoid separating sauce To keep your sauce creamy, don’t let it boil hard. Instead, let it simmer gently. Stir often to mix the cream with the shrimp and garlic. This keeps everything rich and smooth. Using different cheese options If you want to mix up your cheese, try using mozzarella or goat cheese. Each will give a different flavor and creaminess. Just make sure to melt it well into the sauce. {{image_2}} You can easily swap shrimp for chicken or tofu. If you choose chicken, use bite-sized pieces. Cook them until they are golden. Tofu is a great choice for a vegetarian option. Use firm tofu, and sauté it until crispy. This adds a nice texture. Both options keep the dish tasty and filling. If you want a lighter meal, try using zoodles. Zoodles are zucchini noodles that are low in carbs. Whole wheat pasta is also a healthy choice. It adds fiber and a nutty flavor. Other pasta types like penne or spaghetti work well too. Just remember to cook them al dente for the best bite. Adding veggies brings color and taste to your dish. Spinach wilts nicely and adds nutrients. Cherry tomatoes burst with flavor and sweetness. You can also try different herbs. Basil, oregano, or even dill can change the vibe. Use what you have on hand to make it your own. To store leftovers, let the pasta cool first. Place it in an airtight container. Make sure to cover it well to keep it fresh. Leftovers can last up to three days in the fridge. When reheating, use a skillet over low heat. Add a splash of water or cream to keep it moist. Stir often to prevent sticking. You want it warm but not overcooked. Yes, you can freeze creamy shrimp pasta! However, the texture may change slightly. To freeze, place it in a freezer-safe container. Leave some space at the top for expansion. Seal it tightly to avoid freezer burn. To thaw, move it to the fridge overnight. For quicker thawing, use the microwave on a low setting. Reheat slowly to maintain creaminess. In the fridge, creamy shrimp pasta lasts about three days. If you notice any strange smells or colors, throw it out. Look for changes in texture, too. If it feels slimy or dry, it's best not to eat it. Yes, you can. For a lighter version, try using low-fat milk or almond milk. You can also use a mix of chicken broth and a little cornstarch for creaminess. Coconut milk adds a nice flavor too, if you like that taste. Pair your dish with a simple side salad. A green salad with a light vinaigrette works great. Garlic bread is a classic choice too. Steamed broccoli or roasted asparagus complements the pasta nicely. Look for shrimp that are pink and opaque. They should curl into a "C" shape. If they turn into an "O" shape, they might be overcooked. Cooking should take only about 2-3 minutes per side. Absolutely! If you love garlic, add more cloves. You can use up to 6 or even 8 cloves for a stronger flavor. Just sauté it a bit longer to avoid bitterness. Enjoy your garlicky delight! You learned how to make a creamy garlic shrimp pasta dish from scratch. We explored the key ingredients, cooking steps, and ways to make it even better. Remember, you can adjust the recipe to suit your taste, whether you prefer different proteins or vegetables. Proper storage keeps leftovers fresh. Enjoy creating a meal that impresses friends and family. This recipe not only tastes great but also showcases your cooking skills! Keep experimenting and have fun in the kitchen!

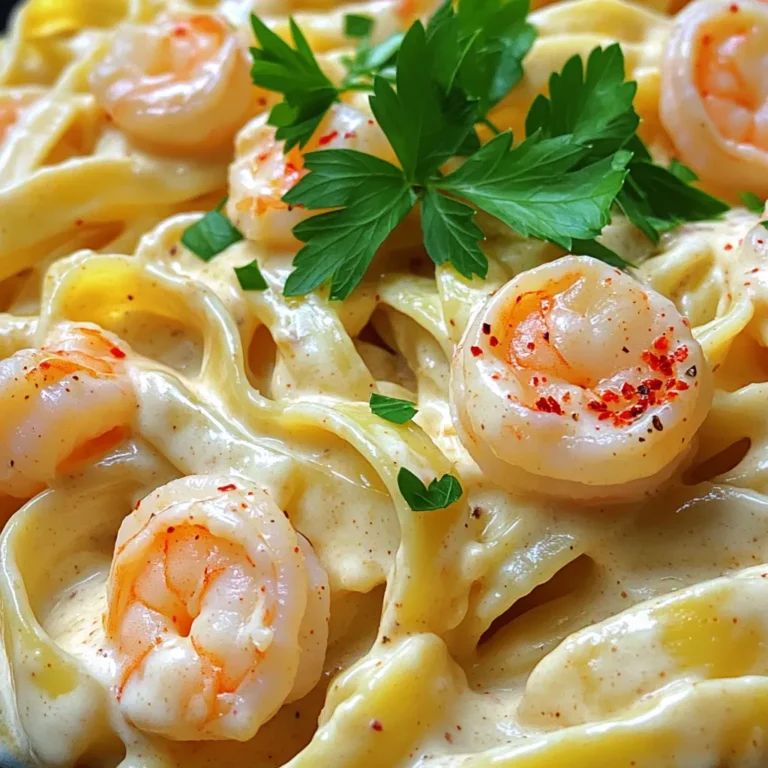
Minute Creamy Garlic Shrimp Pasta Quick and Simple Meal

- Puff Pastry: Use one sheet of thawed puff pastry. It should be light and flaky. This pastry creates a nice, airy texture for your braid. - Pumpkin Puree: Grab one cup of pumpkin puree. Use canned puree for ease, or make your own. Just roast fresh pumpkin, scoop it out, and blend until smooth. - Cream Cheese and Sugar: You need half a cup of softened cream cheese. Mix it with half a cup of powdered sugar for sweetness. This blend makes the filling creamy and rich. - Optional Toppings: Consider using chopped pecans or walnuts. They add a lovely crunch on top of your braid. You can sprinkle them on before baking for extra flavor. 1. Prepping the oven and baking sheet Start by preheating your oven to 400°F (200°C). Line a baking sheet with parchment paper. This helps the braid not stick. 2. Thawing and rolling out the pastry Take your puff pastry out of the freezer. Let it thaw completely. Once thawed, roll it out on a lightly floured surface. Aim for a rectangle about 12 x 16 inches. 3. Mixing the filling components In a mixing bowl, combine pumpkin puree, softened cream cheese, powdered sugar, vanilla extract, and pumpkin pie spice. Mix these ingredients until smooth. This filling is rich and creamy. 1. Adding the cream cheese filling Place the cream cheese mixture down the center of the pastry. Leave about 3 inches free on each side. This space ensures the braid can fold easily. 2. Cutting the pastry for braiding Use a sharp knife to cut 1-inch diagonal strips along both sides of the filling. Be careful not to cut into the filling. This step is key for a beautiful braid. 3. Folding the pastry strips Fold the pastry strips over the filling. Alternate folding from each side to create a braid pattern. Pinch the ends to seal the braid well. This keeps the filling inside while baking. 1. Creating the egg wash In a small bowl, whisk together one egg and a tablespoon of milk. This egg wash gives the braid a nice golden color when baked. 2. Adding toppings before baking If you like, sprinkle chopped pecans or walnuts on top before baking. They add great crunch and flavor to your Danish braid. 3. Baking time and temperature guide Place the braid in the preheated oven. Bake for 20-25 minutes until the pastry is golden and flaky. Let it cool slightly before serving. This treat is best enjoyed warm! - Ensuring flaky layers in puff pastry: Start with cold puff pastry. Keep it chilled until you're ready to roll it out. This helps create those light, flaky layers. Use a light hand when rolling. Don't overwork the dough, or the layers can stick together. - Tips for preventing filling spillage: Make sure to leave enough space on the edges of the pastry. When you cut the strips, do it gently, avoiding deep cuts into the filling. This helps keep the mixture inside as you braid. - Best practices for the egg wash application: Whisk the egg and milk until mixed well. Use a pastry brush to apply the wash evenly. This gives a beautiful golden color and shine. Don’t forget to brush the ends of the braid for a nice finish. - Overmixing the filling: When you mix the pumpkin and cream cheese, stop as soon as it's smooth. Overmixing can lead to a runny filling that oozes out while baking. - Cutting techniques for even braiding: Cut the strips about 1 inch apart and at a diagonal. This helps create a uniform braid. If they are too thick or thin, the braid won’t look nice and may bake unevenly. - Timing adjustments based on oven type: Every oven is different. Keep an eye on your Danish braid while it bakes. If your oven runs hot, check it a few minutes early to avoid burning. {{image_2}} You can switch out some ingredients to fit your taste. Here are some ideas: - Alternative pumpkin flavors: If you want a twist, use sweet potato or butternut squash puree instead of pumpkin. Both give a nice flavor. - Dairy-free options for cream cheese: Use a dairy-free cream cheese brand found in stores. This works well for those who avoid dairy but love the taste. - Sweetener alternatives for powdered sugar: You can use coconut sugar or agave nectar if you prefer a less processed option. Just mix it in until the filling is smooth. Make this treat fit the season with easy changes: - Adding cranberries for a holiday twist: Toss in some fresh or dried cranberries into the filling. This adds a tart flavor that pairs well with the sweet pumpkin. - Drizzling with caramel or chocolate: After baking, drizzle caramel or melted chocolate over the braid. This extra touch makes it more indulgent. - Modifying spices for different preferences: Change the spices to match your taste. You can try cinnamon, nutmeg, or even a pinch of ginger to switch things up. To keep your pumpkin cream cheese Danish braid fresh, store it in an airtight container. This method helps to lock in moisture and flavor. You can keep it in the refrigerator for up to three days. If you want to save it for longer, freeze it. Wrap the braid tightly in plastic wrap and then in aluminum foil. This way, it can last up to three months in the freezer. When you're ready to enjoy your leftovers, reheating them correctly is key. Preheat your oven to 350°F (175°C). Place the Danish braid on a baking sheet. Heat it for about 10-15 minutes. This helps to keep the pastry flaky. If you want to refresh the texture, you can cover it with foil for the first half of heating. Then remove the foil to crisp the outside. Enjoy your delicious treat just like it was fresh! You can prepare the Danish braid a day in advance. Roll out the puff pastry and fill it with the cream cheese mixture. Instead of baking, cover it tightly with plastic wrap. Store it in the fridge. This keeps it fresh and ready for baking. - If you make it ahead, bake it the next day. - Always check for freshness before using. Yes, you can freeze the braid. After shaping the braid, wrap it well in plastic wrap. Place it in a freezer bag. This helps keep it fresh and tasty. - For best results, freeze it before baking. - When ready to serve, thaw it overnight in the fridge. This Danish braid is great for breakfast or dessert. You can serve it warm with a side of whipped cream or vanilla ice cream. - Fresh fruit like apples or berries pairs well too. - For drinks, try coffee, tea, or a spiced cider. We explored how to make a pumpkin cream cheese Danish braid from scratch. You learned about key ingredients like puff pastry and pumpkin puree. The step-by-step guide helped you prepare, shape, and bake the braid perfectly. I shared tips to avoid common mistakes and variations to try. Remember, the perfect braid combines flavor and structure. Enjoy experimenting with different toppings and fillings. Whether for breakfast or a dessert, this recipe can impress everyone. Happy baking!

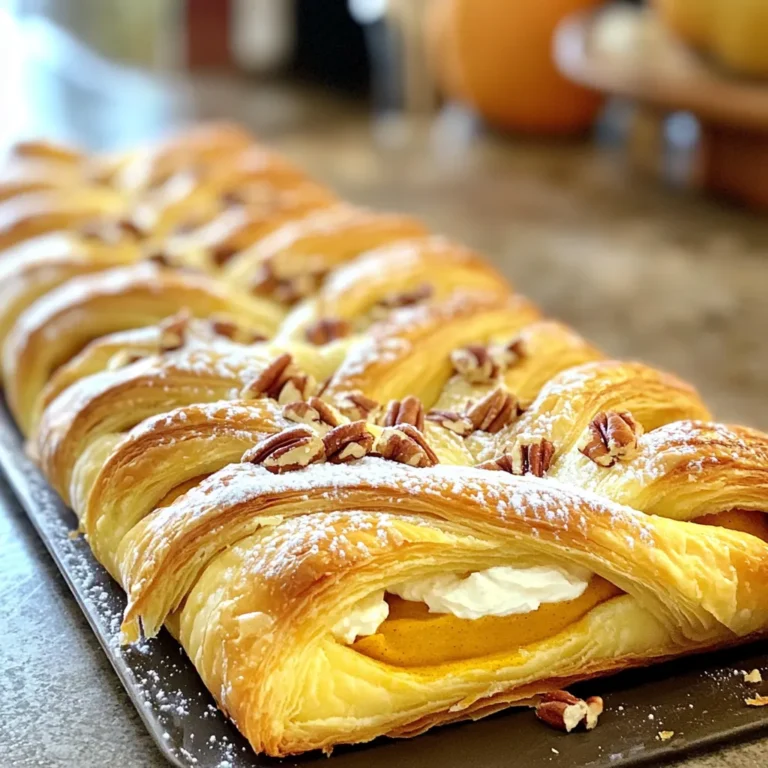
Pumpkin Cream Cheese Danish Braid Irresistible Treat

PREV 1 … 13 14 15 … 56 NEXT
secrets pice kitchen

explore

DessertsDinnerAppetizersDrinks

Our Policies

  • Cookie Policy
  • Copyright Policy
  • Disclaimer
  • GDPR Policy
  • Terms Of Use
Back to Top
  • About
  • Contact Us
  • Privacy Policy
© 2025 secrets pice kitchen