FREE DINNER EBOOK! Get your copy!
  • Cookie Policy
  • GDPR Policy
  • Disclaimer
  • Terms Of Use
  • Visit my other site: Fun Cookie Recipes
secrets pice kitchen
  • Home
  • Dinner
  • Desserts
  • Drinks
  • Appetizers
  • Contact
  • About
  • Privacy Policy
  • Home
  • Dinner
  • Desserts
  • Drinks
  • Appetizers
  • Contact
  • About
  • Privacy Policy
  • Cookie Policy
  • GDPR Policy
  • Disclaimer
  • Terms Of Use
Visit my other site: Fun Cookie Recipes

HOME / CATEGORIES /

Latest

- 2 cups all-purpose flour - 1/2 cup granulated sugar - 2 teaspoons baking powder - 1/2 teaspoon baking soda - 1/4 teaspoon salt - 1 teaspoon ground cinnamon - 1/2 teaspoon ground nutmeg - 1/2 cup apple cider - 1/4 cup milk - 2 large eggs - 1/4 cup unsalted butter, melted - 1 teaspoon vanilla extract The main ingredients bring a mix of flavors and textures. The flour gives structure. Sugar adds sweetness. Baking powder and baking soda help the donut holes rise. Salt balances the sweetness while spices like cinnamon and nutmeg add warmth. Apple cider brings a fruity note. The milk adds moisture, and eggs bind everything together. Unsalted butter gives richness. Vanilla adds a lovely aroma. - 1 cup powdered sugar - 2 tablespoons apple cider - 1/4 teaspoon cinnamon The glaze turns donut holes into a treat. Powdered sugar makes it sweet and smooth. Apple cider in the glaze gives a nice tang. A touch of cinnamon ties it back to the donut holes. This glaze is simple yet flavorful, making each bite irresistible. Start by taking a large bowl. Whisk together the following dry items: - 2 cups all-purpose flour - 1/2 cup granulated sugar - 2 teaspoons baking powder - 1/2 teaspoon baking soda - 1/4 teaspoon salt - 1 teaspoon ground cinnamon - 1/2 teaspoon ground nutmeg Make sure everything is mixed well. This step creates a base full of flavor. In a separate bowl, mix these wet ingredients: - 1/2 cup apple cider - 1/4 cup milk - 2 large eggs - 1/4 cup unsalted butter, melted - 1 teaspoon vanilla extract Whisk them until they blend nicely. This combination adds moisture and sweetness. Now, pour the wet mixture into the dry bowl. Stir gently to combine. - Avoid over-mixing; it can make the donut holes tough. Just mix until you see no dry flour. This keeps them soft and fluffy. Next, heat your oil. Preheat it to 350°F (175°C). - Use a deep fryer or a large pot. - Prepare a baking sheet with paper towels for draining. Scoop batter into the hot oil. Drop about 4-5 donut holes at once. - Cook them for 2-3 minutes. - They should turn golden brown. Turn them halfway through cooking. Once done, remove them with a slotted spoon and let them drain. For the glaze, whisk together: - 1 cup powdered sugar - 2 tablespoons apple cider - 1/4 teaspoon cinnamon Mix until smooth. Once the donut holes cool slightly, dip them into the glaze. - Make sure they are well-coated. - Set them on a wire rack to let the glaze set. These steps bring the sweet, apple flavor together. Enjoy every bite! To fry donut holes just right, keep the oil at 350°F (175°C). Use a kitchen thermometer for accuracy. If the oil is too cool, your donut holes absorb oil and get greasy. If it's too hot, they brown too fast and stay raw inside. Fry about 4-5 holes at a time. This keeps the oil temperature steady and cooks them evenly. Cook each batch for 2-3 minutes, turning them halfway. You'll know they are done when they turn golden brown. One common mistake is over-mixing the batter. Mix until wet and dry ingredients just combine. If you mix too much, the donut holes can turn tough. Another mistake is frying too many at once. This can lower the oil temperature and lead to soggy donuts. Stick to frying small batches for the best results. To make your donut holes even better, you can play with spices. Try adding more cinnamon or a dash of ginger for a warm kick. You can also add zest from an orange or lemon for a fresh twist. For added flavor, consider using different extracts like almond or maple. Each little change can make your donut holes unique and special. {{image_2}} You can change the taste of your donut holes easily. For a fun twist, try pumpkin spice donut holes. Just add pumpkin spice mix to the dry ingredients. This gives a warm, cozy flavor perfect for fall. Maple-glazed options are another great choice. Swap some of the apple cider for maple syrup in the glaze. This adds a rich sweetness that pairs well with the cinnamon. Want a healthier version? Use whole wheat flour instead of all-purpose flour. This option adds fiber and nutrients to your treat. You can also substitute applesauce for butter. This swap cuts fat and adds moisture. Just use the same amount of applesauce for a lighter donut hole. To make your donut holes pop, think about toppings. Sprinkles or chopped nuts add a fun crunch and color. You can let your kids help with this part too! For serving, pair them with hot cider or coffee. This makes a cozy snack for any time of year. Enjoy these little treats with your favorite drink for a perfect match! To keep your donut holes fresh, place them in an airtight container. This prevents moisture loss. Store them at room temperature for up to two days. For longer freshness, consider refrigerating them. They should last about a week in the fridge. Just remember to let them come to room temperature before serving. Freezing is a great option if you want to save some for later. Allow the donut holes to cool completely. Then, arrange them in a single layer on a baking sheet. Freeze them for a few hours until solid. After that, transfer them to a freezer-safe bag. They can last up to three months in the freezer. When you are ready to enjoy them, simply thaw at room temperature. To reheat the donut holes, preheat your oven to 350°F (175°C). Place the donut holes on a baking sheet. Warm them for about 5 to 10 minutes. This helps maintain their soft texture and flavor. You can also microwave them for 10-15 seconds if you're in a hurry. Just be careful not to overheat, or they might get tough. Apple cider glazed donut holes stay fresh for about 2 to 3 days. Keep them in an airtight container at room temperature. If you want them to last longer, you can store them in the fridge. However, the glaze may become less crisp over time. Yes, you can bake apple cider glazed donut holes! Preheat your oven to 375°F (190°C). Use a donut hole pan and fill each cavity about halfway with batter. Bake for about 10-12 minutes, or until they are golden brown. Baking gives a lighter texture, but the flavor is still amazing! To reheat donut holes, place them on a microwave-safe plate. Heat for about 10-15 seconds. This method keeps them soft. Alternatively, you can warm them in the oven at 350°F (175°C) for about 5 minutes. This keeps them crisp on the outside. You can find apple cider glazed donut holes at local bakeries, especially during fall. Many farmers' markets also sell them. Some grocery stores may carry them in their bakery section. You can also check online for local shops that specialize in unique flavors. This blog post shared how to make tasty apple cider glazed donut holes. We covered key ingredients, from flour to spices. I gave you step-by-step instructions for mixing, frying, and glazing. You learned helpful tips to avoid mistakes and variations for extra flavor. Now, you can enjoy these warm treats at home. With the right techniques, your donut holes will impress friends and family. I hope you try these recipes and share the joy of baking!

Apple Cider Glazed Donut Holes Irresistible Treat

- 1 cup unsalted butter - 1 cup brown sugar, packed - ½ cup granulated sugar - 1 large egg - 1 tablespoon pure maple syrup - 1 teaspoon vanilla extract - 2 cups all-purpose flour - 1 teaspoon baking soda - ½ teaspoon salt - 1 cup chopped pecans - ½ teaspoon ground cinnamon (optional) - Alternative sugars: You can use coconut sugar or honey for a different taste. - Nut substitutes: Try walnuts or almonds if you don’t have pecans. - Gluten-free options: Use a gluten-free flour blend for a safe alternative. I love using unrefined sugars for flavor. They add depth and richness. You can switch out the nuts, too, based on what you have. This adds a personal touch to your cookies. If you want them gluten-free, just grab that special flour mix! To make brown butter, heat unsalted butter in a medium saucepan. Use medium heat and stir it often. The butter will start to foam, then turn golden brown. This takes about 5 to 7 minutes. The key is to watch it closely. Once it smells nutty and looks brown, remove it from the heat. Let it cool for a few minutes. Perfectly browned butter should be golden, not burnt. You want a rich, deep flavor for your cookies. In a large bowl, mix the brown sugar and granulated sugar. Pour in the cooled brown butter. Whisk them together until they blend well. Next, add the egg, maple syrup, and vanilla. Whisk until the mix is smooth. In a separate bowl, whisk together the flour, baking soda, salt, and optional cinnamon. Gradually add this dry mix to the wet one. Stir gently until just combined. Avoid overmixing; this keeps your cookies soft and chewy. Now it’s time to shape the cookies. Preheat your oven to 350°F (175°C). Line a baking sheet with parchment paper to prevent sticking. Use a cookie scoop or a tablespoon to drop dough balls onto the sheet. Leave about 2 inches of space between each ball. This helps them bake evenly. Bake for 10 to 12 minutes. The edges should be golden, while the centers may seem slightly underbaked. This is fine! They will firm up as they cool. Chilling your dough is key. It helps the cookies hold their shape. If you skip this step, your cookies may spread too much. I recommend chilling for at least 30 minutes. This makes a huge difference! For cookie softness, aim for a shorter baking time. Bake until the edges are golden but the center looks soft. For a crispier cookie, bake a bit longer. Keep a close eye to avoid overbaking. Different types of maple syrup can change the taste. Try using dark maple syrup for a richer flavor. Light syrup gives a milder taste. Both work well, so pick your favorite! You can also add spices like nutmeg or ginger. They give the cookies warmth and depth. Chocolate chips are another fun option. They add sweetness and extra texture. Mix and match to find your perfect flavor combo! {{image_2}} To keep your brown butter maple pecan cookies fresh, use airtight containers. Glass or plastic containers work well. Line them with parchment paper to absorb moisture. Store cookies at room temperature for up to a week. To keep cookies soft, add a slice of bread to the container. The bread helps retain moisture. If you prefer crunchy cookies, store them without bread. Freezing cookies is easy and keeps them tasty. Here’s how to do it: 1. Cool the Cookies: Let your cookies cool completely on a wire rack. 2. Prepare for Freezing: Place cooled cookies in a single layer on a baking sheet. 3. Flash Freeze: Freeze for about 1 to 2 hours, until firm. 4. Store: Transfer cookies to a freezer bag or container. Remove as much air as possible. 5. Label: Write the date on the bag or container. For thawing, take out the desired number of cookies. Let them sit at room temperature for 15 to 30 minutes. You can also warm them in the oven at 350°F for a few minutes. Enjoy the fresh-baked taste! Cookies may spread too much for a few reasons. Here are common causes and fixes: - Butter Temperature: If the butter is too warm, it may cause spreading. Use softened butter instead of melted. - Chilling the Dough: Not chilling the dough can lead to flat cookies. Always chill your dough for at least 30 minutes. - Flour Measurement: Too little flour can cause cookies to spread. Make sure to measure flour correctly. Use the spoon-and-level method. - Baking Soda: Using too much baking soda can lead to excessive spreading. Stick to the recipe's amount. Yes, you can make brown butter ahead of time! Here are some tips: - Cooling: After browning, let the butter cool completely. - Storage: Pour the cooled butter into an airtight container. - Refrigeration: Store it in the fridge for up to a week. - Freezing: You can freeze brown butter for up to three months. Just thaw it in the fridge before using. No pecans? No problem! Here are some great substitutes: - Other Nuts: Use walnuts, almonds, or hazelnuts for a similar crunch. - Seeds: Sunflower seeds or pumpkin seeds work well for nut-free options. - Omit Them: You can simply leave them out if you prefer a plain cookie. - Chocolate Chips: Add chocolate chips for a sweet twist instead of nuts. This blog post covered all you need for perfect cookies. We detailed ingredients, from butter to pecans. You learned how to make browned butter and mix the batter right. We shared tips for shaping, baking, and storing your cookies. Remember, chilling dough can help create your favorite cookie texture. Feel free to experiment with new flavors or substitutes. Whether you want soft or crispy cookies, you're ready to impress anyone with your baking skills. Enjoy your time in the kitchen, and happy baking!

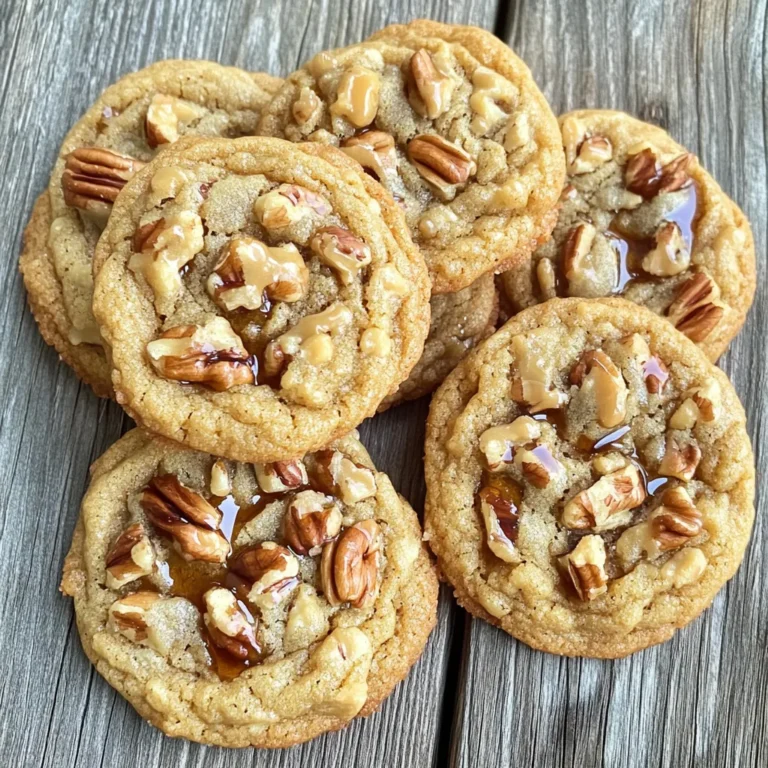
Brown Butter Maple Pecan Cookies Delightful Treat

- 4 chicken thighs, boneless and skinless - 2 cups mixed bell peppers (red, yellow, green), sliced - 1 red onion, cut into wedges - 1 zucchini, sliced - 1 cup broccoli florets - 5 cloves garlic, minced - 4 tablespoons olive oil - 2 tablespoons soy sauce (or tamari for gluten-free) - 1 tablespoon honey - 1 teaspoon chili flakes (adjust for heat preference) - Salt and pepper to taste To create this dish, you need fresh ingredients. Chicken thighs give great flavor and juiciness. Mixed bell peppers add color and crunch. Red onion adds sweetness and depth. Zucchini provides a nice texture, while broccoli florets contribute nutrients and a vibrant green. For the marinade, garlic is a must for that punchy flavor. Olive oil keeps things moist. Soy sauce brings a savory taste, while honey adds a hint of sweetness. Chili flakes can spice things up, and salt and pepper round it all out. Gather these ingredients, and you are ready to make a tasty meal! Set your oven temperature to 425°F (220°C). This hot heat helps cook the chicken and veggies just right. In a large bowl, mix minced garlic, olive oil, soy sauce, honey, and chili flakes. Add salt and pepper for flavor. Place the chicken thighs in the bowl and coat them well. Let the chicken marinate for at least 15 minutes. For more flavor, marinate up to 4 hours in the fridge. In another bowl, toss sliced bell peppers, red onion, zucchini, and broccoli with 1 tablespoon of olive oil. Add a pinch of salt and pepper. Mix until all veggies are well coated. This step adds flavor and makes them nice and tasty. Line a large baking sheet with parchment paper. This makes cleanup easy. Place the marinated chicken in the center of the pan. Then, arrange the veggies around the chicken. This layout helps everything cook evenly. Bake in the preheated oven for 25-30 minutes. The chicken is done when it reaches an internal temperature of 165°F (75°C). The veggies should be tender and slightly caramelized, showing they are ready to eat. For a crispier finish, turn on the broil function for the last 3-5 minutes. Keep a close watch to prevent burning. This step gives your dish a delightful crunch. Enjoy that crispy edge! To make your sheet-pan chili garlic chicken and veggies even better, try adding spices. Here are some ideas: - Cumin: Adds warmth and earthiness. - Paprika: Gives a sweet, smoky flavor. - Oregano: Brings a fresh, herbaceous note. - Ginger: Adds a zesty kick. Mix and match these spices to find your favorite blend. Fresh herbs like basil or parsley can also brighten the dish. How do you know when your chicken and veggies are done? The chicken should cook until it reaches 165°F (75°C). For the veggies, look for a tender texture and slight browning. To check, pierce a piece of chicken with a fork. If the juices run clear, your chicken is ready. To create a complete meal, consider these pairing ideas: - Rice or Quinoa: Serve the chicken and veggies over a bed of rice or quinoa. - Side Salad: A fresh salad with greens and a light dressing adds freshness. - Flatbreads: Warm flatbreads are great for scooping up the chicken and veggies. These options balance the flavors and make your meal more enjoyable. {{image_2}} You can switch out chicken thighs for other meats. Use chicken breasts for a leaner option. Pork or turkey thighs also work well. If you want a vegetarian dish, try tofu or tempeh. These options absorb flavors from the marinade nicely. Feel free to change the veggies based on your taste. Carrots, asparagus, or green beans can add variety. Sweet potatoes bring a nice sweetness too. You can use any seasonal veggies you like. Just remember to cut them into similar sizes for even cooking. To make this dish gluten-free, use tamari instead of soy sauce. You can also skip honey for a low-carb option. Instead, try a sugar-free sweetener to keep the flavor. For a lower-calorie meal, reduce the olive oil or use a cooking spray. These swaps help you enjoy this dish while meeting your dietary needs. To store leftovers, place the chicken and veggies in an airtight container. Let them cool first. Store in the fridge for up to three days. This keeps them fresh and safe to eat later. The best way to reheat is in the oven. Preheat your oven to 350°F (175°C). Place the chicken and veggies on a sheet pan. Heat for about 15-20 minutes. This method keeps the flavors bright and the texture nice. You can also use a microwave. If you do, cover the dish with a lid to keep moisture in. Heat in short bursts and check often. You can freeze the whole dish or its parts. For the whole dish, let it cool first. Then, wrap it tightly in plastic wrap and foil. This helps prevent freezer burn. Use within three months for the best taste. If you freeze components, store chicken and veggies separately. When ready to eat, thaw in the fridge overnight before reheating. Yes, you can use chicken breasts. However, chicken breasts cook faster than thighs. They can dry out if overcooked. Thighs have more fat, making them juicier and more flavorful. If using breasts, reduce the cooking time by about 5-10 minutes. Aim for an internal temperature of 165°F (75°C). You want them tender and juicy. If you lack soy sauce, try tamari for a gluten-free option. You can also use coconut aminos. It has a sweet flavor but is lower in sodium. Another option is using Worcestershire sauce, which adds depth. Mix in a bit of water to reduce its strong taste. These substitutes keep the dish tasty and flavorful. To spice up this recipe, add more chili flakes. Start with an extra teaspoon and adjust to taste. You can also include sliced fresh jalapeños or serrano peppers. For a bold kick, use a dash of hot sauce in the marinade. These options will give your dish a nice heat that warms the soul. This blog covered a tasty sheet pan chicken recipe with colorful veggies. You saw how to marinate chicken thighs and prepare bell peppers, zucchini, and more. I shared tips for baking and ways to serve your meal. You learned about variations, storage, and answering common questions. Try this recipe to enjoy quick, healthy meals. Keep experimenting and enjoy cooking!

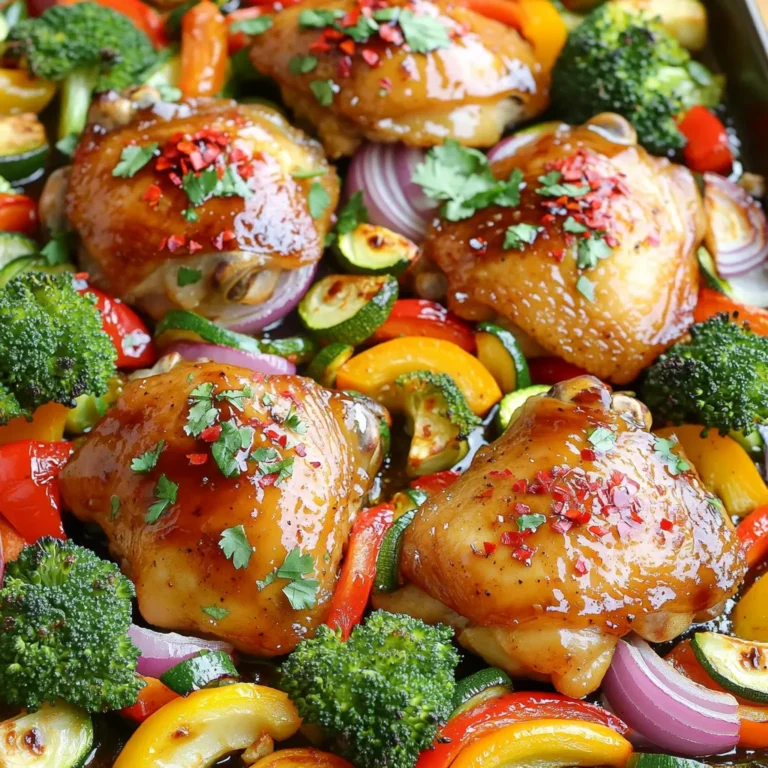
Sheet-Pan Chili Garlic Chicken and Veggies Delight

- Pumpkin puree (2 cups): You can use canned or fresh pumpkin. Canned is easy and quick. Fresh gives a richer taste but takes more work. Just cook the pumpkin until soft and blend it. - Apples (4 medium): Choose sweet apples like Honeycrisp or Granny Smith. Honeycrisp adds sweetness, while Granny Smith brings a nice tartness. The mix gives great flavor. - Brown sugar (1 cup): This adds sweetness and a nice caramel flavor. You can adjust this to your taste. - Spices: - Cinnamon (1 teaspoon): This spice gives warmth and comfort. - Nutmeg (½ teaspoon): A little nutmeg adds depth and richness. - Ginger (½ teaspoon): Ginger adds a nice kick. - Allspice (¼ teaspoon): This spice combines notes of cinnamon, nutmeg, and clove. - Apple cider (½ cup): This keeps the mixture moist and adds fruity flavor. - Vanilla extract (1 tablespoon): This enhances all the other flavors. - Lemon juice (1 tablespoon): A touch of acidity helps balance sweetness. - Salt (pinch): Just a little salt brings out all the flavors nicely. - Metrics: For those in other countries, here are some conversions: - Pumpkin puree: 475 mL - Brown sugar: 200 g - Apple cider: 120 mL - Spices: Use 5 g for cinnamon, 1.5 g for nutmeg, and so on. - Larger batches: If you want to make more, just double or triple the amounts. Keep the same ratios for spices and sugar to keep the flavor right. Start by prepping your apples. Peel, core, and chop four medium apples. Honeycrisp or Granny Smith apples work well here. These apples add great flavor and natural sweetness. Next, combine all the ingredients in the slow cooker. Add 2 cups of pumpkin puree, the chopped apples, and 1 cup of brown sugar. Then, sprinkle in 1 teaspoon of cinnamon, ½ teaspoon of nutmeg, ½ teaspoon of ginger, and ¼ teaspoon of allspice. Pour in ½ cup of apple cider, 1 tablespoon of vanilla extract, and 1 tablespoon of lemon juice. Finally, add a pinch of salt. Stir everything together until well combined. Now, cover the slow cooker and set it to low heat. Cook the mixture for 6 to 8 hours. Stir occasionally to help the flavors blend and to monitor the mixture. You want it to thicken and for the apples to become tender. Once cooked, you can use an immersion blender to blend the apple butter until smooth. If you don't have one, transfer the mixture in batches to a regular blender. Blend until you reach your desired texture. Feel free to taste the apple butter and adjust the sweetness or spices. If you want it sweeter, add more brown sugar or spices. To make the best pumpkin apple butter, you can adjust the sweetness and spice to your taste. If you like it sweeter, add more brown sugar. If you love spice, add extra cinnamon or nutmeg. You can also try a pinch of cloves for warmth. For enhanced flavor, consider adding a splash of maple syrup. You can also stir in some chopped nuts for crunch. A bit of orange zest can brighten the dish. These small tweaks can make a big difference. Choosing the right slow cooker size is key. A 4-quart slow cooker works well for this recipe. If yours is too small, the mixture may not cook evenly. To ensure even cooking, stir the mixture every few hours. This helps all the flavors blend. If you notice any hot spots, adjust the slow cooker’s position. Proper cooling is important. Let the pumpkin apple butter cool for about 30 minutes before you transfer it to jars. This helps prevent condensation inside the jars. To avoid overcooking, keep an eye on the time. Cooking for 6-8 hours on low heat gives the best results. If you cook it too long, it may burn or dry out. {{image_2}} You can easily switch up the sugar in this recipe. Instead of brown sugar, try maple syrup. This change adds a nice depth of flavor. You can also use honey or agave syrup for a different twist. Want to spice things up? Add more cinnamon, cloves, or even a pinch of cayenne pepper for warmth. You can also use pumpkin pie spice instead of individual spices. This option makes it easy and quick. If you're looking for a sugar-free option, use a sugar substitute. Stevia or erythritol can work well. These alternatives keep it sweet without the calories. For a vegan twist, replace vanilla extract with a splash of almond extract. This adds a lovely nutty flavor. You can also skip the butter and just focus on the fruits and spices. Pair your pumpkin apple butter with fresh bread or warm pastries. It makes a great spread for breakfast or brunch. Try it on pancakes or waffles for a fun twist. You can also use pumpkin apple butter in recipes. Swirl it into yogurt or oatmeal for added flavor. Add it to smoothies for a seasonal touch. The possibilities are endless! Store your pumpkin apple butter in the fridge. It lasts up to two weeks. Use clean, sterilized jars to keep it fresh. Make sure the jars are tightly sealed. This helps prevent spoilage and keeps flavors strong. For long-term storage, canning is a great option. Here’s how to do it step-by-step: 1. Prepare your jars by washing them in hot, soapy water. 2. Rinse well and place them in a boiling water bath for ten minutes. 3. Fill each jar with warm pumpkin apple butter, leaving about half an inch of space at the top. 4. Wipe the rims of the jars with a clean cloth. 5. Place the lids on and screw on the bands until snug. 6. Process the jars in a boiling water bath for ten minutes. 7. Let them cool completely before checking the seals. For safe canning, always use new lids. Check for any signs of damage. It’s key to prevent foodborne illness. Freezing is another great way to store your pumpkin apple butter. Here’s how to do it: - Let the apple butter cool completely before freezing. - Use freezer-safe containers or heavy-duty freezer bags. - Leave some space in the containers for expansion. To thaw, place the container in the fridge overnight. You can also thaw it in a pot over low heat. Once thawed, stir well before using. This keeps the texture smooth and tasty. You can enjoy pumpkin apple butter in many ways. It spreads well on toast or bagels. Add it to pancakes for a sweet twist. You can also use it in baking, like in muffins or cakes. Try it with cheese on a charcuterie board. It pairs nicely with yogurt or oatmeal too. Yes, you can use frozen apples or pumpkin puree. Just thaw the apples before adding them. For pumpkin puree, use canned or homemade. Both options work great in this recipe. It makes it easy to use what you have on hand. Pumpkin apple butter lasts about two weeks in the fridge. Store it in clean, sealed jars. If you can it, it can last up to a year. Freezing is another option. Just make sure to leave space in the jars for expansion. Yes, this recipe is gluten-free. All the ingredients, like pumpkin and apples, do not contain gluten. Feel free to enjoy it without worry. Always check labels if you buy packaged goods, just to be safe. This blog post covers the essentials for making pumpkin apple butter. We discussed ingredients, measurement conversions, and step-by-step cooking instructions. Tips for flavor, storage, and unique variations also help you make the best product. In conclusion, making pumpkin apple butter is fun and rewarding. You can create a tasty treat that lasts long. Follow these steps, and you'll enjoy great results every time. Happy cooking!

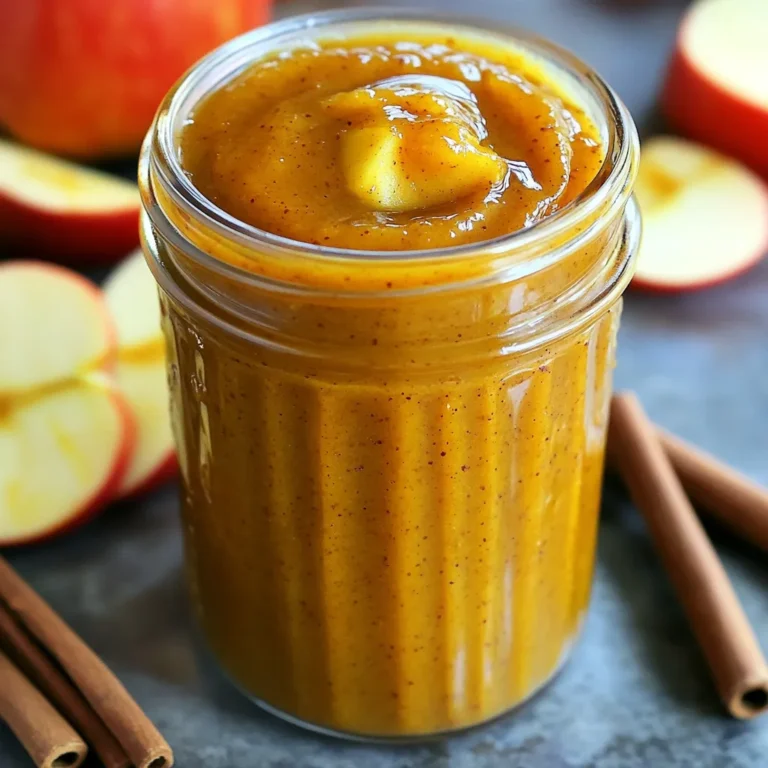
Slow Cooker Pumpkin Apple Butter Deliciously Easy Recipe

Here’s what you need to make these tasty mozzarella sticks: - 12 mozzarella cheese sticks - 1 cup all-purpose flour - 2 large eggs, beaten - 1 cup breadcrumbs (preferably panko for extra crunch) - 1 teaspoon garlic powder - 1 teaspoon onion powder - 1 teaspoon Italian seasoning - Salt and pepper to taste - Cooking spray These ingredients create a mix of flavors and textures. The mozzarella gives that gooey center. The flour helps the egg and breadcrumbs stick. The breadcrumbs, especially panko, add the perfect crunch. Seasonings like garlic and onion powder boost the taste. You can adjust salt and pepper to fit your liking. Cooking spray helps them get crispy in the air fryer. Gathering these ingredients is simple and quick. You can find most of them in your kitchen or at the store. Ready to get cooking? Freezing the cheese sticks Start by placing the mozzarella sticks in the freezer. Let them chill for about 30 minutes. This step helps keep the cheese firm when cooking. Setting up the dredging station Next, set up your dredging station. You will need three shallow bowls. Fill the first bowl with all-purpose flour. In the second bowl, add two beaten eggs. The third bowl should hold your breadcrumb mix, including garlic powder, onion powder, Italian seasoning, salt, and pepper. Flour coating process Take a frozen mozzarella stick from the freezer. Lightly coat it in flour, making sure it is fully covered. Give it a gentle shake to remove any extra flour. Egg dipping procedure Now, dip the floured stick into the beaten eggs. Let any excess egg drip off. This helps the breadcrumbs stick better. Breadcrumb application tips Roll the stick in the breadcrumb mixture. Press gently to ensure the breadcrumbs stick well. Repeat this for all the mozzarella sticks. Preheating the air fryer Preheat your air fryer to 390°F (200°C). This step is key for getting that perfect crisp. Arranging sticks in the basket Lightly spray the air fryer basket with cooking spray. Arrange the mozzarella sticks in a single layer. Make sure not to overcrowd the basket. This allows for even cooking. Cooking time and flipping technique Spray the tops of the sticks with cooking spray to enhance crispiness. Air fry them for 6-8 minutes or until they turn golden brown. Flip the sticks halfway through to ensure even crisping. Once they are ready, carefully remove them and let them cool for a few minutes before serving. Freezing your mozzarella sticks is key. It helps them keep their shape while cooking. When they stay firm, they fry better. I freeze them for about 30 minutes. This makes a big difference in texture. For extra crispiness, use panko breadcrumbs. They add a nice crunch. A light spray of cooking oil on top also helps. For best results, use part-skim mozzarella sticks. They melt well and stay tasty. Avoid low-fat versions; they may not crisp up right. Store cheese sticks in the fridge until you use them. Keep them in their original packaging to stay fresh. If you need to, wrap them tightly in plastic. Serve your mozzarella sticks with marinara sauce for dipping. It adds a great flavor. You can also try ranch or spicy aioli for fun twists. For a nice touch, garnish with chopped parsley. It adds color and freshness. Enjoy your snack! {{image_2}} You can make your mozzarella sticks even better by adding flavors to the breadcrumbs. Mix in herbs like basil, parsley, or oregano for a fresh taste. You can also sprinkle in some paprika or cayenne for a kick. This simple change can elevate your snack to a whole new level and impress your friends. Don't be afraid to get creative with flavors you love! If you want to switch things up, try different types of cheese sticks. Cheddar, pepper jack, or gouda can add unique flavors. Each cheese brings its own taste and texture. For a fun twist, use a mix of cheeses for extra gooeyness. Kids and adults alike will love the surprises inside! For a gluten-free option, you can easily swap the flour and breadcrumbs. Use almond flour or coconut flour instead of regular flour. For the breadcrumbs, look for gluten-free panko or crush gluten-free crackers. This way, everyone can enjoy crispy mozzarella sticks without worry. It’s all about enjoying good food together! To store leftover mozzarella sticks, place them in an airtight container. Keep them in the fridge. They stay fresh for up to three days. Before storing, let them cool completely. This keeps moisture from making them soggy. If you need to reheat them later, they will still taste great. Freezing uncooked mozzarella sticks is easy. After coating them, lay them flat on a baking sheet. Make sure they do not touch each other. Freeze for about 1 hour until firm. Transfer the sticks to a freezer bag or container. They can stay in the freezer for up to two months. When you want to cook them, you can go straight from the freezer to the air fryer. To reheat mozzarella sticks, use the air fryer for the best results. Preheat it to 350°F (175°C). Place the sticks in a single layer in the basket. Cook for about 4-5 minutes. This keeps them crispy and warm. Avoid using the microwave, as it can make them soggy. Enjoy your tasty snack! Yes, you can use pre-made frozen mozzarella sticks. Just skip the coating steps. Air fry them according to the package instructions. This saves time and gives you a quick snack. The sticks are done when they are golden brown and crispy. You should also see some cheese starting to ooze out. Cook them for 6-8 minutes, flipping halfway through for even cooking. Marinara sauce is a classic choice. You can also try ranch dressing or garlic aioli. For a twist, serve with spicy sriracha or a tangy barbecue sauce. These dips enhance the flavor of your crispy mozzarella sticks. People often ask if they can add spices to the breadcrumbs. Yes! You can mix in herbs like oregano or chili powder for extra flavor. Another popular question is about making them healthier. You can use whole wheat breadcrumbs or even almond flour for a different taste. You learned how to make tasty mozzarella sticks from scratch. We covered ingredients, step-by-step cooking, and storage tips. You can use different cheeses or breadcrumbs to change the flavor. Remember to freeze the sticks for the best texture. Pair them with fun dips for extra flavor. Making mozzarella sticks is easy and rewarding. Enjoy your delicious snack any time!

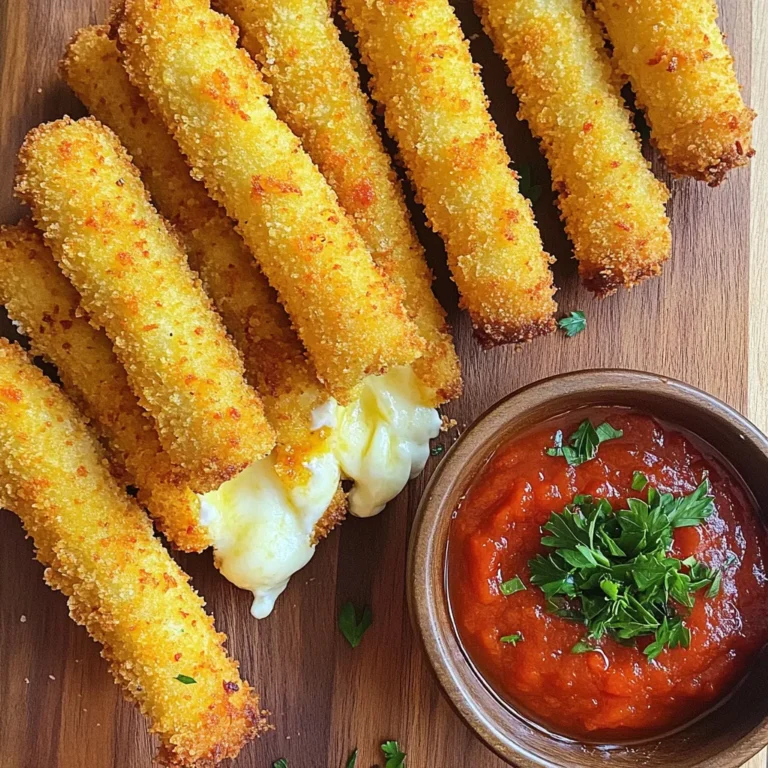
Air Fryer Crispy Mozzarella Sticks Tasty Snack Recipe

- Penne pasta - Artichoke hearts - Fresh spinach - Vegetable broth - Heavy cream - Grated Parmesan cheese - Garlic - Onion powder - Garlic powder - Olive oil - Salt and pepper - Optional ingredients (like red pepper flakes) To make One-Pot Spinach and Artichoke Pasta, you need some key ingredients. First, grab 8 ounces of penne pasta. This pasta shape holds the sauce well. Next, get a can of artichoke hearts, about 14 ounces. Drain and chop them up for great flavor. You will also need 4 cups of fresh spinach. This adds a nice green color and nutrients. For the cooking base, use 1 cup of vegetable broth. It brings in a rich taste. You’ll need 1 cup of heavy cream to create that creamy texture. Don’t forget 1 cup of grated Parmesan cheese. This cheese gives a salty and nutty flavor. You’ll also need 2 cloves of minced garlic. Garlic adds a lovely aroma. For seasoning, gather 1 teaspoon of onion powder and 1 teaspoon of garlic powder. Use olive oil for sautéing. You will also need salt and pepper to taste. If you want a kick, add some red pepper flakes as an optional ingredient. Each item plays a big role in making this dish flavorful and satisfying. - Sauté the garlic and artichoke hearts Start by heating olive oil in a large pot. Add minced garlic and let it cook for about 30 seconds until it smells great. Then add chopped artichoke hearts. Cook these for about 2-3 minutes. Stir them often until they start to brown a bit. - Simmer the vegetable broth with pasta Next, pour in vegetable broth. Bring this mix to a light simmer. Now, add the penne pasta. Stir it well to make sure it mixes with the broth. Cook for about 8-10 minutes. Stir it occasionally until the pasta is just right, or al dente. - Incorporate cream and seasoning After the pasta cooks, turn the heat down to low. Stir in heavy cream, onion powder, and garlic powder. Add grated Parmesan cheese too. This mix will create a nice, creamy sauce. - Add spinach and finish cooking Finally, add the roughly chopped spinach. Cook for an extra 2-3 minutes. You want the spinach to wilt and everything hot. Season with salt and pepper to taste. This method creates a rich, tasty dish. The flavors blend well, and you get a creamy pasta that's both vibrant and satisfying. Enjoy! - Cooking pasta al dente: Cook your penne pasta until it is firm. This means it should have a slight bite. The pasta will finish cooking in the sauce, absorbing more flavor. - Balancing flavors with salt and spices: Start with a small pinch of salt. Taste as you go. You want to enhance the flavors. You can add more salt, garlic powder, or onion powder as you mix. - Achieving the perfect creaminess: Add the heavy cream slowly. Stir it in well. This helps it mix evenly. The Parmesan cheese will also add a rich, creamy texture. - Overcooking spinach: Spinach cooks quickly. Add it at the end of cooking. Cook just until it wilts. Overcooked spinach loses its bright color and nutrients. - Not properly measuring ingredients: Use measuring cups for the broth and cream. Too much or too little can change the dish. Stick to the recipe for the best results. {{image_2}} You can switch up the pasta type. Use farfalle or fusilli for fun shapes. Each type brings a new twist to the dish. Adding protein makes it heartier. Try grilled chicken or shrimp for extra flavor. You can also make it vegan. Use coconut cream instead of heavy cream. Nutritional yeast can replace the cheese. This keeps the dish creamy and rich. Herbs add layers of taste. Fresh basil or thyme can brighten the dish. Just sprinkle them in when you add the spinach. Want more depth? Add sun-dried tomatoes or mushrooms. They bring a savory kick. You can sauté them with the garlic for extra flavor. These small changes make the dish exciting and new each time. To keep your One-Pot Spinach and Artichoke Pasta fresh, store it right. First, let it cool for a bit. Then, place it in an airtight container. Store it in the fridge. It can last up to three days. If you want to keep it longer, try freezing it. Use a freezer-safe container. It can freeze for up to two months. Just remember to label your container with the date. When it's time to reheat, avoid the microwave if you can. Instead, use a pot on the stove. Add a splash of water or broth to keep it moist. Heat on low, stirring gently. This helps prevent mushiness. If you must use a microwave, cover it with a damp paper towel. Heat in short bursts, stirring in between. This way, your pasta stays creamy and delicious. Yes, you can make this dish gluten-free. Just swap penne pasta for gluten-free pasta. Many brands offer gluten-free options that taste great. To make this dish dairy-free, use coconut cream instead of heavy cream. Replace Parmesan cheese with a dairy-free alternative. Nutritional yeast adds a cheesy flavor without dairy. This pasta pairs well with a fresh salad or crusty bread. You can also serve it with grilled chicken or shrimp for added protein. Roasted vegetables make a nice side too. This blog post covered how to make delicious One-Pot Spinach and Artichoke Pasta. I shared the key ingredients and led you through each cooking step. You now know tips for perfecting flavor and avoiding common mistakes. You can even explore fun variations to suit your taste. Enjoy the creamy goodness of this dish, and don’t forget to experiment! The kitchen is your playground. Happy cooking!

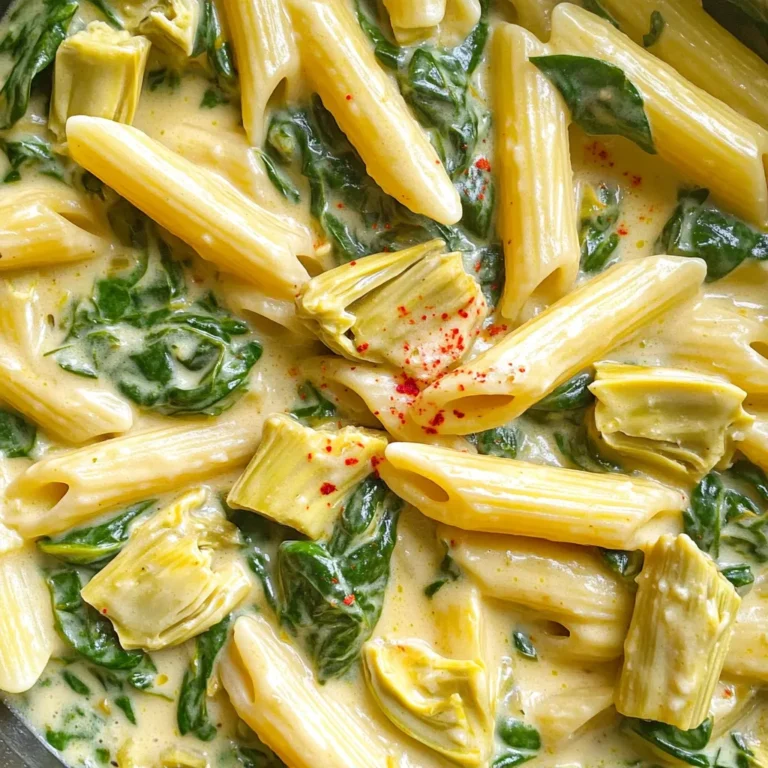
One-Pot Spinach and Artichoke Pasta Flavor Boost

To make this dish, you will need: - 1 kg chicken, cut into pieces - 2 large onions, finely chopped - 3 tomatoes, pureed - 4 cloves garlic, minced - 1 inch ginger, grated - 2 green chilies, slit - 1 cup plain yogurt - 3 tablespoons vegetable oil or ghee These ingredients form the base of your chicken curry. The chicken provides the main protein. The onions add sweetness, while tomatoes bring acidity. Garlic and ginger add warmth, and green chilies give a kick. Yogurt helps to tenderize the chicken and adds creaminess. For flavor, you will need: - 2 teaspoons cumin seeds - 1 teaspoon mustard seeds - 1 teaspoon turmeric powder - 2 teaspoons coriander powder - 1 teaspoon garam masala - Salt to taste These spices create the famous curry flavor. Cumin and mustard seeds add depth. Turmeric gives a warm color and earthiness. Coriander adds a citrusy note, while garam masala rounds off the flavor with warmth and complexity. Salt enhances all the flavors. To finish your dish, consider: - Fresh coriander leaves for garnish Garnishing with coriander adds a fresh taste and vibrant color. You can also serve it with naan or rice to soak up the sauce. A lime wedge adds brightness, making each bite more exciting. {{ingredient_image_1}} To marinate chicken, start with a bowl. Add 1 kg of chicken pieces. Then, mix in 1 cup of plain yogurt, 1 teaspoon of turmeric powder, and salt to taste. The yogurt adds moisture and flavor. It helps tenderize the chicken too. Mix well and cover the bowl. Let it sit for at least 30 minutes. This step is key for great taste. Heat 3 tablespoons of vegetable oil or ghee in a large pan. Use medium heat for best results. Once hot, add 2 teaspoons of cumin seeds and 1 teaspoon of mustard seeds. Let them sizzle until fragrant. Next, add 2 large onions that you have chopped finely. Stir them often. Cook until they turn golden brown. This should take about 10 minutes. Properly sautéed onions add a rich base to your curry. Once the chicken is added, mix it well with the spice blend. Cover the pot and reduce the heat to low. Let it simmer for about 25-30 minutes. This slow cooking makes the chicken tender. Stir occasionally to avoid sticking. If the curry looks too thick, add a bit of water. The sauce should be thick but pourable. Adjust the seasoning if needed. This final step makes the dish perfect. To get the best flavor in your chicken curry, start with fresh spices. Whole spices are better than ground ones. Toast them lightly in oil to bring out their oils and aromas. Use good quality yogurt for marinating. It gives your chicken a creamy texture. Don't rush the cooking of onions; let them brown deeply. This adds richness to your dish. Always simmer your curry gently; this helps the flavors meld well. One big mistake is skipping the marination. Marinating the chicken makes it tender and flavorful. Another common error is not cooking the onion enough. Undercooked onions taste raw and ruin the dish. Avoid using too much water too soon. This can make your curry watery. Lastly, don’t forget to taste as you cook. Adjusting seasoning at the end can save your dish. To make your curry milder, remove the seeds from green chilies. You can also add more yogurt. It cools down the heat. If you want it spicier, use more green chilies or add red chili powder. Start with a small amount and taste. You can always add more later. For a sweet touch, add a bit of sugar or honey. This can balance the spices nicely. Pro Tips Marination Magic: Allow the chicken to marinate for at least 1 hour for deeper flavor absorption from the spices and yogurt. Layering Flavors: Sauté the onions until they are deeply caramelized; this will enhance the overall depth of flavor in your curry. Adjusting Spice Levels: If you prefer a milder curry, remove the seeds from the green chilies before adding them to the pot. Perfect Consistency: For a thicker gravy, let the curry simmer uncovered for the last 10 minutes of cooking. {{image_2}} You can easily adjust this chicken curry for special diets. For a lighter dish, use skinless chicken. If you want a dairy-free option, replace yogurt with coconut milk. This adds creaminess without dairy. For those avoiding gluten, use gluten-free yogurt. You can also skip the ghee and use a plant-based oil. These small swaps keep the flavors rich while meeting dietary needs. India is vast and diverse. Each region has its style of chicken curry. In Punjab, you'll find a creamy, buttery version called butter chicken. The south favors coconut milk and spices, making it different and flavorful. In Bengal, you might see mustard oil and poppy seeds used. Each style tells a story of its region and culture. Explore these variations to add new flavors to your table. Chicken is great, but you can try other proteins too. Goat meat adds a rich flavor and works well with spices. For a vegetarian option, use chickpeas or paneer. These alternatives soak up spices and keep the dish hearty. Tofu is another good choice for a plant-based meal. Each protein brings its own taste, making this curry versatile and exciting. To store leftover chicken curry, let it cool first. Transfer it to an airtight container. Make sure the lid seals tightly. This helps keep the curry fresh. You can store it in the fridge for up to three days. If you want it to last longer, consider freezing. When reheating chicken curry, use a low heat setting. This allows the flavors to blend back together. Stir it often to prevent sticking. You can add a splash of water if it seems too thick. Heat until it's steaming hot, but don’t boil it. This keeps the chicken tender and juicy. Freezing chicken curry is easy. Portion it into smaller containers. Label each container with the date. This way, you know when to use it. You can freeze it for up to three months. When you are ready to eat, thaw it in the fridge overnight. Reheat it gently, and enjoy your tasty meal! Chicken curry has deep roots in Indian cuisine. It comes from the Mughal era. The Mughals introduced rich spices and cooking styles. Over time, chicken curry evolved into many regional varieties. Each region adds its own twist, using local spices and methods. This dish reflects India's diverse food culture and history. You can find different versions in every part of India. Yes, you can use a slow cooker for this recipe. Start by marinating the chicken as usual. Then, sauté the onions, garlic, and ginger in a pan. After that, transfer everything to the slow cooker. Add the spices and tomatoes, and mix well. Set the slow cooker on low for about 6 hours. This method makes the chicken very tender and flavorful. Chicken curry pairs well with several side dishes. Here are some great options: - Naan bread - Basmati rice - Raita (yogurt sauce) - Pickles - Papadam (crispy lentil wafers) These side dishes enhance the meal and add layers of flavor. Enjoy exploring different combinations! In this article, we explored how to make authentic Indian chicken curry. We examined essential ingredients, proper cooking techniques, and tips to enhance flavor. I shared storage info and answered common questions about this dish. As you prepare your own curry, remember that practice makes perfect. Use the tips provided to avoid mistakes. Enjoy the process and make it your own. Each curry you create can be a new adventure in flavor.

Authentic Indian Chicken Curry Flavorful and Simple Dish

To make this fresh tomato pasta, gather these key ingredients: - 400g spaghetti or your preferred pasta - 6 ripe heirloom tomatoes, diced - 3 tablespoons extra virgin olive oil - 3 cloves garlic, minced - 1 small red onion, finely chopped - 1 teaspoon red pepper flakes (optional for heat) - Salt and pepper to taste - 1 cup fresh basil leaves, torn or chopped - 50g parmesan cheese, grated (optional for garnishing) Each ingredient plays a big part in making this dish tasty and fresh. The heirloom tomatoes bring a sweet flavor and juicy texture. The garlic and onion add depth, while the olive oil provides richness. When choosing tomatoes, I recommend using heirloom varieties. Heirloom tomatoes are sweet and have a lovely texture. You can also use Roma tomatoes for a more classic taste. They hold up well in sauces and have fewer seeds. If you want a bold flavor, try using cherry tomatoes. Their sweetness can brighten the dish. To make this pasta even better, consider adding these options: - Fresh herbs like parsley or oregano for extra flavor - A splash of balsamic vinegar for tanginess - Crushed nuts like pine nuts for texture - A sprinkle of lemon zest for brightness These additions can change the dish’s flavor profile. Feel free to mix and match based on your taste. Each option can make your meal unique and delicious! {{ingredient_image_1}} Start by boiling a large pot of salted water. Add your spaghetti and cook it until al dente. This usually takes about 8 to 10 minutes, but check the package for exact times. Once done, reserve 1 cup of the pasta water. This water has starch, which helps the sauce stick. Drain the pasta and set it aside. In a large skillet, heat 3 tablespoons of extra virgin olive oil over medium heat. Add the finely chopped red onion. Sauté it for about 3 to 4 minutes until it softens. Next, add 3 cloves of minced garlic and 1 teaspoon of red pepper flakes if you like heat. Cook this mix for 1 to 2 minutes, but don’t let the garlic burn. The smell will be amazing! Now, it’s time for the star of the dish. Add 6 diced heirloom tomatoes to the skillet. Season the mix with salt and pepper. Cook this for about 5 to 7 minutes. Stir often as the tomatoes soften and create a light sauce. The juices will blend beautifully with the onions and garlic. Once it’s ready, toss the cooked spaghetti into the skillet. If it feels dry, add some reserved pasta water. Finally, fold in 1 cup of fresh basil leaves. Taste and adjust seasoning if needed. Enjoy your vibrant, fresh tomato pasta! To cook perfect pasta, start with a large pot of salted water. Use about one tablespoon of salt for every four quarts of water. Bring the water to a rolling boil. Add your spaghetti and stir it gently. Follow the package directions for cooking time. Test the pasta a minute early. It should be firm yet tender. This is the al dente stage. After cooking, save one cup of pasta water. This water helps bind your sauce. Seasoning is key to a tasty dish. Use fresh herbs like basil to lift the flavor. Add salt and pepper to taste while cooking. If you like heat, include red pepper flakes. Sauté your garlic and onion until soft. This step makes the dish aromatic. Adding the diced heirloom tomatoes boosts flavor too. Let them cook down to create a light sauce. Adjust the seasoning as needed, tasting along the way. A beautiful dish is always more inviting. Start by plating the pasta in deep bowls. Twirl the spaghetti for a nice shape. Top with fresh basil leaves for color. Sprinkle grated parmesan cheese if you like. Add extra red pepper flakes for a pop. You can also serve with crusty bread on the side. This adds a nice touch to the meal. Enjoy your dish with friends or family for a delightful experience! Pro Tips Use Fresh Ingredients: The flavor of this dish relies heavily on the quality of the tomatoes and basil. Use the ripest, freshest produce you can find for the best results. Customize the Heat: Adjust the amount of red pepper flakes based on your heat preference. For a milder dish, use less or omit entirely, and for more heat, add a pinch more. Save the Pasta Water: The starchy pasta water helps to bind the sauce and pasta together. Always reserve some before draining the pasta to achieve the perfect consistency. Experiment with Cheese: While parmesan is a classic choice, try other cheeses like pecorino or a sprinkle of feta for a unique twist on flavor. {{image_2}} You can easily make this dish vegetarian. Simply skip the meat and focus on the fresh flavors. For a protein boost, add chickpeas or lentils. They add texture and keep it filling. You can also mix in seasonal veggies like zucchini or bell peppers. Their colors and crunch create a vibrant dish. Top it with extra basil for freshness. To make this pasta vegan, remove the parmesan cheese. You can substitute it with a mix of nutritional yeast and garlic powder for a cheesy flavor. This twist keeps the dish rich without dairy. Consider adding toasted nuts for crunch. Pine nuts or walnuts work well. They add good fats and protein. Don't forget to use a vegan-friendly pasta. For meat lovers, chicken or shrimp are great choices. If you choose chicken, cook it in the skillet first. Season it well and remove it before adding the onions. After cooking the sauce, mix the chicken back in. For shrimp, add them to the sauce last. Cook until they turn pink, about 3-4 minutes. Both options enhance the dish with savory depth. Enjoy your pasta with whatever variation you choose! To store leftover fresh tomato pasta, let it cool first. Place it in an airtight container. You can keep it in the fridge for up to three days. If you want to keep it longer, freezing is a great option. When reheating, use a skillet for the best results. Add a splash of water or olive oil to keep it moist. Heat it over low to medium heat. Stir often until it's warm. Avoid using high heat; it can dry out the pasta. To freeze your fresh tomato pasta, portion it into freezer-safe bags. Remove as much air as possible before sealing. Label the bags with the date. It can last up to three months in the freezer. When ready to eat, thaw it in the fridge overnight before reheating. Enjoy your pasta anytime! Yes, you can use canned tomatoes. They work well in a pinch. Use whole or diced tomatoes. Choose good quality brands for the best taste. Keep in mind, fresh tomatoes add brightness. They give a unique flavor and texture. If you use canned, drain excess liquid. This helps keep your sauce from becoming watery. If you need a substitute for parmesan cheese, try nutritional yeast. It gives a cheesy flavor without dairy. You can also use pecorino cheese. It has a sharper taste but works well. For a dairy-free option, try a cashew cheese blend. Blend soaked cashews with garlic and lemon juice. It creates a creamy, tasty topping. This recipe is not gluten-free as written. The spaghetti contains gluten. However, you can easily make it gluten-free. Choose gluten-free pasta made from rice or quinoa. Cook it just like regular pasta. Follow the same steps in the recipe. The flavor will still be delicious and satisfying. In this post, we explored how to make fresh tomato pasta. We discussed key ingredients and the best tomato types. I shared step-by-step instructions, tips for perfect pasta, and serving ideas. We also looked at tasty variations, storage tips, and answered common questions. Fresh tomato pasta is flexible and easy to make. With the right ingredients and techniques, you can enjoy a delicious meal. Experiment with flavors and have fun in the kitchen!

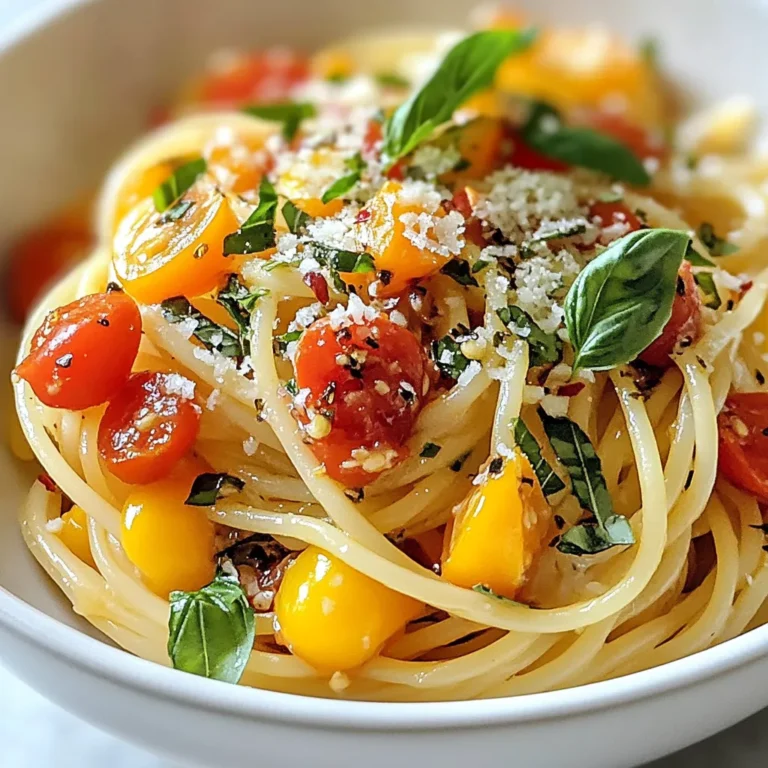
Fresh Tomato Pasta Flavorful and Simple Recipe Guide

The key to making Air Fryer Cinnamon Sugar Churro Bites is using fresh and simple ingredients. Each one plays a big role in the flavor and texture of the churros. Here’s what you need: - 1 cup all-purpose flour - 1/2 cup water - 1/2 cup unsalted butter - 1 teaspoon vanilla extract - 1/4 teaspoon salt - 1 teaspoon baking powder - 1/2 cup granulated sugar - 2 teaspoons ground cinnamon - 1 large egg - Cooking spray Let's break down why each ingredient matters. 1. All-purpose flour: This gives the churros their structure. A good base is key. 2. Unsalted butter: It adds richness and flavor. Use unsalted to control salt levels. 3. Water: This helps to dissolve and blend your ingredients well. 4. Vanilla extract: A splash of this adds a warm, sweet note. 5. Salt: Just a touch enhances all the flavors in the churros. 6. Baking powder: This helps the churros puff up and become light. 7. Granulated sugar: Sweetness is essential. It’s also used in the topping. 8. Ground cinnamon: This gives that classic churro flavor. Use fresh for the best taste. 9. Large egg: It binds the dough and adds moisture. 10. Cooking spray: This ensures your churros crisp up nicely without sticking. With these ingredients, you are ready to make delicious churro bites! Each one brings something special to the table. - First, I heat a medium saucepan. Combine 1/2 cup water, 1/2 cup unsalted butter, 1 teaspoon vanilla extract, and 1/4 teaspoon salt. Stir until the butter melts and bubbles form. - Next, I remove the pan from heat. I mix in 1 cup all-purpose flour and 1 teaspoon baking powder until a dough forms. I let the dough sit for about 5 minutes to cool a bit. - Finally, I beat in 1 large egg using a wooden spoon. I make sure the dough is smooth and well mixed. - Now, I preheat the air fryer to 375°F (190°C). This step helps the churro bites cook evenly. - I scoop the dough into a piping bag fitted with a star tip. I line the air fryer basket with parchment paper for easy removal later. - I pipe small churro shapes, about 2 inches long, onto the parchment paper. I make sure to leave space between each piece so they can puff up. - I lightly spray the churro bites with cooking spray. This helps them crisp up nicely. - I air fry the churro bites for 8-10 minutes. I watch for them to turn golden brown and puffed up. - While they cook, I mix 1/2 cup granulated sugar and 2 teaspoons ground cinnamon in a shallow bowl. - Once the churro bites are done, I toss them in the cinnamon sugar mixture while they are still warm. This gives them a sweet coating. - I let them cool slightly before serving. To make sure your churro bites are crispy, always use cooking spray. This spray adds a nice layer of crunch and helps them brown perfectly. A quick spray right before cooking makes a big difference. Adjusting the air fryer temperature is also key. Set it to 375°F (190°C). If your churro bites are not crispy enough, check them a minute early. Each air fryer can act a bit differently. Using a piping bag makes it easy to shape your churros. Fit it with a star tip for those classic ridges. Fill the bag carefully and twist the top to hold the dough in. To get the right shapes, practice piping small bites. Aim for about 2 inches long. Space them out on the parchment paper to give them room to puff up. When serving churro bites, think about how they look. A nice bowl or platter adds flair. You can even sprinkle a little extra cinnamon sugar on top for a pop. For dipping, chocolate or caramel sauce works well. These sauces add a fun twist. You can even serve whipped cream for a sweet touch. {{image_2}} You can easily change the flavor of your churro bites. Adding chocolate chips is a great idea. Just fold in about half a cup of mini chocolate chips into the dough. This makes each bite even more special! Also, try using different spices. For example, you can replace some cinnamon with nutmeg or cardamom. This adds a warm twist to the flavor. Get creative with your spices to find new favorites! Want to make your churro bites a bit healthier? Using whole wheat flour is a smart choice. It adds more fiber and nutrients. Simply swap out the all-purpose flour for whole wheat flour in the same amount. You can also reduce the sugar content. Try cutting the granulated sugar in half. You still get sweet churros, but with less sugar. This makes a tasty treat a bit better for you. Enjoy these variations to fit your taste and health goals! To keep your churro bites fresh, use an airtight container. A plastic or glass container works well. Make sure to let them cool completely before storing. This helps prevent moisture build-up, which can make them soggy. Churro bites stay good for up to two days at room temperature. For longer storage, you can freeze them. They will last about one month in the freezer. Just make sure to separate them with parchment paper to avoid sticking. When you want to enjoy them again, thaw them and reheat in the air fryer for a crispy finish. Yes, you can! If you don’t have an air fryer, you can fry churro bites in hot oil. Heat oil in a deep pan to 350°F (175°C). Carefully drop the piped dough into the oil. Fry for about 2-3 minutes or until golden brown. Use a slotted spoon to remove them and place them on paper towels to drain excess oil. You can also bake churros in the oven at 375°F (190°C) for about 12-15 minutes. The result may be less crispy but still tasty! Watch for a few signs to know when churro bites are ready. They should be golden brown and puffed up. You can also check the texture; they should feel firm on the outside. You can give one a gentle squeeze; if it feels light and airy, it’s done. Keep an eye on them while they cook, as air fryers can vary in cooking times. Absolutely, you can double the recipe! Increase each ingredient by two times. If you have a large air fryer, you can cook larger batches at once. Just make sure not to crowd the basket. If your air fryer is smaller, cook in batches. This way, all your churro bites will be fresh and warm for serving. Enjoy sharing these delicious treats! Making churro bites is simple and fun. We covered ingredients, preparation, cooking, and serving tips. You can also explore tasty variations and smart storage methods. Remember, using the right techniques ensures your churros are crispy and delicious. Enjoy experimenting with flavors and sharing them with friends. Churro bites are a treat that can bring joy to any occasion. Try these steps, and you’ll impress everyone with your tasty creation. Happy cooking!

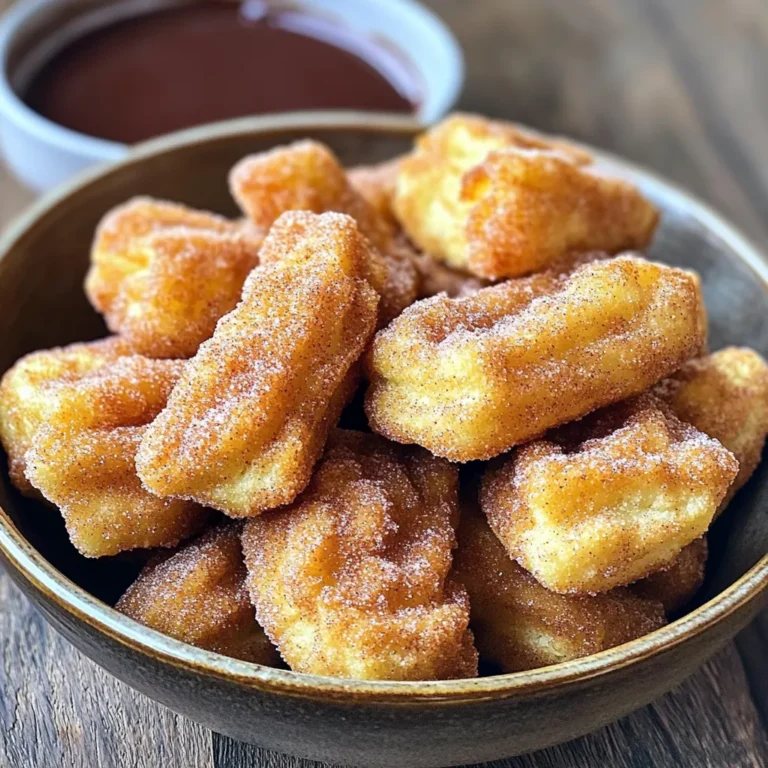
Air Fryer Cinnamon Sugar Churro Bites Delight

For this creamy buffalo chicken dip, you need: - 2 cups cooked, shredded chicken - 1 (8 oz) package cream cheese, softened - 1/2 cup sour cream These ingredients form the base of your dip. The chicken adds protein, while cream cheese and sour cream create a creamy texture. Make sure the cream cheese is soft. This helps it blend well with the other ingredients. Next, you’ll need: - 1/2 cup buffalo sauce (adjust according to heat preference) - 1 teaspoon garlic powder - 1 teaspoon onion powder - Salt and pepper to taste The buffalo sauce gives the dip its signature kick. Adjust the amount based on how spicy you like it. Garlic and onion powders add flavor. Salt and pepper bring all the tastes together. You can also add: - 1 cup shredded cheddar cheese - 1/2 cup blue cheese crumbles (optional) - Fresh celery and carrot sticks for serving The cheddar cheese makes the dip even richer. Blue cheese crumbles add a bold taste, but you can skip them if you prefer. Serve the dip with celery and carrot sticks for a crunchy contrast. You can also use tortilla chips for dipping. Gather all your ingredients before you start. This makes cooking easier. You will need: - 2 cups cooked, shredded chicken - 1 (8 oz) package cream cheese, softened - 1/2 cup sour cream - 1/2 cup buffalo sauce - 1 cup shredded cheddar cheese - 1/2 cup blue cheese crumbles (optional) - 1 teaspoon garlic powder - 1 teaspoon onion powder - Salt and pepper to taste - Fresh celery and carrot sticks for serving Make sure the cream cheese is soft. This helps it mix well. You can shred the chicken yourself or buy it ready-made. Place all your prepared ingredients into the slow cooker. Start with the shredded chicken, followed by cream cheese, sour cream, and buffalo sauce. Add garlic powder, onion powder, salt, and pepper. Stir until everything is mixed well. Next, sprinkle half of the cheddar cheese and any blue cheese on top. Cover the slow cooker and set it to low heat. Cook for about 2 hours. Stir the dip every so often. When it's hot and bubbly, it’s almost done! Once it’s heated, mix the dip again. Add the rest of the cheddar cheese on top. Cover and let it warm for another 15-20 minutes. Wait until the cheese melts completely. Now, it's time to serve! You can keep the dip in the slow cooker for a rustic look. Arrange fresh celery and carrot sticks around it. This adds color and crunch. You can also serve the dip with tortilla chips for extra flavor. Enjoy this tasty treat with your friends and family! To change the heat, start with half a cup of buffalo sauce. If you want it hotter, add more sauce bit by bit. You can also mix in some hot sauce if you like. If you want it milder, use less sauce or add more sour cream. This will balance the spice. Taste as you go to find the right heat for you. For a smooth dip, use softened cream cheese. Mix it well with the other ingredients. Stir slowly to combine everything. Adding sour cream helps too. If your dip is too thick, add a splash of milk. This will keep it creamy and easy to scoop. The goal is a thick yet smooth dip that feels great on your palate. Serve this dip hot and bubbly. Use a slow cooker for a cozy look. Pair it with fresh celery and carrot sticks for crunch. Tortilla chips also work well for dipping. You can even add crunchy veggies around the dip for color. This makes your table look inviting and fun. Don't forget to have napkins handy for those messy bites! {{image_2}} To spice up your buffalo chicken dip, you can add more buffalo sauce. Try using a hot sauce that you love. Mix in some diced jalapeños for extra heat. You can also add a sprinkle of cayenne pepper. This will boost the flavor and heat. If you want a vegetarian version, substitute the chicken with shredded jackfruit or chickpeas. Use a mix of cream cheese and cashew cream for richness. You can also add black beans for texture. This way, you enjoy the same creamy taste without meat. Cheese can change the taste of your dip. Try using pepper jack cheese for a spicy kick. A blend of mozzarella and gouda gives a rich, creamy texture. If you love blue cheese, use more of it for a stronger flavor. Mixing cheeses can make your dip unique and tasty. After you enjoy your creamy buffalo chicken dip, store any leftovers in the fridge. Place the dip in an airtight container. It will stay fresh for about 3 to 4 days. Make sure to let it cool down before sealing it up. This keeps the flavors intact and prevents sogginess. If you want to save some for later, freezing is a great option. Allow the dip to cool completely. Then, transfer it to a freezer-safe container. You can freeze it for up to 2 months. When ready to eat, just remember to thaw it in the fridge overnight. To reheat, scoop the dip into a saucepan or back into the slow cooker. Heat it on low until warm. Stir it often to ensure even heating. You can also use a microwave if you prefer. Heat it in short bursts, stirring between each. This helps prevent hot spots and keeps it creamy. Enjoy the dip warm with your favorite snacks! Yes, you can use raw chicken. Just follow these steps: - Add raw chicken to the slow cooker. - Combine it with cream cheese, sour cream, and spices. - Cook on low for about 4-5 hours. - Shred the chicken once it is cooked through. This method allows the chicken to soak up the flavors well. You can easily make this dip gluten-free. Here’s how: - Use gluten-free buffalo sauce. - Check that your cream cheese and sour cream have no gluten. - Avoid using regular chips. Instead, serve with veggie sticks or gluten-free chips. This way, everyone can enjoy the dip. Buffalo chicken dip pairs well with many snacks. Here are some ideas: - Fresh celery sticks - Carrot sticks - Tortilla chips - Pita chips - Crackers (gluten-free if needed) Choose your favorite and enjoy the creamy goodness of the dip! This post covered how to make a tasty buffalo chicken dip. I shared key ingredients like chicken and dairy, plus sauces and seasonings. We discussed easy step-by-step instructions for preparing and cooking in a slow cooker. You now have tips for adjusting heat and ensuring creaminess. I also shared variations, storage info, and answered common questions. Enjoy making this dip for your next gathering. It’s simple, fun, and will please any crowd!

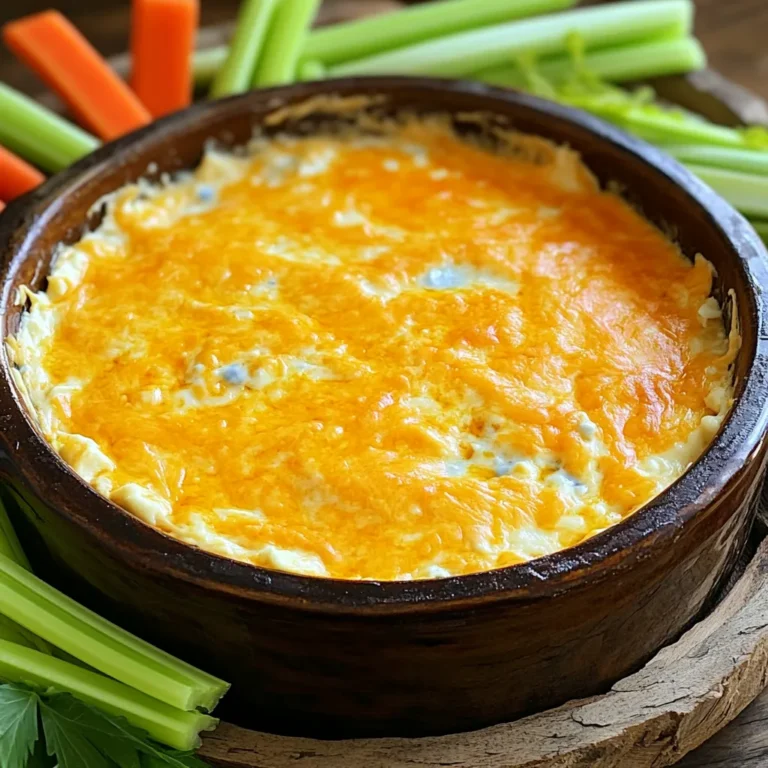
Slow Cooker Creamy Buffalo Chicken Dip Delight

PREV 1 … 14 15 16 … 56 NEXT
secrets pice kitchen

explore

DessertsDinnerAppetizersDrinks

Our Policies

  • Cookie Policy
  • Copyright Policy
  • Disclaimer
  • GDPR Policy
  • Terms Of Use
Back to Top
  • About
  • Contact Us
  • Privacy Policy
© 2025 secrets pice kitchen