FREE DINNER EBOOK! Get your copy!
  • Cookie Policy
  • GDPR Policy
  • Disclaimer
  • Terms Of Use
  • Visit my other site: Fun Cookie Recipes
secrets pice kitchen
  • Home
  • Dinner
  • Desserts
  • Drinks
  • Appetizers
  • Contact
  • About
  • Privacy Policy
  • Home
  • Dinner
  • Desserts
  • Drinks
  • Appetizers
  • Contact
  • About
  • Privacy Policy
  • Cookie Policy
  • GDPR Policy
  • Disclaimer
  • Terms Of Use
Visit my other site: Fun Cookie Recipes

HOME / CATEGORIES /

Latest

- 12 mozzarella string cheese sticks - 1 cup all-purpose flour - 2 large eggs, beaten - 1 cup breadcrumbs (preferably panko for extra crunch) - 1 teaspoon Italian seasoning - 1/2 teaspoon garlic powder - 1/2 teaspoon onion powder - Salt and pepper to taste - Olive oil spray - Marinara sauce, for dipping Gather these ingredients before you start. Fresh mozzarella sticks make a big difference. Choose panko breadcrumbs for that extra crunch. It adds texture that regular breadcrumbs can't match. The Italian seasoning gives flavor to the mix. Garlic and onion powders add a nice touch. Don't forget to season with salt and pepper. Using olive oil spray helps them crisp up nicely. This way, you’ll get that golden-brown finish. Marinara sauce is a must for dipping. It complements the cheesy taste perfectly. Enjoy the process of preparing these snacks! They are fun to make and even better to eat. - Cut cheese sticks in half. - Freeze for at least 30 minutes. To start, I cut each mozzarella stick in half. This size is perfect for snacking. I place them in the freezer for at least 30 minutes. Freezing helps keep the cheese from melting too fast when cooking. - Arrange flour, beaten eggs, and breadcrumb mixture in separate bowls. Next, I set up my breading station. I use three shallow bowls. One bowl holds all-purpose flour. The second bowl has beaten eggs. The last bowl has a mix of breadcrumbs, Italian seasoning, garlic powder, onion powder, salt, and pepper. This setup makes the breading easy and quick. - Coat in flour, then eggs, then breadcrumb mixture. - Repeat for a thicker crust. Now comes the fun part! I take a frozen cheese stick and coat it in flour first. I shake off the extra flour. Then, I dip it in the beaten eggs. Finally, I roll it in the breadcrumb mixture. For a thicker crust, I repeat the egg and breadcrumb steps. This gives each stick a nice, crunchy layer. - Preheat air fryer to 390°F (200°C). - Air fry for 6-8 minutes, flipping halfway. Now, I preheat the air fryer to 390°F (200°C). I let it warm up for about 5 minutes. Once ready, I place the breaded cheese sticks in a single layer in the air fryer basket. I lightly spray them with olive oil for extra crispiness. I cook them for 6-8 minutes, flipping them halfway for even browning. - Cool slightly and serve with marinara sauce. After cooking, I remove the mozzarella sticks from the air fryer. I let them cool for a minute before serving. They taste great with marinara sauce for dipping. This snack is crispy and delicious! - Maintain the right temperature for optimal crispiness: Set your air fryer to 390°F (200°C). This helps the cheese melt without leaking. - Avoid overcrowding the air fryer basket: Give each mozzarella stick space. This ensures even cooking and crispiness. - Use panko for extra crunch: Panko breadcrumbs create a light, crispy texture. They make your mozzarella sticks even more delightful. - Lightly spray with olive oil: A quick spray helps the breading brown nicely. This also adds flavor to your snack. - Cheese leaking during frying: If cheese leaks, ensure sticks are frozen long enough. Try not to skip the freezing step. - Adjusting cook time for different air fryer models: Cook times may vary. Keep an eye on your sticks. They should be golden brown and crispy. {{image_2}} You can enhance the flavor of your mozzarella sticks in fun ways. Adding grated Parmesan cheese to the breadcrumb mix gives a savory kick. Fresh herbs like parsley or basil also add great taste. If you want some heat, spice it up! You can mix in cayenne pepper or crushed red pepper. This will make your snack exciting and full of flavor. The right sauce can take your mozzarella sticks to the next level. Marinara sauce is a classic choice, but you can get creative. Try ranch dressing for a creamy option. Sriracha adds a nice kick, while garlic aioli brings a rich taste. Mix and match to find your favorite sauce! If you need gluten-free snacks, I have you covered. Use gluten-free breadcrumbs instead of regular ones. You can also swap all-purpose flour for a gluten-free flour mix. This way, everyone can enjoy these tasty mozzarella sticks without worry. To store leftover mozzarella sticks, let them cool completely. Then, place them in an airtight container. They will keep well in the fridge for up to three days. Avoid stacking them to prevent sogginess. For the best crispiness, reheat in your air fryer. Set it to 350°F (175°C) and cook for about 3-5 minutes. You can also use an oven. Preheat it to 375°F (190°C) and bake for 5-7 minutes. This method helps restore that crunchy texture. You can freeze mozzarella sticks before or after frying. For freezing before cooking, simply place the breaded sticks on a baking sheet. Freeze for about one hour until firm. Then transfer them to a freezer bag. For freezing after frying, let them cool, then follow the same steps. These can last for up to three months in the freezer. When ready to eat, cook directly from frozen, adding a few extra minutes to the cooking time. You should freeze the cheese sticks for at least 30 minutes. This helps them keep their shape while cooking. If you freeze them longer, they will still be fine. Just make sure they are not too hard to handle. Yes, you can make mozzarella sticks in a deep fryer or oven. If you use a deep fryer, heat oil to 350°F (175°C). Fry until golden brown. For the oven, bake at 400°F (200°C) for about 10-12 minutes. You might miss the same crispiness an air fryer gives, but they will still taste great. If you don’t have panko, you can use regular breadcrumbs. They will work, but the texture will be less crunchy. You can also crush cornflakes or use crushed crackers for a fun twist. The mozzarella sticks are done when they are golden brown and crispy. You can also check if the cheese is starting to ooze out a little. Keep an eye on them to avoid burning. Absolutely! You can use other cheeses like cheddar or pepper jack. Just remember that softer cheeses may melt faster. Adjust the freeze time if you use a different type of cheese, so they hold their shape. You now know how to make crispy, homemade mozzarella sticks in an air fryer. We covered all the steps, from freezing the cheese to frying it perfectly. I shared tips for achieving the best texture and offered flavor variations. Don’t forget to try different sauces for dipping. Whether you're making these for a snack or a party, they’re sure to impress. Enjoy your cooking and happy munching!

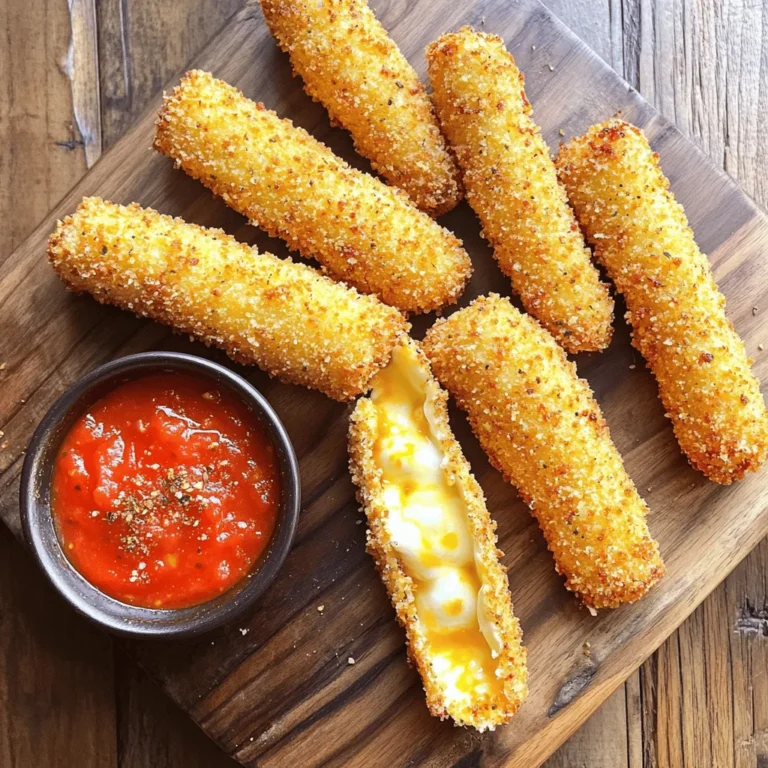
Air Fryer Mozzarella Sticks Crispy and Delicious Snack

- 2 medium sweet potatoes, peeled and cubed - 1 butternut squash, peeled, seeded, and cubed - 2 carrots, sliced - 1 red onion, cut into wedges - 1 cup Brussels sprouts, halved You can pick fresh, seasonal veggies for this dish. Sweet potatoes add sweetness. Butternut squash brings a creamy texture. Carrots give a nice crunch. Red onion adds a hint of sharpness. Brussels sprouts bring a touch of earthiness. Together, they create a colorful plate. - 1/4 cup maple syrup - 2 tablespoons olive oil - 1 teaspoon fresh thyme leaves - 1 teaspoon garlic powder - Salt and pepper to taste The glaze is simple but full of flavor. Maple syrup makes it sweet and sticky. Olive oil helps the veggies roast nicely. Fresh thyme adds a herby taste. Garlic powder gives it depth. Salt and pepper balance everything out perfectly. - 1/4 cup pecans, chopped Adding pecans gives a nice crunch. They also add a nutty flavor. You can sprinkle them on during the last few minutes of roasting. This step takes the dish to a new level. - Preheat your oven to 425°F (220°C). This high heat helps caramelize the veggies. - Prepare your vegetables. Peel and cube the sweet potatoes and butternut squash. Slice the carrots. Cut the red onion into wedges. Halve the Brussels sprouts. - In a small bowl, mix the glaze. Combine 1/4 cup maple syrup, 2 tablespoons olive oil, 1 teaspoon fresh thyme leaves, 1 teaspoon garlic powder, salt, and pepper. Whisk until it's smooth and well blended. - Toss the prepared vegetables with the glaze in a large mixing bowl. Make sure every piece is coated. - Spread the glazed veggies in a single layer on a baking sheet. This helps them roast evenly. - Roast in your preheated oven for 25-30 minutes. Stir them halfway through to ensure they cook evenly. If you want extra crunch, add chopped pecans during the last 5 minutes of roasting. - Optimal oven temperature: Set your oven to 425°F (220°C). This high heat helps caramelize the veggies, giving them a nice golden color. - Vegetable cut sizes: Cut your sweet potatoes and butternut squash into similar-sized cubes. Aim for about 1-inch pieces. This ensures even cooking. Slice the carrots and cut the red onion into wedges. Halve the Brussels sprouts for quick cooking. - Suggested herbs and spices: Use fresh thyme for a warm flavor. Garlic powder adds depth. You can also experiment with rosemary or sage for a different taste. - Importance of seasoning: Don’t skip the salt and pepper! They help bring out the natural sweetness of the vegetables and enhance the maple glaze. - Serving suggestions: Serve the roasted veggies on a large platter. Drizzle any leftover glaze over them for extra flavor. - Garnish options: Top with fresh thyme sprigs for a pop of color. Chopped pecans add crunch and a tasty finish. {{image_2}} You can mix up your roasted fall vegetables. Try using different root vegetables. Turnips or parsnips add a sweet touch. You can also add seasonal favorites like pumpkin or acorn squash. Each vegetable brings its own flavor and texture. This keeps your dish exciting and fresh. If you want to switch the flavor, consider swapping the maple syrup. Honey or agave syrup works well too. You can add spices to the glaze for more warmth. A dash of cinnamon or nutmeg gives a lovely autumn vibe. You can even try adding a splash of soy sauce. This adds a savory note to balance the sweetness. Making this dish vegan is easy. Just ensure that the maple syrup you choose is pure. Most brands are vegan-friendly. For gluten-free needs, check your glaze ingredients carefully. Most items are naturally gluten-free, but always read labels. This way, you know your meal fits everyone's diet. To keep your roasted fall vegetables fresh, place them in an airtight container. You can store them in the fridge for up to four days. Make sure they cool first to avoid moisture buildup. This saves the taste and texture for your next meal. Reheating is simple. Preheat your oven to 350°F (175°C). Spread the vegetables on a baking sheet. Heat for about 10-15 minutes until warm. You can also use a microwave. Place the veggies in a microwave-safe dish and cover. Heat for 2-3 minutes, stirring halfway through. If you want to freeze your roasted veggies, let them cool completely. Place them in a freezer-safe bag or container. Remove as much air as possible to avoid freezer burn. They can last up to three months in the freezer. To thaw, place them in the fridge overnight. You can reheat them directly from frozen, but it may take longer. You can use many vegetables for this dish. Try parsnips, turnips, or beets. Each adds a unique flavor and texture. For a colorful mix, add red bell peppers or yellow squash. Yes, you can prepare this dish ahead. Chop the vegetables and store them in the fridge. Mix the glaze and keep it separate. Roast them just before serving for the best taste. The vegetables are done when they are tender and caramelized. You can check by piercing them with a fork. If the fork goes in easily, they are ready. Absolutely! This recipe works well for meal prep. Roasted vegetables keep well in the fridge for a few days. Just reheat them in the oven or microwave before serving. Yes, you can substitute maple syrup. Honey or agave syrup works great too. For a sugar-free option, try a sugar substitute like stevia or erythritol. Adjust the amount to taste. This post covered roasting vegetables with a tasty maple glaze. You learned about key ingredients, preparation steps, and tips for perfect results. Explore different vegetables and variations to suit your taste. Remember, season well and try new flavors. Store leftovers properly for later and enjoy reheating them. With these tips, you can make delicious roasted veggies anytime. Now, go ahead and get creative in your kitchen!

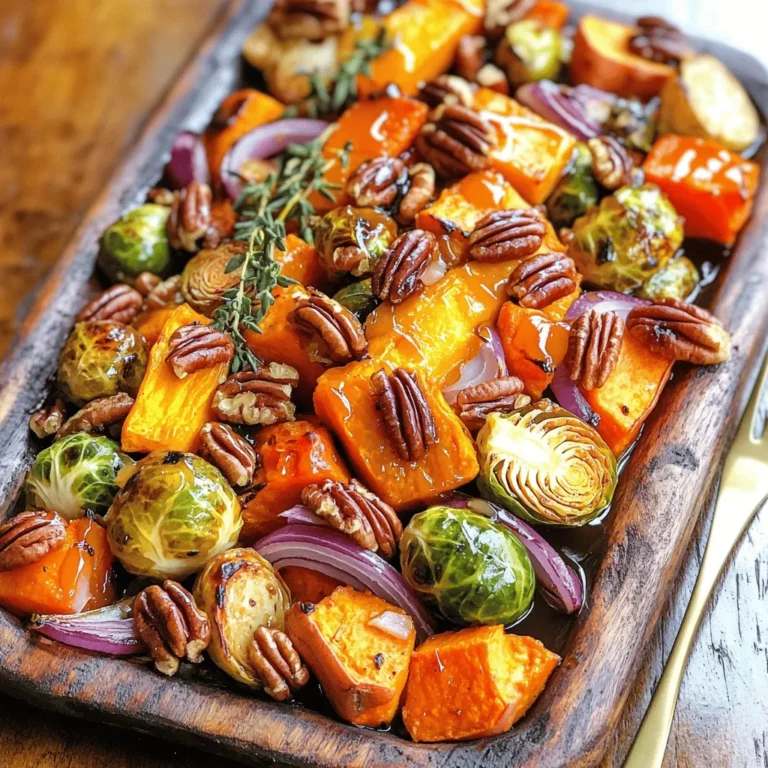
Roasted Fall Vegetables with Maple Glaze Delight

- 1 lb boneless chicken breast, cut into bite-sized pieces - 2 tablespoons cornstarch - 2 tablespoons vegetable oil - 1 red bell pepper, sliced - 1 green bell pepper, sliced - 1 cup pineapple chunks (fresh or canned) - 1 cup broccoli florets - 3 cloves garlic, minced - 1 tablespoon fresh ginger, grated - 1/4 cup soy sauce - 1/4 cup rice vinegar - 3 tablespoons brown sugar - 1 tablespoon ketchup - 1/2 teaspoon red pepper flakes (optional) - Salt and pepper to taste Sweet and sour chicken stir fry shines with its colorful mix of veggies and chicken. The chicken brings protein, while the peppers add crunch. Pineapple gives a sweet twist, and broccoli adds healthiness. Each ingredient plays a key role in taste and texture. - Cooked white rice or fried rice for serving I love pairing this dish with rice. It soaks up the flavors well and makes each bite satisfying. You can use plain white rice or fried rice for extra flavor. Try adding sesame seeds or chopped green onions for a fresh touch. Enjoy every bite of this vibrant meal! - Preparing Chicken: Start by cutting the chicken breast into bite-sized pieces. This helps it cook fast and evenly. In a bowl, toss the chicken with cornstarch, salt, and pepper until it’s well coated. The cornstarch gives the chicken a nice texture. - Prepping Vegetables: Slice the red and green bell peppers into strips. Make sure to wash them first. Cut the broccoli into small florets. If you use fresh pineapple, cut it into chunks. If you prefer canned, just drain it well. - Stir-Frying Chicken: Heat 1 tablespoon of vegetable oil in a large skillet or wok over medium-high heat. Once the oil is hot, add the chicken. Stir-fry it for about 5 to 7 minutes until it turns golden brown. Make sure it’s cooked through. Once done, remove the chicken from the skillet and set it aside. - Adding Vegetables and Sauce: In the same skillet, add the remaining tablespoon of oil. Toss in the minced garlic and grated ginger. Stir for about 30 seconds until they smell good. Then, add the sliced bell peppers, broccoli florets, and pineapple chunks. Stir-fry these for about 3 to 4 minutes until they are tender but still crisp. - Combining Ingredients: In a small bowl, whisk together the soy sauce, rice vinegar, brown sugar, ketchup, and red pepper flakes if you want some heat. Pour this sauce over the veggies and stir until everything is mixed. Bring it to a simmer. Now, add the cooked chicken back into the skillet. Toss everything together for about 2 minutes, so it all gets coated in that tasty sauce. Taste it and adjust the seasoning if you need to. Serve your sweet and sour chicken stir fry over rice. Enjoy your meal! Adjusting Sweetness and Sourness To get the right taste, you may need to tweak the sauce. If it’s too sweet, add more rice vinegar. If it’s too sour, mix in a bit more brown sugar. Always taste as you go. You want a balance that sings in your mouth. Spice Level Tips If you like heat, add red pepper flakes. Start with a little. You can always add more if you want it spicier. For less heat, leave them out. You can also use a milder sauce to keep it kid-friendly. Recommended Equipment A large skillet or wok works best for this dish. They help heat evenly and allow for great stir-frying. A wooden spatula is also handy for stirring your food without scratching your pan. Stir-Frying Tips Make sure your pan is hot before adding the oil. This way, your chicken will sear and not steam. Cook in small batches for even cooking. Don’t overcrowd the pan, or your food won’t brown nicely. {{image_2}} You can change the protein in this dish. Try shrimp or tofu for a twist. Pork also works well. Each option brings its own flavor and texture. You can swap out the bell peppers and broccoli. Carrots, snap peas, and zucchini add great crunch. Feel free to use any veggies you love. This dish is flexible! If you need a gluten-free dish, use tamari instead of soy sauce. It tastes just as good! Also, check that your rice vinegar is gluten-free. Want to make this meal lighter? Use skinless chicken breast and cut down on sugar. You can also add more veggies. This way, you keep the taste while cutting calories. - Storing Leftovers: After you enjoy your sweet and sour chicken stir fry, cool it down. Store it in an airtight container. It stays fresh for up to three days in the fridge. Keep it away from strong-smelling foods. This helps maintain its bright flavor. - Reheating Guidelines: When you're ready to eat, you can reheat it easily. Place the stir fry in a skillet over medium heat. Stir it often until it warms up. You can also use the microwave. Heat in short bursts, stirring in between. This keeps the chicken juicy and the veggies crisp. - How to Freeze Stir Fry: If you want to save your stir fry for later, freezing is a great choice. Let it cool completely. Transfer the stir fry to a freezer-safe bag or container. Remove as much air as possible. Label it with the date. It can last up to three months in the freezer. - Thawing Instructions: To enjoy your frozen stir fry, take it out of the freezer. The best way to thaw it is in the fridge overnight. If you're in a hurry, use the microwave's defrost setting. Once thawed, reheat it in a skillet or microwave. Stir it well to ensure even warming. What is the best way to thicken the sauce? To thicken your sauce, you can add more cornstarch. Mix one tablespoon of cornstarch with two tablespoons of water. Stir this mixture into the sauce while it simmers. This will give your sauce a nice, thick texture. You can also simmer the sauce longer to reduce it and make it thicker. Can I make this dish vegetarian? Yes, you can make this dish vegetarian. Swap the chicken for tofu or tempeh. Use the same prep steps to coat your protein. You can also add more vegetables like mushrooms or snap peas for extra flavor. This keeps the sweet and sour taste while making it veggie-friendly. Calories and Macronutrients This dish has about 350 calories per serving. It contains around 25 grams of protein and 15 grams of fat. The carbs come from the rice and vegetables, adding good fiber. Adjust your portion size based on your diet needs. Health Benefits of Ingredients Sweet and sour chicken stir fry has many health benefits. Chicken provides lean protein, which helps build muscles. Bell peppers are rich in vitamins A and C. Pineapple adds natural sweetness and aids digestion. Broccoli is high in fiber and antioxidants. This dish is balanced and nutritious. In this blog post, we explored making sweet and sour chicken stir fry. We covered main ingredients, from chicken to sauces. Then, we shared step-by-step cooking instructions and helpful tips for a balanced flavor. You learned about variations for different diets and how to store leftovers safely. In closing, stir fry is a fun and easy meal. With a few swaps, you can make it your own. Enjoy creating your tasty version!

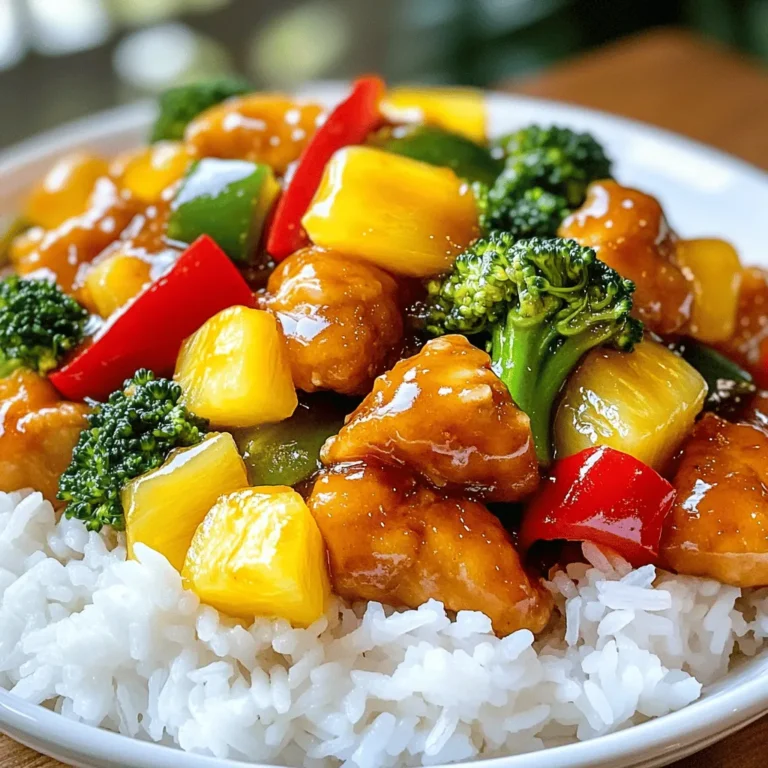
Sweet and Sour Chicken Stir Fry Flavorful Quick Meal

When making caramel pecan sticky buns, you need the right ingredients. Here’s what you will need: - 3 cups all-purpose flour - 1/4 cup granulated sugar - 1/2 teaspoon salt - 2 teaspoons instant yeast - 1/2 cup warm milk (110°F) - 1/4 cup unsalted butter, melted - 1 large egg - 1/2 teaspoon vanilla extract - 1/2 cup brown sugar - 1/2 cup pecans, chopped - 1/4 cup unsalted butter, softened - 1 tablespoon ground cinnamon - 1/4 cup maple syrup - Pinch of nutmeg These ingredients work together to create soft, sweet buns. Flour gives the dough structure. Sugar adds sweetness, while salt balances flavors. Yeast helps the dough rise, making it fluffy and light. Warm milk activates the yeast. Butter enriches the dough, adding flavor and moisture. The egg binds the ingredients and gives a rich texture. Vanilla extract provides a lovely aroma. Brown sugar and pecans bring the sticky element. Cinnamon warms the flavor, and maple syrup adds extra sweetness. Lastly, nutmeg gives a hint of spice, enhancing the overall taste. Gather these ingredients before you start. It makes the process smooth and fun. You’ll enjoy the journey to making these tasty treats! 1. In a large bowl, mix the dry ingredients. Combine 3 cups of flour, 1/4 cup sugar, 1/2 teaspoon salt, and 2 teaspoons instant yeast. Stir well to blend them. 2. In another bowl, mix the wet ingredients. Combine 1/2 cup warm milk, 1/4 cup melted butter, 1 large egg, and 1/2 teaspoon vanilla. Whisk until smooth. 3. Pour the wet mixture into the dry ingredients. Stir until a dough forms. 4. Knead the dough on a floured surface. Do this for about 5 to 7 minutes. The dough should feel smooth and elastic. Place it in a greased bowl. Cover with a damp cloth. Let it rise in a warm spot for 1 hour or until it doubles in size. 1. After the dough rises, punch it down. Roll it out on a floured surface. Aim for a rectangle about 1/4 inch thick. 2. Spread softened butter over the dough. Then, sprinkle 1/2 cup brown sugar, 1 tablespoon cinnamon, and 1/2 cup chopped pecans evenly across the dough. 3. Roll the dough into a log shape. Start from one edge and roll carefully. Pinch the seam to seal it. 4. Slice the log into 12 equal pieces. Place these slices in a greased baking dish. 1. To prepare the caramel topping, mix 1/4 cup melted butter, 1/4 cup maple syrup, and a pinch of nutmeg in a small pot. Heat on low until combined. 2. Pour this caramel mixture over the sliced buns in the dish. 3. Cover the dish with plastic wrap and let it rise again for 30 minutes. 4. Preheat the oven to 350°F (175°C). Bake the sticky buns for 25 to 30 minutes. They should be golden brown and bubbly. 5. When they are baked, let them cool for 5 minutes. Invert the dish onto a platter to show off the caramelized pecan topping. Enjoy the warm, sweet delight! To make great sticky buns, you need good dough. Start by kneading the dough for 5 to 7 minutes. This builds gluten and makes the dough smooth. If your dough feels too sticky, add a little flour. If it’s too dry, add a drop of water. The best rising environment is warm and humid. I like to use my oven. Turn it on for a minute, then turn it off. Place the dough in there to rise. Cover it with a damp cloth to keep it moist. Let it rise until it doubles in size. To boost flavor, add spices like nutmeg or cardamom. A pinch of these can make a big difference. You can also mix in some lemon zest for a fresh twist. For nuts, pecans are ideal. But feel free to swap them for walnuts or almonds. Each nut brings its own flavor. You can replace brown sugar with honey or agave syrup for different sweetness. When serving your sticky buns, make them look special. Drizzle extra maple syrup on top. Garnish with whole pecans for a nice touch. Arrange them on a pretty plate to impress guests. Pair these buns with warm coffee or a creamy latte. They also taste great with a glass of milk. The sweet and nutty flavors match perfectly with these drinks. {{image_2}} I love to play with flavors in my sticky buns. You can try chocolate chip caramel sticky buns. Just add chocolate chips to the filling. The sweet chocolate pairs great with the caramel. Another fun option is pumpkin spice sticky buns. Add pumpkin puree and pumpkin spice to the dough. This gives the buns a warm, cozy flavor perfect for fall. If you need gluten-free sticky buns, swap regular flour for a gluten-free blend. Make sure it has xanthan gum for the texture. You can still enjoy that soft, fluffy bite. For a vegan version, replace the egg with a flaxseed egg. Mix one tablespoon of flaxseed meal with three tablespoons of water. Use plant-based milk and coconut oil instead of butter. These swaps keep the buns tasty and light. You can serve sticky buns in various ways. Individual sticky bun cups are great for parties. Use a muffin tin to bake them in single portions. Everyone loves their own little bun! Family-style serving is another option. Place all the buns on a large platter. Drizzle them with extra maple syrup and sprinkle with pecans. It makes a beautiful and inviting display for everyone to enjoy. To keep your caramel pecan sticky buns fresh, store them in an airtight container. Place them in the fridge to maintain their flavor and texture. They will stay good for about 3 to 5 days when stored this way. Oven heating: Preheat your oven to 350°F (175°C). Place the sticky buns on a baking sheet. Heat them for about 10 to 15 minutes until warm. This method keeps the buns soft and delicious. Microwave instructions: For a quick reheat, place a bun on a microwave-safe plate. Heat it for about 15 to 20 seconds. Check to see if it is warm enough. This method is fast but may make the buns a bit chewy. To freeze your sticky buns, first let them cool completely. Wrap each bun tightly in plastic wrap. Then place them in a freezer-safe bag or container. They can last up to 2 months in the freezer. For thawing, simply move the buns from the freezer to the fridge overnight. For quicker results, you can thaw them at room temperature for a few hours. Caramel pecan sticky buns can last about 3 to 5 days in the fridge. Make sure to store them in an airtight container. This keeps them fresh and prevents them from drying out. If you want to enjoy them longer, try freezing them. Yes, you can make sticky buns ahead of time! Prepare the dough and let it rise. Then, cover it and place it in the fridge overnight. In the morning, allow the dough to come to room temperature. Then, shape, fill, and bake as usual. This method saves time and keeps your morning stress-free. If you need to substitute pecans, there are several great options. You can use walnuts, almonds, or hazelnuts. For a nut-free version, try using seeds like sunflower seeds or pumpkin seeds. Dried fruit or chocolate chips can also add a sweet twist. This blog gave you a clear path to make delicious caramel pecan sticky buns. We covered the ingredients, detailed step-by-step instructions, and shared tips to enhance flavor. Remember, you can try fun variations and make smart storage choices. Baking should be enjoyable, so don’t stress. Use these steps to create treats that everyone will love. Happy baking!

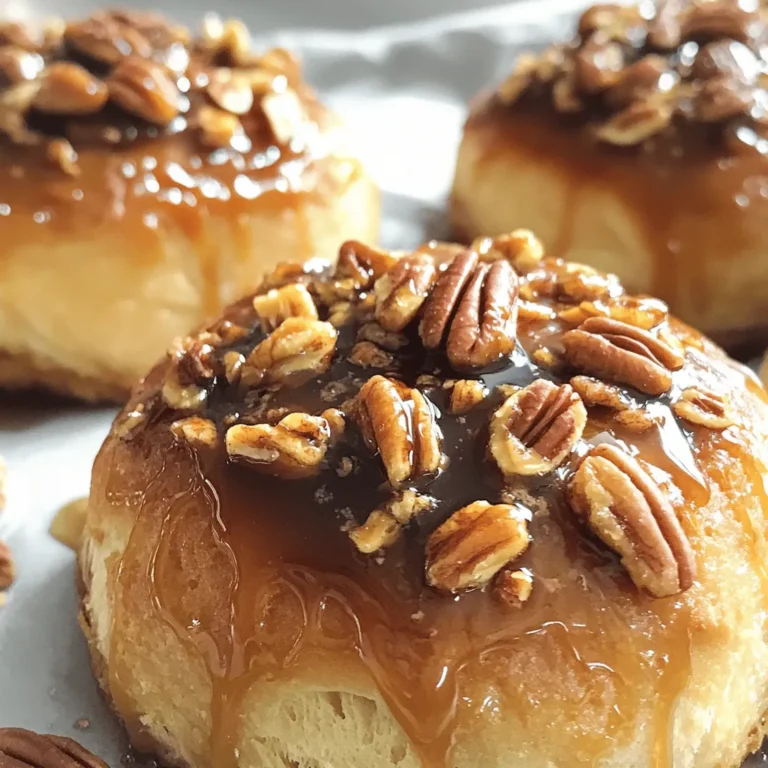
Caramel Pecan Sticky Buns Irresistible Warm Delight

To make this tasty dish, you need: - 1 lb (450g) beef sirloin, thinly sliced - 2 tablespoons sesame oil - 4 cloves garlic, minced - 1 tablespoon fresh ginger, grated - 2 bell peppers (red and yellow), sliced - 1 cup snap peas, trimmed - 3 green onions, chopped - 1 tablespoon soy sauce - 1 tablespoon hoisin sauce - 1 tablespoon rice vinegar - 1 tablespoon sesame seeds - Salt and pepper to taste - Cooked jasmine rice, for serving These ingredients work well together. They create a mix of flavors and textures. The beef gives you protein, while the veggies add crunch. The sauces tie everything together with a savory taste. You can add more ingredients if you like. Some good options are: - Sliced carrots for sweetness - Broccoli florets for extra crunch - Crushed red pepper for heat - Cashews for a nutty twist These ingredients can change the taste and feel of the dish. Feel free to mix them based on what you enjoy! You will need some key tools to cook this stir fry: - A large skillet or wok for even cooking - A sharp knife for slicing the beef and veggies - A cutting board for prep work - Measuring spoons for accurate sauce amounts With these tools, your cooking process will be smooth and fun! Start by slicing 1 pound of beef sirloin into thin strips. Place the beef in a bowl. Sprinkle a pinch of salt and pepper over the beef. Toss it well to coat. Let it sit for about 10 minutes. This helps the beef absorb the flavors. Heat 2 tablespoons of sesame oil in a large skillet or wok. Use medium-high heat until the oil shimmers. Add the beef in a single layer. Cook for 2 to 3 minutes on each side. You want the beef browned but not fully cooked. Once done, remove it from the pan and set it aside. In the same skillet, add 4 minced garlic cloves and 1 tablespoon of grated ginger. Stir-fry these for about 30 seconds. This step wakes up the flavors. Next, toss in 2 sliced bell peppers and 1 cup of trimmed snap peas. Stir-fry for 2 to 3 minutes until they soften but stay crisp. Return the beef to the skillet. Add 1 tablespoon each of soy sauce, hoisin sauce, and rice vinegar. Stir everything well. Cook for an additional 2 to 3 minutes. This allows the beef to finish cooking and soak up the sauce. Once completed, remove from heat. Garnish with chopped green onions and sesame seeds before serving. To get the best texture, slice your beef thinly. Thin slices cook fast and stay tender. Make sure your skillet is hot before adding the beef. This helps it sear quickly. Don’t overcrowd the pan; cook in batches if needed. This step keeps the beef juicy and not soggy. You can swap beef sirloin for chicken or tofu if you prefer. Try adding broccoli or carrots for more color. If you like heat, toss in some red pepper flakes. For a sweeter taste, add pineapple chunks. Always taste as you go to adjust flavors. Serve this stir fry over fluffy jasmine rice. For a crunchy touch, sprinkle more sesame seeds on top. You can also add a side of spring rolls or a fresh salad. Pair it with a light soy sauce or a spicy dipping sauce for extra flavor. Enjoy this meal as a quick and tasty dinner option! {{image_2}} You can switch up the beef for other proteins. Chicken or shrimp works well here. Both cook fast and take on flavors easily. If you're looking for a vegetarian twist, use tofu instead. Just press and cube it before cooking. This option absorbs the sauce nicely and adds a great texture. Feel free to mix in your favorite veggies. Broccoli or carrots add crunch and color. You can also try mushrooms for a savory kick. Spinach or bok choy can offer a nice soft touch. Be creative! Use what you have in your fridge for a fresh twist on this dish. To make this dish gluten-free, swap soy sauce for a gluten-free version. Tamari is a great choice and tastes similar. Always check labels to ensure no hidden gluten sneaks in. Pair it with rice that’s labeled gluten-free for a safe, tasty meal. To keep your Sesame Garlic Beef Stir Fry fresh, store leftovers in an airtight container. Let the dish cool to room temperature before sealing it. Place it in the fridge within two hours of cooking. Proper storage helps maintain flavor and texture. You can keep it in the fridge for up to three days. When you reheat your stir fry, do it gently. Use a skillet over medium heat for even warming. Add a splash of water or broth to keep it moist. Stir occasionally to heat evenly and avoid burning. You can also use the microwave, but cover it to prevent drying out. Heat in short bursts, stirring in between until warm. If you want to freeze your stir fry, it’s best to do so before adding the fresh green onions and sesame seeds. Place the cooled stir fry in a freezer-safe container. It can last up to three months in the freezer. When ready to eat, thaw it overnight in the fridge. Reheat thoroughly before serving. Yes, you can use other cuts. Flank steak or ribeye work well. Just slice them thin. Thin slices help the beef cook fast and stay tender. You can even use chicken, pork, or tofu if you prefer. To add spice, include red pepper flakes or sliced fresh chili peppers. You can also use spicy sauces like Sriracha or chili garlic sauce. Start with a small amount and taste as you go. Adjust to your heat level. This stir fry goes great with jasmine rice or fried rice. You can also serve it with steamed broccoli or bok choy. A simple cucumber salad adds a fresh crunch too. For a light meal, serve with spring rolls or dumplings. In this article, we looked at how to make sesame garlic beef stir fry. We covered essential and optional ingredients, cooking steps, and helpful tips. You learned how to customize this dish with different proteins and veggies. Proper storage and reheating methods keep leftovers fresh. Remember, cooking is all about fun and making it your own. Enjoy your tasty stir fry, and don’t be afraid to experiment!

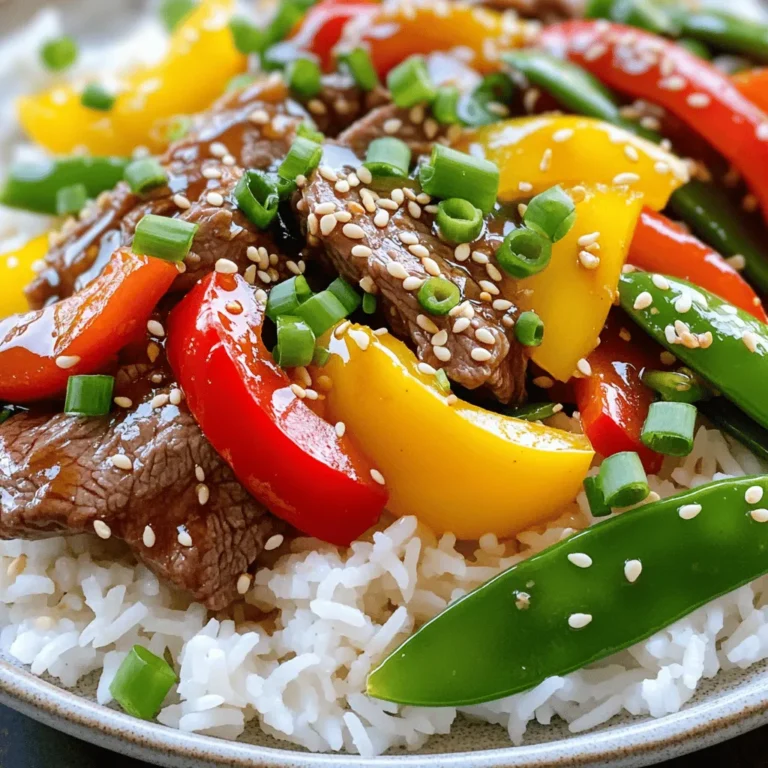
Savory Sesame Garlic Beef Stir Fry Easy Weeknight Meal

- 1 cup rolled oats - 1 cup cottage cheese - 3 large eggs - 1 teaspoon baking powder - 1 teaspoon cinnamon - 1 medium apple, grated - Pinch of salt - Cooking spray or coconut oil for the pan These main ingredients form the base of your protein pancakes. The rolled oats give them a hearty texture. Cottage cheese adds protein and makes them fluffy. Eggs help bind everything together, while the apple brings natural sweetness. Baking powder and cinnamon enhance the flavor and fluffiness. - 1 tablespoon maple syrup (optional, for sweetness) - Sliced apples and a sprinkle of cinnamon for topping Adding maple syrup is a great way to sweeten your pancakes. Topping with sliced apples and cinnamon adds a lovely touch. These optional ingredients can elevate your breakfast experience. Each serving of these pancakes is packed with nutrients. You get about 20 grams of protein and healthy carbs from the oats and apples. They are low in sugar, especially if you skip the maple syrup. This breakfast is not just tasty; it supports your fitness goals too. Enjoy a meal that fuels your day! To make the batter, grab your blender or food processor. Add 1 cup of rolled oats. Then, mix in 1 cup of cottage cheese. Next, crack in 3 large eggs. Add 1 teaspoon of baking powder and 1 teaspoon of cinnamon. Grate 1 medium apple and toss it in. If you like a bit of sweetness, add 1 tablespoon of maple syrup. Finally, add a pinch of salt. Blend everything until it is smooth and well combined. This batter should be thick but pourable. Next, heat a non-stick skillet over medium heat. Lightly coat the skillet with cooking spray or coconut oil. Pour about 1/4 cup of the batter for each pancake onto the skillet. Cook until bubbles form on the surface, which takes about 2 to 3 minutes. After that, carefully flip the pancakes. Cook for another 2 to 3 minutes until they are golden brown and cooked through. Remove the pancakes from the skillet and place them on a warm plate. Repeat this process with the remaining batter. Serve the pancakes warm for the best taste. Top them with sliced apples for a fresh crunch. Add a sprinkle of cinnamon for extra flavor. If you want more sweetness, drizzle some maple syrup on top. Enjoy your delicious, protein-packed breakfast! To get the best texture, blend your ingredients well. This helps mix the oats with the cottage cheese and eggs. A smooth batter makes a fluffy pancake. If the batter seems too thick, add a splash of water or milk. This will loosen it up. Let the batter sit for a few minutes. This allows the oats to absorb some moisture, making your pancakes softer. Flipping pancakes can be tricky, but practice makes perfect. Wait until bubbles form on the surface before flipping. This shows the pancake is ready. Use a thin spatula to slide under the pancake. Lift it gently. Turn it over quickly but carefully. Cook it until both sides are golden brown. If you find it hard to flip, try smaller pancakes. They are easier to handle. Adding protein to your pancakes has great benefits. Protein helps build muscles and keeps you full longer. Using cottage cheese adds creaminess and protein. Each serving of these pancakes packs a protein punch. This makes them a smart choice for breakfast or a snack. You can enjoy them without feeling guilty. Plus, they taste amazing with apples and cinnamon! {{image_2}} To make these pancakes gluten-free, swap rolled oats for certified gluten-free oats. You can also use a gluten-free all-purpose flour. This keeps your pancakes light and fluffy while being safe for those with gluten allergies. For a vegan version, replace cottage cheese with silken tofu or a plant-based yogurt. Use flax eggs instead of real eggs. To make a flax egg, mix 1 tablespoon of ground flaxseed with 2.5 tablespoons of water. Let it sit for about five minutes to thicken. Feel free to customize your pancakes with fruits and nuts. Add blueberries, bananas, or walnuts to the batter for extra flavor. Chopped pecans or almonds work well too. Just remember to adjust the cooking time slightly if you add a lot of extras. To keep your leftover pancakes fresh, stack them in an airtight container. Place parchment paper between each pancake. This step prevents them from sticking together. Store the container in the fridge if you plan to eat them within a few days. They stay good for about 3 to 5 days in the fridge. When you’re ready to enjoy your pancakes again, you can reheat them quickly. The best method is to use a skillet. Heat your skillet over low heat and place the pancakes in it. Cook for about 1 to 2 minutes on each side. You can also use a microwave. Just heat them for 20 to 30 seconds. If you want to save pancakes for a longer time, freezing is a great option. Let the pancakes cool completely first. Then, stack them with parchment paper between each one. Place the stack in a freezer-safe bag or container. They can last for up to 2 months in the freezer. When you’re ready to eat, simply reheat them from frozen. Yes, you can make these pancakes ahead of time. Cook them and let them cool. After that, store them in an airtight container in the fridge. They will stay fresh for about three days. You can also freeze them. Just place sheets of parchment paper between each pancake to stop them from sticking. When ready, you can reheat them in the microwave or on a skillet. If you do not have cottage cheese, you can use Greek yogurt. It will give a creamy texture and add protein too. You can also try ricotta cheese, which has a similar texture. Both options work well, but they may change the flavor slightly. To make these pancakes sweeter, add more maple syrup to the batter. Start with an extra tablespoon and taste. If you want more sweetness, you can also mix in a little honey or agave syrup. For a natural sweet taste, try adding more grated apple or some mashed banana. You learned about pancake ingredients, preparation, and storage. We explored tips for texture and health benefits. Variations make these pancakes great for everyone, including gluten-free and vegan eaters. Make these pancakes your go-to breakfast. They are easy to customize and store. Enjoy making them again and again!

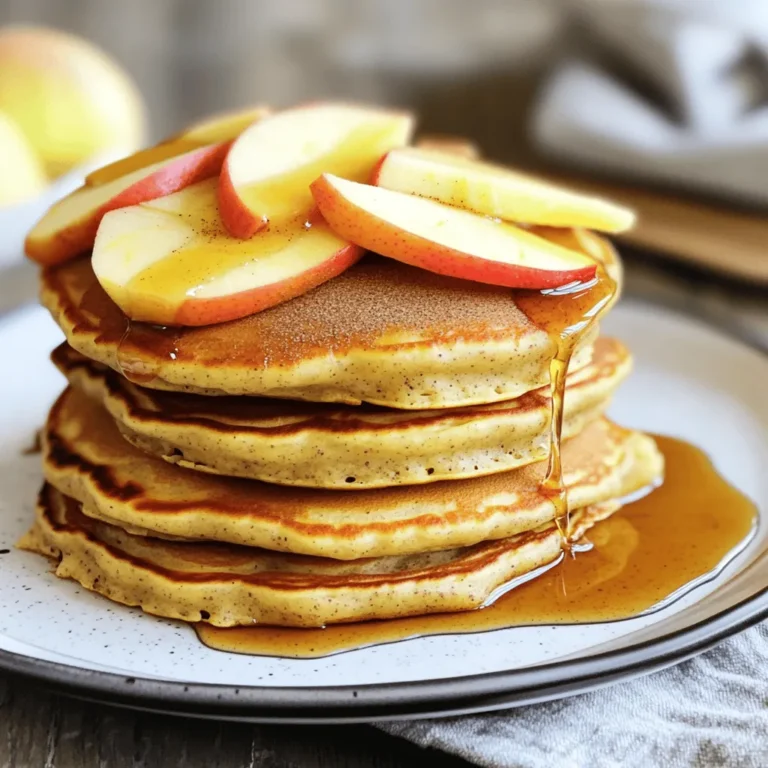
Apple Cinnamon Protein Pancakes Simple and Nutritious

- 1.5 pounds boneless, skinless chicken thighs - 4 cups low-sodium chicken broth - 2 cups carrots, sliced - 1 cup celery, diced - 1 onion, diced - 3 cloves garlic, minced - 1 teaspoon dried thyme - 1 teaspoon dried rosemary - 1 teaspoon onion powder - 1/2 teaspoon black pepper - 1 can (16 oz) refrigerated biscuit dough - 1 cup frozen peas - 2 tablespoons cornstarch (optional, for thickening) - 2 tablespoons fresh parsley, chopped, for garnish Gathering the right ingredients is key for a great dish. Start with 1.5 pounds of chicken thighs. I recommend boneless and skinless for easy cooking. Next, you need 4 cups of low-sodium chicken broth. This broth adds depth to the flavor. For veggies, slice 2 cups of carrots and dice 1 cup of celery. Adding 1 diced onion will bring a lovely sweetness. Don’t forget 3 minced cloves of garlic. It packs a tasty punch! For seasonings, use 1 teaspoon each of dried thyme and rosemary. These herbs bring warmth. Add 1 teaspoon of onion powder and 1/2 teaspoon of black pepper for extra flavor. Now let’s talk about dumplings. Grab 1 can of refrigerated biscuit dough. This will make it quick and easy. Toss in 1 cup of frozen peas for color and nutrition. If you want a thicker broth, use 2 tablespoons of cornstarch. Lastly, finish with 2 tablespoons of chopped fresh parsley for a bright touch. With these ingredients, you're ready to create a cozy meal that warms the heart! First, grab your slow cooker. Add 1.5 pounds of boneless, skinless chicken thighs. Next, toss in 2 cups of sliced carrots, 1 cup of diced celery, and 1 diced onion. Don’t forget the 3 cloves of minced garlic! Now, sprinkle in 1 teaspoon of dried thyme, 1 teaspoon of dried rosemary, 1 teaspoon of onion powder, and 1/2 teaspoon of black pepper. Finally, pour in 4 cups of low-sodium chicken broth. Give everything a good stir to mix it up. Now, set your slow cooker to low heat. Let it cook for 6-8 hours or on high heat for 3-4 hours. You want the chicken to be fully cooked and tender. Check it after a few hours to see how it’s doing! When the chicken is cooked, carefully remove it from the slow cooker. Use two forks to shred the chicken into bite-sized pieces. This step adds great texture! Return the shredded chicken back into the slow cooker and stir it in. Open a can of refrigerated biscuit dough. Cut each biscuit into quarters. Gently drop these dough pieces into the slow cooker. Make sure they are spread out evenly in the broth. Cover the slow cooker and cook on high for an additional 30-40 minutes. Check for fluffiness and ensure the dumplings are fully cooked. They should rise nicely and look golden! If you want to thicken the broth, prepare a cornstarch slurry. Mix 2 tablespoons of cornstarch with a little water and stir it in. Add 1 cup of frozen peas at this point. Stir gently to combine everything before serving. To get the best dumplings, cut the biscuit dough into equal pieces. Make sure to drop them gently into the broth. This way, they cook evenly. Keep some space between each piece. This will help them rise and become fluffy. For cooking time, check the dumplings after 30 minutes. They should be light and airy, not doughy. You can add more flavor with a pinch of garlic powder or some smoked paprika. Fresh herbs like thyme or parsley brighten the dish. Try adding peas or corn for a sweet touch. They add color and extra nutrition. Consider stirring in some chopped spinach for a healthy boost. Use the low setting for a longer cook time of 6-8 hours. This will make the chicken tender and juicy. If you’re short on time, the high setting works well too. Set it for 3-4 hours instead. If you have a different slow cooker model, adjust times as needed. Always check the chicken is cooked through before serving. {{image_2}} Adding fresh herbs makes your dish pop with flavor. Use herbs like parsley, thyme, or rosemary. You can add them at the start or near the end of cooking. Fresh herbs are often more aromatic than dried ones. If you have dried herbs, use about one-third of the amount. This keeps the taste bright without being overpowering. For a lighter meal, swap chicken thighs for chicken breast. Chicken breast has less fat and fewer calories. You can also consider low-carb or gluten-free options. Try using cauliflower instead of dumplings. This will give you a tasty, healthy twist on the classic dish. Boost nutrition by adding seasonal vegetables. Consider fresh green beans, sweet potatoes, or zucchini. These veggies add color and flavor. You can also sneak in spinach or kale for extra vitamins. They won’t change the taste much, but they will make your meal healthier. To keep your chicken and dumplings fresh, store leftovers in the fridge. Use airtight containers to prevent moisture loss. Let the dish cool before sealing. This helps keep the flavors intact. Try to enjoy your leftovers within three days for the best taste. When it comes to reheating, the best method is the stove. Gently heat the chicken and dumplings in a pot. Stir often to prevent sticking. If using a microwave, use a microwave-safe dish. Heat in short bursts, stirring in between. To refresh the dumplings, add a splash of chicken broth. This keeps them soft and moist. If you want to freeze the dish, cool it completely first. Use freezer-safe containers to avoid freezer burn. Label with the date to track freshness. When ready to eat, thaw in the fridge overnight. Reheat on the stove, adding broth to restore moisture. This method helps keep the dish's quality and flavor. Yes, you can use frozen chicken thighs in this recipe. Cooking from frozen is easy in a slow cooker. Just add the frozen chicken thighs directly to the pot with the broth and veggies. You should increase the cooking time by about 1-2 hours. Ensure the chicken reaches an internal temperature of 165°F for safety. This method keeps the chicken moist and flavorful. If you don't have biscuit dough, you can make dumplings from scratch. Combine 2 cups of flour, 1 tablespoon of baking powder, and a pinch of salt. Then stir in 3/4 cup of milk until just mixed. Drop spoonfuls of this dough onto the stew. Another option is to use gnocchi or even store-bought dumplings. Both are tasty and save time. The chicken is fully cooked when it reaches an internal temperature of 165°F. You can use a meat thermometer for accuracy. The meat should be tender and shred easily with a fork. This ensures it’s safe to eat and delicious in your dish. Yes, you can prepare this recipe ahead of time. You can chop the veggies and place them in the slow cooker with the chicken and broth. Store it in the fridge overnight. In the morning, just set the slow cooker and enjoy a warm meal later. This makes busy days much easier. This blog post guides you through making delicious chicken and dumplings. We started with fresh ingredients like chicken thighs, veggies, and seasonings. Then, we detailed step-by-step cooking in a slow cooker, ensuring tender chicken and fluffy dumplings. Remember, you can customize this dish to your taste and dietary needs. Enjoy experimenting with flavors or adding extra vegetables. This comforting recipe makes meals easy and satisfying. With the right tips, you’ll impress your family and friends every time. Happy cooking!

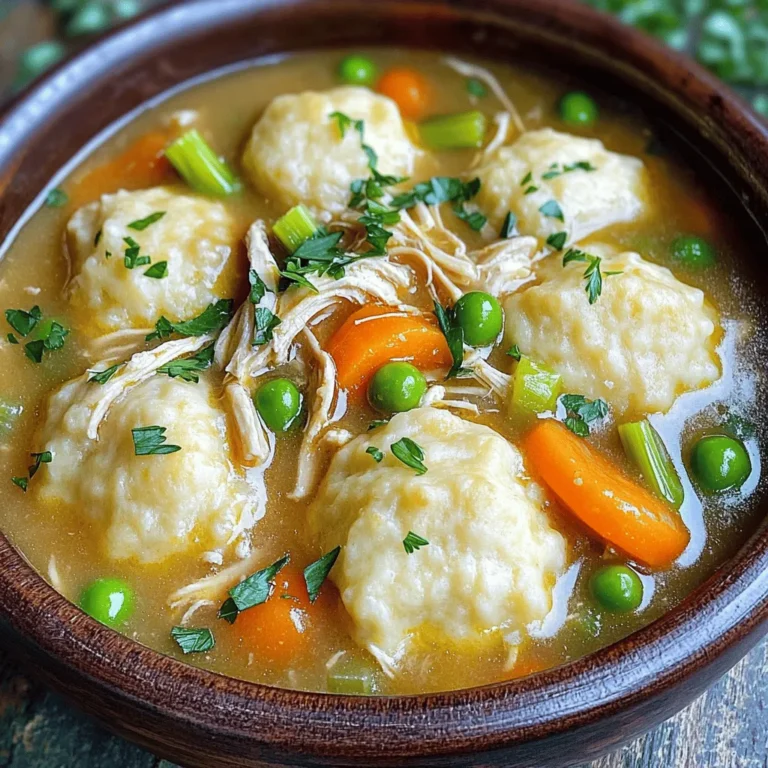
Slow Cooker Chicken & Dumplings Hearty Comfort Dish

To make Brown Sugar Maple Pecan Blondies, gather these key ingredients: - 1 cup unsalted butter, melted - 1 cup brown sugar, packed - 2 large eggs - 2 teaspoons vanilla extract - 1 cup all-purpose flour - 1/2 teaspoon baking powder - 1/4 teaspoon baking soda - 1/4 teaspoon salt - 1/2 cup chopped pecans - 1/4 cup pure maple syrup - 1/2 cup white chocolate chips (optional) These ingredients work together to create a rich, chewy texture. The melted butter adds moisture and flavor. Brown sugar gives the blondies a deep sweetness and chewy bite. Eggs help bind everything, while vanilla adds warmth. The flour provides structure, and the baking powder and baking soda help the blondies rise. Chopped pecans bring a nice crunch and nutty flavor. Maple syrup offers a sweet, earthy taste that complements the brown sugar. You can choose to add white chocolate chips for extra creaminess if you like. With these ingredients ready, you are on your way to baking a delightful treat! - Preheat oven to 350°F (175°C). - Grease a 9x9 inch baking pan or line with parchment paper. Start by heating your oven. This step is key for even baking. While it heats, prepare your pan. Greasing or lining it helps the blondies come out easily. - Combine melted butter and brown sugar. - Add eggs and vanilla extract. In a large bowl, mix the melted butter and brown sugar. Stir well until smooth. Then, add the eggs one at a time. Mix them in fully before adding the vanilla extract. This creates a rich and creamy base for your batter. - Whisk together flour, baking powder, baking soda, and salt. - Gradually incorporate dry mixture into wet ingredients. Take a separate bowl. Whisk the flour, baking powder, baking soda, and salt together. This helps distribute the leaveners evenly. Slowly add this mix to the wet ingredients. Stir gently until just combined, being careful not to overmix. Overmixing can make the blondies tough. - Fold in chopped pecans, maple syrup, and optional white chocolate chips. - Pour batter into the prepared baking pan. Now, fold in the chopped pecans and maple syrup. If you like, add white chocolate chips for extra sweetness. The batter will be thick, which is perfect. Pour it into your prepared baking pan, spreading it out evenly. - Bake for 25-30 minutes. - Cool in the pan before transferring to wire rack. Place the pan in your preheated oven. Bake the blondies for 25-30 minutes. Check for doneness by inserting a toothpick in the center. It should come out clean or with a few moist crumbs. Once baked, let them cool in the pan for at least 15 minutes. After that, transfer them to a wire rack to cool completely before cutting. Enjoy your delicious blondies! To get the best texture, do not overmix your batter. Overmixing can make your blondies tough. Mix just until the flour disappears. This helps keep them soft and chewy. Use a toothpick to check if they are done. Insert it into the center. If it comes out clean or with a few moist crumbs, they are ready. For a beautiful presentation, serve your blondies on a rustic wooden platter. Dust them lightly with powdered sugar for a lovely look. You can also drizzle extra maple syrup on top. This adds flavor and makes them shine. Garnish with whole pecans for a nice crunch and a pop of color. One common mistake is not measuring your ingredients accurately. Use proper measuring cups for dry and wet ingredients. Another mistake is not adjusting baking time for your oven. Every oven cooks a bit differently. Keep an eye on your blondies while they bake to get the perfect result. {{image_2}} You can switch out pecans for other nuts. Walnuts work well. They add a rich taste. Almonds are another great choice. They give a nice crunch and flavor. Just chop them up like you do with pecans. Use the same amount of nuts in the recipe. To make these blondies even better, think about adding spices. Cinnamon adds warmth and a hint of spice. Nutmeg gives a nice, cozy flavor too. Both spices work well with maple syrup. You can also add zest from oranges or lemons. This adds a refreshing twist. Just a teaspoon of zest goes a long way. If you want gluten-free blondies, try using almond flour or coconut flour. Both flours work great in this recipe. The taste stays delicious, and the texture remains soft. For a vegan version, use flax eggs. Just mix one tablespoon of flaxseed meal with three tablespoons of water. Let it sit until it thickens. This swap keeps the blondies moist and tasty. To keep your brown sugar maple pecan blondies fresh, store them at room temperature. Place them in an airtight container. This helps maintain their soft texture and rich flavor. If you want to store them longer, refrigerate them. Wrap each blondie in plastic wrap, then place them in a container. For freezing, wrap blondies tightly in plastic wrap and then foil. This extra layer protects them from freezer burn. At room temperature, blondies last about 3 to 4 days. Ensure they are away from direct sunlight and heat. In the fridge, they can last up to a week. To keep them fresh longer, try to minimize their exposure to air. You can also place a slice of bread in the container. This will help keep the blondies moist. When you want to enjoy leftovers, reheating is key. For the best texture, preheat your oven to 350°F (175°C). Place the blondies on a baking sheet and heat for about 5 to 10 minutes. This warms them through and restores their chewy goodness. You can also microwave them for about 10-15 seconds. Just be careful not to overheat, as this can make them dry. Enjoy your warm blondies! You can check for doneness by looking for a few signs. First, the edges should be slightly golden brown. Second, the center should look set and not jiggly. Lastly, insert a toothpick into the center. If it comes out clean or with a few moist crumbs, they are ready. This usually takes about 25 to 30 minutes in the oven. Yes, you can reduce the sugar. Try cutting the brown sugar by 1/4 cup. You can also substitute some of the brown sugar with unsweetened applesauce. This keeps the texture nice and moist. Just remember, reducing sugar may change the flavor a bit. You may want to add a pinch of salt to balance the taste. Absolutely! You can leave out the pecans if you prefer. For a nut-free version, just skip the nuts. You might want to replace the pecans with more chocolate chips or even dried fruit. This way, you still keep a nice texture and taste in the blondies. This blog post covered a simple recipe for delicious blondies. We looked at each ingredient, from butter and sugar to optional white chocolate chips. The step-by-step instructions made it easy to bake. I shared tips to ensure the best texture and avoid common mistakes. You can also customize recipes with nut alternatives and spices. Remember, storing your blondies correctly helps keep them fresh. Enjoy your baking, and have fun experimenting with flavors. Happy baking!

Brown Sugar Maple Pecan Blondies Delightful Treat

- 1 can (15 oz) chickpeas - 2 tablespoons olive oil - 1/4 cup hot sauce - 1 teaspoon garlic powder - 1 teaspoon onion powder - 1/2 teaspoon smoked paprika - Salt and pepper to taste - Chopped green onions - Celery sticks To make Air Fryer Buffalo Chickpeas, you need a few key ingredients. First, start with one can of chickpeas. Drain and rinse them well to remove any extra salt. Next, get your olive oil ready. You will need two tablespoons. This oil helps the chickpeas get crispy and flavorful. The star of our dish is the hot sauce. Use a quarter cup of your favorite, like Frank's RedHot. It adds that spicy kick! For flavor, add one teaspoon each of garlic powder and onion powder. These spices will give the dish depth. Also, include half a teaspoon of smoked paprika for a bit of smokiness. Finally, season with salt and pepper to taste. If you want to make it extra special, consider adding some optional garnishes. Chopped green onions add a fresh crunch. Celery sticks pair perfectly for dipping. These simple ingredients make a tasty snack or meal addition that everyone will love! Set your air fryer to 400°F (200°C). Preheat it for about 5 minutes. This step helps the chickpeas cook evenly. First, drain and rinse one can of chickpeas. This removes excess salt and makes them cleaner. In a medium bowl, mix the rinsed chickpeas with olive oil, hot sauce, garlic powder, onion powder, smoked paprika, salt, and pepper. Toss well so every chickpea gets coated in flavor. Now, place the seasoned chickpeas in the air fryer basket. Make sure they are in a single layer. If your air fryer is small, work in batches. Cook them for 15 to 18 minutes. Shake the basket halfway through cooking. This helps them crisp up evenly. When done, the chickpeas should be golden brown and slightly crispy. Carefully remove them and let them cool for a minute before serving. To get the best crunch, arrange your chickpeas in a single layer. This helps them cook evenly. If they crowd together, they might steam instead of crisp up. If your air fryer is small, cook in batches. Shaking or stirring the chickpeas halfway through cooking is key. This lets hot air reach all sides. You’ll end up with a tasty and crunchy treat. Want more heat? Adjust the amount of hot sauce. Start with a little, then add more to taste. You can also mix in cayenne pepper or chili powder for extra kick. Try different spices for new flavors. Smoked paprika gives a nice depth. You can also use cumin or even Italian herbs if you want a twist. Serve your buffalo chickpeas in a bright bowl. A colorful dish makes everything look more fun. Garnish with chopped green onions for a fresh touch. Pair with celery sticks for a crunchy side. These sticks also help cool down the heat from the chickpeas. You could also dip them in ranch or blue cheese dressing for extra flavor. Enjoy your snack! {{image_2}} You can mix up the flavor of your Air Fryer Buffalo Chickpeas by adding cayenne pepper. Just a pinch adds a nice kick. If you want to try other blends, consider using chili powder or cumin. These spices can change the taste a lot. You can also add herbs like oregano or thyme for a fresh twist. If you prefer a strict vegan option, this recipe is already friendly. All the ingredients are plant-based. You can ensure your hot sauce is vegan too. Some brands may add animal products, so check the label. Swap the olive oil for avocado oil if you want a different flavor. These chickpeas are great for meal prep. You can toss them into salads or wraps for added crunch and spice. They also make a fantastic topping for grain bowls. To make ahead, cook a big batch and store them. They stay tasty in the fridge for a few days. Just reheat them in the air fryer for a few minutes before serving. To keep your Air Fryer Buffalo Chickpeas fresh, store them in an airtight container. Glass or plastic containers work great. Make sure the lid is on tight. You can keep them in the fridge for about three days. After that, they may lose their crunch. Always check for signs of spoilage, like a bad smell or a change in color. When it's time to enjoy your leftovers, the air fryer is the best way to reheat them. Set your air fryer to 350°F (175°C). Heat for about 5 to 7 minutes. This keeps them crispy and tasty. If you don’t have an air fryer, you can use an oven. Preheat it to 350°F (175°C) and place the chickpeas on a baking sheet. Heat for 8 to 10 minutes. Keep an eye on them so they don’t burn. Using these methods helps bring back that delicious crunch. Air Fryer Buffalo Chickpeas last about 3 to 5 days in the fridge. Store them in an airtight container. Check for signs of spoilage, like a bad smell or a slimy texture. If they look or smell off, it’s best to toss them. For longer storage, you can freeze them. Just remember, freezing may change their texture. Yes, you can use dried chickpeas. First, soak them overnight in water. Then, cook them until tender before using them in the recipe. This step is important. Dried chickpeas need about 1 to 2 hours of cooking time. Once cooked, you can follow the same steps for seasoning and air frying. Air Fryer Buffalo Chickpeas are packed with nutrition. A serving of about 1 cup contains roughly 180 calories. They provide about 7 grams of protein, 5 grams of fiber, and healthy fats from olive oil. They are also low in saturated fat and high in flavor. This snack is a great way to enjoy a healthy treat! In this blog post, we covered how to make Air Fryer Buffalo Chickpeas. You learned about the main ingredients and optional garnishes that enhance flavor. I shared step-by-step instructions, tips for crispiness, and ways to personalize your dish. We discussed storage and reheating methods, too. These chickpeas are tasty, healthy, and easy to make. Whether for a snack or meal, they offer great flavor. Enjoy experimenting with your seasoning options and serving ideas. You'll love the crunch and spice!

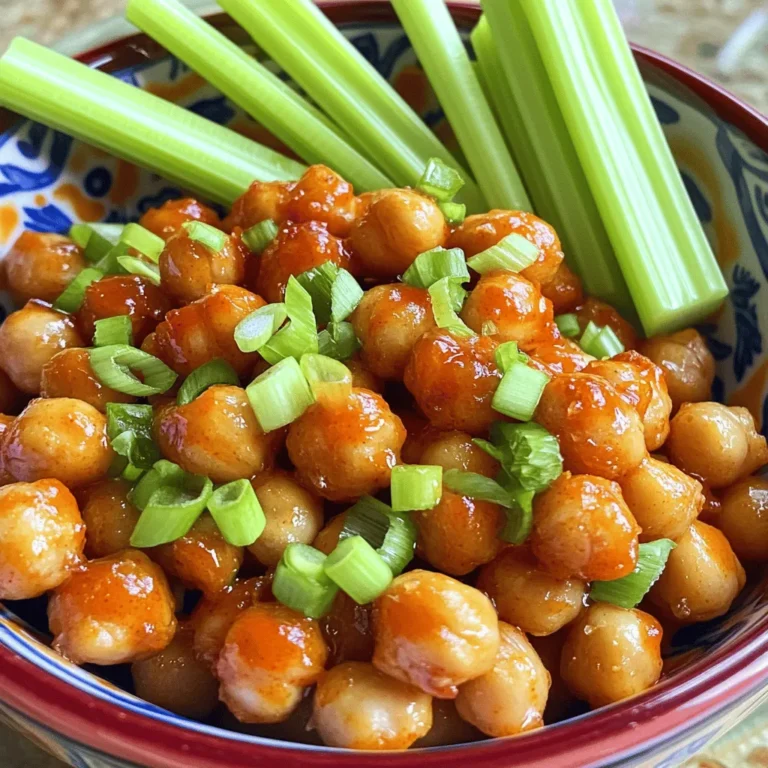
Air Fryer Buffalo Chickpeas Finger-Licking Good Snack

- 1 lb sirloin steak, cut into bite-sized cubes - 4 cloves garlic, minced - 2 tablespoons fresh rosemary, finely chopped - 1 tablespoon fresh thyme, finely chopped - 1 teaspoon red pepper flakes - 3 tablespoons olive oil - Salt and pepper to taste - Fresh parsley, chopped (for garnish) - Large mixing bowl - Skillet (preferably cast iron) - Tongs To start, you need some great ingredients. Sirloin steak works best for tender bites. Cut it into small cubes for quick cooking. Garlic adds a nice punch. Fresh rosemary and thyme give it that lovely aroma. I love using red pepper flakes for a hint of heat. Olive oil is key for marinating and cooking. For tools, grab a large bowl to mix your marinade. A cast iron skillet gives a nice sear to the steak. Tongs help flip the bites without losing any juice. This simple list of ingredients makes your meal tasty and fun to make. Each component adds flavor to your steak bites, making them truly special. Enjoy gathering these items for an amazing dish! First, cut the sirloin into bite-sized cubes. Make sure each piece is even. This helps with cooking time. Next, season the cubes with salt and pepper. Use enough to coat all sides well. Now, prepare the marinade. In a large bowl, combine minced garlic, chopped rosemary, thyme, red pepper flakes, and olive oil. Mix these ingredients well to create a flavorful marinade. Once the marinade is ready, add the steak cubes into the bowl. Toss the steak to coat each piece evenly with the marinade. Cover the bowl and let it sit for 30 minutes at room temperature. If you want a deeper flavor, refrigerate it for up to two hours. This marinating time makes the steak juicy and tasty. Heat a large skillet over medium-high heat. Make sure it gets hot before adding the steak. Add the marinated steak bites in a single layer. Avoid overcrowding the pan, as this can steam the meat. Cook the steak for about 2-3 minutes on each side for medium-rare. Use tongs to flip the bites for even cooking. When the steak is done, it should be browned with a nice crust. To get the best steak bites, use a meat thermometer. Aim for 130°F for medium-rare. The cooking time changes based on how thick your steak cubes are. Thinner pieces cook faster, while thicker ones take longer. Always watch them closely to prevent overcooking. You can add more herbs or spices to your marinade. Try fresh basil or oregano for a twist. For a richer taste, consider using a dash of soy sauce or balsamic vinegar in your marinade. This change adds depth and pairs well with the garlic. Think about what to serve with your steak bites. Salads with fresh greens or roasted vegetables work great. You can also serve warm bread for dipping. For presentation, arrange the bites on a platter and sprinkle fresh parsley on top. This makes it look inviting and delicious. {{image_2}} You can easily swap out the sirloin steak for chicken or shrimp. To make chicken bites, use boneless, skinless chicken breasts. Cut the chicken into cubes and follow the same marinade steps. Cook them for about 4-5 minutes on each side until fully cooked. For shrimp, use large, peeled shrimp. Marinate and cook them for just 2-3 minutes on each side until they turn pink. For a vegetarian twist, try mushroom bites. Use large portobello mushrooms or button mushrooms. Cut them into thick slices. Marinate them just like the steak. Cook them in a skillet for about 3-4 minutes on each side until tender and flavorful. You can change the flavor with different marinades. For an Asian twist, mix soy sauce, ginger, and sesame oil with garlic. This gives the steak bites a savory, umami taste. You can also add a touch of honey for sweetness. For a Southwest flavor, use chili powder, cumin, and lime juice in the marinade. This will give the steak a nice kick and a fresh zest. Feel free to experiment with spices that you love! You can grill or skillet-cook your steak bites. Grilling adds a nice char and smoky flavor. Preheat the grill and cook the bites for 2-3 minutes per side. If you choose to use a skillet, heat it over medium-high heat. Add the marinated steak bites and cook for 2-3 minutes on each side. Another method is using an air fryer. Set it to 400°F and cook the steak bites for about 8-10 minutes, shaking the basket halfway through. This method gives you crispy edges and juicy meat. To keep your garlic herb steak bites fresh, store them in the fridge. Use an airtight container. This will help lock in the flavor and moisture. They can last up to three days in the fridge. When reheating, use a skillet over low heat. This keeps the steak juicy and tasty. Stir occasionally to ensure even heating. You can also add them to salads or wraps for a quick meal. To freeze, place cooled steak bites in a freezer bag. Remove as much air as possible before sealing. They can be frozen for up to three months. When ready to eat, thaw overnight in the fridge. Reheat gently in a skillet to enjoy. To check if your steak bites are done, use a meat thermometer. Here are the recommended temperatures for doneness: - Rare: 120°F - Medium Rare: 130°F - Medium: 140°F - Medium Well: 150°F - Well Done: 160°F For perfect steak bites, I aim for medium rare. The meat stays tender and juicy. Cook them for about 2-3 minutes on each side. Use tongs to flip them gently. Avoid cutting into the meat to check doneness. This lets the juices escape, drying the steak. Yes, you can! Marinating overnight gives the steak a deeper flavor. The longer the steak sits in the marinade, the more the flavors soak in. Garlic, herbs, and olive oil work together to make each bite tasty. Just remember, if you marinate too long, the meat may get mushy. Stick to a maximum of 24 hours for the best texture. Garlic herb steak bites pair well with many sides. Here are some great options: - Roasted vegetables: carrots, zucchini, or bell peppers - Salads: a fresh green salad or a Caesar salad - Mashed potatoes: creamy and buttery to balance the flavors - Rice: a simple garlic rice or herb rice - Bread: crusty French bread to soak up the juices These sides will complement the savory, herb-infused flavors of the steak bites. Enjoy mixing and matching to find your favorite pairing! This article covered how to prepare delicious garlic herb steak bites. We discussed the main ingredients, effective marinating tips, and cooking steps. You learned about alternative proteins, flavor variations, and smart storage tips. Remember, using a meat thermometer ensures the best doneness. Pair these bites with sides for a great meal. Enjoy experimenting with different herbs or cooking methods. You can make this dish your own. Now, grab your ingredients and start cooking!

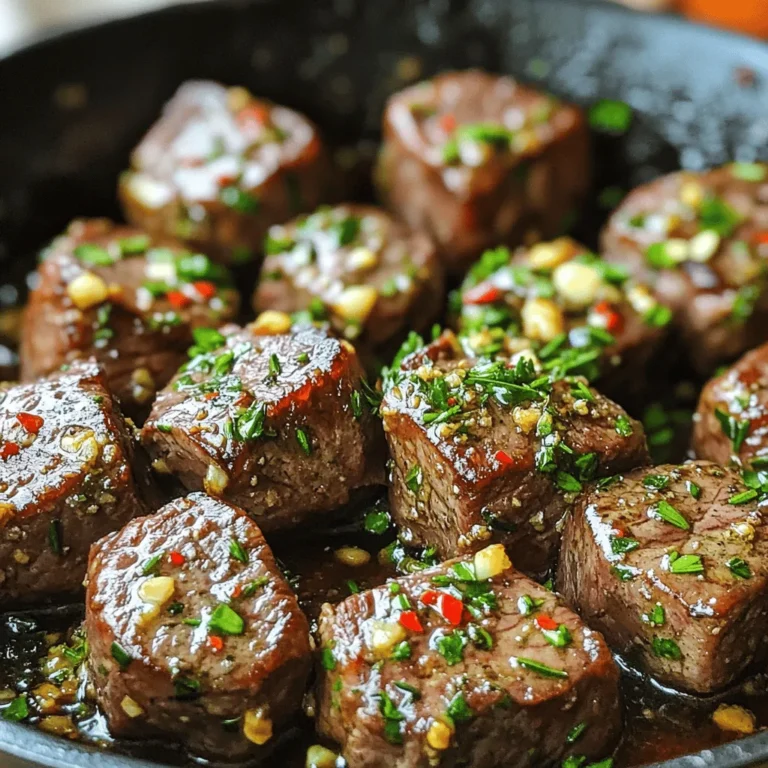
Garlic Herb Steak Bites Juicy and Flavorful Treat

PREV 1 … 17 18 19 … 57 NEXT
secrets pice kitchen

explore

DessertsDinnerAppetizersDrinks

Our Policies

  • Cookie Policy
  • Copyright Policy
  • Disclaimer
  • GDPR Policy
  • Terms Of Use
Back to Top
  • About
  • Contact Us
  • Privacy Policy
© 2025 secrets pice kitchen