FREE DINNER EBOOK! Get your copy!
  • Cookie Policy
  • GDPR Policy
  • Disclaimer
  • Terms Of Use
  • Visit my other site: Fun Cookie Recipes
secrets pice kitchen
  • Home
  • Dinner
  • Desserts
  • Drinks
  • Appetizers
  • Contact
  • About
  • Privacy Policy
  • Home
  • Dinner
  • Desserts
  • Drinks
  • Appetizers
  • Contact
  • About
  • Privacy Policy
  • Cookie Policy
  • GDPR Policy
  • Disclaimer
  • Terms Of Use
Visit my other site: Fun Cookie Recipes

HOME / CATEGORIES /

Latest

- 1 lb sirloin steak, cut into 1-inch cubes - 4 medium potatoes, diced (about 1 inch) - 4 tablespoons unsalted butter, melted - 4 cloves garlic, minced - 1 teaspoon dried rosemary - 1 teaspoon dried thyme - 1 teaspoon paprika - Salt and pepper to taste I love using sirloin steak for this recipe. It has great flavor and cooks well. The potatoes give a nice texture and soak up all the tasty juices. Garlic and butter are key here; they add a rich, savory taste. The dried herbs bring out the best in the steak and potatoes. Rosemary and thyme pair perfectly with beef. Paprika adds a hint of warmth and color. Don't forget salt and pepper! They help enhance all the flavors. - Fresh parsley Fresh parsley is a lovely touch. It adds a burst of color and a fresh taste. Just chop it up and sprinkle it on top before serving. It makes your dish look even more appetizing! Using these simple ingredients, you can create a satisfying meal. Each bite bursts with flavor, making it a winner at any dinner table. Enjoy cooking! 1. Preheat your grill to medium-high heat. This step is key for even cooking. 2. In a large bowl, mix the diced potatoes with 2 tablespoons of melted butter. Add minced garlic, dried rosemary, dried thyme, paprika, salt, and pepper. Toss well to coat all the potatoes. This adds flavor to each bite. 3. In another bowl, mix the steak cubes with the remaining melted butter, salt, and pepper. Ensure the steak is well coated. This will keep the meat juicy and tasty. 4. Lay out four large pieces of aluminum foil on a flat surface. This makes packing easier. 5. Divide the potato mixture among the four sheets. Place it in the center of each piece of foil. 6. Top the potato mixture with an equal portion of the seasoned steak cubes. This ensures each pack has both steak and potatoes. 7. Fold the sides of the foil over the mixture. Crimp the edges tightly to seal each pack. This step keeps all the juices inside while cooking. 8. Place the foil packs on the grill. Cook for about 25-30 minutes. This timing allows the potatoes to become tender and the steak to reach your desired doneness. 9. Carefully remove the packs from the grill. Use tongs as they will be hot! Open each pack with caution. Hot steam will escape, so be careful. 10. Garnish with fresh parsley before serving. This adds a nice pop of color and freshness to your dish. Seasoning is key for great taste. Use salt and pepper generously. The garlic adds depth, while rosemary and thyme bring freshness. Mix the potatoes well with the spices. This helps each bite burst with flavor. Cooking times matter too. Potatoes take longer to cook than steak. Start the potatoes first in the grill. After ten minutes, add the steak. This way, both cook perfectly together. You can bake these foil packs in the oven. Preheat your oven to 400°F. Place the foil packs on a baking sheet. Bake for about 30-35 minutes. Check the potatoes for softness before serving. Camping? No problem! You can cook these over a campfire. Wrap the packs tightly in foil. Place them on a grill grate over the fire. Cook for 25-30 minutes, turning them once. Enjoy the smoky flavor! {{image_2}} You can change the protein in this dish. Instead of sirloin steak, try chicken or shrimp. Chicken thighs add moistness and flavor. Cut them into bite-sized pieces. Shrimp cooks quickly and tastes great with garlic butter. Use about 1 pound of either. Season them the same way you do the steak. Adding extra veggies makes this dish even better. Bell peppers add sweetness and color. Chop them into chunks and toss them in with the potatoes. Onions also work well; they bring a nice flavor. You can use red, yellow, or green onions. Feel free to add your favorite veggies like zucchini or corn. Just keep their cooking times in mind. Changing herbs and spices can create new flavors. Try adding Italian seasoning for a fresh twist. You can also use cumin or chili powder for a kick. If you love fresh herbs, add basil or cilantro before serving. Experimenting with flavors makes this dish fun and unique. Don't be afraid to mix and match! To store your foil pack leftovers, let them cool first. Place them in an airtight container. You can also wrap them tightly in plastic wrap. Store the packed leftovers in the fridge. They will stay good for up to three days. If you want to keep them longer, freeze the packs. Just make sure to use freezer-safe containers. They can last up to three months in the freezer. When you are ready to eat, reheating is simple. You can use the oven or microwave. For the oven, preheat it to 350°F. Place the foil pack on a baking sheet. Heat for about 15-20 minutes. Check to see if it is hot all the way through. If you use the microwave, remove the foil. Place the food in a microwave-safe dish. Heat in short bursts of 1-2 minutes. Stir in between to ensure even heating. This way, your steak and potatoes will stay tasty! Cook the foil packs for about 25-30 minutes on a preheated grill. Check the potatoes and steak for doneness. The steak should be browned, and the potatoes should be tender. If you like your steak medium-rare, it will cook faster. Always check to avoid overcooking. Yes, you can prepare these foil packs ahead of time. Assemble the packs, seal them tightly, and store them in the fridge. They will stay fresh for up to 24 hours. Just grill them when you are ready to eat. This makes meal prep easy and fun! If you don’t have a grill, you can use your oven. Preheat it to 400°F (200°C). Place the foil packs on a baking sheet and cook for about 30-35 minutes. You can also use an air fryer. Set it to 375°F (190°C) and cook for 20-25 minutes. Both methods work well and give you tasty results! This blog post explored making delicious foil pack meals. We covered key ingredients like sirloin steak, potatoes, and garlic. I shared step-by-step instructions for preparation, assembly, and cooking. You learned helpful tips for optimal flavor and alternative cooking methods. Variations let you customize with different proteins and veggies. Store leftovers safely and reheat wisely. Embrace this cooking method for tasty meals tailored to your taste. Enjoy every bite!

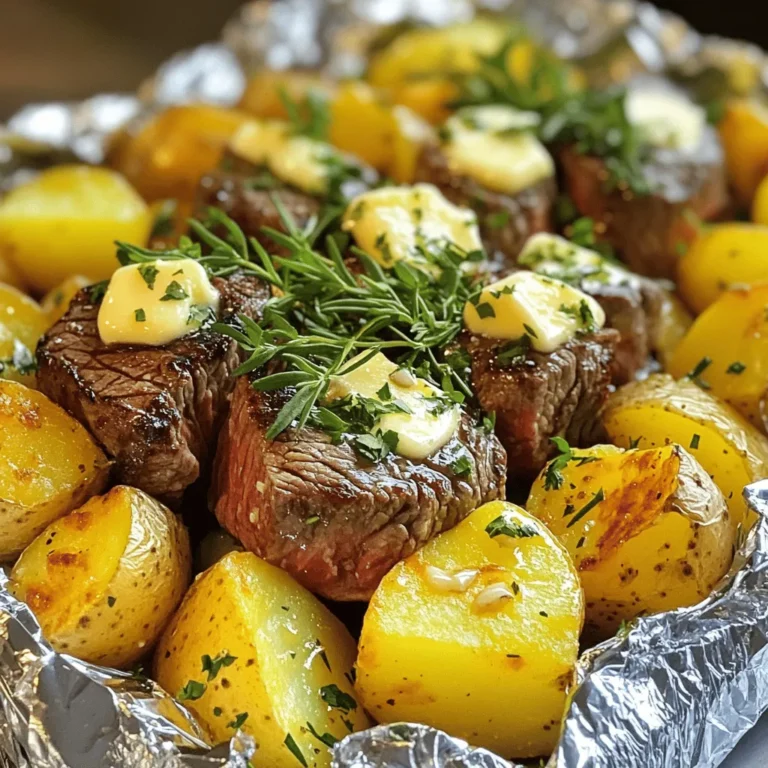
Garlic Butter Steak Potato Foil Packs Easy Recipe

To make creamy tomato basil gnocchi, you need these key items: - 1 package (16 oz) gnocchi - 2 tablespoons olive oil - 3 cloves garlic, minced - 1 can (15 oz) crushed tomatoes - 1/2 cup heavy cream - 1/2 cup fresh basil leaves, chopped - 1 teaspoon dried oregano - Salt and pepper to taste - 1/4 cup grated Parmesan cheese (plus more for serving) You can add or change some ingredients for your taste: - Red pepper flakes for heat - Use whole wheat gnocchi for a healthier choice - Swap heavy cream with coconut milk for a lighter sauce - Try fresh herbs like parsley or thyme for extra flavor Each serving of this creamy tomato basil gnocchi offers: - Calories: Approximately 450 - Protein: 12g - Carbohydrates: 60g - Fat: 20g - Fiber: 3g - Sugars: 5g This dish is filling and delicious, making it perfect for a cozy meal. Start by filling a large pot with water. Add a good amount of salt to it. Bring the water to a rolling boil. Once it boils, add the gnocchi from the package. Cook it just like the package says. When the gnocchi floats, it’s ready. This usually takes about 2-3 minutes. Drain the gnocchi well and set it aside. In a large skillet, pour in the olive oil. Heat it over medium heat. Once hot, add the minced garlic. Sauté the garlic for about one minute. Watch it closely so it doesn’t burn. Next, pour in the crushed tomatoes. Stir in the dried oregano, too. Let the sauce simmer for about 5 minutes. This helps the flavors mix well. Now, lower the heat and slowly add the heavy cream. Stir it in gently until it’s all mixed. Let it simmer for another 2-3 minutes. The sauce should thicken just a bit. Now it’s time to bring everything together. Add the cooked gnocchi to your sauce in the skillet. Toss in the chopped basil as well. Mix everything gently so the gnocchi gets coated in the sauce. Season it with salt and pepper to taste. If you like heat, add some red pepper flakes. Finally, remove the skillet from the heat. Stir in the grated Parmesan cheese. Let it melt into the sauce. Serve your creamy tomato basil gnocchi in bowls. Top with extra basil and more Parmesan if you like. Enjoy! To cook gnocchi, use a large pot of salted water. Bring it to a boil. Add the gnocchi and watch them carefully. They are done when they float to the top. This usually takes just a few minutes. Drain them right away. Rinse with cool water if you are not using them soon. This keeps them from sticking together. When making the sauce, use fresh garlic for a great flavor. Sauté it until it smells nice, but do not burn it. If you have leftovers, let them cool first. Place the creamy gnocchi in an airtight container. Store it in the fridge for up to three days. To keep the sauce creamy, avoid freezing the dish. If you must freeze, store the gnocchi and sauce separately. This will help maintain the texture and taste. This recipe serves about four people. For a full meal, serve with garlic bread or a simple salad. A light green salad with vinaigrette pairs well. It adds a fresh taste to the rich gnocchi. You can also sprinkle extra Parmesan on top for more flavor. If you like spicy food, add red pepper flakes for a kick! {{image_2}} You can make a vegan version of creamy tomato basil gnocchi. Swap the heavy cream with coconut milk or cashew cream. These keep the dish creamy and rich. Use nutritional yeast instead of Parmesan for a cheesy flavor. Fresh basil and garlic still shine through in this vegan take. You can easily swap some ingredients for a healthier dish. Try whole wheat gnocchi for more fiber. Instead of heavy cream, use Greek yogurt for creaminess without the fat. You can also add more fresh tomatoes or spinach to boost nutrients. This makes the dish colorful and tasty. Adding veggies or proteins can enhance this meal. Toss in some fresh spinach, zucchini, or bell peppers for added crunch. If you want protein, try adding cooked chicken or chickpeas. This makes the dish more filling. The flavors mix well with the creamy sauce, making each bite delightful. To store creamy tomato basil gnocchi, let it cool first. Place it in an airtight container. You can keep it in the fridge for up to three days. Make sure to layer parchment paper between servings to avoid sticking. This helps keep the gnocchi intact and ready to enjoy later. If you have leftovers, freezing is a great option. Let the gnocchi cool completely before freezing. Use a freezer-safe container or a zip-top bag. Try to remove as much air as possible. Label the bag with the date. You can freeze it for up to three months. When you’re ready to eat, thaw it overnight in the fridge. Reheating can be tricky, but I have tips to help. For best results, use a skillet. Add a splash of water or broth to keep it moist. Heat on low and stir gently. This helps avoid drying out the gnocchi. You can also use the microwave. Heat in short bursts and stir in between. This ensures even heating. Add a bit of fresh basil or grated cheese on top for extra flavor when serving. Yes, you can make this dish ahead of time. Prepare the gnocchi and sauce separately. This lets you store them in the fridge. When ready to eat, just combine and heat. The dish tastes great even after a day or two. I prefer using fresh gnocchi for its soft texture. You can also use store-bought gnocchi if fresh is not available. Both types work well in this creamy sauce. Just remember to follow the cooking times on the package for the best results. To add some heat, sprinkle in red pepper flakes while cooking the sauce. Start with a pinch and taste as you go. You can also use spicy sausage or diced jalapeños for more flavor. Adjust the spice level to fit your taste. You’ve learned how to make creamy tomato basil gnocchi from scratch. We covered key ingredients, easy steps, and helpful tips. You saw how to store leftovers and even make tasty variations. Remember to experiment with ingredients to suit your taste. Enjoy this dish any day of the week. It’s simple, delicious, and sure to please everyone. Happy cooking!

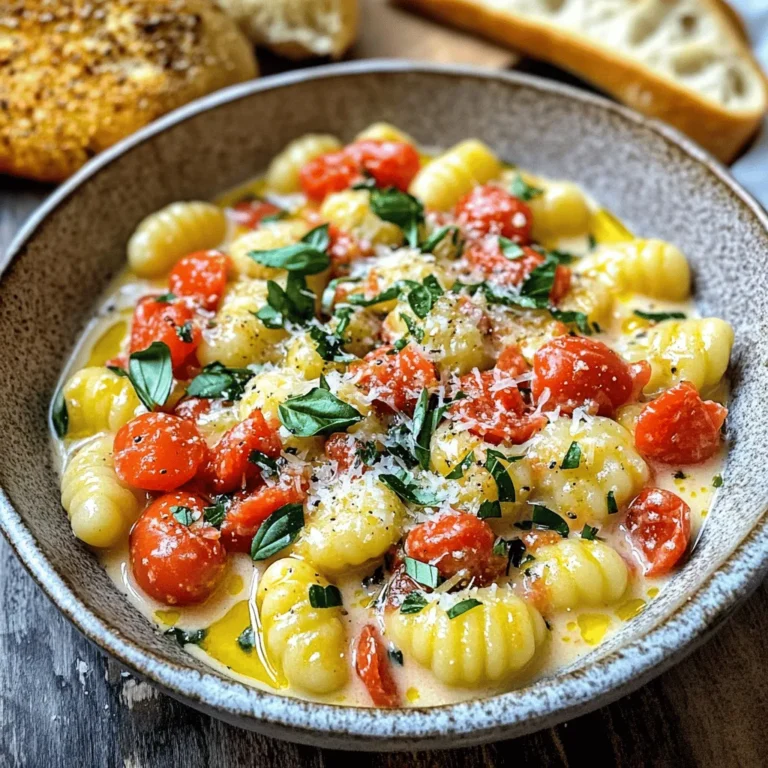
Creamy Tomato Basil Gnocchi Simple and Flavorful Dish

- 1 cup all-purpose flour - 1 tablespoon pumpkin spice blend - 1/2 teaspoon baking powder - 1/2 teaspoon salt - 1/2 cup water - 1/4 cup unsalted butter, cubed - 1/2 cup granulated sugar - 1 tablespoon cinnamon - 1/2 cup pumpkin puree - 2 large eggs - Vegetable oil for frying To make these tasty Pumpkin Spice Churro Bites, you need simple ingredients. Each one plays a key role. First, we use all-purpose flour to form the dough. The pumpkin spice blend gives that warm, cozy flavor we love in fall treats. Baking powder helps the churro bites rise while frying. Don’t forget the salt; it balances the sweetness. Next, we need water and butter. When heated together, they create a rich base for our dough. Then comes the granulated sugar and cinnamon. These two make the churros sweet and help them shine after frying. We also add pumpkin puree for a moist texture and extra flavor. Finally, eggs bind everything together, making the dough smooth. Lastly, we’ll need vegetable oil for frying. It creates that crispy outer layer we all crave. With these ingredients ready, you're set for a fun cooking adventure! - Combine 1/2 cup water and 1/4 cup cubed butter in a saucepan. - Bring to a boil over medium heat. - Once boiling, remove from heat. Add 1 cup flour, 1 tablespoon pumpkin spice blend, 1/2 teaspoon baking powder, and 1/2 teaspoon salt. - Stir vigorously until the dough forms. Return to low heat and cook for 1-2 minutes. - Remove the dough from heat. Let it cool for about 5 minutes. - Stir in 1/2 cup pumpkin puree until fully mixed. - Beat in 2 large eggs one at a time. Mix well after each addition. The dough should look smooth and shiny. - In a large pot, heat about 2 inches of vegetable oil to 350°F (175°C). - Using a piping bag with a large star tip, pipe small pieces of dough (about 2 inches) into the hot oil. - Fry until golden brown, about 2-3 minutes on each side. - Remove the churro bites with a slotted spoon and drain them on paper towels. - In a small bowl, mix 1/2 cup granulated sugar with 1 tablespoon cinnamon. - While the churro bites are still warm, roll them in the cinnamon-sugar mixture. - Serve warm and enjoy every bite of your Pumpkin Spice Churro Bites! To make good churro bites, the dough must be just right. It should be smooth but not too sticky. If your dough is too wet, add a bit more flour until it feels soft and holds shape. If it's too dry, a little water works wonders. Temperature is key when frying. Heat your oil to 350°F (175°C). If it's too cool, the churros soak up oil and become soggy. If it's too hot, they cook too fast and burn. Use a thermometer for the best results. Churro bites taste great on their own, but dips make them even better. Try chocolate sauce for a rich treat. A sweet cream cheese dip also works well. For a fall twist, a maple syrup dip adds a nice touch. Toppings can elevate your churro bites. Roll them in cinnamon sugar right after frying. For extra flavor, drizzle caramel sauce on top. A sprinkle of crushed nuts adds nice crunch too. {{image_2}} You can switch up the flavor of your churro bites with ease. If you want to try something new, consider using other spice blends. For example, swap pumpkin spice for cinnamon or nutmeg. This can give your churros a different twist while still being tasty. Another fun idea is to add a drizzle of chocolate or caramel. Melt some chocolate or warm up caramel sauce and drizzle it over the churro bites before serving. This adds sweetness and richness to each bite, making them even more enjoyable. If you're looking for a healthier option, try baking instead of frying. You can make a baked version by placing the dough on a baking sheet lined with parchment paper. Bake at 375°F for about 15-20 minutes. This method cuts down on oil and can make the churro bites lighter. You can also use alternative sweeteners. Instead of granulated sugar, consider using honey or a sugar substitute. These options can reduce calories and provide different flavors. Just remember to adjust the amounts to get the sweetness you desire. To keep your pumpkin spice churro bites fresh, store them properly. Place any leftovers in an airtight container. This helps keep them from drying out. You can also use a zip-top bag. Just make sure to press out as much air as possible. Store them at room temperature for up to two days. If you want them to last longer, refrigerate them. They can stay fresh in the fridge for up to five days. When it’s time to enjoy your churro bites again, reheating is key. The best way to do this is in the oven. Preheat your oven to 350°F (175°C). Place the churro bites on a baking sheet. Heat them for about 5-7 minutes. This method helps restore their crispiness. Avoid using the microwave, as it can make them soggy. If you must use it, heat on low power for short bursts. Check often to prevent excess moisture. Enjoy your delicious churro bites warm! Yes, you can use pre-made dough for churro bites. However, I recommend making the dough from scratch. Homemade dough gives the best flavor and texture. Plus, you can control the spices better. If you choose pre-made dough, look for one that is suitable for frying. This will help you get a good crisp. To make churro bites crispy, ensure the oil temperature is just right. Heat the vegetable oil to 350°F (175°C) before frying. Too cool oil will make the churros soggy. Fry them in small batches to avoid crowding. This helps them cook evenly. After frying, roll the churro bites in cinnamon-sugar while they are still warm. This adds extra crunch and flavor. Yes, you can freeze pumpkin spice churro bites. To freeze them, let them cool completely first. Place them in an airtight container or a freezer bag. Make sure to remove as much air as possible. When you’re ready to eat them, thaw them in the fridge overnight. - How do I ensure they stay fresh when thawing? To keep them fresh after thawing, reheat them in the oven. This will help regain their crispiness. Preheat the oven to 350°F (175°C) and bake for about 5-7 minutes. Avoid using the microwave, as it can make them soggy. Enjoy your churro bites warm for the best taste! In this post, we covered how to make delicious pumpkin spice churro bites. You learned the key ingredients, step-by-step instructions, and helpful tips for perfect texture. We also explored variations for flavor and health, plus storage and reheating tips. Pumpkin spice churro bites are fun and easy to make. With a few simple steps, you can enjoy a tasty treat. I hope you feel inspired to try making this sweet snack at home. Happy cooking!

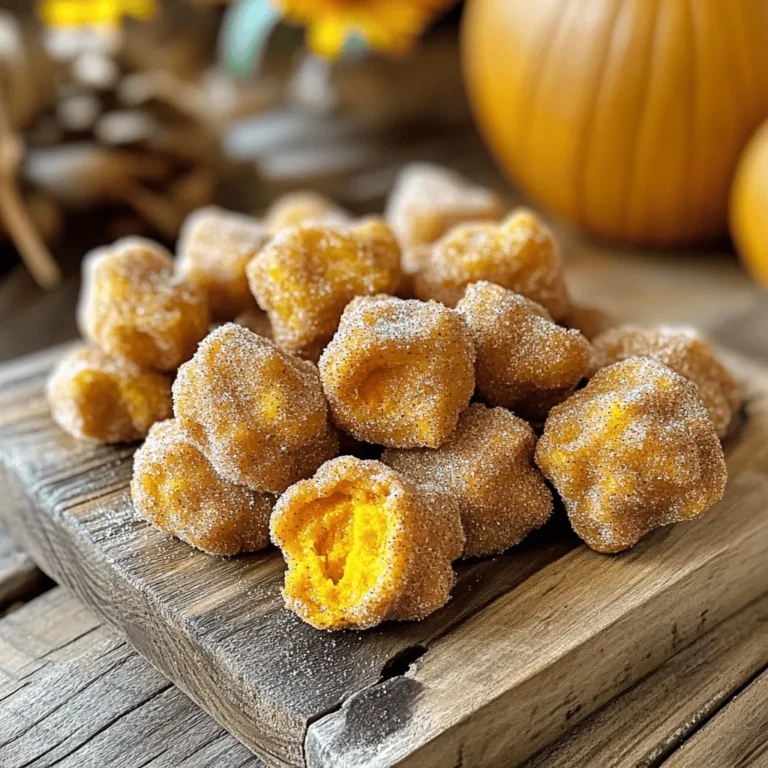
Pumpkin Spice Churro Bites Irresistibly Delicious Treat

To make Greek Lemon Chicken, you need fresh and simple ingredients. Each one adds a burst of flavor. Here is what you will need: - 4 boneless, skinless chicken thighs - 2 lemons (zested and juiced) - 3 cloves garlic, minced - 1 tablespoon fresh oregano (or 1 teaspoon dried) - 1 tablespoon olive oil - Salt and pepper to taste - 1 cup chicken broth - 1 cup cherry tomatoes, halved - 1 cup Kalamata olives, pitted and halved - Fresh parsley for garnish Chicken thighs are juicy and tender. They soak up the zesty marinade well. Lemons give the dish its bright flavor. The zest adds a nice aromatic touch. Garlic brings warmth, while oregano adds a hint of earthiness. Olive oil keeps the chicken moist. Salt and pepper enhance all the flavors. Chicken broth adds richness to the dish. Cherry tomatoes add sweetness and color. Kalamata olives bring a salty bite. Fresh parsley makes a lovely garnish. Gather these ingredients, and you are ready to cook a delightful meal! {{ingredient_image_1}} First, grab a bowl. In it, combine the juice and zest of two lemons. Add three minced garlic cloves, one tablespoon of oregano, and one tablespoon of olive oil. Don’t forget to sprinkle in salt and pepper to taste. Mix it all up well. Now, take your four chicken thighs and add them to the marinade. Make sure they get fully coated. Cover the bowl and pop it in the fridge. Let it marinate for at least 30 minutes. If you have time, two hours will give you even better flavor. Next, preheat your oven to 400°F (200°C). Heat a large oven-safe skillet over medium heat. Take the marinated chicken thighs out of the fridge. Sear the chicken in the skillet for about 3-4 minutes on each side. You want them golden brown. Once done, remove the chicken and set it aside. In the same skillet, pour in one cup of chicken broth. Add halved cherry tomatoes and pitted Kalamata olives. Stir this mixture and bring it to a gentle simmer. Nestle the seared chicken thighs back into the skillet. Now, transfer the skillet to your preheated oven. Bake for 25-30 minutes. Make sure the chicken reaches an internal temperature of 165°F. When the chicken is done, take the skillet out of the oven. Sprinkle fresh parsley on top for that nice touch. Now your Greek Lemon Chicken is ready to serve! Enjoy the bright flavors and juicy chicken. - Optimal marinating time: Marinate your chicken for at least 30 minutes. For the best taste, go for 2 hours. This time lets the flavors seep in well. - How to enhance flavor: Add more garlic or herbs for a bolder taste. You can also include red pepper flakes for a spicy kick. Don't forget to coat the chicken fully in the marinade. - Searing vs. baking methods: Start by searing the chicken to lock in juices. This step gives the chicken a golden color and a nice crust. After that, bake it to finish cooking. This two-step method keeps it juicy. - Temperature tips for juiciness: Bake at 400°F (200°C). This temperature cooks the chicken evenly. Use a meat thermometer to check for doneness. Aim for an internal temperature of 165°F. - Best sides to pair with Greek Lemon Chicken: Serve it with lemon rice or a fresh Greek salad. These sides balance the dish's rich flavors. You can also add crusty bread to soak up the tasty broth. Pro Tips Marinate Longer for Flavor: For the best flavor, marinate the chicken thighs for at least 2 hours. If you have time, marinating overnight will infuse even more zest and tenderness. Use Fresh Herbs: While dried oregano works well, using fresh oregano will elevate the dish with a brighter flavor. If possible, try to use fresh herbs whenever you can. Check Chicken Temperature: Ensure the chicken is fully cooked by checking its internal temperature with a meat thermometer. The chicken should reach an internal temperature of 165°F (75°C) for safe consumption. Serve with a Side: This dish pairs wonderfully with a side of rice, couscous, or a fresh Greek salad to complement the zesty flavors of the chicken. {{image_2}} You can change the cuts of chicken if you like. Chicken breasts work well too. Thighs stay juicy, but breasts are leaner. You can also use bone-in chicken for more flavor. Herbs and spices are easy to swap. If you don’t have oregano, use thyme or rosemary. Fresh herbs add a nice touch. Dried herbs can work in a pinch. For gluten-free options, check your chicken broth. Some broths may contain gluten. Use a gluten-free brand for a safe choice. You can also skip the olives if needed. If you want low-calorie alternatives, use less olive oil. You can also reduce the amount of chicken. Instead of using thighs, try skinless breasts. They are lower in fat. Add some heat if you like spice. A pinch of red pepper flakes will do the trick. You can also add a chopped jalapeño for more kick. Mix in different veggies for a colorful dish. Bell peppers or zucchini pair well. They add flavor and nutrients. Try adding spinach for a healthy twist. To store your Greek Lemon Chicken safely, let it cool first. Once cool, place it in an airtight container. This helps keep it fresh and tasty. Make sure to use a container that seals well. Glass containers are great, but sturdy plastic works too. You can store it in the fridge for up to three days. When you want to enjoy leftovers, simply reheat them. You can use a microwave or oven. If using the oven, cover the dish with foil to keep it moist. To freeze Greek Lemon Chicken, first let it cool completely. Then, wrap each piece in plastic wrap. After that, place the wrapped chicken in a freezer bag. Be sure to remove as much air as possible. This will help prevent freezer burn. You can freeze it for up to three months. When you’re ready to eat, take it out of the freezer. Place it in the fridge overnight to thaw slowly. For quicker thawing, you can use the microwave. Once thawed, reheat in the oven or on the stove. Make sure it reaches an internal temperature of 165°F for safe eating. Enjoy your flavorful meal again! For the best flavor, marinate Greek Lemon Chicken for at least 30 minutes. If you have more time, you can marinate it for up to 2 hours. This longer time helps the chicken soak up the lemon, garlic, and herbs. The result? Juicy and tasty chicken bursting with flavor. Yes, you can use other chicken cuts if you prefer. Boneless, skinless chicken breasts work well, too. Just remember that they cook faster than thighs. Adjust your cooking time to avoid drying them out. You can also use chicken drumsticks or wings for a fun twist. Pair Greek Lemon Chicken with dishes that complement its bright flavors. Here are some great side options: - Greek salad with cucumbers and feta - Roasted vegetables like zucchini and bell peppers - Rice pilaf with herbs - Crusty bread to soak up the juices For drinks, a crisp white wine, like Sauvignon Blanc, pairs nicely. If you prefer non-alcoholic options, try sparkling water with a slice of lemon. Enjoy! This blog post covered the key ingredients and steps for making Greek Lemon Chicken. You learned how to prepare a tasty marinade, cook the chicken, and serve it beautifully. Remember to try different herbs or veggies for new flavors. Storing leftovers properly ensures you enjoy this dish even later. Embrace these tips for a delightful meal that impresses every time. Happy cooking!

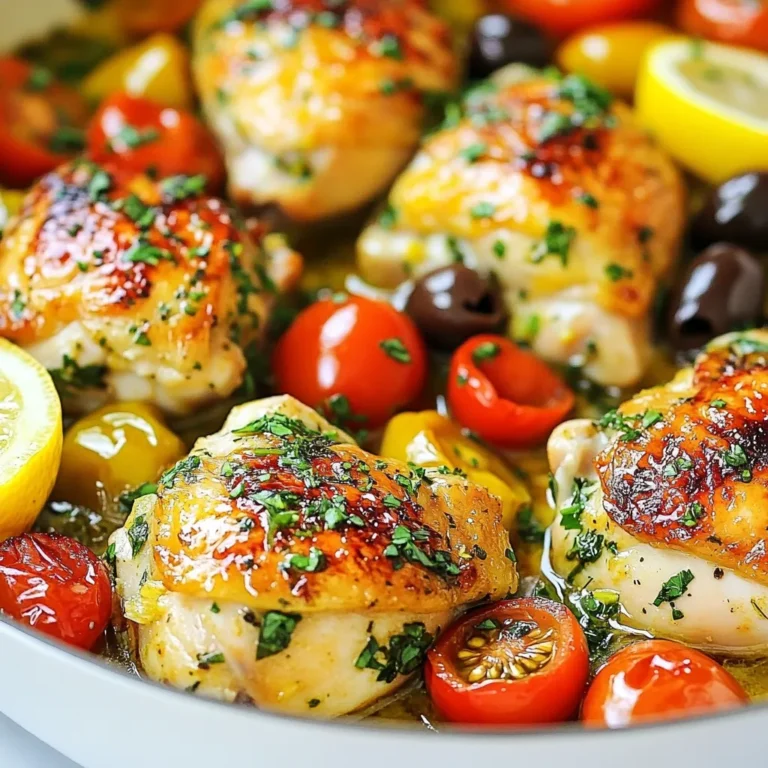
Greek Lemon Chicken Flavorful and Juicy Delight

- 1 cup unsalted butter - 1 cup brown sugar, packed - 1/2 cup granulated sugar - 2 large eggs - 2 teaspoons vanilla extract - 3 cups all-purpose flour - 1 teaspoon baking soda - 1/2 teaspoon sea salt - 1 cup semi-sweet chocolate chips - 1 cup toffee bits You can use margarine instead of butter for a dairy-free option. If you want less sugar, try using coconut sugar instead of brown sugar. For the chocolate, dark chocolate works well if you prefer a richer taste. If you need gluten-free cookies, you can use a gluten-free flour blend. Just make sure it includes xanthan gum for the right texture. Adjust the amount slightly as gluten-free flour can vary in density. To prepare brown butter, start by melting the unsalted butter in a medium saucepan over medium heat. Stir it constantly. This keeps it from burning. Watch closely as it begins to foam. After a few minutes, the butter will turn golden brown. You will notice a nutty aroma filling the air. This usually takes about 5 to 7 minutes. Once you see the color change, remove it from the heat. Let it cool slightly before using it in your dough. In a large mixing bowl, add the brown sugar and granulated sugar. Pour in the cooled brown butter. Mix these ingredients together until creamy. Then, crack in the two large eggs, one at a time. Be sure to mix well after each egg. Next, stir in the vanilla extract. In a separate bowl, whisk together the all-purpose flour, baking soda, and sea salt. Gradually add this dry mixture to the wet ingredients. Stir until just combined. Finally, fold in the semi-sweet chocolate chips and toffee bits. Make sure the chocolate and toffee are evenly mixed into the dough. Chilling the dough is a key step. Cover the bowl with plastic wrap and place it in the fridge. Chill for at least 30 minutes to 1 hour. This helps the flavors blend and improves the cookie texture. When ready to bake, preheat your oven to 350°F (175°C). Line a baking sheet with parchment paper. Use a cookie scoop or tablespoon to drop rounded balls of dough onto the sheet. Space them about 2 inches apart. Bake the cookies for 10 to 12 minutes. The edges should be golden brown, while the centers stay soft. After baking, let them cool for 5 minutes on the baking sheet. Then, transfer them to a wire rack to cool completely. When making these cookies, avoid overmixing. If you mix too much, your cookies may turn out tough. Mix just until the flour blends in. This keeps the cookies soft and chewy. Another key point is ensuring the right cookie texture. If your dough is too dry, cookies will not spread. Always check the consistency. It should be slightly sticky but not too wet. You can add spices like cinnamon or nutmeg for a warm touch. They give cookies a cozy flavor. If you like crunch, consider adding chopped nuts like pecans or walnuts. They pair well with chocolate and toffee. For chocolate, use semi-sweet chips for a classic taste. Dark chocolate offers a deeper flavor. You can even mix both for a fun twist. Try different types to find your favorite blend. To present your cookies, stack them in a clear jar. Tie a ribbon around the jar for a lovely gift. Serve on a colorful plate to make them pop. A sprinkle of sea salt on top adds a nice touch. It enhances the sweet and salty contrast. This simple step makes your cookies look gourmet and inviting. {{image_2}} You can choose different types of chocolate for your cookies. Semi-sweet chocolate chips give a rich flavor. Dark chocolate adds a bold taste and less sweetness. If you prefer, milk chocolate brings a creamy, sweet touch. For a fun twist, try white chocolate chips. They add a nice contrast to the brown butter and toffee. Adding nuts can change the texture and flavor. Chopped pecans or walnuts work great. You can also add dried fruit, like cranberries or cherries, for a sweet and chewy bite. If you're feeling adventurous, try different toffee flavors, like chocolate-covered toffee bits. For seasonal fun, add pumpkin spice in the fall. This gives your cookies a warm, cozy flavor. To make these cookies vegan, swap out the butter for coconut oil. Use flax eggs instead of regular eggs. Mix one tablespoon of ground flaxseed with three tablespoons of water. Let it sit for five minutes to thicken. For dairy-free chocolate, look for dairy-free chocolate chips. This way, everyone can enjoy these tasty cookies! To keep your Brown Butter Toffee Chocolate Chip Cookies fresh, choose the right storage method. The best way is to store them in an airtight container. This helps keep the cookies soft and chewy. If you don’t have an airtight container, a zip-top bag works well too. Make sure to press out all the air before sealing it. For added freshness, place a slice of bread in the container. The bread helps absorb moisture and keeps cookies soft. You can freeze both the dough and baked cookies. Here’s how: 1. For Dough: Scoop the dough into balls. Place them on a baking sheet and freeze until solid. This takes about an hour. Once frozen, transfer the dough balls to a zip-top bag. Label the bag with the date. 2. For Baked Cookies: Let the cookies cool completely. Then, layer them in an airtight container with parchment paper between each layer. Close the container tightly. Thawing and Baking from Frozen: - For frozen dough, bake directly from the freezer. Just add a minute or two to the baking time. - For baked cookies, let them thaw at room temperature for about 30 minutes before enjoying. At room temperature, these cookies stay fresh for about 5 days. Make sure to keep them in an airtight container. If you refrigerate them, they can last up to 2 weeks. However, the cookies might lose some softness in the fridge, so enjoy them at room temp for the best taste! Brown butter can have a strong flavor if you cook it too long. If the taste is too nutty or burnt, try using less heat next time. Stir it constantly and watch for a golden color. This helps keep the flavor balanced. You can mix in a bit of regular butter to soften the flavor. Adding a little sea salt can also help balance the taste. Yes, you can make these cookies without eggs. Common substitutes include applesauce or mashed bananas. Use 1/4 cup of applesauce for each egg. These substitutes will change the texture slightly. Cookies may be denser but still taste great. You can also use flaxseed meal mixed with water. This helps bind the ingredients together. To get crunchy edges, bake the cookies a bit longer. Check them at 12 minutes. If the edges are golden, they are ready. For soft centers, take them out when the edges are set but the center is still soft. You can also chill the dough longer for a thicker cookie, which may help keep the center softer. To sum up, we explored a delicious recipe for brown butter cookies. We outlined essential ingredients, smart swaps, and step-by-step instructions to create the perfect dough. I shared tips to enhance flavor and texture, plus ways to adapt the recipe for different diets. Proper storage methods help keep your cookies fresh, and I answered common questions about baking issues. With these insights, you’ll bake fantastic cookies every time. Enjoy your time in the kitchen!

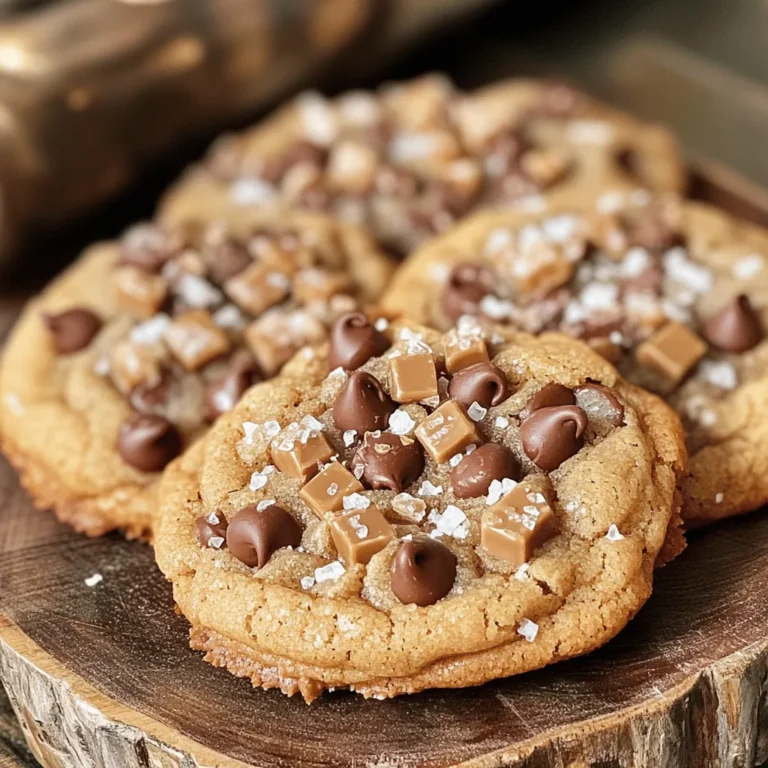
Brown Butter Toffee Chocolate Chip Cookies Delight

- 2 cups cooked jasmine rice - 2 large eggs - 2 tablespoons chili crisp - 1 cup mixed vegetables (peas, carrots, corn) - 2 tablespoons soy sauce - 1 tablespoon sesame oil - 1 tablespoon vegetable oil - Salt and pepper to taste - Sesame seeds - Chopped green onions To make Chili Crisp Egg Fried Rice, you need simple, fresh ingredients. Start with cooked jasmine rice, as day-old rice works best. The eggs add protein and richness. Chili crisp brings a spicy kick. Mixed vegetables add color and nutrition. For flavor, we use soy sauce, sesame oil, and vegetable oil. Salt and pepper balance everything. Optional garnishes like sesame seeds or chopped green onions can elevate your dish. They add a nice touch, making your meal not just tasty but also visually appealing. Enjoy the process of choosing your favorite ingredients, and make this dish your own! To make great fried rice, start with the right rice. If you have freshly cooked rice, spread it on a baking sheet. Let it cool for about 10 minutes. This helps it dry a bit. Drier rice will not turn mushy when you fry it. If you can, use day-old rice. Cold rice works best because it is firmer and easier to fry. Grab two large eggs for this dish. In a bowl, whisk the eggs with a pinch of salt. This adds flavor. Heat a non-stick skillet over medium heat. Add a splash of vegetable oil. Pour in the eggs and scramble them. Cook for 1-2 minutes until just set. Do not overcook them. Remove the eggs from the skillet and set them aside. In the same skillet, add more vegetable oil and heat it up. Toss in your mixed vegetables, like peas, carrots, and corn. Sauté them for 3-4 minutes until they are warm and slightly tender. Next, raise the heat to high. Add the cooled rice to the skillet. Stir-fry it for about 3-5 minutes. Break up any clumps and let the rice soak up the flavors. Now, it’s time to add flavor! Pour in soy sauce and sesame oil. Stir the rice to mix everything well. Add chili crisp to taste, depending on how spicy you want it. Then, mix in the scrambled eggs and chopped green onions. Stir everything together for another minute to combine. Taste your rice and adjust with salt and pepper if you like. You can change the protein in this dish for more variety. Adding shrimp or chicken gives a nice twist. For shrimp, just sauté them until pink. For chicken, use cooked, diced chicken and mix it in when you add the rice. If you prefer vegetarian options, you can use tofu. Just cube it and sauté until golden. This adds great texture and flavor. You can also skip meat altogether. The dish still shines with just vegetables and eggs. Seasonal vegetables can enhance your dish. Try bell peppers, zucchini, or green beans. These add color and crunch. You can also use frozen mixed vegetables for convenience. They work well too! Got leftovers? Don’t toss them! You can add almost any leftover veggies. Just chop and sauté them with the other ingredients. This makes your meal unique and reduces waste. Making chili crisp at home is easy and fun. Here are the ingredients you’ll need: - ½ cup vegetable oil - 2 tablespoons red pepper flakes - 1 tablespoon garlic, minced - 1 tablespoon onion, minced - 1 teaspoon sesame seeds - Salt to taste To make it, heat the oil in a small pan over low heat. Add the garlic and onion, stirring gently. Cook until fragrant but not brown. Then, add the red pepper flakes and sesame seeds. Let it cook for a few minutes. Remove from heat and cool. Store it in a jar. You now have homemade chili crisp! This adds a personal touch to your fried rice. Plus, you can adjust the spice level to your taste. {{image_2}} To store leftover chili crisp egg fried rice, let it cool to room temperature. Then, transfer it to an airtight container. This helps keep it fresh. You can store it in the fridge for up to three days. Use glass or plastic containers that seal well. These containers help prevent spills and keep odors away. When you are ready to eat, you can reheat the fried rice. The best method is to use a skillet. Heat the skillet over medium heat and add a splash of oil. This helps revive the rice's texture. Stir the rice often to heat it evenly. You can also use the microwave. Place the rice in a microwave-safe bowl. Add a few drops of water to create steam. Cover the bowl with a lid or plate. Heat for one minute, then stir and heat for another minute. To avoid sogginess, do not add too much water. The oil from reheating will help keep the rice fluffy. You can use several spicy condiments in place of chili crisp. Here are some good options: - Sriracha - Hot sauce - Red pepper flakes - Sambal oelek Each option provides a spicy kick, but they have different flavors. Adjust the amount to match your taste. Yes, you can use various rice types for this recipe. Some great choices are: - Basmati rice - Brown rice - Sushi rice Each rice type brings a unique taste and texture. Just remember to cook it well and let it cool before frying. To make this dish vegetarian, simply skip the eggs. You can add tofu for protein instead. Here are some tips: - Use firm tofu, cubed and fried. - Add more vegetables for a hearty meal. - Ensure your soy sauce is vegetarian-friendly. These swaps keep the dish tasty while fitting a vegetarian diet. This blog post covered how to make delicious fried rice with simple steps. We discussed key ingredients like cooked jasmine rice, vegetables, and eggs. You learned to sauté veggies and scramble eggs properly. I shared tips to enhance flavor and texture, serving ideas, and how to customize your dish with proteins or veggies. Fried rice is easy to make and fun to personalize. I hope you enjoy trying out these recipes and tips in your kitchen!

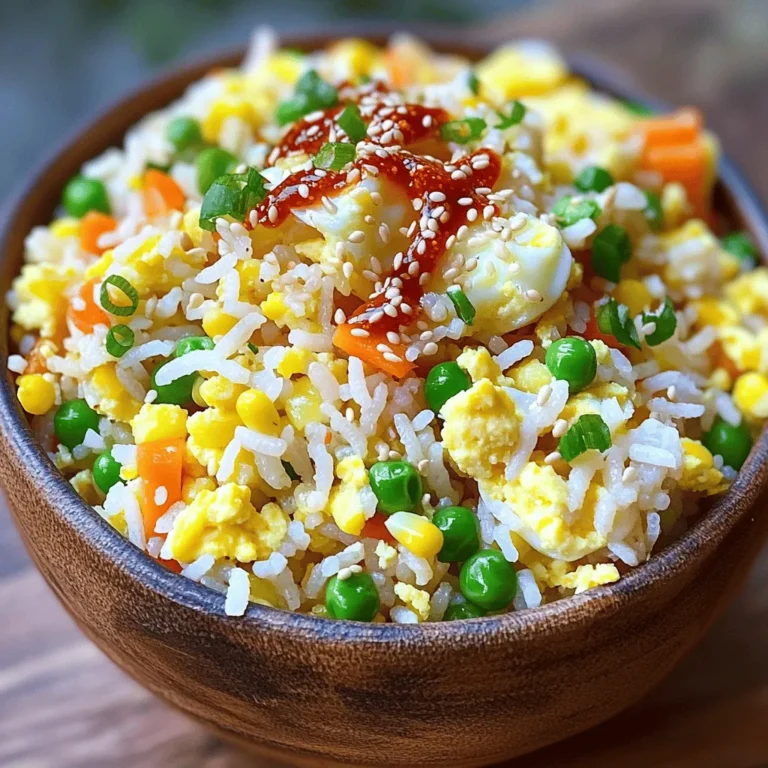
Chili Crisp Egg Fried Rice Flavorful and Satisfying Dish

- 4 chicken breasts - 2 tablespoons garlic, minced - 1 tablespoon fresh rosemary, chopped - 1 tablespoon fresh thyme, chopped - 1 teaspoon paprika - 3 tablespoons olive oil - Salt and pepper to taste - 1 red bell pepper, sliced - 1 yellow bell pepper, sliced - 1 zucchini, sliced - 1 cup cherry tomatoes, halved - 1 red onion, cut into wedges - 1 cup broccoli florets The marinade for the chicken is key. It adds rich flavor and keeps the chicken juicy. You use garlic, rosemary, thyme, paprika, olive oil, salt, and pepper. This mix brings out the best in your chicken. The herbs give a fresh taste, while the garlic adds depth. Paprika adds a nice color and a hint of warmth. The veggies shine with simple seasoning. A drizzle of olive oil and a sprinkle of salt and pepper are all you need. This keeps the focus on their natural flavors. The rainbow of colors makes your dish look appealing, too. Bright red and yellow peppers, green zucchini, and vibrant broccoli create a feast for the eyes. Gather these fresh ingredients before you start. This way, you are ready to make a meal that is both healthy and tasty. To start, gather your ingredients. In a large bowl, mix together minced garlic, chopped rosemary, and chopped thyme. Add paprika, olive oil, salt, and pepper. Stir well to combine. This blend creates a tasty marinade that will add flavor to the chicken. Next, take your chicken breasts and place them in the bowl with the marinade. Make sure each piece is coated well. Let the chicken sit for 10 to 15 minutes. This step is key. It allows the chicken to soak in all the tasty flavors. While the chicken marinates, it’s time to prepare the rainbow veggies. Slice the red and yellow bell peppers, zucchini, and red onion. Halve the cherry tomatoes and gather the broccoli florets. Spread all the veggies on a large sheet pan. Drizzle with olive oil and sprinkle with salt and pepper. Toss the veggies to ensure they are well coated. After arranging the veggies, place the marinated chicken breasts in the center of the sheet pan. Bake everything in a preheated oven at 400°F (200°C) for 25 to 30 minutes. The chicken should be cooked through, and the veggies should be tender and slightly caramelized. Once done, let it rest for five minutes. Garnish with fresh parsley before serving for a pop of color. For the best flavor, start with fresh herbs. I love using rosemary and thyme. Mince garlic finely to spread its flavor. Combine garlic, herbs, paprika, olive oil, salt, and pepper in a bowl. Toss the chicken breasts in this mix. Let them rest for 10-15 minutes. This time helps the chicken soak up the flavors. If you have more time, marinate for an hour or overnight. This makes the chicken even tastier. Choose vibrant, fresh veggies for a colorful dish. Slice bell peppers, zucchini, and onion evenly. This helps them cook at the same time. Toss the veggies in olive oil, salt, and pepper. Spread them out on the sheet pan. Avoid crowding the pan; this allows them to roast well. A single layer helps achieve nice, caramelized edges. Bake until they are tender and slightly browned. This adds great flavor and texture. To serve, you can keep it simple. Serve directly from the sheet pan for a rustic look. This makes it easy and fun for everyone. If you want a more elegant touch, slice the chicken. Arrange the chicken and veggies on a platter. Drizzle the pan juices over the top. This adds extra flavor and makes the dish shine. Finish with fresh parsley for a pop of color. Enjoy the beauty and taste of your meal! {{image_2}} You can easily swap chicken for other proteins. Tofu works great for a plant-based meal. Use firm tofu, cut into cubes, and marinate like the chicken. If you prefer pork, use pork tenderloin. Adjust the cooking time based on the thickness of the meat. Pork cooks faster than chicken, so check for doneness early. Feel free to mix and match veggies. Carrots, asparagus, and cauliflower can add color and taste. Try using snap peas or green beans for a crunch. The key is to keep the cooking time in mind, as some veggies cook faster than others. Always cut them to a similar size for even cooking. Changing herbs can create new flavor profiles. Basil or cilantro can give a fresh twist. If you like heat, add chili flakes or cayenne pepper. For a smoky flavor, try smoked paprika. Experimenting with spices makes the dish unique every time. Don't be afraid to be bold with your choices! Store your leftovers in an airtight container. This keeps the chicken and veggies fresh. Make sure to let them cool first. You can keep them in the fridge for up to three days. To reheat, use a microwave or oven. If using a microwave, heat on medium power for about 2-3 minutes. Stir halfway for even heating. If using an oven, preheat to 350°F (175°C). Bake for about 10-15 minutes until warmed through. You can freeze leftovers for later meals. Place them in freezer-safe bags or containers. Be sure to label them with the date. They can stay good for up to three months in the freezer. To thaw, place them in the fridge overnight before reheating. Enjoy your meal prep! Bake the chicken and veggies for 25 to 30 minutes. This time ensures the chicken cooks through, and the veggies become tender. You want the chicken to reach an internal temperature of 165°F. If you cut into the chicken, the juices should run clear. Yes, you can use frozen vegetables. However, they may release extra moisture during cooking. This can make the dish a bit watery. To fix this, add a few extra minutes to the baking time. Stir the veggies halfway through to help them cook evenly. You can serve this dish with rice, quinoa, or a simple salad. The chicken pairs well with a side of crusty bread too. If you want more color, add a fresh herb garnish or a drizzle of balsamic glaze on top. Absolutely! This recipe is great for meal prep. You can make it ahead of time and store it in the fridge. Just divide the chicken and veggies into meal containers. They last up to four days in the fridge, making them perfect for quick meals. Yes, grilling is a tasty option! Marinate the chicken as usual, then cook it on the grill. Grill the chicken for about 6 to 7 minutes per side over medium heat. You can still roast the veggies in the oven or toss them on the grill for more flavor. This post covered a tasty Garlic Herb Chicken with colorful veggies. You learned about the ingredients, how to marinate chicken, and bake your meal to perfection. I shared tips for marinating, roasting veggies, and serving well. You can also explore protein swaps, varied veggies, and flavor twists. Don’t forget how to store leftovers safely for later meals. Try this recipe, and you’ll impress your family and friends. It’s easy, fun, and delicious! Enjoy cooking and experimenting with your own variations!

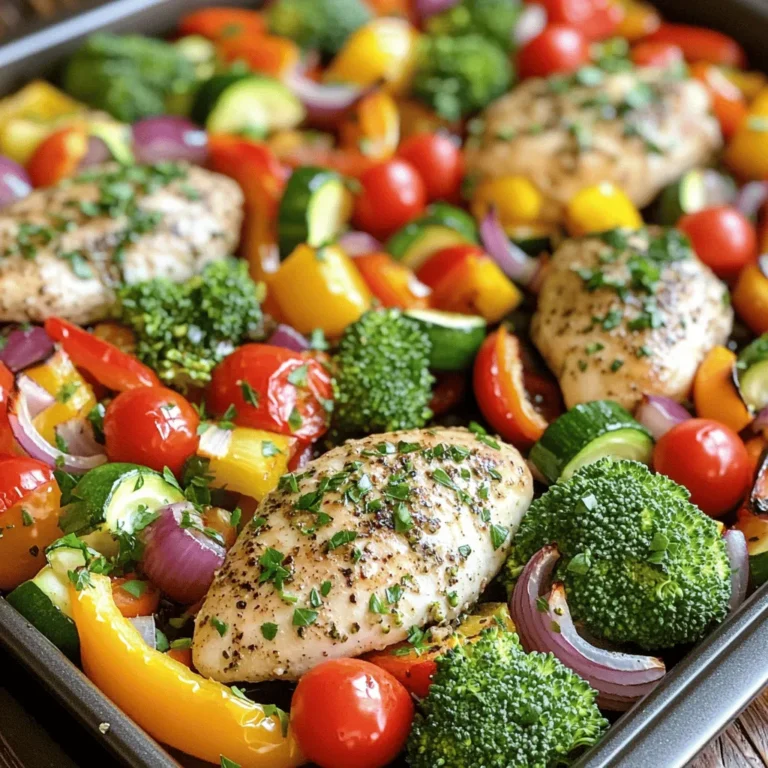
Garlic Herb Chicken Rainbow Veggies Sheet Pan Delight

- 8 oz cream cheese, softened - 1 cup powdered sugar - 1 cup vanilla cake mix (dry) - 1 cup sprinkles (rainbow or themed) - 1/2 cup vanilla extract - 1 cup white chocolate chips - 1 tablespoon coconut oil (for melting chocolate) When measuring ingredients, use dry measuring cups for the cake mix and sugar. For the cream cheese, use a scale or standard measuring cup. Liquid ingredients like vanilla extract should be measured with a liquid measuring cup. This ensures you get the right amount for perfect truffles. You will need a few key tools: - Large mixing bowl - Hand mixer - Baking sheet - Parchment paper - Microwave-safe bowl - Fork or toothpick for dipping These tools help make the process smooth and fun. First, grab a large mixing bowl. Place 8 oz of softened cream cheese inside. Use a hand mixer to beat it until it's smooth and creamy. This step makes your base rich and tasty. Gradually add 1 cup of powdered sugar. Keep mixing until you see no lumps. Next, add 1 cup of dry vanilla cake mix. This gives the truffles their cake flavor. Stir well to combine everything evenly. Now, pour in 1/2 cup of vanilla extract. This adds sweetness and depth. Finally, mix in half of the 1 cup of sprinkles. These will bring a festive touch to your mixture. Once your mixture is well mixed, it’s time to shape it. Use your hands to scoop out small balls, about 1 inch wide. Place these balls on a baking sheet lined with parchment paper. Make sure they are spaced out so they don’t stick together. After shaping the truffles, place the baking sheet in the freezer. Let them chill for about 30 minutes. This helps them firm up and makes them easier to coat in chocolate. While your truffles chill, it's time to melt the chocolate. In a microwave-safe bowl, add 1 cup of white chocolate chips and 1 tablespoon of coconut oil. Heat this mixture in 30-second bursts. Stir in between until it's completely smooth. Once melted, take each truffle out of the freezer. Dip each one into the melted chocolate, fully coating it. Use a fork or toothpick to lift the truffle out. Tap off any extra chocolate before placing it back on the baking sheet. Now, sprinkle the remaining sprinkles on top while the chocolate is still wet. This makes them look fun and festive. Finally, return the dipped truffles to the fridge for 15-20 minutes to let the chocolate harden completely. Now, your birthday cake cheesecake truffles are ready to enjoy! Mixing is key to great truffles. Start with room-temperature cream cheese. This helps it blend smoothly. Use a hand mixer for the best results. Beat the cream cheese until it’s creamy. Then, add the powdered sugar and cake mix slowly. This way, you avoid lumps. Mix until smooth, then add the vanilla extract. Fold in the sprinkles gently. You want them evenly spread in the mix. You can make these truffles your own! Try using chocolate cake mix instead of vanilla for a different flavor. You could also swap out the white chocolate for dark chocolate. Want a fun twist? Add a splash of almond extract. You can change the sprinkles too. Use holiday-themed sprinkles for a festive touch. You can even roll the truffles in crushed nuts or cookies for extra crunch. Watch out for these common mistakes. Don’t skip chilling the truffles before dipping. If they are too soft, they won’t hold their shape. Also, don’t rush melting the chocolate. Heat it slowly and stir often. If the chocolate gets too hot, it can seize. Lastly, sprinkle the truffles right after dipping. If the chocolate sets, the sprinkles won’t stick. {{image_2}} You can play with flavors to make these truffles even more fun. Try using chocolate cake mix instead of vanilla for a chocolate twist. You can also add peanut butter or caramel for a richer taste. Want something fruity? Toss in some lemon or orange zest to brighten up the flavor. Each variation offers a new taste that can make your truffles special for any celebration. If you want gluten-free truffles, just use a gluten-free cake mix. This change keeps the same great taste while ensuring everyone can enjoy them. For a vegan option, swap the cream cheese with a vegan cream cheese. Use powdered sugar and vegan chocolate chips too. These simple swaps keep the truffles delicious and friendly for different diets. Decorating your truffles can be a blast! Depending on the theme, you can use colored sprinkles to match any party. For a holiday, use red and green sprinkles for Christmas or pastel colors for Easter. You can even drizzle colored chocolate on top for a fun look. Get creative! The right decor can turn your truffles into a show-stopping treat. To keep your Birthday Cake Cheesecake Truffles fresh, store them in an airtight container. Place parchment paper between layers to prevent sticking. You can keep them in the fridge for up to one week. This helps maintain their creamy texture and delicious taste. You can freeze these truffles for longer storage. First, chill them in the fridge for about 30 minutes. Then, place them in a single layer on a baking sheet and freeze until solid. Once frozen, transfer them to a freezer-safe bag. They can stay frozen for up to three months. Thaw them in the fridge before serving. These truffles taste best when fresh but can last a while. If stored properly, they remain good for about a week in the fridge. Check for any off smells or changes in texture before eating. Enjoy your treats while they are at their best! Yes, you can! You may use dark or milk chocolate instead of white chocolate. Each type brings a unique taste. Dark chocolate adds a rich flavor. Milk chocolate is sweeter and creamier. Just remember to melt it the same way as white chocolate. These truffles can stay fresh for about one week. Keep them in an airtight container. Store them in the fridge for the best taste. If you want to keep them longer, you can freeze them. They can last up to three months in the freezer. If your mixture is too soft, chill it in the fridge. This helps it firm up for easier shaping. You can also add a bit more dry cake mix if needed. Just mix until it all comes together. Then, shape the truffles and freeze them again before dipping in chocolate. This blog post covered all you need to know about making cheesecake truffles. We explored ingredients, measurements, and essential tools first. Then, I shared a clear step-by-step guide to help you create delicious truffles. Tips on mixing, customization, and common mistakes will ensure your success. You can try different flavors, adjust for diets, and even get creative with decor. With proper storage, your truffles will stay fresh and tasty. Enjoy making these sweet treats and impress everyone around you!

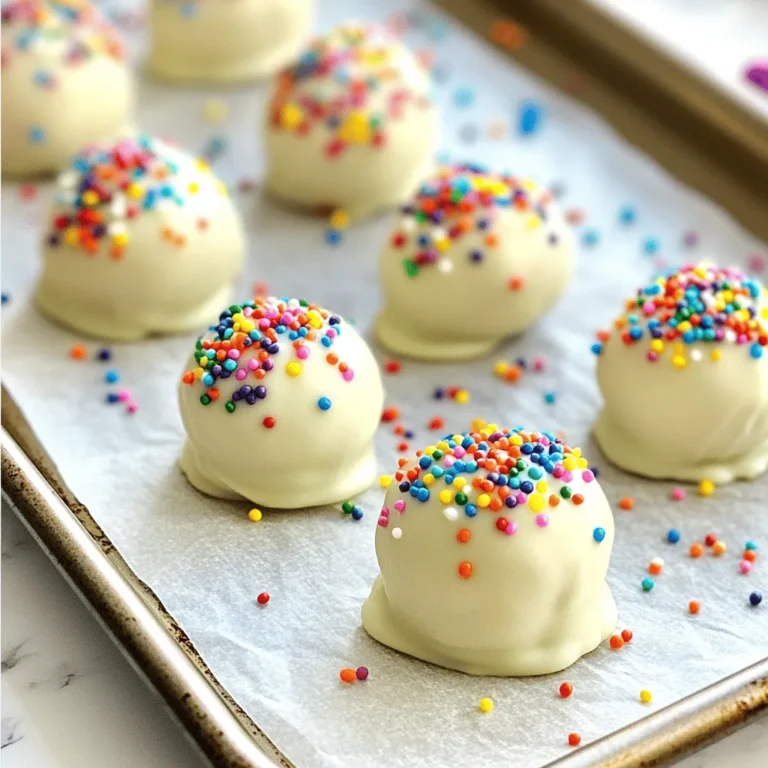
Birthday Cake Cheesecake Truffles Delightful Treats

- 1 lb large shrimp, peeled and deveined - 8 oz fettuccine pasta - 2 tablespoons Cajun seasoning - 2 tablespoons olive oil - 3 cloves garlic, minced - 1 cup heavy cream - 1 cup grated Parmesan cheese - 1 cup cherry tomatoes, halved - 2 cups baby spinach - Salt and pepper to taste - Fresh parsley, chopped (for garnish) In this dish, the shrimp shines bright. You want to use large shrimp for the best bite. They soak up all the Cajun spices. The fettuccine pasta is a perfect match. It holds the creamy sauce well. Cajun seasoning gives this dish a bold kick. You control the spice level. If you prefer milder flavors, use less seasoning. Olive oil adds richness when cooking the shrimp. Garlic brings a nice aroma to the meal. The heavy cream is key for a rich sauce. It makes everything smooth and creamy. Then, we add Parmesan cheese for a cheesy finish. Tomatoes add a burst of freshness. Spinach gives a pop of color and nutrients. Always taste for salt and pepper. They balance the flavors. Finally, fresh parsley brightens the dish. It adds a lovely touch when serving. Enjoy creating this easy yet flavorful meal! - Bring salted water to a boil. - Cook fettuccine according to package instructions. This usually takes about 10 minutes. Make sure it is al dente. Reserve about 1 cup of pasta water before draining. - Toss shrimp with Cajun seasoning in a bowl. Make sure each piece is well-coated. - Sauté shrimp in olive oil over medium heat. Cook for 2-3 minutes on each side until they turn pink and opaque. Remove shrimp from the skillet and set aside. - In the same skillet, add minced garlic and sauté for about 30 seconds. The garlic should become fragrant but not brown. - Pour in heavy cream and bring to a gentle simmer. Stir in grated Parmesan cheese until melted. This will create a smooth and creamy sauce. - Add the cooked fettuccine, halved cherry tomatoes, and baby spinach to the skillet. Toss gently to combine. - Incorporate reserved pasta water a little at a time until the sauce reaches your desired thickness. Season with salt and pepper to taste. - Return the cooked shrimp to the skillet and toss everything together. Heat for an additional 2-3 minutes until warmed through. - Plate the Cajun shrimp Alfredo in bowls. Garnish with fresh chopped parsley for a touch of color and flavor. Enjoy your meal! Choosing the right shrimp When picking shrimp, look for large, fresh shrimp. Fresh shrimp should smell like the sea, not fishy. Frozen shrimp works too; just ensure it is peeled and deveined. Tips for seasoning the shrimp Evenly coat shrimp with Cajun seasoning. Use a bowl to toss them well. This step adds flavor, making each bite tasty. You can adjust the amount of seasoning to fit your taste. Adjusting sauce thickness with pasta water When your sauce is too thick, add pasta water. Start with a little and mix well. This water has starch, which helps the sauce cling to the pasta nicely. Alternative thickening methods If you want a thicker sauce, use more Parmesan cheese. You can also add a bit of cornstarch mixed with water if needed. Stir it in slowly until the sauce thickens to your liking. Adding spices for extra heat To spice things up, add red pepper flakes. Start with a pinch and taste as you go. You can also try different spices like cayenne or smoked paprika for a unique twist. Incorporating vegetables Add veggies to boost flavor and color. Cherry tomatoes and spinach work well in this dish. You can toss in bell peppers or zucchini for extra crunch. Make this dish even healthier and more vibrant! {{image_2}} You can switch shrimp for other proteins. Chicken is a great option. Cook it until it's golden brown and juicy. For a plant-based choice, try tofu. Press and cube the tofu before tossing it in Cajun seasoning. Sauté it until crispy. You can also explore different seafood. Scallops or crab work well. Just adjust the cooking time to ensure they cook perfectly. Fettuccine is classic, but other pastas can shine too. Penne or linguine are great choices. They hold sauce well. If you need gluten-free options, look for brown rice or chickpea pasta. These have great flavor and texture. Whole grain pasta adds more fiber. It helps you feel full longer. Plus, it offers a nutty taste that complements the dish. Want it milder? Use less Cajun seasoning. You can also add cream or cheese to tone down the heat. For a bolder flavor, add more seasoning. You might even mix in cayenne pepper or hot sauce for extra kick. Trying different Cajun blends can be fun. Some blends have herbs or lemon zest, giving a new twist to the dish. Experiment to find your favorite flavor. After you finish your Cajun shrimp Alfredo, let it cool first. Place it in an airtight container. This keeps it fresh. Store it in the fridge. It stays good for about 3 days. Make sure to eat it before that time for the best taste. You can reheat your leftovers in two ways: the microwave or stovetop. For the microwave, put the dish in a bowl and cover it. Heat it in short bursts, stirring often. If you use the stovetop, warm it in a skillet. Add a splash of heavy cream to keep it creamy. Stir it while heating. If you want to keep it longer, freezing is a great option. Let the dish cool completely before you freeze it. Use a freezer-safe container. It can last up to 3 months in the freezer. To thaw, move it to the fridge overnight. Reheat it as you would leftovers, adding cream to restore the texture. Yes, you can prep Cajun Shrimp Alfredo ahead. Cook the fettuccine and shrimp, then store them separately. This keeps them fresh. You can mix them with the sauce later. Store leftovers in an airtight container in the fridge for up to 3 days. Reheat gently on the stove, adding a splash of cream if needed. Cajun Shrimp Alfredo pairs well with many sides. Try garlic bread for a crunchy bite. A simple green salad with vinaigrette adds freshness. If you enjoy wine, a chilled Sauvignon Blanc complements the dish nicely. You can also serve it with roasted vegetables for added color and nutrients. Cajun Shrimp Alfredo has a mild to medium spice level. The Cajun seasoning adds warmth, not overwhelming heat. If you want more spice, add extra Cajun seasoning or red pepper flakes. For a milder dish, reduce the seasoning. Adjust to your taste for the best flavor. Yes, you can make Cajun Shrimp Alfredo gluten-free. Substitute regular fettuccine with gluten-free pasta. Many brands offer great options that cook well. Always check the package for cooking times. This way, everyone can enjoy the dish without worry. Cajun Shrimp Alfredo is a delicious mix of shrimp, fettuccine, and creamy sauce. You start with flavorful shrimp and vibrant ingredients, cooking everything in a few simple steps. Don't forget the tips for perfecting the dish and making it your own. Whether you want to spice it up or try different proteins, the options are endless. This dish stores well and reheats easily too. Enjoy making this meal for family or friends. It's sure to impress everyone at the table!

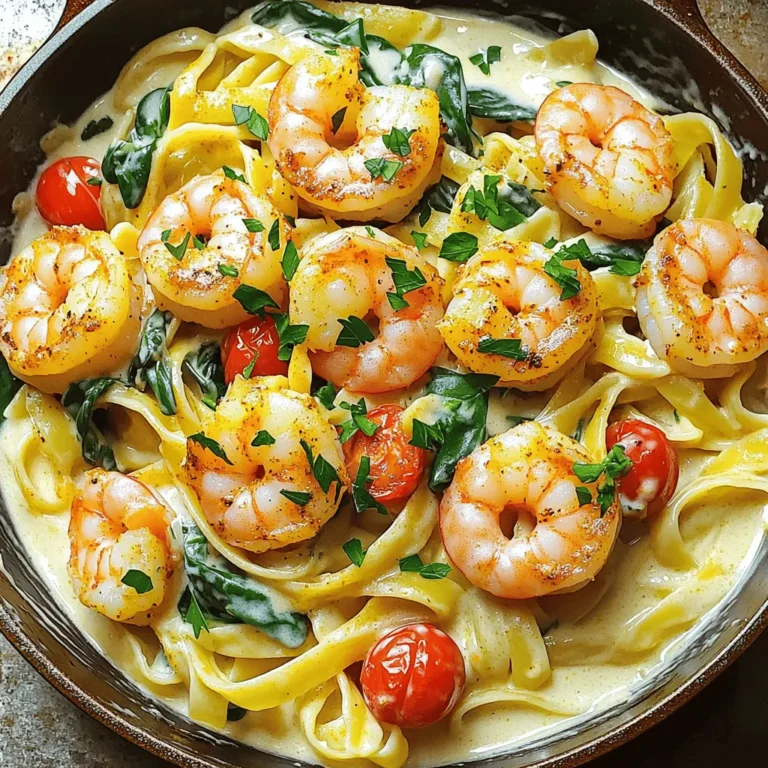
Cajun Shrimp Alfredo Skillet Quick and Flavorful Meal

- 2 cups all-purpose flour - 1/4 cup unsweetened cocoa powder - 1/3 cup granulated sugar - 1 tablespoon baking powder - 1/2 teaspoon salt The dry ingredients create the base for our scones. The flour gives structure, while cocoa adds rich chocolate flavor. Sugar sweetens the mix, and baking powder helps them rise. Salt enhances all these flavors, making them pop. - 1/2 cup cold unsalted butter, cubed - 1 large egg - 1/2 cup heavy cream - 1 teaspoon vanilla extract The wet ingredients bring moisture and richness. Cold butter makes the scones flaky. The egg binds everything together. Heavy cream adds creaminess, while vanilla gives a lovely aroma and flavor. - 1/2 cup chocolate chips (semi-sweet or dark) - Additional chocolate chips for topping Chocolate chips are the stars of this recipe. They melt slightly during baking, giving you gooey bites of chocolate. Extra chips on top make the scones even more tempting and beautiful. These ingredients come together to create delicious double chocolate chip scones that are sure to impress. - Preheat the oven to 400°F (200°C). - Prepare the baking sheet with parchment paper. - In a large bowl, whisk together: - 2 cups all-purpose flour - 1/4 cup unsweetened cocoa powder - 1/3 cup granulated sugar - 1 tablespoon baking powder - 1/2 teaspoon salt This mix gives your scones a rich chocolate flavor. Cocoa adds depth and sweetness. - Add 1/2 cup of cold unsalted butter, cubed, to the dry mix. - Blend it using a pastry cutter or your fingertips. - Keep mixing until you see coarse crumbs. The cold butter creates flaky layers in your scones. This step is key for great texture. - In a separate bowl, mix together: - 1 large egg - 1/2 cup heavy cream - 1 teaspoon vanilla extract Gently pour the wet mix into the dry ingredients. Fold carefully without overworking the dough. Overmixing can make your scones tough. We want them light and crumbly. - Turn the dough out onto a floured surface. - Shape it into a circle, about 1-inch thick. - Cut the circle into 8 equal wedges. Place the wedges on your prepared baking sheet. - Sprinkle additional chocolate chips on top of each scone for more chocolatey goodness. Bake for 15-20 minutes or until the tops feel firm. A toothpick should come out clean from the center. These steps lead to warm, delicious scones that melt in your mouth. Using cold butter is key for scones. Cold butter helps create a flaky texture. When it melts during baking, it forms steam. This steam lifts the scone, making it light and airy. To blend the butter, use a pastry cutter or your fingertips. Stop mixing when the mixture looks like coarse crumbs. Overmixing can lead to tough scones. You want to keep some chunks of butter intact. To know when your scones are done, look for a firm top. Gently press the top; it should spring back. You can also use a toothpick. Insert it into the center. If it comes out clean, the scones are ready. An oven thermometer is a wise choice. Ovens often show incorrect temperatures. By using a thermometer, you ensure accurate baking heat. This helps your scones rise perfectly. Double chocolate chip scones shine when served warm. Add a dollop of clotted cream for richness. A drizzle of chocolate ganache can elevate them further. Both make the scones feel extra special. Pair your scones with tea or coffee. This classic combo is a delightful treat. For a beautiful presentation, arrange the scones on a fancy plate. Sprinkle some extra chocolate chips on top for a tempting look. {{image_2}} You can easily change the flavor of your double chocolate chip scones. Try adding nuts like walnuts or pecans for a crunch. You can also use different types of chocolate chips. Semi-sweet, dark, or even white chocolate can make a big difference. Another fun idea is to mix in flavored extracts. A dash of mint extract gives a fresh twist. Or, use almond extract for a warm, nutty flavor. Just remember to keep the amount small so it doesn’t overpower the chocolate. If you follow a gluten-free diet, you can swap the all-purpose flour with gluten-free flour blends. Many brands work well in scone recipes. Just make sure the blend contains a binding agent like xanthan gum for the best texture. For vegan options, replace the butter with coconut oil or a vegan butter substitute. You can also use a plant-based milk in place of heavy cream. Almond or oat milk works great in this recipe. Scones don't have to be just wedges. You can shape them into circles or triangles for a fun look. If you want mini scones, just make smaller rounds and cut them into smaller wedges. Drop scones are another option. Instead of shaping the dough, you can scoop it onto the baking sheet. This makes for a casual, rustic look. Plus, they bake up just as yummy! To keep your double chocolate chip scones fresh, store them at room temperature. Place them in an airtight container. This method keeps them soft and tasty for up to two days. If you want to keep them longer, refrigeration is a good option. Wrap each scone in plastic wrap and place them in a bag. They can stay fresh for about a week in the fridge. For even longer storage, freeze your scones. Place them in a freezer-safe bag or container. You can keep them frozen for up to three months. To enjoy your scones warm, reheating is key. For the best taste, preheat your oven to 350°F (175°C). Place the scones on a baking sheet. Heat them for about 5 to 10 minutes. This method revives their soft texture and rich flavor. You can also use a microwave if you're in a hurry. Heat each scone for 15 to 20 seconds. However, this can make them a bit chewy compared to the oven method. When stored correctly, double chocolate chip scones last about two days at room temperature. In the fridge, they stay fresh for up to a week. If you freeze them, they can last for three months. Always check for any signs of spoilage before enjoying. You can use several options if you need a heavy cream substitute. Almond milk or coconut milk works well for a dairy-free version. You can also use full-fat coconut cream for a rich taste. If you want a lower-fat option, try using milk mixed with a bit of butter. This will give you some creaminess without all the fat. Yes, you can prepare the dough ahead of time. Just mix the dry and wet ingredients as usual. Shape the dough into a circle, then cut it into wedges. Wrap the wedges in plastic wrap and freeze them. When you want fresh scones, bake them straight from the freezer. Just add a couple of extra minutes to the baking time. Dry scones often come from overmixing the dough. Mix just until combined; some lumps are okay. Also, make sure your butter is cold. This helps the scones stay flaky. Lastly, check your oven temperature. If it’s too high, scones can dry out quickly. Scones and biscuits are similar but have key differences. Scones often use cream or milk, making them richer. They are sweeter and denser than biscuits. Biscuits are lighter and fluffier, often served with savory dishes. The texture and ingredients set them apart, giving each a unique taste. You learned how to make double chocolate chip scones with simple steps and tasty ingredients. We covered mixing dry and wet components, shaping the dough, and baking to perfection. I shared tips for the best texture and serving ideas. You also found ways to adjust the recipe for different diets and storage methods. Now, you can enjoy delicious scones at home. Try these recipes and make them your own for any occasion or just a treat for yourself.

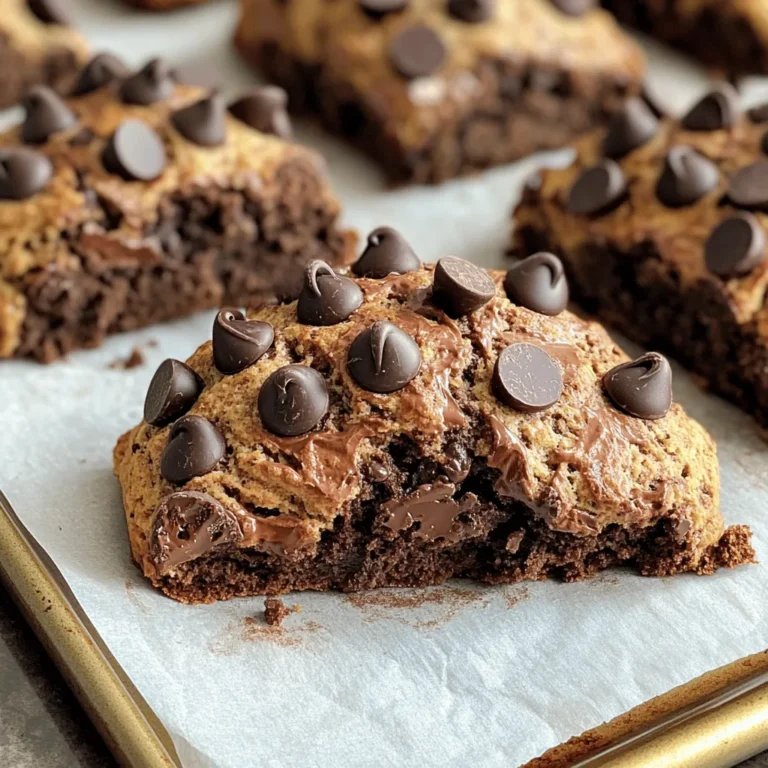
Delicious Double Chocolate Chip Scones Irresistible Treat

PREV 1 … 20 21 22 … 57 NEXT
secrets pice kitchen

explore

DessertsDinnerAppetizersDrinks

Our Policies

  • Cookie Policy
  • Copyright Policy
  • Disclaimer
  • GDPR Policy
  • Terms Of Use
Back to Top
  • About
  • Contact Us
  • Privacy Policy
© 2025 secrets pice kitchen