FREE DINNER EBOOK! Get your copy!
  • Cookie Policy
  • GDPR Policy
  • Disclaimer
  • Terms Of Use
  • Visit my other site: Fun Cookie Recipes
secrets pice kitchen
  • Home
  • Dinner
  • Desserts
  • Drinks
  • Appetizers
  • Contact
  • About
  • Privacy Policy
  • Home
  • Dinner
  • Desserts
  • Drinks
  • Appetizers
  • Contact
  • About
  • Privacy Policy
  • Cookie Policy
  • GDPR Policy
  • Disclaimer
  • Terms Of Use
Visit my other site: Fun Cookie Recipes

HOME / CATEGORIES /

Latest

- 1 lb large shrimp, peeled and deveined - 1 cup shredded coconut (sweetened or unsweetened, as preferred) - 1 cup panko breadcrumbs - 1 teaspoon garlic powder - 1 teaspoon paprika - 1/2 teaspoon salt - 1/2 teaspoon black pepper - 1/4 teaspoon cayenne pepper (optional, for heat) - 1/2 cup all-purpose flour - 2 large eggs - Optional heat element (cayenne pepper) You need fresh, large shrimp for this recipe. They should be peeled and deveined for the best taste and texture. The shrimp will provide a great base for flavor. Shredded coconut adds a nice crunch and sweetness. You can choose sweetened or unsweetened coconut based on your taste. Panko breadcrumbs are key for that crispy texture. They help the shrimp bite stay light and airy. Next, we have the seasonings. Garlic powder and paprika give depth to the flavor. The salt and black pepper enhance the shrimp taste. If you want a kick, add cayenne pepper. It brings that extra heat, but it’s not a must. For coating, all-purpose flour helps the shrimp stick to the egg and then to the breading. The eggs create a wet layer. It’s important for binding everything together. Remember, this is all about layers for that perfect crunch! Preheating your air fryer is key. It helps the shrimp cook evenly. Set it to 400°F (200°C) for about 5 minutes. This ensures a crispy finish. You need three shallow bowls for the breading. - In the first bowl, mix: - 1/2 cup all-purpose flour - 1 teaspoon garlic powder - 1 teaspoon paprika - 1/2 teaspoon salt - 1/2 teaspoon black pepper - 1/4 teaspoon cayenne pepper (optional) - In the second bowl, beat 2 large eggs. - In the third bowl, combine: - 1 cup shredded coconut - 1 cup panko breadcrumbs Mix these well so they are ready for the shrimp. Coating shrimp is simple. 1. Take a shrimp and dip it in the flour mixture. 2. Shake off any extra flour. 3. Next, dip it into the beaten eggs. 4. Finally, coat it in the coconut-panko mix. Press lightly so it sticks. Repeat this for all the shrimp. Make sure each one is fully covered for the best crunch. Now, it’s time to cook! - First, spray the air fryer basket with cooking spray to keep the shrimp from sticking. - Arrange the breaded shrimp in a single layer. Don’t overcrowd them; this helps them cook evenly. You may need to do this in batches. Air fry the shrimp at 400°F (200°C) for 8-10 minutes. Flip them halfway through for even cooking. They should be golden brown and crispy when done. Serving these shrimp bites is fun! - Pair them with dipping sauces like sweet chili or tangy lime aioli. - For a nice touch, serve on a plate with fresh herbs or lime wedges around them. This adds color and flavor. Enjoy! To get that perfect crunchy bite, use spray oil. A light coat helps the coating crisp up. The air fryer needs to be set at 400°F (200°C). This temperature cooks the shrimp evenly and makes them golden brown. Cook for about 8-10 minutes. Flip halfway for a nice, even crust. Do not overcrowd the air fryer basket. Giving each shrimp space allows hot air to flow around them. This helps to cook them evenly. Flip the shrimp halfway through cooking. This ensures both sides get that beautiful golden color. Feel free to adjust the seasonings. Add more garlic powder or cayenne for a kick. You can also swap shrimp for chicken or tofu. This gives you more options and flavors. Experiment with different proteins for your own twist. {{image_2}} You can switch up the breading for your shrimp. Regular breadcrumbs work well if you want a classic crunch. Just swap the panko for standard breadcrumbs. They may not be as light, but they still taste great. If you need a gluten-free option, try using gluten-free breadcrumbs. Many brands offer these, and they work just as well. You won't lose that crispy texture! Adding herbs or spices can elevate your shrimp bites. Try mixing in some dried parsley or cilantro for a fresh kick. You can also add spices like cumin or chili powder for a bolder taste. If you want something sweet, consider using a hint of cinnamon or a drizzle of honey. This can balance the coconut's flavor nicely. Just make sure you keep your flavors in harmony. Air frying is a fantastic way to cook these shrimp bites. It gives them a crispy finish without deep frying. But you can also bake them in the oven. Set your oven to 400°F (200°C) and bake for about 12-15 minutes, flipping halfway through. If you don't have an air fryer or oven, you can use a stovetop skillet. Just add some oil and cook on medium heat until they are golden brown. Each method has its charm, so feel free to experiment! To keep your crispy coconut shrimp bites fresh, place them in the fridge. Use airtight containers for best results. Make sure the shrimp cool completely before sealing. This helps avoid moisture buildup which can make them soggy. Reheating is easy and can keep your shrimp crispy. The best method is using the air fryer. Preheat the air fryer to 350°F (175°C). Place the shrimp inside for about 5-7 minutes. Check them often to ensure they don’t overcook. This method keeps them crunchy and delicious. If you want to save some shrimp for later, freezing is a great choice. First, let the shrimp cool fully. Then, place them in a freezer-safe bag. Remove as much air as possible before sealing. To reheat, thaw the shrimp in the fridge overnight. Once thawed, follow the reheating instructions above to enjoy them again. Yes, you can use frozen shrimp. Just remember to thaw them first. Thawing shrimp takes about 12 to 24 hours in the fridge. If you need them fast, place them in a bowl of cold water for about 15-20 minutes. Once thawed, pat them dry with paper towels. This step helps the coating stick better. To add some heat, try these tips: - Mix in extra cayenne pepper with the flour. - Add hot sauce to the beaten eggs. - Serve with a spicy dipping sauce. These choices will bring a nice kick to your shrimp bites. These shrimp bites pair well with many sides: - Sweet chili sauce for dipping. - A fresh salad with lime dressing. - Steamed rice or quinoa for a filling meal. - Tropical fruit salsa for a fruity touch. These options complement the flavors of the shrimp nicely. Leftovers will stay good for about 2-3 days in the fridge. Store them in an airtight container to keep them fresh. Reheat them in the air fryer for about 4-5 minutes at 350°F (175°C). This method helps them stay crispy. Always check for any off smells before eating leftovers. In this post, we explored how to make crispy air fryer coconut shrimp. We covered key ingredients and step-by-step instructions. I shared tips for perfecting texture and even cooking. You can customize your shrimp easily and keep leftovers fresh. Remember to try different seasonings and cooking methods. Experimenting can bring you new flavors. Enjoy your delicious shrimp bites, and don’t hesitate to share your results with friends!

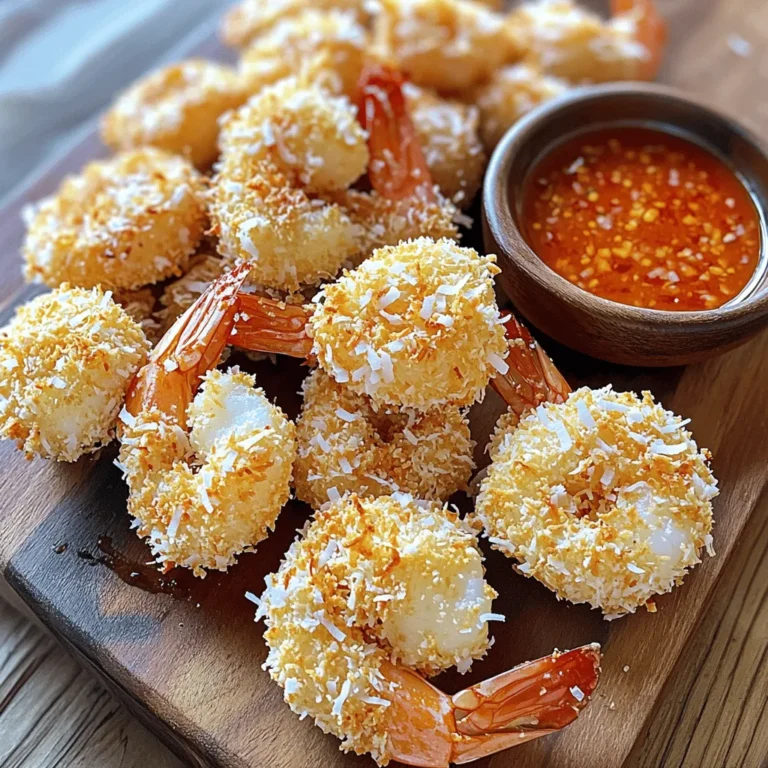
Air Fryer Crispy Coconut Shrimp Bites Delightful Treat

To make a tasty Cheesy Zucchini Bake, gather these key ingredients: - 4 medium zucchinis, sliced into rounds - 1 cup grated zucchini (from 1 medium zucchini) - 1 cup shredded mozzarella cheese - 1/2 cup grated Parmesan cheese - 1/2 cup breadcrumbs (preferably whole wheat) - 2 cloves garlic, minced - 1 large egg - 1/4 cup fresh basil, chopped - 1 teaspoon dried oregano - Salt and pepper to taste - Olive oil for drizzling These ingredients create a rich and cheesy dish. The zucchini gives it a fresh taste, while the cheeses add creamy goodness. You can enhance the flavor of your Cheesy Zucchini Bake with these optional extras: - Red pepper flakes for heat - Lemon zest for a citrus twist - Additional herbs like thyme or parsley Adding these can give your dish a unique flair. Feel free to mix and match based on your taste. If you need to swap some ingredients, here are some ideas: - Use feta cheese instead of Parmesan for a tangy flavor. - Substitute almond flour for breadcrumbs to make it gluten-free. - Replace fresh basil with dried basil if fresh is not available. These substitutions can still give you a tasty result. Don't worry if you can't find something; creativity in the kitchen often leads to delicious surprises! {{ingredient_image_1}} First, set your oven to 375°F (190°C). Grab a baking dish and coat it with some olive oil. Next, take four medium zucchinis. Slice them into rounds. Put the rounds into a mixing bowl. Add minced garlic, salt, pepper, and dried oregano. Toss everything well to coat the zucchini evenly. In another bowl, take one grated zucchini, shredded mozzarella, grated Parmesan, breadcrumbs, one egg, and chopped fresh basil. Mix these until combined. This mixture will make your cheesy filling. Now, it’s time to layer our bake. Start by placing half of the sliced zucchinis on the bottom of your greased baking dish. Spread half of the cheesy mixture over this zucchini layer. Make sure to cover it well. Then, repeat this step. Add the rest of the sliced zucchinis on top and finish with the remaining cheesy mixture. Drizzle a bit of olive oil over the top for extra flavor. Place your dish in the oven and bake it for 30 to 35 minutes. You’ll know it’s ready when the top is golden brown and the cheese is bubbly. Once done, take it out and let it cool for a few minutes. This cooling time helps the layers set. Finally, slice and serve your Cheesy Zucchini Bake warm. Enjoy this colorful dish as a side or a main course! When picking zucchini, look for firm and smooth skin. The color should be deep green. Avoid any with soft spots or blemishes. Smaller zucchinis are often sweeter and more tender. Aim for zucchinis that are about six to eight inches long. They will slice well and cook evenly in the bake. To get that gooey, melty cheese, use freshly shredded mozzarella. Pre-shredded cheese has additives that can prevent melting well. Mix mozzarella with grated Parmesan for a great flavor combination. Adding a bit of olive oil helps the cheese melt beautifully. Sprinkle some cheese on top during the last few minutes for a nice golden finish. Spices bring life to your Cheesy Zucchini Bake. Fresh basil adds a lovely aromatic touch. Dried oregano gives a warm, earthy flavor. A pinch of red pepper flakes can add a kick if you like heat. Don’t forget to season with salt and pepper. These simple steps will make each bite burst with flavor. Pro Tips Use Fresh Zucchini: For the best flavor and texture, choose firm, fresh zucchinis. Avoid those with soft spots or blemishes. Adjust Cheese to Taste: Feel free to mix different types of cheese, such as cheddar or gouda, for a unique flavor profile. Breadcrumb Alternatives: If you want a gluten-free option, substitute breadcrumbs with crushed nuts or gluten-free breadcrumbs. Let it Rest: Allow the bake to cool for a few minutes before slicing. This helps it set and makes serving easier. {{image_2}} You can add proteins to your cheesy zucchini bake for extra flavor and nutrition. Cooked chicken or sausage works well. Just chop them into small pieces. Mix them into the cheese layer before spreading it over the zucchini. This adds heartiness to the dish. It makes it more filling, perfect for a main course. Feel free to mix in other veggies to change the taste. Bell peppers, mushrooms, or spinach can be great choices. Chop these vegetables into small pieces. Toss them in with the sliced zucchini and garlic. This not only adds color but also boosts nutrition. You can create a veggie medley that fits your taste. To make this dish gluten-free, substitute breadcrumbs with gluten-free options. You can use ground almonds or crushed gluten-free crackers instead. These will still give you that crispy top. Just make sure to check labels for hidden gluten. This way, everyone can enjoy your cheesy zucchini bake without worry. Store your Cheesy Zucchini Bake in an airtight container. Let it cool first. Place it in the fridge for up to three days. Make sure to cover it well to keep it fresh. If you want to keep it longer, freezing is a great option. To reheat, preheat your oven to 350°F (175°C). Place the leftover bake in a baking dish. Cover it with foil to keep the moisture in. Heat for about 15-20 minutes, or until it’s warm all the way through. You can also use the microwave. Heat in short bursts, checking often to avoid overcooking. To freeze, let the bake cool completely first. Cut it into portions for easy serving. Wrap each piece in plastic wrap, then place them in a freezer bag. Be sure to remove as much air as possible. It can last for about two months in the freezer. When ready to eat, thaw it overnight in the fridge before reheating. Yes, you can make Cheesy Zucchini Bake ahead of time. Prepare the dish up to the baking step. Cover it and store it in the fridge for up to 24 hours. When ready to bake, just pop it in the oven. This makes it great for busy days or gatherings. Absolutely! Cheesy Zucchini Bake is perfect for meal prep. It holds well in the fridge and reheats nicely. You can portion it into containers for easy lunches or dinners. This dish stays tasty for about 3-4 days when stored properly. You can serve Cheesy Zucchini Bake with many sides. It pairs well with a fresh salad or crusty bread. You can also enjoy it with grilled chicken or fish for a full meal. The flavors mix well and make for a delightful dining experience. The Cheesy Zucchini Bake is easy and tasty. We covered key ingredients, step-by-step prep, and helpful tips. I’ve shared variations for proteins and veggies, plus how to store leftovers. Remember, fresh zucchini makes a big difference. You can also add your favorite spices for extra flavor. Feel free to experiment and adapt the recipe to your taste. Enjoy your dish and impress everyone at the table!

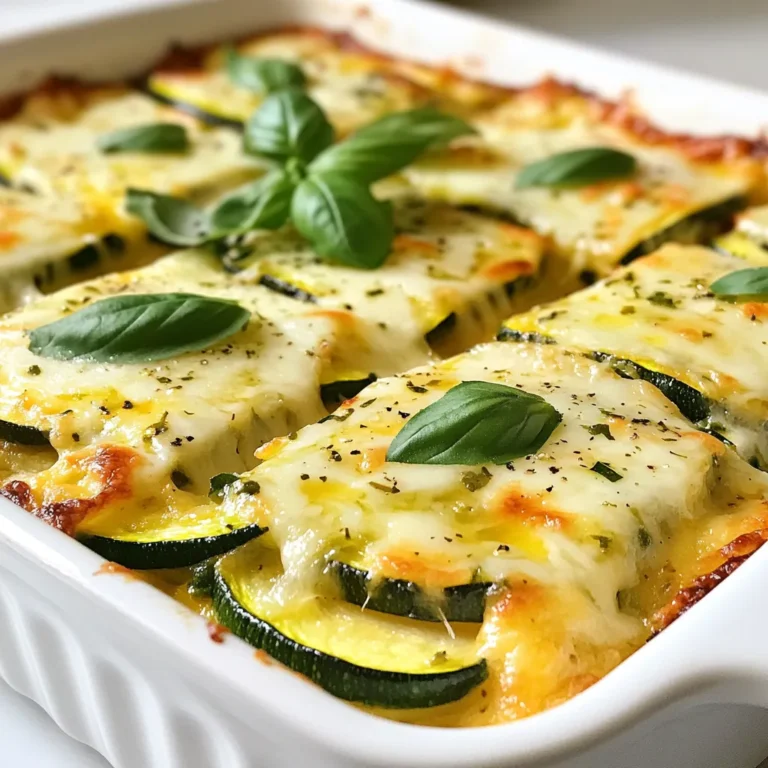
Cheesy Zucchini Bake Flavorful and Easy Recipe

- 3 1/2 cups all-purpose flour - 1/4 cup granulated sugar - 2 1/4 teaspoons instant yeast - 1 teaspoon salt - 1/2 cup whole milk, warmed - 1/4 cup unsalted butter, melted - 2 large eggs The dough is the base of our sticky buns. Start with all-purpose flour. It gives the best texture. Granulated sugar adds sweetness and helps with browning. Instant yeast makes the dough rise quickly. The salt enhances flavor. Warmed whole milk helps activate the yeast. Melted unsalted butter adds richness. Finally, eggs provide structure and flavor. - 1/2 cup packed brown sugar - 1 tablespoon ground cinnamon - 1/4 cup unsalted butter, softened - 1 cup pecans, chopped The filling is where the magic happens. Packed brown sugar gives that deep flavor. Cinnamon adds warmth and spice. Softened butter helps spread the filling easily. Chopped pecans add crunch and nutty goodness. - 1/2 cup unsalted butter - 1 cup brown sugar - 1/4 cup heavy cream - 1/2 teaspoon vanilla extract - 1/4 teaspoon salt Brown butter caramel is the star of this recipe. Start with unsalted butter. We’ll brown it for depth. Brown sugar creates a rich sweetness. Heavy cream adds creaminess and smoothness. Vanilla extract enhances the flavor, while salt balances the sweetness. This caramel is what makes these sticky buns truly special. - In a large bowl, combine 3 1/2 cups of flour, 1/4 cup of sugar, 2 1/4 teaspoons of yeast, and 1 teaspoon of salt. This mix forms the base of your dough. - In another bowl, mix 1/2 cup of warmed milk, 1/4 cup of melted butter, and 2 large eggs. This adds moisture and richness. - Pour the wet mix into the dry mix. Stir until a sticky dough forms. - Transfer the sticky dough onto a floured surface. Knead it for about 5-7 minutes. You want it smooth and elastic. - Place the kneaded dough in a greased bowl. Cover it with a towel. Let it rise in a warm spot for about 1 hour or until it doubles in size. - In a small bowl, mix 1/2 cup of brown sugar and 1 tablespoon of ground cinnamon together. This blend adds flavor to your rolls. - Set this filling aside for later use. - After the dough has risen, punch it down. Roll it out into a rectangle, about 15x10 inches, on a floured surface. - Spread 1/4 cup of softened butter over the dough. Then, sprinkle the cinnamon sugar mix evenly on top. Add 1 cup of chopped pecans across the surface. - Starting from the long edge, tightly roll the dough into a log. - Cut the log into 12 equal pieces. Place these in a greased 9x13-inch baking dish. - In a saucepan, melt 1/2 cup of unsalted butter over medium heat. Stir constantly until it starts to brown, about 3-5 minutes. - Remove from heat and mix in 1 cup of brown sugar, 1/4 cup of heavy cream, 1/2 teaspoon of vanilla extract, and 1/4 teaspoon of salt. Stir until smooth. - Pour this caramel mixture over the rolls in the baking dish. - Cover the dish with a towel. Let the rolls rise again for about 30 minutes, until they are puffy. - Preheat the oven to 350°F (175°C). Bake the rolls for 25-30 minutes or until they are golden brown and bubbly. - Allow the buns to cool in the pan for 10 minutes. - Invert the rolls onto a serving platter. Serve them warm, drizzled with any extra caramel from the pan. Measuring ingredients is key. Use a kitchen scale for accuracy. Too much flour makes the dough dry. Too little can lead to a sticky mess. Always level your flour when measuring. The ideal room temperature for rising is around 75°F. This warmth helps yeast grow. If your kitchen is cold, find a warm spot. An oven with the light on works well. Perfect browning of brown butter is crucial. Watch for a nutty smell and a golden color. Stir constantly to avoid burning. If you see dark flecks, that might be burnt butter. Adjusting sweetness is easy. If you want a less sweet caramel, reduce the brown sugar slightly. You can also add a pinch more salt to balance flavors. Over-kneading the dough can make it tough. Knead just until smooth and elastic. This takes about 5-7 minutes. Incorrect oven temperature is another pitfall. An oven that is too hot will burn the tops. Always preheat and use an oven thermometer for accuracy. {{image_2}} If you want to skip nuts, that's fine! You can fill your buns with chocolate chips instead. They add a sweet touch and melt beautifully. Another option is to use dried fruits, like raisins or cranberries. They provide a nice chew and a burst of flavor. Want to make these sticky buns even better? Try adding chocolate chips to the filling. They melt and mix well with the caramel. You can also sprinkle in extra spices, like nutmeg or cardamom. These spices give a warm, cozy flavor that pairs perfectly with caramel. If you need a gluten-free version, use a blend of gluten-free flour. Look for one made for baking. A mix of almond flour and coconut flour can work well too. Just remember to add a binding agent, like xanthan gum, to help the dough hold together. To keep your sticky buns fresh, use airtight containers. Glass or plastic containers work well. Make sure the buns are completely cool before sealing them. This helps avoid sogginess. Refrigeration Tips: - Store leftover buns in the fridge. - They can last up to 5 days. - Wrap them in plastic wrap for extra protection. Freezing Tips: - You can freeze these buns too! - Place them in a freezer-safe bag. - They can last up to 3 months. - Thaw in the fridge before reheating. To enjoy your sticky buns warm again, use these methods: Oven Method: - Preheat your oven to 350°F (175°C). - Place the buns on a baking sheet. - Cover with foil to keep them moist. - Heat for about 10-15 minutes. Microwave Method: - Place a bun on a microwave-safe plate. - Cover it with a damp paper towel. - Heat for about 20-30 seconds. - Check if it’s warm enough; add more time if needed. These methods keep your sticky buns tasty and fresh, just like the first day! Your dough is ready when it has doubled in size. You can poke it gently with your finger. If it springs back slowly, it’s good to go. If it springs back quickly, it needs more time. Look for a smooth and puffy texture. This shows the yeast has worked well. Yes, you can make these sticky buns ahead of time! Prepare the dough and fill it. Then, cover it and place it in the fridge overnight. In the morning, let it come to room temp, then bake. You can also freeze the unbaked rolls. Just thaw them before baking. If you want a nut-free option, try sunflower seeds or pumpkin seeds. You can also use walnuts for a different taste. If you prefer a similar flavor, consider adding toffee bits or chocolate chips. They add sweetness and crunch, just like pecans. To keep your buns moist, avoid over-baking. Check them a few minutes early. Cover the rolls with foil if they start to brown too fast. Also, adding a bit of cream to the caramel can help keep the buns soft. Enjoy the gooey, tender texture! You now have all the tools to make delicious sticky buns at home. We covered each ingredient, from the dough to the rich caramel. You learned step-by-step how to knead, roll, and bake these treats to perfection. Plus, I shared tips to avoid common mistakes and some fun variations to try. Baking should be fun and rewarding, so don’t stress about every detail. Enjoy the process, experiment, and share your tasty results with friends!

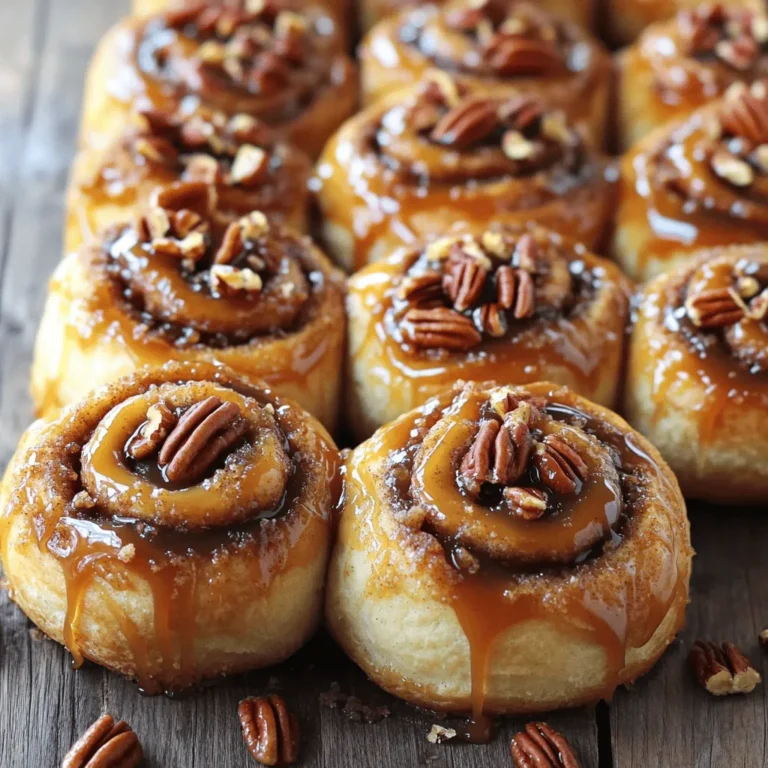
Brown Butter Caramel Pecan Sticky Buns Delight

For the Berry Cheesecake Smoothie, you need fresh and tasty items. Here’s the list: - 1 cup mixed berries (strawberries, blueberries, raspberries) - 1 frozen banana - ½ cup Greek yogurt (plain or vanilla) - 1 scoop vanilla protein powder - 1 tablespoon softened cream cheese - 1 tablespoon honey or maple syrup (optional) - ½ cup almond milk (or any milk of your choice) - ¼ teaspoon vanilla extract - A pinch of cinnamon (optional) Each ingredient plays a role. The mixed berries give a fruity flavor. A frozen banana adds sweetness and creaminess. Greek yogurt packs in protein. The protein powder boosts the smoothie, making it filling. Cream cheese brings that cheesecake taste. Honey or maple syrup is for those who like it sweeter. Almond milk makes it smooth and easy to drink. A touch of vanilla extract enhances the flavors, while cinnamon can add warmth. Using fresh or frozen berries is fine. Frozen berries make the drink colder and thicker. Fresh berries work well too, just adjust the ice. This mix creates a tasty, energizing drink. Each sip brings flavor and nutrition. You can customize the sweetness to your liking. Enjoy blending! - Wash and dry mixed berries: Start by rinsing your mixed berries under cold water. Pat them dry gently with a clean towel. This step is key for freshness. - Combine all ingredients in a blender: Next, toss the washed berries into your blender. Add in the frozen banana, Greek yogurt, protein powder, and softened cream cheese. Don’t forget the almond milk, vanilla extract, and cinnamon if you like. - Blend until smooth and creamy: Blend everything on high speed. Stop to scrape down the sides if needed. Keep blending until the mixture is completely smooth and creamy. - Adjust thickness and sweetness as needed: If it’s too thick for your liking, add more almond milk a little at a time. Taste your smoothie. If you want it sweeter, add a bit more honey or maple syrup and blend again. - Serve and garnish: Pour the smoothie into your favorite glasses. For a fun touch, top with a few whole berries or a sprinkle of graham cracker crumbs. This gives that cheesecake vibe. To boost the taste of your berry cheesecake smoothie, consider adding more fruits. Bananas add creaminess, while mangoes offer sweetness. You can also mix in spinach for extra nutrition without changing the flavor. For protein powder, I recommend brands like Optimum Nutrition or Garden of Life. They blend well and taste great. Achieving the perfect consistency is key. If your smoothie is too thick, add more almond milk. If it’s too thin, blend in a few more berries or a bit of yogurt. Always taste as you go. Adjust sweetness with honey or maple syrup based on your preference. The best blenders for smoothies are high-speed models. Brands like Vitamix or Ninja work wonders. They blend fruits into a smooth, creamy texture. If you want a budget option, consider a NutriBullet. It’s powerful and compact. Measuring tools also matter. Use a kitchen scale for precise ingredient amounts. A set of measuring cups and spoons helps you get the right quantities every time. These tools make your smoothie-making process smooth and easy. {{image_2}} Greek yogurt and protein powder pack a punch. Greek yogurt is rich in protein and calcium. It helps build muscle and keeps you full. Protein powder adds even more protein to your smoothie. This boost aids recovery after workouts. Berries are small but mighty. They are full of vitamins, fiber, and antioxidants. Strawberries, blueberries, and raspberries help your body fight off disease. Plus, they add natural sweetness without extra sugar. A serving of this smoothie has about 250 calories. This is perfect for a snack or meal replacement. Here’s a breakdown of the macros per serving: - Protein: 20g - Carbs: 30g - Fats: 6g These numbers make the Berry Cheesecake Smoothie a balanced choice. You get protein, healthy carbs, and just enough fat. It fuels your day while tasting great! You can easily swap Greek yogurt for other options. Consider using silken tofu for a vegan twist. Cottage cheese is also a great choice if you want a creamier texture. You can try using plant-based yogurt if you prefer dairy-free options. Sweeteners can change the taste too. If honey or maple syrup isn’t your thing, try agave syrup or stevia. These alternatives offer a low-calorie option, which keeps the sweetness you love. Want to add some spice? A pinch of nutmeg or ginger can make your smoothie pop. You can also try adding a splash of almond extract for a nutty flavor. If you like a little heat, a dash of cayenne can surprise your taste buds. Adding greens can boost nutrition. Spinach or kale blends well and offers extra vitamins. You won’t taste them, but your body will love the added nutrients. Just a handful will make a big difference without altering the taste. Yes, you can use fresh berries. Fresh berries will give a light texture. If you want a colder drink, add ice. Frozen berries make the smoothie thicker and creamier. To make it dairy-free, swap Greek yogurt for a dairy-free yogurt. You can use almond, coconut, or soy yogurt. Also, choose a dairy-free protein powder. This keeps the taste while removing dairy. The best times to drink a protein smoothie are in the morning or post-workout. In the morning, it fuels your day. After workouts, it aids muscle recovery. Yes, you can prepare it ahead of time. Blend all ingredients and store it in the fridge. Use it within 24 hours for the best taste. Shake or stir before drinking for freshness. This blog post showed you how to make a tasty protein smoothie. We covered the ingredients, step-by-step instructions, and helpful tips for flavor and nutrition. You learned about variations and common questions, too. Now you can blend your own smoothie for a great snack or meal. Enjoy the benefits of healthy protein and delicious flavors. Try different fruits and swaps to make it your own. Making smoothies can be fun and full of health!

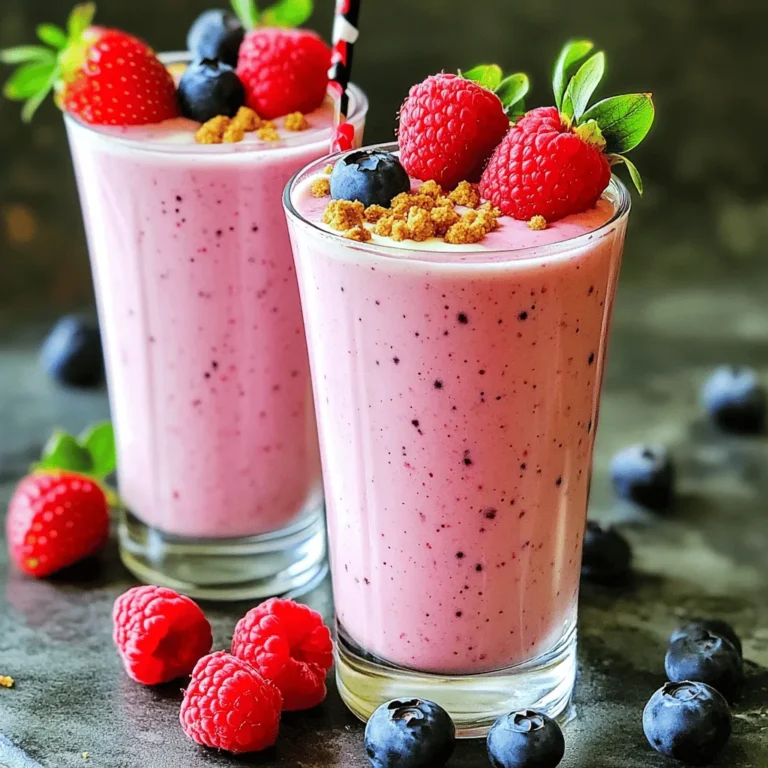
Berry Cheesecake Smoothie High Protein Energizing Drink

- 12 oz pasta (penne or fusilli) - 4 cups fresh spinach, chopped - 1 cup ricotta cheese - 1 cup heavy cream - 1 cup vegetable broth - 1 onion, finely chopped - 3 cloves garlic, minced - 1 tablespoon olive oil - 1 teaspoon Italian seasoning - Salt and pepper to taste - 1/2 cup grated Parmesan cheese (plus extra for serving) - Fresh basil leaves for garnish Gather these ingredients before you start. The fresh spinach and creamy ricotta bring a great taste. Use penne or fusilli pasta; both work well in this dish. The heavy cream makes it rich and smooth. Chop the onion finely and mince the garlic. This helps them mix well in the pot. The vegetable broth adds flavor while cooking the pasta. Don't forget the Italian seasoning for that extra kick. Parmesan cheese adds saltiness and depth. You can sprinkle more on top when serving. Lastly, the fresh basil leaves give a nice touch. They add color and a fresh taste. With these simple ingredients, you're ready to make a delicious meal. - Heat 1 tablespoon of olive oil in a large pot on medium heat. - Add 1 finely chopped onion and sauté until translucent, about 3-4 minutes. - Add 3 minced garlic cloves for flavor and sauté for 1-2 minutes. - Pour in 1 cup of vegetable broth and bring it to a gentle simmer. - Add 12 oz of uncooked pasta to the simmering broth. - Stir occasionally to prevent sticking. - Cook according to package instructions, usually about 8-10 minutes. - Once the pasta is cooked, reduce heat to low. - Stir in 1 cup of heavy cream, 1 cup of ricotta, and 4 cups of chopped spinach. - Season with salt, pepper, and 1/2 cup of grated Parmesan cheese. - Mix until the spinach wilts and the sauce is creamy. - Serve in bowls, garnished with extra Parmesan and fresh basil leaves. - How to prevent pasta from sticking To stop pasta from sticking, stir it often while cooking. Make sure the pasta is fully submerged in the liquid. Adding a splash of olive oil can also help. Just a little goes a long way! - Choosing the right pasta for creaminess For a creamy dish, I suggest using penne or fusilli. Their shapes hold onto the sauce well. They make each bite rich and tasty. - Alternatives for ricotta or heavy cream If you want lighter options, cottage cheese works well instead of ricotta. For heavy cream, use half-and-half or plain yogurt. They still give you that creamy texture. - Vegan options for a dairy-free dish To make this dish vegan, use tofu blended until smooth in place of ricotta. Coconut cream can replace heavy cream for a rich flavor. Both options taste wonderful! - Adding spices or herbs To boost flavor, try adding red pepper flakes for a kick. Fresh herbs like thyme or parsley can brighten the dish. Experiment with what you love! - Using fresh ingredients for the best taste Fresh spinach is key for this recipe. It wilts perfectly and adds great taste. Always choose the freshest ingredients you can find for the best results. {{image_2}} You can make this dish heartier by adding cooked chicken or shrimp. Simply cook the protein first, then mix it in during the final steps. This way, the flavors blend well. If you prefer plant-based options, chickpeas or lentils work great. They add protein without meat. Want to mix it up? Incorporate other veggies like peas or bell peppers. They add color and crunch. You can also use seasonal vegetables for fresh variations. Think zucchini in summer or butternut squash in fall. The options are endless! Cheese changes the taste of your dish. Try using different cheeses like feta or goat cheese. These can add a unique flavor. You can also adjust the amount of Parmesan for richness. More cheese means creamier pasta, so find your perfect balance! To store creamy spinach ricotta pasta, let it cool first. Place it in an airtight container. This keeps it fresh and tasty. You can store it in the fridge for up to three days. After that, the quality may not be great. Always check for any off smells or changes in texture. When reheating, use a low heat. This helps keep the creaminess intact. You can use a stovetop or microwave. If using the stovetop, add a splash of water or broth to help it warm evenly. Stir often to prevent sticking. In the microwave, heat in short bursts. Stir between each burst for even warmth. Yes, you can freeze this creamy pasta! First, let it cool completely. Then, place it in a freezer-safe container. Make sure to leave some space for expansion. It can last in the freezer for up to two months. When ready to eat, thaw it overnight in the fridge. Reheat gently for the best results. Can I make this recipe gluten-free? Yes, you can! Use gluten-free pasta. Many brands offer great options. Just check that the type you choose cooks well in the sauce. What type of pasta works best? I find that penne and fusilli are perfect for this dish. Their shapes hold the creamy sauce nicely. You can also try farfalle or rotini if you like. How can I make this dish spicier? To add heat, stir in some red pepper flakes. You can also use spicy Italian sausage. Just cook it with the onion for extra flavor. Can I use frozen spinach instead of fresh? Yes, frozen spinach works well too! Just thaw and drain it before adding to the pot. It saves time and still tastes great. What goes well with creamy spinach ricotta pasta? This pasta pairs nicely with a fresh salad. A simple green salad with lemon vinaigrette is perfect. Garlic bread also makes a great side. Ideas for side dishes or drinks to pair with it For drinks, a crisp white wine complements the dish nicely. Sparkling water with lemon is refreshing too. Serve with roasted vegetables or a light soup for a full meal. This pasta dish combines rich flavors and fresh ingredients. You start with sautéing onion and garlic, then add broth and pasta. Stir in cream, ricotta, and spinach for a creamy finish. Remember, you can swap ingredients and add proteins or veggies to make it your own. Store leftovers properly and reheat carefully for the best taste. Enjoy getting creative with this recipe. Your kitchen can be a place for fun and tasty meals!

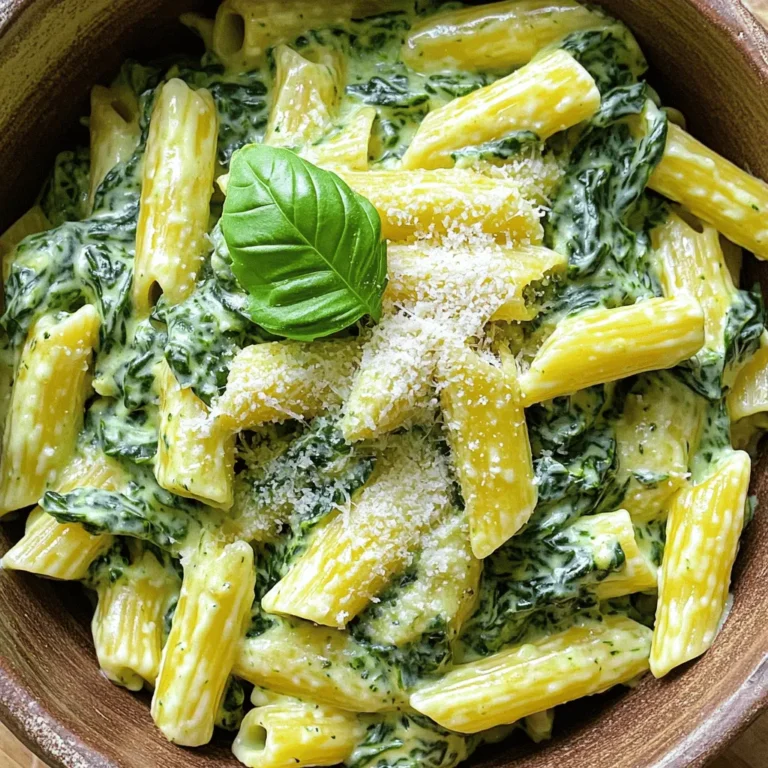
Creamy Spinach Ricotta Pasta One Pot Delight

- 1 lb flank steak, thinly sliced against the grain - 1/4 cup cornstarch - 2 tablespoons vegetable oil - 1 tablespoon sesame oil - 4 green onions, chopped (white and green parts separated) - 3 cloves garlic, minced - 1 teaspoon fresh ginger, grated - 1/4 cup soy sauce - 1/4 cup brown sugar - 1/2 teaspoon red pepper flakes (optional for heat) Gathering the right ingredients is key to making Mongolian beef that beats takeout. Flank steak is my go-to choice. It has the right amount of tenderness and flavor. Slicing it against the grain makes it even more tender. The cornstarch helps create a nice crust when you sear the beef. Next, the oils. I use vegetable oil for frying and sesame oil for that nutty flavor. The combination adds depth to each bite. The aromatics are also super important. Green onions, garlic, and ginger bring freshness and warmth. Now, let's talk sauce. Soy sauce gives a salty kick, while brown sugar adds sweetness. Don't forget the red pepper flakes if you want some heat. This balance of flavors is what makes your Mongolian beef truly pop! - Coating with cornstarch: Start by taking your thinly sliced flank steak. Place it in a medium bowl and add 1/4 cup of cornstarch. Toss the beef well until each piece is coated. This step helps create a crispy texture. - Rest time for adhesion: Let the beef sit for about 15 minutes. This resting time allows the cornstarch to stick to the meat. - Heating the oils: Grab a large skillet or wok. Heat 2 tablespoons of vegetable oil and 1 tablespoon of sesame oil over medium-high heat. Wait until the oil shimmers. This means it's hot enough to sear the beef. - Searing the beef: Add the coated beef to the skillet in a single layer. Don't overcrowd the pan. Cook each side for about 2-3 minutes until browned. Once done, take the beef out and set it aside. - Sautéing aromatics: In the same skillet, toss in the white parts of the chopped green onions, 3 minced garlic cloves, and 1 teaspoon of grated ginger. Stir-fry these for about 1 minute until they smell amazing. - Preparing the sauce: In a small bowl, mix together 1/4 cup of soy sauce, 1/4 cup of brown sugar, and 1/2 teaspoon of red pepper flakes if you like some heat. Pour this sauce mix into the skillet with the aromatics. Stir well to combine. - Combining beef with the sauce: Bring the sauce to a boil, then lower the heat. Add the cooked beef back into the skillet. Stir to coat the beef well with the sauce. - Thicken the sauce: Cook for an additional 2 minutes. This lets the sauce thicken slightly, making it rich and flavorful. Stir in the green parts of the green onions just before serving. Marinating beef is key. It helps the meat soak up flavors. I suggest a quick marinate with soy sauce and brown sugar. Even a short time boosts taste. Fresh ingredients matter too. Use crisp green onions, garlic, and ginger. They add brightness and depth to the dish. Heat your skillet well. A hot skillet gives that nice sear. I recommend medium-high heat. This locks in juices and flavor. Avoid overcrowding your pan. Cook in batches if needed. This way, each piece gets good color and cooks evenly. Garnish with sesame seeds for a nice crunch. It adds a lovely touch. You can serve it over rice or noodles. This makes for a filling meal. Place the beef in the center and sprinkle green onions on top. This looks great and tastes even better! {{image_2}} You can make your Mongolian beef even better by adding veggies. - Incorporating bell peppers: Slice some bell peppers into strips. Add them when you sauté the aromatics. They bring color and crunch. - Using broccoli or snap peas: Broccoli florets or snap peas add a nice bite. Toss them in just before you add the sauce. This keeps them bright and fresh. Want more heat? You can easily adjust the spice in your dish. - Adding more red pepper flakes: If you like it spicy, add more red pepper flakes. Start with an extra half teaspoon. Taste as you go. - Including chili paste: A tablespoon of chili paste gives a deeper heat. Mix it into the sauce for a bold flavor kick. You can switch up the protein for a new twist. - Using chicken or tofu: Chicken breast or thighs work great. Tofu is perfect for a vegetarian option. Just cook them the same way as the beef. - Beef cuts for different textures: Try sirloin or ribeye for a different texture. Each cut offers a unique taste and feel. To store your leftover Mongolian beef, let it cool first. Place it in an airtight container. This keeps the beef fresh and safe to eat. I recommend using glass or plastic containers. They help maintain the flavor and texture well. You can freeze Mongolian beef for later meals. First, let it cool completely. Then, place it in a freezer-safe bag or container. Make sure to remove as much air as possible. This helps prevent freezer burn. When you are ready to eat, thaw it in the fridge overnight. Reheat it in a skillet over medium heat. This keeps the beef juicy. In the fridge, Mongolian beef lasts about 3 to 4 days. Always check for any signs of spoilage before eating. When frozen, it can last up to 3 months. Just make sure to label your container or bag with the date. This way, you know how long it has been stored. Yes, you can prepare Mongolian beef in advance. Here are some tips for pre-cooking: - Cook the beef: Follow the recipe until step six. - Cool and store: Let the beef cool, then place it in an airtight container. - Refrigerate: Store the beef in the fridge for up to three days. - Reheat gently: Use low heat on the stove or microwave to warm it up. Mongolian beef pairs well with many sides. Here are some ideas: - Steamed rice: White or brown rice works well. - Noodles: Try egg noodles or rice noodles for a tasty option. - Vegetables: Serve with steamed broccoli or sautéed snap peas for color. - Salad: A light cucumber salad adds a refreshing touch. Mongolian beef is not very spicy. However, you can adjust the heat: - Red pepper flakes: Add more if you like it hot. - Chili paste: Mix in chili paste for a bolder kick. - Omit spice: Skip the red pepper flakes for a milder dish. Mongolian beef is easy to make and full of flavor. We covered key ingredients, like flank steak and fresh aromatics. I shared tips to enhance taste and cooking methods to get that perfect sear. You can even customize this dish with veggies or different proteins. With proper storage, your leftovers will stay fresh. Cooking this meal brings joy and warmth to your table. Enjoy creating this dish and tweaking it to your taste!

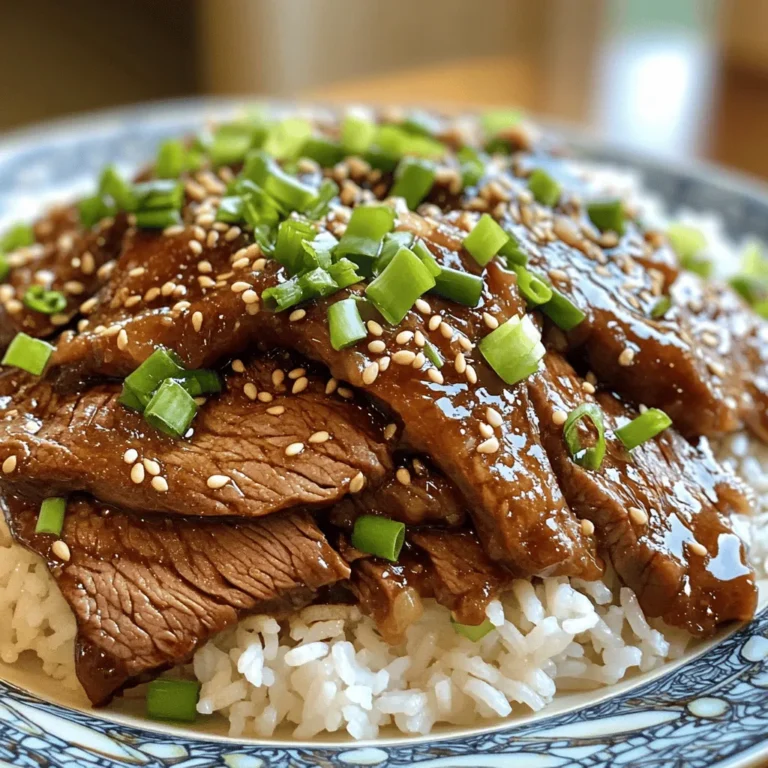
Mongolian Beef Better Than Takeout Flavor Explosion

To make a tasty Apple Fritter Loaf, you need these key ingredients: - 2 cups all-purpose flour - 1 cup granulated sugar - 1 tablespoon baking powder - 1 teaspoon ground cinnamon - ½ teaspoon salt - ½ cup unsalted butter, melted - 2 large eggs - 1 cup milk - 2 cups apples, peeled and diced (preferably Granny Smith) - ½ cup powdered sugar (for glaze) - 1 tablespoon milk (for glaze) - Extra cinnamon for sprinkling These ingredients come together to create a loaf that is moist, sweet, and full of apple flavor. The flour and sugar form the base, while the baking powder helps it rise. Cinnamon adds warmth and spice, complementing the apples perfectly. Use Granny Smith apples for a nice tartness that balances the sweetness of the loaf. The melted butter and eggs add richness, while milk keeps the batter moist. Finally, the glaze made from powdered sugar and milk gives it a sweet finish. Don't forget to sprinkle extra cinnamon for a lovely touch! 1. Preheat the Oven: Start by preheating your oven to 350°F (175°C). This step is key. It ensures your apple fritter loaf cooks evenly. 2. Prepare the Loaf Pan: Grease a 9x5-inch loaf pan. You can also line it with parchment paper. This will make it easy to remove the loaf later. 3. Mix Dry Ingredients: In a large bowl, combine the flour, granulated sugar, baking powder, ground cinnamon, and salt. Whisk these dry ingredients together well. This helps distribute the flavors evenly. 4. Combine Wet Ingredients: In another bowl, mix the melted butter, eggs, and milk. Whisk until the mixture is smooth. This creates a nice base for your batter. 5. Fold Ingredients Together: Gradually add the wet mixture to the dry ingredients. Mix gently until just combined. A few lumps are fine; avoid over-mixing. 6. Incorporate the Diced Apples: Gently fold in the diced apples. Make sure they are evenly mixed in the batter. This adds sweetness and texture to your loaf. 7. Transfer to Pan: Pour the batter into the prepared loaf pan. Smooth the top with a spatula for even baking. 8. Bake: Place the pan in the oven and bake for 50-60 minutes. Check doneness by inserting a toothpick into the center. It should come out clean. 9. Cool: After baking, let the loaf cool in the pan for 10 minutes. Then, transfer it to a wire rack to cool completely. This step prevents sogginess. To check if your Apple Fritter Loaf is done, use a toothpick. Insert the toothpick in the center of the loaf. If it comes out clean, your loaf is ready. If it has batter on it, bake longer. To avoid over-mixing, stir just until combined. A few lumps are fine. This keeps your loaf fluffy and light. For a lovely presentation, slice the loaf and place it on a rustic wooden board. Add some slices of fresh apple beside it. Sprinkle a bit of cinnamon around the loaf for a nice touch. Pair this loaf with a warm cup of coffee or your favorite tea. The flavors blend perfectly, making each bite a delight. {{image_2}} You can make your loaf even better by adding some nuts or raisins. Chopped walnuts or pecans add a nice crunch. Raisins bring sweetness and chewiness. Both options give the loaf a delightful texture. You can also change the spices for new flavors. Try nutmeg for warmth or ginger for a little kick. These spices make the loaf unique and fun to eat. If you want a healthier loaf, you can swap some ingredients. Use whole wheat flour instead of all-purpose flour. This adds fiber and nutrients. You can also cut back on sugar. Try using less sugar or a natural sweetener like honey or maple syrup. For gluten-free lovers, you can make a gluten-free loaf. Use a gluten-free flour blend in place of regular flour. Make sure it contains xanthan gum to help with texture. This way, everyone can enjoy this tasty treat! To keep your Apple Fritter Loaf fresh, store it in an airtight container. This helps prevent it from drying out. You can also wrap it tightly in plastic wrap. Place it in a cool, dry spot. This way, it will stay fresh for about three days. For longer storage, freezing is a great option. Wrap the loaf in plastic wrap, then in aluminum foil. This protects it from freezer burn. You can freeze it for up to three months. When you are ready to eat it, just thaw it in the fridge overnight. Reheating the loaf can bring back its fresh taste. You can use an oven or a microwave. If using the oven, preheat it to 350°F (175°C). Place the loaf on a baking sheet and heat for about 10-15 minutes. This keeps the crust nice and crispy. If you choose the microwave, slice the loaf first. Heat each slice for about 10-15 seconds. This method is quick but may not keep the texture as nice. You can drizzle a bit of glaze on top after reheating to refresh its flavor. Enjoy your tasty treat warm! The best apples for this recipe are Granny Smith apples. They are tart and firm. This tartness balances the sweet glaze well. You can also use Honeycrisp apples for a sweeter loaf. Mixing different types can add depth to the flavor. Yes, you can make this recipe ahead of time. I suggest baking the loaf and letting it cool. Wrap it tightly in plastic wrap or foil. Store it in the fridge for up to three days. This keeps it fresh and tasty. The loaf stays fresh for about three days at room temperature. After that, it may start to dry out. If you want it to last longer, store it in the fridge. You can also freeze it for up to three months. Just make sure it's well-wrapped. Yes, you can make this recipe dairy-free. Substitute the unsalted butter with coconut oil or a dairy-free butter. Replace the milk with almond milk or oat milk. This way, you can enjoy the loaf without any dairy products. You learned how to bake a delicious apple loaf from scratch. We covered the key ingredients needed and each step of the process clearly. I shared tips to help you avoid mistakes and make your loaf shine. You can easily customize the recipe to fit your taste, whether you prefer nuts or healthier options. Remember to store your leftovers properly to keep them fresh. Baking can be fun and rewarding, and I hope you enjoy your tasty creation!

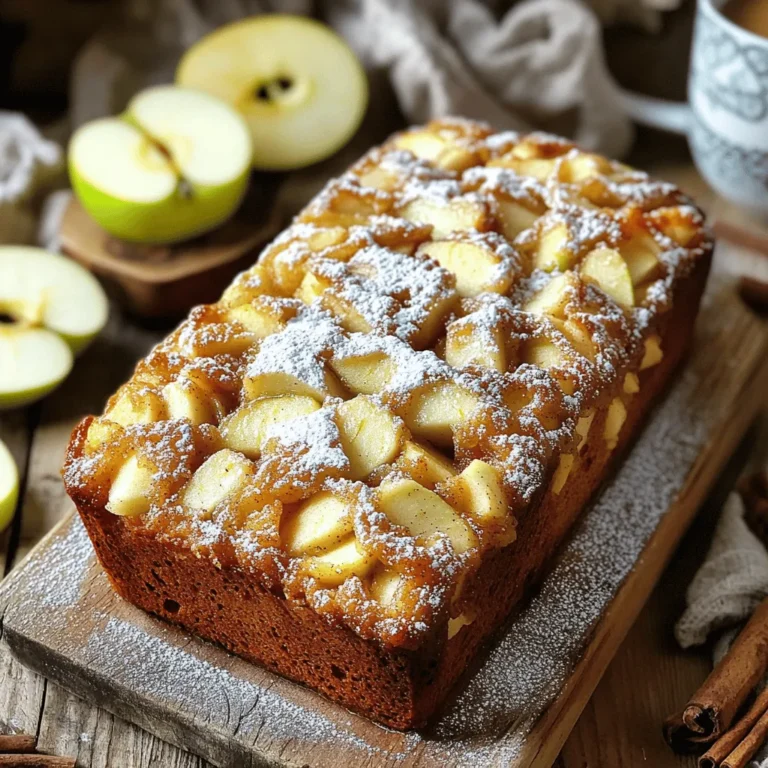
Apple Fritter Loaf Bakery Recipe Quick and Easy Guide

- 200g egg noodles - 4 cloves minced garlic - 2 red chilies, finely chopped - 3 tablespoons soy sauce - 2 tablespoons sesame oil - 1 tablespoon chili oil - 1 cup mixed vegetables (bell peppers, carrots, and snow peas) - 2 green onions, chopped - 1 tablespoon fresh cilantro, chopped - Salt to taste - Sesame seeds for garnish - Extra chili oil for spice When I cook Garlic Chili Noodles, I start with simple, fresh ingredients. The egg noodles are the base, offering a soft, chewy texture. I use four cloves of minced garlic to add a strong, rich flavor. The two red chilies bring heat, making each bite exciting. For the sauce, I mix three tablespoons of soy sauce with two tablespoons of sesame oil. This blend adds depth and a nutty taste. I also add one tablespoon of chili oil for an extra kick. The mixed vegetables are key to this dish. I prefer bell peppers, carrots, and snow peas. They add color and crunch. Chopped green onions and fresh cilantro finish the dish with brightness. If you want to elevate your Garlic Chili Noodles, consider sesame seeds for garnish. They add a nice crunch. Extra chili oil can boost the spice level if you love heat. First, boil water in a pot. Add 200g of egg noodles. Cook until al dente, about 3-4 minutes. Drain the noodles and set them aside. Next, heat 2 tablespoons of sesame oil in a large pan over medium heat. Add 4 cloves of minced garlic and 2 finely chopped red chilies. Sauté for 1-2 minutes until you smell the garlic. Now, toss in 1 cup of mixed vegetables, like bell peppers, carrots, and snow peas. Sauté for 3-4 minutes until they are tender but still crunchy. Pour in 3 tablespoons of soy sauce and 1 tablespoon of chili oil. Mix well with the vegetables. Add the cooked noodles to the pan. Toss everything together to coat the noodles in the sauce. Cook for an additional 2-3 minutes, allowing the noodles to absorb the flavors. Season with salt to taste. Stir in 2 chopped green onions and 1 tablespoon of fresh chopped cilantro just before serving. Enjoy your tasty garlic chili noodles! To make the best garlic chili noodles, balance is key. Use fresh ingredients for rich flavors. The garlic and chilies should shine, not overpower. Use equal parts garlic and chili to enhance the dish without drowning it. Cook your egg noodles al dente. This means they should be firm to the bite. Overcooked noodles become mushy and lose their texture. Follow the package instructions closely. Drain them quickly and toss them with a little sesame oil to prevent sticking. To store leftovers, place them in an airtight container. This keeps them fresh and prevents them from drying out. Garlic chili noodles last about three days in the fridge. When reheating, use a pan over medium heat. This method helps maintain the noodles' texture. Add a splash of water or extra oil to keep them moist. Stir frequently to ensure even heating. For a great look, serve your noodles in a shallow bowl. This style shows off the vibrant colors of the vegetables. Garnish with green onions and a sprinkle of sesame seeds. This adds crunch and visual appeal. You can also serve the dish on a plate. This works well for larger portions. Either way, keep it simple and let the noodles shine. {{image_2}} You can easily change the mixed vegetables to fit your taste. Try using: - Broccoli - Zucchini - Mushrooms These options keep your meal fresh and exciting. If you want gluten-free noodles, swap egg noodles for rice noodles or quinoa pasta. They work well in this recipe. If you prefer milder flavors, reduce the red chilies. You can use one chili instead of two. For extra heat, add more chili oil or use a spicy sauce. Want some protein? Add shrimp or chicken. Cook them first in the pan, then add the garlic and chilies. This way, the protein absorbs all the tasty flavors. Soy sauce is a classic choice, but you can explore other options. Try tamari for a gluten-free version. If you want to get creative, use homemade sauces like garlic soy or spicy chili sauce. These can add unique flavors to your dish. Mixing different oils can also change the taste. Consider using peanut oil or olive oil for a twist. Store your garlic chili noodles in an airtight container. Glass or plastic containers work well. Make sure the noodles cool down before sealing. This helps keep them fresh. In the fridge, they last up to three days. To freeze garlic chili noodles, first let them cool completely. Portion them into freezer bags or containers. Remove as much air as you can before sealing. They can stay in the freezer for up to a month. When you want to eat them, take a portion out of the freezer. Thaw it in the fridge overnight. To reheat, warm them in a pan over low heat. You can add a splash of water or oil to help them heat evenly. This keeps them tasty! Making garlic chili noodles takes about 20 minutes. You need 10 minutes for prep and 10 minutes for cooking. This quick meal is perfect for busy days. Yes, you can use different noodles! Try rice noodles or soba noodles for a fun twist. Gluten-free options like zucchini noodles also work well. Just adjust the cooking time based on the noodle type. If you don’t have sesame oil, try using olive oil or peanut oil. Both give a nice flavor. You can also use vegetable oil in a pinch. Just keep in mind it may change the taste a bit. In this article, I detailed a tasty recipe for garlic chili noodles. You learned about the essential ingredients, step-by-step cooking instructions, and helpful tips. I also shared ideas for customizing flavors and storing leftovers. With this recipe, you can enjoy a quick, delicious meal any day. Experiment with your favorite ingredients to make it your own. I hope you enjoy every bite of your garlic chili noodles!

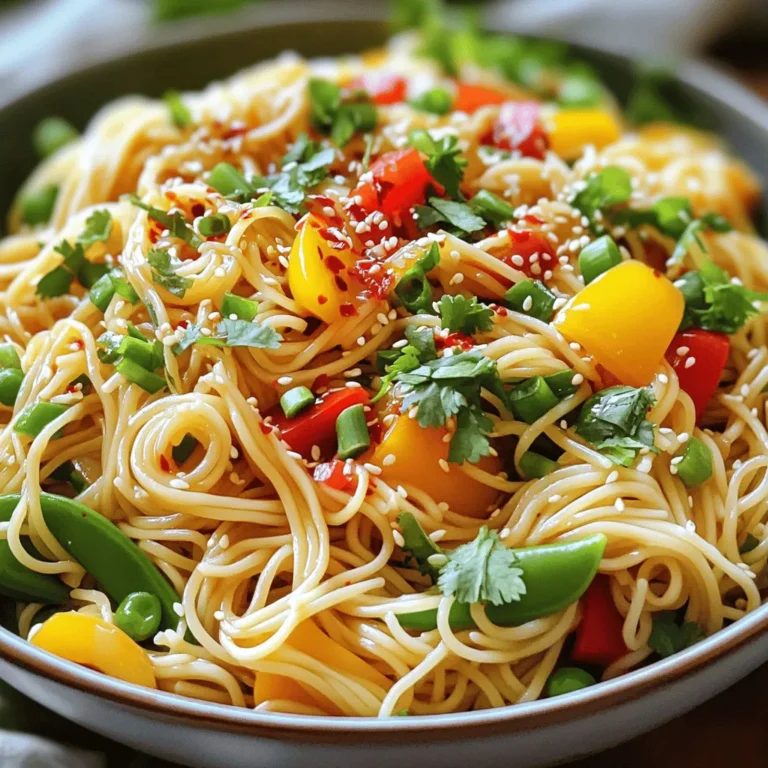
Garlic Chili Noodles in 15 Quick and Tasty Meal

For creamy white chicken chili, gather these items: - 1 pound boneless, skinless chicken breasts - 1 can (15 oz) white beans, drained and rinsed - 1 can (4 oz) diced green chilies - 1 cup onion, chopped - 1 cup corn, frozen or fresh - 3 cloves garlic, minced - 2 cups chicken broth - 1 teaspoon cumin - 1 teaspoon oregano - 1 teaspoon chili powder - 1 cup heavy cream - Salt and pepper to taste - Fresh cilantro, for garnish - Lime wedges, for serving Choosing fresh or frozen ingredients can change the dish. Fresh corn and onions boost flavor. However, frozen corn works well and saves time. Canned beans are easy and quick. They add creaminess and nutrition. Fresh cilantro gives a pop of color and taste. You can use dried herbs, but fresh herbs add a unique charm. Garnishes make your dish more fun. Try adding fresh cilantro on top. Lime wedges add a zesty kick. Crushed tortilla chips add crunch. Avocado slices are creamy and rich. You can even add shredded cheese for extra flavor. These choices let you customize your chili and impress your guests. Start by washing your hands. Gather all your ingredients. Take 1 pound of boneless, skinless chicken breasts and place them at the bottom of your slow cooker. Chop 1 cup of onion and mince 3 cloves of garlic. You want these flavors to shine through, so make sure they're fresh. If you are using frozen corn, measure out 1 cup. If you have fresh corn, cut it off the cob. Now, it's time to layer the ingredients. On top of the chicken, add the white beans from a 15 oz can, drained and rinsed. Then, pour in the 4 oz can of diced green chilies. Add the chopped onion and corn next. Finally, sprinkle in the minced garlic. This makes a colorful and tasty base for your chili. Pour in 2 cups of chicken broth to cover the ingredients. Add 1 teaspoon each of cumin, oregano, and chili powder. Don’t forget to add salt and pepper to taste. Stir everything gently so the spices mix well. Cover the slow cooker. Cook on low for 6-7 hours or on high for 3-4 hours. When the chicken is fully cooked and tender, shred it directly in the slow cooker using two forks. Stir in 1 cup of heavy cream until it's well blended and heated. Taste and adjust the seasonings if needed. To shred chicken easily, wait until it’s cool. Use two forks; one holds the chicken while the other pulls apart the meat. Shredding right in the slow cooker saves time and mess. Keep the chicken moist by mixing it with the broth. This way, the flavors blend well. Want it spicier? Add more chili powder or diced green chilies. If you prefer milder chili, skip the extra spices. You can also use less chili powder at the start. Tasting throughout cooking helps you find the right heat. Remember, you can always add more spice, but you can't take it away. For extra flavor, add a squeeze of lime juice just before serving. Fresh cilantro adds a nice touch and aroma. To make the chili creamier, mix in more heavy cream or a dollop of sour cream. You can also toss in some shredded cheese before serving for rich, melty goodness. {{image_2}} You can swap chicken for turkey. Use the same amount for best results. Turkey gives a leaner taste. If you want a plant-based option, try tofu. Press and cube the tofu before adding it. This way, you keep the texture nice. Both options work well in this chili. To make the chili dairy-free, replace heavy cream. Use coconut milk or cashew cream instead. Both add a creamy texture without dairy. You can also use almond milk, but it may be less rich. Adjust the amount based on your taste. This change keeps the chili tasty and smooth. Feel free to add more veggies for extra flavor. Bell peppers, zucchini, or spinach can enhance the dish. Chop them into small pieces. Add them to the slow cooker with the other ingredients. This not only boosts nutrition but also makes the chili colorful. You can mix and match based on what you have at home. To store your creamy white chicken chili, let it cool first. Then, place it in an airtight container. You can keep it in the fridge for up to four days. Make sure to label the container with the date, so you know when it was made. This helps you enjoy your leftovers fresh. If you want to save your chili for later, freezing is a great option. Pour the cooled chili into freezer-safe bags or containers. Remove as much air as possible before sealing. You can freeze it for up to three months. Just remember to write the date on the bag or container. This way, you will know when to eat it. When you are ready to enjoy your chili again, thaw it overnight in the fridge. You can also use the microwave for quick thawing. To reheat, pour the chili into a pot over low heat. Stir often to avoid burning. If it's too thick, add a little chicken broth or water to reach your desired creaminess. Once hot, serve it with fresh cilantro and lime for extra flavor. Yes, you can make creamy white chicken chili on the stovetop. Start by cooking the chicken in a pot for about 5-7 minutes on medium heat. Add the onion and garlic, cooking until soft. Then, mix in the rest of the ingredients, except for the cream. Let it simmer on low for about 30 minutes until the chicken is cooked. Shred the chicken, stir in the cream, and heat through. This method is quick and will still give you a tasty chili! Creamy white chicken chili pairs well with several sides. Here are some options: - Tortilla chips for crunch - Fresh avocado slices for creaminess - Cornbread for a sweet touch - Rice for a hearty meal - A crisp salad for freshness These sides will enhance your meal and make it more filling! To add spice to your chili, try these ideas: - Use hotter green chilies instead of mild ones. - Add a dash of cayenne pepper or red pepper flakes. - Mix in sliced jalapeños or serrano peppers. Start with small amounts, then taste and adjust. This way, you can reach your desired heat level without overwhelming the dish. Yes, this recipe is gluten-free! All the ingredients, like chicken, beans, and spices, do not contain gluten. Just make sure your chicken broth is labeled gluten-free, as some brands may add gluten. Enjoy this dish worry-free! In this article, we covered the key ingredients for your dish, including fresh and frozen options. You learned how to prepare the chicken and vegetables, and we shared tips to enhance flavor and adjust spice levels. Variations help you customize this recipe to fit your needs, while storage tips ensure your meal lasts. Remember, cooking is fun and creative. Enjoy making this dish your own and serving it to others!

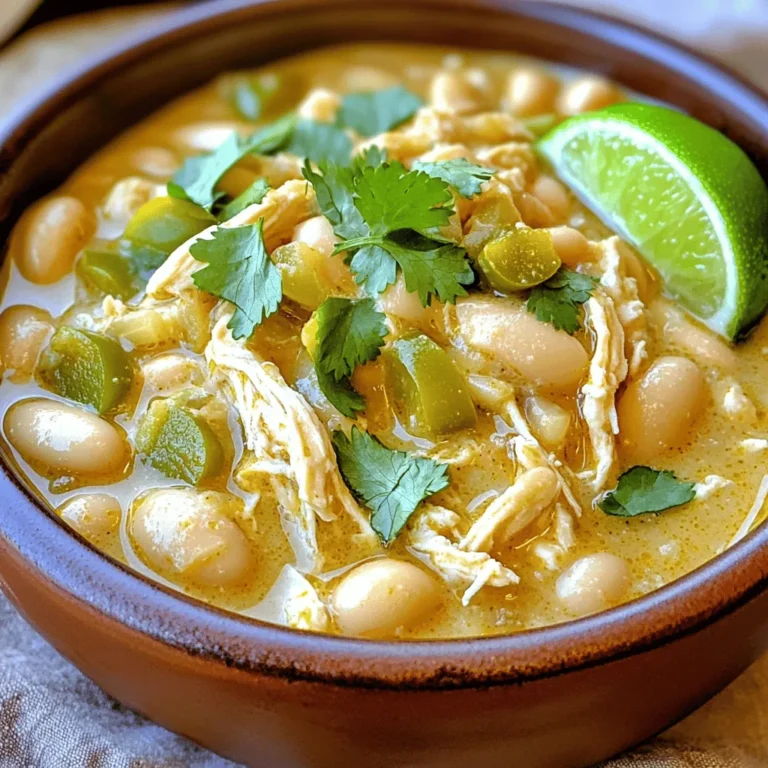
Creamy White Chicken Chili Slow Cooker Delight

To make pumpkin spice energy bites, you need: - 1 cup rolled oats - 1/2 cup pumpkin puree - 1/4 cup almond butter (or peanut butter) - 1/4 cup honey or maple syrup - 1 teaspoon pumpkin pie spice - 1/2 teaspoon vanilla extract - 1/4 cup chia seeds - 1/4 cup mini dark chocolate chips (optional) - Pinch of salt You can swap some ingredients if needed. Use crunchy peanut butter instead of almond butter. If you want a vegan option, replace honey with maple syrup. You can also use sunflower seed butter for a nut-free version. Chia seeds can be replaced with flaxseeds if you prefer. If you don’t have mini dark chocolate chips, try dried fruit or nuts for a different taste. Each bite is packed with nutrients. Here’s what you get per serving (one bite): - Calories: 80 - Protein: 2g - Carbohydrates: 10g - Fat: 4g - Fiber: 2g - Sugar: 3g These energy bites are a great snack. They provide fuel for your day and taste delicious! Start by gathering all your ingredients. You will need: - 1 cup rolled oats - 1/2 cup pumpkin puree - 1/4 cup almond butter or peanut butter - 1/4 cup honey or maple syrup - 1 teaspoon pumpkin pie spice - 1/2 teaspoon vanilla extract - 1/4 cup chia seeds - 1/4 cup mini dark chocolate chips (optional) - Pinch of salt In a large mixing bowl, combine the rolled oats, pumpkin puree, almond butter, and honey or maple syrup. Mix them well until everything is smooth. This helps blend the flavors nicely. Next, add the pumpkin pie spice, vanilla extract, chia seeds, and a pinch of salt. Stir again until all the ingredients are fully mixed. If you want to add chocolate chips, fold them in gently. They add a nice touch of sweetness. Mixing is key to getting a good texture. Use a sturdy spoon or spatula to blend everything. Start with the wet ingredients first. This helps the dry ingredients stick well. If you prefer, you can also use your hands. Just make sure to wash them well first. If the mixture seems too dry, add a little more pumpkin puree or honey. If it's too wet, sprinkle in more oats. You want it to be sticky but not so much that it falls apart when rolling. To roll the bites, take small portions of the mixture. Aim for about 1 inch in diameter. If the mixture is sticky, dampen your hands slightly with water. This will help you shape the balls without making a mess. Place the rolled bites on a parchment-lined baking sheet or plate. Once you shape them all, refrigerate them for at least 30 minutes. This will help them firm up nicely. After they set, you can store them in an airtight container in the fridge. Enjoy your tasty and healthy pumpkin spice energy bites! To keep your energy bites from sticking, you can use a few simple tricks. First, dampen your hands slightly before rolling the mixture into balls. This helps prevent the mixture from sticking to your fingers. If you find the mixture still too sticky, add a little more oats or chia seeds to help bind it. Lastly, chill the mix for about 10 minutes before rolling. Chilling firms up the mixture, making it easier to handle. After making your bites, it’s best to chill them in the fridge. This helps them firm up and makes them easier to store. Place the energy bites on a parchment-lined tray and refrigerate for at least 30 minutes. Once set, transfer them to an airtight container. This keeps them fresh and tasty. Store them in the fridge for up to a week. If you want them to last longer, consider freezing them. These pumpkin spice energy bites are great for snacking any time of the day. You can serve them plain or garnish them with a sprinkle of pumpkin pie spice for a festive touch. They also pair well with a cup of tea or coffee. Consider packing them in your lunch for a boost of energy. Kids love them as after-school snacks, too. Get creative and enjoy these bites however you like! {{image_2}} You can change the flavors in pumpkin spice energy bites. For a fruity twist, use mashed banana instead of pumpkin puree. This swap adds natural sweetness and creaminess. You can also try adding a splash of apple cider for a fall flavor. If you love chocolate, swap out pumpkin spice for cocoa powder for rich chocolate bites. Nut butter options can really change the taste. Almond butter adds a nutty flavor, while peanut butter gives a classic taste. Sunflower seed butter is great for nut-free bites. You can even use cashew butter for a smooth and creamy texture. Each nut butter brings its own unique taste and health benefits. Get creative with add-ins and toppings for your energy bites. Try diced dried fruit, like cranberries or apricots, for sweetness. You can also mix in shredded coconut for a chewy texture. For toppings, roll the bites in crushed nuts or seeds for crunch. Mini chocolate chips add a sweet touch, making them a favorite snack. To keep your Pumpkin Spice Energy Bites fresh, use an airtight container. Glass or plastic containers work well for this. If you want to save space, use a flat container. This way, the bites won’t stick together. These energy bites stay fresh for about one week in the fridge. Make sure to check for any signs of spoilage, like an off smell or change in texture. If they look good, they should taste great! You can freeze these bites for up to three months. Just place them in a freezer-safe bag or container. When you’re ready to eat them, thaw them in the fridge overnight. This keeps them tasty and ready for snacking! Yes, you can make these energy bites vegan. Use maple syrup instead of honey. Choose almond butter or peanut butter for the nut butter. Both options fit well in this recipe. These energy bites last about one week in the fridge. Store them in an airtight container to keep them fresh. If you want to keep them longer, you can freeze them. Yes, you can use quick oats as a substitute. They will still work well in this recipe. Just remember that the texture may be a little different. Yes, these energy bites can be gluten-free. Make sure to use certified gluten-free oats. This ensures you avoid any gluten contamination. In this blog post, we explored all about energy bites. We covered ingredients, substitutes, and nutrition. The step-by-step guide helped you prepare these tasty snacks. Tips on preventing stickiness and refrigeration were shared. You also learned about exciting variations and storage tips. Remember, you can make these bites your own. Feel free to experiment with flavors and ingredients. These snacks are fun, healthy, and easy to customize. Enjoy every bite you make!

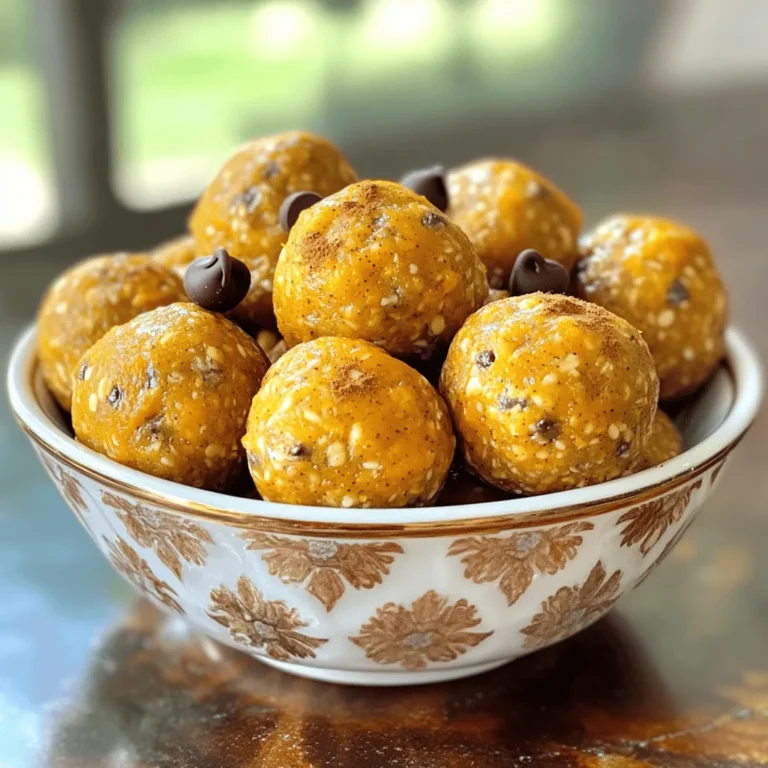
Pumpkin Spice Energy Bites No Bake Easy Recipe

PREV 1 … 25 26 27 … 57 NEXT
secrets pice kitchen

explore

DessertsDinnerAppetizersDrinks

Our Policies

  • Cookie Policy
  • Copyright Policy
  • Disclaimer
  • GDPR Policy
  • Terms Of Use
Back to Top
  • About
  • Contact Us
  • Privacy Policy
© 2025 secrets pice kitchen