FREE DINNER EBOOK! Get your copy!
  • Cookie Policy
  • GDPR Policy
  • Disclaimer
  • Terms Of Use
  • Visit my other site: Fun Cookie Recipes
secrets pice kitchen
  • Home
  • Dinner
  • Desserts
  • Drinks
  • Appetizers
  • Contact
  • About
  • Privacy Policy
  • Home
  • Dinner
  • Desserts
  • Drinks
  • Appetizers
  • Contact
  • About
  • Privacy Policy
  • Cookie Policy
  • GDPR Policy
  • Disclaimer
  • Terms Of Use
Visit my other site: Fun Cookie Recipes

HOME / CATEGORIES /

Latest

- 6 cups Rice Krispies cereal - 4 cups mini marshmallows - 3 tablespoons unsalted butter The main ingredients create a soft and chewy treat. Rice Krispies give a crispy base. Mini marshmallows add sweetness and a gooey texture. Unsalted butter binds everything and adds rich flavor. - 1 teaspoon pumpkin spice mix - 1/2 teaspoon vanilla extract - 1 cup pumpkin puree Flavor enhancers bring the fall spirit to these treats. Pumpkin spice mix gives warmth with cinnamon, ginger, and nutmeg. Vanilla extract adds depth. Pumpkin puree adds moisture and a lovely orange hue. - 1/2 cup chopped pecans - 1/4 cup white chocolate chips Optional add-ins let you customize your treats. Chopped pecans add a crunchy texture. Drizzling white chocolate chips on top gives a sweet finish. Feel free to mix and match to find your favorite combo! Start by melting 3 tablespoons of unsalted butter in a large pot over medium heat. Once the butter melts, add 4 cups of mini marshmallows. Stir continuously until the marshmallows are completely melted and smooth. This step is key for your treats to have that gooey texture. Now, stir in 1 cup of pumpkin puree, 1 teaspoon of pumpkin spice mix, and 1/2 teaspoon of vanilla extract. Mix until everything is combined and creamy. Next, remove the pot from heat. Gradually add 6 cups of Rice Krispies cereal to the melted mixture. Gently fold the cereal in. You want to coat each piece without crushing it. If you like extra crunch, fold in 1/2 cup of chopped pecans at this point. This adds a nice texture to your treats. Now it's time to transfer the mixture into a greased 9x13 inch baking pan. Use a spatula or wax paper to press down firmly, making an even layer. If you want to add a sweet touch, melt 1/4 cup of white chocolate chips in the microwave. Drizzle it over the top of the pressed Rice Krispie treats for a fun finish. Let the treats cool for at least 30 minutes before cutting them into squares. Enjoy your tasty fall snack! - Ensuring marshmallows are completely melted: It’s key to melt your mini marshmallows fully. This step creates a smooth base. Stir the marshmallows until they are creamy and lump-free. A good melt helps the Rice Krispies stick together well. - Pressing down mixture firmly: After mixing in the Rice Krispies, transfer the mixture to your greased pan. Use a spatula or wax paper to press it down firmly. This step ensures your treats hold their shape when you cut them. - Adjusting pumpkin spice to taste: The pumpkin spice mix can be adjusted. If you love a stronger flavor, add more. Start with a teaspoon and taste as you go. The perfect balance makes all the difference. - Using flavored extract options: Besides vanilla, consider adding almond or maple extract. These can add a unique twist to your treats. Just a few drops can elevate the taste. - Creative serving suggestions: Stack a few squares on a festive plate. This makes for an attractive display. You can also wrap individual squares in clear bags for gifts. - Garnishing techniques: A sprinkle of pumpkin spice on top adds color and flair. You can also drizzle some melted white chocolate for a sweet touch. It’s all about making your treats look as good as they taste! {{image_2}} You can enjoy Pumpkin Spice Rice Krispie Treats even if you have dietary needs. - Gluten-free options: Use gluten-free Rice Krispies. This way, you keep the crunch without gluten. - Dairy-free alternatives: Swap unsalted butter for coconut oil or dairy-free margarine. This makes the treats safe for those who avoid dairy. Want to switch things up? Try these fun flavors! - Chocolate pumpkin spice treats: Melt some chocolate chips into the marshmallow mix. This adds a rich, sweet twist. - Peanut butter pumpkin treats: Stir in peanut butter with the marshmallows. It gives a nutty flavor that kids love. Seasonal ingredients can make your treats even more special! - Incorporating cranberries or raisins: Fold in dried cranberries or raisins for a sweet and tart bite. - Toppings for a special occasion: Use sprinkles, chopped nuts, or a drizzle of caramel. These toppings make the treats festive and fun. To keep your Pumpkin Spice Rice Krispie Treats fresh, choose an airtight container. A glass or plastic container works best. This will help keep moisture out and preserve the treats. Line the bottom with wax paper for easy removal. Store them at room temperature away from sunlight. These treats stay fresh for about 3 to 5 days. After that, they may start to lose their soft texture. Look for signs of spoilage. If you see hard edges or a stale smell, it’s time to toss them. If your treats lose their shape, you can restore them easily. Use a microwave for a few seconds to soften them. Place a damp paper towel on top to help. You can also chop them up and mix with yogurt for a fun snack. Yes, you can make these treats ahead of time. To do this, follow these best practices: - Prepare the treats and let them cool completely. - Cut them into squares and store them in an airtight container. - Keep them at room temperature for up to three days. - For longer storage, freeze the squares in a single layer. When ready to serve, just thaw at room temperature. To prevent stickiness, try these tips: - Use a large pot to melt the butter and marshmallows. - Stir constantly to avoid burning. - Allow the mixture to cool slightly before adding the Rice Krispies. - Lightly grease your spatula or hands with butter before pressing the mixture into the pan. This keeps your hands clean and the treats from sticking. If you don't have pumpkin puree, consider these alternatives: - Use butternut squash puree for a similar texture and taste. - Try sweet potato puree for a sweeter flavor. - Applesauce can work, but it will change the taste and texture. These options provide some pumpkin flavor while keeping the treats tasty. To make these tasty treats, we used Rice Krispies, marshmallows, and butter. We added pumpkin spice to boost flavor. Optional add-ins like pecans and white chocolate create extra joy. Remember to melt all ingredients fully for the best texture. You can also try different flavors or dietary changes to suit your taste. Keep treats fresh by storing them properly. Knowing shelf life helps in enjoying them longer. These tips ensure deliciousness every time. Get creative and have fun making these treats your own!

Pumpkin Spice Rice Krispie Treats Tasty Fall Snack

- 8 cups apple cider - 1 cup caramel sauce (plus extra for drizzling) - 1/4 cup brown sugar - 1 tsp ground cinnamon - 1/2 tsp ground nutmeg - 1/4 tsp ground allspice - 1/4 tsp ground cloves - Juice of 1 lemon - 2 cups water - 1 apple, sliced for garnish - Whipped cream (optional, for serving) To make this punch, you need simple ingredients. Apple cider is the star here, giving that warm, fruity taste. Caramel sauce adds sweetness and richness, making it feel special. Brown sugar helps deepen the flavor. The spices like cinnamon, nutmeg, allspice, and cloves bring warmth, perfect for fall. If you don’t have brown sugar, you can use white sugar. For the spices, feel free to adjust them to your taste. If you want a sweeter punch, just add more caramel sauce. You can also swap the apple cider with pear cider for a twist. Each ingredient plays a big role in making this drink delightful. - Prepping the slow cooker First, grab your slow cooker. Make sure it is clean and ready for use. Place it on a stable surface. - Mixing the base ingredients In the slow cooker, pour in 8 cups of apple cider. Add 1 cup of caramel sauce next. Then, sprinkle in 1/4 cup of brown sugar. Toss in 1 teaspoon of ground cinnamon, 1/2 teaspoon of nutmeg, 1/4 teaspoon of allspice, and 1/4 teaspoon of cloves. Stir all these together well. Finally, add the juice of 1 lemon and 2 cups of water. Mix again until all ingredients blend nicely. - Setting the slow cooker and cooking time Cover your slow cooker with the lid. Set it to low heat. Let it cook for about 2 hours. This helps the flavors come together beautifully. - Adjusting flavors after cooking After 2 hours, carefully taste your punch. If you want it sweeter, add more caramel or brown sugar. Mix well and taste again until it’s just right. Once you’re happy with the flavor, ladle the warm punch into cups. Drizzle some extra caramel sauce on top for a sweet finish. Optional: For a fun touch, add whipped cream and garnish with apple slices. Enjoy your Caramel Apple Cider Punch! To make your Caramel Apple Cider Punch even better, consider adding spices. Ground ginger adds warmth, while a dash of cayenne gives it a nice kick. You can mix in a little vanilla extract for a sweet touch. Adjusting sweetness is easy. If your punch tastes a bit tart, add more caramel sauce or brown sugar. Start with just a teaspoon; then taste again. You want it to be balanced and just right. Presentation matters! Serve your punch in clear mugs to show off its rich color. Drizzle extra caramel on top for a lovely look. You can also garnish with fresh apple slices for a fun touch. Pair this punch with salty snacks like pretzels or popcorn. It goes well with sweet treats, too. Try it with cookies or pie for a warm dessert vibe. {{image_2}} You can change up the flavors in your Caramel Apple Cider Punch. Want to skip the caramel? Use maple syrup or honey for sweetness. You can also try different spices. Cardamom or ginger adds a nice kick. For those who enjoy a little heat, add a dash of cayenne pepper. If you want to make this punch grown-up, consider adding alcohol. A splash of whiskey or spiced rum makes it festive. You could also use a bit of vodka for a lighter touch. Just remember to keep the balance right. You want to enjoy the apple and caramel flavors too. This punch is perfect for any season! In fall, add pumpkin spice for a cozy feel. You can even throw in some orange zest for a bright twist. During the holidays, add cranberry juice for a festive color. It gives a tart contrast to the sweet apple cider. For gatherings, serve the punch in a large bowl. Add cinnamon sticks and apple slices for a pretty touch. You can also set out whipped cream and extra caramel. Let guests dress their own cups! This makes it fun and interactive. To keep your Caramel Apple Cider Punch fresh, store it in the fridge. Use a glass or plastic container with a lid. Make sure it is airtight to prevent any strange smells from other foods. If you have a lot left, you can also use smaller containers for easy servings. When you are ready to enjoy your leftover punch, pour it back into the slow cooker or a pot. Heat it on low to keep the flavors intact. Stir it often to ensure even warming. If you use the microwave, warm it in short bursts. This way, you avoid losing any flavor. Your punch will stay fresh for about 3 to 5 days in the fridge. Enjoy it warm or cold! Yes, you can make this punch ahead of time. It tastes even better when flavors mix. Just prepare it in the slow cooker and let it cool. Store it in the fridge for up to three days. When ready to serve, warm it up in the slow cooker. You can use apple juice if you cannot find apple cider. The flavor will be sweeter but still good. You might want to add a little lemon juice to balance the sweetness. You can also try pear cider for a different twist. Yes, you can make this punch on the stove. Just combine all ingredients in a pot. Heat over medium-low heat until warm, stirring often. This method takes about 30 minutes. Watch closely to avoid boiling. This punch is already non-alcoholic. It is perfect for kids and families. If you want to add a little sparkle, mix in some sparkling water or ginger ale before serving. This will give it a fun fizz without alcohol. In this article, we covered everything you need for a great Caramel Apple Cider Punch. You learned about the ingredients, step-by-step instructions, and helpful tips. We also explored fun variations and how to store leftovers. Remember, you can make this punch your way. Whether you want it sweeter or spiced up, the choices are yours. Enjoy making and sharing this delicious drink at your next gathering!

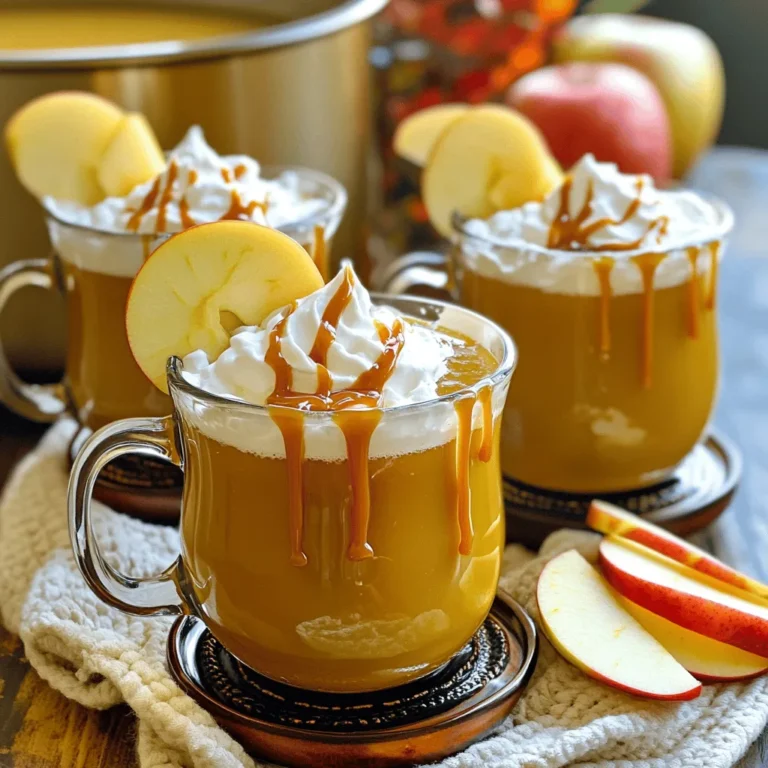
Caramel Apple Cider Punch Slow Cooker Delight

- 3 ½ cups all-purpose flour - ¼ cup granulated sugar - 1 teaspoon salt - 1 packet (2 ¼ teaspoons) active dry yeast - ½ cup whole milk, warmed (110°F) - 4 large eggs - ½ cup unsalted butter, softened - 1 tablespoon ground cinnamon - ½ cup brown sugar - ½ cup chopped walnuts or pecans (optional) - 1 additional egg for shiny finish The main ingredients are simple yet essential for great brioche. All-purpose flour gives the bread its structure. Granulated sugar adds sweetness. Active dry yeast helps the dough rise, creating a light texture. Whole milk makes the brioche rich and tender. Large eggs provide moisture and richness. Unsalted butter enhances flavor and allows the dough to be soft. The filling ingredients add that wonderful cinnamon flavor. Ground cinnamon brings warmth and spice. Brown sugar adds a nice depth of sweetness. Nuts are optional but add a lovely crunch. You can skip them if you prefer a smoother texture. Finally, the egg wash gives the brioche a beautiful shine. It makes your bread look more appealing when baked. To start, you need to combine milk and yeast. In a bowl, mix the warmed milk with the yeast. Let it sit for about five minutes. You want it to get frothy. In a large bowl, mix the dry items. Whisk together the flour, sugar, and salt. Now, combine the wet and dry ingredients. Make a well in the dry mix. Pour in the yeast mixture and add three eggs. Stir until the dough starts to come together. Next, knead the dough on a floured surface. Knead for about ten minutes until it feels smooth. Gradually add the softened butter while kneading. Once done, shape the dough into a ball. Place it in a greased bowl. Cover it with a towel and let it rise in a warm spot for one to one and a half hours. The dough should double in size. After the first rise, it’s time to prepare the cinnamon filling. In a small bowl, mix the brown sugar, cinnamon, and nuts if you like. Set this aside. Now, punch the dough down and move it to a floured surface. Roll it out into a rectangle about twelve by eighteen inches. Spread the cinnamon filling on top, leaving a one-inch edge all around. Roll the dough tightly from the long side to form a log. Next, cut the log in half lengthwise to show the layers. Twist the two pieces around each other. Then shape it into a coil or braid. Place it in a greased loaf pan. Cover it with a towel again and let it rise for another thirty to forty-five minutes, until it puffs up. While this happens, preheat your oven to 350°F (175°C). Beat the last egg and brush it over the dough for shine. Bake for thirty to thirty-five minutes. The top should be golden brown. A toothpick should come out clean when you check it in the center. After baking, let it cool in the pan for ten minutes before moving it to a wire rack. To get the best dough texture, knead until smooth. The dough should feel soft and elastic. If it sticks to your hands, add a bit more flour. Ingredient temperature matters too. Use warm milk at 110°F to help the yeast wake up. This warmth gets your dough rising well. To know when your bread is done, look for a golden brown top. The sides should pull away from the pan a bit. Use a toothpick to check for doneness. Insert it into the center. If it comes out clean, your brioche is ready. Slice your brioche and serve it warm. Add powdered sugar on top for a nice look. You can also pair it with fruit preserves or butter. For best flavor, store your brioche in an airtight container. Reheat slices in the oven for a few minutes to warm them up. Enjoy! {{image_2}} You can change the flavor of your brioche with a few fun twists. - Chocolate swirl brioche: Add chocolate chips or cocoa powder to the filling. You can mix in ½ cup of chocolate chips with the brown sugar and cinnamon. This gives a rich, sweet taste. - Fruit-infused brioche options: Try adding fruit like berries or apples. Chop them finely and mix them with the cinnamon and sugar. This adds a fresh, fruity flavor that pairs well with the soft bread. If you need to change the recipe for dietary needs, here are some easy swaps. - Gluten-free alternatives: Use a gluten-free flour blend instead of all-purpose flour. This helps keep the texture light and fluffy. Make sure your yeast is gluten-free, too. - Vegan substitutes for eggs and dairy: Replace eggs with flaxseed meal or applesauce. Use almond milk or oat milk instead of whole milk. Swap the unsalted butter for coconut oil or vegan butter. This way, everyone can enjoy a slice! To keep your cinnamon swirl brioche bread fresh, store it properly. - Room Temperature vs Refrigerated: If you plan to eat it within two days, keep it at room temperature. Store it in a bread box or a paper bag. This helps maintain the crust's crispiness. If you want it to last longer, refrigerate it. However, refrigeration can dry it out. - How to Wrap for Freshness: To keep the bread fresh at room temperature, wrap it in plastic wrap or aluminum foil. This will trap moisture and prevent it from getting stale. If you refrigerate it, make sure to wrap it tightly to avoid drying out. Freezing is a great option if you have leftovers. - Proper Freezing Techniques: First, let the brioche cool completely. Then, slice it if you like. Wrap each slice in plastic wrap, then place them in a freezer bag. Remove as much air as possible to prevent freezer burn. - Thawing Instructions for Best Results: When you’re ready to eat, take out the slices and let them thaw at room temperature. This usually takes about an hour. If you want it warm, pop the slices in the toaster or oven for a few minutes. This will bring back the fresh-baked taste. Making cinnamon swirl brioche bread takes about 3 hours in total. You will spend 30 minutes on prep and about 2.5 hours on rising and baking. The first rise takes 1 to 1.5 hours, and the second rise takes 30 to 45 minutes. Baking takes about 30 to 35 minutes. Timing is key, so watch the dough closely. Yes, you can use milk alternatives. Almond milk, soy milk, or oat milk work well. Just warm them to about 110°F before mixing with the yeast. This helps the yeast activate and rise properly. Choose unsweetened options to avoid altering the taste. If your dough doesn’t rise, check the yeast. Make sure it’s fresh and active. If your kitchen is cold, try a warm spot or preheat the oven slightly and turn it off. Let the dough rise in this warm environment. If all else fails, you may need to start over with new yeast. To check if your brioche is baked, look for a golden-brown crust. You can also tap the bottom of the loaf; it should sound hollow. Another method is to insert a toothpick; it should come out clean. If you want extra assurance, use an instant-read thermometer. The internal temperature should reach 190°F to 200°F. Making cinnamon swirl brioche bread is a fun and rewarding process. You start with basic ingredients like flour and yeast. Then, you mix, knead, and shape, creating delicious layers of flavor. Remember to keep an eye on your dough’s texture and rise times. If you want to mix it up, try chocolate or fruit variations. Store your bread right to keep it fresh. With these tips, you can make a perfect loaf every time. Enjoy baking and share your yummy results!

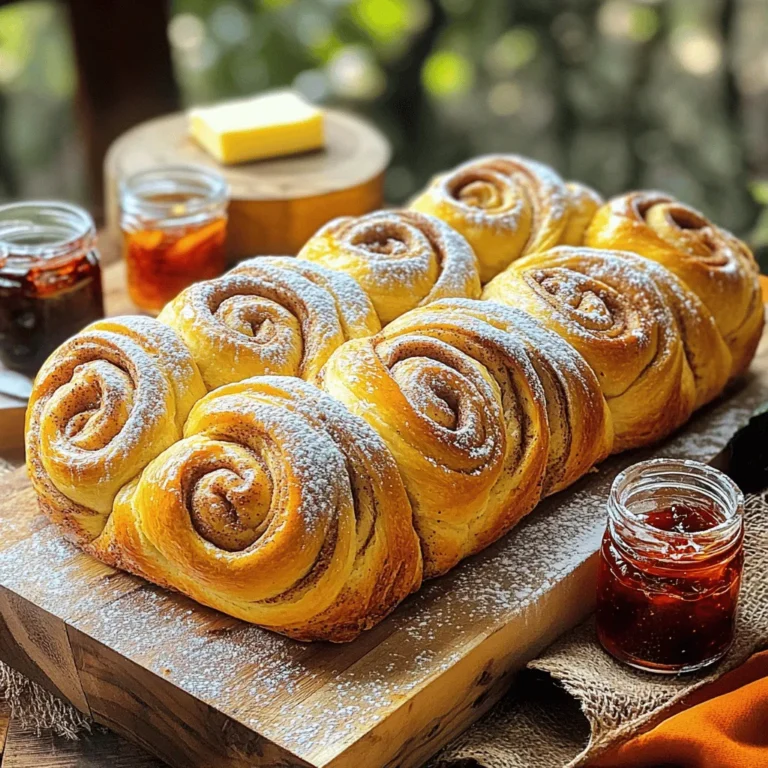
Cinnamon Swirl Brioche Bread Bakery Delight Recipe

To make these Maple Walnut Cheesecake Cups, gather the following: - 8 oz cream cheese, softened - 1 cup heavy whipping cream - ½ cup powdered sugar - ¼ cup pure maple syrup - 1 tsp vanilla extract - 1 cup walnuts, chopped - 1 cup graham cracker crumbs - 4 tbsp unsalted butter, melted - Extra maple syrup for drizzling - A pinch of salt When measuring your ingredients, here are some tips: - Use a kitchen scale for precise measurements, especially for cream cheese. - For powdered sugar, spoon it into the measuring cup and level it off with a knife. - When measuring sticky items like maple syrup, spray the measuring cup with a bit of oil first. This will help it pour out easily. - Chop walnuts evenly for better texture in each bite. If you need alternatives, here are some options: - You can use Greek yogurt instead of cream cheese for a lighter option. - Coconut cream can replace heavy whipping cream for a dairy-free version. - If you do not have powdered sugar, you can blend regular sugar until fine. - For a nut-free option, use sunflower seeds instead of walnuts. - Honey or agave can replace maple syrup, but the flavor will change. To start, grab a mixing bowl. Add the graham cracker crumbs, melted butter, and a pinch of salt. Mix them well until the crumbs feel moist. This step is key for a tasty base. Next, take your serving cups. Evenly divide the crumb mixture among them. Use the back of a spoon to press down gently. You want a solid base at the bottom of each cup. Now, let’s make the creamy filling. In a clean bowl, beat the softened cream cheese until smooth. I use an electric mixer for this part. Add in the powdered sugar, maple syrup, and vanilla extract. Mix until everything is well blended. In another bowl, whip the heavy cream until it forms stiff peaks. This makes the filling light and fluffy. Gently fold the whipped cream into the cream cheese mix. Be careful not to lose the airiness. Finally, fold in the chopped walnuts, ensuring they are evenly mixed. It’s time to layer! Spoon the cheesecake filling into each cup over the crust. Use a spatula to smooth the top if you'd like. Once filled, cover the cups and chill them in the fridge for at least two hours. This helps the cheesecake set and firm up. Just before serving, drizzle a little extra maple syrup on top. For a nice touch, add a whole walnut for garnish. Enjoy your delightful maple walnut cheesecake cups! To get the best creamy texture, start with softened cream cheese. This helps it blend well. Use an electric mixer to beat the cream cheese until it's smooth. Add the powdered sugar, maple syrup, and vanilla extract next. Mix until everything is well combined. For a fluffy texture, whip the heavy cream until stiff peaks form. Then, gently fold it into the cream cheese mixture. This keeps your cheesecake light and airy. Chilling is key for these cheesecake cups. After filling the cups, cover them and place them in the fridge. Let them chill for at least two hours. This allows the mixture to set and firm up nicely. If you can, chill them overnight for even better results. This gives the flavors time to meld together. Enjoy the wait; the end result is worth it! Serve your cheesecake cups with a drizzle of maple syrup on top. This adds a nice touch of sweetness. You can also garnish with whole walnuts for added crunch. If you want to get fancy, try adding a dollop of whipped cream. For a fun twist, serve them in clear cups. This way, everyone can see the lovely layers inside. Your guests will love both the look and the taste! {{image_2}} You can change the flavor of these cheesecake cups easily. Try adding a few tablespoons of cocoa powder for a rich chocolate taste. You can also mix in some lemon zest for a fresh kick. If you love peanut butter, fold in a bit of creamy peanut butter for a nutty twist. Each add-in can change the flavor without changing the base recipe. Toppings can enhance your cheesecake cups. Instead of just maple syrup, try caramel sauce for a sweet touch. Fresh berries like strawberries and blueberries add a nice color and flavor. You can sprinkle some crushed nuts on top for crunch. Try a dollop of whipped cream for extra creaminess. These toppings can make your dessert even more special. You don’t have to stick with graham cracker crumbs for the crust. For a gluten-free option, use crushed almond flour or coconut flour. If you want a different taste, try crushed oreos or shortbread cookies. You can even use crushed pretzels for a salty-sweet mix. Each crust brings its own flavor and texture to your cheesecake cups. Store your maple walnut cheesecake cups in the fridge. Use an airtight container to keep them fresh. They stay good for up to five days. If you plan to eat them later, cover each cup tightly with plastic wrap. This keeps moisture in and prevents drying. You can freeze these cheesecake cups for a longer shelf life. First, let them chill in the fridge for two hours. Then, cover each cup with plastic wrap. After that, place them in a freezer-safe bag. They keep well for about two months. When ready to eat, thaw them in the fridge overnight. To keep your cheesecake cups fresh, avoid adding toppings until serving. If you want to add extra maple syrup or walnuts, do this just before you serve. This helps maintain the texture and flavor. Always check for any signs of spoilage before enjoying. Yes, you can use low-fat cream cheese. It will still taste good. The texture may be less rich. You might need to adjust the sugar. You can store the cheesecake cups for up to four days. Keep them in the fridge. Use an airtight container to prevent drying. Yes, you can make these cups ahead. They taste better after chilling. Make them the day before, if possible. If you have nut allergies, use crushed graham crackers. You can also try seeds like sunflower seeds. They add a nice crunch without nuts. Absolutely! Just double all the ingredients. Make sure you have larger cups. This way, you can serve more people. This blog post covered all you need to make cheesecake cups. We discussed key ingredients, measurement tips, and substitutions. I shared step-by-step instructions for the crust and filling. You learned how to chill it for the best taste and texture. We also explored fun variations, storage tips, and answered common questions. Now, it’s time for you to dive in and create your own cheesecake cups. Enjoy experimenting with flavors, and delight in the process.

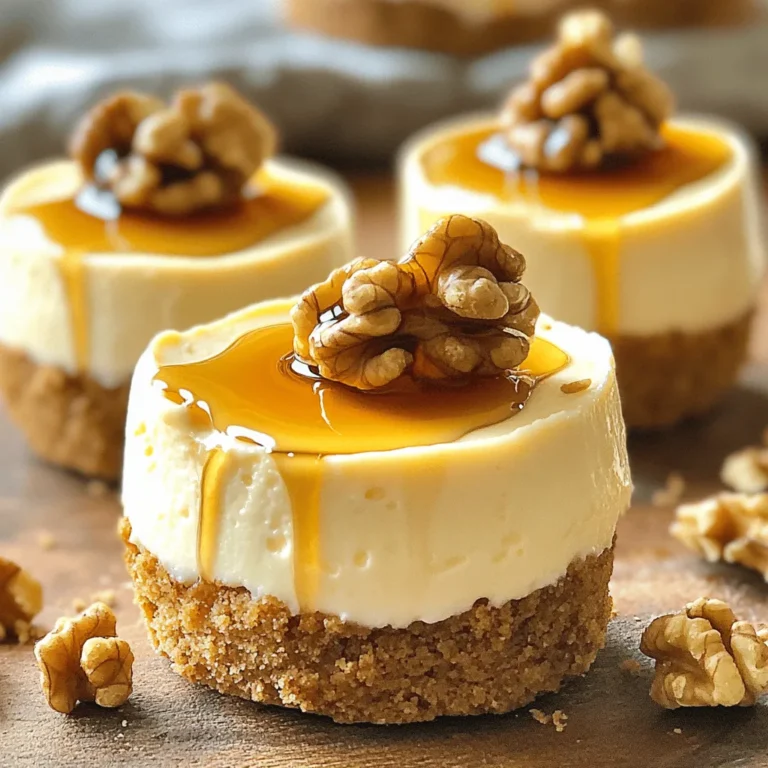
Maple Walnut Cheesecake Cups No Bake Easy Recipe

To make tasty air fryer sweet potato fries, you'll need: - 2 large sweet potatoes, peeled and cut into fries - 2 tablespoons olive oil - 1 teaspoon smoked paprika - 1 teaspoon garlic powder - ½ teaspoon salt - ½ teaspoon black pepper These simple ingredients create a crunchy and flavorful snack. Sweet potatoes provide a nice sweetness that pairs well with spices. You can mix it up with different seasonings. Here are some ideas: - Add chili powder for some heat. - Try cinnamon for a sweet twist. - Use Italian herbs for a savory flavor. Feel free to experiment with your favorite spices. The right seasoning can change the whole taste. Want your fries extra crispy? Consider adding: - 1 tablespoon cornstarch Cornstarch helps absorb moisture and makes the fries crunchier. Toss it in with the other ingredients for the best results. Start with 2 large sweet potatoes. Peel them, then cut them into fries. Try to keep the fries even in size. This helps them cook at the same rate. Place the cut fries in a large bowl. Add 2 tablespoons of olive oil. Then, sprinkle in 1 teaspoon of smoked paprika, 1 teaspoon of garlic powder, ½ teaspoon of salt, and ½ teaspoon of black pepper. If you want extra crispiness, add 1 tablespoon of cornstarch. Toss everything together until the fries are well coated. Next, you must preheat your air fryer. Set it to 400°F (200°C) and let it heat for about 5 minutes. This step is key for making sure the fries cook evenly and get crispy. Once the air fryer is ready, it’s time to cook. Place the fries in the basket in a single layer. Avoid overcrowding, as this can lead to soggy fries. If you have a lot, you may need to fry them in batches. Cook the fries for 15-18 minutes. Halfway through, shake the basket to ensure even cooking. Check the fries; they should be golden brown and crispy. When done, take them out and let them cool for a couple of minutes. This cooling time boosts their crispiness, making them even more delicious. To make your fries extra crispy, use cornstarch. It absorbs moisture, which helps in crisping. Toss your sweet potatoes well with cornstarch before adding oil and spices. This small step makes a big difference. The air fryer works best when fries are in a single layer. Overcrowding leads to steaming, not crisping. Always preheat your air fryer. This helps to start the cooking process evenly. Set it to 400°F (200°C) and wait for about 5 minutes. When cooking, shake the basket halfway through. This ensures all sides cook evenly. For best results, cook in batches if needed. Each batch should fit comfortably in the basket. If your fries turn out soggy, check for too much moisture. Ensure sweet potatoes are dried well before frying. If they lack flavor, adjust your seasonings next time. You can add more salt or spices based on taste. Lastly, if they burn, reduce the cooking time or lower the temperature slightly. Always keep an eye on them, especially the first time you make them. {{image_2}} You can change the flavor of your sweet potato fries easily. For a spicy kick, add cayenne pepper or chili powder. A pinch of cinnamon can turn your fries sweet and warm. Mix brown sugar with the spices for a sweet twist. You can even make a savory version by adding curry powder or herbs like thyme. Don’t limit yourself to just one mix. You can try different seasonings to match your taste. For a zesty flavor, use lemon zest or lime zest. Try mixing in ranch seasoning for a fun twist. You can also sprinkle some Parmesan cheese for a cheesy touch. The combinations are endless, so get creative! If you don’t have an air fryer, you can still make these fries. To cook them in the oven, preheat it to 425°F (220°C). Spread the fries on a baking sheet and bake for about 25-30 minutes. Turn them halfway through for even cooking. If you prefer a deep fryer, heat the oil to 350°F (175°C). Fry the sweet potatoes in small batches until they are golden and crispy. Each method offers a different texture, so try them all to find your favorite! To store leftover sweet potato fries, let them cool first. Then, place them in an airtight container. They will stay fresh for about 3 days in the fridge. If you want them to last longer, consider freezing. Just remember, they may lose some crunch after storing. To reheat your fries, use the air fryer again. Preheat it to 375°F (190°C). Place the fries in a single layer. Heat them for about 5-7 minutes. This method helps restore their crispiness. You can also use an oven at 400°F (200°C) for the same time. Avoid using a microwave, as it makes them soggy. If you want to freeze your fries, spread them on a baking sheet first. Freeze them for about 1-2 hours until firm. Then, transfer to a freezer bag. They can last for up to 3 months. When ready to cook, do not thaw them. Just air fry them straight from the freezer. Add a couple of extra minutes to the cook time for best results. Air fryer sweet potato fries taste best fresh. You can store them in the fridge for 3 to 5 days. Make sure they cool down first. Place them in an airtight container. This helps keep them crispy longer. Reheating them in the air fryer can revive their crunch. Yes, you can make sweet potato fries without oil. They will still cook well in the air fryer. Just skip the olive oil in the recipe. The fries may not be as crispy. They will still taste great, though. You can add spices for more flavor. Sweet potato fries pair well with many dips. You can serve them with ketchup or aioli. Spicy sauces add a nice kick too. For a twist, try them with a yogurt dip. They also work great as a side dish with burgers or sandwiches. Enjoy experimenting with different flavors! This article covered making delicious air fryer sweet potato fries. We discussed key ingredients, cooking steps, and tips for crispiness. You learned different flavor variations and how to store leftovers for later. Remember, experimenting with seasonings can create unique tastes. Enjoy your fries and feel free to get creative with them!

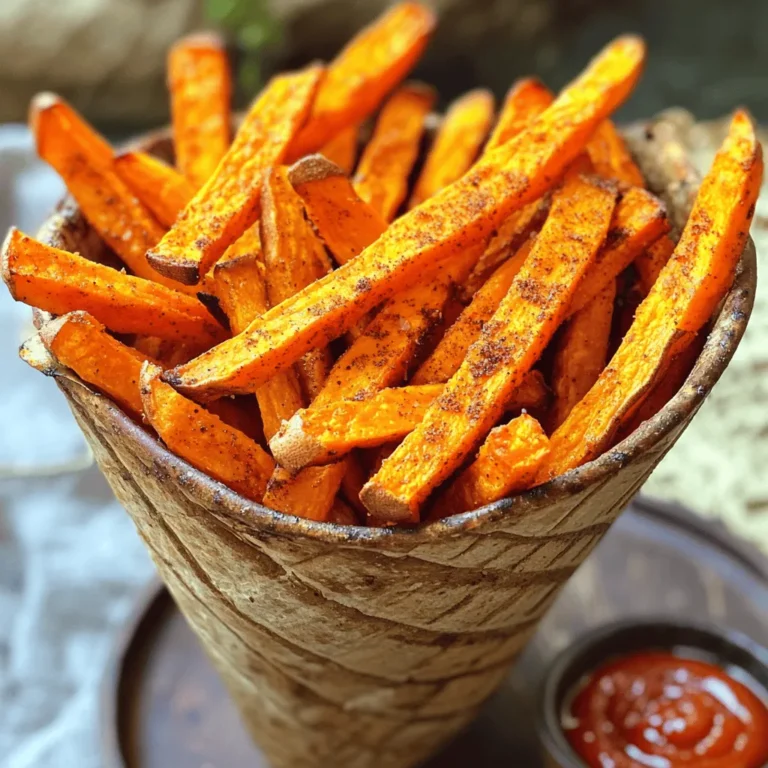
Air Fryer Sweet Potato Fries Flavorful and Crunchy Snack

- 1 pound ground turkey - 1 medium onion, diced - 3 cloves garlic, minced - 1 red bell pepper, diced - 1 green bell pepper, diced - 1 can (15 oz) black beans, rinsed and drained - 1 can (15 oz) kidney beans, rinsed and drained - 1 can (28 oz) crushed tomatoes - 2 cups vegetable broth I use ground turkey for this chili because it cooks quickly and tastes great. The turkey gives the chili a nice, meaty flavor without being too heavy. I love adding onion and garlic for their rich taste and aroma. The bell peppers bring color and sweetness, making the dish even better. Black beans and kidney beans add protein and fiber, making this meal filling and healthy. - 2 tablespoons chipotle in adobo sauce, chopped - 1 tablespoon smoked paprika - 1 tablespoon ground cumin - 1 teaspoon dried oregano - 1 teaspoon salt - ½ teaspoon black pepper - 1 tablespoon olive oil Chipotle in adobo sauce gives the chili its smoky kick. I love how it adds depth and warmth. Smoked paprika and ground cumin also contribute to the rich flavor. Dried oregano adds a hint of earthiness, while salt and pepper enhance all the tastes. Olive oil is perfect for sautéing the onions and garlic, adding a bit of healthy fat to the mix. - Fresh cilantro, for garnish - Sour cream or Greek yogurt, for serving (optional) - Lime wedges, for serving (optional) I enjoy topping my chili with fresh cilantro. It brings a bright, fresh taste that balances the rich flavors. A dollop of sour cream or Greek yogurt adds creaminess and coolness, perfect for spicy chili. Lime wedges add a zesty finish that brings everything together. Together, these toppings make the chili even more delightful! To start, heat 1 tablespoon of olive oil in a large pot over medium heat. Add 1 medium diced onion and sauté for about 5 minutes. The onion should turn soft and clear. Next, add 3 minced garlic cloves. Cook for another minute until it smells great. Now, stir in 1 pound of ground turkey. Break it apart with a spoon. Cook until it turns brown, about 6-7 minutes. Once the turkey is browned, it's time to add some color and nutrition. Toss in 1 diced red bell pepper and 1 diced green bell pepper. Cook these for another 5 minutes until they begin to soften. Now, mix in 1 can of black beans and 1 can of kidney beans, both rinsed and drained. This adds protein and fiber to your chili. Now comes the exciting part! Pour in 1 can of crushed tomatoes and add 2 tablespoons of chipotle in adobo sauce. This gives the chili its smoky flavor. Stir in 1 tablespoon of smoked paprika, 1 tablespoon of ground cumin, 1 teaspoon of dried oregano, 1 teaspoon of salt, and ½ teaspoon of black pepper. Finally, add 2 cups of vegetable broth and stir everything together. Bring the mixture to a boil, then lower the heat. Let it simmer uncovered for 25-30 minutes. Stir it every so often until it thickens to your liking. If you want more heat, feel free to add extra chipotle sauce. After cooking, let it sit for a few minutes before serving. To make your Smoky Chipotle Turkey Chili shine, adjust the spice levels. Start with the recipe’s measurements. If you like heat, add more chipotle in adobo. For a milder taste, reduce the amount. Always taste as you go. This way, you can find the right balance for your taste buds. When sautéing your onions and garlic, heat the olive oil over medium heat. Add the onions first. Cook them until they are soft and clear. This usually takes about five minutes. Then, add the garlic. Cook it for one more minute to release its rich aroma. This step builds a great base for your chili. Serve Smoky Chipotle Turkey Chili with cornbread for a comforting meal. The sweet cornbread complements the chili’s heat. You can also serve it with tortilla chips for a fun crunch. For presentation, use deep bowls. Ladle the chili into them and top with a dollop of sour cream or Greek yogurt. Sprinkle fresh cilantro on top for a pop of color. Add lime wedges on the side for a zesty finish that brightens each bite. You can cook this chili in different ways. A slow cooker works well. After browning the turkey and sautéing the veggies, transfer everything to the slow cooker. Let it cook on low for 6-8 hours. This makes the flavors deepen nicely. To achieve your desired thickness, let the chili simmer uncovered. If it’s too thin, let it cook longer. If you want it thicker, mash some beans against the pot’s side. This will help create a creamy texture while keeping the chili hearty. {{image_2}} You can easily swap proteins in this chili. Ground turkey is great, but you can use chicken or beef. For a lighter option, try ground chicken. If you want a plant-based meal, swap in lentils or mushrooms. Both give a hearty bite. For vegetarian or vegan versions, use beans as the main protein. You can add more black beans, kidney beans, or chickpeas. They soak up flavors well and keep the dish filling. To boost the taste, add extra veggies. Try corn, zucchini, or carrots for a sweet twist. Each veggie adds new textures and colors. You can also mix in different beans. White beans or pinto beans work great in the chili. If you like heat, toss in fresh jalapeños or more chipotle. These changes make every bowl unique and fun. This chili is perfect for meal prep. Make a big batch and store it in containers. You can easily reheat it during the week for quick meals. Pair it with rice or cornbread for a complete feast. When serving, add tasty toppings. Fresh cilantro gives a nice pop of flavor. A dollop of sour cream or Greek yogurt adds creaminess. Serve with lime wedges for a zesty touch. These small additions make each bowl special. After enjoying your Smoky Chipotle Turkey Chili, store any leftovers in a safe way. Use an airtight container for the best results. Place the chili in the fridge for up to four days. Make sure it cools down before sealing. If you want to keep it longer, freeze it. Chili can freeze well for about three months. Just portion it out in freezer-safe containers. Label them with the date to keep track. When you're ready to enjoy the chili again, there are a few easy ways to reheat it. You can use the microwave, stove, or even an oven. If using the microwave, heat in short intervals, stirring in between. On the stove, warm it over low heat, stirring often. If you use the oven, place it in a covered dish at a low temperature. After reheating, taste the chili. You might need to adjust the seasoning. Add a pinch of salt or more chipotle for extra flavor. In the fridge, your chili lasts about four days. Keep an eye on it after that. Signs that it has gone bad include an off smell or mold. If it looks or smells strange, it is best to toss it. Always trust your senses; they help you stay safe! The Smoky Chipotle Turkey Chili has a nice kick. The chipotle in adobo sauce gives it a smoky heat. If you are sensitive to spice, you can adjust the heat by using less chipotle. Start with one tablespoon and taste. If you want more heat, you can add more later. This way, you control how spicy your chili will be. Yes, you can use different meats in this chili. Ground chicken, beef, or pork all work well. If you prefer, you can even use plant-based meat. Just make sure to brown it well before adding the other ingredients. Each meat will add its own flavor, making the chili unique. This chili is perfect for meal prep. It stores well in the fridge for about four days. You can also freeze it for up to three months. To make a large batch, just double the ingredients. When you are ready to eat, simply reheat on the stove. Add a splash of broth if it gets too thick. This blog post guides you through making Smoky Chipotle Turkey Chili. We discussed the main ingredients, like ground turkey, bell peppers, and beans. I shared tips on spices and optional toppings. You learned step-by-step instructions for a flavorful dish, plus storage tips for leftovers. In the end, cooking should be fun and easy. Feel free to tweak the recipe to match your taste. Enjoy the process and dig into a bowl of chili that warms your heart!

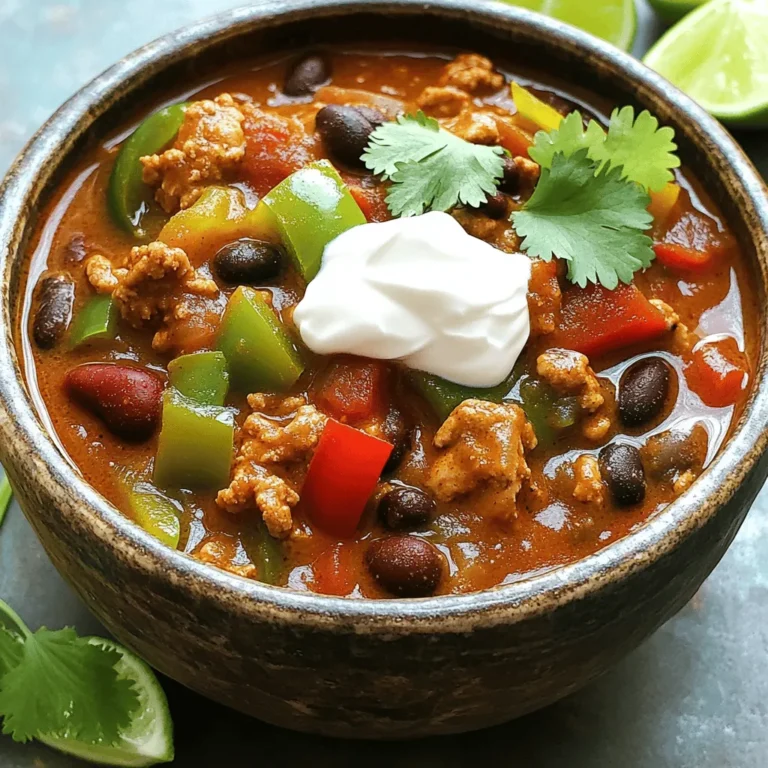
Smoky Chipotle Turkey Chili One Pot Delightful Meal

- 2 cups cooked pasta (penne or rotini) - 1 cup cooked chicken breast, shredded - 2 cups broccoli florets, steamed - 1 cup cheddar cheese, shredded - 1 cup mozzarella cheese, shredded - 1 cup cream cheese - 1 cup chicken broth - 1 teaspoon garlic powder - 1 teaspoon onion powder - 1 teaspoon Italian seasoning - 1/2 teaspoon black pepper - Salt to taste - 1/2 cup breadcrumbs (for topping) - 2 tablespoons olive oil When I prepare this dish, I love using fresh ingredients. The pasta should be cooked al dente. It holds its shape better in the bake. Shredded chicken adds protein and flavor. I often use leftover rotisserie chicken for ease. Steamed broccoli gives a bright color and crunch. I prefer florets for even cooking. The combination of cheddar and mozzarella cheese creates a creamy texture. Cream cheese adds richness and binds everything together. I season the mix with garlic powder and onion powder for depth. Italian seasoning brings warmth, while black pepper adds a slight kick. I always taste the mix before baking. Adjusting salt is key for balance. The breadcrumbs on top give a nice crunch. Mixing them with olive oil helps them brown. This adds a delightful texture to the dish. Always check for allergens when serving. This recipe contains dairy and gluten. It can be a hearty meal for families. Enjoy making this dish just as much as I do! {{ingredient_image_1}} 1. Preheat your oven to 350°F (175°C). This step is key for even cooking. 2. In a large bowl, add 2 cups of cooked pasta, 1 cup of shredded chicken, and 2 cups of steamed broccoli. Stir gently to combine them well. 1. In a separate bowl, mix 1 cup of cream cheese and 1 cup of chicken broth until smooth. 2. Stir in 1 teaspoon of garlic powder, 1 teaspoon of onion powder, 1 teaspoon of Italian seasoning, 1/2 teaspoon of black pepper, and salt to taste. This mix adds great flavor. 3. Pour the cream cheese mixture over the pasta, chicken, and broccoli. Stir gently to coat everything evenly. 4. Add half of the cheddar and mozzarella cheese. Mix again to combine. 5. Transfer everything to a greased 9x13 inch baking dish. Spread it out evenly. 6. Top with the rest of the cheddar and mozzarella cheese. 7. In a small bowl, mix 1/2 cup of breadcrumbs with 2 tablespoons of olive oil. Sprinkle this mix over the cheese for a crunchy topping. 8. Bake in the preheated oven for 25-30 minutes. Look for melted cheese and a golden brown top. 1. Allow the bake to cool slightly before serving. This makes it easier to dish out. 2. For serving, I suggest plating individual portions. A sprinkle of fresh herbs, like basil or parsley, adds color. You can also add extra cheese on top for fun! - To prepare broccoli correctly, cut it into small florets. Steam it for about 4-5 minutes. This gives a bright green color and keeps it tender yet crunchy. - For the best pasta, use penne or rotini. These shapes hold the sauce well. They also mix nicely with the chicken and broccoli. - Ensure even coating of all ingredients. Pour the cream cheese mixture over the pasta and stir gently. This way, every bite is creamy and full of flavor. - For the perfect cheese melt, use a mix of cheddar and mozzarella. This combo gives a great stretch and rich taste. Add the cheese to the top layer for a golden crust. - Garnish with fresh herbs like basil or parsley. This adds color and a fresh taste to your dish. - Serve in individual portions with a sprinkle of extra cheese on top. This makes the dish look appealing and inviting. Pro Tips Cook Pasta Al Dente: Make sure to cook the pasta just until al dente, as it will continue to cook in the oven and absorb some of the sauce. Use Rotisserie Chicken: For convenience and added flavor, consider using rotisserie chicken instead of cooking your own. Customize Your Vegetables: Feel free to mix in or substitute other vegetables such as spinach, bell peppers, or carrots for added nutrition and flavor. Make Ahead: This dish is perfect for meal prep! Assemble it in advance and store it in the refrigerator for up to 24 hours before baking. {{image_2}} You can easily swap ingredients in this dish. If you want a different protein, try turkey or tofu. Both options work well and taste great. For those who need dairy-free cheese, use almond or coconut-based cheese. These substitutes keep the dish creamy and flavorful. To add a unique twist, try different spices or herbs. A pinch of paprika or crushed red pepper can bring heat. Fresh herbs like basil or parsley can brighten the dish. You might also add other vegetables like bell peppers or spinach. These will boost the nutrition and color too. Feel free to change the pasta shape. Shells, fusilli, or even spaghetti can work nicely. For a healthier option, use whole grain pasta. If you want to avoid gluten, try gluten-free pasta. Both options give you a tasty meal while fitting your needs. To store leftovers, let the dish cool first. Place it in an airtight container. This keeps the pasta bake fresh. You can keep it in the fridge for up to 3 days. For freezing, allow the dish to cool completely. Wrap it tightly in plastic wrap. Then, place it in a freezer-safe bag. This helps to avoid freezer burn. You can freeze it for up to 2 months. When ready to eat, thaw it overnight in the fridge. To reheat, use the oven for the best texture. Preheat it to 350°F (175°C). Place the pasta bake in an oven-safe dish. Cover it with foil to keep it moist. Heat for about 20-25 minutes. You can also microwave it for quick reheating. Just use a microwave-safe bowl and cover it. Add a splash of chicken broth if it looks dry. Enjoy the same great taste! Yes, you can make this dish ahead of time. Prepare it up to the baking step. Cover it tightly and store it in the fridge. When you're ready, bake it straight from the fridge. You may need to add a few extra minutes to the baking time. This saves time on busy nights. If you want a swap for cream cheese, use Greek yogurt or sour cream. Both give a creamy texture. You can also try ricotta cheese for a lighter option. Each choice alters the taste slightly but keeps it delicious. Yes, this dish works great for meal prep. You can portion it into containers. It stays tasty in the fridge for up to four days. Just reheat it in the microwave or oven when ready to eat. This makes lunch or dinner easy and quick. To make it vegetarian, skip the chicken. Replace it with more veggies or some beans for protein. You can add mushrooms, bell peppers, or zucchini for more flavor. This keeps the dish hearty and satisfying. Yes, frozen broccoli is a great choice. It cooks quickly and saves prep time. Just steam it before adding to the dish. This ensures it blends well with the pasta and cheese. This dish is simple yet rich. We covered all the key ingredients and steps. Remember, choose pasta you love and cook the broccoli well. You can mix things up with different proteins and flavors too. Store leftovers wisely to enjoy later. With these tips, you’ll impress everyone with your cooking. Enjoy your creamy pasta bake!

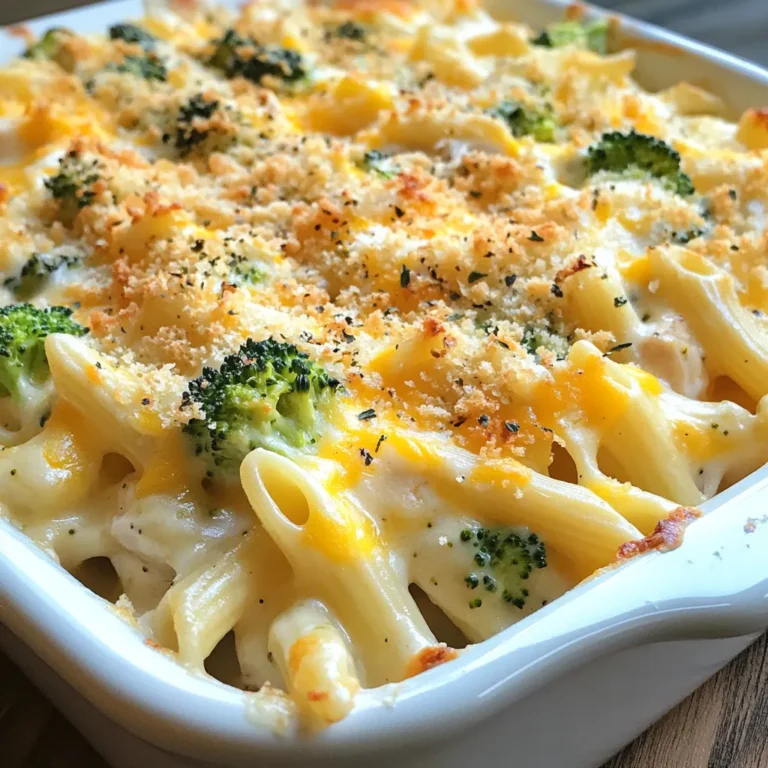
Broccoli Chicken Pasta Bake Flavorful Family Dinner

- 1 lb ground beef (or chicken) - 1 medium onion, sliced - 1 bell pepper (any color), sliced - 8 ounces mushrooms, sliced - 1 teaspoon garlic powder - 1 teaspoon onion powder - Salt and pepper to taste - 1 cup heavy cream - 2 cups shredded provolone cheese (or a blended cheese of your choice) - 2 tablespoons olive oil - Fresh parsley, chopped (for garnish) For this Low Carb Philly Cheesesteak Casserole, I like to use ground beef for its rich flavor. You can also use ground chicken if you prefer a lighter option. Next, I slice a medium onion, a colorful bell pepper, and some mushrooms. These add sweetness and depth to the dish. I season the mixture with garlic powder and onion powder. Salt and pepper are key to enhance all the flavors. For creaminess, I use heavy cream. It makes the dish smooth and rich. Provolone cheese tops it off. It melts beautifully and gives that classic cheesesteak taste. Olive oil helps in sautéing the veggies to get them soft and tasty. Finally, I like to sprinkle fresh parsley on top for a pop of color and extra flavor. This combination of ingredients creates a hearty and satisfying meal that is perfect for any low-carb diet. {{ingredient_image_1}} Start by heating two tablespoons of olive oil in a large skillet over medium heat. Add one medium sliced onion, one sliced bell pepper, and eight ounces of sliced mushrooms. Sauté these for about five to seven minutes. You want them soft and fragrant. Stir them often to prevent sticking. This mix adds great flavor to our casserole. Next, add one pound of ground beef or chicken to the skillet. Break it apart with a spatula as it cooks. Season the meat with one teaspoon of garlic powder, one teaspoon of onion powder, salt, and pepper to taste. Cook until the meat is browned and no longer pink, which takes about seven to ten minutes. This step is key for a tasty filling. Once the meat is cooked, pour in one cup of heavy cream. Stir well until all the ingredients are combined. Let it cook for another two to three minutes. This helps the mixture thicken slightly. After that, transfer it into a greased 9x13 inch baking dish, spreading it out evenly. Now, sprinkle two cups of shredded provolone cheese over the top of the mixture. This cheese melts nicely and adds a rich flavor. Place the dish in your preheated oven at 350°F (175°C). Bake for 25 to 30 minutes, or until the cheese is melted and bubbly. After baking, let it sit for five minutes before serving. This resting time helps it set. Enjoy your low carb Philly cheesesteak casserole! To make the best Low Carb Philly Cheesesteak Casserole, use fresh ingredients. I recommend using: - 1 lb ground beef or chicken - 1 medium onion, sliced - 1 bell pepper, sliced - 8 ounces mushrooms, sliced - 1 teaspoon garlic powder - 1 teaspoon onion powder - Salt and pepper to taste - 1 cup heavy cream - 2 cups shredded provolone cheese Garlic powder and onion powder add depth. Adjust salt and pepper to your taste. You can also add optional spices like paprika or cayenne for a kick. For a creamy casserole, the heavy cream is key. It brings richness that balances the meat and veggies. Cook everything until it thickens slightly before baking. This step locks in flavor and creaminess. Don't rush the sautéing process; let the veggies soften well. This makes every bite pleasant and smooth. Garnishing is simple but impactful. Sprinkle fresh parsley on top before serving. It adds color and a fresh taste. I love pairing this casserole with a low-carb salad. A green salad with a light vinaigrette complements the rich casserole. Enjoy it warm, right from the dish, for a cozy meal. Pro Tips Use High-Quality Cheese: Opt for a good quality provolone or cheese blend to enhance the flavor and creaminess of the casserole. Customize Your Veggies: Feel free to add or substitute other vegetables like zucchini or spinach for added nutrition and flavor. Let It Rest: Allow the casserole to sit for a few minutes after baking to help it set and make serving easier. Pair with Low-Carb Sides: Serve with a low-carb salad or roasted vegetables to complement the richness of the casserole. {{image_2}} You can switch up the ground beef in this dish. Try using ground chicken or turkey. Both options work well and keep it low-carb. If you want a plant-based version, use lentils or a meat substitute. These choices add unique flavors and textures. While provolone cheese is traditional, you can experiment with different cheese blends. Cheddar adds a sharp taste, while mozzarella gives a nice stretch. Mixing cheeses can create a richer flavor. Just make sure to use low-carb options to stay on track. Feel free to add other low-carb veggies to your casserole. Zucchini, spinach, or broccoli can work well. These veggies boost nutrients and flavor. You can mix and match based on what you have or like best. This makes your casserole fun and healthy. To store your leftovers, let the casserole cool first. Place it in an airtight container. This keeps the dish fresh for up to three days in the fridge. If you use glass containers, it can help keep odors away. Always label your container with the date. This way, you know when to use it. If you want to freeze the casserole, let it cool completely. Cut it into portions for easy use later. Wrap each piece tightly in plastic wrap, then place them in a freezer bag. Be sure to remove as much air as you can. The casserole can last in the freezer for up to three months. To reheat, the best method is to use the oven. Preheat it to 350°F (175°C). Place the casserole in an oven-safe dish and cover it with foil. Bake for about 20-25 minutes. If you want a crispy top, remove the foil for the last 5 minutes. You can also use the microwave, but the oven keeps the texture better. Heat in short bursts, stirring in between, until it's hot. Yes, you can prepare this casserole ahead. First, cook the meat and veggies. Then mix in the cream and cheese. Transfer this mixture to your baking dish. Cover it and store it in the fridge. You can bake it when you're ready. Just add an extra 5-10 minutes to the bake time. Absolutely! This recipe is gluten-free. The main ingredients, like ground beef, veggies, and cheese, contain no gluten. Always check the labels on your cheese and any seasonings. Some pre-packaged items may have hidden gluten. To adjust the spice levels, simply change the amount of seasoning. If you want more heat, add crushed red pepper or cayenne. For a milder dish, reduce the garlic powder or onion powder. Taste as you go to find your perfect balance. This article guides you through making a delicious low-carb casserole. We covered the main ingredients like meat, veggies, and cheese. I shared steps to prepare, cook, and bake your dish. The tips help you perfect flavor and texture. You can customize it with different proteins and cheeses. Proper storage and reheating keep leftovers tasty. Enjoy your cooking experience and impress your friends with this easy-to-follow recipe. Dive into new variations and make it your own!

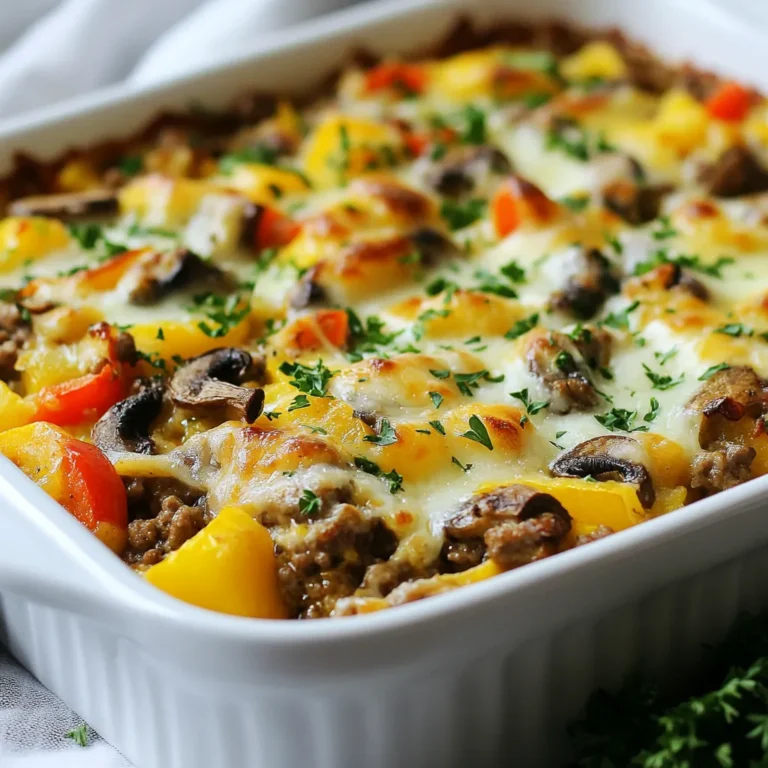
Low Carb Philly Cheesesteak Casserole Recipe Guide

To make a tasty baked potato chicken casserole, you need these ingredients: - 4 large russet potatoes, peeled and cubed - 2 cups cooked chicken, shredded (rotisserie chicken works great) - 1 cup sour cream - 1 cup shredded sharp cheddar cheese - 1 cup shredded mozzarella cheese - 1/2 cup milk - 1/2 cup green onions, chopped (plus extra for garnish) - 1 teaspoon garlic powder - 1 teaspoon onion powder - 1 teaspoon salt - 1/2 teaspoon black pepper - 1/4 teaspoon smoked paprika - 1/4 cup crispy fried onions for topping (optional) You can swap some ingredients for different flavors. If you want a lighter option, use Greek yogurt instead of sour cream. For a cheesy twist, try pepper jack cheese instead of cheddar. If you don’t have green onions, use regular onions or chives. For a vegetarian version, replace chicken with mushrooms or cooked lentils. You can also use sweet potatoes for a different taste. When picking potatoes, look for firm ones with no spots or bruises. Fresh chicken should smell clean and have a nice pink color. For cheese, choose blocks instead of pre-shredded for better melting. Check the date on sour cream to ensure freshness. Always buy green onions with bright green tops, as they will taste better in your dish. Fresh ingredients make your casserole more delicious! {{ingredient_image_1}} Start by washing the russet potatoes. Peel them and cut them into small cubes. Now, take a large pot, fill it with water, and add salt. Bring the water to a boil, then add the potato cubes. Cook them for about 15 to 20 minutes until they are tender. You can check by poking them with a fork. Drain the potatoes and set them aside. For the chicken, I prefer using rotisserie chicken. It is easy, tasty, and saves time. Shred the chicken into bite-sized pieces. This will help it mix well with the other ingredients. Grab a large mixing bowl. In this bowl, combine the shredded chicken, sour cream, and both types of cheese—sharp cheddar and mozzarella. Add in the milk, chopped green onions, garlic powder, onion powder, salt, black pepper, and smoked paprika. Stir everything until it’s mixed well. Be gentle when you add the drained potatoes. Fold them into the mixture slowly. You want to avoid mashing them too much. The potatoes should remain chunky for the best texture. Preheat your oven to 375°F (190°C). Now, take a greased 9x13 inch baking dish. Spoon the chicken and potato mixture into the dish, spreading it out evenly. If you love a little crunch, sprinkle crispy fried onions on top. Cover the dish with aluminum foil. Place it in the oven and bake for 25 minutes. After that, remove the foil and bake for another 10 to 15 minutes. Look for the casserole to bubble and the top to turn golden brown. Once it’s done, let it cool for about 5 minutes. Before serving, add some extra chopped green onions on top for a fresh touch. When making baked potato chicken casserole, avoid these common mistakes: - Overcooking potatoes: Boil them until tender but not mushy. Aim for about 15-20 minutes. - Skipping the mixing step: Mix the chicken and sauces well. This ensures even flavor. - Using too much salt: Be mindful, especially if your chicken is salted. Taste as you go. - Not letting it cool: Let the casserole sit for about five minutes before serving. This helps flavors settle. To boost flavors in your casserole, try these tips: - Use fresh herbs: Add chopped parsley or dill for a fresh taste. You can mix them in or use them as a garnish. - Experiment with spices: Try adding a pinch of cayenne pepper for heat or more smoked paprika for depth. - Try different cheeses: Mixing sharp cheddar with pepper jack cheese can add a creamy and spicy twist. - Squeeze fresh lemon juice: A bit of acidity can brighten the dish and balance the richness of cheese. This casserole pairs well with several sides to create a complete meal: - Green salad: A fresh salad with vinaigrette balances the richness of the casserole. - Steamed veggies: Broccoli or green beans add color and nutrients to your plate. - Garlic bread: A slice of toasted garlic bread makes for a comforting addition. - Pickles or olives: A small side of pickles or olives can add a nice tangy crunch. Pro Tips Choose the Right Potatoes: Russet potatoes are ideal for this casserole due to their fluffy texture when cooked, which complements the creamy ingredients perfectly. Use Rotisserie Chicken: For a quicker prep time, using rotisserie chicken not only saves time but also adds great flavor to the dish. Mix Cheeses for Depth: Combining sharp cheddar and mozzarella gives a nice balance of flavor and creaminess. Feel free to experiment with other cheese varieties! Let It Rest: Allowing the casserole to cool for a few minutes before serving helps it set, making it easier to portion and serve. {{image_2}} You can easily make a vegetarian version of the casserole. Swap the chicken for hearty veggies. Good choices include broccoli, bell peppers, or mushrooms. You can also use canned beans for protein. Replace the sour cream with a plant-based version. Use a dairy-free cheese to keep it creamy and cheesy. If you like heat, add some spice! Mix in diced jalapeños or a few dashes of hot sauce. You can also use pepper jack cheese for a kick. Another option is to sprinkle crushed red pepper flakes on top. These small changes bring bold flavors to the dish. For a low-carb twist, replace the potatoes with cauliflower. Steam the cauliflower until soft, then mash it. This keeps the creamy texture without the carbs. You can also skip the milk or use unsweetened almond milk. This way, you enjoy the casserole while staying on track with your diet. After enjoying your baked potato chicken casserole, let it cool to room temp. Then, cover it tightly with plastic wrap or aluminum foil. You can also use an airtight container. Store it in the fridge for up to four days. This way, it stays fresh and safe to eat. When you're ready to enjoy leftovers, reheating is key. Preheat your oven to 350°F (175°C). Place the casserole in an oven-safe dish. Cover it with foil to keep it moist. Heat for about 20-25 minutes or until hot throughout. You can also microwave individual portions for about 2-3 minutes. Stir halfway for even heating. If you want to keep your casserole longer, freezing is a great option. Cut the casserole into portions, then wrap each piece in plastic wrap. Place them in a freezer-safe bag or container. Label with the date. You can freeze it for up to three months. To reheat, thaw in the fridge overnight and follow the oven instructions above. Yes, you can use different types of cheese. I love mixing flavors. Try gouda or pepper jack for a twist. You could also use cream cheese for a creamy texture. Just remember, each cheese adds its unique taste. Keep your favorite cheese on hand for easy swaps. Making this casserole ahead of time is simple. You can prepare it a day before. Just follow the recipe up to the baking step. Cover it with foil and store it in the fridge. When you’re ready, bake it straight from the fridge. Just add a few extra minutes to the baking time. This casserole pairs well with many side dishes. A fresh green salad adds a nice crunch. You might enjoy steamed broccoli or sautéed green beans for color. Garlic bread is another great option for dipping. Feel free to mix and match your favorites! This blog post detailed how to make a tasty Baked Potato Chicken Casserole. We covered key ingredients, substitutions, and how to pick fresh ones. You learned step-by-step instructions for prep, mixing, and baking. Tips helped avoid common mistakes and enhance flavor. We explored variations like vegetarian options and low-carb choices. Finally, I shared storage tips for leftovers and reheating. Now you're ready to impress friends and family with this dish. Enjoy cooking and sharing your delicious casserole!

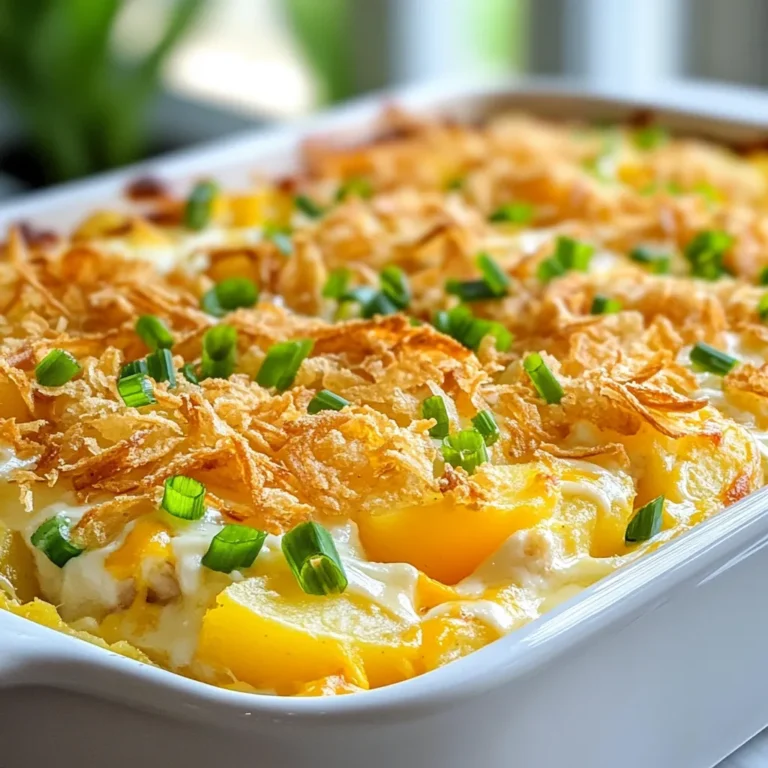
Baked Potato Chicken Casserole Hearty Dinner Dish

- 1 lb chicken breast - 2 tablespoons cornstarch - 2 tablespoons vegetable oil - 4 green onions - 3 cloves garlic - 1-inch piece ginger - 1/2 cup soy sauce - 1/4 cup brown sugar - 1 tablespoon rice vinegar - 1 teaspoon sesame oil - 1 red bell pepper - 1 cup broccoli florets - 1 tablespoon sesame seeds To make Better-Than-Takeout Mongolian Chicken, gather these fresh ingredients. Start with 1 lb of chicken breast. Slice it thin for quick cooking. Next, measure 2 tablespoons of cornstarch. This will help the chicken become crispy. You will need 2 tablespoons of vegetable oil for frying. For flavor, chop 4 green onions, mince 3 cloves of garlic, and grate a 1-inch piece of ginger. These will add a great taste to your dish. For the sauce, combine 1/2 cup of soy sauce with 1/4 cup of brown sugar. Add 1 tablespoon of rice vinegar and 1 teaspoon of sesame oil. This mix brings the dish to life. You will also need a 1 red bell pepper, sliced, and 1 cup of broccoli florets. These veggies add color and crunch. Finally, have 1 tablespoon of sesame seeds ready for a nice garnish. With these ingredients, you will create a meal that tastes better than takeout! Start by coating the thinly sliced chicken breast in cornstarch. This is a key step. The cornstarch helps create a crispy texture when you cook the chicken. Once coated, set the chicken aside for about ten minutes. This allows the cornstarch to stick better. Next, heat two tablespoons of vegetable oil in a large pan over medium-high heat. When the oil is hot, add the chicken pieces. Cook them until they are golden brown and cooked through. This should take about five to seven minutes. Once done, remove the chicken from the pan and set it aside. In the same pan, add four chopped green onions, three minced garlic cloves, and a one-inch piece of grated ginger. Sauté these for one to two minutes. You want to cook them until they become fragrant. This step adds a lot of flavor to your dish. Now, it’s time to make the sauce. In the pan, mix together half a cup of soy sauce, a quarter cup of brown sugar, one tablespoon of rice vinegar, and one teaspoon of sesame oil. Stir well until the brown sugar dissolves. This mixture will provide a rich, sweet, and salty flavor. Next, add one sliced red bell pepper and one cup of broccoli florets to the sauce. Cook for about three to four minutes. You want the vegetables to be tender-crisp. After that, return the cooked chicken to the pan. Stir everything together to coat the chicken in the sauce and veggies. Let the mixture simmer for an additional two to three minutes. This helps all the flavors blend together. Once done, remove the pan from heat. Serve your Mongolian chicken hot, garnished with one tablespoon of sesame seeds. Enjoy your delicious homemade meal! To get that perfect crunch, start by coating your chicken in cornstarch. This step is key. It helps create a crispy outer layer when you cook the chicken. After coating, let it sit for about 10 minutes. This helps the cornstarch stick well. When cooking, use medium-high heat. This temperature is best. It cooks the chicken quickly and makes it golden brown. If the heat is too low, the chicken can become soggy. You want it crispy! Want more spice? You can add red pepper flakes or chili paste. This gives the dish a nice kick. You can also try adding fresh chili for a different heat level. Using fresh ingredients like green onions and garlic is best. Fresh gives bright flavors. Dried herbs work too, but fresh will make your dish shine. Always taste as you go to make sure the flavors match your liking. For a full meal, serve your Mongolian chicken over jasmine rice or stir-fried noodles. Both pair well with the sauce and chicken. The rice soaks up the sauce nicely. For a pretty presentation, use a large bowl. Place the chicken on a bed of rice or noodles. Top with extra green onions and sesame seeds. This not only adds color but also makes the dish look gourmet. Enjoy your meal! {{image_2}} For a leaner option, try using boneless skinless chicken thighs instead of chicken breast. Thighs stay moist and can add rich flavor. You can also substitute soy sauce with coconut aminos. This swap reduces sodium and adds a hint of sweetness. Feel free to get creative with your veggies. Snap peas, carrots, or bok choy work well here. Just remember to adjust your cooking time. Softer veggies like spinach need less time, while firmer ones like carrots need more. If you need a gluten-free dish, use gluten-free soy sauce. This option has the same great taste without the gluten. You can also use cornstarch or arrowroot powder as thickeners. These options keep your sauce thick and smooth. After cooking, allow the Mongolian chicken to cool down. Place leftovers in airtight containers. This keeps the dish fresh and tasty. It is best to store it within two hours of cooking. The chicken can stay in the fridge for up to four days. If you want to keep it longer, consider freezing. To reheat, I like using the stove or microwave. For the stove, add a splash of water to the pan. Heat on low, stirring gently. This keeps the chicken juicy and flavorful. In the microwave, cover the dish with a damp paper towel. Heat in short bursts, stirring in between. This method prevents dry spots. To freeze, place cooled Mongolian chicken in freezer-safe bags. Remove as much air as possible. Label the bags with the date. This meal can last up to three months in the freezer. When ready to eat, thaw in the fridge overnight. For quicker thawing, place the bag in cold water. Always reheat until hot before serving. You can make Mongolian chicken less sweet by reducing the brown sugar. Try using two tablespoons instead of four. You can also add more soy sauce or vinegar to balance the flavors. This creates a savory taste without the extra sweetness. Yes, you can use frozen chicken. Just make sure to thaw it before cooking. You can do this in the fridge overnight or use the microwave. Once thawed, slice it thinly and coat it with cornstarch as usual. Mongolian chicken pairs well with several dishes. Jasmine rice or stir-fried noodles are great choices. You can also serve it with steamed broccoli or snap peas for extra veggies. Mongolian chicken is not spicy. It has a sweet and savory flavor profile, thanks to the soy sauce and brown sugar. If you like a bit of heat, consider adding chili flakes or sliced jalapeños to the dish. Mongolian chicken lasts about three to four days in the fridge. Store it in an airtight container to keep it fresh. Make sure to cool it down before putting it in the fridge. This recipe for Mongolian chicken combines simple ingredients into a flavorful meal. You learned how to prepare the chicken, create a savory sauce, and add vibrant vegetables. I shared tips to enhance texture and flavor. You also explored variations for health and dietary needs. Enjoy making this dish with your own twist! With proper storage, it can last for days. Happy cooking!

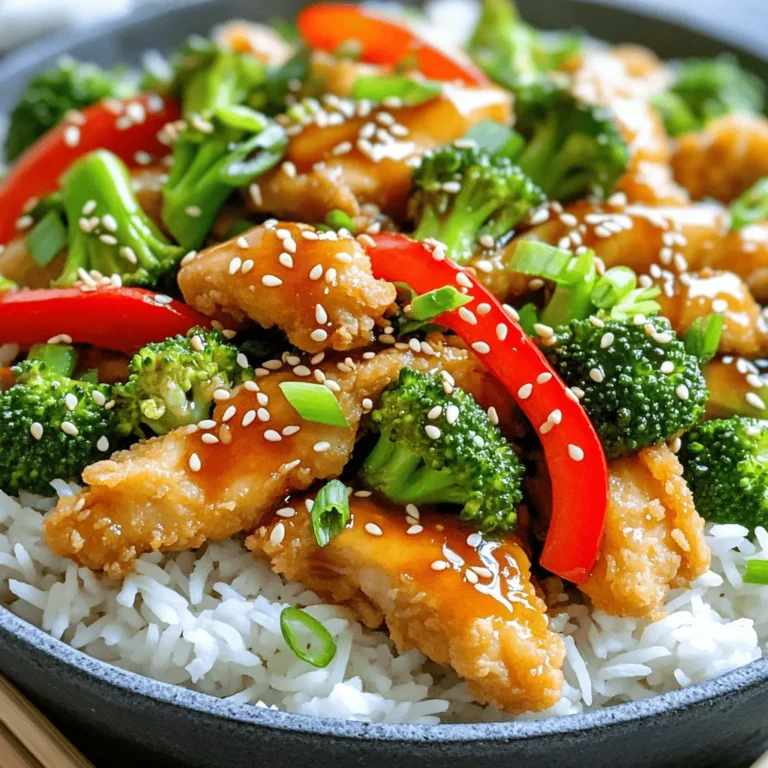
Better-Than-Takeout Mongolian Chicken Dinner Delight

PREV 1 … 28 29 30 … 57 NEXT
secrets pice kitchen

explore

DessertsDinnerAppetizersDrinks

Our Policies

  • Cookie Policy
  • Copyright Policy
  • Disclaimer
  • GDPR Policy
  • Terms Of Use
Back to Top
  • About
  • Contact Us
  • Privacy Policy
© 2025 secrets pice kitchen