FREE DINNER EBOOK! Get your copy!
  • Cookie Policy
  • GDPR Policy
  • Disclaimer
  • Terms Of Use
  • Visit my other site: Fun Cookie Recipes
secrets pice kitchen
  • Home
  • Dinner
  • Desserts
  • Drinks
  • Appetizers
  • Contact
  • About
  • Privacy Policy
  • Home
  • Dinner
  • Desserts
  • Drinks
  • Appetizers
  • Contact
  • About
  • Privacy Policy
  • Cookie Policy
  • GDPR Policy
  • Disclaimer
  • Terms Of Use
Visit my other site: Fun Cookie Recipes

HOME / CATEGORIES /

Latest

- 1 lb large shrimp, peeled and deveined - 1/2 cup roasted unsalted peanuts - 1 red bell pepper, diced - 1 green bell pepper, diced - 2-3 green onions, sliced - 3 cloves garlic, minced - 1 tablespoon fresh ginger, minced - 4 tablespoons soy sauce - 2 tablespoons hoisin sauce - 1 tablespoon rice vinegar - 1 tablespoon cornstarch - 2 tablespoons vegetable oil - 1 teaspoon crushed red pepper flakes - Salt and pepper to taste You can swap out shrimp for chicken or tofu. This makes it a great dish for all diets. Use other veggies like broccoli or snap peas if you like. For a vegan option, replace shrimp with tofu. You can also use tamari instead of soy sauce for a gluten-free version. These simple swaps let you enjoy this dish in many ways. First, you need to marinate the shrimp. Mix 1 pound of shrimp with 2 tablespoons of soy sauce, 1 tablespoon of cornstarch, and a pinch of salt and pepper. Let this sit for 15 minutes. The cornstarch helps create a nice texture and keeps the shrimp moist. Next, prepare the sauce. In a bowl, combine 3 tablespoons of soy sauce, 2 tablespoons of hoisin sauce, 1 tablespoon of rice vinegar, and 1 teaspoon of crushed red pepper flakes. Adjust the red pepper flakes based on your spice level. If you want it spicy, add more! Now it's time to cook. Heat 1 tablespoon of vegetable oil in a large skillet over medium-high heat. Add the marinated shrimp and stir-fry for 2-3 minutes until they turn pink and opaque. Remove the shrimp and set them aside. In the same skillet, add another tablespoon of oil. Add minced garlic, ginger, and the diced bell peppers. Stir-fry for 3-4 minutes. This keeps the veggies crunchy and colorful. Finally, combine everything. Return the cooked shrimp to the skillet. Pour in the sauce and mix gently for another 1-2 minutes. Stir in 1/2 cup of roasted peanuts. Adjust salt, pepper, or red pepper flakes to taste. Serve hot over jasmine rice and garnish with green onions for a beautiful touch. Enjoy your meal! To get the best shrimp, focus on timing and heat. Cook shrimp over medium-high heat for just 2-3 minutes. They should turn pink and opaque. If you leave them too long, they can turn rubbery. Always check that they are fully cooked but not overdone. You can boost the flavor with extra spices. Consider adding sesame oil for a nutty taste. A splash of chili oil can also increase the heat. Pair the dish with steamed jasmine rice for a perfect balance. The rice soaks up the sauce and adds great texture. One big mistake is overcooking the shrimp. Remember, they cook fast. Take them out once they turn pink. Another mistake is not balancing the flavors. Taste the sauce before adding it to the shrimp. Adjust it with more soy sauce or vinegar if needed. This will keep your dish delicious and well-rounded. {{image_2}} You can swap shrimp for chicken or tofu. Chicken gives a hearty taste. Tofu makes a great vegan choice. Just marinate it like shrimp. This keeps the flavor strong. If you need gluten-free options, use tamari instead of soy sauce. It tastes just as good. For low-carb diets, skip the sugar and use more veggies. Cauliflower rice makes a good base too. Many regions have their own spin on Kung Pao. In some places, they add different nuts like cashews. Others might use different types of pepper for heat. This keeps the dish fresh and exciting. You can try various adaptations to find your favorite. To keep your Kung Pao shrimp fresh, use airtight containers. Glass containers work great. They let you see what’s inside and do not retain odors. Plastic containers are fine too, but make sure they seal tightly. Label your containers with the date. This way, you can track how long they’ve been stored. When reheating, avoid microwaving for too long. Microwaves can make shrimp tough. Instead, use a skillet over low heat. Add a splash of water or broth to keep moisture. Stir gently until heated through. This method helps keep the shrimp juicy and the veggies crunchy. To freeze, first cool the dish to room temperature. Then, use freezer-safe containers or bags. Remove as much air as possible to prevent freezer burn. Kung Pao shrimp can last up to three months in the freezer. When ready to eat, thaw it in the fridge overnight before reheating. Kung Pao shrimp comes from China. It has roots in Sichuan cuisine. The dish is named after Ding Baozhen, a governor. He liked the dish so much it got his title, Kung Pao. It uses spicy flavors and peanuts. The mix of ingredients makes it both tasty and crunchy. Yes, you can prep Kung Pao shrimp in advance. For best results, marinate the shrimp first. Store it in the fridge for up to 24 hours. You can also chop the veggies ahead. Just keep them in an airtight container. Cook it fresh when ready for the best taste. Kung Pao shrimp can be spicy, but you control the heat. The crushed red pepper flakes add the kick. If you want it milder, use less or skip them. You can also add more sugar or soy sauce to balance the heat. Adjust it to fit your taste. Spicy Kung Pao shrimp pairs well with rice. Steamed jasmine rice is a classic choice. You can also serve it with fried rice for extra flavor. A light salad can balance the dish too. For drinks, try iced tea or a light beer. This blog covered how to make Kung Pao Shrimp from start to finish. We discussed choosing fresh ingredients, marinating shrimp, and cooking techniques for the best flavor. I shared tips to avoid common mistakes and variations for different diets. Remember, you can customize this dish easily! Enjoy your delicious Kung Pao Shrimp, serve it with rice, and impress your friends. With the right techniques, you’ll make a meal that stands out.

Spicy Kung Pao Shrimp Bold and Flavorful Delight

- 4 boneless, skinless chicken thighs - 1 cup jasmine rice, rinsed - 2 cups chicken broth - 4 tablespoons unsalted butter - 6 cloves garlic, minced - 1 teaspoon onion powder - 1 teaspoon dried oregano - 1 teaspoon smoked paprika - Salt and pepper to taste - 1 cup frozen peas - 1 tablespoon fresh parsley, chopped (for garnish) - Zest of 1 lemon Gathering the right ingredients is key to making this dish shine. Chicken thighs are juicy and full of flavor, perfect for our one-pan meal. Jasmine rice cooks up fluffy, soaking up all the delicious broth. Chicken broth adds depth, making the rice taste amazing. Butter is the star here. It brings richness and helps the garlic shine. Minced garlic adds a strong, aromatic kick. Onion powder rounds out the flavor. For seasonings, dried oregano adds earthiness, and smoked paprika gives a hint of warmth. Don't forget salt and pepper! They keep everything balanced and tasty. Frozen peas add a pop of color and sweetness. Fresh parsley makes it pretty and adds freshness, while lemon zest brightens the whole dish. This mix of ingredients creates a comforting and flavorful meal that you’ll love to share. To start, you need to sear the chicken thighs. First, melt 2 tablespoons of butter in a large skillet over medium-high heat. Season the chicken with salt, pepper, onion powder, oregano, and smoked paprika. This mix gives the chicken a robust flavor. Once the butter is hot and bubbling, add the chicken thighs. Sear them for about 5 to 6 minutes on each side. Look for a golden brown color. When cooked, remove the thighs and set them aside. Next, let’s focus on the rice. In the same pan, add the remaining 2 tablespoons of butter and the minced garlic. Sauté the garlic for about 1 minute. You want it fragrant, but be careful not to burn it. Then, pour in the rinsed jasmine rice. Stir the rice for about 1 to 2 minutes to toast it in the garlic butter. This step adds a nice flavor to the rice. Now, add the chicken broth and the zest of the lemon. Bring the mixture to a gentle simmer. Now it’s time to bring everything together. Return the seared chicken thighs to the pan, nestling them into the rice. Make sure they are mostly covered by the rice. Cover the skillet with a lid and reduce the heat to low. Cook for about 15 to 20 minutes. During this time, the rice will become tender and soak up the broth. After about 15 minutes, you can add the frozen peas on top of the rice. Cover the skillet again and cook for an additional 5 minutes. This will heat the peas through. Once done, fluff the rice with a fork. Taste and adjust the seasoning with salt and pepper if needed. For a fresh pop, garnish with chopped parsley before serving. Enjoy your one-pan garlic butter chicken and rice! To get golden-brown chicken, start with dry chicken thighs. Pat them with a paper towel. Season them well with salt, pepper, onion powder, oregano, and smoked paprika. Heat your skillet over medium-high heat. Melt 2 tablespoons of butter until it bubbles. Place the chicken in the pan without crowding. Cook for about 5-6 minutes on each side. Look for a rich golden color to know it’s ready. To check doneness, use a meat thermometer. The chicken should reach 165°F. If you don’t have one, cut into the thickest part. The meat should be white and juices should run clear. For tender and flavorful rice, rinse jasmine rice well under cold water. This removes excess starch and helps prevent stickiness. After toasting it in garlic butter, add chicken broth and lemon zest. Simmer gently for about 15-20 minutes. To avoid mushy rice, use the right liquid-to-rice ratio. For jasmine rice, 2 cups of broth to 1 cup of rice works best. Once the rice absorbs the liquid, avoid stirring it too much. Stirring can break the grains and make it mushy. Garnishing makes your dish pop. Chopped fresh parsley adds color and freshness. You can also sprinkle lemon zest on top for brightness. When serving, plate the rice first, then place the chicken on top. This way, the chicken sits on a bed of rice, soaking up the flavors. You can add a lemon wedge on the side for an extra zing. {{image_2}} You can switch the chicken thighs for chicken breasts. Chicken breasts are leaner and cook faster. Just remember to adjust the cooking time. If you prefer plant-based meals, try tofu or chickpeas. Tofu absorbs flavors well. Chickpeas add protein and a nice texture. Both options make this dish hearty and satisfying. You can substitute jasmine rice with basmati rice. Basmati has a nutty taste and fluffy texture. It pairs well with garlic butter and chicken. Brown rice is another great choice. It’s whole grain and adds fiber. Just keep in mind that it takes longer to cook than jasmine rice. Adding vegetables can brighten this dish. Try bell peppers, carrots, or spinach. They bring color and nutrients. For extra flavor, add spices like cumin or chili powder. Fresh herbs such as thyme or basil can also enhance the taste. Mix and match to create your perfect dish. - Refrigeration: Place leftovers in an airtight container. This keeps the chicken and rice fresh. Store in the fridge for up to 3 days. - Freezing: For longer storage, freeze the dish in a freezer-safe container. It will last for up to 3 months. Make sure to cool the dish completely before freezing. - Microwave: Use a microwave-safe dish. Heat in 1-minute intervals, stirring in between. This ensures even warming. - Stovetop: Add a splash of chicken broth to a skillet. Heat over low, stirring gently. This helps keep the rice moist and fluffy. Yes, you can use frozen chicken for this recipe. Just remember to thaw it first. Frozen chicken takes longer to cook than fresh. If you use frozen chicken, cook it for a few extra minutes. Always check the internal temperature; it should reach 165°F. Leftovers can stay fresh in the fridge for up to four days. Make sure to store them in an airtight container. If you want to keep them longer, consider freezing the leftovers. They can last up to three months in the freezer. You can serve this dish with a side salad or steamed vegetables. Garlic bread also pairs well, adding a nice crunch. For a light option, consider a cucumber salad. These sides can balance the rich flavors of the chicken and rice. Yes, this recipe is great for meal prep. You can cook a big batch and portion it out. It saves time during busy weeks. Plus, it reheats well, so you can enjoy it later. This makes it a smart choice for lunch or dinner. You can prepare this dish a day ahead. Cook it fully and then store it in the fridge. When ready to eat, reheat it on the stovetop or in the microwave. Just be careful not to overcook it when reheating! In this blog post, we explored a tasty chicken and rice dish. We discussed key ingredients like chicken thighs, jasmine rice, and flavorful seasonings. I provided step-by-step cooking instructions and tips to perfect your dish. You learned about variations for proteins and rice types. Lastly, we went over storage and reheating methods. This recipe is simple yet flexible. It’s great for family meals or meal prep. I hope you enjoy making it and share it with loved ones.

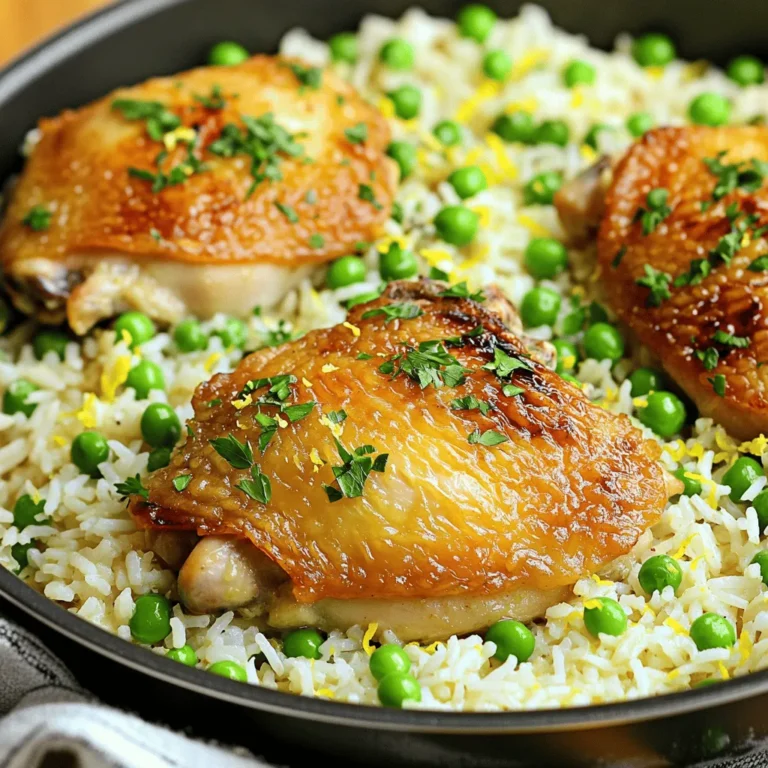
One-Pan Garlic Butter Chicken and Rice Delight

To make No-Bake S’mores Cheesecake Cups, you will need: - 1 cup graham cracker crumbs - 1/4 cup unsweetened cocoa powder - 1/3 cup melted unsalted butter - 2 cups cream cheese, softened - 1/2 cup powdered sugar - 1 teaspoon vanilla extract - 1 cup whipped cream - 1 cup mini marshmallows - 1/2 cup chocolate chips, melted - Additional mini marshmallows and chocolate shavings for topping Gather these items before you start. Having everything ready makes cooking easy and fun. You can add these toppings for extra flavor: - Toasted mini marshmallows - Chocolate shavings - Extra melted chocolate - Crushed graham crackers These toppings add a nice touch. They make the cups look great and taste even better. You can make swaps if you don’t have something. For example: - Use Oreo crumbs instead of graham crackers for a twist. - Swap the cream cheese for a dairy-free cream cheese to make it vegan. - Use honey or maple syrup instead of powdered sugar for sweetness. Feel free to get creative! Cooking is all about making it your own. To start, gather your ingredients. You need graham cracker crumbs, cocoa powder, and melted butter. In a medium bowl, mix the crumbs, cocoa, and butter. Stir until the crumbs look like wet sand. This mixture will form a tasty base for your cups. Next, take serving cups or jars. Divide the crust evenly between them. Press it down firmly at the bottom. This creates a strong base. Place the cups in the fridge while you make the filling. Now, let’s make the cheesecake filling. In a large bowl, add softened cream cheese. Use an electric mixer to beat it until smooth. Then, add powdered sugar and vanilla extract. Mix these until they blend well together. Next, fold in the whipped cream gently. This step adds fluffiness to your filling. Be careful not to stir too hard; you want to keep that nice airy texture. Time to layer the cups! Spoon the cheesecake mixture over the chilled crust. Fill each cup to the top. While the filling is soft, drizzle melted chocolate over it. This adds a rich flavor. Now, sprinkle mini marshmallows on top. If you like, drizzle a bit more melted chocolate over the marshmallows. This gives them extra sweetness. Chill the cups in the fridge for at least two hours. This allows the flavors to meld and the cups to set. If you want toasted marshmallows, use a kitchen torch or broiler carefully. Before serving, add more mini marshmallows and chocolate shavings on top. This makes them look great and adds a bit of crunch. Enjoy your delicious No-Bake S’mores Cheesecake Cups! To get a smooth cheesecake, start with softened cream cheese. Cold cream cheese can clump. Beat the cream cheese until it's creamy and fluffy. Mix in the powdered sugar and vanilla next. This keeps the filling smooth. When you fold in the whipped cream, be gentle. This helps keep the airy texture. If you mix too hard, the filling can get dense. These cups are great for parties or family dinners. You can serve them in small jars or cups. For a fun touch, add a toasted marshmallow on top. Use a kitchen torch for a smoky flavor. You can also drizzle more melted chocolate over the top for extra sweetness. Serve with graham crackers on the side for crunch. One mistake is not chilling the cups long enough. They need at least 2 hours to set. If you skip this step, they can fall apart when served. Another mistake is overmixing the whipped cream. This leads to a dense filling. Finally, don’t skip the crust preparation. A firm crust holds everything together. {{image_2}} You can tweak the classic s’mores cheesecake cups to fit your taste. Try using Oreo crumbs instead of graham cracker crumbs for a chocolatey twist. This small change gives a richer flavor and texture. You can also swap the mini marshmallows for crushed candy bars or peanut butter chips. This adds a fun surprise in every bite. For a fruity version, mix in fresh berries or a layer of fruit preserves. These alternatives bring new flavors and keep the dessert exciting. Making these cups gluten-free is easy. Just use gluten-free graham crackers or almond flour for the crust. For a vegan version, replace the cream cheese with a plant-based alternative. Use coconut cream or cashew cream for a rich texture. Switch the powdered sugar with a vegan sweetener. You can also find vegan whipped cream at stores. These swaps let everyone enjoy this treat without missing out. Seasonal flavors can make your s’mores cheesecake cups even more special. In fall, add pumpkin spice to the filling for a cozy taste. During winter, try peppermint extract for a refreshing holiday twist. You can also mix in seasonal fruits like strawberries in spring or apples in autumn. Top with crushed nuts or toffee bits for extra crunch. These small changes make your dessert feel fresh and festive. To keep your leftover cheesecake cups fresh, place them in the fridge. Use an airtight container or cover them with plastic wrap. This will stop air from making them dry. The cool temperature keeps the cream cheese filling nice and firm. Enjoy your treats within three days for the best taste. If you want to save some for later, you can freeze them. First, let the cups chill completely. Then, cover each cup tightly with plastic wrap. Place them in a freezer-safe container. This helps keep them fresh. You can freeze the cups for up to one month. When ready to enjoy, move them to the fridge overnight to thaw. These no-bake s'mores cheesecake cups last well if stored properly. In the fridge, they are good for about three days. If you freeze them, they stay tasty for up to a month. For the best flavor, try to eat them fresh. Yes, you can use store-bought whipped cream. It saves time and works well. Just make sure it is fresh and fluffy. This will help keep your cheesecake light. If you want, you can also make your own for a richer taste. These cheesecake cups need to chill for at least 2 hours. This time helps the layers set well. If you can wait longer, chilling overnight is even better. This way, the flavors meld together nicely. Absolutely! You can prepare these cups a day ahead. Keep them in the fridge until you are ready to serve. This makes them perfect for parties or gatherings. Just add any toppings before serving for the best look. This blog post guides you through making delicious cheesecake cups. We covered key ingredients, step-by-step instructions, and helpful tips. You learned about variations and easy substitutions, perfect for any diet. Now, you can craft tasty treats at home with ease. Remember the tips to avoid common mistakes. These cheesecake cups are fun to make and share. Enjoy your creamy creations and impress your friends with your skills!

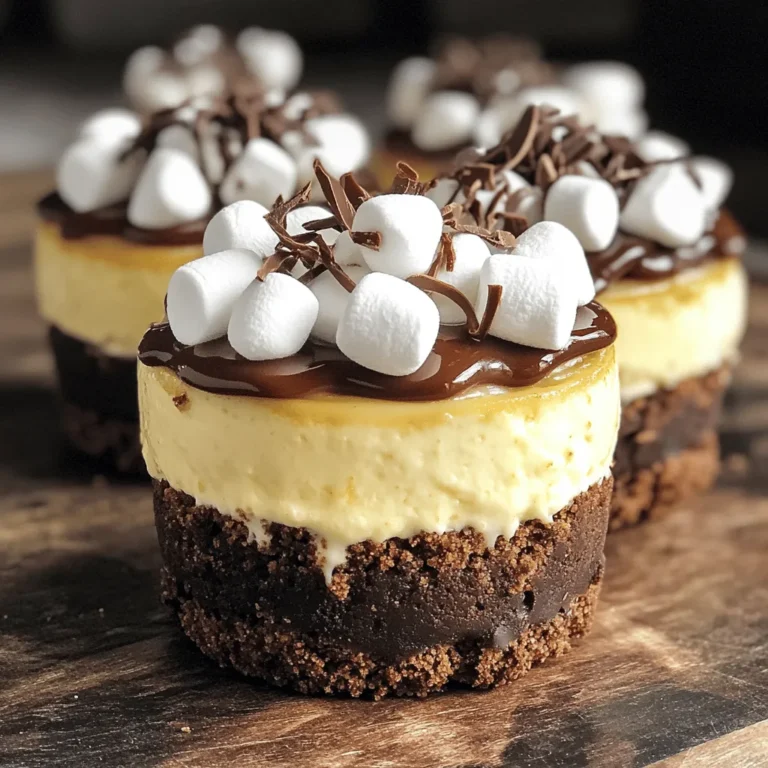
No-Bake S’mores Cheesecake Cups Delicious and Simple

- 1 lb chicken tenderloins - 1/2 cup Dijon mustard - 1/4 cup honey To make these chicken tenders, start with fresh chicken tenderloins. They cook quickly and stay juicy. Next, grab Dijon mustard and honey. These two combine to make a sweet and tangy marinade that brings out the best flavors in the chicken. - 1 teaspoon garlic powder - 1 teaspoon onion powder - 1/2 teaspoon smoked paprika The spices add depth to the dish. Garlic powder lends a rich taste, while onion powder adds sweetness. Smoked paprika gives a hint of smokiness that enhances the overall flavor. Don’t skip these! - 1 cup panko breadcrumbs - 1/4 cup all-purpose flour - 2 large eggs, beaten Panko breadcrumbs give a nice crunch. They are lighter and crispier than regular breadcrumbs. Use all-purpose flour for the first step of coating the chicken. The beaten eggs help the breadcrumbs stick well. This combination makes each bite irresistible. First, we need to make the honey mustard marinade. In a medium bowl, mix together the Dijon mustard, honey, garlic powder, onion powder, smoked paprika, salt, and pepper. Stir until the mixture is smooth and well combined. This marinade adds rich flavor to the chicken. Next, add the chicken tenderloins to the bowl. Make sure each piece is well coated in the marinade. Cover the bowl and let it sit in the fridge for at least 30 minutes. This step helps the chicken soak up all the yummy flavors. Now let’s set up our breading station. Grab three shallow bowls. In the first bowl, add the all-purpose flour. In the second bowl, place the beaten eggs. In the last bowl, fill it with panko breadcrumbs. When breading, start with the flour. Dredge each chicken tender, shaking off any extra flour. Next, dip it into the beaten eggs, letting any excess drip off. Finally, coat it with the panko breadcrumbs. Press down gently to help them stick. This will give the chicken a nice crunch. Before cooking, preheat your air fryer to 400°F (200°C). This usually takes about 5 minutes. Preheating helps the chicken cook evenly and get that golden color we all love. When the air fryer is ready, arrange the breaded chicken tenders in a single layer in the basket. Make sure not to overcrowd the basket. This ensures even cooking and crispiness. You might need to cook in batches. Cook the chicken tenders for 10 to 12 minutes. Remember to flip them halfway through for even browning. They should turn golden brown and reach an internal temperature of 165°F (75°C). After cooking, let them rest for a couple of minutes before serving. Enjoy the crunch! Marinating is key. Let your chicken sit in the honey mustard mix for at least 30 minutes. This time helps the flavors soak in. If you want to change it up, try maple syrup instead of honey. You can also use yellow mustard if you prefer a milder taste. For a crispy coating, use panko breadcrumbs. They give a crunch that regular breadcrumbs can't match. Make sure to press the panko onto the chicken. This helps it stick better. Cooking times may vary between air fryers. Always check for an internal temperature of 165°F. If your air fryer runs hot, start with 8 minutes and check for doneness. Pair your chicken tenders with a variety of dipping sauces. Honey mustard sauce is a classic choice. You can also try ranch or barbecue sauce for a fun twist. For side dishes, fresh veggie sticks add a nice crunch. French fries or a simple salad also work well. {{image_2}} You can spice things up with a spicy honey mustard variation. Just add some hot sauce or cayenne pepper to the marinade. This gives your chicken tenders a nice kick. You can also try an herb-infused marinade. Mix in fresh or dried herbs like thyme or rosemary. These herbs add a great depth of flavor to the dish. If you don’t have an air fryer, you can still make these chicken tenders. For oven-baked instructions, preheat your oven to 425°F (220°C). Place the breaded chicken on a baking sheet lined with parchment paper. Bake for 15–20 minutes, flipping halfway through. For a pan-fried option, heat oil in a skillet over medium heat. Cook the tenders for about 5–7 minutes on each side. This gives them a crispy texture too! You can easily make this dish gluten-free. Use gluten-free breadcrumbs and flour instead. For low-calorie alterations, cut back on honey and use less oil when frying. You can also bake them for a lighter option. These small changes help fit various diets while keeping the taste delicious! To keep your air fryer honey mustard chicken tenders fresh, store them in the fridge. Place the cooked tenders in an airtight container. This helps keep them moist. You can also wrap them in plastic wrap or foil. They will stay good for up to three days. If you want to save some for later, freezing is a great option. First, let the cooked chicken tenders cool completely. Then, place them in a freezer-safe bag or container. Squeeze out as much air as you can. This helps prevent freezer burn. They can last up to three months in the freezer. When you're ready to eat them, thaw the tenders in the fridge overnight. This keeps them safe and tasty. The best way to reheat chicken tenders is in the air fryer. Preheat your air fryer to 350°F (175°C). Place the tenders in a single layer in the basket. Heat them for about 5 to 7 minutes. Check if they are hot all the way through. To avoid sogginess, do not cover the tenders while reheating. This keeps them crispy. Enjoy your tenders just like they were fresh! Cook chicken tenders in the air fryer for 10-12 minutes at 400°F (200°C). Flip them halfway through cooking. They should turn golden brown and be fully cooked. Make sure the internal temperature reaches 165°F (75°C). This ensures they are safe to eat and stay juicy. You can use frozen chicken tenderloins, but it’s best to thaw them first. Thawing helps the marinade soak in better. If you use frozen, add a few extra minutes to the cooking time. Check that they reach the safe internal temperature of 165°F (75°C) before serving. Serving sides can enhance your meal. Here are some popular options: - French fries: Classic and loved by all. - Coleslaw: Adds crunch and creaminess. - Steamed veggies: A healthy balance. - Macaroni and cheese: Comfort food favorite. For dipping sauces, consider these choices: - Extra honey mustard: Perfect for dipping. - Ranch dressing: Creamy and cool. - BBQ sauce: A smoky touch. Feel free to mix and match sides and sauces to suit your taste! You learned how to make tasty honey mustard chicken tenders. We covered key ingredients, from chicken tenderloins to spices and breading. You now know step-by-step instructions for marinating, breading, and cooking in an air fryer. With these tips, you can enjoy perfect flavor and texture. Don't forget to try the variations, like spicy marinades. Remember, storage and reheating can keep your leftovers fresh. Get ready to impress with this easy, yummy recipe!

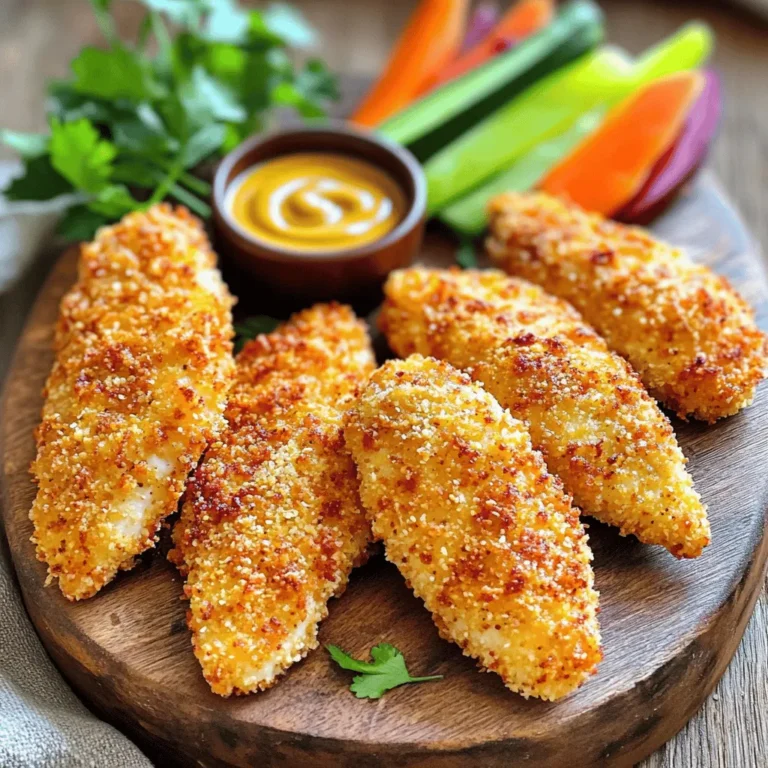
Air Fryer Honey Mustard Chicken Tenders Crunchy Dish

- Chicken: 1 lb boneless, skinless chicken breasts - Rice: 1 cup wild rice, rinsed and drained - Vegetables: 1 medium onion, diced; 2 carrots, diced; 2 celery stalks, diced; 4 cloves garlic, minced - Seasonings: 1 teaspoon dried thyme; 1 teaspoon dried parsley; salt and pepper to taste - Liquid: 6 cups chicken broth; 1 cup heavy cream or coconut cream - Add-ins: 1 cup frozen peas; 2 tablespoons olive oil; fresh parsley for garnish In this creamy soup, chicken and wild rice shine. The chicken provides protein and flavor. I like using boneless, skinless chicken breasts. They stay tender and cook well in the slow cooker. Rinsing the wild rice helps remove extra starch. This makes the rice fluffier and prevents clumping. Next, we have our veggies. Onions, carrots, and celery create a lovely base. I dice them small so they cook evenly. Garlic adds a punch of flavor. Using fresh garlic enhances the taste. Now let’s talk seasonings. Dried thyme and parsley bring warmth and earthiness. I always add salt and pepper to taste. The chicken broth gives the soup a rich, savory depth. For creaminess, I choose heavy cream or coconut cream. Both options make the soup smooth and luscious. You can add frozen peas for a pop of color and sweetness. Finally, I finish the soup with a drizzle of olive oil. This adds richness and depth. A sprinkle of fresh parsley gives a bright touch. Each ingredient plays a role in making this soup a warm, comforting delight. First, heat 2 tablespoons of olive oil in a large skillet over medium heat. Add diced onion, carrots, and celery. Sauté them for about 5-7 minutes until they soften. This step builds a rich flavor base for your soup. Next, add 4 minced garlic cloves to the skillet. Sauté for an additional minute until it smells great. This will bring out the garlic's best taste. Now, place the sautéed vegetables into your slow cooker. Add 1 pound of boneless, skinless chicken breasts and 1 cup of rinsed wild rice. Pour in 6 cups of chicken broth. Sprinkle in 1 teaspoon each of dried thyme and dried parsley. Season the mixture with salt and pepper to taste. Cover the slow cooker and set it to cook. Use the low setting for 6-7 hours or the high setting for 3-4 hours. Your soup will be done when the chicken is fully cooked and the rice is tender. After the cooking time, carefully remove the chicken breasts from the slow cooker. Use two forks to shred the chicken. Return the shredded chicken back into the soup. Next, stir in 1 cup of heavy cream or coconut cream and 1 cup of frozen peas. Let the soup cook for an extra 20-30 minutes on low. This step warms the soup and makes it creamy. Taste it to see if it needs more salt or pepper. You can choose between heavy cream and coconut cream. Heavy cream gives a rich taste. Coconut cream adds a hint of sweetness. This choice depends on your taste. You can also adjust the seasoning. A little more salt or pepper can boost flavor. Try adding garlic powder or onion powder for depth. To avoid dry chicken, cook it on low heat. This slow cooking helps keep the chicken moist. You can also shred the chicken before adding cream. This way, it absorbs more flavor. Sautéing vegetables makes a big difference too. It brings out their natural sweetness and flavor. Cook them until they are soft before adding to the slow cooker. For a great presentation, use fresh parsley. Just chop it and sprinkle it on top. This adds color and freshness. You can pair the soup with crusty bread. A side salad also makes a nice touch. Both options balance the creaminess of the soup. {{image_2}} You can switch up the protein in this soup. Try using turkey instead of chicken. Tofu also works well for a plant-based option. Both will add a different texture and flavor. Adding more vegetables can boost nutrition and taste. Spinach adds a nice green color and flavor. Corn gives a sweet crunch that brightens the dish. Feel free to mix and match. If you need gluten-free options, choose a gluten-free rice blend. Many brands offer wild rice mixes that are safe for your diet. These blends enhance flavor without any gluten. For dairy-free soup, use coconut cream instead of heavy cream. It gives a rich texture and a hint of sweetness. This option keeps the soup creamy without dairy. Want to spice things up? Add a teaspoon of paprika for a smoky taste. A splash of lemon juice brightens the soup and adds freshness. Herbs can also change the flavor profile. Try adding fresh dill or rosemary for a fragrant twist. Both herbs pair well with chicken and enhance the overall taste of the soup. To store your leftover soup, let it cool first. Transfer it to an airtight container. Keep it in the fridge for up to three days. This soup tastes great when fresh, but you can still enjoy it later. You can freeze this soup without losing its creamy goodness. Use a freezer-safe container, leaving some space at the top for expansion. It keeps well for up to three months. When ready to eat, thaw it overnight in the fridge. To reheat, warm it on the stove over low heat. Stir often to keep the texture smooth. Get a head start on dinner by prepping your ingredients ahead of time. Chop the onion, carrots, and celery, then store them in the fridge. You can also rinse the wild rice in advance. When you're ready to cook, just toss everything into the slow cooker. It’s great for busy days, making meals easy and quick! Can I make Slow Cooker Creamy Chicken Wild Rice Soup ahead of time? Yes, you can make this soup ahead of time. Prepare it, cool it down, and store it in the fridge. Just reheat it before serving. How do I know when the chicken is done cooking? The chicken is done when it reaches 165°F. You can use a meat thermometer for accuracy. The chicken will also look white and tender. Is it possible to cook this soup on the stovetop instead of in a slow cooker? Yes, you can cook it on the stovetop. Just follow the same steps, but simmer for about 30-40 minutes until the chicken is cooked. Can I substitute wild rice with another type of rice? Yes, you can use brown rice or white rice. Keep in mind that cooking times may change slightly. What can I serve alongside this creamy soup? This soup pairs well with bread or a simple salad. You can also enjoy it with crackers for a crunchy contrast. You learned how to make Slow Cooker Creamy Chicken Wild Rice Soup. We covered the key ingredients, the steps to prepare it, and tips for success. You can customize this recipe easily by changing proteins, veggies, or seasonings. Proper storage ensures it stays delicious later. Now, you can enjoy a warm, comforting bowl anytime. Get creative and make it your own!

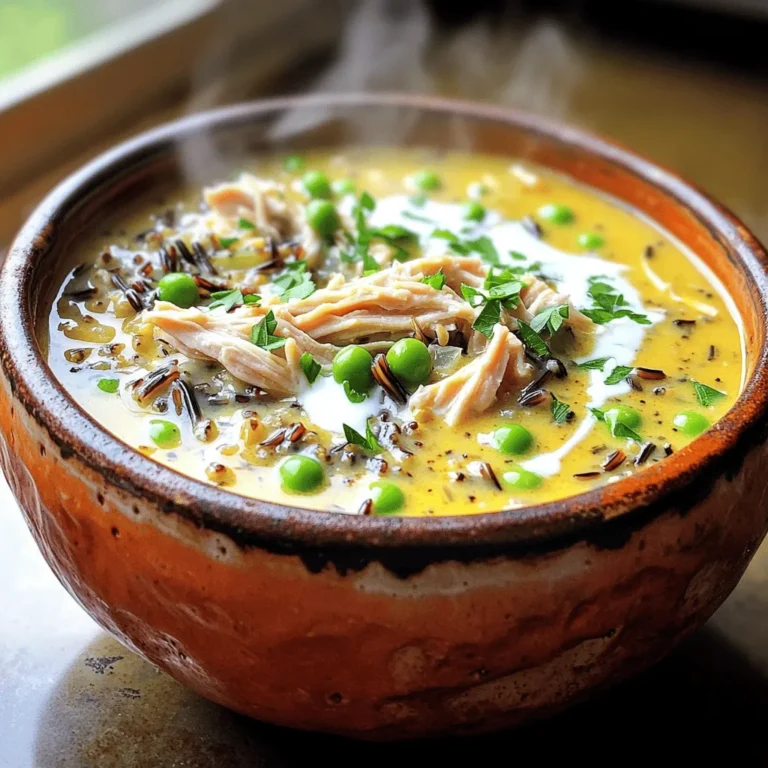
Slow Cooker Creamy Chicken Wild Rice Soup Delight

- 2 salmon fillets (about 4-6 oz each) - 1 cup cooked jasmine or sushi rice - 1/4 cup teriyaki sauce (store-bought or homemade) - 1/2 cup snap peas - 1/2 cup shredded carrots - 2 green onions, sliced - 1 tablespoon sesame oil - 1 teaspoon sesame seeds for garnish - Salt and pepper to taste To make the Minute Teriyaki Salmon Rice Bowls, gather the main ingredients first. Salmon fillets are the star of the dish. They should be fresh and firm. You can use jasmine or sushi rice, which gives a great base. Teriyaki sauce adds a sweet and savory taste. You can buy it or make your own if you prefer. Don't forget your veggies! Snap peas and shredded carrots add crunch and color. They also make the meal more balanced. Green onions bring a nice flavor boost when sliced on top. For seasoning, sesame oil adds a rich taste. Use it to cook the salmon. It gives a nice nutty flavor. Sesame seeds are great for garnish. They add a bit of crunch. Finally, salt and pepper will enhance the overall taste. With these simple ingredients, you can create a delicious meal that is both healthy and satisfying! To start, you need to cook the jasmine or sushi rice. Follow the package instructions for the best results. This rice will serve as a tasty base for your bowl. Once cooked, set the rice aside. Keep it warm so it stays fluffy and ready for your dish. Next, take your salmon fillets and place them in a bowl. Drizzle half of the teriyaki sauce over the fillets. Make sure to coat them well. Let the salmon marinate for about 10 minutes. If you have more time, you can let it sit longer for extra flavor. Now, heat a non-stick skillet over medium heat. Add 1 tablespoon of sesame oil to the skillet. Once the oil is hot, place the marinated salmon fillets in skin-side down. Cook them for about 3-4 minutes. After that, flip the fillets and pour the remaining teriyaki sauce over them. Cook for another 3-4 minutes until the salmon flakes easily with a fork. In the same skillet, add the snap peas and shredded carrots. Sauté these veggies for about 2-3 minutes. You want them to be tender but still crisp. Season with a pinch of salt and pepper to enhance their natural flavors. Time to put it all together! In serving bowls, place a scoop of the cooked rice at the bottom. Next, add the sautéed vegetables on top. Finally, place the cooked salmon fillets over everything. This creates a beautiful and colorful meal. To finish your teriyaki salmon rice bowls, sprinkle sliced green onions and sesame seeds on top. This adds a nice crunch and a pop of color. Enjoy your delicious creation! Cooking to Flake Test To know when salmon is ready, use the flake test. Gently press the fish with a fork. If it flakes easily, it is done. This test ensures your salmon stays moist and tender. Avoid overcooking, as it can dry out the fish. Marinade Variations While teriyaki sauce is great, you can mix it up. Try adding ginger or garlic for extra flavor. You might also use soy sauce or honey for a sweet touch. Experiment with different marinades to suit your taste. Using Minute Rice Minute rice cooks quickly and saves time. Just boil water, add rice, and let it sit. In about five minutes, your rice is ready. It is perfect for busy weeknights or meal prep. Skillet vs. Oven Cooking You can cook salmon in a skillet or the oven. A skillet gives a nice sear and cooks fast. If you prefer, bake it for a more hands-off approach. Just set the oven to 400°F and bake for 12-15 minutes. Additional Seasonings To boost flavor, consider adding a pinch of red pepper flakes. A squeeze of fresh lime juice can brighten the dish. You can also sprinkle some garlic powder on the vegetables for extra zing. Suggested Accompaniments Pair your salmon bowl with a side of steamed broccoli or edamame. They add color and nutrients. A sprinkle of fresh herbs, like cilantro or basil, can elevate the dish even more. Enjoy your flavorful meal! {{image_2}} You can switch out the salmon for tofu if you want a vegetarian option. Tofu soaks up flavors well. Use firm tofu and press it to remove extra water. Cut it into cubes, then marinate it just like salmon. Chicken or shrimp are great alternatives too. Use boneless chicken breasts or thighs. For shrimp, choose large, peeled shrimp. Cook them the same way as the salmon for juicy results. You can use seasonal vegetables for more color and taste. Try bell peppers, zucchini, or broccoli. These vegetables are easy to find and add crunch. Adding leafy greens can boost nutrition. Spinach or kale works well. Toss them in the skillet for a minute or two. They wilt quickly and blend nicely with the other flavors. If you prefer a homemade teriyaki sauce, it’s easy to make. Combine soy sauce, honey, garlic, and ginger in a bowl. This gives a fresh taste and helps control the sweetness. You can also try alternative sauces. Sweet chili sauce or soy sauce with a squeeze of lime offers a new twist. These options keep the dish exciting while still being delicious. To store leftovers, place the salmon and rice in separate airtight containers. This keeps the salmon moist and the rice fluffy. Try to eat leftovers within three days for the best taste. If you add the vegetables, store them separately too. They can lose their crunch if mixed with rice or salmon. To reheat salmon, use a microwave on low power for about 30 seconds. Check if it's warm and not overcooked. You want it tender, not dry. If you prefer the stove, heat a non-stick skillet on low, adding a splash of water. Cover the pan, steam gently for a few minutes, and check often. For long-term storage, you can freeze the salmon. Wrap each fillet tightly in plastic wrap and then in foil. This helps prevent freezer burn. You can also freeze the rice, but it's best to do this without the sauce or vegetables. Store in a freezer-safe bag, and try to use it within three months for the best flavor. I recommend marinating the salmon for at least 10 minutes. This time allows the teriyaki sauce to soak in and add flavor. For a stronger taste, you can marinate it longer, up to 30 minutes. Just keep an eye on it to avoid overpowering the salmon's natural flavor. Yes, you can use frozen salmon for this dish. It’s easy to cook right from frozen. Just make sure to thaw it first for best results. To do this, place the salmon in the refrigerator overnight or submerge it in cold water for quicker thawing. After thawing, pat it dry before marinating. You can add many vegetables to enhance your bowl. Some great options include: - Broccoli - Bell peppers - Zucchini - Spinach These veggies cook well and add color and crunch to your dish. Absolutely! Minute Rice is a great choice. It cooks quickly and is ready in just a few minutes. This makes it perfect for busy days. Using Minute Rice saves time and still gives you a tasty base for your salmon and veggies. This post covered how to make a delicious teriyaki salmon bowl. You learned about key ingredients like salmon, rice, and fresh veggies. We went through step-by-step instructions for cooking and assembling your dish. I shared helpful tips for getting the best flavor and texture, plus variations for personal twists. Now, it's time to try this recipe yourself. Enjoy cooking and share your results!

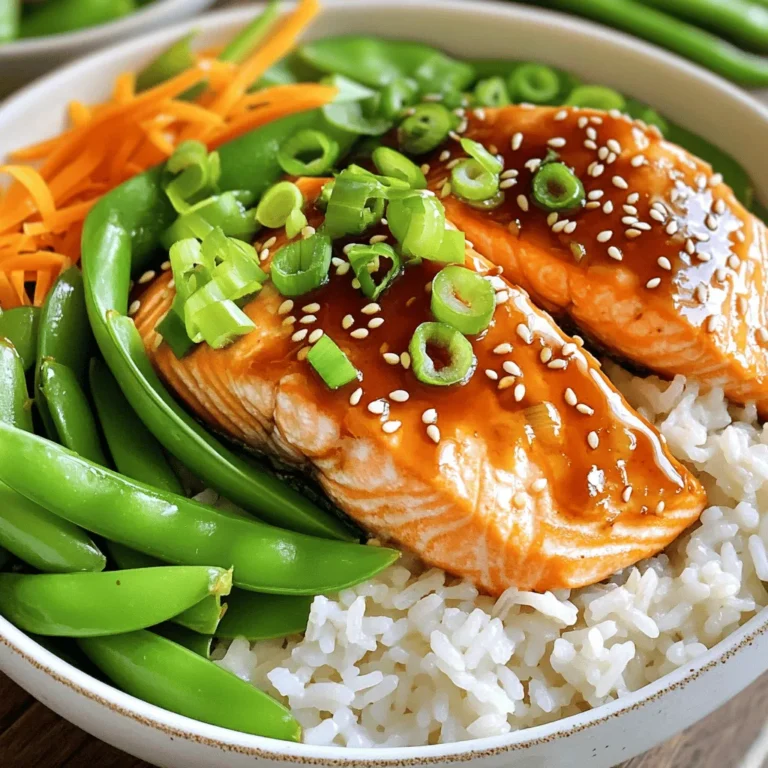
Minute Teriyaki Salmon Rice Bowls Flavorful Meal Prep

- 1 ½ cups graham cracker crumbs - ½ cup unsalted butter, melted - ½ cup brown sugar - 1 teaspoon cinnamon - 16 oz cream cheese, softened - ¾ cup granulated sugar - 2 large eggs - 1 cup pumpkin puree - 1 teaspoon vanilla extract - 1 teaspoon pumpkin pie spice - ¼ teaspoon salt To make these bars, you need simple yet tasty ingredients. The crust combines graham cracker crumbs, melted butter, brown sugar, and cinnamon. This blend gives a sweet and spicy base. The filling includes cream cheese, sugar, eggs, pumpkin puree, and spices. This mix creates a rich, creamy layer. Each bite will be smooth and flavorful. I love using high-quality cream cheese. It makes the filling extra creamy. The pumpkin puree adds a nice texture and taste. Pumpkin pie spice gives that cozy fall flavor. Remember to use fresh spices for the best taste. Gather your ingredients, and let’s make these bars! First, set your oven to 350°F (175°C). This is the perfect temperature for baking. Next, grab an 8x8 inch baking pan. Grease it lightly and line it with parchment paper. Leave some paper hanging over the edges. This helps you lift the bars out later. In a medium bowl, mix together the graham cracker crumbs, melted butter, brown sugar, and cinnamon. Use a fork or your hands to combine everything well. Press this mixture firmly into the bottom of the prepared pan. Make sure it is even and compact. In a large bowl, beat the softened cream cheese and granulated sugar until smooth. You can use an electric mixer to make this easier. After it’s creamy, add the eggs one at a time. Mix well after each egg. Then, add the pumpkin puree, vanilla extract, pumpkin pie spice, and salt. Blend everything until it is smooth and creamy. Pour the pumpkin cheesecake filling over the crust in the pan. Spread it out evenly. If you want a pretty swirl effect, use a knife or toothpick to lightly swirl the top. Then, put the pan back into the oven. Bake for 30-35 minutes. The center should be set but still a little jiggly. This is okay! Let the bars cool at room temperature for about 30 minutes. After cooling, place the pan in the fridge for at least 2 hours. This helps the bars firm up. When ready, use the parchment paper to lift the bars out. Cut them into small squares and serve. Enjoy them chilled or at room temperature! To create that beautiful swirl, use a knife or toothpick. Dip it into the filling. Gently move it in a figure-eight motion. This technique mixes the pumpkin cheesecake and crust without overdoing it. Aim for a light touch to keep the layers distinct. Each cut adds a unique touch to your bars. One common mistake is overbaking the bars. Keep an eye on the center; it should still jiggle slightly. If it looks too firm, it may dry out. Also, let the bars cool completely before cutting. This helps them hold their shape better. Finally, always use softened cream cheese. This ensures a smooth filling. For a delightful presentation, serve the bars on a decorative plate. Dust them with powdered sugar for a sweet touch. A sprinkle of cinnamon also adds warmth and style. For extra flair, top each square with whipped cream. You can even add a pinch of nutmeg for an extra kick. Feel free to get creative! {{image_2}} You can easily boost the flavor of your pumpkin spice cheesecake swirl bars. Add-ins make each bite special. Consider mixing in: - Chopped nuts, like walnuts or pecans - Chocolate chips for a sweet twist - Dried cranberries for a tangy touch - A dash of maple syrup for extra sweetness These options will enhance the bars and surprise your taste buds. You can enjoy these bars even if you have dietary needs. For gluten-free bars, use gluten-free graham cracker crumbs. For a dairy-free version, try using: - Dairy-free cream cheese - Coconut milk or almond milk instead of regular milk These swaps keep the flavor while making it friendly for your diet. Toppings can change your bars from good to great. Here are some ideas: - Drizzle with caramel sauce for added sweetness - Top with a sprinkle of crushed pecans for crunch - Serve with a dollop of whipped coconut cream for a light touch - Dust with cocoa powder for a rich flavor Experiment with these options to make your bars truly unique. To keep your pumpkin spice cheesecake swirl bars fresh, store them in the fridge. Use an airtight container to prevent them from drying out. If you cut the bars, place parchment paper between the layers to stop them from sticking together. These bars taste best when chilled, so make sure to enjoy them cold! You can freeze these bars for longer storage. First, cut them into squares. Then, wrap each square in plastic wrap. Place the wrapped bars in a freezer-safe bag or container. They can stay in the freezer for up to three months. When you're ready to eat them, thaw them in the fridge overnight. These pumpkin spice cheesecake swirl bars last about five days in the fridge. To keep them tasting fresh, avoid leaving them out at room temperature for too long. Always check for any signs of spoilage before enjoying your treats. Following these best practices will help you savor every bite! Yes, you can use fresh pumpkin. Cook and puree it until smooth. Make sure to drain excess water. This will keep the bars from becoming too watery. I love the fresh taste, but it takes extra time. Check the center of the bars. They should be set but still jiggle slightly. A toothpick inserted should come out mostly clean. Don’t worry if it seems soft; it will firm up while cooling. If your filling is runny, try adding more cream cheese. Blend in small amounts until thick. Make sure the cream cheese is softened well before mixing. This helps it blend smoothly. Yes! These bars are great for making ahead. Store them in the fridge for up to three days. This allows the flavors to blend nicely. Just cut them right before serving. These bars pair well with whipped cream or ice cream. A drizzle of caramel sauce adds a nice touch. You can also sprinkle nuts or chocolate shavings on top. Enjoy with a warm drink for a cozy treat! Making pumpkin spice cheesecake swirl bars is fun and easy. We discussed the best ingredients, steps, and tips to get great results. I shared ideas for flavor variations and how to store these treats. Remember to keep your pan ready and follow the steps carefully. Use my serving tips for a great look. With these bars, you can impress anyone at your next gathering. Enjoy making and sharing these tasty delights!

Pumpkin Spice Cheesecake Swirl Bars Delightful Treat

- 2 cups all-purpose flour - 1 tablespoon baking powder - ½ teaspoon baking soda - ½ teaspoon salt - ¾ cup granulated sugar - 1 tablespoon ground cinnamon (plus more for topping) - ½ cup unsalted butter, melted - 1 large egg - 1 cup buttermilk (or substitute with milk + 1 tablespoon vinegar) - 1 teaspoon vanilla extract The main ingredients come together to create a soft and fluffy muffin. All-purpose flour gives structure, while baking powder and baking soda help them rise. The salt enhances flavor. Granulated sugar and cinnamon add sweetness and warmth, making each bite delightful. Melted butter keeps the muffins moist, and the egg acts as a binder. Buttermilk adds rich flavor and tenderness, while vanilla extract brings a lovely aroma. - ½ cup all-purpose flour - ⅓ cup brown sugar - 1 teaspoon ground cinnamon - ¼ cup cold unsalted butter, diced The streusel topping is the star of these muffins. All-purpose flour and brown sugar make it sweet and crumbly. Ground cinnamon adds a spicy kick. Cold, diced butter forms the perfect texture when mixed, creating a crunchy topping. This topping adds a beautiful contrast to the soft muffin base. You’ll love the way it bakes up golden and crisp. 1. Preheat your oven to 375°F (190°C). Line a muffin tin with paper liners or grease it lightly. 2. In a large bowl, combine 2 cups of all-purpose flour, 1 tablespoon of baking powder, ½ teaspoon of baking soda, ½ teaspoon of salt, ¾ cup of granulated sugar, and 1 tablespoon of ground cinnamon. Mix well. 3. In another bowl, whisk together ½ cup of melted unsalted butter, 1 large egg, 1 cup of buttermilk, and 1 teaspoon of vanilla extract until smooth. 4. Pour the wet ingredients into the dry ingredients. Stir gently until just combined. Do not overmix; a few lumps are fine. 5. For the streusel, mix ½ cup of all-purpose flour, ⅓ cup of brown sugar, and 1 teaspoon of ground cinnamon in a small bowl. 6. Add ¼ cup of cold, diced unsalted butter. Use a fork or your fingers to create a crumbly texture. 7. Fill each muffin cup about two-thirds full with the muffin batter. Sprinkle a generous amount of streusel topping on each muffin. 8. Bake in the preheated oven for 18-20 minutes. Check for doneness by inserting a toothpick into the center. If it comes out clean, your muffins are ready! How do I avoid overmixing? Overmixing can lead to tough muffins. Mix the wet and dry ingredients just enough to combine them. A few lumps are okay. This keeps your muffins light and fluffy. How can I tell when muffins are done? To check if muffins are done, insert a toothpick into the center. If it comes out clean, they are ready. You can also gently press the top; it should spring back. What can I add to boost flavor? You can add spices like nutmeg or cardamom for a twist. Chopped nuts, like walnuts or pecans, add a nice crunch. You might also mix in chocolate chips for a sweet touch. How do I dust with cinnamon sugar? To dust with cinnamon sugar, mix cinnamon with granulated sugar. After baking, sprinkle this mixture over warm muffins. This gives them a lovely sweet finish and looks great on the table. {{image_2}} You can make your cinnamon streusel muffins even better with some tasty additions. Here are two great ideas: - Chocolate chips: Add ½ to 1 cup of chocolate chips to the batter. This gives each bite a sweet surprise. - Fruit options: You can mix in fresh fruit like blueberries or diced apples. About 1 cup of fruit will add nice flavor and moisture. These additions can make your muffins even more special. Try each option to find your favorite! If you have dietary needs, you can easily adapt the recipe. Check out these substitutes: - Gluten-free flour options: Use a 1:1 gluten-free flour blend instead of all-purpose flour. This keeps the muffins soft and delicious. - Vegan ingredient swaps: Replace the egg with a flax egg (1 tablespoon of flaxseed meal mixed with 2.5 tablespoons of water). For the buttermilk, use plant-based milk mixed with vinegar. This keeps the muffins moist without dairy. These swaps allow everyone to enjoy your cinnamon streusel muffins! Feel free to experiment with these variations to fit your needs. To keep your cinnamon streusel muffins fresh, store them in an airtight container. This keeps moisture in and prevents them from going stale. You can also wrap each muffin in plastic wrap for extra protection. If you want to keep them longer, the refrigerator is a good option. Just remember, refrigeration can dry them out, so try to consume them within a few days. If you want to save muffins for later, freezing is the best choice. Place muffins in a freezer-safe bag or container. Make sure to squeeze out as much air as possible. They can last up to three months in the freezer. When you're ready to enjoy them, just thaw them at room temperature. Warming up muffins can bring back their fresh taste. The best way to reheat them is in the oven. Preheat your oven to 350°F (175°C). Place the muffins on a baking sheet for about 5-10 minutes. This warms them without drying them out. You can also use the microwave for quick reheating. Place a muffin on a microwave-safe plate and cover it with a damp paper towel. Heat it for about 10-15 seconds. This will keep the muffin moist. Just be careful not to overheat, or it may become tough. To make your muffins extra moist, use buttermilk. Buttermilk adds richness and keeps them soft. You can also add applesauce. This adds moisture without changing the flavor much. Lastly, do not overmix your batter. Mixing too much makes muffins dense and dry. Yes, you can freeze cinnamon streusel muffins. Let them cool completely first. Wrap each muffin tightly in plastic wrap. Then place them in a freezer bag. They will stay fresh for up to three months. When ready to eat, thaw them at room temperature or warm them in the oven. If you don’t have buttermilk, you can make a quick substitute. Just mix one cup of milk with one tablespoon of vinegar. Let it sit for five minutes. This will mimic the acidity of buttermilk. You can also use yogurt or sour cream thinned with milk. To check if your muffins are undercooked, use a toothpick. Insert it into the center of a muffin. If it comes out clean or with a few crumbs, they are done. If it comes out wet, the muffins need more time. Bake them a little longer, then check again. Yes, you can make mini muffins with this recipe. Just adjust the baking time. Mini muffins usually bake for 10 to 15 minutes. Check them with a toothpick to see if they are done. Enjoy these bite-sized treats for a fun twist! This blog post covered the simple steps to make delicious muffins. We explored key ingredients, including flour, sugar, and buttermilk. You learned how to prepare the batter and create a tasty streusel topping. I shared tips to perfect texture and enhance flavors while suggesting fun variations. Now you have the tools to bake great muffins at home. Enjoy your baking journey!

Cinnamon Streusel Muffins Irresistible and Simple Recipe

- 1 lb ground turkey (preferably lean) - 1 medium onion, chopped - 2 cloves garlic, minced - 2 carrots, diced - 1 zucchini, diced - 1 red bell pepper, diced - 1 cup green beans, trimmed and cut into bite-size pieces - 4 cups low-sodium chicken broth - 1 can (14.5 oz) diced tomatoes (no added sugar) - 1 teaspoon dried oregano - 1 teaspoon dried basil - Salt and pepper to taste - 2 tablespoons olive oil - Fresh parsley for garnish (optional) Ground turkey is lean and high in protein. It helps build muscle and keeps you full. Onions add flavor, and they are rich in antioxidants. Garlic boosts your immune system and adds taste. Carrots provide fiber and vitamins, good for your eyes. Zucchini is low in calories and high in water, great for hydration. Red bell peppers are packed with vitamins A and C. Green beans are low in calories and full of fiber. Chicken broth adds taste without many calories. Diced tomatoes add flavor and nutrients like vitamin C. Oregano and basil add flavor without extra calories. Olive oil is a healthy fat that helps with heart health. Fresh parsley gives a nice touch and adds vitamins. - Ground turkey can be swapped for ground chicken or lean beef. - Use vegetable broth instead of chicken broth for a vegetarian option. - If you can't find zucchini, try yellow squash or cauliflower instead. - For a low-carb option, skip the carrots and add more green beans. - To make it gluten-free, ensure the broth is certified gluten-free. - If you're low on garlic, garlic powder works as a quick substitute. - Use a mix of your favorite herbs if you don’t have oregano or basil. This soup is flexible. You can change it to fit your needs! {{ingredient_image_1}} Before you start cooking, gather all your ingredients. This makes the process smooth and fun. You need lean ground turkey, fresh veggies, and spices. Prepare your chopping board and knife. Wash your vegetables well. 1. Heat 2 tablespoons of olive oil in a large pot over medium heat. 2. Add the chopped onion and minced garlic. Sauté them for about 3 minutes until the onion is soft and clear. 3. Next, add 1 pound of ground turkey. Break it apart with a spoon. Cook it for 5-7 minutes until it turns brown and no longer pink. 4. Stir in 2 diced carrots, 1 diced zucchini, 1 diced red bell pepper, and 1 cup of green beans. Cook these veggies for another 5-6 minutes. They should start to soften. 5. Now pour in 4 cups of low-sodium chicken broth. Add 1 can of diced tomatoes with their juice. Stir in 1 teaspoon of dried oregano and 1 teaspoon of dried basil. 6. Bring the soup to a boil. Then reduce the heat to low. Cover the pot and let it simmer for 20-25 minutes. This helps the flavors mix well. 7. Taste the soup and add salt and pepper as needed. 8. Serve the soup in bowls. You can add fresh parsley on top for a nice touch. To make the soup taste great, remember these tips: - Sauté the onion and garlic well. This builds a strong base. - Use fresh vegetables for the best flavor. Frozen veggies can work in a pinch but may lack some taste. - Letting the soup simmer is key. It helps all the flavors blend together. - Always taste before serving. Adjust salt and pepper to your liking. This soup is easy to make and packed with flavor. Enjoy your healthy meal! To cook lean turkey well, start with medium heat. This helps keep it juicy. Break up the turkey with a spoon as it cooks. Use a non-stick pot to reduce fat. Brown the turkey until it is no longer pink. This adds great flavor to the soup. Use herbs and spices to boost flavor. Dried oregano and basil work well. Fresh garlic and onion add a rich taste. You can also squeeze in some lemon juice. This gives your soup a bright flavor. Avoid heavy creams or extra oils to keep it light. Make this soup ahead of time for easy meals. It tastes even better the next day. Divide the soup into containers for quick lunches. You can also freeze portions for later. Just let it cool before putting it in the freezer. Be sure to label the containers with the date. Pro Tips Use Fresh Vegetables: Fresh produce enhances flavor and nutrients in your dish. Whenever possible, choose seasonal vegetables for the best taste. Adjust Seasoning to Taste: Always taste your dish before serving! Adjust salt, pepper, and spices to suit your preferences for maximum flavor. Make it a Meal Prep: This soup can be made in larger batches and stored in the fridge or freezer for quick meals throughout the week. Just reheat and enjoy! Garnish for Visual Appeal: A sprinkle of fresh parsley not only adds color but also a burst of freshness that elevates the dish's presentation. {{image_2}} You can mix in many vegetables to change the flavor. Try adding spinach or kale for greens. Sweet potatoes add a nice sweetness. Cauliflower can make the soup thicker. You can also use peas or corn for added texture. Just remember to cut veggies small so they cook evenly. Spices can change the soup's taste. If you like heat, add a pinch of red pepper flakes. To make it smoky, try a bit of smoked paprika. For a fresh taste, toss in some lemon juice or zest. You can also use fresh herbs like thyme or cilantro for a burst of flavor. You can make this soup without turkey. Use lentils or chickpeas as protein. Instead of chicken broth, use vegetable broth. Add mushrooms for a meaty texture. The spices and veggies will still give it great flavor. This way, everyone can enjoy a healthy bowl! Store leftover turkey vegetable soup in a sealed container. Let it cool down first. Use glass or plastic containers. This keeps the soup fresh and safe. It lasts for about 3-4 days in the fridge. Label the container with the date. This way, you won’t forget when you made it. Freezing is a great way to save soup for later. Use freezer-safe bags or containers. Leave some space at the top for expansion. The soup can freeze well for up to 3 months. When you’re ready to eat, thaw it in the fridge overnight. This keeps the flavor intact. Reheat the soup on the stove over low heat. Stir often to warm it evenly. If it seems thick, add a splash of broth or water. This helps regain the right texture. You can also use the microwave. Heat in short bursts, stirring in between. Enjoy your delicious soup just like the first day! This soup is low in calories. A serving has about 180 calories. It’s packed with protein and fiber. You can enjoy a hearty bowl without worry. This makes it great for weight loss. For a filling lunch or dinner, this soup is perfect. Yes, you can use ground chicken. It works well in this recipe. Both meats are lean and healthy. Ground chicken has a similar taste and texture. Just ensure it is not too fatty. This swap keeps the soup light and nutritious. Absolutely! This soup freezes well. You can store it for up to three months. Just let it cool completely before freezing. Use airtight containers or freezer bags. To reheat, thaw overnight in the fridge. Heat it gently on the stove until warm. Enjoy your soup anytime! This article covered key ingredients and their benefits for making Weight Loss Turkey Vegetable Soup. I shared detail on each ingredient, cooking steps, and tips for flavor. You can easily adjust the recipe for your needs, like using ground chicken or adding more veggies. Proper storage and reheating methods ensure your soup stays fresh. With these insights, you can make a tasty and healthy meal that fits your lifestyle. Enjoy your cooking and the benefits of this great recipe!

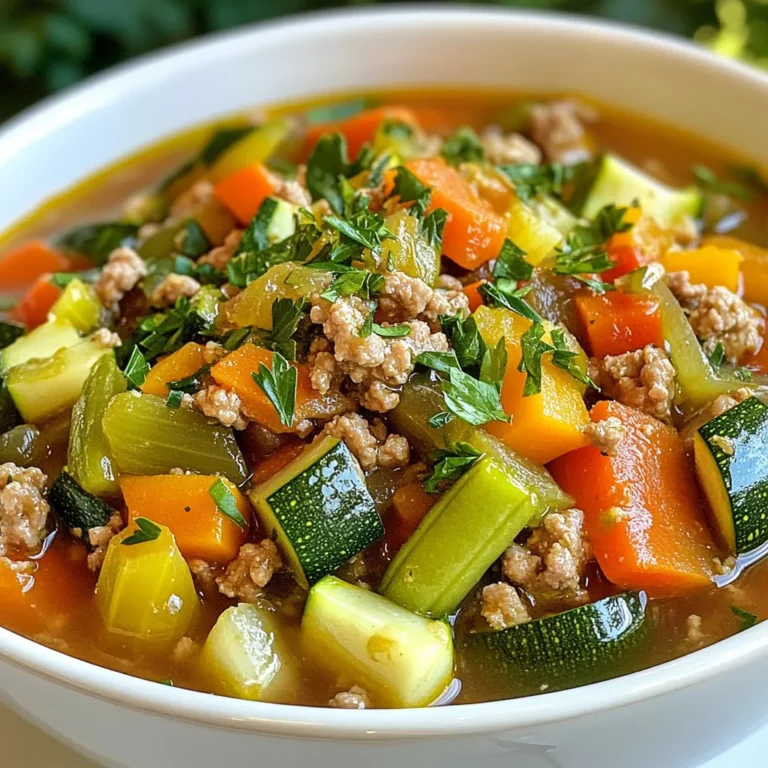
Weight Loss Turkey Vegetable Soup Healthy and Easy

For the BBQ jackfruit sliders, you need: - 2 cans young green jackfruit in water or brine, drained and rinsed - 1 tablespoon olive oil - 1 small onion, finely chopped - 2 cloves garlic, minced - 1 cup BBQ sauce (homemade or store-bought) - 1 teaspoon smoked paprika - 1 teaspoon cumin - Salt and pepper to taste - 4 whole grain slider buns The jackfruit gives a great texture. It mimics pulled pork perfectly. The BBQ sauce adds the smoky, sweet flavor that ties it all together. For the slaw, gather these items: - 2 cups green cabbage, finely shredded - 1 cup red cabbage, finely shredded - 1 medium carrot, grated - 1/4 cup mayonnaise (or vegan alternative) - 1 tablespoon apple cider vinegar - 1 tablespoon maple syrup - Salt and pepper to taste This slaw brings crunch and freshness. The mix of cabbages adds color and taste. The dressing balances the dish with creaminess and tang. To elevate your sliders, consider these toppings: - Fresh herbs like cilantro or parsley - Pickles for extra crunch - Sliced jalapeños for heat These additions can enhance the sliders. They provide more flavor and make your dish look appealing. Enjoy experimenting with these options! To start, grab your pot and heat olive oil over medium heat. Add the finely chopped onion. Cook it for about five minutes until it turns clear. Next, toss in the minced garlic and cook for one more minute. You want to smell that garlic! Now, add the drained jackfruit. Use a fork to pull it apart, making it look like pulled pork. Pour in the BBQ sauce, smoked paprika, cumin, and season with salt and pepper. Mix it well. Lower the heat and let it simmer for 20 to 25 minutes. Stir it every now and then. The jackfruit needs to soak up those tasty flavors and get tender. While the jackfruit cooks, let’s whip up the slaw. Take a big bowl and combine the shredded green cabbage, red cabbage, and grated carrot. In a smaller bowl, mix together mayonnaise, apple cider vinegar, maple syrup, salt, and pepper. This dressing adds a nice touch! Pour the dressing over the cabbage mix and toss it well. Make sure every piece is coated. Now comes the fun part! Grab your whole grain slider buns. Take the bottom half of each bun and add a good scoop of BBQ jackfruit. Don’t be shy—make it generous! Next, add a scoop of slaw on top. Place the top half of the bun over it. If needed, use a toothpick to keep it all together. Repeat this process for the rest of the buns. Your sliders are now ready to impress! When picking jackfruit, choose young green jackfruit. Look for cans labeled "young" or "green." Avoid ripe jackfruit. The ripe ones are sweet and not good for savory dishes. Check for a firm texture when you open the can. Drain and rinse the jackfruit to remove any brine flavor. This helps it absorb the BBQ sauce better. To boost flavor, use a mix of spices. Smoked paprika adds a nice, smoky note. Cumin brings warmth and earthiness. Always taste as you cook. Add salt and pepper to enhance the dish. Let the jackfruit simmer low and slow. This allows it to soak up the BBQ sauce and spices fully. For an extra kick, try adding a splash of hot sauce to the BBQ mix. You can cook jackfruit in several ways. The stovetop method is quick and easy. Sauté the onion and garlic first, then add jackfruit. If you prefer, you can grill the jackfruit. This adds a nice char and depth to the flavor. Another option is to use a slow cooker. Cook it on low for several hours for super tender jackfruit. This method works great if you plan to serve a crowd. {{image_2}} You can use many kinds of BBQ sauce for these sliders. A tangy sauce can add a nice bite. A sweet sauce can balance the flavors well. Try a smoky BBQ sauce for extra depth. You can even make your own sauce at home. Just mix ketchup, vinegar, and spices for a quick blend. Experiment with flavors until you find your favorite. The slaw can change with different dressings. A yogurt-based dressing can make it creamy and light. You might also try a vinaigrette for a zesty twist. For a sweet touch, add some honey to the dressing. If you want a spicy kick, try adding chili flakes. Each dressing can change the whole taste of the dish. You can add more to your sliders for extra flair. Sliced jalapeños can bring some heat. Avocado can give it a rich creaminess. You might like to sprinkle some fresh herbs, like cilantro or parsley, on top. A slice of pickled onion can also add a nice crunch. Each addition brings a new flavor to enjoy. After your BBQ Jackfruit Sliders, you may have leftovers. To store the jackfruit, let it cool down first. Place it in an airtight container. This keeps the moisture in. Store it in the fridge for up to four days. If you want to keep it longer, freeze it. Use a freezer-safe bag or container. It can last for about three months in the freezer. When you’re ready, just thaw it in the fridge overnight. To keep your slaw fresh, store it in a separate container. Use an airtight container to avoid wilting. The slaw will stay fresh for about three days in the fridge. If you want to store it longer, do not mix in the dressing. Keep the dressing separate until you're ready to eat. This helps the slaw stay crisp and tasty. When you're ready to enjoy your leftover jackfruit, reheat it on the stove. Place it in a pan over medium heat. Stir occasionally until it's heated through. This usually takes about five to seven minutes. You can also microwave it. Just place it in a microwave-safe bowl and heat for one to two minutes. Stir halfway to make sure it heats evenly. If you are reheating slaw, enjoy it cold. If you prefer it warm, lightly toss it in a pan until heated. Yes, you can make BBQ jackfruit sliders ahead of time. Cook the jackfruit and slaw in advance. Store each in separate airtight containers. Keep them in the fridge for up to three days. When ready to serve, heat the jackfruit gently. Assemble the sliders just before eating for the best taste. Yes, jackfruit is a healthy meat substitute. It is low in calories and high in fiber. Jackfruit contains vitamins and minerals that support your health. It is also fat-free and cholesterol-free. This makes it a great option for vegans and vegetarians. Its texture resembles pulled pork, making it perfect for sliders. You can serve various sides with BBQ jackfruit sliders. Here are some ideas: - Sweet potato fries - Coleslaw - Corn on the cob - Grilled vegetables - Baked beans - Potato salad Each option adds flavor and balances the meal. You can also offer extra BBQ sauce on the side for dipping. In this blog post, we explored how to make delicious BBQ jackfruit sliders, starting with the key ingredients and preparing tasty slaw. I shared tips on choosing the right jackfruit and enhancing flavors. You learned about variations, storage, and common questions. Now, you have everything you need to try this fun recipe. Enjoy experimenting with flavors, and make it your own. BBQ jackfruit sliders can be a great addition to your meal rotation!

BBQ Jackfruit Sliders with Slaw Flavorful Delight

PREV 1 … 30 31 32 … 57 NEXT
secrets pice kitchen

explore

DessertsDinnerAppetizersDrinks

Our Policies

  • Cookie Policy
  • Copyright Policy
  • Disclaimer
  • GDPR Policy
  • Terms Of Use
Back to Top
  • About
  • Contact Us
  • Privacy Policy
© 2025 secrets pice kitchen