FREE DINNER EBOOK! Get your copy!
  • Cookie Policy
  • GDPR Policy
  • Disclaimer
  • Terms Of Use
  • Visit my other site: Fun Cookie Recipes
secrets pice kitchen
  • Home
  • Dinner
  • Desserts
  • Drinks
  • Appetizers
  • Contact
  • About
  • Privacy Policy
  • Home
  • Dinner
  • Desserts
  • Drinks
  • Appetizers
  • Contact
  • About
  • Privacy Policy
  • Cookie Policy
  • GDPR Policy
  • Disclaimer
  • Terms Of Use
Visit my other site: Fun Cookie Recipes

HOME / CATEGORIES /

Latest

- 1 pound ground beef (or turkey for a lighter option) - 1/2 cup breadcrumbs - 1/4 cup grated Parmesan cheese - 1/4 cup finely chopped onion - 2 cloves garlic, minced - 1 egg - 1 teaspoon salt - 1/2 teaspoon black pepper - 1/4 teaspoon red pepper flakes (optional for heat) - 1/3 cup honey - 1/4 cup soy sauce (or tamari for gluten-free) - 1 tablespoon rice vinegar - 1 teaspoon ginger, minced - 1 tablespoon sesame seeds (for garnish) - Chopped green onions (for garnish) You can swap the ground beef for ground turkey if you want a lighter meatball. For a gluten-free option, use tamari instead of soy sauce. You can also use gluten-free breadcrumbs. If you prefer a meat-free dish, try using lentils or chickpeas. These options keep the dish tasty while fitting your needs. To make these meatballs, you will need: - A large mixing bowl - A baking sheet lined with parchment paper - A small saucepan for the glaze - A spatula or wooden spoon for mixing - A skillet for tossing the meatballs in the glaze - Measuring cups and spoons for precise measurements These items help make the cooking process smooth and fun. Enjoy crafting these honey garlic glazed meatballs that will delight your taste buds! Start by grabbing a large mixing bowl. Add one pound of ground beef or turkey. Next, toss in a half cup of breadcrumbs. Follow that with a quarter cup of grated Parmesan cheese. Then, add a quarter cup of finely chopped onion. Don’t forget two cloves of minced garlic. Crack in one egg, then sprinkle one teaspoon of salt. Add half a teaspoon of black pepper and a quarter teaspoon of red pepper flakes if you like heat. Mix everything with your hands or a spoon until well blended. Now, preheat your oven to 400°F (200°C). While you wait, line a baking sheet with parchment paper. This helps with cleanup later. Once the oven is ready, roll the meat mixture into small balls, about one inch wide. Place them on the prepared baking sheet, giving each ball some space. Bake these in the oven for 15 to 20 minutes. You will know they are done when they are cooked through and browned nicely. While the meatballs bake, let’s make that tasty honey garlic glaze. In a small saucepan, combine one-third cup of honey and a quarter cup of soy sauce. Add one tablespoon of rice vinegar and one teaspoon of minced ginger. Heat this mixture over medium-low heat. Stir it occasionally until it warms up and thickens slightly. Once the meatballs finish baking, transfer them to a large skillet. Pour the honey garlic glaze over the meatballs. Use a spatula to gently toss them, making sure they are well coated. Cook for an extra 2 to 3 minutes to heat the glaze fully. After that, take the skillet off the heat and let the meatballs rest for a minute. Now, they are ready to serve! Garnish with sesame seeds and chopped green onions for a nice touch. To get meatballs just right, mix well but don't overdo it. If you mix too much, they turn tough. Use ground beef or turkey, whichever you like. Add breadcrumbs to help them hold shape. The egg also helps bind everything. The sauce is key to this dish. If you want it sweeter, add more honey. For a saltier taste, increase the soy sauce. A splash of rice vinegar can add a nice zing. If you want heat, throw in some red pepper flakes. Mix and taste as you go! These meatballs shine on their own, but you can pair them with rice or noodles. Serve them on a bed of steamed veggies for a healthy twist. Add a sprinkle of sesame seeds and chopped green onions as a garnish. They add flavor and a nice crunch! {{image_2}} You can switch the ground beef for ground turkey or chicken. These options make the dish lighter. They taste great with the honey glaze. For a vegetarian choice, use lentils or chickpeas. Mash them and mix with breadcrumbs. This gives you a tasty meatless meatball. Spices can change the taste of your meatballs. Add garlic powder for more flavor. Try adding dried oregano or basil for a fresh twist. If you like heat, increase the red pepper flakes. You can also mix in fresh herbs like parsley or cilantro for added freshness. Experiment with flavors to find your favorite blend. You can cook meatballs in many ways. If you want a quick meal, use the stovetop. Just brown them in a skillet and add the glaze. For a slow, rich flavor, use a slow cooker. Cook on low for a few hours. You can even grill them for a smoky taste. Just make sure to baste them with the glaze while grilling. Each method gives a unique flavor and texture. Let the meatballs cool for about 10 to 15 minutes after cooking. This helps them hold their shape. Once they are cool, place them in an airtight container. Make sure to separate layers with parchment paper to avoid sticking. Store them in the fridge for up to three days. The honey garlic glaze will add flavor to the meatballs as they sit. To reheat, place the meatballs in a skillet over medium heat. Add a splash of water or broth to keep them moist. Heat for about 5 to 8 minutes, stirring occasionally. You can also reheat them in the microwave. Use a microwave-safe dish and cover it with a lid. Heat in 30-second bursts until warm. To freeze, let the meatballs cool completely. Place them on a baking sheet in a single layer. Freeze them for about 1 hour until firm. Then, transfer the meatballs to a freezer-safe bag. Label the bag with the date. They will last for up to three months. When ready to enjoy, thaw in the fridge overnight and reheat as needed. You can check if the meatballs are cooked by using a meat thermometer. Insert it into the center of a meatball. It should read 160°F (71°C) for beef or turkey. If you don't have a thermometer, cut one open. The meat should be brown and no pink should show. Yes, you can make these meatballs ahead. Prepare them, form the meatballs, and store them in the fridge. They can stay fresh for up to two days. You can also freeze them for later. Just bake them directly from the freezer, adding a few extra minutes to the cook time. These meatballs are great with many sides. Try serving them with rice or noodles. Steamed veggies also pair well. You can even serve them as appetizers with toothpicks. They are tasty on their own or with extra glaze. To thicken the glaze, you can simmer it longer. Just heat it on medium-low until it reduces. If you want a quick fix, mix cornstarch with cold water, then stir it into the glaze. Heat until it thickens. This will give you that perfect sticky glaze. We covered key parts to make tasty honey garlic glazed meatballs. I shared ingredient lists and cooking steps to guide you. You learned tips for the perfect texture and flavor. We explored variations, storage tips, and answered your common questions. Try these meatballs for your next meal. Enjoy the simple joy they bring to your table. Happy cooking!

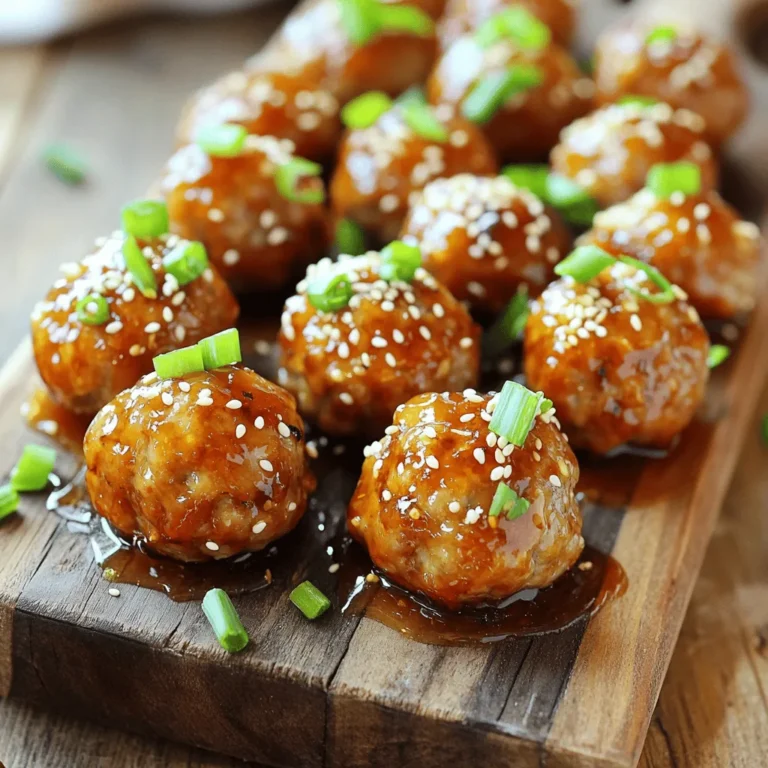
Honey Garlic Glazed Meatballs Simple and Tasty Recipe

- Sweet potatoes and their preparation For this recipe, you need 2 large sweet potatoes. Slice them thinly. This helps them cook evenly and become crispy. I like to use a sharp knife or a mandoline for this task. - Vegetables to include The heart of these nachos is the colorful veggies. Use 1 cup of black beans that are drained and rinsed. They add protein and fiber. Add 1 cup of corn kernels, fresh or frozen, for sweetness. Cherry tomatoes are a must! Halve 1 cup of them for juicy bursts of flavor. You can also add 1 sliced jalapeño for a little heat. Remove the seeds if you want less spice. - Optional toppings and garnishes After baking, top your nachos with 1 diced avocado for creaminess. Fresh cilantro adds a bright flavor; use it generously. Don't forget lime wedges! They brighten the dish and add a zesty kick. These ingredients combine to create a veggie-loaded dish that is both healthy and delicious. Each bite offers a mix of flavors and textures. Enjoy customizing your nachos with your favorite toppings! 1. Start by preheating your oven to 425°F (220°C). This step is key for crispiness. 2. Take two large sweet potatoes and slice them thinly. Place them in a large bowl. 3. Add 1 tablespoon of olive oil, 1 teaspoon of smoked paprika, 1 teaspoon of garlic powder, salt, and pepper to the bowl. Toss until all slices are coated well. 4. Spread the sweet potato slices on a baking sheet lined with parchment paper. Make sure they are in a single layer. 5. Bake the slices in the oven for 20-25 minutes. Flip them halfway through. Look for a crispy, golden brown color. 6. After the sweet potatoes bake, reduce the oven temperature to 375°F (190°C). 7. Layer the baked sweet potato slices on your serving platter. Add black beans, corn, cherry tomatoes, jalapeño slices, and shredded cheese. 8. Return the nachos to the oven. Bake for 10 minutes more, until the cheese is melted and bubbly. 9. Once out of the oven, top with diced avocado and fresh cilantro. This adds color and taste. 10. Serve warm with lime wedges on the side. Squeeze lime over nachos for extra zing. This process gives you tasty, veggie-loaded sweet potato nachos. Enjoy! To get crispy sweet potatoes, cut them thin. About 1/4 inch works best. Toss them well in olive oil. This helps them crisp up in the oven. Spread them out on the baking sheet. Make sure they are not overlapping. This allows hot air to circulate. Bake at 425°F for 20 to 25 minutes. Flip them halfway through for even browning. For flavor, try adding smoked paprika and garlic powder. These spices bring depth to the dish. You can add a pinch of cayenne for heat. A touch of cumin also adds a warm flavor. Adjust the seasoning based on your taste. For parties, serve these nachos on a large platter. Layer them high for a fun display. Place toppings like avocado and cilantro on top. This makes them look fresh and colorful. Pair these nachos with lime wedges. A squeeze of lime adds brightness. You can also serve them with salsa or guacamole. These dips bring extra flavor and creaminess. Consider adding a cool yogurt dip to balance the heat from jalapeños. {{image_2}} You can easily customize your veggie loaded sweet potato nachos. If you want a dairy-free option, try using vegan cheese. It melts well and adds a nice creaminess. You can also swap out the regular cheese for cashew cheese. For extra flavor and color, think about other vegetables. Bell peppers add crunch and sweetness. Spinach gives a nice pop of green. You can even mix in some roasted zucchini or mushrooms. The options are endless! Switching up your cooking method can change the texture of your nachos. An air fryer gives you a crispier finish. Just layer the sweet potatoes in the fryer basket and cook until golden. It requires less oil, making it a healthier choice. Grilling is another fun option. It adds a smoky flavor and nice char marks. Just toss the sweet potatoes in a grill basket and watch them sizzle. If you’re short on time, you can also cook everything on the stovetop. Just sauté the sweet potatoes in a pan until they’re tender and slightly crispy. This method is quick and easy! To store leftover nachos, let them cool first. Place them in an airtight container. This keeps them fresh and tasty. You can also layer them with parchment paper to avoid sticking. When reheating, use the oven for the best results. Preheat it to 350°F (175°C). Spread the nachos on a baking sheet. Bake for about 10 minutes. This way, they stay crispy and warm. You can keep these nachos in the fridge for up to three days. If you want to save them longer, consider freezing. Just freeze the nachos before adding toppings like avocado and cheese. To thaw, place them in the fridge overnight. Then, reheat them in the oven for the best texture. Enjoy your tasty snacks! Can I make this recipe ahead of time? Yes, you can prep some parts ahead. Slice the sweet potatoes and store them in water to prevent browning. You can also cook the sweet potatoes and store them in the fridge. Just layer and bake them when ready to serve. What can I use instead of sweet potatoes? If you want a swap, use regular potatoes or even zucchini slices. Both can provide a tasty base. Just remember that cooking times may change, especially for softer veggies like zucchini. Are these nachos suitable for meal prep? Absolutely! They store well. Just keep the toppings separate. This keeps the nachos crispy. When ready to eat, reheat the sweet potato base and add toppings fresh. Caloric content and health benefits These nachos are a healthy choice. On average, one serving has about 400 calories. They offer fiber from sweet potatoes and beans, plus vitamins from fresh veggies. Avocado adds healthy fats, making them nutritious and filling. Gluten-free options for those with dietary restrictions Good news! Sweet potatoes are naturally gluten-free. All the ingredients in this recipe do not contain gluten. Just ensure your cheese and any extras are also gluten-free for safe eating. These veggie-loaded sweet potato nachos are a great mix of taste and health. We covered the ingredients, preparation steps, and tips for serving them. You can create tasty variations to fit your needs. Remember to store leftovers well for later enjoyment. Enjoy this dish at your next gathering or as a fun weeknight meal. You’ll delight in its flavors while feeling good about what you’re eating. Try these nachos, and you won’t be disappointed!

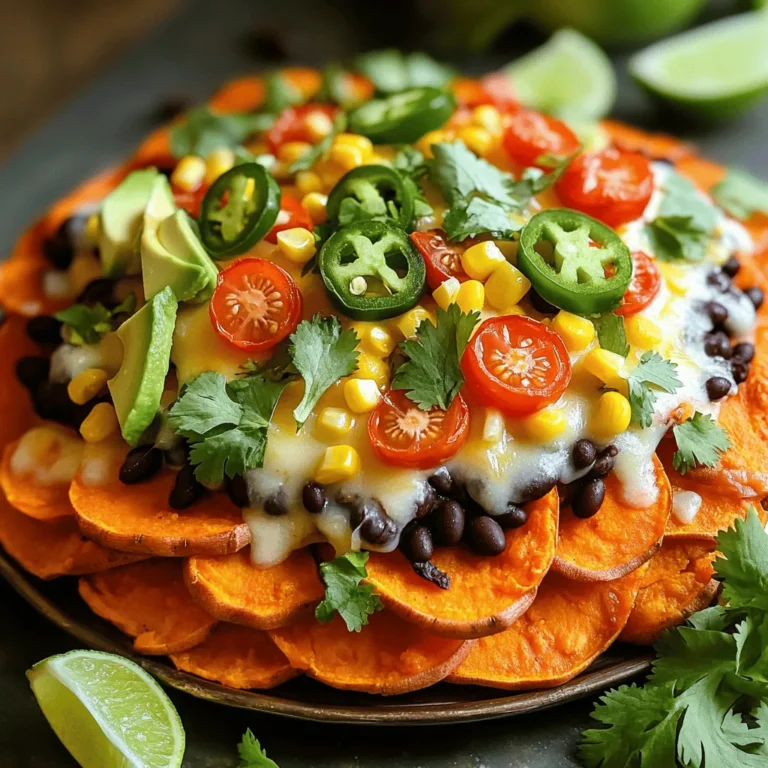
Veggie Loaded Sweet Potato Nachos Flavorful Delight

- 8 ounces dark chocolate (70% cocoa or higher), chopped - 1/2 cup mixed nuts (almonds, walnuts, and hazelnuts), roughly chopped - 1/4 cup dried cranberries or cherries - 1/4 cup shredded coconut (optional) - 1 teaspoon sea salt - 1 tablespoon coconut oil (optional, for a smoother melt) When picking dark chocolate, aim for a bar that has at least 70% cocoa. This gives you a rich flavor. Look for bars with few ingredients. The best options contain cocoa mass, cocoa butter, and sugar. Avoid chocolate with added fillers or artificial flavors. A smooth texture and a nice shine show quality. You can customize your bark with different nuts and fruits. Try using pistachios or pecans for a unique twist. Dried apricots or blueberries can add a sweet touch. You can also experiment with seeds like pumpkin or sunflower. Mix and match to find your favorite combination! First, gather your dark chocolate. I like using chocolate with 70% cocoa or higher. Chop it into small pieces for even melting. Place the chopped chocolate in a microwave-safe bowl. If you want a smoother texture, add a tablespoon of coconut oil. Heat the bowl in the microwave. Do it in 30-second bursts. Stir the chocolate after each interval. Keep going until it is fully melted and smooth. Be careful not to overheat the chocolate. While the chocolate melts, prepare your toppings. Grab your mixed nuts and chop them roughly. You can use almonds, walnuts, or hazelnuts. If you want a toasty flavor, lightly toast the nuts in a dry skillet. Chop your dried cranberries or cherries too. If you like coconut, shred some and set it aside. Once the chocolate is melted, mix in the chopped nuts and dried fruit. Stir well until everything is coated in chocolate. Now, it is time to spread the chocolate. Line a baking sheet with parchment paper. Pour the chocolate mixture onto the sheet. Use a spatula to spread it into an even layer, about 1/4 inch thick. After that, sprinkle sea salt over the top. You can adjust the salt to fit your taste. Now, place the baking sheet in the refrigerator. Let it chill for about 1-2 hours until it hardens. Once set, remove the bark from the parchment. Break it into irregular pieces for a rustic look. Enjoy your treat! To melt chocolate well, start with a microwave-safe bowl. Chop the dark chocolate into small pieces. This helps it melt evenly. If you want a smoother texture, add coconut oil. Heat the mixture in 30-second bursts. Stir after each burst until it is fully melted. Be careful not to overheat. Overheating can cause the chocolate to seize and become grainy. After melting, pour the chocolate onto a lined baking sheet. Use a spatula to spread the chocolate into a flat layer. Aim for about 1/4 inch thick. To get an even spread, work quickly. If the chocolate starts to cool, it may become harder to spread. You can also lift and tilt the baking sheet slightly to help. Feel free to get creative with your bark! You can mix in different nuts or dried fruits. Almonds and walnuts work well, but try pistachios or cashews too. Adding spices like cinnamon or cayenne can give a unique twist. Want a sweeter taste? Drizzle melted white chocolate on top after spreading the dark chocolate. Experiment with flavors to make it your own! {{image_2}} You can swap out the sugar in dark chocolate bark. Try using maple syrup or agave nectar. These sweeteners add a new flavor and keep the bark sweet. You can also add honey for a touch of natural sweetness. If you want a fun twist, try adding a little espresso powder. It enhances the chocolate taste. To make this bark vegan, choose dark chocolate that has no milk. Look for labels that say "dairy-free." You can use coconut oil for a smoother texture. This option keeps your treat rich without using dairy. Substitute nuts with seeds if you prefer. Pumpkin seeds or sunflower seeds work well too. You can change the flavors of your bark with the seasons. In fall, add pumpkin spice or candy corn for a festive touch. For winter, consider crushed peppermint candies or gingerbread spices. In spring, try fresh fruit bits like strawberries or dried mango. In summer, add zesty lime zest or citrus flavors for a refreshing twist. To keep your dark chocolate sea salt bark fresh, store it in an airtight container. Place a piece of parchment paper between layers if you stack them. This prevents the bark from sticking together. Keep the container in a cool, dry place away from heat and sunlight. Avoid storing it in the fridge, as this can cause moisture to form. When stored properly, dark chocolate sea salt bark lasts about two weeks at room temperature. If you want to keep it longer, freezing is a great option. Wrap the bark tightly in plastic wrap, then place it in a freezer-safe bag. It can stay fresh for up to three months in the freezer. To enjoy later, let it thaw at room temperature before eating. For gifts, consider using decorative tins or jars. Layer pieces of bark with parchment paper for a pretty presentation. You can also tie a ribbon around the jar or tin for a special touch. This makes a lovely gift for friends or family. Adding a personal note with serving suggestions can make it even more thoughtful. The best chocolate for bark is dark chocolate with 70% cocoa or higher. This gives the bark a rich flavor and nice texture. Look for brands with few ingredients for quality. Avoid chocolates with added oils or fillers. The higher cocoa content means less sugar, which balances well with the sea salt. Yes, you can add many toppings to your dark chocolate bark. Try using mixed nuts like almonds, walnuts, or hazelnuts for crunch. Dried fruits like cranberries or cherries add a sweet touch. Shredded coconut can give a nice chew too. Get creative! You can even try spices or seeds for extra flavor. Dark chocolate sea salt bark can last up to two weeks if stored properly. Keep it in an airtight container in a cool, dry place. If you want to store it longer, you can freeze it. Just wrap it well to avoid freezer burn. When ready to eat, let it thaw at room temperature. You learned how to make dark chocolate sea salt bark step by step. We covered the best ingredients and tips for choosing quality chocolate. You now know how to mix in nuts or fruits and even customize flavors. Proper storage and shelf life are also key to enjoying your bark later. As you experiment with variations, remember that the fun comes from making it your own. Enjoy sharing your tasty treats with friends and family!

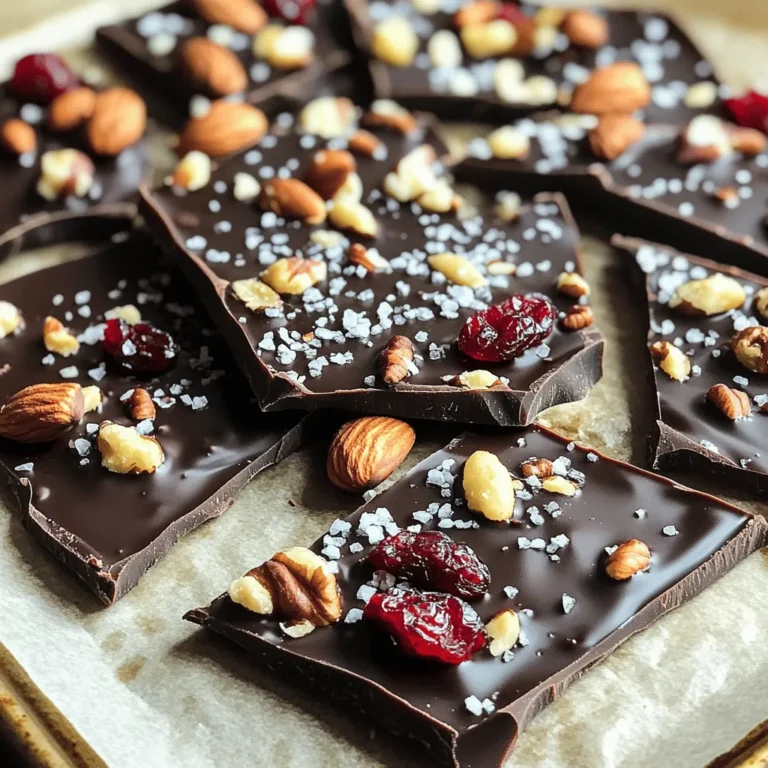
Dark Chocolate Sea Salt Bark Irresistible Treat Recipe

When making Greek Lemon Chicken Soup, fresh ingredients make a big difference. Here's what you need: - 1 lb boneless, skinless chicken breast - 1 medium onion, finely chopped - 2 cloves garlic, minced - 2 medium carrots, diced - 2 stalks celery, diced - 1/4 cup fresh lemon juice - Zest of 1 lemon - 1/4 cup fresh dill, chopped These fresh items add great flavor and nutrition to your soup. You also need some key items from your pantry: - 6 cups chicken broth - 1 cup orzo pasta - Salt and pepper to taste - Olive oil for sautéing These staples help create a tasty base for your soup. If you're missing an ingredient, don't worry! Here are some swaps: - Use chicken thighs instead of breasts for richer flavor. - Swap orzo for rice or quinoa if you prefer. - Fresh dill can be replaced with dried dill if needed. These alternatives can still give your soup a great taste! To start, gather all your ingredients. You will need: - 1 lb boneless, skinless chicken breast - 6 cups chicken broth - 1 medium onion, finely chopped - 2 cloves garlic, minced - 2 medium carrots, diced - 2 stalks celery, diced - 1 cup orzo pasta - 3 large eggs - 1/4 cup fresh lemon juice - Zest of 1 lemon - 1/4 cup fresh dill, chopped (or 1 tablespoon dried dill) - Salt and pepper to taste - Olive oil for sautéing Make sure to wash and chop your veggies. This makes cooking easier. 1. Heat a drizzle of olive oil in a large pot over medium heat. 2. Add the chopped onion and sauté until it turns translucent, about 5 minutes. 3. Next, stir in the minced garlic and cook for one more minute. This makes the soup smell great. 4. Now, add the diced carrots and celery. Sauté for another 5-7 minutes until they soften. 5. Pour in the chicken broth and bring it to a boil. 6. Once it boils, add the chicken breasts and orzo pasta. Reduce the heat and let it simmer for about 15 minutes. The chicken should be cooked through, and the orzo should be tender. 7. Take the chicken out of the pot. Shred it with two forks and return it to the soup. 1. In a small bowl, whisk together the eggs, lemon juice, lemon zest, and a pinch of salt. 2. Gradually add a ladle of the hot soup into the egg mixture while whisking. This step keeps the eggs from curdling. 3. Slowly pour the egg mixture back into the pot while stirring continuously. Cook for another 2-3 minutes on low heat. The soup will thicken slightly. 4. Stir in the fresh dill and season with salt and pepper to taste. 5. Serve the soup hot, garnished with extra dill and lemon slices if you like. Enjoy your tasty Greek lemon chicken soup! To make your soup shine, use fresh lemon juice and zest. This gives a bright, tangy taste. Fresh dill adds a nice herbal note. Always taste and adjust salt and pepper. You want the flavors to pop without being too salty. If you want a deeper flavor, try adding a bay leaf while cooking. Remove it before serving for a clean finish. Orzo cooks fast, so keep an eye on it. Add orzo to the boiling broth and stir well. Cooking it too long makes it mushy. It should be al dente, firm to the bite. If you want to keep it separate, cook orzo in a different pot. Then add it to the soup just before serving. One common mistake is not tempering the eggs. If you add the egg mixture too fast, it will curdle. Always whisk in a bit of hot soup first. Another mistake is cooking the soup too long after adding the eggs. It should just thicken, not boil. Lastly, don't skip the seasoning. You need salt and pepper to bring out the flavors. {{image_2}} You can easily change the flavors in Greek lemon chicken soup. Try using different pasta shapes like rice or quinoa. Swap the chicken for turkey or even cooked shrimp for a twist. If you want a creamier soup, add a bit of heavy cream or coconut milk. Making a vegetarian or vegan version is simple. Use vegetable broth instead of chicken broth. Replace chicken with chickpeas or mushrooms for protein. You can also add leafy greens like spinach or kale for extra nutrition. For a vegan soup, skip the eggs and use a plant-based thickener like cornstarch. Different regions have their own takes on this dish. In some areas, people add capers or olives for a briny touch. Others might toss in roasted red peppers for added sweetness. You could even try spices like paprika or cumin for a unique flavor. Each variation reflects local tastes and traditions. To store your Greek Lemon Chicken Soup, let it cool first. Use an airtight container. Keep it in the fridge for up to three days. This helps keep the flavors fresh. Just make sure it is sealed well. If you want to enjoy it later, freezing is a great option. For freezing, use a freezer-safe container. Pour in the soup after it cools. Leave some space at the top because the soup will expand. You can freeze it for up to three months. When you're ready to eat, just thaw it overnight in the fridge. When reheating, do it slowly. Place the soup in a pot over low heat. Stir it often to keep it from sticking. If the soup is too thick, add a splash of chicken broth or water. This will help bring back its original taste and texture. Enjoy it warm! If you do not have orzo, you can use rice or quinoa. Both options work well. They add a nice texture and soak up the soup's flavors. Just adjust the cooking time based on what you choose. For rice, you may need an extra 5-10 minutes. Quinoa cooks faster, so keep an eye on it. This soup is not gluten-free if you use orzo, as orzo is made from wheat. To make it gluten-free, simply replace orzo with gluten-free pasta or rice. Choose a gluten-free pasta that cooks well in soup. Always check for gluten-free labels to be safe. To make your soup creamier, add a splash of heavy cream or coconut milk. Stir it in right before serving for a rich texture. You can also whisk in more eggs for extra creaminess. Just remember to temper them first, so they blend smoothly. Greek Lemon Chicken Soup pairs well with a fresh salad or crusty bread. A simple Greek salad with cucumbers and tomatoes complements the soup's flavors. You can also serve it with pita bread and tzatziki for a full meal. These sides enhance the bright, zesty notes of the soup. This blog post shared how to make Greek Lemon Chicken Soup, focusing on ingredients, steps, and tips. You learned about fresh and pantry ingredients, plus fun variations like vegan options. The tips helped you avoid common mistakes and make the soup taste great. Don't forget to store leftovers properly so you can enjoy this dish later. With these insights, you can create a delicious soup that warms you up. Enjoy your cooking journey and savor every spoonful!

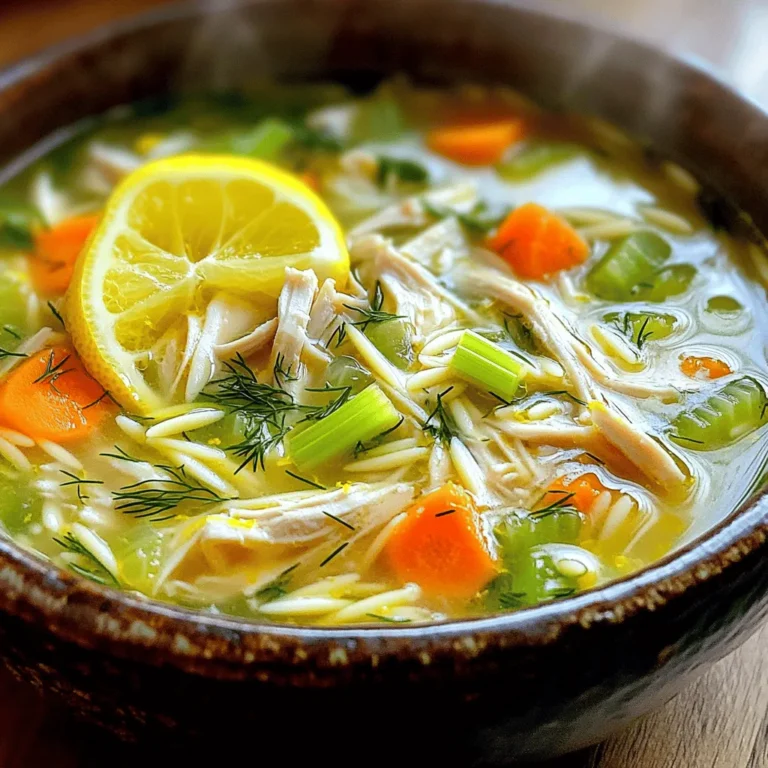
Greek Lemon Chicken Soup Simple and Flavorful Dish

- 2 cups all-purpose flour - 1/2 cup granulated sugar - 1 tablespoon baking powder - 1/2 teaspoon salt - 1/2 cup unsalted butter, cold and cubed - 3/4 cup dried cranberries - Zest of 1 large orange - 1/2 cup heavy cream - 1 large egg - 1 teaspoon vanilla extract For the perfect cranberry orange scone, you need a few key items. The main base starts with all-purpose flour. This gives your scones a nice structure. The sugar adds sweetness and helps with browning. Baking powder makes them rise, while salt enhances the flavor. Using cold, cubed unsalted butter is vital. This keeps your scones flaky. Dried cranberries bring tartness and a chewy texture. The orange zest adds a bright flavor, making each bite fresh. The liquid mix of heavy cream, egg, and vanilla extract binds everything together. When you combine these items, your dough becomes rich and flavorful. - 1/2 cup powdered sugar - 2 tablespoons orange juice A glaze can elevate your scones. Mix powdered sugar with fresh orange juice. This sweet topping adds a zesty finish. It is optional but highly recommended for extra flavor. 1. Preheat your oven to 400°F (200°C). Line a baking sheet with parchment paper. 2. In a large mixing bowl, whisk together: - 2 cups all-purpose flour - 1/2 cup granulated sugar - 1 tablespoon baking powder - 1/2 teaspoon salt 3. Add the cold, cubed butter (1/2 cup) to the flour mix. Use a pastry cutter or your fingers to cut the butter into the flour. Aim for a texture like coarse crumbs. 4. Stir in: - 3/4 cup dried cranberries - Zest of 1 large orange Mix until they are evenly spread in the dough. 5. In another bowl, whisk together: - 1/2 cup heavy cream - 1 large egg - 1 teaspoon vanilla extract Pour this mix into the dry ingredients. Stir until just combined. It’s fine if some dry spots remain. 6. Turn the dough onto a lightly floured surface. Gently knead it just enough to form a ball. Pat the dough into a circle about 1-inch thick. 7. Cut the dough into wedges like a pizza or use a round cutter for individual scones. Place them on the prepared baking sheet. 8. Bake in your preheated oven for 15-20 minutes. The scones should be lightly golden on top. 9. If you want a glaze, whisk together: - 1/2 cup powdered sugar - 2 tablespoons orange juice until smooth. 10. Let the scones cool slightly. Drizzle the glaze over the top before serving. To get the best scone texture, don't overmix the dough. When you combine the wet and dry ingredients, stir gently. It is okay if the dough has some dry spots. Overmixing makes scones tough. Use cold butter for a flaky texture. Cold butter creates pockets of steam that make the scones rise well. To boost flavor, consider adding spices like cinnamon or nutmeg. These spices can give your scones a warm, inviting taste. You can also decide between fresh or dried cranberries. Fresh cranberries offer a tart bite, while dried cranberries add sweetness. Both options work well; just pick what you like best. For a lovely presentation, serve the scones warm on a decorative plate. Drizzle some extra glaze over the top for shine. You can also place fresh cranberries around the scones for color. This makes your plate look bright and festive. A good look makes everyone want to try them! {{image_2}} You can make your cranberry orange scones even better! Consider adding nuts, like chopped walnuts or pecans. They give a nice crunch. You can also add chocolate chips for a sweet twist. Try using dark or white chocolate for a richer taste. Another option is to experiment with different citrus zests. Besides orange, you might try lemon or lime. Each brings its own zing to the scone, making it unique. Mix and match flavors to find your favorite combination! If you need a gluten-free option, use a gluten-free all-purpose flour blend. Many blends work well for baking. Just ensure it contains xanthan gum for proper texture. You can also check for certified gluten-free products. For a vegan alternative, replace the butter with coconut oil or vegan butter. Use almond or oat milk instead of heavy cream. You can swap the egg for a flaxseed egg by mixing 1 tablespoon of ground flax with 2.5 tablespoons of water. Let it sit for five minutes before adding it to the mix. Make your scones fit the season! For holidays, add spices like cinnamon or nutmeg. You can also decorate them with festive colors. Incorporate seasonal fruits too. In spring, try adding fresh blueberries or strawberries. In fall, you can use apples or pears for a cozy touch. Each season offers a chance to create something new and delicious. To keep your cranberry orange scones fresh, store them at room temperature. Place them in an airtight container. This helps to keep them soft and tasty for about two days. If you want to keep them longer, refrigerate them. Wrap each scone in plastic wrap. Then, place them in a container. This way, they can last up to a week. Freezing scones is a great option too. Start by letting them cool completely after baking. Then, wrap each scone tightly in plastic wrap. Place the wrapped scones in a freezer-safe bag. They can stay in the freezer for about three months. When ready to eat, take a scone out and thaw it in the fridge overnight. For a warm treat, you can reheat it in the oven at 350°F (175°C) for about 10 minutes. This will bring back their fresh-baked taste and texture. To make gluten-free cranberry orange scones, you can use gluten-free flour blends. Look for blends that have a mix of rice flour, potato starch, and tapioca flour. Brands like Bob's Red Mill and King Arthur Flour offer great options. Substitute the all-purpose flour with a 1:1 gluten-free blend. You might also want to add a bit of xanthan gum to help with texture. This will keep your scones light and fluffy. Yes, you can use fresh cranberries instead of dried. Fresh cranberries are tart, so adjust the sugar in your recipe to balance the flavors. I recommend adding an extra tablespoon of sugar to your dough. You may also want to chop the fresh cranberries into smaller pieces. This helps distribute their flavor evenly throughout the scone. You can tell the scones are done when they turn lightly golden on top. Another sign is when a toothpick inserted in the center comes out clean. The ideal internal temperature for scones is about 190°F (88°C). Make sure to keep an eye on them during the last few minutes of baking. This will help you avoid overbaking, which can lead to dry scones. Cranberry orange scones are simple to make with easy steps. You mix dry and wet ingredients, shape the dough, and bake until golden. Remember not to overmix for the best texture. Try nuts or spices for extra flavor. Store them at room temp or freeze for later. You can make these scones gluten-free or vegan too. With these tips and variations, you can enjoy these scones any time. Enjoy your baking adventure!

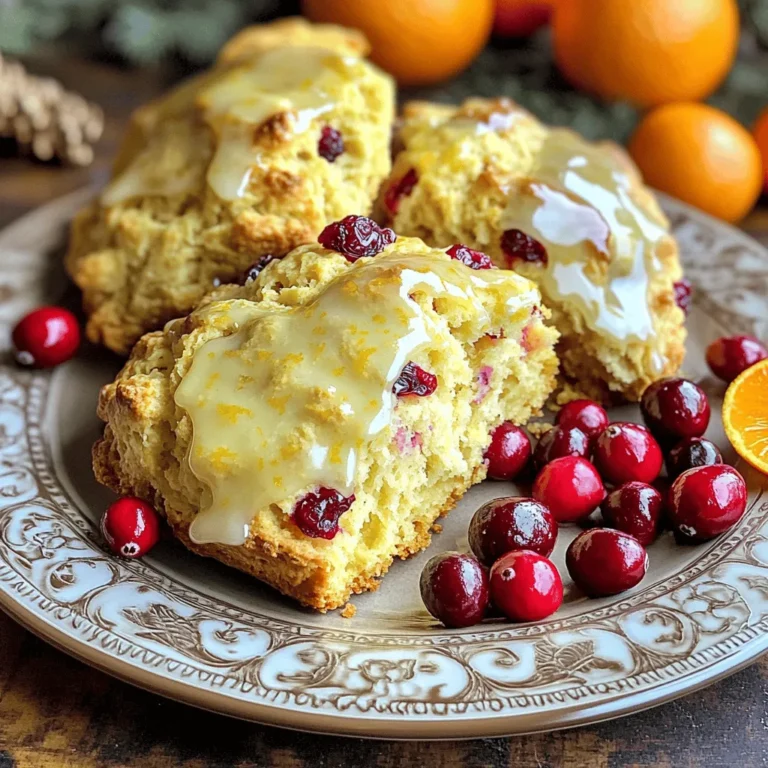
Cranberry Orange Scones Fresh and Flavorful Recipe

To make Chili Lime Grilled Corn on the Cob, you need fresh, simple ingredients. Here’s what you’ll need: - 4 ears of corn, husked - 2 tablespoons olive oil - 1 teaspoon chili powder - 1 teaspoon smoked paprika - 1 teaspoon garlic powder - Zest and juice of 2 limes - Salt to taste - Fresh cilantro, chopped (for garnish) - Cotija cheese, crumbled (optional) Each ingredient adds flavor and joy to the dish. The corn gives a sweet crunch. The spices bring heat and depth. Lime juice brightens everything up. You can also add cilantro and Cotija cheese for extra zest and creaminess. Use fresh corn for the best taste. Enjoy gathering these ingredients as part of your cooking fun! Start by preheating your grill to medium-high heat. This step is key. A hot grill gives the corn a nice char and helps lock in the flavors. Next, take your ears of corn and husk them. Make sure to remove all the silk strands. Rinse the corn under cold water to clean it. After rinsing, pat the corn dry with a towel. This helps the chili lime mixture stick better. In a small bowl, whisk together the olive oil, chili powder, smoked paprika, garlic powder, lime zest, lime juice, and a pinch of salt. Mix until everything is well combined. This mixture brings bright flavors to the corn. Now, take your brush and coat each ear of corn with the chili lime mixture. Make sure you cover all sides. This ensures every bite is packed with flavor. Place the coated corn on the grill. Close the lid and grill for about 10 to 15 minutes. Turn the corn occasionally. You want it to be tender and slightly charred for the best taste. Once the corn is done, carefully remove it from the grill. Sprinkle some chopped cilantro on top. If you like, add crumbled Cotija cheese for extra flavor. Serve the corn hot and enjoy the delicious burst of flavors! Grilling corn is simple and fun. Start with a hot grill at medium-high heat. This helps the corn cook evenly. You can soak the corn in water for 30 minutes before grilling. This keeps it moist and adds flavor. Make sure to turn the corn every few minutes. This way, all sides get nice grill marks and a good char. Choosing fresh corn is key to great taste. Look for ears with bright green husks. The silk should be golden and slightly sticky. If the kernels feel plump and firm, you have a winner! Press a kernel; it should pop easily. If it does not, it may be old. Fresh corn has a sweet smell, which is a good sign. You might want to change the spice level to fit your taste. If you love heat, add more chili powder. For milder corn, cut back on spices. You can also try adding fresh diced jalapeños to the chili lime mix. Taste as you go. This way, you can find the perfect balance for your dish. {{image_2}} Want more heat? Add jalapeño! Chop one or two fresh jalapeños. Mix them into your chili lime blend. This gives a nice kick to your corn. It adds a zesty flavor that pairs well with lime. You can adjust the amount based on your taste. No cheese? No problem! Omit the Cotija cheese for a dairy-free dish. The chili lime mix is full of flavor on its own. You can also add avocado slices as a topping. This keeps the dish fresh and creamy without dairy. Try new flavors to keep things exciting! Here are some ideas: - Garlic Herb: Add fresh herbs like parsley and basil. - Smoky BBQ: Use BBQ sauce instead of the chili lime mix. - Sweet & Spicy: Mix in honey or agave for a sweet twist. These options let you customize your grilled corn to your liking. Enjoy experimenting with different tastes! To store leftover grilled corn, let it cool first. Wrap each ear in plastic wrap. You can also place it in an airtight container. This keeps the corn fresh for up to three days in the fridge. Reheat your corn on the grill for the best flavor. Heat it over medium heat for about five minutes. You can also use a microwave. Wrap the corn in a damp paper towel and heat for one to two minutes. To freeze grilled corn, first, cut the kernels off the cob. Place the kernels in a freezer bag. Remove as much air as possible and seal. You can freeze them for up to six months. When ready to use, thaw in the fridge overnight. Yes, you can! Preheat your oven to 400°F. Husk the corn and coat it with the chili lime mixture. Wrap each ear of corn in foil. Place them on a baking sheet. Bake for about 25-30 minutes. This method gives you a similar tasty flavor. Grilled corn pairs well with many sides. Here are some great options: - Black bean salad - Grilled chicken - Guacamole and chips - Coleslaw - Rice dishes These sides bring balance and enhance the meal. The corn is ready when it turns bright yellow and is tender. You can check by piercing a kernel with a fork. If it’s juicy and soft, it’s done! Also, look for slight char marks, which add great flavor. Grilling corn is simple and fun. We explored fresh ingredients, tasty spices, and easy steps. You learned how to prepare, grill, and serve corn with flair. Remember to experiment with flavors and adjust spice levels to suit your taste. Enjoying grilled corn with family or friends makes the dish even better. Store leftovers properly to keep them fresh. Try these tips and variations for a delicious meal. Dive in, and experience all the wonderful flavors that grilled corn has to offer!

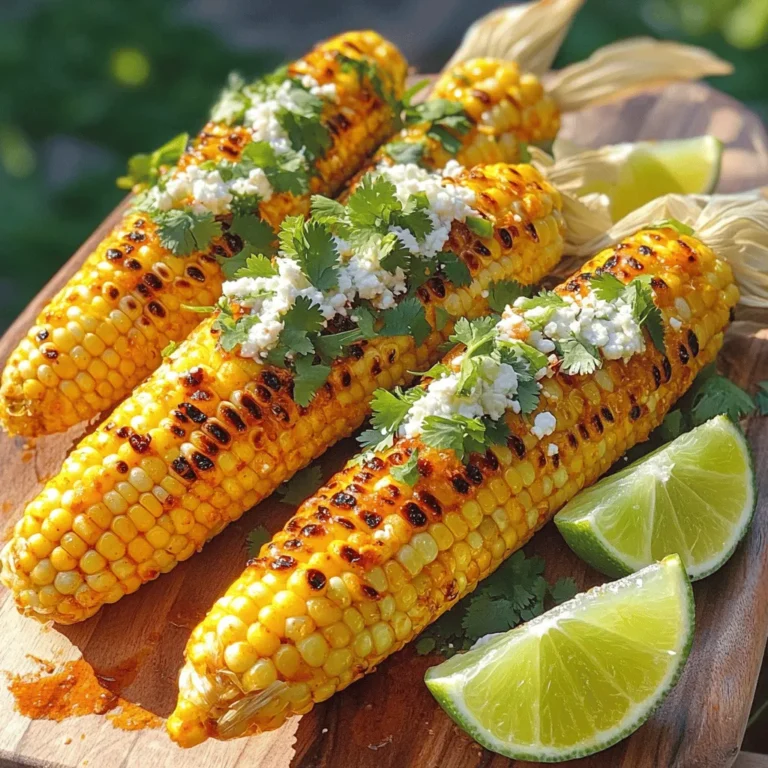
Chili Lime Grilled Corn on the Cob Fresh and Tasty

To make delicious pumpkin spice energy bites, gather these key ingredients: - 1 cup rolled oats - 1/2 cup pumpkin puree - 1/4 cup almond butter (or another nut butter) - 1/4 cup honey or maple syrup - 1/2 teaspoon vanilla extract - 1 teaspoon pumpkin pie spice - 1/4 teaspoon salt - 1/4 cup mini chocolate chips (optional) - 1/4 cup chopped nuts (like walnuts or pecans) (optional) These ingredients work together to create energy bites that are both tasty and nutritious. Rolled oats provide a hearty base. Pumpkin puree adds moisture and a lovely flavor. Nut butter gives it creaminess and healthy fats. Honey or maple syrup adds just the right sweetness. Vanilla extract brings a warm note, while pumpkin pie spice adds that classic fall flavor. A pinch of salt enhances all the tastes. Optional ingredients like mini chocolate chips make them extra fun, while nuts add a crunchy texture. You can customize these bites to fit your taste. To start, grab a large mixing bowl. Combine these dry and wet ingredients: - 1 cup rolled oats - 1/2 cup pumpkin puree - 1/4 cup almond butter (or any nut butter) - 1/4 cup honey or maple syrup - 1/2 teaspoon vanilla extract Mix all these ingredients until they are well combined. Next, we need to add flavor. Stir in: - 1 teaspoon pumpkin pie spice - 1/4 teaspoon salt Mix again until everything is thoroughly blended. If you want to add some fun textures, fold in any optional ingredients like: - 1/4 cup mini chocolate chips - 1/4 cup chopped nuts (like walnuts or pecans) Now that the mixture is ready, it’s time to chill it. Place the bowl in the fridge for about 30 minutes. This helps the mixture firm up. Once chilled, take it out. Scoop the mixture and roll it into small balls, about 1 inch wide. This should make about 12 bites. For a little extra flair, roll each bite in cinnamon or shredded coconut. This adds a delightful twist to the flavor. Then, place the energy bites on a parchment-lined plate or tray. Finally, store them in an airtight container in the fridge. They stay fresh for up to one week. You can also freeze them for longer storage. Enjoy your tasty and healthy treats! To get the right texture in your pumpkin spice energy bites, you might need to tweak the ingredients a bit. If your mixture feels too dry, add a little more pumpkin puree or nut butter. This will help bind everything together. If it’s too wet, sprinkle in more rolled oats until you get that perfect consistency. Stickiness can be a problem, especially when rolling the bites. To avoid this, keep your hands slightly damp with water. You can also dust your hands with a bit of oats. This will help prevent sticking and make rolling easier. These energy bites pair well with many drinks. Try them with a warm cup of coffee or tea. They also taste great with a glass of almond milk or a smoothie. These bites are perfect for any occasion. Serve them at kids' parties or as a snack after school. They also make a great pick-me-up during busy workdays. Making these energy bites fun for kids is easy. Let them help mix the ingredients. They can also roll the bites into fun shapes. Adding colorful sprinkles or rolling them in shredded coconut makes them more appealing. Use this opportunity to teach kids about healthy eating. Talk about the benefits of oats and pumpkin. Explain how these ingredients give energy and help them grow strong. {{image_2}} You can easily change the flavor of your energy bites. Swap out the pumpkin pie spice for cinnamon or nutmeg to give a new taste. Using different nut butters adds a twist too. For example, try peanut butter for a rich, nutty flavor. Cashew butter brings a creamy texture, perfect for a smooth treat. Want to boost the nutrition? Add in some dried fruits like cranberries or raisins. They add sweetness and chewiness. If you like protein, include protein powder or seeds. Chia seeds or flaxseeds work great here. They help keep you full longer and add extra crunch. You can make these bites fun for any season. For the holidays, add crushed candy canes or gingerbread spice for a festive touch. In the summer, fresh fruits like strawberries or blueberries can lighten them up. These seasonal twists keep things exciting and tasty! For your pumpkin spice energy bites, I recommend using airtight containers. This keeps the bites fresh and prevents them from drying out. Plastic bags are okay too, but they might not seal as tightly. When it comes to temperature, refrigeration is best for short-term storage. Your bites stay good in the fridge for up to one week. If you want to store them longer, freeze them. Just remember to use an airtight container or freezer bag to avoid freezer burn. To enjoy maximum flavor, eat your energy bites fresh. If they start to smell off or look discolored, toss them. Also, if they feel dry or hard, they may have spoiled. Freshness is key to enjoying their taste, so check them regularly. These energy bites are perfect for travel. Just pack a few in a small container or a bag. They make a great snack for road trips or busy days. For meal prep, you can make a big batch at once. Store them in portions, so grabbing a bite is easy. Having these ready means you always have a healthy snack on hand! Pumpkin spice energy bites are quite healthy. They offer a good mix of fiber, protein, and healthy fats. Here’s a quick breakdown: - Rolled oats provide fiber and keep you full. - Pumpkin puree is low in calories and high in vitamins. - Nut butter adds protein and healthy fats. - Honey or maple syrup gives natural sweetness and energy. Homemade energy bites are healthier than store-bought ones. You control the ingredients and avoid added sugars or preservatives. Store-bought snacks often lack nutrition. Making these bites at home means you get the best flavors and health benefits. Yes, you can easily make these bites nut-free. Instead of almond butter, try using sunflower seed butter or soy nut butter. These options give a similar texture and taste without nuts. You can also skip the butter entirely and use mashed banana or applesauce as a binder. This way, you keep the energy bites tasty and safe for those with nut allergies. Pumpkin spice energy bites last about one week in the fridge. Store them in an airtight container to keep them fresh. If you want to keep them longer, you can freeze them. In the freezer, they last for about three months. Just make sure to thaw them in the fridge before eating. Yes, you can use fresh pumpkin. First, you need to cook it until soft. Then, mash it well to get a smooth texture. You might need to adjust the amount you use. Fresh pumpkin can be wetter than canned puree. If your mix is too wet, add a bit more oats to help it bind. This keeps the energy bites from falling apart. This blog post covered everything you need to make delicious pumpkin spice energy bites. We explored essential ingredients, step-by-step instructions, helpful tips, tasty variations, and storage methods. Making these bites can be fun and easy. You can customize them to suit your taste and needs. Plus, they are great for kids! Keep this guide handy for your next snack adventure. Enjoy your healthy treats, knowing you created them with care!

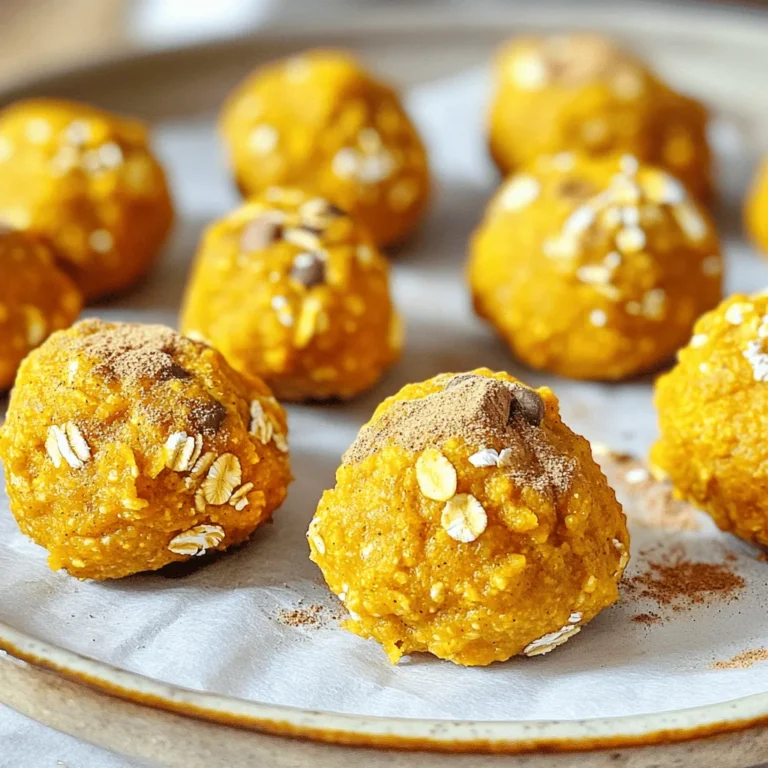
Pumpkin Spice Energy Bites Delicious and Nutritious Treat

- 1 cup orzo pasta - 2 cups vegetable broth - 1 cup cherry tomatoes, halved - 1 cucumber, diced - 1/4 red onion, finely chopped - 1/4 cup fresh parsley, chopped - 2 tablespoons olive oil - 2 tablespoons lemon juice - 2 cloves garlic, minced - Zest of 1 lemon The main ingredients create a bright and fresh taste in the Lemon Garlic Orzo Salad. Orzo pasta is small and cooks quickly. The vegetable broth adds a rich flavor to the pasta. Fresh vegetables like cherry tomatoes, cucumber, and red onion give the dish color and crunch. Garlic, olive oil, lemon juice, and lemon zest bring a zesty kick that makes every bite special. - Salt and pepper - Fresh herbs: parsley Seasoning is key to making this dish shine. Salt and pepper enhance the flavors of each ingredient. Fresh parsley adds a touch of green and a burst of flavor. It also makes the salad look pretty and inviting. Adjust these seasonings to your taste, and don't be afraid to get creative! First, we need to boil the vegetable broth. Pour 2 cups of broth into a medium saucepan. Heat it until it bubbles. Once boiling, add 1 cup of orzo pasta. Cook it for about 8 to 10 minutes. This time gives you al dente orzo. Al dente means it’s firm but not hard. Stir the orzo a few times to keep it from sticking. When it’s done, drain the orzo. Rinse it under cold water to stop the cooking. Set it aside to cool. While the orzo cooks, let’s chop the veggies. Take 1 cup of cherry tomatoes and cut them in half. Then, grab 1 cucumber and dice it. Next, finely chop 1/4 of a red onion. Finally, chop 1/4 cup of fresh parsley. Place all the chopped vegetables into a large mixing bowl. This mix brings bright colors and flavors to the salad. Now, we’ll make the dressing. In a small bowl, add 2 tablespoons of olive oil. Then, squeeze in 2 tablespoons of fresh lemon juice. Next, add 2 cloves of minced garlic and the zest of 1 lemon. Sprinkle in some salt and pepper. Use a whisk to blend everything well. This dressing adds a zesty kick to the salad. Add the cooled orzo to the bowl with the vegetables. Pour the dressing over the top. Now, it’s time to toss! Use a big spoon to gently mix everything together. Make sure all the orzo and veggies get coated with the dressing. This way, every bite is full of flavor. You can serve the salad right away. It tastes great fresh. However, if you have time, chill it in the fridge for 30 minutes. This waiting helps the flavors blend better. Whether you serve it cold or fresh, this salad is a delight! To make your orzo just right, start with water that boils. Add the orzo pasta and cook it for about 8-10 minutes. This gives you an al dente texture. After cooking, drain the orzo and rinse it under cold water. This step stops the cooking and keeps it from getting mushy. If you follow these steps, you’ll get a nice, firm bite in your salad. To make your salad even better, think about adding more herbs. Fresh basil or mint works well with lemon and garlic. You can also try a pinch of red pepper flakes for a bit of heat. These small changes can add depth to the dish. Always taste as you go, and adjust the seasonings to match your likes. Lemon garlic orzo salad tastes great on its own, but you can pair it with many dishes. Serve it alongside grilled chicken or fish for a complete meal. For a fun touch, use a colorful bowl to show off the bright veggies. You can even add some crumbled feta on top for extra flavor. Enjoy it fresh or let it chill for a bit to mix the flavors even more. {{image_2}} If you need gluten-free options for orzo, look for rice-based orzo. It cooks just like regular orzo and tastes great. For vegan adaptations, use vegetable broth instead of chicken broth. Make sure your dressing is free from animal products too. You can easily add proteins to this salad. Cooked chicken or canned chickpeas mix well. Both options add flavor and make the dish more filling. Seasonal vegetable variations can also enhance the salad. Use fresh zucchini in summer or roasted butternut squash in fall. For a Mediterranean-inspired twist, add olives and feta cheese. These ingredients boost flavor and bring a salty kick. If you want to explore fusion ideas, try adding Thai peanut sauce instead of the lemon dressing. It gives the salad a new, exciting taste. To keep your Lemon Garlic Orzo Salad fresh, store it in an airtight container. This prevents moisture and keeps flavors intact. Always let the salad cool down before putting it in the fridge. You can enjoy it cold or at room temperature. The salad stays good for about three days in the fridge. Just check for any changes in smell or color before eating. If you want to save some salad for later, you can freeze it. First, make sure it is completely cool. Then, place the salad in a freezer-safe container. Leave some space at the top for expansion. You can freeze it for up to a month. However, the texture may change when thawed. Fresh veggies can become a bit soft. When you’re ready to eat your orzo salad, thaw it in the fridge overnight. You can also use the microwave to reheat it. If using a microwave, heat it in short bursts, stirring in between. You want it warm, not hot. If you like, add a splash of lemon juice or olive oil to freshen it up. Enjoy your tasty salad! Yes, you can make Lemon Garlic Orzo Salad ahead of time. Preparing it in advance can help the flavors blend better. I suggest making it a few hours before serving. Just store it in the fridge. This helps keep it fresh and tasty. You can add various proteins to the salad. Grilled chicken adds great flavor. Chickpeas or black beans work well for a plant-based option. You can also use shrimp or feta cheese for a twist. Cook or prepare the proteins before mixing them in. Lemon Garlic Orzo Salad lasts about 3 to 5 days in the fridge. Keep it in an airtight container to maintain freshness. If you notice any changes in smell or color, it’s best to discard it. Yes, you can use other pasta types in this recipe. Small pasta shapes, like ditalini or fusilli, work well. Just adjust the cooking time according to the package instructions. Remember, orzo has a unique texture, so try to choose a pasta that cooks similarly. This blog post covered how to make a delicious Lemon Garlic Orzo Salad. We explored main ingredients like orzo, fresh veggies, and flavorful dressings. I shared step-by-step instructions to cook orzo and prepare veggies. Plus, I offered tips for perfecting texture and enhancing flavors. In conclusion, you can customize this salad in many ways. Enjoy experimenting with flavors and ingredients. With simple storage tips, you can keep it fresh for longer. Dive into this recipe and make it your own!

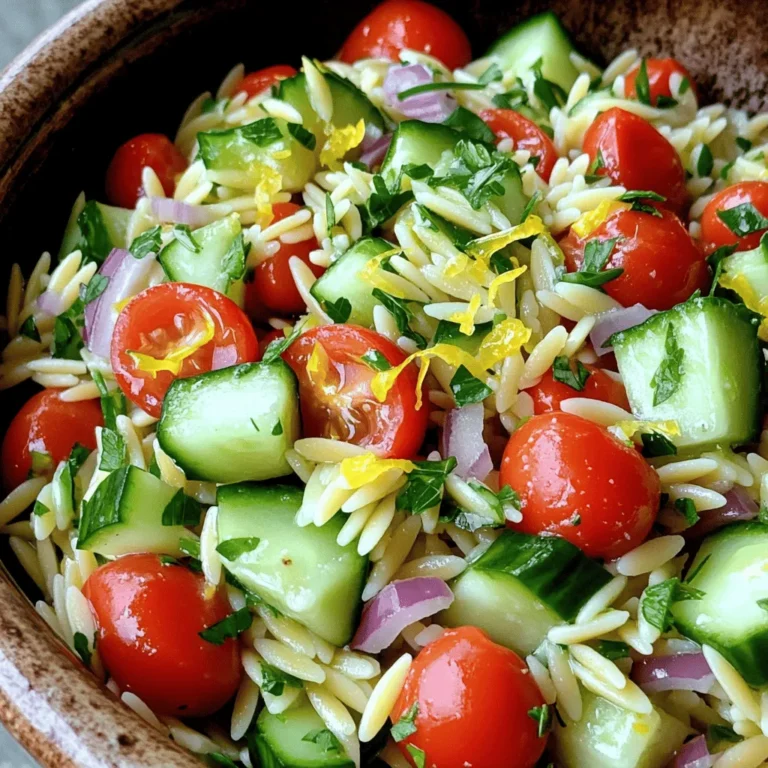
Lemon Garlic Orzo Salad Fresh and Flavorful Dish

To make Vegan Buffalo Chickpea Wraps, gather these simple ingredients: - Canned chickpeas (1 can, 15 oz) - Olive oil (1 tablespoon) - Hot sauce (1/4 cup, like Frank’s RedHot) - Maple syrup (1 tablespoon) - Garlic powder (1 teaspoon) - Onion powder (1 teaspoon) - Seasoning (salt and pepper to taste) - Whole wheat tortillas (4 large) - Fresh toppings (1 cup shredded lettuce, 1/2 cup diced tomatoes, 1/2 avocado sliced) - Vegan ranch dressing (1/4 cup) These ingredients come together to create a tasty and filling meal. The chickpeas provide protein and texture, while the hot sauce gives a kick. Maple syrup adds a touch of sweetness that balances the heat. The spices enhance the overall flavor. Don't forget to prepare fresh toppings. They add crunch and freshness to your wraps. You can customize the toppings based on what you like or have on hand. This makes the dish adaptable and fun. Now that you have your ingredients ready, you're on your way to making a delicious meal. Enjoy the process and get ready for bold flavors! 1. Heat a frying pan over medium heat. Add 1 tablespoon of olive oil and the drained chickpeas. 2. Cook the chickpeas for about 5 minutes. Stir occasionally to heat them through. 3. In a small bowl, mix together 1/4 cup of hot sauce, 1 tablespoon of maple syrup, 1 teaspoon of garlic powder, 1 teaspoon of onion powder, and salt and pepper. 4. Pour this sauce over the chickpeas. Stir well to coat all the chickpeas. Cook for an additional 3-4 minutes until the sauce thickens a bit. 1. Take a large whole wheat tortilla and lay it flat on a clean surface. 2. Start by adding a layer of shredded lettuce down the center of the tortilla. 3. Spoon a generous portion of the buffalo chickpea mix on top of the lettuce. 4. Add diced tomatoes and avocado slices on top of the chickpeas. 5. Drizzle some vegan ranch dressing over the toppings. 6. Fold the sides of the tortilla inward, then roll it up from the bottom to create a wrap. 7. Repeat this process with the remaining tortillas and filling. - To adjust spice levels, use less hot sauce or add more maple syrup for sweetness. - To ensure the sauce thickens properly, cook it a little longer on low heat. Stir often to prevent sticking. To make great wraps, start with even filling. Spread the lettuce down the center of the tortilla. Add the chickpea mix on top but leave space on the edges. This helps keep everything inside when you fold it. When you roll, tuck in the sides first. This seals in the filling and keeps it neat. If you have leftovers, use them wisely. Store the filling separate from the tortillas. This keeps the wrap fresh. You can make new wraps, salads, or even grain bowls with the leftover chickpea mix. It is tasty over rice or quinoa too. You can boost your wraps with other veggies. Try adding bell peppers, cucumbers, or shredded carrots. These give more crunch and flavor. Fresh herbs like cilantro or parsley also add a nice touch. For extra protein, think beyond chickpeas. You can add black beans or lentils for a hearty mix. Tofu or tempeh could work well too. They soak up flavor and make the meal more filling. {{image_2}} You can change the chickpeas if you want. Try using lentils or black beans instead. Both add great flavor and protein. If you want a different texture, use cooked quinoa. For wraps, whole wheat tortillas are good, but feel free to explore. Corn tortillas work well too. You can also try lettuce leaves for a low-carb option. Just make sure they are large enough to hold the filling. Buffalo sauce is delicious, but you can switch it up. Try barbecue sauce for a sweet, smoky taste. A spicy sriracha or a tangy teriyaki sauce can also add a fun twist. If you crave cheesy flavors, add vegan cheese shreds inside the wrap. Nutritional yeast is another great choice for a cheesy taste without dairy. If you want it creamy, mix in some avocado or a vegan cream cheese. To keep your leftover wraps fresh, place them in the fridge. Wrap each one tightly in plastic wrap. This helps keep moisture in and prevents them from drying out. You can also use an airtight container. Just make sure there is no extra air inside. Store the wraps in the fridge for up to three days. When it’s time to enjoy your wraps again, you want to reheat them without losing flavor. The best way is to use a skillet on low heat. Heat for about 5 to 7 minutes. Flip the wraps halfway through to ensure even heating. You can also use a microwave. Heat them for about 30 seconds to 1 minute. Check to see if they are warm. Remember not to overheat, as that can dry them out. Can I make these wraps gluten-free? Yes, you can make these wraps gluten-free. Simply use gluten-free tortillas instead of whole wheat ones. Many stores offer tasty gluten-free options. Just check the label for any allergens. How long do these wraps last in the fridge? These wraps last about 2 to 3 days in the fridge. Store them in an airtight container. To keep them fresh, wrap them in foil or plastic wrap before placing them in the container. Can I freeze the buffalo chickpea mixture? Yes, you can freeze the chickpea mixture. Place it in a freezer-safe bag or container. It will stay good for up to 3 months. When ready to use, thaw it in the fridge overnight before reheating. What can I serve with these wraps? You can serve these wraps with a side salad or some crunchy veggie sticks. They pair well with sweet potato fries too. For extra flavor, try serving them with more vegan ranch dressing. Are these wraps high in protein? Yes, these wraps are high in protein. Chickpeas are a great source of plant-based protein. One can provides about 14 grams of protein. Adding toppings like avocado or beans boosts the protein even more. This article outlined how to prepare tasty vegan buffalo chickpea wraps. We discussed the key ingredients, preparation steps, and helpful tips for making and storing your wraps. You can customize flavors and try substitutes to suit your taste. Remember, it’s easy to adjust spice levels and get creative with toppings. Enjoy experimenting with different flavors while making these wraps. With simple steps, you can create a quick, healthy meal. Now, go enjoy your delicious creation!

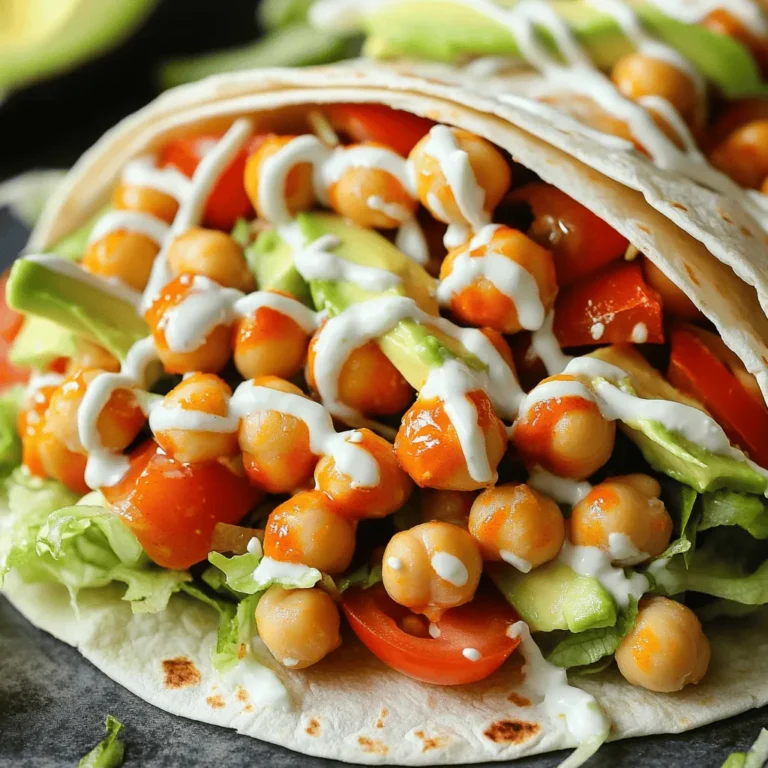
Vegan Buffalo Chickpea Wraps Packed with Flavor

Here’s what you need for cilantro lime shrimp skewers: - 1 lb large shrimp, peeled and deveined - 1/4 cup fresh cilantro, finely chopped - 2 tablespoons olive oil - Zest and juice of 2 limes - 2 cloves garlic, minced - 1 teaspoon ground cumin - 1/2 teaspoon red pepper flakes - Salt and pepper to taste - Bamboo skewers (soaked in water for 30 minutes) These ingredients come together to make a fresh and tasty meal. The large shrimp absorb the bright flavors of lime and cilantro. Olive oil adds a nice richness. Garlic gives the dish depth, while cumin adds warmth. Red pepper flakes add a kick, but you can adjust them to your taste. Don’t forget to soak the bamboo skewers! This step keeps them from burning on the grill. Each ingredient plays a key role in creating a balanced flavor. You can find all these items at your local grocery store. In a medium bowl, gather your ingredients. Combine 1/4 cup of finely chopped cilantro, 2 tablespoons of olive oil, the zest and juice of 2 limes, and 2 minced garlic cloves. Add 1 teaspoon of ground cumin and 1/2 teaspoon of red pepper flakes. Finish with salt and pepper to taste. Mix these well until you have a smooth marinade. This mix gives the shrimp a fresh and zesty flavor. Take 1 pound of large peeled and deveined shrimp. Toss them in the bowl with the marinade. Make sure each shrimp gets coated nicely. Cover the bowl and place it in the fridge for at least 30 minutes. This step helps the shrimp soak up all the flavors. While the shrimp marinates, soak bamboo skewers in water for 30 minutes. Preheat your grill to medium-high heat. Once ready, thread about 4 to 5 marinated shrimp onto each skewer. Leave a little space between each shrimp. This space helps them cook evenly. Place the skewers on the grill. Grill the shrimp for 2 to 3 minutes on each side. You will know they are done when they turn pink and opaque. Be careful, as overcooking can make them tough. After grilling, let them rest for a minute before serving. To cook shrimp evenly on skewers, space them well. I recommend placing 4-5 shrimp on each skewer. Leave a small gap between each shrimp. This helps heat circulate and cook them properly. If they touch, some may cook faster than others. Know the signs of doneness to avoid overcooking. Shrimp turn pink and opaque when done. They curl up slightly, which is normal. If they turn rubbery, they are overcooked. Watch closely while grilling. It usually takes 2-3 minutes per side. For more flavor, let the shrimp marinate longer. An hour or more makes a big difference. You can also use leftover marinade. Just remember to bring it to a boil first if you plan to drizzle it over the cooked shrimp. This kills any bacteria from the raw shrimp. {{image_2}} To make the skewers spicy, you can add more red pepper flakes or slice up a jalapeño. Start by increasing the red pepper flakes to one teaspoon. If you like heat, add sliced jalapeño to the marinade. Adjust the spice level to fit your taste. The heat will enhance the bright flavors of the lime and cilantro. If you want to switch up the herbs, try using parsley or dill instead of cilantro. Both herbs add a fresh taste. Parsley gives a mild flavor, while dill offers a unique twist. Replace the cilantro with the same amount of either herb. This change makes a great option for those who may not enjoy cilantro. You can swap shrimp for other proteins or vegetables. Chicken works well if you cut it into bite-sized pieces. For a vegetarian option, try zucchini, bell peppers, or mushrooms. Just make sure to adjust cooking times accordingly. Each swap opens a new way to enjoy this dish. To store leftovers of your cilantro lime shrimp skewers, place them in an airtight container. Make sure the skewers cool down to room temperature before sealing them. This helps keep them fresh. You can store them in the fridge for up to three days. When you are ready to eat them, check for any off smells before reheating. You can freeze cooked or uncooked shrimp skewers. For cooked skewers, let them cool completely. Then, wrap them tightly in plastic wrap and place them in a freezer bag. They can last up to three months in the freezer. For uncooked skewers, simply place them in a freezer bag after marinating. This way, they hold onto their flavors. When you want to use them, defrost them in the fridge overnight. To reheat shrimp skewers without drying them out, use a skillet on low heat. Add a splash of olive oil to the pan. Cook them for about 2-3 minutes, turning them gently. This keeps them moist and tasty. You can also use the microwave. Place the skewers on a plate, cover with a damp paper towel, and heat for 30 seconds at a time. Check often to avoid overcooking. You can tell when shrimp are cooked by looking for a few signs. First, they will turn pink. Next, they will become opaque. Finally, they will curl into a C shape. If they stay straight or look gray, they need more time. Cooking shrimp takes about 2-3 minutes on each side on the grill. Be careful not to overcook them, as they can become tough. Yes, you can use frozen shrimp for this recipe. To thaw them, place the shrimp in a bowl of cold water for about 15-20 minutes. Change the water a couple of times to speed up the process. Once thawed, pat them dry with a paper towel before marinating. This helps the marinade stick better and ensures even cooking. Many sauces work well with cilantro lime shrimp skewers. Here are some tasty options: - Garlic Aioli: Creamy and rich, it adds depth. - Chili Lime Sauce: Sweet and spicy, perfect for a kick. - Avocado Cream: Smooth and fresh, enhances the dish. - Salsa Verde: Bright and tangy, complements the shrimp. You can also serve these skewers with a fresh salad or rice for a full meal. This shrimp skewer recipe is simple and tasty. You learned how to marinate shrimp, grill them, and avoid overcooking. Adding herbs or changing proteins makes it fun. Store leftovers properly, and reheating them is easy. Remember the key tips I shared for the best results. Enjoy this dish at your next meal or gathering. Try it out and impress your friends! It’s a great way to enjoy fresh flavors.

Cilantro Lime Shrimp Skewers Fresh and Flavorful Meal

PREV 1 … 38 39 40 … 56 NEXT
secrets pice kitchen

explore

DessertsDinnerAppetizersDrinks

Our Policies

  • Cookie Policy
  • Copyright Policy
  • Disclaimer
  • GDPR Policy
  • Terms Of Use
Back to Top
  • About
  • Contact Us
  • Privacy Policy
© 2025 secrets pice kitchen