FREE DINNER EBOOK! Get your copy!
  • Cookie Policy
  • GDPR Policy
  • Disclaimer
  • Terms Of Use
  • Visit my other site: Fun Cookie Recipes
secrets pice kitchen
  • Home
  • Dinner
  • Desserts
  • Drinks
  • Appetizers
  • Contact
  • About
  • Privacy Policy
  • Home
  • Dinner
  • Desserts
  • Drinks
  • Appetizers
  • Contact
  • About
  • Privacy Policy
  • Cookie Policy
  • GDPR Policy
  • Disclaimer
  • Terms Of Use
Visit my other site: Fun Cookie Recipes

HOME / CATEGORIES /

Latest

- 8 oz linguine or spaghetti - 1 lb boneless, skinless chicken breasts - 3 tablespoons olive oil - 4 cloves garlic, minced The main ingredients are the heart of this dish. First, I prefer linguine, but spaghetti works too. The chicken is a great source of protein and makes it filling. Olive oil adds a rich flavor, while garlic brings in a wonderful aroma. - 1/2 teaspoon red pepper flakes - 1 cup chicken broth - 1 tablespoon fresh lemon juice - Zest of 1 lemon For flavor, I use red pepper flakes. They add a kick but can be adjusted. Chicken broth keeps everything moist and adds depth. Fresh lemon juice brightens the dish, and zest gives it an extra zing. - 1/2 cup cherry tomatoes - 1/4 cup fresh parsley - Salt and pepper - Grated Parmesan cheese Cherry tomatoes add sweetness and color. Fresh parsley gives a pop of green and freshness. I always season with salt and pepper to taste. Lastly, grated Parmesan cheese makes a perfect topping. It adds creaminess and richness to every bite. {{ingredient_image_1}} Start by bringing a large pot of salted water to a boil. This step is key for great pasta. Once the water boils, add 8 ounces of linguine or spaghetti. Cook it according to the package directions until it is al dente. This usually takes about 8-10 minutes. After cooking, drain the pasta and set it aside. Remember to keep about 1/2 cup of the pasta water for later. Next, we need to sauté the chicken. In a large skillet, heat 2 tablespoons of olive oil over medium heat. Season 1 pound of sliced chicken breasts with salt and pepper. Add the chicken to the skillet and cook until it is browned. This should take about 5-7 minutes. Once done, remove the chicken from the skillet and set it aside. Now, let's make the sauce. In the same skillet, add the last tablespoon of olive oil. Add 4 cloves of minced garlic and 1/2 teaspoon of red pepper flakes. Cook these for about 1 minute until they smell great. Then, pour in 1 cup of chicken broth, 1 tablespoon of fresh lemon juice, and the zest of 1 lemon. Stir in 1/2 cup of halved cherry tomatoes. Let this simmer for 3-5 minutes to blend the flavors. It’s time to mix everything! Add the cooked chicken back into the sauce. Stir well to combine. Gradually pour in the reserved pasta water until the sauce reaches your desired thickness. Next, add the cooked pasta to the skillet. Toss everything together until the pasta is well-coated in the sauce. To finish, remove the skillet from heat. Stir in 1/4 cup of chopped fresh parsley. Taste your dish and adjust the seasoning if needed. For serving, place the pasta in deep bowls. Top with grated Parmesan cheese and extra parsley for a nice look. A lemon wedge on the side can add a refreshing touch and make it even better. - Cooking chicken to the right temperature: Always cook chicken to an internal temperature of 165°F. Use a meat thermometer for accuracy. This keeps the chicken juicy and safe to eat. - Adjusting spice levels with red pepper flakes: Start with 1/2 teaspoon of red pepper flakes. If you like more heat, add a bit more. Taste as you go. This way, you control the spice level. - Using homemade chicken broth vs. store-bought: Homemade chicken broth offers a richer taste. It’s also healthier. If you use store-bought, choose low-sodium options for better flavor balance. - Recommendations for quality olive oil: Use extra virgin olive oil for the best flavor. It adds depth to your dish. Look for options labeled as cold-pressed for high quality. - Indicators of perfect pasta texture: Cook pasta until it is firm to the bite, or "al dente." It should not be mushy. Taste a strand before draining to check. - Importance of reserving pasta water: Always save about 1/2 cup of pasta water before draining. The starchy water helps to thicken the sauce. It also helps the sauce stick to the pasta better. Pro Tips Choose the Right Pasta: For a more authentic scampi experience, use linguine, but spaghetti works just as well. Perfectly Cooked Chicken: Ensure the chicken is cooked through but not overdone; it should be juicy and tender. Adjusting Heat: If you prefer a milder dish, reduce the red pepper flakes or leave them out entirely. Fresh Ingredients Matter: Using fresh lemon juice and parsley will enhance the flavors significantly compared to dried alternatives. {{image_2}} You can easily switch up the pasta in Chicken Scampi. If you want something healthier, try whole wheat pasta. For a gluten-free option, use rice noodles or gluten-free pasta. Each brings its own flavor and texture, making the dish unique. If you prefer seafood, swap chicken for shrimp or scallops. Both options add a lovely touch. Cook them until just done, and they will soak up the sauce flavors. If you are watching carbs, make a low-carb version. Use zucchini noodles or spaghetti squash instead of pasta. This way, you keep the taste without the extra carbs. For those with dairy issues, skip the Parmesan cheese. You can use nutritional yeast to give a cheesy flavor. It’s a great dairy-free option that still tastes amazing. Changing herbs and spices can bring new life to your dish. Fresh basil or thyme can add a different twist. Experiment with Italian seasoning for a bolder flavor. Adding vegetables is another way to boost the healthiness of this meal. Spinach or bell peppers can add color and nutrition. Just toss them in the skillet with the garlic. They’ll cook nicely and blend well with the sauce. To keep your Chicken Scampi Pasta fresh, refrigerate it right away. Place it in a container with a tight lid. This helps keep the flavors intact. I recommend using glass or BPA-free plastic containers. They are easy to clean and safe for food. When reheating, use the stove for the best texture. Heat it in a skillet over low heat. Add a splash of chicken broth or water to keep it moist. Stir it often to avoid burning. If using a microwave, cover the dish but leave a small vent. This prevents steam buildup. Be careful to avoid soggy pasta; nobody enjoys that! You can freeze portions if you have leftovers. Let the pasta cool completely first. Then, place it in freezer-safe bags or containers. Remove as much air as possible to avoid freezer burn. For reheating, thaw the pasta in the fridge overnight. Reheat gently on the stove or in the microwave, adding broth for moisture. Chicken Scampi Pasta is a tasty dish that mixes chicken, pasta, and a bright sauce. It has roots in Italian cooking, where scampi refers to shrimp. I put a twist on it by using chicken. The dish combines garlic, lemon, and olive oil, creating a fresh flavor. You can find many variations, but the core remains the same: a rich, savory sauce that pairs perfectly with pasta. Making Chicken Scampi Pasta takes about 30 minutes. You will spend around 15 minutes on prep. Cooking the dish takes another 15 minutes. This quick time frame makes it perfect for busy weeknights. You can enjoy a homemade meal without hours in the kitchen. Yes, you can prepare Chicken Scampi Pasta ahead of time! Cook the pasta and chicken, then store them separately. Prepare the sauce and store it in the fridge. When you're ready to eat, reheat everything together. This saves time on busy nights. Just remember that the pasta may soak up the sauce, so add a little extra broth when reheating. Chicken Scampi Pasta pairs well with many sides. A fresh green salad adds crunch and balance. You might also enjoy garlic bread for a nice touch. Roasted vegetables can add color and nutrition to your meal. These sides help round out your dinner and make it more satisfying. In this blog post, we explored the simple steps to make Chicken Scampi Pasta. We covered ingredients needed, how to cook the pasta, and tips for flavor and storage. You can make this dish your own by adjusting ingredients or trying new flavors. Remember, cooking should be fun! With practice, you’ll master this recipe and impress your friends and family. Enjoy every bite of your delicious creation!

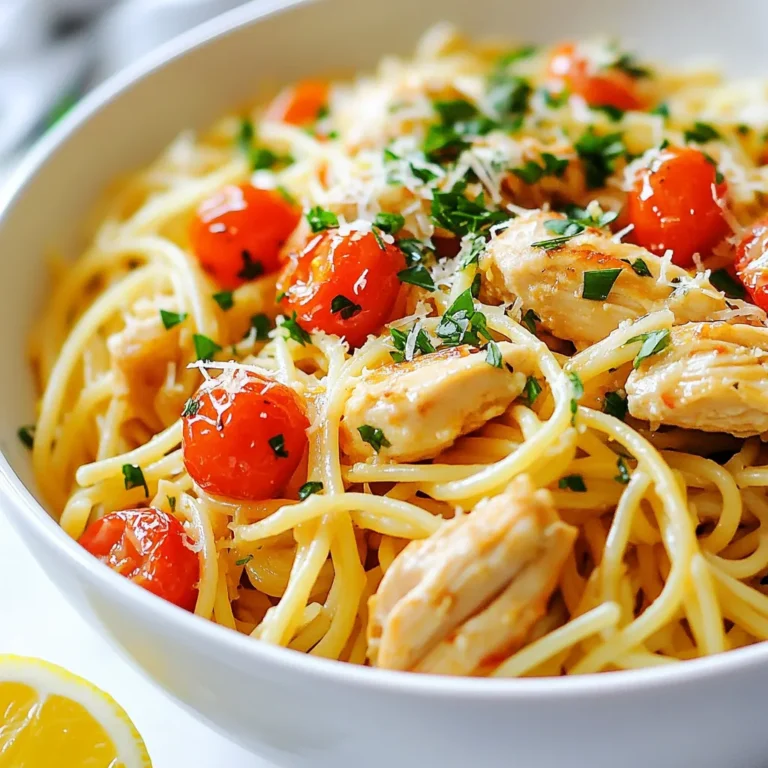
Chicken Scampi Pasta Flavorful Dinner Delight

- 2 medium zucchinis (spiralized into zoodles) - 1 lb boneless, skinless chicken breast - 3 tablespoons olive oil - 4 cloves garlic, minced - Juice and zest of 1 lemon - 1 teaspoon dried oregano - Salt and pepper to taste - ¼ cup fresh parsley, chopped - Grated Parmesan cheese (optional, for serving) To make Lemon Garlic Chicken Zoodles, you need fresh ingredients. Start with two medium zucchinis. Spiralizing them turns them into zoodles, which are a fun and healthy pasta substitute. You will also need one pound of boneless, skinless chicken breast. This provides the protein that makes the dish satisfying. Next, grab three tablespoons of olive oil. This oil adds richness to the dish. You’ll want four cloves of garlic, minced finely. Garlic gives a wonderful aroma and flavor. Don’t forget the juice and zest of one lemon. This adds brightness and balance. You’ll need one teaspoon of dried oregano for an earthy note. Salt and pepper will enhance all the flavors. Finally, chop a quarter cup of fresh parsley for garnish. If you like cheese, have some grated Parmesan ready for serving. These ingredients create a simple yet flavorful meal that you can enjoy any day. Each element works together to make your dish pop with taste and color. {{ingredient_image_1}} Heat a large skillet over medium heat. Add 2 tablespoons of olive oil. Once hot, add the chicken pieces. Sprinkle salt, pepper, and dried oregano on top. This adds great flavor. Cook the chicken for about 6 to 8 minutes. You want it browned and cooked through. When done, take the chicken out of the skillet and set it aside. In the same skillet, add the last tablespoon of olive oil. Then, add the minced garlic. Sauté it for about 30 seconds. This step is key. You want it fragrant but not burnt. Keep an eye on it! Now, it’s time for the zoodles. Stir in the spiralized zucchini. Cook for about 3 to 4 minutes. You want them soft but not soggy. Keep stirring gently to avoid overcooking. Return the cooked chicken to the skillet. Now, add the lemon juice and zest. Don’t forget the chopped parsley! Toss everything gently to combine. Heat it through for about 2 minutes. This blends all the flavors nicely. Taste your dish and adjust seasonings with more salt or pepper if needed. Serve it hot on plates. Garnish with extra parsley and a sprinkle of grated Parmesan cheese if you like. This makes it look great and adds flavor too! To avoid mushy zoodles, use fresh zucchinis. Cook them briefly, just 3-4 minutes. This keeps them firm and tasty. A good spiralizer makes all the difference. I recommend the Paderno spiralizer. It’s easy to use and makes great zoodles. For juicy and flavorful chicken, cut it into small pieces. This helps it cook evenly. Season with salt, pepper, and oregano before cooking. Heat the skillet well before adding the chicken. This gives it a nice brown color and keeps it tender. You can customize the flavors. If you like it a bit spicy, add red pepper flakes. For a richer taste, try adding more garlic or herbs. Taste your dish as you cook. This way, you can adjust the seasoning to your liking. Pro Tips Use Fresh Zucchini: For the best texture and flavor, choose firm, fresh zucchini without blemishes. Older zucchinis can be watery and mushy. Adjust Garlic to Your Taste: If you're a garlic lover, feel free to add more than the suggested amount. Roasted garlic also works beautifully! Perfect Lemon Zest: Use a microplane to zest the lemon for a fine, fragrant zest that will infuse your dish with vibrant lemon flavor. Customize Your Protein: This recipe isn't limited to chicken; try shrimp or tofu for a different protein option that works wonderfully with the zoodles! {{image_2}} You can swap chicken for shrimp or tofu. Shrimp cooks quickly and adds a nice flavor. Just sauté them in the skillet until pink. Tofu is a great option for a vegetarian dish. Use firm tofu, cut it into cubes, and sauté it until golden. Both options keep your meal tasty and fun. Feel free to add more veggies to your zoodles. Bell peppers, spinach, and cherry tomatoes work well. They add color and crunch. You can also toss in broccoli florets or asparagus for a nice twist. Just make sure to cook them until they are tender but still bright. If you want to change the sauce, try a creamy version. You can mix in some heavy cream or Greek yogurt for richness. For a low-carb option, use a simple olive oil and lemon juice mix. This keeps the dish light and fresh. Each sauce brings its own flavor and makes your meal special. After enjoying Lemon Garlic Chicken Zoodles, store any leftovers to keep them fresh. First, let the dish cool to room temperature. Then, place it in an airtight container. Refrigerate it for up to three days. If you want to keep it longer, freeze the chicken and zoodles separately. This helps avoid sogginess. Use freezer-safe bags and remove as much air as possible. They can last up to three months in the freezer. To reheat your Lemon Garlic Chicken Zoodles, use the stovetop for best results. Heat a non-stick skillet over medium heat. Add a splash of olive oil to keep it moist. Place the leftovers in the skillet and stir gently. Cook for about 5 to 7 minutes until heated through. Avoid using the microwave as it can make the zoodles watery. Serve hot and enjoy your delicious meal again! Zoodles are noodles made from zucchini. You can spiralize the zucchini using a simple tool. These noodles are low in carbs and calories, making them a great choice for many diets. They add a fresh taste and a nice crunch to meals. Plus, they are high in vitamins and minerals. You get the benefits of veggies without feeling heavy. Yes, you can prepare this dish ahead of time. Cook the chicken and zoodles separately. Store them in airtight containers. When you are ready to eat, just heat them up. You can also make the zoodles a day before. Just keep them dry to avoid sogginess. This makes meal prep easy and quick. To ensure chicken is safe to eat, check its internal temperature. It should reach 165°F (75°C). You can use a meat thermometer for accuracy. The chicken should be white inside, not pink. If you cut into it and juices run clear, that’s a good sign. These tips help you cook perfectly juicy chicken every time. This blog post shared a simple and tasty recipe using zoodles and chicken. We covered the required ingredients, step-by-step instructions, tips for perfecting your dish, and variations to try. Whether using shrimp or tofu, there are many ways to enjoy this meal. Store leftovers properly for easy meals later. By using these tips, you can create a flavorful dish that delights. Enjoy making this recipe and experimenting with your own twist!

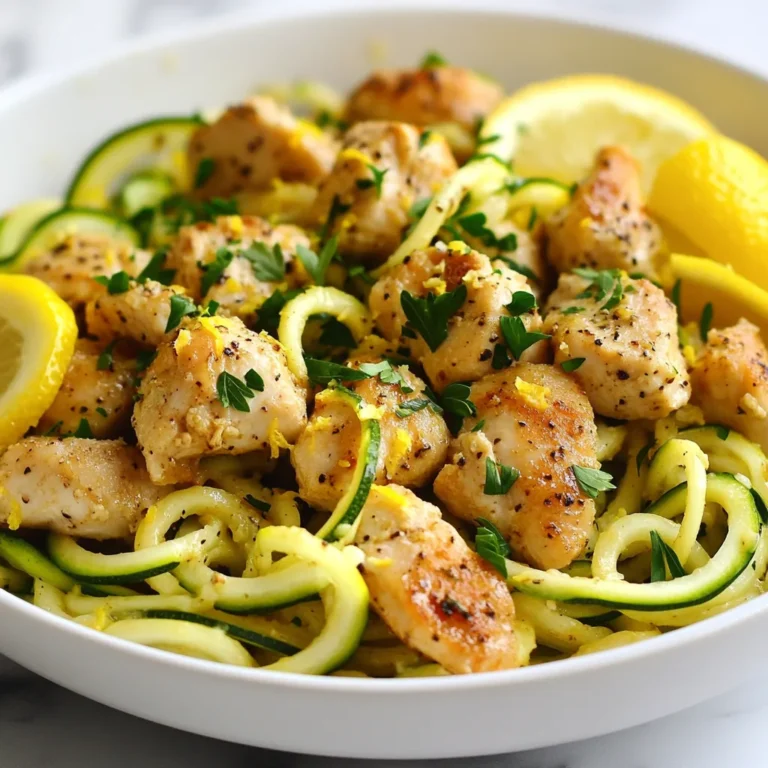
Lemon Garlic Chicken Zoodles Flavorful and Simple Meal

- 1 tablespoon olive oil - 1 medium onion, chopped - 2 garlic cloves, minced - 2 medium carrots, diced - 2 celery stalks, diced - 1 zucchini, diced - 1 cup fresh spinach, roughly chopped In this soup, fresh ingredients create a vibrant taste. The olive oil adds richness. The onion and garlic offer a strong base. Carrots and celery give sweetness and crunch. Zucchini is tender and brings a nice texture. Spinach adds a pop of green and nutrients. - 1 teaspoon dried oregano - 1 teaspoon dried basil - Salt and pepper to taste Herbs make this soup flavorful. Oregano adds an earthy note. Basil brings a hint of sweetness. Salt and pepper help balance all the flavors. The right amount of these spices makes a big difference. - 6 cups low-sodium vegetable broth - 1 cup cooked chickpeas - 1 cup diced tomatoes (canned or fresh) Broth is the heart of the soup. Low-sodium vegetable broth keeps it light and healthy. Chickpeas are a great protein source. They add texture and make you feel full. Diced tomatoes bring acidity and sweetness. Together, these ingredients create a hearty soup that warms you up. {{ingredient_image_1}} 1. Sautéing the vegetables Start by heating one tablespoon of olive oil in a large pot over medium heat. Add one chopped onion. Sauté for about 3-4 minutes. The onion should turn clear. Next, stir in two minced garlic cloves, two diced carrots, and two diced celery stalks. Cook for around 5 minutes. Stir often until the veggies soften. 2. Adding herbs and spices Once the veggies soften, add one diced zucchini. Sprinkle in one teaspoon of dried oregano and one teaspoon of dried basil. Stir everything well. Let it cook for another 3 minutes. This enhances the flavors and aroma. 1. Incorporating broth and chickpeas Now it's time to pour in six cups of low-sodium vegetable broth. Bring the mixture to a gentle simmer. Once it simmers, add one cup of cooked chickpeas and one cup of diced tomatoes. You can use canned or fresh tomatoes. 2. Simmering for flavor development Allow the soup to cook for about 15-20 minutes. This step helps all the flavors blend together. The vegetables should become tender and tasty. 1. Adding spinach before serving Just before serving, stir in one cup of roughly chopped fresh spinach. Cook for another 2-3 minutes. The spinach will wilt quickly, adding color and nutrients. 2. Garnishing and serving tips Season the soup with salt and pepper to taste. Serve hot in bowls. Add fresh parsley on top for a touch of color. Don’t forget a lemon wedge on the side! It adds a nice zesty flavor. To boost the taste of your Light Italian Penicillin Soup, think about adding fresh herbs. Basil and oregano are great, but you can also try thyme or rosemary. These herbs add depth and freshness that dried versions can't always match. Using homemade broth makes a big difference too. Store-bought broth can be salty and lack flavor. Homemade broth gives you control over the taste and health. Just simmer vegetable scraps with water and seasonings for a rich, tasty base. Meal prep can save you time. Chop your veggies ahead of time. You can store them in the fridge for up to three days. This way, you can throw everything into the pot with ease. If you're busy, cut cooking time by using a pressure cooker. It cooks the soup quickly while keeping flavors strong. You can have your soup ready in about 15 minutes! Want a lighter soup? Swap regular olive oil for a spray version to cut calories. You can also use less oil or broth to save on fat. If you prefer a vegan option, replace chickpeas with lentils. They are rich in protein and add texture. Also, try using coconut milk instead of broth for a creamier taste without dairy. Pro Tips Use Fresh Herbs: Fresh basil and oregano can elevate the flavor of your soup significantly compared to dried herbs. Customize Your Veggies: Feel free to add or swap in your favorite vegetables, such as bell peppers or green beans, for a personal touch. Chickpea Variations: If you prefer, you can substitute chickpeas with other beans like cannellini or kidney beans for a different texture and taste. Serve with Grains: For added heartiness, serve the soup over cooked quinoa or brown rice for a complete meal. {{image_2}} You can change the protein in this soup. If you want a meatless option, use beans or lentils. Chickpeas work well, but black beans or kidney beans can add a nice touch. Lentils cook fast and add a hearty feel. If you prefer meat, chicken or turkey can be great choices. Use cooked, shredded chicken for quick prep. For turkey, ground turkey can add nice flavor. Just make sure to cook it before adding it to the soup. Feel free to mix in different vegetables. Seasonal veggies can add freshness and flavor. Try adding bell peppers, peas, or asparagus for a fun twist. Each season offers new tastes. You can also use other leafy greens. Kale or Swiss chard can replace spinach. Just chop them and add them in the last few minutes of cooking. They wilt nicely and boost nutrition. This soup can fit many diets. For gluten-free needs, make sure your broth is gluten-free. The other ingredients are naturally gluten-free. If you want a low-carb option, skip the chickpeas and tomatoes. Instead, increase the amount of zucchini or add cauliflower. This keeps the soup filling while reducing carbs. To keep your Light Italian Penicillin Soup fresh, follow these tips: - Refrigeration tips: Store the soup in an airtight container. It can stay in the fridge for up to 3 days. Make sure it cools down before you seal it. This helps to prevent condensation inside the container. - Freezing guidelines: You can freeze this soup for up to 3 months. Use freezer-safe containers to avoid freezer burn. Leave some space at the top of the container. The soup will expand as it freezes. When it’s time to enjoy your soup again, you have options: - Microwave vs. stovetop: You can reheat it in the microwave or stovetop. For the microwave, heat in short bursts, stirring in between. For the stovetop, warm it over low heat, stirring often. - Maintaining flavor and texture: Add a splash of vegetable broth or water while reheating. This keeps the soup from getting too thick. Stir well to blend the flavors. Knowing how long your soup lasts is key: - How long can the soup last: In the fridge, your soup lasts about 3 days. In the freezer, it can last up to 3 months. - Signs of spoilage: Look for any off smells or changes in color. If the soup appears slimy or has mold, throw it away. Always trust your senses! Italian Penicillin Soup is a warm, hearty dish. It has roots in Italian cooking, often linked to comfort food. Many people believe it helps with colds and flu, hence the name "penicillin." The soup blends vegetables, herbs, and broth, making it both tasty and healthy. Each spoonful offers a burst of flavors from fresh ingredients. This soup is perfect for chilly days or when you need a little extra warmth. Yes, you can make this soup ahead of time. In fact, it tastes even better the next day. To prepare, cook the soup as directed. Once it cools, store it in an airtight container. Keep it in the fridge for up to three days. You can also freeze it for later use. Just remember to let it thaw in the fridge overnight before reheating. This soup is easy to heat on the stove or in the microwave. You can add spice to your Italian Penicillin Soup in many ways. A simple method is to add red pepper flakes. Start with a pinch and taste, adding more if needed. You could also include diced jalapeños or fresh chili peppers. For a different flavor, try a dash of hot sauce. These options will give your soup a nice kick without overpowering it. Keep in mind to balance flavors for the best taste. This blog post covered how to make a tasty and healthy soup. We discussed fresh ingredients like veggies, herbs, and proteins. I shared step-by-step instructions to guide your cooking. You learned tips for enhancing flavor and making it fit various diets. We explored storage and reheating best practices too. Enjoy creating your soup with these ideas. Don’t hesitate to customize it to your taste. Your kitchen can be the place for delicious meals that warm your heart!

Light Italian Penicillin Soup Quick and Flavorful Recipe

- 200g beef sirloin, thinly sliced - 250g egg noodles - 2 tablespoons soy sauce - 1 tablespoon oyster sauce - 1 tablespoon brown sugar - 1 tablespoon sesame oil - 2 cloves garlic, minced - 1-inch piece of ginger, grated - 1 bell pepper, sliced (any color) - 1 carrot, julienned - 1 spring onion, chopped for garnish - Sesame seeds for garnish The main ingredients create a rich base for the dish. The beef sirloin gives a tender bite. The egg noodles soak up the sauce and bring a hearty feel. Soy sauce and oyster sauce add saltiness and umami. Brown sugar balances the flavors with sweetness. Sesame oil lends a nutty aroma. Next, we have the aromatics and vegetables. Garlic and ginger provide a warm, spicy kick. They also create a fragrant base. The bell pepper adds color and crunch. Carrots contribute sweetness and texture. Lastly, the spring onion and sesame seeds are perfect for garnishing. They add a fresh look and a little crunch. Using fresh ingredients is key in this recipe. Choose bright vegetables for the best taste. Quality beef enhances the overall flavor. This mix of ingredients makes every bite enjoyable. {{ingredient_image_1}} First, cook the egg noodles. Follow the package instructions closely. Drain them when done and set aside. This step is crucial for the dish's texture. Perfectly cooked noodles will hold the sauce well. Next, grab a small bowl. Mix two tablespoons of soy sauce, one tablespoon of oyster sauce, and one tablespoon of brown sugar. Stir until combined. This sauce is the heart of your sticky beef noodles. It adds a sweet and savory flavor that makes the dish shine. Now, heat one tablespoon of sesame oil in a large skillet or wok over medium-high heat. Add two cloves of minced garlic and one inch of grated ginger. Sauté for about 30 seconds. You want to smell the garlic and ginger, but not burn them. Raise the heat to high and add 200g of thinly sliced beef sirloin. Stir-fry for 2-3 minutes until the beef is browned. Next, toss in one sliced bell pepper and one julienned carrot. These veggies add color and crunch. Stir-fry for another 2 minutes. Pour the sauce over the beef and vegetables. Stir well to combine. Let it simmer for 1-2 minutes until the sauce thickens slightly. This is when the flavors really meld together. Finally, add the cooked noodles to the skillet. Toss everything together to coat the noodles in the sticky sauce. This will create a wonderful blend of flavors. Serve hot, and enjoy the deliciousness! To get the best flavor from your beef sirloin, slice it thinly. This helps the meat absorb the sauce better. Here are some tips: - Chill the beef: Place it in the freezer for about 30 minutes. This makes it firm and easy to cut. - Use a sharp knife: A sharp knife gives you clean cuts. Aim for slices about 1/4 inch thick. - Cut against the grain: Look for the lines in the meat. Cutting across these lines makes the beef more tender. The sauce is key to sticky beef noodles. To make it just right: - Cook on high heat: High heat helps thicken the sauce quickly. - Watch the time: After adding the sauce, simmer it for 1-2 minutes. This lets the flavors blend and thicken. - Stir constantly: Keep stirring to prevent burning. This also helps the sauce thicken evenly. Garnishing makes your dish look amazing! Here’s how to do it: - Use fresh ingredients: Chopped spring onions add color and freshness. - Sprinkle sesame seeds: These add a nice crunch and visual appeal. - Play with colors: Use colorful veggies like bell peppers to make the dish pop. Pro Tips Slice Against the Grain: Ensure your beef sirloin is sliced against the grain for maximum tenderness in each bite. Veggie Variations: Feel free to mix and match vegetables based on your preferences; broccoli, snap peas, or zucchini work great too! Customize the Sauce: Adjust the soy sauce and oyster sauce ratio to suit your taste—add more for a saltier flavor or more sugar for sweetness. Garnish for Appeal: Enhance presentation by adding chopped herbs like cilantro or parsley along with sesame seeds for extra texture and flavor. {{image_2}} To make this dish vegetarian, swap the beef for tofu or mushrooms. Tofu works well because it absorbs flavors nicely. Use firm tofu and cut it into small cubes. Sauté the tofu until golden brown. For mushrooms, shiitake or portobello add a great umami taste. Slice them thinly and cook them in the same way you would beef. Both options will give you a tasty meal. Don't forget to add extra veggies for more flavor and texture. If you need a gluten-free meal, you can change the soy sauce and noodles. Use tamari as a gluten-free soy sauce. It has a similar taste and works great in the recipe. For noodles, look for rice noodles or gluten-free egg noodles. They cook quickly and hold the sauce well. Follow the package instructions to prepare them. This way, you can enjoy sticky beef noodles without gluten. To add some heat, consider using chili sauce or fresh peppers. Sriracha is an easy choice; just mix it into the sauce. Start with a small amount and add more to your taste. If you prefer fresh peppers, slice jalapeños or Thai chilies and toss them in with the veggies. This will give your dish a nice kick. Adjust the spice level based on your preference, and enjoy the fiery twist! To keep your sticky beef noodles fresh, store them in an airtight container. Make sure to let the noodles cool down before sealing. This helps prevent sogginess. Place the container in the fridge. They will stay good for up to three days. If you want to keep them longer, consider freezing. When you're ready to enjoy your leftovers, reheating is key. Use a pan over medium heat. Add a splash of water or broth to keep moisture. Stir gently for even heating. This method helps keep the noodles soft and the beef tender. You can also use the microwave. Just cover the bowl with a lid or a damp paper towel. To freeze sticky beef noodles, first, let them cool completely. Then, portion them into freezer-safe bags. Press out as much air as possible before sealing. Label each bag with the date. They can last up to three months in the freezer. When ready to eat, move them to the fridge to thaw overnight. You can also use the microwave for quick thawing, but be sure to stir well as they heat. You can serve sticky beef noodles with many tasty side dishes. Here are some great ideas: - Steamed broccoli for a crunchy texture. - A fresh salad with a light dressing. - Fried rice to add more flavor. - Spring rolls for a fun appetizer. - Pickled vegetables for a tangy bite. These sides will balance the richness of the noodles and beef. Making sticky beef noodles ahead is simple and smart. Here are some tips: - Cook the beef and sauce first, then store them in an airtight container. - Cook the noodles but do not toss them with the sauce yet. - Keep noodles and beef separate to avoid sogginess. - When ready to eat, reheat the beef and sauce and mix in the noodles. - This way, your meal stays fresh and tasty! Yes, you can use different noodles! Here are some options: - Rice noodles cook quickly and have a nice texture. - Soba noodles are a good choice for a nutty flavor. - Udon noodles are thick and chewy, adding a hearty feel. Always check the cooking time on the package. Adjust your stir-frying time as needed. Sticky beef noodles are a simple, tasty dish. We covered key ingredients like beef, noodles, and flavorful sauces. I shared step-by-step instructions, helpful tips for slicing and garnishing, and tasty variations for everyone's needs. Proper storage and reheating methods ensure your dish stays fresh. With these insights, you can confidently make sticky beef noodles your own. Enjoy experimenting with flavors and techniques!

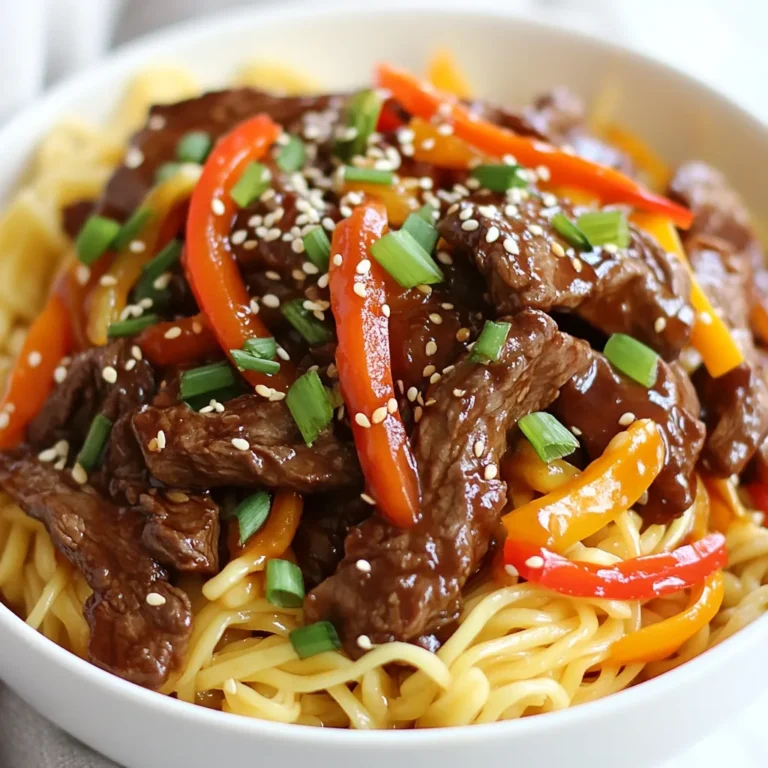
Sticky Beef Noodles Flavorful and Easy Recipe

- 2 lbs (900g) boneless, skinless chicken thighs - 8 oz (225g) cream cheese, softened - 1 cup (240ml) chicken broth - 1 packet ranch seasoning mix - 1 cup (120g) shredded cheddar cheese - 6 slices of cooked bacon, crumbled - 2 green onions, sliced (for garnish) - Salt and pepper to taste The key to a great Keto Crack Chicken lies in the quality of these ingredients. I love using boneless chicken thighs because they stay juicy and tender. Cream cheese adds a rich, creamy texture. Chicken broth enhances the flavor of the dish. The ranch seasoning mix brings a fantastic taste that pairs well with chicken. Shredded cheddar cheese melts beautifully and adds a savory touch. Crumbled bacon gives a crispy bite, making the dish even more tempting. Finally, green onions add a fresh crunch and bright color to the plate. - Alternatives for cream cheese: If you need a dairy-free option, try using coconut cream. It offers a similar texture without dairy. - Low-carb options for chicken broth: You can use homemade broth or bone broth. These options are rich in nutrients and low in carbs. - Substituting ranch seasoning: If you want a different flavor, use taco seasoning or Italian herbs. Both can add a unique twist to your dish. These substitutions can help you customize the recipe while keeping it delicious and keto-friendly. {{ingredient_image_1}} To start, you need to layer the chicken in your slow cooker. I like to place the boneless, skinless chicken thighs at the bottom. This helps them cook evenly and soak up all the flavors. Using boneless thighs is key. They stay juicy and tender, making the final dish melt in your mouth. Next, let’s make the sauce. In a medium bowl, blend the softened cream cheese, chicken broth, and ranch seasoning mix. I recommend using a hand mixer or whisking vigorously until the mix is smooth. A smooth sauce means no lumps and better taste. Now, it’s time to cook. Cover the slow cooker and set it to low for 6-7 hours or high for 3-4 hours. The chicken is done when it easily shreds with a fork. Keep an eye on it so you don’t overcook. Once the chicken is tender, shred it right in the slow cooker. Use two forks to pull it apart. Mix it well with the sauce. Then, stir in the shredded cheddar cheese and crumbled bacon. Let it blend until the cheese melts. Season with salt and pepper to taste. Finally, serve warm and top with sliced green onions for a fresh touch. To ensure tender chicken, use boneless, skinless chicken thighs. They stay moist during cooking. Season the chicken lightly with salt and pepper before adding the sauce. This helps boost flavor. If you find your slow cooker cooks hot, check the chicken sooner. Cooking times vary with different models. For slow cookers that run hotter, reduce cooking time by one hour. Keto Crack Chicken pairs well with simple side dishes. I suggest serving it with steamed broccoli or a fresh salad. These sides add crunch and color to your plate. For a fun twist, consider cauliflower rice. It gives a nice texture and keeps it low-carb. Garnishing with sliced green onions adds a fresh look and taste. You can also sprinkle extra bacon bits on top for a great finish. Prepping ingredients in advance makes cooking easier. You can mix the sauce the night before and store it in the fridge. Just pour it over the chicken in the morning. If you're short on time, shred the chicken ahead of time too. To reheat, use a slow cooker or microwave. Add a splash of chicken broth to keep it moist. This way, your Keto Crack Chicken stays flavorful and delicious! Pro Tips Use Thighs for Juiciness: Boneless, skinless chicken thighs are ideal for this recipe since they remain juicy and tender during slow cooking, enhancing the overall flavor. Mix Ingredients Well: Ensure that the cream cheese is fully softened before mixing with the broth and ranch seasoning for a smooth and creamy sauce. Shred Chicken While Hot: Shredding the chicken while it's still hot in the slow cooker allows it to absorb more of the sauce, making it extra flavorful. Garnish for Color: Adding sliced green onions not only adds a pop of color but also a fresh flavor that balances the richness of the dish. {{image_2}} You can change the taste of Keto Crack Chicken with a few easy tweaks. Try adding spices like garlic powder, onion powder, or smoked paprika. These spices add depth and warmth. Fresh herbs, such as parsley or dill, brighten the dish too. If you love heat, add diced jalapeños. They give a kick that pairs well with the creamy sauce. For a low-carb base, consider using cauliflower rice. It absorbs the flavors well and adds a nice texture. To make a stuffed pepper dish, hollow out bell peppers. Fill them with the cooked chicken mix. Bake until the peppers are tender. This adds a fun twist and makes your meal more colorful. If you need a dairy-free option, swap the cream cheese for a nut-based cream. You can use cashew cream or coconut cream. These alternatives keep the dish creamy without dairy. For a gluten-free meal, check your ranch seasoning mix. Many brands contain gluten, so choose one that is labeled gluten-free. This way, you enjoy all the flavors without worry. To keep your Keto Crack Chicken fresh, place it in the fridge right away. Use airtight containers to prevent moisture loss. This helps maintain its taste and texture. Make sure to let it cool before sealing it. This avoids condensation inside the container. If you want to save some for later, freezing works well. Divide the Keto Crack Chicken into smaller portions. Place each portion in a freezer bag or container. Label it with the date. When you are ready to eat, thaw it overnight in the fridge. To reheat, warm it in a pan over medium heat or use a microwave. In the fridge, Keto Crack Chicken lasts about 3 to 4 days. Always check for signs of spoilage. If it smells bad or looks off, throw it away. Trust your senses; they are your best guide for food safety. Keto Crack Chicken is a creamy, savory dish made with chicken. It has gained a huge following due to its rich flavor and easy prep. The key is the mix of ranch seasoning, cream cheese, and cheese. This dish is perfect for keto diets, as it is low in carbs and high in fat. It cooks in a slow cooker, making it a hassle-free meal option. Yes, you can use chicken breast. However, chicken thighs provide more flavor and moisture. Thighs stay tender during cooking while breasts can dry out. If you prefer breast meat, consider adding extra broth to keep it juicy. Absolutely! This recipe is great for meal prep. You can portion it into containers for easy lunches or dinners. It keeps well in the fridge for up to four days. Reheat it gently in the microwave or on the stove. You can adapt Keto Crack Chicken for other diets. For paleo, swap ranch seasoning for herbs and spices. For Whole30, use compliant cream cheese or a nut-based alternative. These small changes can keep the dish aligned with your dietary needs. Keto Crack Chicken is easy to make and full of flavor. You layer chicken, cream cheese, and seasonings in a slow cooker. Remember to use boneless thighs for the best texture. For variations, try new spices or swap in low-carb sides. This dish is meal prep friendly and stores well. Follow these tips, and you’ll always have a tasty meal ready. Enjoy experimenting with this recipe and making it your own!

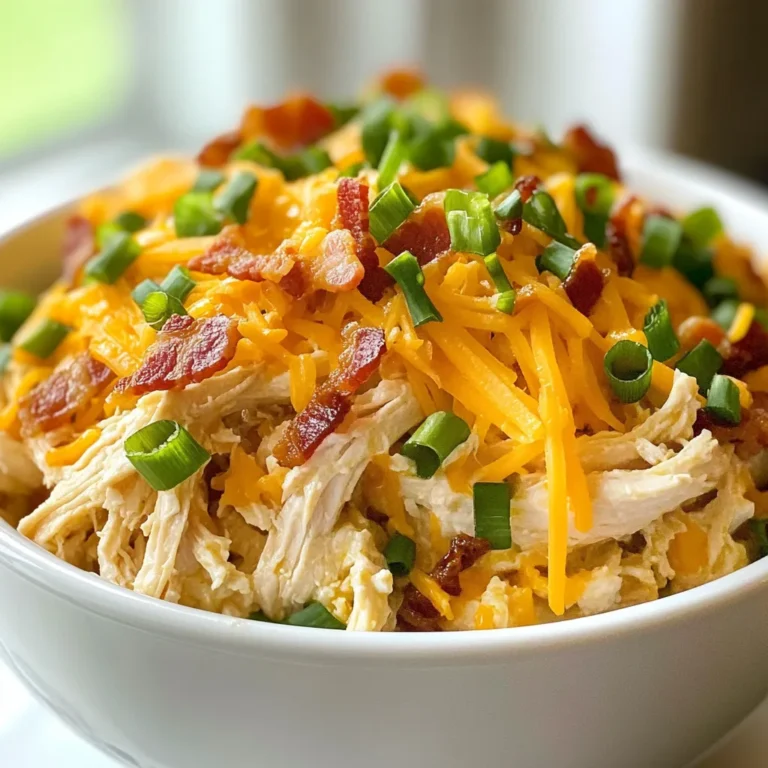
Keto Crack Chicken Simple and Flavorful Recipe

To make this delightful dessert, gather these key ingredients: - 1 ½ cups heavy whipping cream - 1 cup powdered sugar - 1 teaspoon vanilla extract - 1 package (3.4 oz) instant vanilla pudding mix - 2 cups milk - 1 box (15 oz) graham crackers - 2 medium apples, peeled and diced (preferably Granny Smith) - 1 cup caramel sauce (store-bought or homemade) These ingredients work together to create a creamy and sweet treat. The graham crackers form the base, while the whipped cream adds lightness. You can make your cake even better with some easy toppings: - ¼ cup chopped pecans - Cinnamon for dusting Adding chopped pecans gives a nice crunch. A sprinkle of cinnamon enhances the flavor and adds warmth. For the best taste, I recommend using Granny Smith apples. They are tart and balance the sweetness of the caramel. Other good options include Honeycrisp or Fuji apples if you want a sweeter bite. These apples keep their shape well when mixed into the cake. {{ingredient_image_1}} To make the Caramel Apple Éclair Cake, start by whipping the cream. In a large bowl, add 1 ½ cups of heavy whipping cream. Use a mixer to whip until soft peaks form. This means the cream should hold a shape but still be soft. Next, slowly add 1 cup of powdered sugar and 1 teaspoon of vanilla extract. Keep whipping until it becomes thick. Set this aside for later. In another bowl, mix 3.4 ounces of instant vanilla pudding with 2 cups of milk. Whisk this for 2 to 3 minutes. You want it smooth and thick. Once it’s ready, gently fold the whipped cream into the pudding. Be careful not to stir too hard. You want to keep the air in the cream. Now it’s time to layer the cake. Grab a 9x13 inch baking dish. Start by laying down a full layer of graham crackers. Cover the bottom completely. Next, spread half of the pudding mixture over the graham crackers. Smooth it out evenly with a spatula. Now, sprinkle half of the diced apples on top of the pudding. Drizzle some caramel sauce over the apples. You can use store-bought or homemade sauce. Then, add another layer of graham crackers on top. Follow with the rest of the pudding mixture and the remaining apples. Drizzle more caramel sauce on top. Finish with one last layer of graham crackers. Whipping cream can be tricky, but here are some tips. Start with cold cream for better results. Use a chilled bowl and beaters if you can. This helps the cream whip faster. Don’t over-whip the cream; it should be thick but not grainy. If you see butter forming, stop immediately. This can ruin your dessert. Keep these tips in mind, and you’ll have perfect whipped cream every time. To get a creamy and light texture, whip your heavy cream until it forms soft peaks. This means the cream should hold its shape but still be soft. When you mix in the powdered sugar and vanilla, keep whipping until the cream is thick and holds stiff peaks. This makes your cake light. When you combine the whipped cream with the pudding, fold gently. This keeps the air in the cream, making your cake fluffy. One common mistake is over-whipping the cream. If you whip it too much, it can turn grainy. Another error is not letting the layers chill long enough. If you skip this step, the layers won’t soften and blend, making the cake hard to cut. Make sure to cover your dish tightly to avoid any unwanted odors from the fridge. When it’s time to serve, cut the cake into nice squares. You can sprinkle chopped pecans on top for a nice crunch. A light dusting of cinnamon adds a warm flavor. If you want to make it extra special, drizzle more caramel sauce over each slice before serving. This makes it look pretty and tastes amazing! Pro Tips Choose the Right Apples: Granny Smith apples are tart and hold up well in this dessert, providing a perfect contrast to the sweetness of the caramel. Chill Overnight: For the best texture and flavor, let the cake chill overnight. This allows the graham crackers to soften and the flavors to meld beautifully. Homemade Caramel Sauce: If you have time, try making your own caramel sauce. It adds a richer flavor and can be customized to your taste. Serving Suggestions: Serve this dessert with a dollop of whipped cream or a scoop of vanilla ice cream for an extra indulgent treat. {{image_2}} You can change the apples to other fruits. Try pears for a sweet twist. You can also use berries like strawberries or blueberries for a fresh flavor. Bananas add a nice creaminess too. Just remember to slice them thin. Each fruit brings a new taste to the cake. To make this cake gluten-free, use gluten-free graham crackers. You can also swap the heavy cream for coconut cream. For dairy-free options, use almond milk instead of regular milk. These changes keep the cake tasty without dairy or gluten. You still get that layered dessert feel. Add a splash of caramel extract for a richer flavor. Mixing in some chocolate chips can make it even more fun. You can also fold in crushed cookies for extra texture. These infusions create layers of flavor. Feel free to get creative with what you have. Each change makes the cake uniquely yours. To keep your Caramel Apple Éclair Cake fresh, store it in the fridge. Cover it tightly with plastic wrap or foil. This helps keep the moisture in and the flavors strong. Make sure to avoid any strong-smelling foods in the fridge, as they can affect the cake's taste. The cake stays good for about 3 to 5 days in the fridge. After that, the texture might change. It can become soggy from the layers mixing too much. If you want to enjoy it later, consider freezing it. To freeze the Éclair Cake, first, wrap it well in plastic wrap. Then, put it in a freezer-safe container. It can last up to 2 months in the freezer. When you're ready to eat it, move it to the fridge to thaw for about 6 to 8 hours. Avoid reheating; this cake tastes best cold and creamy. Yes, you can switch flavors! Try chocolate or butterscotch pudding for a fun twist. You can also blend flavors, like vanilla and caramel, to create unique tastes. Just keep in mind that different flavors may change the overall taste of the cake. Experiment with your favorites! If you don't have heavy whipping cream, you can use coconut cream. It whips up nicely and adds a light coconut flavor. Another option is to use whipped topping, which is easy and quick. However, it may not have the same richness. To make a mini version, use a smaller dish, like an 8x8 inch pan. Cut the ingredients in half for the right amount. You can also layer individual cups for fun servings. Just remember to adjust the chilling time, as smaller portions may set faster. This blog post covered how to make a tasty caramel apple éclair cake. We explored key ingredients and optional toppings, along with the best apple choices. I shared step-by-step instructions for layering the cake and tips for whipping cream just right. You learned about variations and gluten-free options, plus how to store or freeze your cake. In closing, enjoy making this fun dessert your own. With these tips, your éclair cake will delight everyone.

Caramel Apple Éclair Cake Delicious and Simple Dessert

- 4 boneless, skinless chicken fillets - 1/2 cup grated Parmesan cheese - 1/4 cup breadcrumbs (preferably panko for extra crunch) - 2 cloves garlic, minced - 1 teaspoon crushed red pepper flakes (adjust for spice preference) - 1 teaspoon paprika - 1 teaspoon dried Italian herbs (oregano, basil, thyme) - Salt and pepper to taste - 1/4 cup fresh parsley, chopped (for garnish) - 2 tablespoons olive oil These ingredients work together to create a tasty dish. The chicken fillets are the main star. The grated Parmesan cheese gives a rich flavor. The garlic adds a great aroma and taste. The breadcrumbs provide a crispy coating. If you do not have panko, you can use regular breadcrumbs. You can also replace Parmesan with Pecorino Romano for a sharper flavor. If you don’t have fresh parsley, try using basil or cilantro. For a dairy-free option, use nutritional yeast instead of cheese. You can also swap olive oil with melted butter, which adds a nice flavor. Fresh herbs can brighten the dish. Try adding fresh basil or thyme in place of dried herbs. You can also sprinkle some fresh oregano for a more aromatic taste. If you want a kick, add more crushed red pepper flakes. A dash of lemon zest also adds a refreshing twist. Use these ideas to make the dish your own. Enjoy cooking! {{ingredient_image_1}} To make Spicy Garlic Parmesan Chicken Fillets, start by gathering all your ingredients. You need four boneless, skinless chicken fillets. You'll also need grated Parmesan cheese, breadcrumbs, garlic, and spices. Keep salt and pepper handy too. Preheat your oven to 400°F (200°C). This will ensure the chicken cooks evenly. Line a baking sheet with parchment paper for easy cleanup. In a bowl, mix the grated Parmesan, breadcrumbs, garlic, crushed red pepper, paprika, and herbs. Stir until everything blends well. Next, pat the chicken fillets dry. Drizzle olive oil over both sides of each fillet. This helps the breading stick. Now, take each fillet and coat it in the cheese mixture. Press down gently to make sure it sticks. Place the coated fillets on the baking sheet. Bake them for 20-25 minutes. Check that they reach 165°F (75°C) inside. This means they are safe to eat. Once done, let the chicken rest before serving. To get the best results, use panko breadcrumbs. They add extra crunch. Make sure the chicken fillets are dry before adding oil. This helps the coating stick better. If you want more spice, add extra red pepper flakes. For a fresh look, garnish with parsley. A squeeze of lemon can brighten the flavors too. Enjoy your tasty chicken fillets! To boost the taste of Spicy Garlic Parmesan Chicken Fillets, use fresh ingredients. Fresh garlic adds a strong punch. You can also try mixing in lemon zest for a citrus kick. If you love heat, add more crushed red pepper flakes. For a savory depth, use a bit of smoked paprika. This adds a nice smoky flavor to the dish. You can cook these chicken fillets in various ways: - Air Fryer: Preheat your air fryer to 375°F (190°C). Cook the fillets for 15-20 minutes. Check that they reach 165°F (75°C) inside. This method makes them extra crispy. - Grilling: Preheat your grill to medium-high heat. Grill the fillets for about 6-8 minutes on each side. Use a meat thermometer to ensure they are cooked through. Both methods will give you delicious results. Experiment to see which one you prefer! These chicken fillets pair well with many sides. Serve them with a fresh salad for a light meal. You can also try mashed potatoes or rice to make it hearty. A side of roasted veggies adds color and nutrition. For a bright touch, add lemon wedges on the side. The lemon juice balances the flavors nicely. Enjoy your meal! Pro Tips Tip Title: Ensure Crispiness: For an extra crispy coating, consider using panko breadcrumbs and lightly toasting them in a dry skillet before mixing them with the cheese. Tip Title: Marinate for Flavor: For deeper flavor, marinate the chicken fillets in olive oil, minced garlic, and herbs for at least 30 minutes before coating. Tip Title: Use a Meat Thermometer: To ensure perfectly cooked chicken, use a meat thermometer to check that the internal temperature reaches 165°F (75°C). Tip Title: Experiment with Spices: Feel free to adjust the amount of crushed red pepper flakes or add other spices like cayenne or smoked paprika for a unique flavor twist. {{image_2}} You can swap out the chicken fillets for other proteins. Try using boneless pork chops or turkey cutlets. Fish like salmon or tilapia also works well. Each protein brings a new taste to the dish. Just make sure to adjust cooking times. Fish cooks faster, while pork and turkey may take longer. Use a meat thermometer to check for doneness. If you have picky eaters at home, customize the dish to suit their tastes. You can leave out the crushed red pepper for less spice. Instead, add more garlic for a richer flavor. You can also use plain breadcrumbs and reduce the Parmesan. Serve with a side of dipping sauce like ranch or honey mustard. This makes the meal more fun and appealing to kids. For a low-carb option, skip the breadcrumbs altogether. Coat the chicken with more Parmesan cheese instead. You can also use ground almonds or crushed pork rinds for a crunchy coating. If you need a gluten-free meal, look for gluten-free breadcrumbs. Check labels to ensure they meet your dietary needs. These options keep the dish tasty while meeting different diets. To keep your spicy garlic Parmesan chicken fillets fresh, place them in an airtight container. This helps prevent moisture loss. Store them in the fridge for up to three days. Make sure they cool down to room temperature before sealing the container. When you want to enjoy your leftovers, preheat your oven to 375°F (190°C). Place the chicken on a baking sheet lined with parchment paper. Heat for about 10-15 minutes, or until warmed through. You can also use a microwave. Just cover the chicken with a damp paper towel and heat for 1-2 minutes. If you want to freeze the chicken, wrap each fillet tightly in plastic wrap. Then, place them in a freezer bag or airtight container. You can freeze them for up to three months. When you're ready to eat, let the chicken thaw overnight in the fridge before reheating. To keep chicken moist, always pat it dry before cooking. Use olive oil to coat the fillets. This step makes the chicken juicy and helps the breading stick. Baking at the right temperature is key. Cook to an internal temperature of 165°F (75°C). Let the chicken rest after cooking. This lets the juices spread throughout the meat. Yes, you can use frozen chicken fillets. Just make sure to thaw them completely before cooking. Thawing ensures even cooking. You can place the chicken in the fridge overnight. If you’re in a hurry, use the microwave on the defrost setting. Once thawed, follow the recipe as usual. The cooking time might be slightly longer. To make this recipe less spicy, reduce the crushed red pepper flakes. You can skip them entirely if you prefer no heat. Add more Parmesan cheese for flavor without spice. Another option is to use mild paprika instead of regular paprika. These changes will keep the dish tasty but less fiery. In this blog post, we covered key ingredients and step-by-step instructions for baking chicken fillets. We explored tips for flavor and different cooking methods. We also discussed variations for various diets and picky eaters. Lastly, we shared storage info to keep your meals fresh. You now have all the tools you need to create a delicious dish. Enjoy your cooking journey!

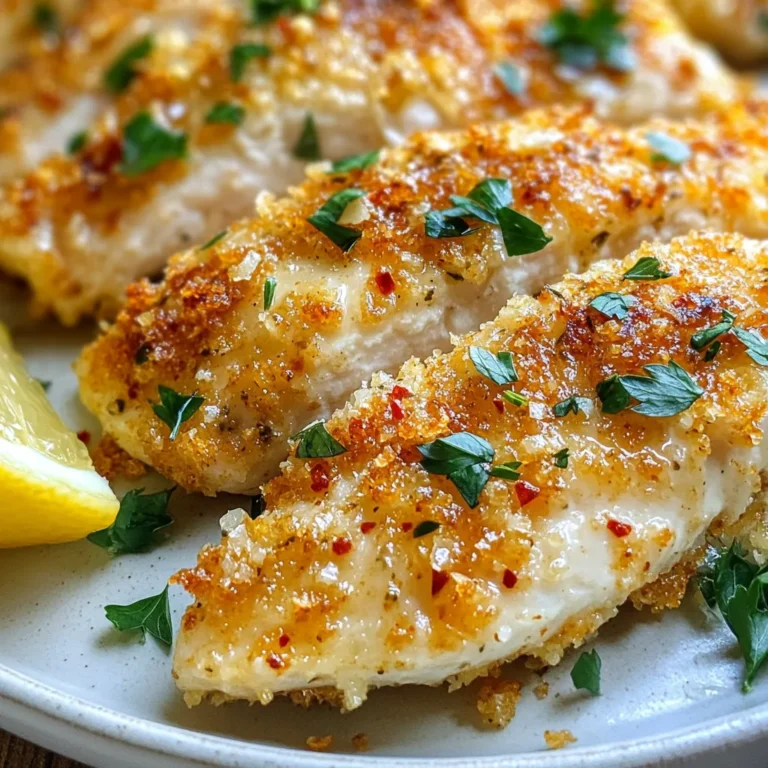
Spicy Garlic Parmesan Chicken Fillets Flavorful Dish

To make this Tuscan Vegetable Soup, you will need: - 1 large onion, chopped - 2 cloves garlic, minced - 2 medium carrots, diced - 2 celery stalks, diced - 1 zucchini, diced - 1 yellow squash, diced - 1 cup green beans, trimmed and cut into 1-inch pieces - 1 can (15 oz) chickpeas, rinsed and drained - 1 can (14 oz) diced tomatoes (no added salt) - 4 cups vegetable broth - 2 cups fresh spinach or kale - 1 teaspoon dried oregano - 1 teaspoon dried basil - Salt and pepper to taste - 2 tablespoons olive oil - Fresh parsley, chopped (for garnish) You can swap some ingredients for others based on what you have. If you don't have chickpeas, use white beans or lentils. Instead of fresh spinach, you can try Swiss chard or arugula. No zucchini? Use bell peppers or eggplant. These changes keep the soup tasty. This soup is healthy and filling. Each serving has about: - Calories: 180 - Protein: 7 g - Fat: 4 g - Carbohydrates: 30 g - Fiber: 8 g - Sugar: 4 g These numbers can vary based on your ingredient choices. This soup is a great way to get your veggies! Enjoy its rich flavors and health benefits. {{ingredient_image_1}} First, gather all your veggies. You need a large onion, garlic, carrots, celery, zucchini, yellow squash, and green beans. Chop the onion and mince the garlic. Dice the carrots, celery, zucchini, and yellow squash. Trim and cut the green beans into small pieces. This step makes the cooking process easier. In a large pot, heat 2 tablespoons of olive oil over medium heat. Add the chopped onion and sauté for 3-4 minutes until it softens. Then, stir in the minced garlic, diced carrots, and celery. Cook these for about 5 minutes, stirring often. Next, add the zucchini, yellow squash, and green beans. Sauté these veggies for another 5 minutes. Now, pour in 1 can of diced tomatoes and 4 cups of vegetable broth. Add 1 can of chickpeas, dried oregano, dried basil, salt, and pepper. Stir everything well. Bring your soup to a boil. Once boiling, reduce the heat and let it simmer for 20 minutes. This allows all the flavors to mix well. Towards the end, add 2 cups of fresh spinach or kale. Let the soup simmer for another 5 minutes until the greens are tender. Taste your soup to check the seasoning. Adjust with more salt or pepper if needed. When serving, garnish each bowl with chopped fresh parsley. You can drizzle a bit of olive oil on top for extra flavor. Enjoy your hearty Tuscan Vegetable Soup! To boost the flavor of your soup, use fresh herbs. Fresh basil or parsley adds bright notes. You can also try a splash of lemon juice for zest. A sprinkle of grated Parmesan cheese gives depth and richness. If you like spice, add a pinch of red pepper flakes for heat. For quick prep, chop your veggies ahead of time. Store them in the fridge for easy access. You can also use pre-chopped vegetables from the store. This saves time and helps you get dinner ready faster. Remember to keep your broth handy. It’s the base of your soup and brings all the flavors together. One common mistake is overcooking your vegetables. This can make them mushy and lose their color. Make sure to watch the cooking times closely. Another mistake is not seasoning enough. Taste your soup and adjust the salt and pepper. Lastly, don’t rush the simmering step. Letting it simmer melds the flavors beautifully. Pro Tips Use Fresh Vegetables: Fresh, seasonal vegetables not only enhance the flavor but also increase the nutritional value of your soup. Customize Your Greens: Feel free to substitute spinach or kale with other greens like Swiss chard or collard greens based on your preference. Blend for Creaminess: For a creamier texture, blend a portion of the soup and mix it back in. This adds richness without heavy cream. Make It Ahead: This soup tastes even better the next day. Make a batch ahead of time and store it in the fridge for a quick meal. {{image_2}} You can easily boost the protein in your Tuscan Vegetable Soup. Adding chicken or tofu works well. If you choose chicken, use cooked, shredded chicken. Stir it in during the last minutes of cooking. For tofu, use firm or extra-firm tofu. Cut it into cubes and sauté it before adding to the soup. If you want a low-sodium version, look for low-sodium vegetable broth. You can skip the salt or use herbs to add flavor. For a vegan option, this soup is already plant-based. Just make sure to use a vegan broth. You can also add nutritional yeast for a cheesy taste without dairy. Feel free to swap out vegetables based on the season. In the fall, use butternut squash or pumpkin. In the spring, add asparagus or peas. Summer calls for fresh corn or bell peppers. This soup is versatile, letting you enjoy fresh flavors all year round. To keep your Tuscan vegetable soup fresh, store it in an airtight container. Make sure the soup cools to room temperature before sealing it. This helps prevent moisture build-up, which can alter the flavor. Leftovers can last in the fridge for about 3 to 4 days. If you want to enjoy it later, consider freezing it. Reheating your soup is easy. Pour the soup into a pot and heat it on medium. Stir often to ensure even warming. You can also use the microwave. Place the soup in a microwave-safe bowl and cover it loosely. Heat in short bursts, stirring in between, until hot. This keeps the flavors intact. Freezing is a great way to save extra soup. First, let the soup cool completely. Then, pour it into freezer-safe bags or containers. Leave some space at the top, as soup expands when frozen. Label the bags with the date. The soup can stay fresh in the freezer for up to 3 months. When you’re ready to eat, thaw it in the fridge overnight before reheating. Enjoy your tasty soup anytime! Tuscan Vegetable Soup stands out for its fresh and simple ingredients. It uses a mix of colorful vegetables like zucchini, carrots, and green beans. The addition of chickpeas makes it hearty and filling. The blend of oregano and basil adds a warm, herbal flavor. This soup reflects the rustic style of Tuscan cooking, focusing on seasonal produce and rich flavors. Each bite brings a taste of Italy right to your kitchen. Yes, you can easily make this soup in a slow cooker. Start by chopping all your veggies and adding them to the slow cooker. Pour in the vegetable broth, tomatoes, and chickpeas. Add the herbs, salt, and pepper. Set the cooker on low for about six hours or on high for three hours. Stir in the spinach or kale during the last 15 minutes. This method lets the flavors meld beautifully while you go about your day. Tuscan Vegetable Soup can last up to five days in the fridge. Store it in an airtight container for best results. When you're ready to eat it, just reheat on the stove or in the microwave. If the soup thickens, add a splash of broth or water to restore its consistency. Enjoying this soup throughout the week makes meal prep easy and satisfying. We explored the key ingredients, step-by-step instructions, and helpful tips for making Tuscan Vegetable Soup. I shared ideas for variations, storage methods, and answered common questions. You can make this soup your own by adding proteins or seasonal veggies. Remember to avoid mistakes and enhance flavors. With these insights, you can enjoy a healthy, tasty dish any time. Dive into this soup and get creative! Enjoy your cooking journey!

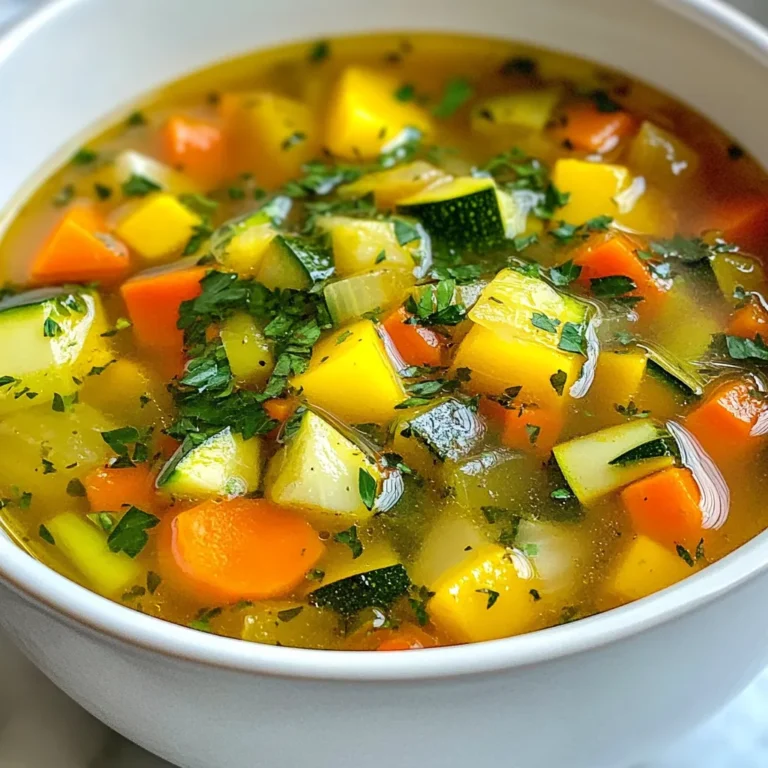
Tuscan Vegetable Soup Hearty and Flavorful Recipe

- 1 lb ground beef - 1/2 lb ground pork (or turkey) - 1/2 cup breadcrumbs - 1/4 cup grated Parmesan cheese - 1/4 cup fresh parsley, chopped - 2 cloves garlic, minced - 1 teaspoon dried oregano - 1 teaspoon salt - 1/2 teaspoon black pepper - 1 cup marinara sauce (homemade or store-bought) - Olive oil for frying When making tender Italian meatballs, the right ingredients matter. The ground beef gives a hearty base. I like to mix in ground pork or turkey for extra flavor and moisture. The breadcrumbs help bind the meatballs and keep them soft. Grated Parmesan adds a lovely cheese taste. For flavor, fresh parsley brightens the dish. Garlic gives a nice kick. Dried oregano brings a classic Italian note. Salt and black pepper are key for seasoning. Don’t forget the marinara sauce! It adds moisture and flavor while cooking. A splash of olive oil in the skillet helps brown the meatballs. This creates a nice crust and keeps them tender inside. Gather these ingredients, and you're on your way to making delicious meatballs! {{ingredient_image_1}} Start by mixing the ground beef and ground pork in a large bowl. You can use ground turkey instead of pork if you prefer. Next, add breadcrumbs, grated Parmesan cheese, chopped parsley, minced garlic, egg, oregano, salt, and black pepper. Mix all the ingredients using clean hands. It is important to combine them well but avoid over-mixing. Over-mixing can make the meatballs tough. You want a soft and tender mix for the best meatballs. Once your mixture is ready, shape it into small balls. Each ball should be about 1 to 1.5 inches wide. This size helps them cook evenly and stay juicy. You should get around 20 meatballs from the mixture. To ensure uniformity, use a cookie scoop or your hands to form the balls. Try to make them all the same size. This way, they will cook at the same rate. Now it's time to cook the meatballs. Heat a few tablespoons of olive oil in a large skillet over medium heat. Once the oil is hot, carefully place the meatballs in the skillet. Be sure not to overcrowd the pan. Sear the meatballs for 2 to 3 minutes on each side until they are golden brown. This step adds flavor and a nice crust. After browning, pour marinara sauce over the meatballs. Cover the skillet and reduce the heat to low. Let them simmer for about 20 minutes. This helps the flavors blend nicely. To boost flavor, I suggest adding spices and fresh herbs. Use dried oregano and a bit of garlic. Fresh parsley brightens every bite. You can also try adding grated cheese like mozzarella. It melts and gives a creamy texture. Other mix-ins like chopped olives or sun-dried tomatoes add depth. The key to tender meatballs is to mix lightly. Use your hands to blend the meats and ingredients just enough. Over-mixing makes them tough, so be gentle. Keep the mixture moist by adding the egg and cheese. This helps create a soft and juicy meatball. For a classic meal, serve meatballs over spaghetti. The sauce clings nicely to the pasta. Crusty bread on the side is perfect for soaking up extra sauce. You can elevate the dish with marinara sauce and fresh basil. A sprinkle of extra Parmesan adds a nice touch, too. Pro Tips Keep it Moist: Adding breadcrumbs soaked in milk can help keep the meatballs tender and juicy. Don't Overmix: Mix the ingredients just until combined to avoid tough meatballs. Overworking the meat can lead to a dense texture. Sear for Flavor: Searing the meatballs before simmering them in sauce enhances the flavor and adds a beautiful color. Rest Before Serving: Allow the meatballs to rest for a few minutes after cooking to let the juices redistribute for optimal flavor and texture. {{image_2}} You can change the meats in this recipe to fit your taste. Ground turkey works great instead of pork. It keeps the meatballs light and tender. If you want a meat-free option, use lentils or chickpeas. These will give you a hearty feel without any meat. You can blend them with spices for extra flavor. Homemade marinara sauce is a classic for meatballs. To make it, cook chopped onions and garlic in olive oil. Add crushed tomatoes, salt, and basil. Let it simmer for 30 minutes. This sauce pairs perfectly with meatballs. You can also try other sauces. Alfredo sauce adds creaminess, while pesto gives a fresh taste. Both can change up your meal and keep it exciting. Italy has many regions, each with unique meatball recipes. In Sicily, you might find meatballs with raisins and pine nuts. In Naples, they often use beef and pork together for a richer flavor. Each area adds its own spices and herbs, creating different profiles. Exploring these variations can bring new life to your cooking. To keep your tender Italian meatballs fresh, follow these best practices for refrigeration. First, let the meatballs cool to room temperature. This helps prevent condensation in the storage container. Next, place them in an airtight container. This keeps air out and maintains moisture. You can also use plastic wrap or foil, but an airtight container works best. Meatballs can last about 3 to 4 days in the fridge. Remember to check for any off smells or changes in texture before eating. If they look or smell off, it's best to toss them out. Want to save some meatballs for later? Freezing is a great option. Here’s a simple step-by-step guide to freeze your meatballs: 1. Cool Completely: Let the cooked meatballs cool completely before freezing. 2. Arrange on a Tray: Place them in a single layer on a baking tray. This prevents them from sticking together. 3. Freeze for 1-2 Hours: Put the tray in the freezer for 1 to 2 hours until the meatballs are firm. 4. Transfer to a Bag: Move the frozen meatballs to a freezer-safe bag. Remove as much air as possible before sealing. 5. Label and Date: Write the date on the bag. This helps you keep track of freshness. To reheat frozen meatballs effectively, thaw them in the fridge overnight. Then, heat them in a skillet over medium heat with marinara sauce. This keeps them moist and flavorful. Meal prepping meatballs makes busy weeks easier. You can prepare a big batch and enjoy them throughout the week. Here are some suggestions: - Make Ahead: Prepare the meatball mixture and shape them. Store un-cooked meatballs in the fridge for up to 24 hours. - Use Different Sauces: Try pairing your meatballs with different sauces each day. Mix it up with marinara, pesto, or alfredo. - Add Variety to Meals: Incorporate meatballs into salads, sandwiches, or wraps during the week. This keeps your meals fresh and exciting. By planning ahead, you can enjoy delicious, tender Italian meatballs anytime you want! The main ingredients for tender Italian meatballs are: - 1 lb ground beef - 1/2 lb ground pork (or turkey) - 1/2 cup breadcrumbs - 1/4 cup grated Parmesan cheese - 1/4 cup fresh parsley, chopped - 2 cloves garlic, minced - 1 large egg - 1 teaspoon dried oregano - 1 teaspoon salt - 1/2 teaspoon black pepper - Marinara sauce - Olive oil for frying These ingredients work together to create a juicy and flavorful meatball. Yes, you can use turkey instead of pork. Ground turkey is a leaner option. It provides a similar texture. Just keep in mind that turkey may need a bit more seasoning. This helps enhance its flavor. To check if meatballs are fully cooked, use a meat thermometer. The inside temperature should reach 165°F (75°C). If you don’t have a thermometer, cut one open. The meat should no longer be pink, and the juices should run clear. Italian meatballs pair well with: - Spaghetti - Crusty bread - Garlic bread - A fresh green salad - Polenta These options complement the meatballs and marinara sauce nicely. To boost the flavor of your meatballs, try these tips: - Add more fresh herbs like basil or thyme. - Mix in some grated cheese for extra richness. - Use different spices, such as crushed red pepper for heat. - Soak the breadcrumbs in milk before adding them to the mix. - Experiment with different types of ground meat for varied flavors. Each of these tips adds depth and makes your meatballs stand out. In this guide, I covered the essential ingredients for meatballs, from ground beef to herbs. I shared step-by-step instructions on mixing, shaping, and cooking, plus tips to enhance flavor. You learned about variations, storage tips, and meal prep ideas. Whether you’re making traditional meatballs or trying new flavors, you now have the tools to impress. Experiment with your favorite ingredients and enjoy the delicious results. Cooking can be fun and rewarding, especially with meatballs! Try these methods today, and share your tasty dishes with others.

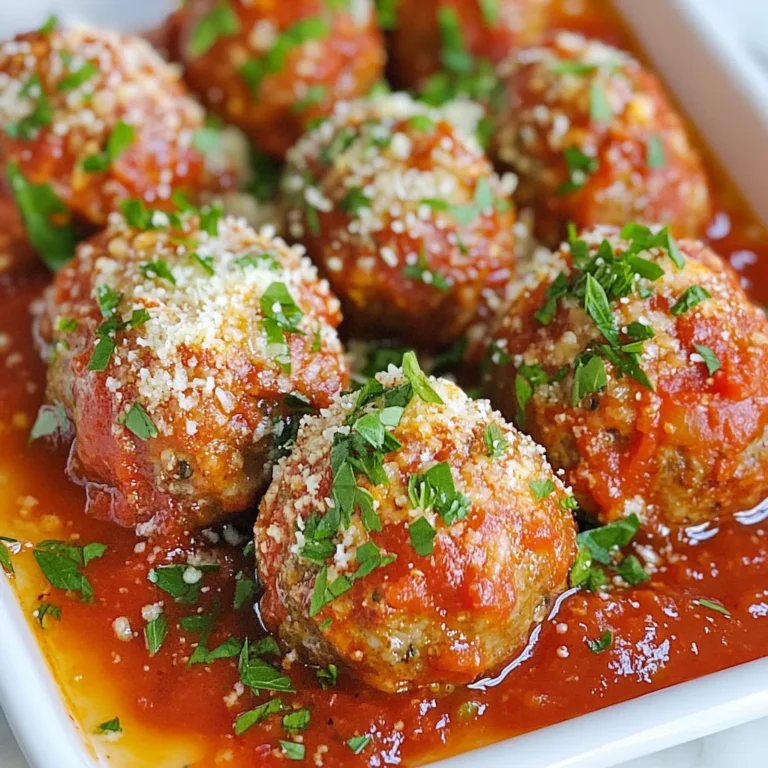
Tender Italian Meatballs Easy and Flavorful Recipe

- 2 lbs beef chuck, cut into 1-inch cubes - 3 tablespoons olive oil - 1 large onion, diced - 4 cloves garlic, minced - 4 large carrots, sliced - 3 medium potatoes, diced - 2 cups beef broth - 1 cup water - 2 tablespoons tomato paste - Dried herbs: thyme, rosemary, paprika - 2 bay leaves - Salt and pepper to taste - 1 cup frozen peas - Fresh parsley for garnish This list gives you everything you need for a hearty beef stew. The beef chuck is key. It gets tender as it cooks. The olive oil helps brown the meat and adds flavor. Onions and garlic build a base of taste. Carrots and potatoes add sweetness and texture. For the broth, beef broth is rich and savory. Water helps balance the flavor. Tomato paste adds depth. The herbs bring freshness. Bay leaves add a subtle hint of earthiness. Adjust salt and pepper to your liking. Feel free to add frozen peas for a pop of color and sweetness. Fresh parsley on top makes the dish look nice. You can use this list to create a comforting one-pot meal that warms the soul. {{ingredient_image_1}} Start by browning the beef cubes. Heat 3 tablespoons of olive oil in a large pot over medium-high heat. Add the beef cubes in batches. Don't overcrowd the pot. This helps them brown better. Season with salt and pepper as you go. Brown the beef on all sides, about 5 minutes per batch. Remove the beef and set it aside. For seasoning tips, use a good amount of salt and pepper. This basic seasoning enhances the beef's natural flavor. You can also add a pinch of garlic powder or onion powder for extra taste. Next, sauté the vegetables. In the same pot, add the diced onion. Cook until it turns translucent, about 5 minutes. Stir often to prevent burning. Then, add 4 minced garlic cloves. Cook for another minute until you smell the garlic's aroma. Now it's time to add the carrots and potatoes. Add 4 sliced carrots and 3 diced potatoes to the pot. Stir them in and cook for about 5 minutes. This softens the veggies a bit and brings out their flavors. Now, it’s time to mix everything in the pot. Return the browned beef to the pot with the veggies. Add 2 cups of beef broth and 1 cup of water. Then, stir in 2 tablespoons of tomato paste, 1 teaspoon of dried thyme, 1 teaspoon of dried rosemary, 1 teaspoon of paprika, and 2 bay leaves. Mix well to combine all the flavors. For cooking times, bring the stew to a gentle boil. Once boiling, reduce the heat to low and cover the pot. Let it simmer for about 1.5 to 2 hours. The beef should be tender when done. If you want to add frozen peas, stir them in during the last 10 minutes of cooking. Remember to remove the bay leaves before serving. Adjust the seasoning with more salt and pepper if needed. To make your beef stew shine, use fresh herbs. Thyme and rosemary add warmth. Paprika brings a smoky touch. These flavors blend well during slow cooking. For tender beef, brown it first. This step locks in juices and flavor. After browning, don’t rush to add liquid. Let the beef rest a bit. This keeps it juicy. Serve beef stew with crusty bread. It soaks up the sauce nicely. A side of green salad adds freshness. For a cozy touch, pair it with mashed potatoes. For presentation, use rustic bowls. Ladle the stew and sprinkle parsley on top. This makes the dish pop with color. It feels inviting and homemade. A heavy pot or Dutch oven works best. It holds heat evenly. This helps meat cook well. A wooden spoon is great for stirring without scratching. Use a sharp knife for chopping. It makes quick work of onions and veggies. A cutting board with a groove catches juices. This keeps your space tidy while you cook. Pro Tips Browning the Beef: Ensure the beef is well-browned before simmering; this step adds depth and richness to the stew's flavor. Use Fresh Herbs: For a more vibrant flavor, consider using fresh thyme and rosemary instead of dried; just add them in the last 30 minutes of cooking. Thicken the Stew: If you prefer a thicker stew, mix a tablespoon of cornstarch with cold water and stir it into the stew about 10 minutes before serving. Rest Before Serving: Letting the stew sit for 10-15 minutes after cooking allows the flavors to meld even more, enhancing the overall taste. {{image_2}} You can change up the beef in your stew. Instead of beef chuck, try brisket or round. These cuts can add new flavors. They also work well for slow cooking. You can swap out some of the veggies too. If you have other root vegetables, add them! Sweet potatoes or parsnips can add sweetness. You can also use green beans or peas for a fresh touch. Adding red wine can deepen the stew's flavor. A cup of red wine pairs well with the beef. You can also use beer for a different twist. Both options add a rich taste to the broth. For a kick, try adding spices. A pinch of cayenne pepper or chili flakes can spice things up. You can also use smoked paprika for a smoky flavor. If you need a gluten-free option, use gluten-free beef broth. This way, you keep the stew safe for everyone. Just check the labels to be sure. For a low-carb version, you can skip the potatoes. Instead, use cauliflower or zucchini. Both options will give you a hearty texture without the carbs. After you enjoy your beef stew, let it cool down. Transfer it to an airtight container. This helps keep it fresh. Store it in the fridge for up to 3 days. If you want it to last longer, you can freeze it. To freeze beef stew, use freezer-safe containers. Leave some space at the top for expansion. This helps avoid spills. You can freeze the stew for up to 3 months. When you are ready to eat, thaw it in the fridge overnight. To reheat, warm it in a pot over low heat. Stir it often to avoid burning. You can also use the microwave. Heat it in short bursts and stir in between. Make-ahead tips are key for busy days. You can cook a big batch of beef stew. Portion it into single servings. This makes it easy to grab for lunch or dinner. Store each portion in a separate container. You can also add a side of crusty bread or a salad to your meal prep. This gives you a complete meal ready to go. The best cut of beef for stew is beef chuck. It has a good amount of fat and connective tissue. This fat melts during cooking, making the meat tender and juicy. Another great option is brisket. It also has a rich flavor and becomes soft when cooked slowly. Avoid lean cuts like sirloin. They can dry out in a stew. For the best results, cook beef stew for about 1.5 to 2 hours. This slow cooking allows the beef to become tender. The longer you cook it, the more the flavors blend. If you want to check if the beef is ready, just poke it with a fork. It should fall apart easily. Keep it covered and on low heat for the best outcome. Yes, you can make beef stew in a slow cooker. Just brown the beef first for extra flavor. Then, add all the ingredients to your slow cooker. Set it on low for 6 to 8 hours or high for 4 to 5 hours. It will still taste great! Just make sure to check the meat for tenderness before serving. This article covers how to make a delicious beef stew. We discussed the main ingredients, like beef chuck, onions, carrots, and potatoes. Next, we looked at step-by-step instructions and tips for perfect flavor. Variations and storage tips help you customize your stew. Beef stew is a warm, filling meal for any day. Now, you can make your own with ease! Enjoy experimenting with flavors and ingredients. Happy cooking!

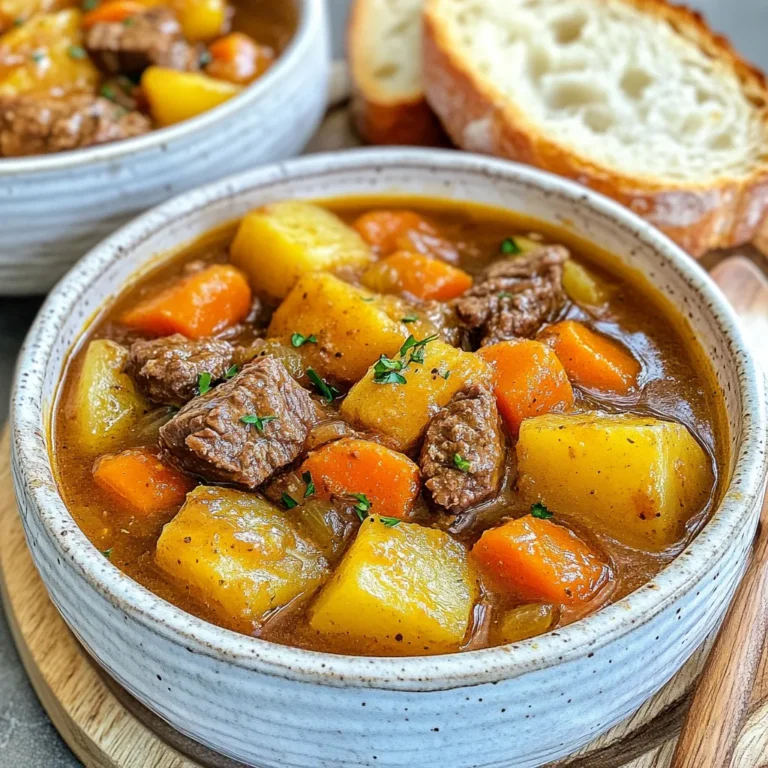
Homemade Beef Stew Comforting One-Pot Meal Recipe

PREV 1 … 40 41 42 … 56 NEXT
secrets pice kitchen

explore

DessertsDinnerAppetizersDrinks

Our Policies

  • Cookie Policy
  • Copyright Policy
  • Disclaimer
  • GDPR Policy
  • Terms Of Use
Back to Top
  • About
  • Contact Us
  • Privacy Policy
© 2025 secrets pice kitchen