FREE DINNER EBOOK! Get your copy!
  • Cookie Policy
  • GDPR Policy
  • Disclaimer
  • Terms Of Use
  • Visit my other site: Fun Cookie Recipes
secrets pice kitchen
  • Home
  • Dinner
  • Desserts
  • Drinks
  • Appetizers
  • Contact
  • About
  • Privacy Policy
  • Home
  • Dinner
  • Desserts
  • Drinks
  • Appetizers
  • Contact
  • About
  • Privacy Policy
  • Cookie Policy
  • GDPR Policy
  • Disclaimer
  • Terms Of Use
Visit my other site: Fun Cookie Recipes

HOME / CATEGORIES /

Latest

- 2 cups cooked shredded chicken - 4 whole wheat wraps or tortillas - 3 tablespoons olive oil - 4 cloves minced garlic - Spices: paprika, dried oregano, salt, pepper - 1 cup mixed greens - ½ cup cherry tomatoes - ½ cup cucumber slices - Greek yogurt and lemon juice When making garlic chicken wraps, the right ingredients matter. The main base starts with cooked shredded chicken. I prefer using chicken breast for its tenderness and flavor. Whole wheat wraps or tortillas add a nice texture and healthy touch. Seasonings bring the chicken to life. Olive oil helps cook the garlic, adding richness. Minced garlic gives the wrap its signature flavor. Paprika adds warmth, while oregano gives a hint of earthiness. Salt and pepper enhance all the flavors. Next, fresh ingredients add crunch and color. Mixed greens offer a fresh bite. Cherry tomatoes add sweetness, while cucumber slices bring coolness. Finally, Greek yogurt mixed with lemon juice creates a tangy dressing. This dressing ties everything together beautifully. Gather these ingredients, and you are ready to create a tasty meal! {{ingredient_image_1}} 1. First, heat 2 tablespoons of olive oil in a skillet over medium heat. 2. Add 4 cloves of minced garlic and sauté for 1-2 minutes. Watch the garlic to avoid burning it. 3. Next, stir in 2 cups of shredded chicken. Sprinkle in 1 teaspoon of paprika, 1 teaspoon of dried oregano, ½ teaspoon of salt, and ½ teaspoon of black pepper. 4. Cook for about 5-7 minutes. Stir occasionally until the chicken is warm and mixed well with the spices. 1. While the chicken cooks, mix ½ cup of Greek yogurt with the juice of 1 lemon in a bowl. This makes a nice dressing. 2. Lay out 4 whole wheat wraps or tortillas on a clean surface. 3. On each wrap, add a generous amount of the garlic chicken mixture. 4. Top with 1 cup of mixed greens, ½ cup of halved cherry tomatoes, and ½ cup of thinly sliced cucumber. 5. Drizzle a spoonful of the yogurt dressing over the top of the chicken and veggies. 1. To wrap, fold in the sides of the tortilla first. 2. Then, roll it up tightly from the bottom. This keeps the filling inside. 3. Repeat this with the other wraps. 4. If you want a crispy touch, heat a clean skillet over medium heat. Toast the wraps seam-side down for about 2-3 minutes. This adds a nice crunch. To avoid burning garlic while sautéing, keep the heat low. Garlic cooks fast, so watch it closely. Sauté for just 1-2 minutes until it smells great. For the chicken mixture, cook for about 5-7 minutes. Stir often to heat it through and mix well with spices. This step is key to getting rich flavor. Layering matters for flavor. Start with the chicken mixture, then add greens, tomatoes, and cucumber. This order keeps the vegetables fresh. To wrap the tortilla, fold in the sides first. Then, roll from the bottom up. This method helps keep all the tasty filling inside. Cut the wraps in half diagonally for serving. This makes them easy to eat and looks nice on a platter. For garnishing, add extra cherry tomatoes and a dollop of yogurt dressing on the side. This adds color and invites guests to dip! Pro Tips Use Fresh Ingredients: Always opt for fresh garlic and vegetables to enhance the flavor profile of your wraps. Customize Your Greens: Feel free to mix and match your greens based on what you have on hand or your personal preferences. Make It Spicy: Add a pinch of red pepper flakes or sliced jalapeños to the chicken mixture for an extra kick. Meal Prep: Prepare the chicken mixture and yogurt dressing in advance for a quick and easy meal throughout the week. {{image_2}} You can easily change up the greens and veggies in these wraps. Try arugula or kale for a peppery bite. You can also use crunchy bell peppers or shredded carrots for added texture. If you want a lighter wrap, swap whole wheat tortillas for lettuce leaves. This keeps your wraps fresh and low-carb. If you want to save time, use shredded rotisserie chicken. It gives you great flavor without cooking. For a vegetarian or vegan twist, try using chickpeas or black beans. You can also use tempeh, which absorbs flavors well. These options keep your wraps tasty and satisfying. You can make different yogurt dressings to change the flavor. Mix Greek yogurt with herbs like dill or basil. For a spicy kick, add a pinch of cayenne or chili powder. You can also use hummus or avocado as a spread. These swaps help you find the perfect taste for your wraps. To keep your Garlic Chicken Wraps fresh, store leftovers in the fridge. Place them in an airtight container. This helps prevent air from making them soggy. If you have extra yogurt dressing, store it separately. It stays fresh longer this way. If you want to save wraps for later, freezing is a great option. Wrap each Garlic Chicken Wrap in plastic wrap. Then, place them in a freezer bag. This keeps them safe from freezer burn. When you’re ready to eat, take a wrap out and let it thaw overnight in the fridge. For reheating, wrap it in foil and bake at 350°F for about 20 minutes. This warms it up without drying it out. To keep your wraps tasty, eat them within three days when stored in the fridge. After that, they may lose their flavor. Use fresh ingredients like chicken and veggies for the best taste. The mixed greens should stay crisp, while the chicken should be moist. If you follow these tips, you’ll enjoy fresh and flavorful Garlic Chicken Wraps every time. You can easily add spice to your Garlic Chicken Wraps. Here are some ideas: - Chili powder: Mix this with your spices for heat. - Cayenne pepper: A little goes a long way! Start with a pinch. - Hot sauce: Drizzle on top of your wraps for extra kick. - Jalapeños: Add fresh slices for a crunchy, spicy bite. - Pepper jack cheese: Use this instead of regular cheese for a spicy twist. These add-ins will make your wraps lively and full of flavor. Yes, you can prep Garlic Chicken Wraps in advance. Here are some tips: - Cook chicken: You can cook and season the chicken a day before. - Wraps: Store the filling and wraps separately to keep them fresh. - Veggies: Slice veggies ahead of time. Keep them in the fridge in a sealed bag. - Dressing: Make the yogurt dressing one day ahead. Store in a jar. When you're ready, just assemble your wraps for a quick meal. Pairing sides with Garlic Chicken Wraps can enhance your meal. Here are some great options: - Garden salad: Fresh greens with a light vinaigrette work well. - Coleslaw: This adds crunch and a bit of sweetness. - Sweet potato fries: They offer a nice contrast to the wraps. - Hummus and pita: A great dip for a tasty side. - Fruit salad: Fresh fruit adds a sweet touch to your meal. These sides will balance the flavors and make your meal more fun. This blog post shared an easy recipe for Garlic Chicken Wraps, focusing on simple steps and fresh ingredients. You learned about the key ingredients, cooking tips, and how to store wraps for later use. In closing, these wraps are tasty, quick, and flexible. You can customize them to suit your tastes while enjoying a healthy meal. Try different flavors, and they’ll become a regular dish in your kitchen.

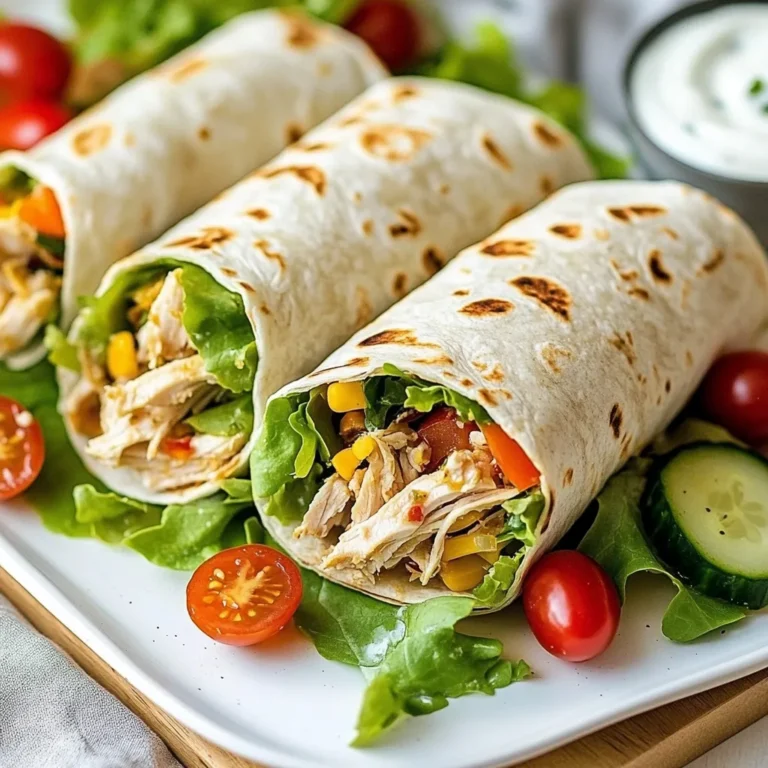
Garlic Chicken Wraps Flavorful and Simple Meal Idea

Here are the ingredients for the Philly Cheesesteak Casserole: - 1 lb ground beef or thinly sliced steak - 1 medium onion, sliced - 1 bell pepper (red, green, or yellow), sliced - 2 cups cooked pasta (elbow or penne) - 2 cups shredded provolone cheese - 1 cup cream cheese, softened - 1 cup beef broth - 1 tablespoon Worcestershire sauce - 1 teaspoon garlic powder - 1 teaspoon black pepper - Salt to taste - Fresh parsley for garnish (optional) You can mix up this recipe to fit your taste: - Swap ground beef for turkey or chicken. - Use different cheeses like mozzarella or cheddar. - Add mushrooms or zucchini for more veggies. - Try different pasta shapes, like penne or fusilli. - Use vegetable broth for a lighter option. Each serving of this casserole offers a good balance: - Calories: about 450 - Protein: 30g - Carbohydrates: 30g - Fat: 25g - Fiber: 2g - Sodium: 800mg This dish combines rich flavors and essential nutrients. It’s comfort food that satisfies! {{ingredient_image_1}} Start by slicing one medium onion and one bell pepper. You can use any color bell pepper you like. Heat a large skillet over medium heat. Add the sliced onion and bell pepper to the skillet. Cook them for about 5 to 7 minutes until they are soft. Then, remove them from the skillet and set them aside. This step gives your casserole a great flavor base. In the same skillet, add one pound of ground beef or thinly sliced steak. Cook it until it turns brown. While it cooks, season it with one teaspoon of garlic powder, black pepper, and salt. If there’s extra fat, drain it away. Next, stir in one tablespoon of Worcestershire sauce, two cups of cooked pasta, and one cup of beef broth. Mix all these ingredients well. This mixture is the heart of your casserole. In a separate bowl, take one cup of softened cream cheese. Mix it with one cup of shredded provolone cheese until it’s creamy. Add this cheese blend to the meat and pasta mixture. Stir until it's evenly mixed. Now, pour everything into a greased 9x13 inch baking dish. Sprinkle the remaining provolone cheese on top. Bake in your preheated oven at 350°F (175°C) for about 20 to 25 minutes. The cheese should be melted and bubbly. Let it sit for about 5 minutes before you serve. If you want, garnish with fresh parsley for a nice touch. Enjoy your hearty Philly cheesesteak casserole! To store your leftovers, let the casserole cool first. Place it in an airtight container. You can keep it in the fridge for up to three days. If you want to store it longer, freeze it. Wrap it tightly in plastic wrap and foil. This keeps it fresh for about three months. You can make this casserole ahead. Prepare it fully but do not bake it. Cover it and store it in the fridge overnight. When you are ready, just bake it as directed. This makes meal prep easy and fast. For the best cheese melt, use fresh provolone cheese. Shred it yourself for better results. Layer the cheese on top just before baking. You can also cover the dish with foil for the first half of baking. This traps steam and helps the cheese melt perfectly. Remove the foil for the last few minutes for a nice golden top. Pro Tips Choose the Right Meat: For a more authentic cheesesteak flavor, consider using ribeye steak instead of ground beef. It adds a rich, savory taste and tender texture. Cook Pasta Al Dente: Make sure to cook your pasta al dente. It will absorb some liquid during baking and prevent the casserole from becoming too mushy. Experiment with Cheese: While provolone is traditional, feel free to mix in other cheeses like mozzarella or cheddar for a unique twist on flavor and texture. Let It Rest: After baking, let the casserole sit for a few minutes before serving. This helps the layers set and makes it easier to serve. {{image_2}} You can easily make a vegetarian version of this dish. Instead of beef, use mushrooms or a meat substitute. Portobello mushrooms give a rich taste. Add lots of veggies like zucchini and spinach. You can keep the cheese and pasta the same for a creamy, tasty meal. Want some heat? Add sliced jalapeños to the mix. Chop them up and cook them with the onions and peppers. This will give your casserole a nice kick. You can also add hot sauce to the meat mixture for more spice. Adjust the amount based on your taste. Cheese can change the flavor of your casserole. Provolone is a classic choice, but you can try others too. Cheddar adds sharpness, while mozzarella gives a gooey texture. You might even mix different cheeses for a unique flavor. Use what you like best or have on hand! After you cook the Philly Cheesesteak Casserole, let it cool first. Cover it tightly with plastic wrap or foil. This keeps the dish fresh. Store it in the fridge for up to three days. When you want to eat it again, just take it out and reheat. You can freeze the casserole if you want to save it for later. First, let it cool completely. Then, place it in an airtight container or a freezer bag. It can stay in the freezer for up to three months. To use it later, just thaw it overnight in the fridge before reheating. Reheating is easy. You can use the oven or the microwave. If using the oven, preheat it to 350°F (175°C). Place the casserole in a dish and cover it with foil. Heat for about 20-25 minutes. If using the microwave, heat individual servings for about 2-3 minutes. Make sure it's hot all the way through before serving. Yes, you can use different meats. Ground turkey or chicken works well. Thinly sliced roast beef is another great option. Each meat adds its own unique flavor. Just make sure to cook it fully before mixing with other ingredients. To make the casserole in a slow cooker, start by cooking the onions and peppers. Then, brown your meat as usual. Mix in the Worcestershire sauce, beef broth, and cooked pasta. Transfer everything to your slow cooker. Top with cream cheese and provolone. Cook on low for about 4-5 hours, or until bubbly. You can serve many sides with this dish. A simple green salad pairs well. Roasted vegetables add color and flavor. Garlic bread is a favorite for soaking up the cheesy goodness. You can even enjoy it with potato chips for some crunch! This blog post covered a delicious Philly Cheesesteak Casserole. We explored the key ingredients and their nutritional values. You learned step-by-step instructions for preparing each element, from veggies to cheese. I shared tips for storing leftovers and making the dish in advance. We even looked at tasty variations and answered common questions. In summary, this recipe offers flexibility and flavor. You can easily customize it to suit your taste. Enjoy your cooking and happy eating!

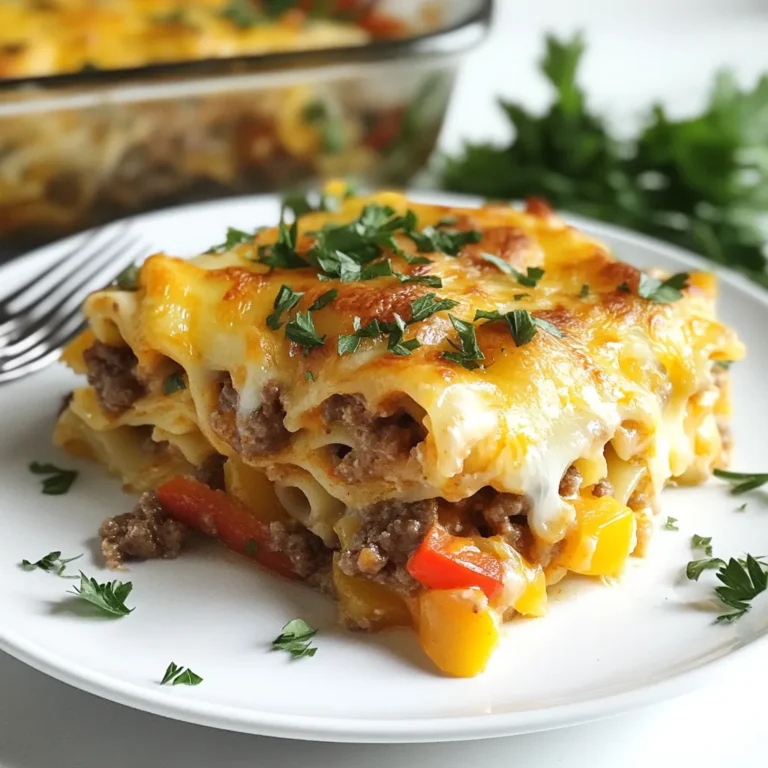
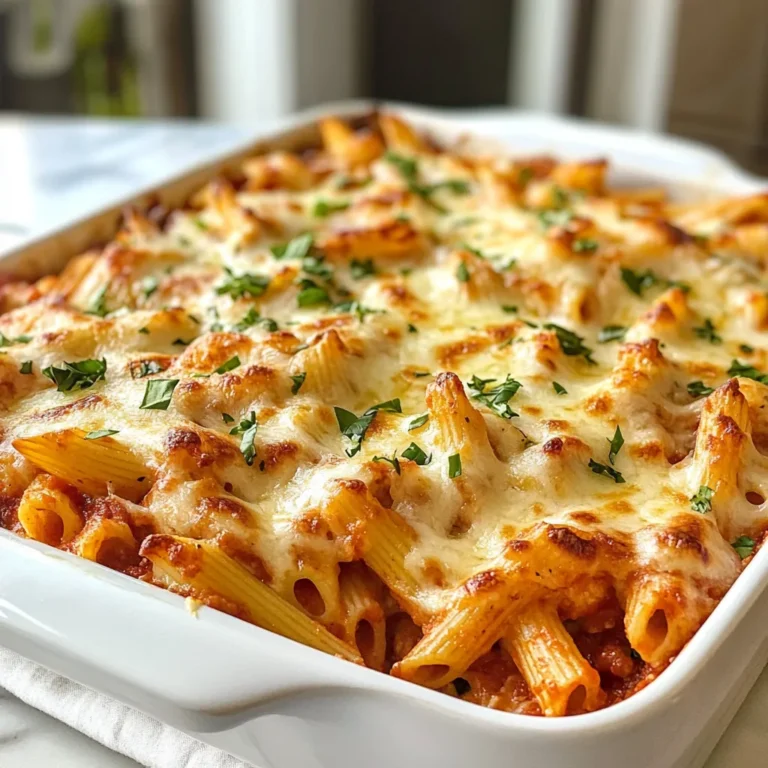
Philly Cheesesteak Casserole Flavorful Comfort Dish

To make Crack Chicken Penne, you will need a mix of tasty and simple ingredients. Here’s what you will gather for this hearty meal: - 12 oz penne pasta - 1 lb boneless, skinless chicken breasts - 1 tablespoon olive oil - 1 packet ranch seasoning mix - 8 oz cream cheese, softened - 1 cup chicken broth - 1 cup shredded cheddar cheese - ½ cup green onions, sliced - 1 cup cooked and crumbled bacon (substitute with plant-based bacon if desired) - Salt and pepper to taste Each ingredient plays a key role in the dish. The penne pasta serves as a perfect base. The chicken breasts bring protein and heartiness. Olive oil helps to cook the chicken, while ranch seasoning adds that special flavor. Cream cheese makes the sauce rich and creamy. Chicken broth enhances the sauce, while cheddar cheese adds extra flavor and creaminess. Green onions give a fresh touch, and bacon adds a delightful crunch. Don’t forget salt and pepper to make everything taste just right. When you gather these ingredients, you set the stage for a meal that is not just filling but also full of flavor. {{ingredient_image_1}} - Start by boiling salted water in a large pot. - Once the water boils, add 12 oz of penne pasta. - Cook the penne until al dente, usually about 8-10 minutes. - Drain the pasta and set it aside for later. - Heat 1 tablespoon of olive oil in a large skillet over medium heat. - Season 1 lb of boneless, skinless chicken breasts with salt and pepper. - Cook the chicken for about 5-7 minutes on each side until fully cooked. - Once cooked, let the chicken rest for a few minutes, then shred it using two forks. - In the same skillet, combine 8 oz of softened cream cheese and 1 packet of ranch seasoning mix. - Stir until creamy and smooth. - Gradually add 1 cup of chicken broth while stirring to combine. - Heat until the sauce is warm and smooth, making sure not to boil. - Add the shredded chicken back into the skillet with the sauce. - Toss in the cooked penne pasta and stir until well coated in the sauce. - Mix in 1 cup of shredded cheddar cheese until melted and creamy. - Fold in 1 cup of cooked and crumbled bacon if you desire. - Top the dish with ½ cup of sliced green onions for a fresh taste. - Adjust seasoning with salt and pepper to your liking. - Serve the Crack Chicken Penne in attractive bowls, garnished with more cheese and green onions. To ensure the chicken is cooked through, use a meat thermometer. The chicken should reach 165°F inside. This will keep your dish safe and tasty. Always let the chicken rest before shredding. This keeps it juicy. For al dente pasta, cook the penne for about 1-2 minutes less than the package says. This means you will have a firm bite, which really enhances the dish. After draining, toss the pasta with a little olive oil. This prevents sticking. To boost flavor, try adding garlic powder or onion powder to the ranch mix. You can also stir in some fresh herbs like parsley or dill. This adds a fresh taste to your meal. If you want it spicier, add red pepper flakes or a dash of hot sauce. For a milder version, simply reduce the ranch mix. You can also use a cream cheese with herbs for a nice twist. For side dishes, a fresh salad pairs well. A simple green salad with a lemon vinaigrette is perfect. You can also serve Crack Chicken Penne with garlic bread or steamed vegetables. Garnish the dish with extra green onions or a sprinkle of more cheese. This makes it look nice and adds some crunch. Serve it in large bowls for a cozy meal feel. Pro Tips Cook Pasta Perfectly: Always cook your pasta al dente to maintain a nice texture that holds up when mixed with the sauce. Season Your Chicken: Don’t skip on seasoning the chicken before cooking; it enhances the overall flavor of the dish. Use Fresh Ingredients: Fresh green onions and quality cheddar cheese make a significant difference in taste and presentation. Adjust Consistency: If the sauce is too thick, add a bit more chicken broth until you reach your desired consistency. {{image_2}} If you want to make this dish plant-based, consider using plant-based bacon. It adds a smoky flavor without meat. Brands like tempeh bacon or coconut bacon work well. You can also use dairy-free cream cheese. Look for brands that taste rich and creamy. They blend well into sauces and keep the dish smooth. You can swap the chicken for turkey or tofu. Turkey gives a leaner taste, while tofu absorbs all the flavors. If you love seafood, shrimp is a tasty choice too. Just cook it until it turns pink. You can also add vegetables like spinach or bell peppers for extra nutrition and color. To change the flavor, try adding different spices or sauces. A sprinkle of paprika or garlic powder can enhance the taste. You can also mix in a bit of hot sauce for a kick. Using assorted cheeses is another fun idea. Blend cheddar with mozzarella or pepper jack for a creamy, zesty flavor. To store leftovers, cool the dish to room temp. Place it in an airtight container. This keeps the flavors fresh and prevents spills. Crack Chicken Penne lasts in the fridge for about 3 to 4 days. Make sure to label the container with the date. You can reheat Crack Chicken Penne in the microwave or on the stove. For the microwave, use a microwave-safe bowl. Heat in 30-second bursts, stirring in between. On the stove, add a splash of chicken broth in a skillet. Heat on low and stir until warm. To keep it creamy, avoid high heat and stir often. To freeze Crack Chicken Penne, let it cool completely. Place it in a freezer-safe bag or container. Squeeze out as much air as possible. It can stay frozen for up to 3 months. When ready to eat, thaw it overnight in the fridge. Reheat using the same methods mentioned above. Add a bit of broth if it seems dry after thawing. Yes, you can make Crack Chicken Penne ahead of time. To do this, prepare the dish fully and let it cool. Store it in an airtight container in the fridge. It will stay fresh for up to three days. When ready to eat, simply reheat it on the stove or in the microwave. Add a splash of chicken broth if the sauce seems thick. Absolutely! Crack Chicken Penne is great for meal prep. You can divide it into individual portions for easy lunches or dinners. Just store each portion in a sealed container. This makes it easy to grab and go. Plus, it tastes just as good reheated. Crack Chicken Penne pairs well with many sides. A simple green salad adds freshness. Garlic bread is a tasty option too. You might also enjoy steamed veggies for a healthy balance. Pair it with a light white wine or iced tea for drinks. Yes, you can easily make Crack Chicken Penne gluten-free. Use gluten-free penne pasta instead of regular pasta. Many brands offer good options. Just check the label to ensure it meets your needs. This way, everyone can enjoy this delicious meal! Crack Chicken Penne blends simple ingredients into a delicious meal. We covered each step, from cooking pasta to mixing in cheese and bacon. Remember to adjust flavors to fit your taste. You can easily customize this dish with substitutions or new proteins. Don’t forget the best practices for cooking and storage. Enjoy this comforting dish with friends or family, and feel free to experiment with your own twists. Cooking can be fun and creative, and Crack Chicken Penne is a great dish to try!

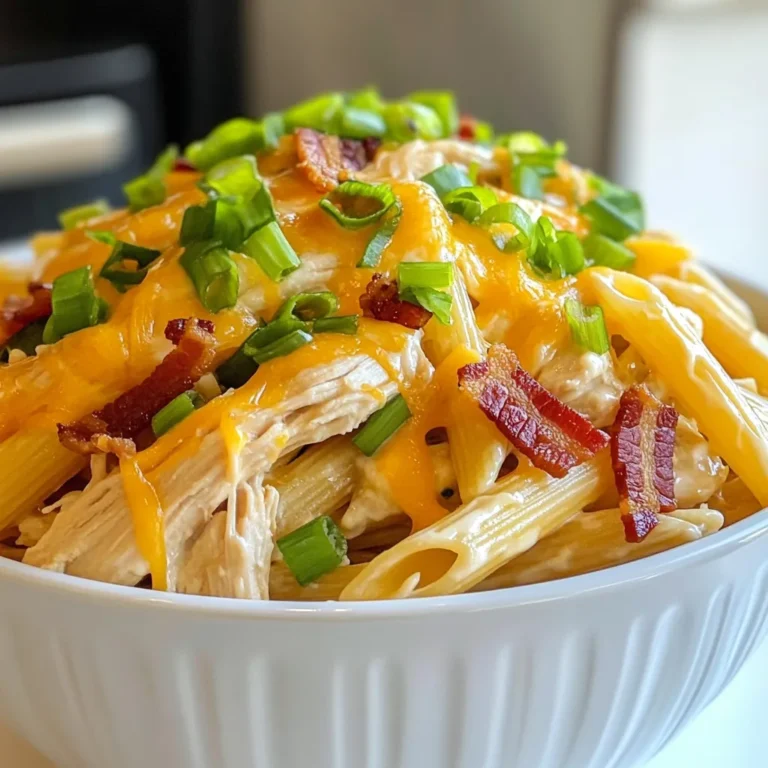
Crack Chicken Penne Flavorful and Hearty Meal

To make a delicious pizza grilled cheese, you need a few key items. Here’s what you’ll need: - 4 slices of sourdough bread - 1 cup shredded mozzarella cheese - 1/2 cup pizza sauce - 1/4 cup sliced pepperoni (or your choice of toppings) - 1/4 cup grated Parmesan cheese - 2 tablespoons butter - 1 teaspoon dried oregano - 1 teaspoon garlic powder - Salt and pepper to taste These ingredients create a tasty blend of flavors. The sourdough bread gives a crispy texture. The mozzarella melts beautifully, while the pizza sauce adds that classic pizza taste. You can make your pizza grilled cheese more fun by adding your favorite toppings. Here are some ideas: - Sliced olives - Bell peppers - Mushrooms - Spinach - Cooked sausage - Fresh basil Feel free to mix and match toppings. This lets you create a sandwich that suits your taste perfectly. Sourdough bread shines in this recipe, but other types can work too. Consider these options: - Ciabatta - Whole wheat - French bread - Rye Each type of bread brings its own flavor and texture. Choose one that you love for the best results. {{ingredient_image_1}} First, gather all your ingredients. You will need: - 4 slices of sourdough bread - 1 cup shredded mozzarella cheese - 1/2 cup pizza sauce - 1/4 cup sliced pepperoni (or your choice of toppings) - 1/4 cup grated Parmesan cheese - 2 tablespoons butter - 1 teaspoon dried oregano - 1 teaspoon garlic powder - Salt and pepper to taste Next, heat a skillet over medium heat. Melt one tablespoon of butter in the skillet. While the skillet heats, it's time to build your sandwich. Take two slices of sourdough bread and spread pizza sauce on each slice. On one slice, layer half of the shredded mozzarella cheese. Then, add the sliced pepperoni. Sprinkle half of the grated Parmesan on top. Next, add the dried oregano and garlic powder. Finally, top it with the remaining mozzarella cheese. Now, place the second slice of bread on top to create a sandwich. Carefully put the sandwich in the hot skillet. Toast it until the bread turns golden brown and the cheese starts to melt, about 3-4 minutes. While it cooks, spread a thin layer of the remaining butter on the top slice of the sandwich. After 3-4 minutes, flip the sandwich carefully. Cook the other side for another 3-4 minutes until it’s golden and crispy. Once cooked, take the sandwich out of the skillet. Let it sit for a minute. This helps the cheese settle before slicing. Slice the sandwich in half for easy handling. Serve it warm on a cutting board. For a fun touch, garnish with fresh parsley. Offer a small bowl of extra pizza sauce on the side for dipping. This adds flavor and makes your meal more enjoyable. To get a crispy crust, use medium heat. This helps the bread toast without burning. A cast-iron skillet works best for even heat. You can also use a non-stick pan, but watch closely. Start by melting butter in the skillet. It adds flavor and helps with crispness. Flip the sandwich gently to avoid squishing it. For gooey, melted cheese, use a mix of mozzarella and Parmesan. Mozzarella melts well, while Parmesan adds a nice bite. Layer the cheese thick but not too much. This ensures it melts evenly. Cover the skillet with a lid while cooking. This traps heat and helps the cheese melt faster. To prevent sogginess, use fresh sourdough bread. Dry the bread a bit before adding sauce. Spread only a thin layer of pizza sauce. Too much sauce can make the bread soft. Let the cooked sandwich rest for a minute. This helps steam escape, keeping it crispy. Serve it right away for the best taste! Pro Tips Choose the Right Bread: Sourdough adds a delicious tang and texture; however, feel free to experiment with other types like ciabatta or whole wheat for different flavors. Layer Wisely: Ensure even cheese distribution by layering toppings in the order of cheese, toppings, and then more cheese, which helps bind everything together. Control the Heat: Cooking on medium heat allows the cheese to melt thoroughly without burning the bread. If needed, lower the heat for a more controlled toasting. Customize Your Toppings: Get creative with toppings like bell peppers, olives, or mushrooms to make the sandwich your own. Just keep the quantity balanced to avoid sogginess. {{image_2}} If you want a tasty vegetarian pizza grilled cheese, swap the pepperoni for veggies. Try sliced bell peppers, mushrooms, or spinach. These options add flavor and crunch. You can also use a mix of your favorite vegetables. Just make sure to cook them lightly before adding them to the sandwich. This helps them blend well with the cheese. While mozzarella is classic, other cheeses can enhance this dish. Consider mixing mozzarella with provolone or fontina for a rich taste. You could also use cheddar for a sharp kick. For a creamy texture, try using goat cheese or ricotta. Each cheese brings its own flavor, so feel free to experiment. Get creative with your toppings! Add sliced olives, jalapeños, or even pineapple for a sweet twist. You can sprinkle herbs like basil or thyme for fresh flavor. For a smoky taste, try adding a few drops of liquid smoke. The options are endless, so go ahead and make this sandwich your own. To store leftover pizza grilled cheese, let it cool down first. Place it in an airtight container. This keeps the flavors fresh and prevents sogginess. You can store it in the fridge for up to three days. If you want to keep it longer, freezing is a great option. When reheating, I suggest using a skillet. Heat the skillet on medium. Add a small amount of butter to the pan. Place the sandwich in the skillet and cover it. This helps the cheese melt while keeping the bread crispy. Cook for about three to four minutes on each side. You can also use an oven. Preheat to 350°F (175°C) and bake for about 10 minutes. To freeze pizza grilled cheese, wrap each sandwich tightly in plastic wrap. Then, place them in a freezer bag. This method prevents freezer burn. You can freeze them for up to two months. To cook, thaw in the fridge overnight. Then, follow the reheating tips to enjoy your meal. Yes, you can use different cheeses. Try cheddar, provolone, or even a mix. Each cheese brings its own flavor. Mixing cheeses can also enhance the taste. Just make sure to melt them well for that gooey effect. If you don't have sourdough, use any bread you like. White, whole grain, or ciabatta work great. Just pick a bread that can hold the fillings. The key is to have a sturdy base for your sandwich. For a healthier option, choose whole grain bread. Use low-fat cheese and leaner toppings. You can add veggies like spinach or bell peppers for extra nutrients. Reducing butter can also cut down calories. Absolutely! An air fryer is perfect for this sandwich. Preheat it to 350°F (175°C). Assemble your sandwich as usual, then place it in the air fryer. Cook for about 8-10 minutes, flipping halfway through. Enjoy that crispy goodness! Pizza grilled cheese is a fun twist on two favorites. We covered key ingredients, cooking steps, and tips to make it great. You learned how to add your favorite toppings and try different cheeses. Plus, we shared ways to store and reheat your sandwich. Enjoy your pizza grilled cheese adventure, and don’t be afraid to experiment. The best sandwich is the one that comes from your heart and taste.

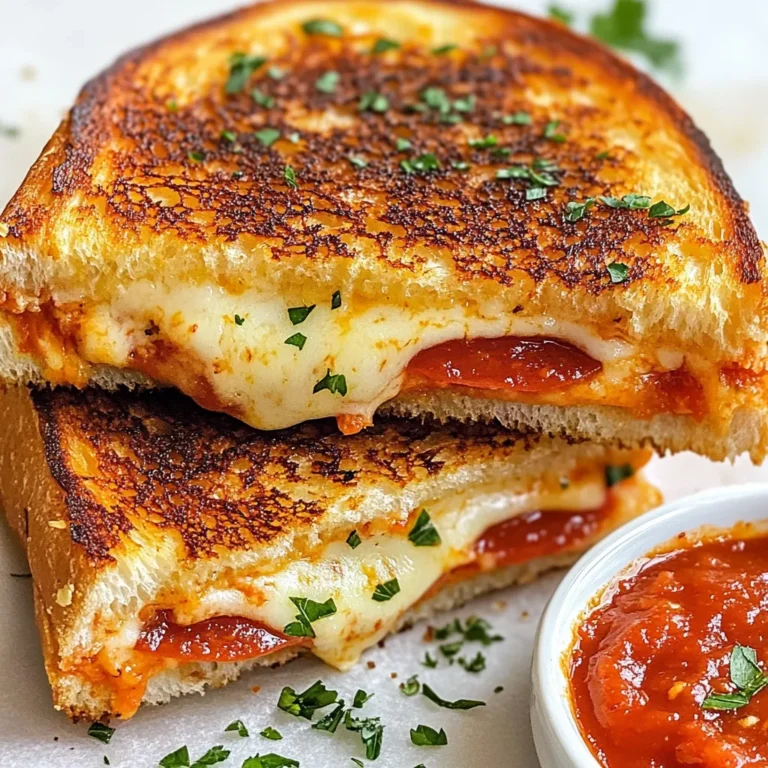
Pizza Grilled Cheese Delight for Easy Weeknight Meal

To make a tasty Beef Pepper Rice Bowl, you will need: - 1 cup jasmine rice - 1 lb ground beef - 1 bell pepper (red, yellow, or green), thinly sliced - 1 onion, thinly sliced - 2 cloves garlic, minced - 1 tablespoon soy sauce - 1 tablespoon oyster sauce - 1 teaspoon sesame oil - 1 tablespoon vegetable oil - Salt and pepper to taste These ingredients combine to create a flavorful dish that is sure to please. The ground beef brings rich flavor, while the bell pepper and onion add color and crunch. Jasmine rice serves as a perfect base, soaking up all the delicious sauce. For added flair, consider these garnishes: - Chopped green onions - Sesame seeds These garnishes not only make the dish look great but also enhance the taste. Green onions give a fresh crunch, and sesame seeds add a nutty flavor. To prepare this dish, gather the following kitchen tools: - Medium pot - Large skillet or wok - Spatula - Fork for fluffing rice Having the right tools makes cooking smoother and more enjoyable. A good skillet helps you achieve that nice sear on the beef, while a pot cooks the rice just right. {{ingredient_image_1}} First, rinse 1 cup of jasmine rice under cold water. This helps remove excess starch. Rinse until the water runs clear. In a medium pot, combine the rinsed rice with 2 cups of water. Bring it to a boil over high heat. Once boiling, reduce the heat to low. Cover the pot and let it simmer for 15 minutes. The water should absorb fully. After 15 minutes, remove the pot from heat. Let it sit covered for another 5 minutes. Finally, fluff the rice with a fork to make it light and airy. In a large skillet or wok, heat 1 tablespoon of vegetable oil over medium-high heat. Add 1 thinly sliced onion and cook it until it turns translucent, about 3-4 minutes. Then, add 2 cloves of minced garlic and 1 thinly sliced bell pepper. Sauté these for another 2-3 minutes until the pepper becomes tender. Next, push the vegetable mixture to one side of the skillet. Add 1 pound of ground beef to the empty side. Break the beef apart using a spatula. Cook it until it is browned and fully cooked, which takes about 5-7 minutes. Once the beef is cooked, mix it with the veggies. Stir in 1 tablespoon of soy sauce, 1 tablespoon of oyster sauce, and 1 teaspoon of sesame oil. Season with salt and pepper to taste. Cook everything together for another 2-3 minutes to meld the flavors. Taste and adjust the seasoning if needed. To serve, take a generous scoop of the fluffy jasmine rice and place it in a bowl. Top it with the savory beef and pepper mixture. For a bright finish, sprinkle chopped green onions and sesame seeds on top. This adds color and a nice crunch. Enjoy your Beef Pepper Rice Bowl! To get fluffy rice, rinse jasmine rice well. Rinse until the water runs clear. This helps remove extra starch. Use two cups of water for one cup of rice. Bring it to a boil, then cover and simmer. Let it sit for five minutes after cooking. Fluff it gently with a fork. This method gives you the best texture. Seasoning is key to a tasty dish. Soy sauce adds savory depth, while oyster sauce brings sweetness. Sesame oil adds a nice nutty flavor. Don’t forget to taste your mix! Adjust the salt and pepper to suit your taste. A little extra soy sauce can enhance the umami flavor. When cooking ground beef, use medium-high heat. This helps it brown nicely. Break the beef into small pieces as it cooks. This ensures even cooking. Mix it well with the veggies for great flavor. Cook until no pink remains. This usually takes about five to seven minutes. Make sure to stir frequently for even cooking. Pro Tips Use Cold Water for Rinsing: Rinsing the rice under cold water helps to remove excess starch, resulting in fluffier rice once cooked. Cook on Medium-High Heat: Cooking the beef on medium-high heat allows it to brown nicely, enhancing the overall flavor of the dish. Adjust Sauce to Taste: Feel free to adjust the soy sauce and oyster sauce quantities according to your preference for saltiness and richness. Add More Veggies: You can incorporate additional vegetables like carrots or snap peas to increase the nutritional value and add color to the dish. {{image_2}} You can switch the ground beef for other meats. Ground turkey or chicken work well. These proteins have a lighter flavor but still get nice and juicy. If you want a richer taste, use thinly sliced beef or pork. Just remember to adjust the cooking time based on the protein you choose. For chicken, cook it fully before mixing with veggies. For pork, make sure it reaches a safe temperature. If you want a plant-based option, you can use tofu or tempeh. Press the tofu to remove extra water before cooking. Cut it into cubes and fry until golden. You can also use chickpeas for added protein and texture. For a heartier dish, add mushrooms or jackfruit. Both add a nice umami flavor. Make sure to use vegan sauces, like soy sauce or coconut aminos, instead of oyster sauce. Want to add some heat? You can easily spice up your beef pepper rice bowl. Add sliced jalapeños or chili flakes while cooking. If you like it mild, skip the peppers. For a sweet heat, try adding a bit of sriracha or chili garlic sauce. Mix it into the beef mixture to blend flavors well. Always taste as you go, so you can find the right heat for you. To keep your Beef Pepper Rice Bowl fresh, store it in airtight containers. Cool the dish to room temperature before sealing. This helps prevent moisture buildup. Leftovers are best enjoyed within two to three days. Make sure to keep the rice and beef mixture separate if possible. This keeps the rice from becoming mushy. When you are ready to eat, reheat the beef and rice separately for best results. Use a microwave-safe dish for the rice. Add a splash of water to keep it moist. Heat it for 1-2 minutes, stirring halfway through. For the beef mixture, heat it in a skillet over medium heat. Stir until warmed through, about 5 minutes. This method keeps the flavors fresh and lively. If you want to freeze the Beef Pepper Rice Bowl, place the cooled portions in freezer-safe bags. Squeeze out as much air as you can before sealing. Label the bags with the date. You can freeze it for up to three months. To thaw, move it to the fridge overnight. Reheat as mentioned above. Enjoy a homemade meal even when you're busy! A Beef Pepper Rice Bowl is a tasty dish made with fluffy rice, ground beef, and fresh veggies. You cook jasmine rice, sauté bell peppers, onions, and garlic, then mix in seasoned beef. This dish offers a perfect blend of flavors, making it filling and delicious. It’s a quick meal that you can whip up in about 35 minutes. Yes, you can use brown rice. It has a nuttier flavor and more fiber. Brown rice takes longer to cook than jasmine rice, so adjust the cooking time. Cook brown rice with twice the water and let it simmer until tender. This change makes the dish healthier while still tasting great. To make a gluten-free Beef Pepper Rice Bowl, swap regular soy sauce for gluten-free soy sauce or tamari. Check your oyster sauce for gluten-free options too. The other ingredients, like rice and veggies, are naturally gluten-free. This way, you can enjoy the same great taste without the gluten. You can find Beef Pepper Rice Bowls at many Asian restaurants, especially in Japanese or Korean cuisine. Some casual dining spots may offer their own version as well. Check local menus or delivery apps to discover nearby places that serve this flavorful dish. In this article, we explored how to make a Beef Pepper Rice Bowl. We covered key ingredients, cooking steps, and helpful tips. You learned about variations and how to store leftovers safely. This dish is fun and flexible, allowing creative options. Use different proteins or make it vegetarian. Let your taste guide you in adjusting flavors. With the right steps, you can enjoy a tasty meal anytime.

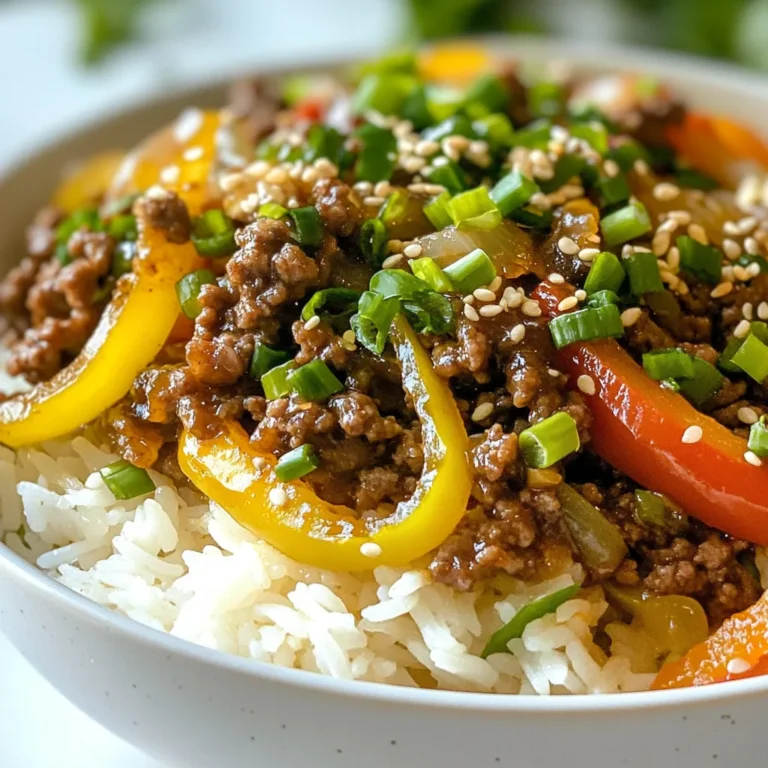
Beef Pepper Rice Bowl Flavorful and Easy Recipe

For this tasty chicken parmesan casserole, you need some key ingredients. Here’s what you will use: - 2 cups cooked chicken, shredded - 3 cups marinara sauce - 2 cups cooked penne pasta - 1 teaspoon garlic powder - 1 teaspoon Italian seasoning - 2 cups shredded mozzarella cheese - 1 cup grated Parmesan cheese - 1/2 cup fresh basil, chopped - 1/2 teaspoon red pepper flakes (optional) - Salt and pepper to taste - Olive oil spray These ingredients come together to create a warm, comforting dish. The chicken gives protein, while the pasta adds heartiness. You can make this dish even better with some great seasonings and toppings. I suggest using: - Garlic powder for a savory kick. - Italian seasoning for a nice herb flavor. - Red pepper flakes if you like some heat. For the top, more mozzarella and Parmesan cheese will make it melty and delicious. Fresh basil not only adds color but also a fresh taste. You can customize your casserole with some fun add-ins. Consider these options: - Use rotisserie chicken for a quick option. - Swap out penne for another pasta type, like fusilli or rigatoni. - Add veggies like spinach, bell peppers, or mushrooms for extra nutrition. These changes let you make the dish your own while keeping it tasty! {{ingredient_image_1}} Start by gathering all your ingredients. You need 2 cups of cooked chicken, shredded. Use leftover chicken or cook some fresh. Next, measure out 3 cups of marinara sauce and 2 cups of cooked penne pasta. For flavor, grab 1 teaspoon of garlic powder and 1 teaspoon of Italian seasoning. You’ll also need 2 cups of shredded mozzarella cheese and 1 cup of grated Parmesan cheese. Don't forget 1/2 cup of fresh basil, chopped. Add 1/2 teaspoon of red pepper flakes if you like heat. Finally, have salt, pepper, and olive oil spray ready. In a large bowl, mix the shredded chicken, marinara sauce, and cooked penne pasta. Add the garlic powder, Italian seasoning, and a pinch of salt and pepper. If you chose red pepper flakes, toss those in now. Stir until everything is well combined. Now, fold in 1 cup of mozzarella cheese and half of the Parmesan cheese. This adds creaminess to your dish. Next, lightly spray a 9x13-inch baking dish with olive oil. Pour the chicken mixture into the dish. Spread it out evenly. Now, top the casserole with the rest of the mozzarella cheese and the remaining Parmesan cheese. This will give you a nice cheesy crust. Preheat your oven to 375°F (190°C). Cover the dish with aluminum foil and place it in the oven. Bake for 25 minutes. After that, remove the foil and bake for another 15 minutes. Keep an eye on it. You want the cheese to be bubbly and golden brown. Once it’s done, take it out and let it cool for about 10 minutes. Before serving, sprinkle some fresh basil on top for extra flavor and color. Enjoy your tasty chicken Parmesan casserole! To make this dish truly shine, use fresh herbs. Fresh basil adds bright flavor. Mix it into the chicken and sauce for a fresh taste. You can also try adding more garlic powder for a stronger kick. If you enjoy heat, sprinkle in red pepper flakes. This gives a nice zing without overwhelming the dish. You can prepare this casserole a day before. Just follow all the steps and cover it tightly. Store it in the fridge overnight. When you are ready to eat, bake it straight from the fridge. Just add about 10 minutes to the baking time. This makes busy nights easier while keeping flavors fresh. This casserole pairs well with a simple salad. A light green salad with a lemon dressing is perfect. You can also serve it with garlic bread. The bread soaks up the sauce and adds crunch. For extra fun, add a sprinkle of crushed red pepper on top before serving. This adds a pop of color and flavor. Pro Tips Use Rotisserie Chicken: For a quicker preparation, consider using store-bought rotisserie chicken. It saves time and adds great flavor. Customize Your Pasta: Feel free to substitute the penne pasta with your favorite type of pasta, such as rigatoni or fusilli, for a different texture. Make It Ahead: This casserole can be assembled a day in advance. Just cover it tightly and refrigerate until ready to bake. Experiment with Cheese: While mozzarella and Parmesan are traditional, try adding provolone or fontina for a unique twist on the flavor. {{image_2}} For a vegetarian twist, swap chicken for veggies. Use 2 cups of chopped mushrooms, zucchini, or spinach. Mix these with the marinara and pasta. This keeps the flavor while being meat-free. The cheese will still melt beautifully on top. You can still enjoy that cheesy goodness. To make this dish gluten-free, choose gluten-free penne pasta. This pasta cooks the same as regular penne. Check the marinara sauce to ensure it's gluten-free. Many brands are safe. With these simple swaps, you can still enjoy every bite of this casserole without worry. If you like heat, add red pepper flakes to the mix. Use one teaspoon for a mild kick or more for extra spice. You can also use spicy marinara sauce for more flavor. This option gives the dish a fun twist that many love. Enjoy the heat while savoring the cheesy goodness! After enjoying your Chicken Parmesan Casserole, let it cool down. Place it in a container with a tight lid. You can keep it in the fridge for up to three days. This way, you can enjoy it again later. To reheat, take out the portion you want. Place it in an oven-safe dish. Cover it with foil to keep it moist. Heat it in the oven at 350°F (175°C) for about 20 minutes. You can also microwave it for 2-3 minutes, but it may not stay as crispy. If you want to freeze it, let it cool completely first. Use a freezer-safe container or a heavy-duty freezer bag. It can last up to three months in the freezer. When you’re ready to eat, thaw it overnight in the fridge. Then, reheat as mentioned above. Enjoy your tasty meal anytime! Yes, you can use rotisserie chicken. It saves time and adds flavor. Simply shred the chicken and mix it into your casserole. The seasoned chicken makes this dish even tastier. If you want a change, try using Alfredo sauce or pesto. Both will give your casserole a new twist. You could also use a blend of your favorite sauces for a unique taste. The casserole will last about three to four days in the fridge. Make sure to store it in an airtight container. This keeps it fresh and ready for your next meal. In this post, we explored the tasty Chicken Parmesan Casserole. We covered key ingredients, seasonings, and optional add-ins to fit your taste. I shared a simple step-by-step guide to help you prep, assemble, and bake easily. We also shared tips for great flavor and suggested fun variations. Remember, store leftovers properly and reheating is simple. Enjoy making this dish! It’s a comforting meal for anyone who loves cheesy goodness.

Chicken Parmesan Casserole Simple and Tasty Meal

- 1 pound beef flank steak - 3 cups broccoli florets - 4 cloves garlic - 1 tablespoon ginger - 1/4 cup soy sauce - 1 tablespoon oyster sauce - 1 tablespoon cornstarch - 2 teaspoons sesame oil - 1 tablespoon sugar - Salt and pepper to taste - 1/4 cup water To make a great beef broccoli stir fry, you need fresh, quality ingredients. The beef flank steak is key. It’s tender and flavorful when sliced thin. Broccoli florets add a nice crunch and color. Garlic and ginger bring a warm aroma. Soy sauce and oyster sauce give the dish a savory depth. Cornstarch helps thicken the sauce for a perfect coating. Sesame oil adds a nutty flavor. Sugar balances the saltiness, while salt and pepper round it all out. - Toasted sesame seeds - Cooked rice or noodles Adding toasted sesame seeds on top gives extra crunch. Serving it over rice or noodles makes it filling and satisfying. You can mix and match these garnishes to suit your taste. {{ingredient_image_1}} First, place your thinly sliced beef in a large bowl. Add soy sauce, oyster sauce, cornstarch, sesame oil, sugar, salt, and pepper. Mix it all together well. This marinade adds flavor and tenderness to the beef. Let it sit for at least 15 minutes. This time helps the beef soak up the sauce. Next, heat one tablespoon of olive oil in a large skillet over medium-high heat. Carefully add the marinated beef to the skillet in a single layer. Let it cook for about 2-3 minutes. Stir occasionally. This helps the beef cook evenly and brown nicely. Once browned, remove the beef from the pan and set it aside. In the same skillet, add the remaining tablespoon of olive oil. Toss in the minced garlic and grated ginger. Stir-fry these for about 30 seconds. You want them to become fragrant but not burn. After that, add your broccoli florets. Stir-fry for about 3-5 minutes. The broccoli should be bright green and just tender. Now, return the cooked beef to the skillet. Pour in 1/4 cup of water and stir everything well. Let this mixture simmer for 2-3 minutes. This step helps everything blend together. Taste the dish and adjust the flavors. You can add more soy sauce or sugar if needed. Serve hot over cooked rice or noodles. Garnish with toasted sesame seeds for a nice touch. To make a great beef broccoli stir fry, heat is key. Use medium-high heat for fast cooking. This keeps the beef juicy and the broccoli bright. A wok or a large skillet is best for this dish. The wide surface helps to cook the meat and veggies evenly. One common mistake is overcooking broccoli. You want it bright green and slightly tender. Cook it for just 3-5 minutes. Another mistake is not marinating the beef long enough. Fifteen minutes is the minimum. Longer marinating adds flavor and tenderness. You can boost flavor with extra sauces. Try adding hoisin or chili sauce for more depth. Balancing sweetness and saltiness is important too. Adjust the sugar and soy sauce to your taste. This will make every bite delicious. Pro Tips Marinate for Flavor: Allow the beef to marinate for at least 30 minutes for deeper flavor absorption. If time allows, marinate overnight in the refrigerator for the best results. Perfectly Cooked Broccoli: To achieve tender yet crisp broccoli, cook it until it's bright green and slightly tender but still has a crunch. Overcooking can lead to a mushy texture. Adjust the Sauce: Feel free to customize the sauce by adding a splash of rice vinegar for acidity or a bit of chili paste for heat, tailoring it to your taste preferences. Serving Suggestions: Serve this dish over jasmine rice for a fragrant experience or try it with whole grain noodles for added nutrition and a different texture. {{image_2}} You can swap beef for chicken, tofu, or shrimp. Each protein has its own taste and texture. For chicken, slice it thinly like beef. Cook it for about the same time. It should be white and juicy. For tofu, use firm or extra firm. Press it to remove excess water. Cut it into cubes and stir-fry until golden. Shrimp cooks quickly, so add it near the end. Just a few minutes will do! Want more veggies? Try bell peppers or snap peas! Cut bell peppers into strips and add them with the broccoli. They need about 3-4 minutes to cook. Snap peas can join the party too! They only need 2-3 minutes. Keep an eye on them. You want them bright and crisp, not mushy! If you need a gluten-free option, use tamari instead of soy sauce. This way, you keep the flavor but avoid gluten. For a vegan twist, skip the beef and oyster sauce. Use mushrooms for a meaty texture. Add some extra soy sauce for flavor. You can make this dish fit any diet! To store your leftover beef broccoli stir fry, let it cool first. Place it in an airtight container. This keeps the flavors fresh and prevents odors from mixing. Use containers made of glass or BPA-free plastic. These materials are safe and easy to clean. If you want to freeze your stir fry, make sure it cools completely. Divide it into portions. Use freezer-safe bags or containers. Remove as much air as possible to prevent freezer burn. When you're ready to eat, thaw it in the fridge overnight. For reheating, you can use a microwave or skillet. If using the microwave, heat in short bursts. Stir the dish well between each burst to heat evenly. In a skillet, add a splash of water to keep it moist. Heat over medium until warmed through. In the fridge, your beef broccoli stir fry will last about 3 to 4 days. If you freeze it, it can stay good for about 2 to 3 months. Always check for any off smells or changes in texture before eating. Yes, you can use frozen broccoli. Just remember to thaw it first. Drain any extra water. Frozen broccoli cooks quickly, so you may need less time than fresh. Stir-fry it until bright green. This keeps it crisp and tasty. If you avoid shellfish, try soy sauce mixed with a bit of sugar. Another option is hoisin sauce. Both give a rich flavor. You can also use mushroom sauce for a similar taste. You can add red pepper flakes or sliced fresh chili peppers. A dash of hot sauce works well too. Adjust the amount based on your heat preference. Start small and taste as you go. Yes, you can prep ingredients in advance. Marinate the beef and chop the veggies. Store them separately in the fridge. This keeps them fresh. Cook them right before serving for the best taste. This stir-fry guide covers essential ingredients, cooking steps, and tips for success. You learned to marinate beef, cook veggies perfectly, and avoid common mistakes. Experimenting with proteins and adding your favorite vegetables can make it your own. Remember to store leftovers safely and enjoy them later. With this knowledge, you can create tasty meals that impress. Happy cooking!

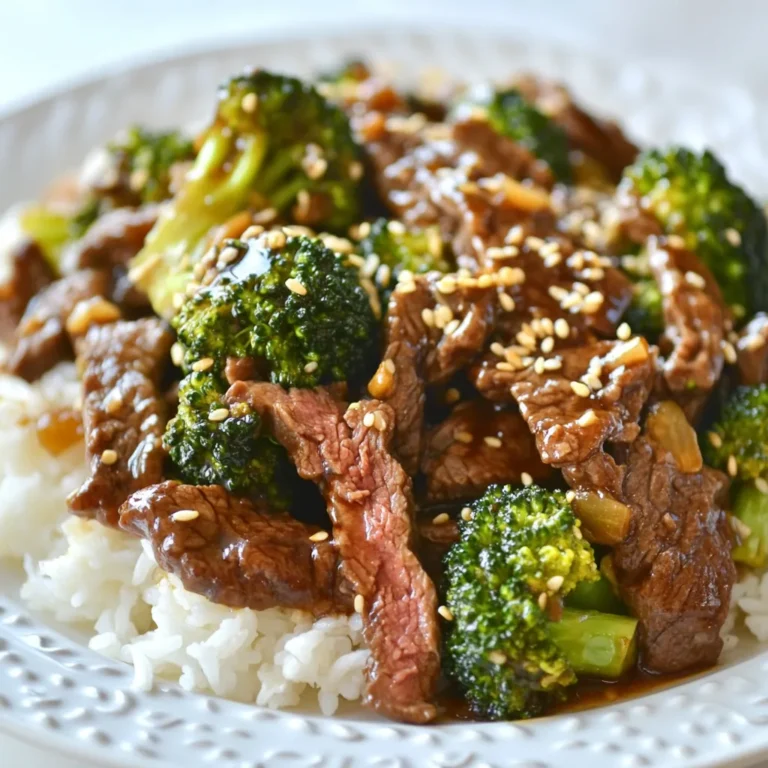
Chinese Beef Broccoli Stir Fry Flavorful and Easy Dish

- 2 boneless, skinless chicken breasts - 1 medium onion, diced - 3 cloves garlic, minced - 1 cup carrots, sliced - 1 cup celery, sliced - 2 cups spinach, fresh - 1 teaspoon dried thyme - 1 teaspoon paprika - Salt and pepper to taste I love using boneless, skinless chicken breasts. They cook evenly and stay juicy. Fresh vegetables like onion, garlic, carrots, and celery add great flavor. The spinach gives it a nice color and nutrition boost. - 8 oz cream cheese, cubed Cream cheese is the star here. It makes the soup creamy and rich. I recommend using full-fat cream cheese for the best taste and texture. It melts perfectly into the soup, creating a velvety finish. - 4 cups chicken broth Chicken broth is key for depth of flavor. I always use low-sodium broth to control the saltiness. It combines well with the chicken and veggies, making a lovely base for the soup. {{ingredient_image_1}} Start by heating olive oil in your slow cooker on the sauté setting. Add diced onion and minced garlic. Cook them until they smell great and turn light gold, about five minutes. This step builds a fantastic base for your soup. Next, add sliced carrots and celery to the slow cooker. Mix them well with the onion and garlic. Let them cook for another three to four minutes. This brings out their taste and makes the soup more colorful. Now, lay the chicken breasts right on top of the veggies. Pour four cups of chicken broth over the chicken. Sprinkle dried thyme, paprika, salt, and pepper on top. The spices add depth to your soup. Cover the slow cooker with its lid. Cook on low for six to seven hours, or on high for three to four hours. The chicken should be fully cooked and tender. Use a meat thermometer to check if it’s 165°F for safety. Once the cooking time is done, carefully take out the chicken breasts. Use two forks to shred the chicken into bite-sized pieces. This makes the chicken mix well with the soup. Return the shredded chicken to the slow cooker. Add cubed cream cheese and stir until it melts and blends in. Finally, add fresh spinach and stir until it wilts, about two to three minutes. Taste and adjust the seasoning if needed. Adjusting Seasoning To get the best taste, season your soup well. Start with salt and pepper. Taste after cooking. You can always add more, but you can't take it out. If you want more flavor, add a pinch of thyme or paprika. Fresh herbs like parsley can also brighten the taste. Enhancing Creaminess Cream cheese makes this soup rich and creamy. For extra creaminess, you can add more cream cheese. You might also try adding a splash of heavy cream at the end. For a lighter option, Greek yogurt can work too. Stir it in right before serving for a smooth finish. Cooking on Low vs. High Cooking on low gives a rich flavor. It takes about 6-7 hours to cook. If you're in a hurry, use high heat for 3-4 hours. The chicken will still be tender, but the flavors may not be as deep. Ideal Cookware for Slow Cooking Choose a slow cooker with a good seal. This keeps moisture in. A ceramic or stoneware insert works best. Make sure the size is right. Too small, and it overflows; too big, and it cooks unevenly. Garnishes for Presentation A simple garnish can make your soup look great. Try a sprinkle of fresh herbs on top. Chopped chives or parsley add color and flavor. You could also add a dollop of sour cream for a nice touch. Pairing with Bread or Salads This soup pairs well with crusty bread. A slice of sourdough or a baguette is perfect for dipping. You can also serve it with a fresh salad. A light green salad with lemon vinaigrette complements the richness of the soup nicely. Pro Tips Use Bone-In Chicken: For an even richer flavor, consider using bone-in chicken breasts or thighs. The bones add depth to the broth while cooking. Customize Your Veggies: Feel free to add or substitute vegetables according to your preference. Potatoes, corn, or peas make great additions! Make it Ahead: This soup freezes beautifully! Make a double batch and freeze half for a quick meal on busy days. Fresh Herbs for Garnish: Enhance the presentation and flavor by garnishing with fresh herbs like parsley or dill before serving. {{image_2}} You can make this soup even better by adding more ingredients. Extra vegetables bring extra flavor and color. Consider adding: - Peas - Corn - Bell peppers These veggies add sweetness and texture. They also boost the soup's nutrition. You can toss them in during the last hour of cooking. This way, they stay bright and fresh. You can also change the protein in this soup. Instead of chicken, try turkey or tofu. Turkey gives a similar taste but with less fat. Tofu is a great option for a vegan dish. Just cut it into cubes and add it when you add the chicken. Spices can take this soup to new heights. Adding cayenne gives it a nice kick. If you like Italian flavors, sprinkle in some Italian seasoning. It adds a warm, herby taste that works well in creamy soups. If you want a different texture or taste, try cream cheese alternatives. Greek yogurt is a great choice. It adds creaminess and a tangy flavor. Sour cream also works well, making the soup rich and smooth. Just stir it in before serving to keep it creamy. To store your slow cooker chicken cream cheese soup, follow these steps: - Refrigerator Storage Guidelines: Let the soup cool to room temperature. Transfer it to an airtight container. Place it in the fridge. It will stay fresh for up to 3-4 days. - Freezing Instructions: For longer storage, freeze the soup. Use a freezer-safe container or bag. Make sure to leave some space for expansion. The soup can last for up to 3 months in the freezer. Reheating your soup properly ensures it tastes great. Here are the best methods: - Microwave: Pour the soup into a microwave-safe bowl. Cover it loosely. Heat on high for 1-2 minutes. Stir halfway through to ensure even heating. - Stove: Pour the soup into a pot. Heat on medium-low. Stir often until it’s hot. This method keeps the soup creamy and delicious. Knowing how long your soup lasts is key: - In the Fridge: The soup is good for 3-4 days when stored in the fridge. - In the Freezer: It can stay fresh for up to 3 months in the freezer. Make sure to label your containers with dates. This way, you know when to use them. Yes, you can! You can make this soup on the stovetop. Start by sautéing the onion and garlic in a pot. Add the carrots and celery, cooking them for a few minutes. Then, layer in the chicken breasts and pour in the chicken broth. Season with thyme, paprika, salt, and pepper. Bring it to a boil, then reduce the heat. Cover and simmer for about 30 to 40 minutes, or until the chicken is cooked through. Shred the chicken, add the cream cheese and spinach, and stir until creamy. Yes, you can use frozen chicken breasts. Just place them directly in the slow cooker. Add the broth, veggies, and spices as usual. Cooking times may change a bit. For best results, cook on high for 4 to 5 hours or on low for 7 to 8 hours. Check that the chicken is fully cooked. Then shred and mix in the cream cheese and spinach. If you want a thicker soup, there are a few options. You can add more cream cheese. Stir it in after the chicken is shredded. Another way is to mix a bit of cornstarch with water. Stir this mixture into the soup and cook for an extra 10 minutes. You can also blend some of the soup in a blender, then return it to the pot for a creamy texture. This blog post covered how to make a delicious slow-cooker chicken soup. We discussed the best ingredients, including chicken, fresh veggies, and cream cheese. I provided step-by-step instructions, helpful tips, and variations to suit your taste. Remember, adjusting the seasoning can elevate your soup. Whether you make it classic or add your twists, this recipe offers flexibility and flavor. Enjoy your cooking, and I hope you savor every bowl!

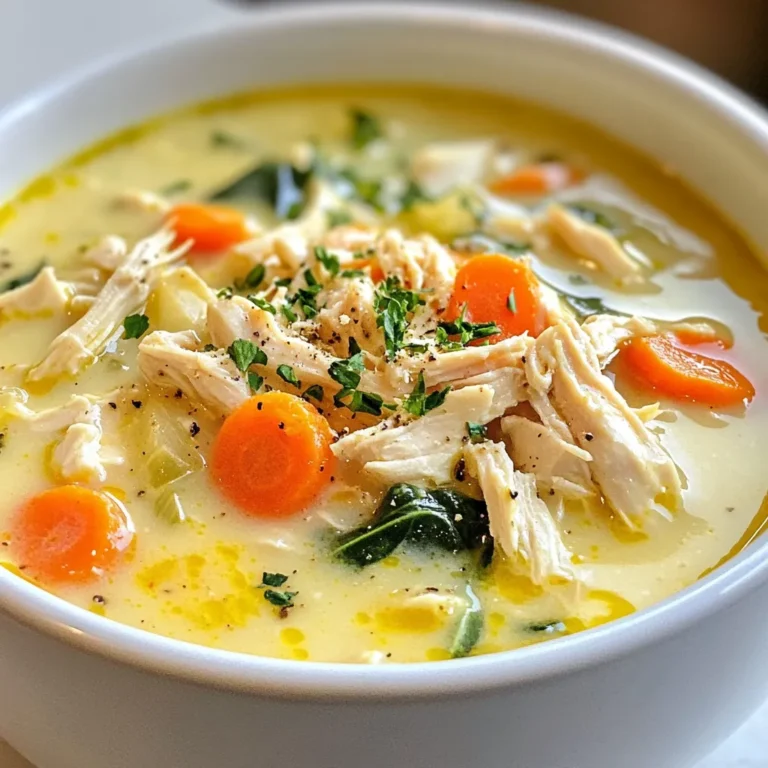
Slow Cooker Chicken Cream Cheese Soup Satisfying Recipe

- 1 cup cooked jasmine rice - 1 lb chicken breast, diced - 1 cup corn kernels (fresh or frozen) - 1/2 cup cherry tomatoes, halved - 1/4 cup red onion, finely chopped - 1 avocado, diced - 1 cup cilantro, chopped - 1 lime, juiced - 1/4 cup crumbled feta cheese (optional) - Hot sauce (optional, for serving) - 2 tablespoons olive oil - 1 teaspoon chili powder - 1 teaspoon garlic powder - Salt and pepper to taste Gather these ingredients before you start. The fresh flavors blend well to create a tasty bowl. Each ingredient adds a special touch. The cooked jasmine rice acts as a soft base. The chicken gives you protein and heartiness. Sweet corn brings a pop of color and flavor. Cherry tomatoes add freshness. Red onion gives a nice crunch and bite. You can customize your bowl with optional ingredients. Avocado adds creaminess and healthy fats. Cilantro brings a bright flavor that balances the dish. Lime juice adds tang and freshness. Feta cheese gives a salty kick if you choose to use it. Hot sauce can add some heat for spice lovers. The seasonings are simple yet effective. Olive oil helps the spices stick to the chicken. Chili powder and garlic powder add warmth and depth. Salt and pepper enhance every bite. This mix makes the chicken juicy and full of flavor. With these ingredients ready, you will create a delicious street corn chicken rice bowl. Enjoy the cooking process and get ready for a feast! {{ingredient_image_1}} - Combine diced chicken with 2 tablespoons of olive oil, 1 teaspoon chili powder, 1 teaspoon garlic powder, salt, and pepper. - Let the chicken marinate for about 20 minutes. This step adds a lot of flavor. - Heat a large skillet over medium-high heat. - Cook the marinated chicken for 6-8 minutes. Stir until it turns brown and is cooked through. The chicken should be juicy and tender. - In the same skillet, add a little more olive oil if needed. Toss in 1 cup of corn kernels. - Sauté the corn for 3-5 minutes until it starts to caramelize. This gives it a sweet taste. - In a serving bowl, layer 1 cup of cooked jasmine rice as the base. - Top the rice with the cooked chicken, sautéed corn, 1/2 cup halved cherry tomatoes, diced avocado, and 1/4 cup chopped red onion. - Squeeze fresh lime juice over the bowl. Sprinkle with chopped cilantro and crumbled feta cheese if you like it. - For a spicy kick, add hot sauce before serving. - You can mix the bowl before eating to blend the flavors. Enjoy your street corn chicken rice bowl! - Use a meat thermometer to ensure chicken reaches safe temperature (165°F). - Avoid overcrowding the skillet for even cooking. Cooking chicken can be tricky. I always use a meat thermometer. It helps me make sure the chicken is safe to eat. The perfect temperature is 165°F. This way, I know it’s juicy and cooked through. When I cook, I make sure not to crowd the skillet. This helps the chicken cook evenly. If I add too much chicken at once, it will steam instead of brown. - Experiment with spices like smoked paprika or cumin. - Add herbs like chopped parsley or green onions for extra freshness. I love to play with flavors. Spices like smoked paprika add a nice smokiness. Cumin brings warmth and depth. You can also add fresh herbs. Chopped parsley or green onions add a bright taste. These ingredients make the dish come alive. - Serve in colorful bowls for an appealing look. - Drizzle with additional lime juice and sprinkle cilantro before serving. When I serve my street corn chicken rice bowl, I like to use colorful bowls. Bright colors make the meal more inviting. I also drizzle extra lime juice on top. It gives a zesty kick. Finally, I sprinkle fresh cilantro for a pop of green. It looks great and tastes amazing too! Pro Tips Marination Magic: Allow the chicken to marinate for longer if possible, up to 2 hours, to enhance the flavor and tenderness. Perfectly Cooked Corn: For added sweetness and texture, use fresh corn on the cob, and grill it before adding to the bowl. Avocado Freshness: To prevent browning, toss the diced avocado in lime juice right after cutting it. Customize Your Heat: Adjust the amount of chili powder or add diced jalapeños for an extra kick, depending on your spice preference. {{image_2}} You can easily make this bowl vegetarian. Just swap the chicken for grilled tofu or chickpeas. Both options add great protein. Tofu soaks up flavors well. Chickpeas add a nice texture. You can season them just like the chicken to keep that yummy taste. Switch up the base if you want. Use quinoa, brown rice, or even cauliflower rice. Each grain brings its own flavor and texture. Quinoa adds a nutty note. Brown rice offers a hearty feel. Cauliflower rice is great if you want a low-carb option. Want to kick it up a notch? Add black beans for more protein and a nice chew. They blend well with the other flavors. If you like heat, toss in jalapeños or other peppers. They will give your bowl a spicy twist. Adjust the amount to fit your taste. Store leftovers in an airtight container in the refrigerator for up to 3 days. This keeps the dish fresh and safe to eat. Make sure to let the food cool down before sealing. Freeze portions in freezer-safe containers for up to 2 months. It’s a great way to save extra meals. Label each container with the date so you can track freshness. Reheat in a microwave or on the stovetop. If using the stovetop, add a splash of water to prevent drying out. Stir well to make sure everything heats evenly. Enjoy your meal again without losing flavor! Yes, you can prep the ingredients and store them separately. This lets you enjoy fresh flavors. You can cook the chicken and corn ahead too. Store them in the fridge. When ready, just mix and serve. Absolutely! Feel free to add or substitute ingredients as per your preference. Want more spice? Add jalapeños. Prefer no chicken? Use grilled tofu or beans. You can also swap out veggies. Try bell peppers or zucchini for a twist. Consider serving it with a side salad, grilled vegetables, or tortilla chips. A fresh salad adds crunch. Grilled veggies bring a smoky flavor. Tortilla chips offer a fun crunch. They all work well with the bowl's tastes. This blog post provided a complete guide to making a delicious rice bowl. We covered all the main ingredients, from jasmine rice to chicken and corn. You learned tips for cooking chicken, enhancing flavor, and making the dish visually appealing. Remember, you can customize your bowl with vegetarian options or different grains. This recipe is flexible and easy to adapt. Enjoy your tasty creation, and don't forget to store leftovers properly. Happy cooking!

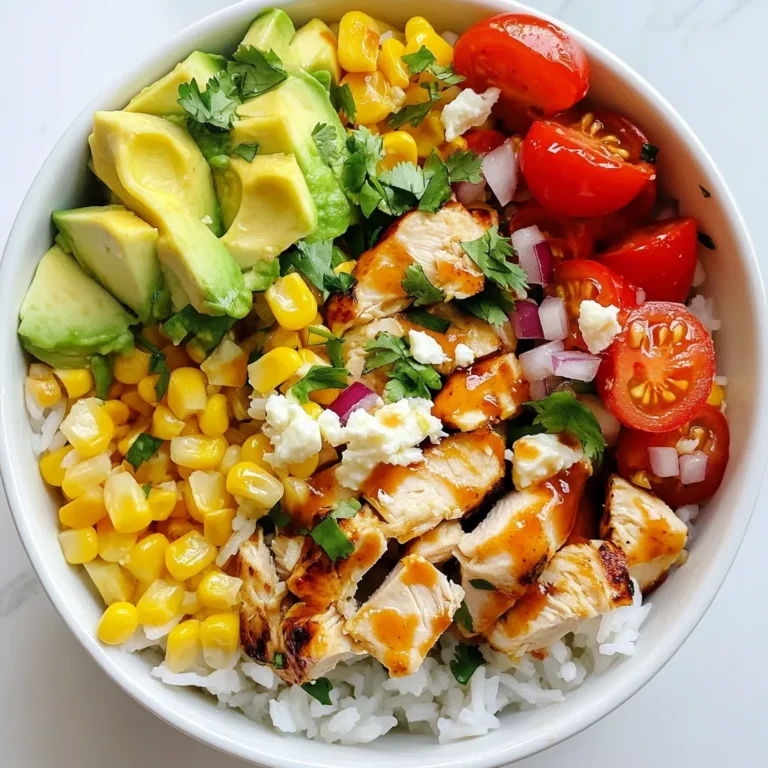
Street Corn Chicken Rice Bowl Delectable Meal Idea

- 1 pound ground chicken - 1 medium zucchini, grated and excess moisture squeezed out - 1/4 cup breadcrumbs (whole wheat or gluten-free) - 1/4 cup grated Parmesan cheese - 1 clove garlic, minced - 1/2 teaspoon onion powder - 1/2 teaspoon Italian seasoning - 1/4 teaspoon salt - 1/4 teaspoon black pepper - Whole wheat burger buns - Fresh spinach or lettuce - Sliced tomato and avocado Using these fresh and healthy ingredients makes your chicken zucchini burgers tasty and nutritious. The ground chicken serves as a lean protein base. Grated zucchini adds moisture and sneaks in some veggies. Breadcrumbs help bind the mixture and create a nice texture. Parmesan cheese gives a savory kick, enhancing the overall flavor. For extra taste, I add minced garlic, onion powder, and Italian seasoning. These spices bring warmth and depth to each bite. Salt and black pepper balance everything out, making the flavors pop. When it comes to serving, I love whole wheat burger buns for their added fiber. Fresh spinach or lettuce gives a nice crunch, while sliced tomato and avocado add creaminess and freshness. This combination not only looks good but also tastes amazing. Enjoy building your healthy chicken zucchini burgers with these ingredients! {{ingredient_image_1}} First, you need to squeeze the excess moisture from the grated zucchini. This step helps the burgers hold their shape and taste great. After that, take a large bowl and mix all the ingredients together. You will combine one pound of ground chicken, the squeezed zucchini, breadcrumbs, Parmesan cheese, minced garlic, onion powder, Italian seasoning, salt, black pepper, and one beaten egg. Use your hands or a spoon to mix until just combined. Don't overmix; this keeps the burgers tender. Next, divide the mixture into equal parts. Shape each part into patties. You can make four to six patties, depending on how big you want them. Make sure they are even in size so they cook evenly. Now, preheat your skillet or grill over medium heat. Add a drizzle of olive oil to prevent sticking. Once hot, carefully place the patties in the skillet. Cook each side for about five to six minutes. Look for a golden-brown color and check the internal temperature. It should reach 165°F for safe eating. While the patties cook, toast the whole wheat burger buns in another pan until golden brown. Your burgers are ready to be served! Enjoy them with fresh spinach, sliced tomato, and avocado. - Avoid overmixing the meat mixture. Overmixing makes the burgers tough. - Use moist ingredients for juiciness. Grated zucchini adds moisture and flavor. - You can grill or pan-fry these burgers. Grilling gives a smoky flavor. Pan-frying is easy and quick. - For outdoor grilling, preheat the grill. Keep the lid closed as much as possible. This helps cook the burgers evenly. - Try adding fresh herbs like basil or cilantro. They boost taste and freshness. - Consider seasonal variations. In summer, add fresh corn; in fall, mix in pumpkin spice. Pro Tips Moisture Management: Ensure you squeeze out as much moisture as possible from the grated zucchini to prevent soggy burgers. Even Cooking: Make patties of uniform size to ensure they cook evenly throughout, achieving the perfect golden-brown crust. Flavor Boost: Experiment with different herbs and spices in the mixture, such as smoked paprika or fresh basil, to customize the flavor profile. Perfectly Toasted Buns: Lightly brush the burger buns with olive oil before toasting for an extra crispy and flavorful bite. {{image_2}} You can boost the flavor of your chicken zucchini burgers in fun ways. - Add crispy bacon for a savory crunch. - Melt cheese on top for a creamy touch. - For a kick, mix in diced jalapeños or hot sauce. These options can make your burgers exciting and tasty. Experiment with what you love. If you need gluten-free options, use gluten-free breadcrumbs. They work just as well. For a dairy-free version, skip the Parmesan cheese. You can use nutritional yeast instead. These swaps help everyone enjoy the meal without worries. Change how you serve these burgers for some variety. - Shape the mixture into meatballs instead of patties. They are fun and bite-sized. - For a lighter option, wrap the patties in lettuce instead of buns. - Serve with a variety of sauces like mustard, tzatziki, or a spicy mayo. These ideas keep meal time fresh and exciting! To keep your chicken zucchini burgers fresh, cool them first. Place them in an airtight container. Store them in the fridge for up to three days. This keeps them safe to eat and tasty. If you leave them out, they may spoil fast. When reheating, you want to keep them juicy. The oven works well. Preheat it to 350°F and place the burgers on a baking sheet. Heat for about 10 minutes. The microwave is quicker but can dry them out. If using a microwave, cover the burgers with a damp paper towel. This adds moisture and helps keep them tender. You can freeze these burgers for later. If they are uncooked, place patties on a baking sheet in the freezer for about an hour. Once firm, transfer them to a freezer bag. Seal tightly, and they can last for up to three months. If they are cooked, let them cool before freezing. Store them in a freezer-safe container or bag. They will keep for about two months. Cook the burgers for about 5-6 minutes on each side. Make sure the internal temperature reaches 165°F. This ensures they are safe to eat. Use a meat thermometer for best results. For even cooking, preheat your pan or grill to medium heat. Yes, you can use chicken breast. Just grind it into small pieces. Keep in mind that ground chicken is more tender. If you use chicken breast, add some moisture to the mix to keep burgers juicy. Each burger has roughly 200 calories. It also contains about 25 grams of protein. You get healthy fats from the olive oil and toppings. The zucchini adds fiber and vitamins, making it a balanced meal. Dry burgers often come from overcooking. Always check the cooking time. If your burgers are dry, add moisture next time. You can include grated zucchini or a bit of yogurt. This keeps the texture juicy and flavorful. In this post, we explored how to make healthy chicken zucchini burgers. We covered key ingredients like chicken, zucchini, and breadcrumbs. You learned simple steps for preparation, forming, and cooking the burgers. Tips helped you ensure juiciness and enhance flavor. These burgers are versatile for any meal. Feel free to try different spices or serve them in various styles. With the right methods, you can create a tasty dish that meets your dietary needs. Enjoy your cooking adventure!

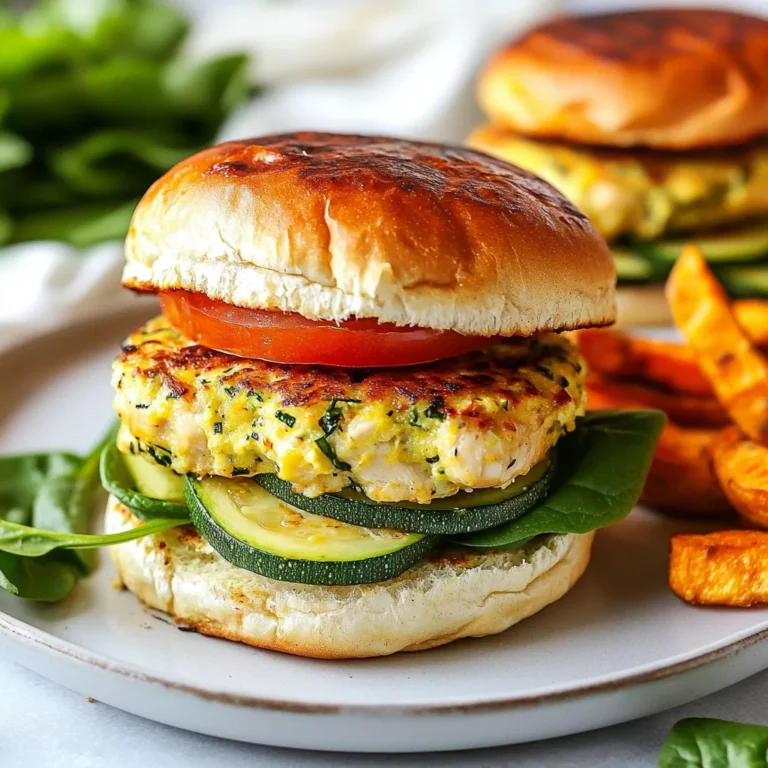
Healthy Chicken Zucchini Burgers Flavorful and Simple Meal

PREV 1 … 42 43 44 … 56 NEXT
secrets pice kitchen

explore

DessertsDinnerAppetizersDrinks

Our Policies

  • Cookie Policy
  • Copyright Policy
  • Disclaimer
  • GDPR Policy
  • Terms Of Use
Back to Top
  • About
  • Contact Us
  • Privacy Policy
© 2025 secrets pice kitchen