FREE DINNER EBOOK! Get your copy!
  • Cookie Policy
  • GDPR Policy
  • Disclaimer
  • Terms Of Use
  • Visit my other site: Fun Cookie Recipes
secrets pice kitchen
  • Home
  • Dinner
  • Desserts
  • Drinks
  • Appetizers
  • Contact
  • About
  • Privacy Policy
  • Home
  • Dinner
  • Desserts
  • Drinks
  • Appetizers
  • Contact
  • About
  • Privacy Policy
  • Cookie Policy
  • GDPR Policy
  • Disclaimer
  • Terms Of Use
Visit my other site: Fun Cookie Recipes

HOME / CATEGORIES /

Latest

- 2 slices of whole grain bread - 1 cup fresh spinach, chopped - 1/2 cup feta cheese, crumbled - 1/4 cup sun-dried tomatoes, chopped - 1/4 cup kalamata olives, sliced - 2 tablespoons olive oil - 1 teaspoon garlic powder - Salt and pepper to taste - 1/2 teaspoon dried oregano - 1/2 cup shredded mozzarella cheese Each ingredient in this sandwich adds a special touch. Whole grain bread offers a nutty flavor and good texture. Fresh spinach brings a bright, green taste and packs in nutrients. Feta cheese adds a creamy, tangy kick that makes each bite exciting. Sun-dried tomatoes give a sweet and savory burst, while kalamata olives offer a salty depth. Olive oil helps sauté and crisp the bread. Garlic powder adds warmth, and oregano gives an earthy note. The mozzarella cheese melts beautifully, creating that gooey effect we all love. To make the best Mediterranean Spinach Grilled Cheese, choose fresh ingredients. Look for whole grain bread with a soft crust and no preservatives. For spinach, pick vibrant green leaves without any browning. When buying feta, choose the kind packed in brine for creaminess. Sun-dried tomatoes should feel slightly soft and smell sweet. Select kalamata olives that are dark and shiny. Always check olive oil for freshness—look for a dark bottle and a harvest date on the label. Lastly, for mozzarella, select a block instead of pre-shredded for better melting. {{ingredient_image_1}} To start, grab a bowl. Add 1 cup of chopped fresh spinach. Next, include 1/2 cup of crumbled feta cheese. Toss in 1/4 cup of chopped sun-dried tomatoes and 1/4 cup of sliced kalamata olives. Now, drizzle in 2 tablespoons of olive oil. Sprinkle 1 teaspoon of garlic powder, 1/2 teaspoon of dried oregano, and a pinch of salt and pepper. Mix everything until well combined. This tasty mixture will be the heart of your sandwich. Now, take 2 slices of whole grain bread. On one slice, spread half of the spinach mixture evenly. Then, add 1/4 cup of shredded mozzarella cheese on top of the mixture. Place the second slice of bread on top to form the sandwich. This layer of cheese helps bind the filling and adds flavor. Heat a skillet over medium heat. Add a splash of olive oil to coat the pan. When the skillet is hot, place your sandwich in it. Cook for 3-4 minutes or until the bottom is golden brown and crispy. Carefully flip your sandwich. Now, add the remaining spinach mixture and mozzarella cheese on top. Press down gently. Cook for another 3-4 minutes, ensuring the cheese melts and the bread becomes perfectly golden. Enjoy your delicious creation warm for the best taste! To make the Mediterranean Spinach Grilled Cheese, you need a few key tools. - A skillet: This helps cook the sandwich evenly. - A spatula: Use this to flip the sandwich safely. - A mixing bowl: This is where you combine the spinach and cheese. - A sharp knife: Use this for slicing the sandwich after cooking. Having the right equipment makes your cooking easier and more fun! Melting cheese can be tricky. Here are some tips to help you achieve gooey perfection: - Use low to medium heat: This prevents burning. - Cover the skillet: A lid traps heat and helps the cheese melt faster. - Add cheese in layers: Spread it on both sides for extra meltiness. - Choose the right cheese: Mozzarella melts well, giving a nice stretch. Following these tips will ensure you get that perfect cheesy goodness every time! Personalizing your grilled cheese is easy and fun! Here are some ideas: - Change the cheese: Try goat cheese or provolone for different flavors. - Add veggies: Sliced bell peppers or mushrooms add great taste and texture. - Experiment with spices: A pinch of red pepper flakes can add a nice kick. - Use different bread: Sourdough or rye can change the whole sandwich. Feel free to mix and match to create your own unique version of this delightful meal! Pro Tips Use Fresh Ingredients: Fresh spinach and quality feta cheese make a significant difference in flavor and texture, elevating your grilled cheese experience. Toast the Bread: Lightly toasting the bread before assembling the sandwich can add an extra layer of crunch and prevent it from getting soggy from the filling. Experiment with Cheeses: While mozzarella is classic, try mixing in other cheeses like provolone or gouda for a unique twist on flavor. Customize Your Toppings: Feel free to add more ingredients such as roasted red peppers or artichoke hearts to enhance the Mediterranean flavor profile. {{image_2}} You can change the cheese to fit your taste. Try goat cheese for a tangy flavor. It melts well and pairs nicely with spinach. For a creamier option, use cream cheese. It adds a rich texture that makes every bite delightful. If you want more flavor, try sharp cheddar or provolone. Both give a nice kick to your sandwich. Bread choice can change the whole meal. Whole grain bread gives a nutty taste and great texture. For a lighter feel, use sourdough or ciabatta. These breads have a nice crust and soft inside. You can even use pita or naan for a fun twist. Each option brings its own unique taste. Get creative with your toppings! Add sliced avocado for creaminess or fresh basil for a burst of flavor. Grilled onions or bell peppers can bring sweetness and crunch. If you like spice, add jalapeños or crushed red pepper. For a savory touch, sprinkle some extra oregano or thyme. Each add-in can take your grilled cheese to a new level. To keep your Mediterranean Spinach Grilled Cheese fresh, wrap it well. Use plastic wrap or aluminum foil. You can also place it in an airtight container. Store it in the fridge for up to three days. Make sure it cools to room temperature before storing. This helps prevent soggy bread. To reheat, use a skillet for the best results. Heat the skillet over medium heat. Place the sandwich in the skillet. Cook for about 3-4 minutes on each side. This method keeps the bread crispy and the cheese melty. You can also use a microwave, but it may make the bread soft. If you choose the microwave, heat it in short bursts. Check it often to avoid overheating. If you want to freeze your sandwich, wrap it tightly in plastic wrap. Then, place it in a freezer bag. This helps prevent freezer burn. You can freeze it for up to a month. To enjoy, thaw it in the fridge overnight. Reheat it in a skillet for the best taste and texture. Yes, you can use gluten-free bread. Look for slices made from rice or almond flour. They work well for this sandwich. Check labels to ensure they fit your needs. This way, you still enjoy the great taste without gluten. You can use goat cheese or ricotta. Both add creaminess and flavor. Cream cheese is another option, though it has a milder taste. Choose what you like best. Each cheese will change the flavor, but they all work nicely in the sandwich. You can add cooked chicken or turkey. These meats blend well with the flavors. Another option is to mix in chickpeas or white beans. They boost protein and add a nice texture. Experiment with what you have at home for a tasty twist! This blog post guides you through making a tasty Mediterranean grilled cheese sandwich. We covered the best ingredients, step-by-step instructions, and tips for perfecting your sandwich. I shared ways to customize your dish and store leftovers too. In the end, grilling cheese is simple and fun. You can enjoy it your way. Try out different flavors with fresh ingredients for a unique twist! Your next meal can be a delicious adventure.

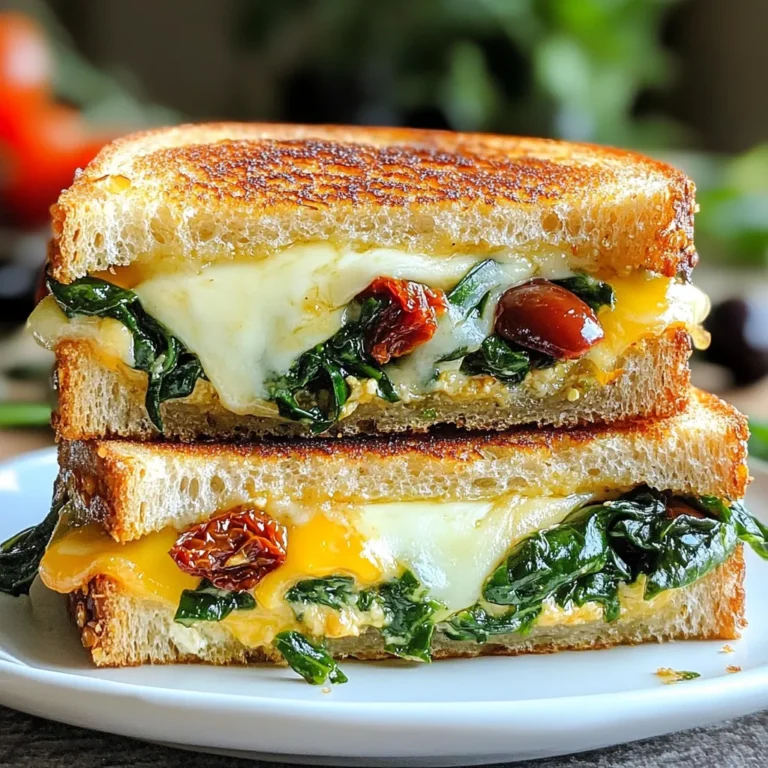
Mediterranean Spinach Grilled Cheese Delightful Meal

- 4 boneless, skinless chicken thighs - 1 can (14 oz) coconut milk - 1 tablespoon olive oil - 1 medium onion, finely chopped - 3 cloves garlic, minced - 1 tablespoon ginger, minced - 1 red bell pepper, sliced - 1 lime, juiced - 2 teaspoons paprika - 1 teaspoon cumin - 1 teaspoon cayenne pepper - Salt and pepper to taste - Fresh cilantro, chopped (for garnish) Gather these ingredients to prepare a delightful Brazilian Coconut Chicken. Each item plays a key role in creating rich flavors. The chicken thighs are tender and soak up the coconut milk well. Coconut milk provides a creamy texture and a hint of sweetness. The onion, garlic, and ginger add depth. They bring warmth and aroma that make the dish irresistible. The red bell pepper adds a pop of color and sweetness, balancing the spices. Lime juice brightens the flavors and adds freshness. The spices—paprika, cumin, and cayenne pepper—create a lovely warmth. Feel free to adjust the cayenne for your spice preference. Don’t forget the salt and pepper! They enhance all the other flavors. Finally, fresh cilantro adds a burst of color and a fresh taste when you serve. With these ingredients, you are ready to create a tasty and inviting meal. {{ingredient_image_1}} To start, you need to mix the marinade. In a bowl, combine the coconut milk, lime juice, paprika, cumin, cayenne pepper, salt, and pepper. Once mixed, add the chicken thighs and coat them well. Cover the bowl with plastic wrap. Place it in the refrigerator for at least 30 minutes. If you have more time, let it marinate for up to 2 hours. This step makes the chicken flavorful and juicy. Next, let’s prepare the skillet. Heat the olive oil in a large skillet over medium heat. Once hot, add the finely chopped onion. Sauté for about 5 minutes until the onion turns translucent. This adds a sweet base to your dish. Then, add the minced garlic and ginger. Cook for another minute. This step fills your kitchen with a great aroma. Now, it's time to cook the chicken. Take the marinated chicken from the fridge. Let the excess marinade drip off. Place the thighs in the skillet with the aromatics. Sear each side for about 4-5 minutes. Look for a golden brown color. This shows the chicken is cooking well. Once the chicken is browned, it’s time to add the bell peppers. Slice the red bell pepper and toss it into the skillet. Then, pour in the remaining coconut milk marinade from the bowl. Stir everything together well. This balance of flavors makes the dish rich and tasty. Next, reduce the heat to low and cover the skillet. Let the chicken simmer for about 20-25 minutes. This helps the chicken become tender and flavorful. Stir occasionally and check for creaminess. If it seems too thick, add more coconut milk to keep it creamy. After cooking, remove the chicken from heat. Let it rest for a few minutes. This helps the juices settle. Before serving, garnish with fresh cilantro. This adds a pop of color and fresh taste. Enjoy this dish over jasmine rice or with warm naan bread for a complete meal. - Over-marinating: Marinating for too long can make the chicken mushy. Stick to 30 minutes to 2 hours for best results. - Cooking at the wrong temperature: Cooking too high can burn the chicken. Keep your heat medium to low for even cooking. - Adding herbs and spices: Fresh cilantro adds bright notes. Try adding fresh basil or parsley for more depth. - Suggestions for fresh ingredients: Use fresh lime juice instead of bottled. Fresh ingredients always enhance the dish's flavor. - Best skillet type to use: A heavy-bottomed skillet works best. It distributes heat evenly and prevents burning. - Importance of a lid for simmering: Covering the skillet helps the chicken cook evenly. It keeps heat and moisture locked in for juicy meat. Pro Tips Marination Time: For the best flavor, marinate the chicken for at least 2 hours, or even overnight if possible. This allows the spices to penetrate and enhance the taste. Adjusting Spice Levels: Feel free to adjust the cayenne pepper according to your spice tolerance. Start with less and add more if you prefer a spicier dish. Using Fresh Ingredients: Opt for fresh ginger and garlic instead of powdered versions for a vibrant and aromatic flavor in your dish. Serving Suggestions: Pair this dish with steamed jasmine rice or warm naan bread to soak up the delicious coconut sauce. {{image_2}} You can switch out chicken for shrimp or tofu. Both options add unique flavors. If you use shrimp, cook it for about 3-4 minutes until pink. For tofu, use firm tofu and sauté it until golden, which takes about 5-7 minutes. Adjust your cooking time based on what protein you choose. Each option brings its own taste to the dish. If you want a non-dairy version, you can use almond milk or cashew milk instead of coconut milk. Each works well, but they will change the flavor slightly. You can also add other vegetables. Try adding mushrooms, spinach, or green beans. These veggies add both color and nutrition. They will cook well with the chicken and absorb the tasty sauce. Brazil has many styles of coconut chicken. In Bahia, they use more spices and palm oil. In the south, they might add herbs like parsley or cilantro. Each region has its own twist, thanks to local spices. This makes the dish diverse and exciting. You can experiment with spices to find your favorite flavor. To keep your Brazilian Coconut Chicken fresh, place leftovers in an airtight container. Store it in the fridge. This dish stays good for about 3 to 4 days. Make sure it cools down first before sealing the container. This step helps keep the chicken juicy and tasty. When reheating, use a skillet on medium heat. This method helps keep the flavor intact. Stir often to ensure even heating. If the chicken seems dry, add a splash of coconut milk. This keeps it moist and creamy, just like when it was first cooked. For long-term storage, freeze your leftovers. Use freezer-safe containers or bags to keep them fresh. Remove as much air as possible to prevent freezer burn. When ready to eat, thaw it overnight in the fridge. This method helps maintain the chicken’s texture and flavor. Brazilian Coconut Chicken is a delicious dish from Brazil. It features chicken cooked in creamy coconut milk. The dish combines flavors like lime, garlic, and ginger. This dish often uses spices like paprika and cumin. It is a vibrant part of Brazilian cuisine, celebrating tropical ingredients. Yes, you can make this recipe spicy! The key is the cayenne pepper. Start with one teaspoon. If you want more heat, add more cayenne. You can also use fresh chili peppers for a different kick. Adjust the spice level based on your taste. I recommend serving this dish with jasmine rice. The rice soaks up the coconut sauce well. Naan bread is also a great choice. You can add fresh cilantro and lime wedges for extra flavor. A side salad with tropical fruits pairs nicely too. Making Brazilian Coconut Chicken takes about one hour. Prep time is around ten minutes. Marinating the chicken enhances the flavor. Cooking the chicken and simmering takes around 50 minutes. This includes time for sautéing and simmering. Yes, Brazilian Coconut Chicken can be healthy. It uses lean chicken thighs, which are good for protein. Coconut milk adds healthy fats, but use it in moderation. Fresh vegetables like bell peppers add nutrients. Pairing with rice or bread balances the meal. In this post, we explored how to make Brazilian Coconut Chicken. We covered the essential ingredients, step-by-step cooking instructions, and tips for perfecting the dish. Remember to avoid common mistakes and try out variations with different proteins or ingredients. Proper storage and reheating ensure your leftovers stay fresh. By following these guidelines, you can enjoy a delicious and flavorful meal that highlights Brazilian cuisine. Happy cooking!

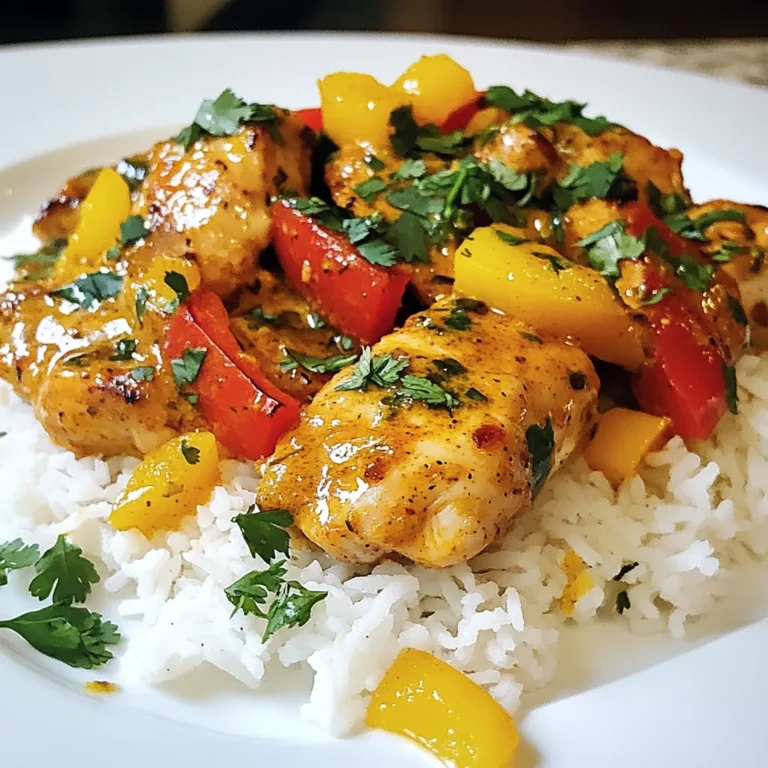
Brazilian Coconut Chicken Flavorful Dinner Delight

- 12 lasagna noodles - 2 cups cooked chicken breast, shredded - 3 cups ricotta cheese - 2 cups alfredo sauce (store-bought or homemade) - 1 cup mozzarella cheese, shredded - 1 cup parmesan cheese, grated - 2 cups fresh spinach, roughly chopped - 1 teaspoon garlic powder - 1 teaspoon Italian seasoning - Salt and pepper to taste - Fresh parsley, chopped for garnish Gathering the right ingredients is the first step to making Chicken Alfredo Lasagna. You want quality, fresh items to ensure the best taste. Start with lasagna noodles, which provide structure. Then, use cooked chicken breast for protein and flavor. Ricotta cheese adds creaminess, while alfredo sauce brings rich taste. Don’t forget the mozzarella and parmesan. These cheeses melt beautifully and create a nice top layer. Fresh spinach adds a vibrant touch and boosts nutrition. Seasoning with garlic powder and Italian herbs enhances the overall flavor. Lastly, have salt and pepper ready for extra seasoning. Fresh parsley will make your dish look lovely when you serve it. - Suggestions for homemade alfredo sauce include butter, cream, and parmesan. - Additional vegetables for flavor can be mushrooms, zucchini, or bell peppers. - Types of cheese for variation include gouda or asiago for a twist. Feel free to personalize your lasagna! If you enjoy cooking sauces, try making your own alfredo. Adding vegetables can create more taste and nutrition. You can also swap cheeses to find your favorite mix. Cooking is all about experimenting! {{ingredient_image_1}} 1. Preheat the oven to 375°F (190°C). This is important for even cooking. 2. Cook the lasagna noodles as per package instructions. Aim for al dente. Drain them and set aside. 1. In a mixing bowl, combine the cooked chicken, ricotta cheese, garlic powder, Italian seasoning, salt, pepper, and chopped spinach. Mix well. 2. Spread a thin layer of alfredo sauce on the bottom of a 9x13 inch baking dish. This helps prevent sticking. 3. Layer 4 lasagna noodles over the sauce. Add half of the chicken mixture. Top it with a third of the remaining alfredo sauce. Sprinkle half of the mozzarella and parmesan cheese on top. 4. Repeat the layering process. Add another 4 noodles, the remaining chicken mixture, another third of the alfredo sauce, and the rest of the mozzarella and parmesan cheese. 5. Finish with the last 4 lasagna noodles on top. Spread the remaining alfredo sauce evenly over them. Sprinkle any leftover cheeses on top. 1. Cover the baking dish with aluminum foil. Bake in the preheated oven for 25 minutes. 2. Remove the foil and bake for an additional 15 minutes. Watch for a golden, bubbly top. 3. Let it sit for 10-15 minutes before slicing. This helps the layers set nicely. 4. Garnish with chopped fresh parsley before serving. Enjoy your comforting meal! To get the best texture for your lasagna noodles, cook them until they are al dente. This means they should be firm but not hard. Follow the package instructions for cooking time. After you drain them, rinse them with cold water to stop the cooking process. This keeps them from sticking together. When layering, make sure to spread the filling evenly. This helps the lasagna cook evenly. Use a spatula to press down the layers gently. This keeps everything in place and helps the flavors mix well. You can add herbs and spices to boost flavor. Fresh basil or oregano works great. You can also add a pinch of red pepper flakes for a little heat. These small tweaks make a big difference in taste. For garnishes, fresh parsley is a perfect choice. It adds color and freshness. You can also sprinkle extra cheese on top right before serving for a fun touch. A fresh salad pairs nicely with this lasagna. A simple green salad with a light vinaigrette adds a crisp contrast. Garlic bread is another great option. It soaks up the creamy sauce perfectly. For leftovers, slice the lasagna and store in an airtight container. You can reheat it in the oven or microwave. To keep it moist, add a splash of water before reheating. This will help bring back its creamy goodness. Pro Tips Perfect Noodle Texture: Ensure you cook the lasagna noodles just until al dente. They will continue to cook while baking in the oven, preventing them from becoming too soft. Homemade Alfredo Sauce: For a richer flavor, consider making your own alfredo sauce using butter, heavy cream, garlic, and parmesan cheese instead of store-bought. Layering Tips: Spread the alfredo sauce evenly between layers to ensure every bite is creamy and delicious. Don’t skimp on the cheese; it adds flavor and creaminess! Resting Time: Allowing the lasagna to rest for 10-15 minutes after baking helps it set, making it easier to slice and serve without falling apart. {{image_2}} You can easily swap chicken for other proteins. Turkey works well in this dish. For a plant-based option, use shredded jackfruit or tofu. Both options keep the texture nice. If you want to lower the fat, choose low-fat cheeses. You can also use dairy-free cheese. Almond or cashew cheese melts nicely and adds creaminess. If you need gluten-free options, use gluten-free lasagna noodles. They cook up just as well as regular noodles. Check the package for cooking times. For vegetarians, skip the chicken altogether. Add more veggies like mushrooms, zucchini, or bell peppers. They add great flavor and texture to the dish. You can change the sauce to mix things up. Try using pesto instead of alfredo. It adds a fresh, herby taste. Tomato sauce is another tasty option. Add spices for a unique twist. A pinch of red pepper flakes gives a nice heat. You could also try adding fresh herbs like basil or thyme. They bring a wonderful aroma and flavor to your lasagna. To store leftovers, let the lasagna cool first. Then, cover it tightly with plastic wrap or aluminum foil. You can also place it in an airtight container. This helps keep the flavors fresh. Chicken Alfredo Lasagna can last in the fridge for about 3 to 5 days. When reheating, the oven is the best choice for even warmth. Preheat your oven to 350°F (175°C). Place a piece of foil over the dish to keep it moist. Heat for about 20 minutes or until hot. If you use a microwave, put a slice on a plate. Heat it for one minute and check. If it needs more time, heat in 30-second bursts. For freezing, use a freezer-safe container or wrap portions in plastic wrap. Make sure to label the container with the date. Chicken Alfredo Lasagna can freeze well for up to 3 months. To thaw, place it in the fridge overnight. For a quicker method, you can use the microwave. Just be sure to reheat it well to ensure safety. Can I make Chicken Alfredo Lasagna ahead of time? Yes, you can make Chicken Alfredo Lasagna ahead of time. Prepare it up to the baking step. Cover it well and store it in the fridge for one day. When you are ready to bake, add a few extra minutes to the cooking time. What is the best way to reheat lasagna without drying it out? To reheat your lasagna, set your oven to 350°F (175°C). Cover the dish with foil to keep moisture in. Heat for about 20-30 minutes or until warm. You can also use a microwave for single servings. Add a splash of water, cover with a damp paper towel, and heat in short bursts. How many calories per serving? Each serving of Chicken Alfredo Lasagna has around 450 calories. This can vary based on portion size and specific ingredients used. Nutritional breakdown (protein, carbs, fats) - Protein: Approximately 30g - Carbohydrates: About 40g - Fats: Roughly 20g This dish offers a good balance of protein and carbohydrates, making it a hearty meal. Can I use no-boil lasagna noodles? Yes, you can use no-boil lasagna noodles. They are a great time-saver. Just layer them with the filling and sauce as usual. The moisture from the sauce will cook them perfectly. What can I substitute for ricotta cheese? If you want to substitute ricotta cheese, try cottage cheese or cream cheese. Greek yogurt can also work for a lighter option. Each of these will give a nice texture and flavor to your lasagna. To sum it up, this guide walks you through making a Chicken Alfredo Lasagna. You learned about key ingredients, step-by-step directions, tips, variations, and storage information. You can now create a tasty dish that suits your taste and dietary needs. Consider mixing flavors or ingredients for your unique touch. Enjoy your cooking and the delicious lasagna!

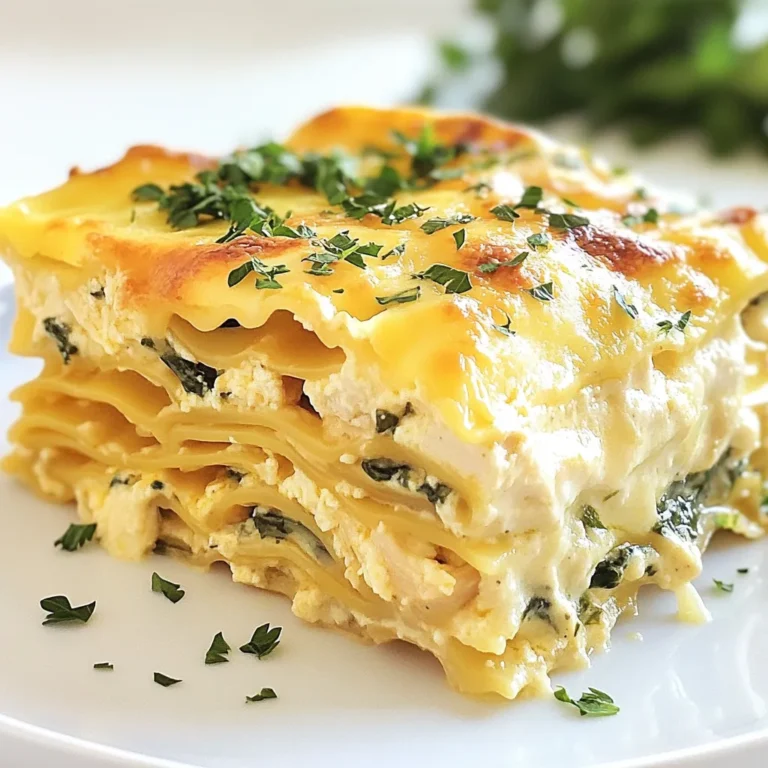
Chicken Alfredo Lasagna Hearty Comfort Food Delight

- 8 oz fettuccine pasta - 1 lb shrimp (peeled and deveined) - 2 tablespoons Cajun seasoning - 2 tablespoons olive oil - 3 cloves garlic, minced - 1 cup heavy cream - 1 cup chicken broth - 1 cup cherry tomatoes, halved - 1 cup spinach leaves - Salt and pepper to taste - Grated Parmesan cheese for serving - Fresh parsley, chopped for garnish To make Creamy Cajun Shrimp Pasta, you need a mix of fresh and flavorful ingredients. First, I use fettuccine pasta for its rich, creamy texture. It holds the sauce well, making every bite a delight. Next, the shrimp is the star of the dish. I always choose fresh, peeled, and deveined shrimp. It saves time and makes cooking easier. The Cajun seasoning adds a kick that makes this meal special. Just two tablespoons gives a nice balance of heat and flavor. The creamy sauce is key to this dish. I use heavy cream and chicken broth to create that smooth texture you crave. Minced garlic adds depth of flavor, while cherry tomatoes and spinach bring freshness. Don’t forget salt and pepper to taste. Finally, I love to garnish with grated Parmesan and fresh parsley. They add a perfect touch. This list covers all you need for a flavorful dinner delight! {{ingredient_image_1}} Boiling Water Tips Start with a big pot. Fill it with water and add salt. Use about one tablespoon of salt for every gallon of water. This helps season the pasta well. Bring the water to a rolling boil before adding the fettuccine. Achieving Al Dente Cook the fettuccine according to the package. Aim for about 8 to 10 minutes. Test it a minute or two before it’s done. You want it firm to the bite but not hard. Drain the pasta, but save a little water just in case. Seasoning Techniques In a bowl, toss the shrimp with Cajun seasoning. Make sure each shrimp gets a good coat. This adds a lot of flavor. You can use more or less seasoning based on your taste. Cooking Time Insights Heat olive oil in a large skillet over medium-high heat. Add the shrimp in a single layer. Cook for 2 to 3 minutes on each side. Look for a pink color to show they are done. Remove them from the skillet and set aside. Sautéing Garlic and Deglazing In the same skillet, add minced garlic. Sauté for one minute until it smells great. Pour in chicken broth and let it simmer. Scrape the bottom of the skillet to mix in all the flavor. Combining Ingredients for Creaminess Next, stir in the heavy cream. Let it simmer gently for 2 to 3 minutes. This thickens the sauce a bit. Then, add halved cherry tomatoes and spinach. Cook until the spinach wilts. Return the shrimp to the skillet, mixing everything well. Tossing Everything Together Add the cooked fettuccine directly to the skillet. Toss everything together until well mixed. Taste and season with salt and pepper as needed. Presentation Tips Serve the pasta in large bowls. Garnish with grated Parmesan cheese and fresh parsley. For a pop of color, add a slice of lemon on the side. Enjoy your meal! Avoiding Overcooking: Shrimp cooks fast. Aim for 2-3 minutes per side over medium-high heat. They should be pink and firm. Overcooked shrimp turn rubbery and lose flavor. Watch them closely. Best Types of Shrimp: I prefer large shrimp for this dish. They offer a nice bite and hold up well in sauces. Look for shrimp that are peeled and deveined for ease. Fresh or frozen both work. Adjusting Sauce Consistency: If your sauce is too thick, add a splash of chicken broth. For a thicker sauce, let it simmer longer. You want a nice, creamy texture that clings to the pasta. Alternative Creamy Ingredients: You can swap heavy cream for half-and-half or Greek yogurt. This can change the flavor a bit, but it still tastes great. Just remember, these options may not be as rich. Additional Seasonings to Consider: Experiment with smoked paprika or cayenne for extra heat. A pinch of lemon zest can brighten the dish. Taste as you go to find your perfect balance of flavors. Fresh Herbs for Garnish: Chopped parsley adds a fresh touch. You can also use basil or cilantro for a different flavor. Fresh herbs elevate the dish and make it look beautiful on the plate. Pro Tips Use Fresh Shrimp: For the best flavor and texture, opt for fresh shrimp instead of frozen. If using frozen, ensure they are properly thawed before cooking. Customize the Heat: Adjust the amount of Cajun seasoning based on your spice preference. Start with less and add more gradually if you like it spicy! Perfectly Cooked Pasta: To prevent overcooking, make sure to test the fettuccine a minute before the package's recommended cooking time for that perfect al dente bite. Garnish for Flavor: Don’t skip the garnish! A sprinkle of fresh parsley and a squeeze of lemon juice enhance the dish's flavor and brighten up its presentation. {{image_2}} Chicken Alternatives You can swap shrimp for chicken if you prefer. Use boneless, skinless chicken breasts or thighs. Cut them into bite-sized pieces and season with Cajun spice. Cook them the same way as the shrimp, ensuring they reach 165°F for safety. Vegetarian Options If you want to make this dish vegetarian, try using mushrooms or tofu. Both options take on flavors well. Sauté sliced mushrooms until golden or cubed tofu until crispy. This keeps the dish rich and satisfying without meat. Gluten-Free Choices For a gluten-free option, choose gluten-free pasta. Many brands offer great substitutes that taste good and hold sauce well. Look for brown rice or chickpea pasta for added nutrition. Other Pasta Shapes Fettuccine is a classic choice, but you can use other shapes too. Penne or linguine work well and can add a fun twist. Try whole wheat or spinach pasta for added flavor and color. Adding Different Vegetables Feel free to mix in other veggies! Bell peppers, zucchini, or asparagus add color and crunch. Simply sauté them with garlic before adding the cream. This boosts nutrition and flavor. Spice Level Adjustments Want more heat? Add a pinch of cayenne or red pepper flakes. Mix in some diced jalapeños for a fresh kick. Adjust the spice to fit your taste and enjoy the warmth! To keep your creamy Cajun shrimp pasta fresh, follow these tips. First, let the dish cool to room temperature. Then, store it in the fridge within two hours. Place it in an airtight container. This helps prevent any odors from other foods. Use glass or plastic containers that seal well. When it’s time to enjoy your leftovers, you have a few options. If you choose the microwave, place the pasta in a bowl. Add a splash of broth or cream to keep it moist. Cover the bowl with a damp paper towel. Heat it in short bursts, stirring in between. This ensures even warming. For stovetop reheating, use a skillet over low heat. Add a bit of oil or broth to the pan. Stir the pasta gently, allowing it to warm through. Keep an eye on it to avoid burning. If you want to save some for later, freezing is a great option. First, let the dish cool completely. Then, portion it into freezer-safe bags or containers. Remove as much air as possible to prevent freezer burn. Label the bags with the date. This way, you'll know how long it's been stored. When you’re ready to eat, defrost the pasta in the fridge overnight. For a quicker method, use the microwave on the defrost setting. Once thawed, reheat it using one of the methods mentioned above. Enjoy your flavorful meal again! Yes, you can make this dish ahead of time. Cooking the pasta and sauce in advance saves you time. - Preparing in Advance: Cook the pasta and shrimp. Keep them separate from the sauce. This helps keep everything fresh. Store them in airtight containers in the fridge for up to two days. - Best Storage Practices: Use glass or plastic containers. Make sure to cool everything before sealing. This keeps the food safe and fresh. If you need a substitute for heavy cream, use half-and-half or coconut milk. This keeps the dish creamy. - Alternative Ingredients: You can also use Greek yogurt or cashew cream for a lighter option. Each will change the flavor a bit, but they still work well. - Impact on Texture and Flavor: Half-and-half will make it less rich. Coconut milk adds a slight coconut taste. Greek yogurt makes it tangy, which can be nice. Cajun seasoning has a moderate spice level. It's flavorful but not too hot for most people. - Spice Level Overview: The heat comes from spices like cayenne pepper. Most blends have a good balance of spices that make it tasty without overwhelming heat. - Adjusting for Heat Preferences: If you want less heat, use less Cajun seasoning. You can also add a bit of sugar to balance the flavors. For more heat, add extra seasoning or some hot sauce. This post covered how to make a delicious Cajun shrimp pasta dish. You learned about essential ingredients, step-by-step cooking methods, and helpful tips. I shared variations to keep your meals exciting and storage tips for your leftovers. Cooking can be fun and simple. With practice, you can impress anyone with this dish. Enjoy your cooking journey and taste the rewards of your hard work!

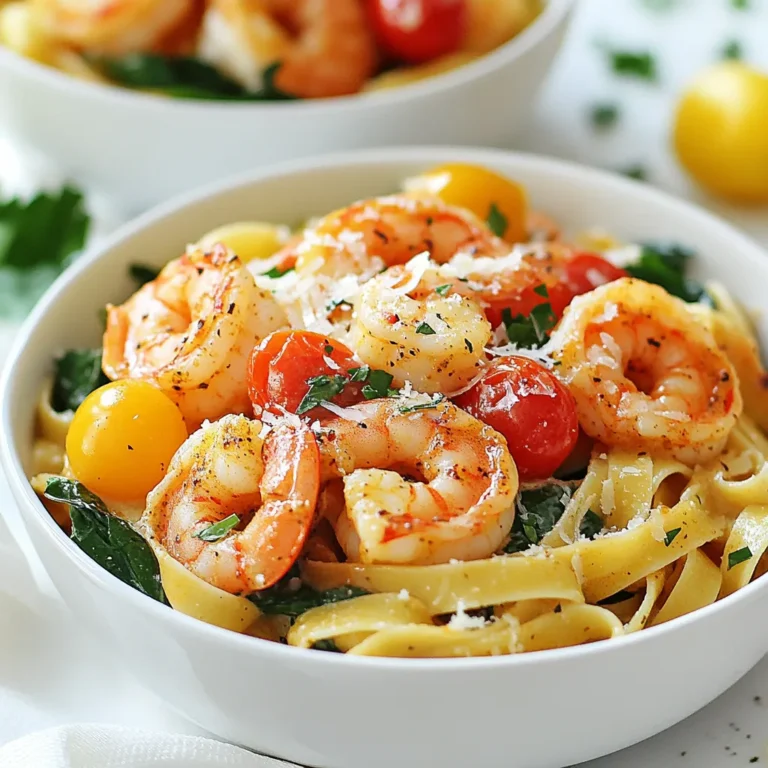
Creamy Cajun Shrimp Pasta Flavorful Dinner Delight

To make General Tso's Chicken, you need to gather these key ingredients: - 1 pound boneless, skinless chicken breasts, cut into bite-sized pieces - 1/2 cup cornstarch - 1/4 cup all-purpose flour - 1 teaspoon baking powder - Salt and pepper, to taste - 2 large eggs, beaten - 3 tablespoons vegetable oil (for frying) - 2 cloves garlic, minced - 1 tablespoon fresh ginger, minced - 1/4 cup soy sauce - 2 tablespoons rice vinegar - 2 tablespoons honey - 1 tablespoon chili paste (adjust for spice preference) - 1 tablespoon sesame oil - 2 green onions, finely chopped - Sesame seeds, for garnish These ingredients create a crispy chicken with a sweet and spicy sauce. If you have dietary needs, you can make some swaps: - Gluten-Free: Use gluten-free flour instead of all-purpose flour. - Low-Carb: Try almond flour in place of cornstarch and flour. - Vegan: Substitute chicken with tofu or tempeh. Use a vegan egg replacement. - Nut-Free: Ensure that the soy sauce is nut-free, and skip sesame oil if needed. These swaps keep the dish tasty while respecting dietary needs. When buying ingredients, choosing good brands makes a difference. Here are my favorites: - Soy Sauce: Kikkoman or Tamari for gluten-free options. - Cornstarch: Bob's Red Mill is a trusted brand. - Chili Paste: Huy Fong Foods Sriracha for heat with flavor. - Honey: Manuka honey is a great choice for quality. Using these brands can enhance your cooking experience and flavor. {{ingredient_image_1}} To start, gather your chicken pieces. Use 1 pound of boneless, skinless chicken breasts. Cut them into bite-sized pieces. In a bowl, mix 1/2 cup of cornstarch, 1/4 cup of flour, 1 teaspoon of baking powder, salt, and pepper. This mixture gives the chicken a nice crunch. Dip the chicken pieces in 2 beaten eggs. Then, coat them well in the cornstarch mix. Make sure each piece is evenly covered. Next, heat 3 tablespoons of vegetable oil in a skillet over medium-high heat. Once the oil is hot, add the chicken in batches. Fry the chicken for about 5-7 minutes. You want them to be golden brown and cooked through. Remove them and drain on paper towels. This helps to remove extra oil, keeping them crispy. In the same skillet, reduce the heat to medium. Add 2 minced cloves of garlic and 1 tablespoon of minced ginger. Sauté for about 30 seconds until fragrant. In a small bowl, whisk together 1/4 cup of soy sauce, 2 tablespoons of rice vinegar, 2 tablespoons of honey, and 1 tablespoon of chili paste. If you like it spicier, add more chili paste. Pour this mixture into the skillet. Bring it to a gentle simmer, stirring to combine all the flavors. Now, add the fried chicken back into the skillet. Toss everything together to coat the chicken in the sauce. Cook for an additional 2-3 minutes until heated through. Remove from heat and mix in 2 chopped green onions. For a beautiful presentation, serve the chicken on a platter over steamed jasmine rice. Garnish with sesame seeds and more green onions. Add a side of pickled vegetables for extra color and taste. Enjoy your homemade General Tso's Chicken! To get that perfect crunch, use cornstarch. It makes the chicken crispier. Dip each piece of chicken in beaten eggs first. Then coat it well in the cornstarch mix. Fry in hot oil to seal in the crunch. Fry in batches so the oil stays hot. This way, you avoid steaming the chicken. One common mistake is overcrowding the pan. When you add too much chicken at once, it lowers the oil's temperature. This leads to soggy chicken instead of crispy. Another mistake is not heating the oil enough. Always test the oil with a small piece first. If it bubbles and sizzles, it’s ready for frying. Lastly, don’t skip the resting step. Let the chicken drain on paper towels after frying to remove excess oil. For a zesty twist, add fresh lemon juice or lime juice to the sauce. This brightens up the flavors. You can also mix in some grated orange zest. It adds a nice citrusy note. If you like heat, try adding more chili paste or sliced fresh chilies. For a nutty flavor, sprinkle in some toasted sesame seeds before serving. This gives a great crunch and taste. Pro Tips Use Cold Chicken: Starting with cold chicken helps it maintain moisture during cooking, resulting in a juicier and more tender final dish. Double Frying: For extra crunch, consider double frying the chicken. Fry it once to cook through, let it rest, then fry again briefly for a crispy exterior. Adjusting Spice Levels: Feel free to modify the amount of chili paste based on your spice tolerance. You can also add some sliced fresh chilies for more heat. Garnishing: For a pop of color and flavor, sprinkle additional fresh herbs or citrus zest on top before serving. {{image_2}} You can easily make a vegetarian version of General Tso's Chicken. Instead of chicken, use tofu or tempeh. Firm tofu works best. Cut it into bite-sized pieces and press it to remove excess water. Coat it in the same cornstarch mixture. Fry until golden and crispy. For added flavor, marinate the tofu in soy sauce for 30 minutes before cooking. This gives it a rich taste. Follow the same steps for the sauce, and you’ll enjoy a tasty vegetarian meal. If you're looking for healthier options, there are simple swaps. Substitute the all-purpose flour with almond flour or whole wheat flour. This adds more nutrients. You can also bake the chicken instead of frying it. Use an air fryer for a crispy finish with less oil. For the sauce, reduce the honey or use a sugar substitute. This makes it less sweet and lowers the calories. These changes make the dish lighter while keeping it flavorful. For those who love heat, spice it up! Add more chili paste to the sauce. You can also include sliced fresh chilies, like jalapeños or Thai bird chilies. Mix them in when you sauté the garlic and ginger. For an extra kick, sprinkle crushed red pepper flakes on top before serving. Adjust the spice level to your liking, and enjoy a fiery twist on this classic dish! To keep your General Tso's Chicken fresh, store it in an airtight container. Let it cool to room temperature first. This helps prevent steam from making it soggy. You can keep it in the fridge for up to three days. If you want to keep it longer, freezing is a good option. When reheating, use the stovetop if you can. Heat it in a pan on medium heat. Add a splash of water or broth to keep it moist. Stir often until it's heated through. This way, the chicken stays crispy. If using a microwave, cover it loosely to avoid drying out. Heat in short bursts, stirring in between. To freeze General Tso's Chicken, portion it into freezer-safe bags. Remove as much air as possible before sealing. Label the bags with the date. It can last up to three months in the freezer. When ready to eat, thaw it overnight in the fridge. Then, reheat using the stovetop method for the best taste. General Tso's Chicken comes from Chinese cuisine. It is named after a Chinese general, Tso Tsung-t'ang. The dish became popular in the United States in the 1970s. Many believe it was created by Chinese chefs in America. It's not a common dish in China, but it has gained fame worldwide. To make General Tso's Chicken less spicy, reduce or skip the chili paste. You can also use mild sauces or add more honey. This will balance out the heat with sweetness. Taste your sauce before adding the chicken. Adjust the flavors to match your preference. Yes, you can use other proteins! Tofu works well for a vegetarian option. Shrimp or beef can also be used if you prefer. Just adjust the cooking time as needed. Ensure your protein is cooked through and coated in the sauce. General Tso's Chicken pairs great with steamed jasmine rice. You can also serve it with fried rice for extra flavor. Stir-fried vegetables add color and crunch. Egg rolls or spring rolls make tasty appetizers too. These sides will round out your meal perfectly. General Tso's Chicken is more than just a tasty dish; it's an experience. We covered key ingredients, cooking steps, and tips for that perfect crunch. You learned how to adapt the recipe for different diets and tastes. We also discussed how to store and reheat leftovers properly. In the end, this dish is simple to make and fun to customize. Enjoy making it your own and impressing friends and family with your skills.

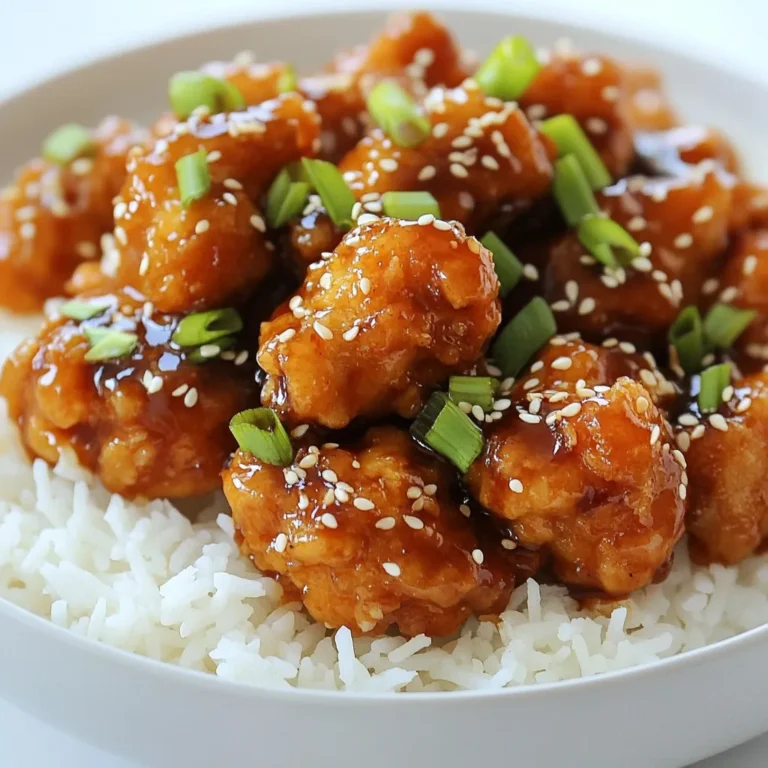
General Tso’s Chicken Easy and Flavorful Recipe

- 1.5 lbs beef sirloin, thinly sliced - 2 cups broccoli florets - 1 cup beef broth - 1/4 cup soy sauce (or tamari for a gluten-free option) - 1/4 cup oyster sauce - 2 tablespoons sesame oil - 3 cloves garlic, minced - 1 tablespoon fresh ginger, grated The key to this dish is the beef sirloin. It cooks well and stays tender. Broccoli adds color and crunch. The sauces bring flavor and depth to the meal. - 1 tablespoon cornstarch (optional for thickening) - 2 tablespoons water (if using cornstarch) - 1 tablespoon sesame seeds (for garnish) - Cooked rice or quinoa, for serving Cornstarch makes the sauce thicker. If you want a smoother sauce, use it. Sesame seeds add a nice touch on top. Rice or quinoa makes a great base for the dish. {{ingredient_image_1}} 1. Start by slicing the beef sirloin into thin strips. This helps it cook evenly and soak up the flavors. 2. Next, wash the broccoli florets. Make sure to cut them into bite-sized pieces. This makes them easy to eat and helps them cook well. 3. In your slow cooker, combine the sliced beef, beef broth, soy sauce, oyster sauce, sesame oil, minced garlic, and grated ginger. Mix everything well. You want every piece of beef coated in that flavorful sauce. 1. Cover the slow cooker. Set it on low and cook for 4 to 5 hours. This slow cooking makes the beef tender and juicy. 2. About 30 minutes before the end, add the broccoli florets to the slow cooker. Stir gently to coat the broccoli in sauce. This keeps the broccoli bright and slightly crisp. 3. If you like a thicker sauce, mix cornstarch with water in a small bowl. Pour this mixture into the slow cooker in the last 15 minutes of cooking. Stir well to combine and let it thicken. 4. Once done, carefully spoon the beef and broccoli over bowls of cooked rice or quinoa. This adds a nice base for the dish. 5. Finally, sprinkle sesame seeds on top for a lovely finish. Enjoy your meal! To ensure you have tender beef, choose a nice cut like sirloin. Slicing the beef thinly helps it cook evenly. When cooking, keep the slow cooker on low. This slow heat helps break down the meat, making it tender. For vibrant broccoli, add it later in the cooking process. I usually wait until the last 30 minutes. This keeps the broccoli bright green and crisp. If you add it too early, it can turn mushy. When thickening the sauce, use cornstarch if you want a richer texture. Mix one tablespoon of cornstarch with two tablespoons of water to make a slurry. Stir this into the slow cooker 15 minutes before serving. Serve your beef and broccoli over cooked rice or quinoa. Both options soak up the tasty sauce well. I recommend using deep bowls for serving. This way, you get a good amount of sauce with each bite. For a nice touch, sprinkle sesame seeds on top. It adds a lovely crunch and flavor. You can also provide chopsticks for a fun, authentic experience. Enjoy your meal! Pro Tips Choose the Right Cut: Using beef sirloin ensures a tender and flavorful dish; avoid tougher cuts that require longer cooking times. Marinate for Extra Flavor: If time allows, marinate the beef in soy sauce and sesame oil for 30 minutes before adding it to the slow cooker for enhanced flavor. Keep Broccoli Bright Green: Add the broccoli towards the end of the cooking time to maintain its vibrant color and crisp texture. Thickening Tips: For a richer sauce, remember to mix the cornstarch with cold water before adding it to the slow cooker to prevent clumping. {{image_2}} You can easily make this dish gluten-free. Instead of regular soy sauce, use tamari. Tamari gives a nice flavor without gluten. You can also swap out the oyster sauce with a gluten-free version. This keeps the dish tasty for everyone. If you want to change the veggies, broccoli is not the only choice. You can try bell peppers, snap peas, or carrots. These alternatives add color and crunch. They also give a fresh taste to the meal. Adding spices can elevate your beef and broccoli. Try adding hoisin sauce for a sweet twist. A splash of sriracha can bring heat if you like spice. You can also sprinkle in some red pepper flakes for extra flavor. If you want to change the protein, beef isn’t your only option. Chicken works great in this recipe. Cut it into thin strips, just like the beef. Tofu is another good choice for a vegan option. It soaks up all the tasty sauce, making it a hearty meal. To store your beef and broccoli, let it cool first. Place the food in airtight containers. This helps keep the meal fresh. For the fridge, use glass or plastic containers with tight lids. They keep the flavors locked in. Make sure to eat leftovers within three to four days for the best taste. When reheating, use low heat to keep the beef tender. You can use a microwave or a stovetop. If using a microwave, cover the dish to avoid dryness. Add a splash of water or broth to keep it moist. For freezing, place leftovers in freezer-safe bags or containers. Store them for up to three months for best quality. Remember to label them with the date for easy tracking. How long does it take to cook beef and broccoli in a slow cooker? It takes about 4 to 5 hours on low heat. The beef will become very tender. The broccoli should be added in the last 30 minutes. This timing keeps the broccoli bright and crisp. Can I prepare this recipe ahead of time? Yes, you can prep ingredients the night before. Just combine the beef and sauces in the slow cooker. Store the broccoli separately. Add it when you start cooking. Can I use frozen broccoli instead of fresh? You can use frozen broccoli. Just remember it may cook faster. Add it later in the cooking time. This way, it stays green and tasty. Is soy sauce necessary for this recipe? Soy sauce adds flavor, but it is not a must. You can use tamari for gluten-free or coconut aminos for a different taste. Adjust the amount based on your preference. Is this slow cooker beef and broccoli recipe low-carb? This recipe can be low-carb if served without rice. The beef and broccoli provide protein and fiber. You can enjoy it as a standalone dish. Can this dish be made in a healthy way? Yes, use lean beef and low-sodium sauces. You can also add more veggies. Try bell peppers or snap peas for added nutrition. This slow cooker beef and broccoli recipe is easy and delicious. You learned about the main ingredients, preparation steps, and cooking tips. I shared storage tips and answered common questions. Feel free to mix it up with different sauces and vegetables. Enjoy your meal with rice or quinoa. Experimenting can make your dish even better. Now, you have a solid recipe to impress friends and family. Happy cooking!

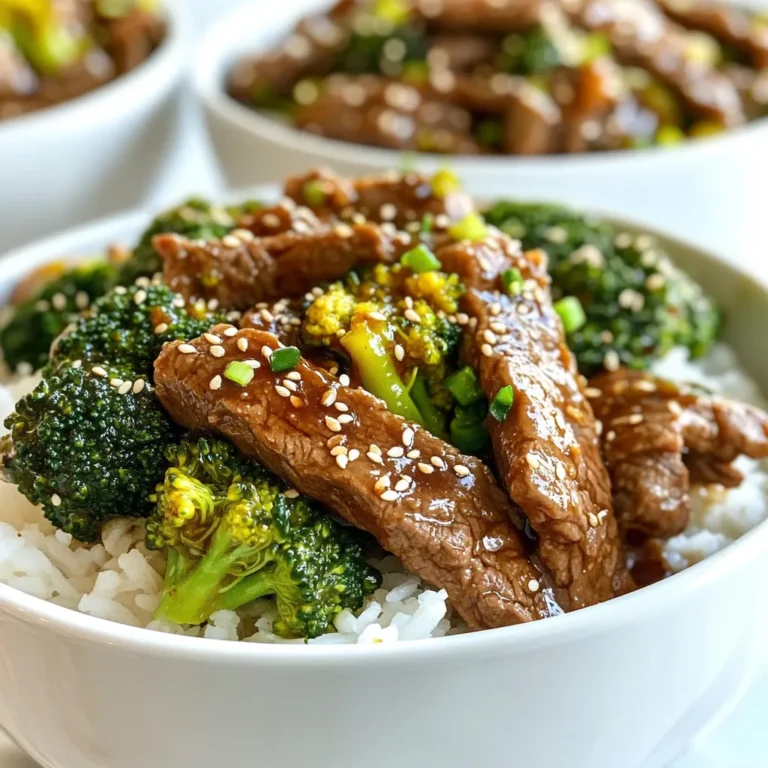
Slow Cooker Beef and Broccoli Simple Comfort Meal

To make Black Pepper Chicken with Mushrooms, you will need: - 500g boneless chicken breasts, cut into bite-sized cubes - 200g mushrooms, sliced (shiitake or button mushrooms) - 2 tablespoons black pepper, freshly ground - 3 tablespoons soy sauce - 1 tablespoon oyster sauce - 1 tablespoon cornstarch - 2 tablespoons vegetable oil - 1 red bell pepper, sliced - 1 green bell pepper, sliced - 3 cloves garlic, minced - 1 teaspoon ginger, minced - 2 green onions, chopped for garnish - Salt to taste You can swap some ingredients based on what you have at home. - Use chicken thighs for a juicier option. - Swap soy sauce with tamari for a gluten-free dish. - Try any mushrooms you like, such as portobello or cremini. - If you don’t have oyster sauce, you can skip it or use hoisin sauce. - Use any kind of oil, like canola or peanut oil, if vegetable oil is not available. Choosing fresh ingredients is key for great flavor. - Look for chicken that is pink and firm. Avoid any with a gray color. - Select mushrooms that are firm and dry. Avoid slimy or dark spots. - Choose bell peppers that are bright and firm, with no soft spots. - Fresh garlic should be plump with no sprouting. - When buying green onions, pick ones that are green and crisp. {{ingredient_image_1}} Start by cutting 500g of boneless chicken breasts into bite-sized cubes. This helps the chicken cook evenly. In a mixing bowl, combine the chicken with 3 tablespoons of soy sauce, 1 tablespoon of oyster sauce, and 1 tablespoon of cornstarch. Mix well until the chicken is fully coated. Let it marinate for at least 20 minutes. This step adds flavor and helps tenderize the chicken. Heat 2 tablespoons of vegetable oil in a large skillet or wok over medium-high heat. Once the oil is hot, add the marinated chicken. Cook it for about 5 to 7 minutes. You want the chicken to be browned and cooked through. After cooking, remove the chicken from the skillet and set it aside. This keeps it juicy. In the same skillet, add 3 cloves of minced garlic and 1 teaspoon of minced ginger. Sauté them for about 30 seconds until they become fragrant. Next, add 200g of sliced mushrooms and sliced red and green bell peppers. Cook these vegetables for about 4 to 5 minutes until they are tender. Once done, return the chicken to the skillet. Sprinkle 2 tablespoons of freshly ground black pepper over the mix. Toss everything together for 2 to 3 minutes. This ensures all the flavors blend well. Taste and add salt if needed. Finally, remove from heat and garnish with chopped green onions. Enjoy your meal! Marinating chicken adds depth and taste. For this dish, mix soy sauce, oyster sauce, and cornstarch. This blend makes the chicken tender and flavorful. Let it sit for at least 20 minutes. If you have time, marinate it longer for more flavor. You can also add a splash of rice vinegar for extra zing. Black pepper is the star of this dish. If you love heat, use more pepper. For a milder taste, cut back. You can even add red pepper flakes for a different spice. Remember, a little goes a long way. Always taste as you go to find your perfect level of spice. Heat your skillet well before adding the chicken. This helps it sear and brown nicely. Cook the chicken until it's fully done, about 5 to 7 minutes. Remove it before adding garlic and ginger. This keeps flavors fresh and bright. When you add the veggies, stir frequently. This way, they stay crisp and colorful. Finally, toss everything together at the end to coat well with black pepper. Enjoy your cooking! Pro Tips Marinade Time: Allow the chicken to marinate for at least 20 minutes, but for best results, marinate for 1-2 hours. This enhances the flavor and tenderness of the chicken. Black Pepper Freshness: Always use freshly ground black pepper for maximum flavor. Pre-ground pepper loses its potency, so invest in a good pepper mill. Veggie Variety: Feel free to add other vegetables like broccoli or snap peas for added color and nutrition. Just adjust cooking times accordingly to keep them crisp. Serving Suggestions: This dish pairs wonderfully with steamed rice or noodles. Consider garnishing with sesame seeds for extra crunch and flavor. {{image_2}} You can add more veggies to the black pepper chicken. Try using broccoli, snap peas, or carrots. These will add color and crunch. You can also use baby corn or zucchini for a twist. The more vegetables you add, the more nutrients you get. If you want to switch up the protein, use shrimp, tofu, or beef. Shrimp cooks fast and adds a nice flavor. Tofu absorbs the sauce well and is great for a vegetarian option. Beef gives a rich taste, so choose thin strips for easy cooking. Serve this dish over rice or noodles. White rice is classic, while brown rice offers more fiber. For a lighter option, try cauliflower rice. You can also serve it with a side salad or steamed vegetables to balance the meal. Don't forget to sprinkle some extra green onions on top for a fresh touch! To keep your Black Pepper Chicken with Mushrooms fresh, let it cool. Place it in an airtight container. Store it in the fridge for up to three days. If you want to keep it longer, freezing is a great option. When you're ready to enjoy leftovers, reheat them in a skillet. Use medium heat and add a splash of water to keep it moist. Stir until heated through, about five to seven minutes. You can also use the microwave. Heat in short bursts, stirring in between, until warm. To freeze, divide the chicken into serving portions. Use freezer-safe bags or containers. Remove as much air as you can to prevent freezer burn. This dish can last up to three months in the freezer. When ready to eat, thaw overnight in the fridge. Reheat to enjoy a delicious meal again. Yes, you can use boneless thighs. They add a richer taste. Thighs stay juicy and tender during cooking. They may take a bit longer to cook through, so check them closely. You can use soy sauce or hoisin sauce as a substitute. Both add a nice flavor. If you want a sweeter taste, try hoisin sauce. You can also mix soy sauce with a bit of sugar. To make this dish gluten-free, use gluten-free soy sauce. Check the labels on sauces to be sure. Cornstarch is usually gluten-free, so you’re safe there. This way, you can enjoy the dish without worry. Yes, you can prepare this dish in advance. Cook it and let it cool. Store it in an airtight container in the fridge. Reheat it on the stove or microwave when you’re ready to eat. Just be sure to heat it well. In this post, we explored key ingredients and their substitutes for your dish. You learned how to prepare and cook chicken along with sautéing fresh veggies. I shared tips to boost flavors, tweak spice levels, and ensure great cooking. We also looked at variations and how best to store leftovers. Cooking can be fun and simple with fresh foods and good techniques. Enjoy making your meal and experimenting with variations. Happy cooking!

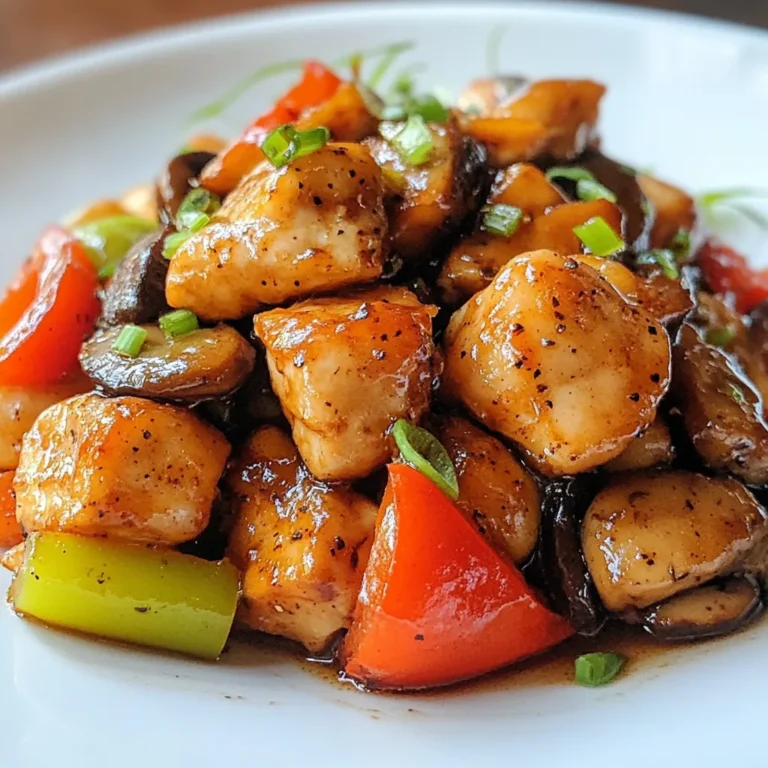
Black Pepper Chicken with Mushrooms Simple Recipe

- Chicken and Broth Components - 1 lb boneless, skinless chicken breasts - 4 cups chicken broth - Vegetables and Aromatics - 1 tablespoon olive oil - 1 medium onion, diced - 2 cloves garlic, minced - 1 bell pepper, chopped (any color) - 1 can (14 oz) diced tomatoes with green chilies - 1 can (15 oz) black beans, drained and rinsed - 1 can (15 oz) corn, drained - Spices and Seasonings - 1 tablespoon chili powder - 1 teaspoon cumin - 1 teaspoon paprika - Salt and pepper to taste - Toppings and Serve Suggestions - 1 cup shredded cheddar cheese (plus extra for topping) - 1/2 cup sour cream (for serving) - Fresh cilantro, chopped (for garnish) - Tortilla chips (for serving) Having the right ingredients makes all the difference. You want fresh chicken and a rich broth. The veggies add color and taste. I love using onion, garlic, and bell pepper to build flavor. Tomatoes with green chilies give a nice kick. Black beans and corn add heartiness. The spices tie everything together. Top it off with cheese, sour cream, and cilantro. Crunchy tortilla chips complete the bowl. With these ingredients, you create a warm hug in a bowl, perfect for any day. {{ingredient_image_1}} Sautéing the Onions and Peppers First, heat 1 tablespoon of olive oil in a large pot over medium heat. Add the diced onion. Sauté the onion until it turns soft and clear, which takes about 5 minutes. Then, stir in 2 cloves of minced garlic and 1 chopped bell pepper. Cook this mix for 3 to 4 minutes, just until the bell pepper softens. Cooking the Chicken and Combining Ingredients Next, add 1 pound of boneless chicken breasts to the pot. Pour in 1 can of diced tomatoes, 4 cups of chicken broth, 1 can of black beans, and 1 can of corn. Sprinkle in 1 tablespoon of chili powder, 1 teaspoon of cumin, 1 teaspoon of paprika, and some salt and pepper to taste. Bring this mixture to a boil. Once boiling, lower the heat and cover the pot. Let it simmer for about 20 to 25 minutes, until the chicken is fully cooked. Shredding the Chicken After the chicken cooks, take it out of the pot. Use two forks to shred the chicken into bite-sized pieces. Return the shredded chicken back into the pot and stir well. Adding Cheese and Adjusting Seasoning Now, add 1 cup of shredded cheddar cheese to the pot. Stir until the cheese melts and blends into the soup. Taste your soup and adjust the seasoning, adding more salt or pepper if needed. Simmering for Flavor Enhancement Let the soup simmer for another 5 minutes. This allows all the flavors to mix well. Now, your Chicken Enchilada Soup is ready to serve! Optimal Cooking Times For the best flavor, cook the soup low and slow. After bringing it to a boil, lower the heat. Simmer for about 20-25 minutes. This time lets the chicken cook through and the flavors blend well. How to Shred Chicken Easily To shred chicken like a pro, remove it from the pot first. Use two forks. Hold one fork in each hand. Pull the chicken apart gently until it’s in nice, even pieces. This method is quick and keeps the chicken tender. Overcooking Chicken Be careful not to overcook the chicken. If you cook it too long, it can get dry. Stick to the cooking time of 20-25 minutes for juicy chicken. Not Seasoning Properly Always taste your soup before serving. If it needs more flavor, add salt, pepper, or spices. The right seasonings make your soup pop with flavor. Don’t skip this step! Pro Tips Use Rotisserie Chicken: For a quicker option, substitute cooked rotisserie chicken to save time on prep and cooking. Spice It Up: Adjust the spice level by adding more chili powder or diced jalapeños for an extra kick. Make It Creamy: For a richer flavor, stir in a little cream cheese or heavy cream at the end for added creaminess. Garnish Creatively: Experiment with different toppings like avocado slices, lime wedges, or sliced green onions for a fresh twist. {{image_2}} To make a vegetarian version of this soup, swap the chicken for a can of chickpeas or extra black beans. This keeps it hearty and satisfying. You can also use vegetable broth instead of chicken broth for a full flavor. When cooking, sauté the onions, garlic, and peppers just as you would in the original recipe. Then, add the beans, tomatoes, corn, and spices. Simmer until everything is hot. You can also add zucchini or spinach for extra veggies. Using a slow cooker is easy and great for busy days. Start by sautéing the onions, garlic, and peppers in a pan. This step adds more flavor. After that, add all the ingredients to the slow cooker, including the chicken, beans, and spices. Step-by-Step Slow Cooker Instructions: 1. Sauté onions, garlic, and bell pepper in a skillet. 2. Place the sautéed mix in the slow cooker. 3. Add the chicken, diced tomatoes, broth, beans, corn, and spices. 4. Cook on low for 6-8 hours or high for 4-5 hours. 5. Shred the chicken before serving and stir in the cheese. For best results, check the chicken around the last hour of cooking. You can adjust the heat level easily. For a milder soup, skip the diced tomatoes with green chilies and use regular diced tomatoes. Add a pinch of sugar to balance the flavors if needed. If you like it spicy, add jalapeños or a dash of hot sauce. You can also use spicy cheese for more kick. Recommended Add-ons: - Avocado slices for creaminess - Extra cheese for richness - Fresh lime juice for a zesty touch Experiment with these variations to find your favorite! To store your chicken enchilada soup, let it cool first. Once cool, place it in an airtight container. This way, it stays fresh and tasty. You want to keep it in the fridge. The best practice is to eat it within 3 to 4 days. The soup may lose its flavor after that. You can freeze chicken enchilada soup for later use. For freezing, let the soup cool completely. Then pour it into a freezer-safe container or bag. Ensure you leave some space at the top because it will expand. Label the container with the date. The soup will keep well for up to 3 months in the freezer. When you want to eat it, take it out of the freezer. Thaw it overnight in the fridge. If you’re in a hurry, you can use the microwave. Just make sure to stir it often. To reheat, pour it into a pot on low heat. Stir until hot. Add a splash of chicken broth if it seems thick. Enjoy your delicious soup again! Can I use frozen chicken? Yes, you can use frozen chicken. Just add the chicken directly to the pot. Cook it a bit longer. Make sure it reaches 165°F before serving. What can I use instead of black beans? If you don't have black beans, try pinto beans or kidney beans. Both add great flavor and texture to the soup. How can I make it gluten-free? To make this soup gluten-free, check your broth and canned goods. Use gluten-free broth and ensure your spices are free from gluten. Best Side Dishes to Pair Serve your soup with warm cornbread or a fresh green salad. Both add nice balance to the meal. You can also serve tortilla chips for extra crunch. Meal Prep Ideas for Busy Days Make a big batch of this soup on a weekend. Store it in the fridge for quick meals during the week. It reheats well and tastes even better the next day! This blog post covered how to make a delicious soup, from key ingredients to cooking methods. You learned about sautéing veggies, perfecting flavors, and avoiding mistakes. We also discussed variations like vegetarian options and slow cooker methods. Lastly, I shared tips for storing leftovers and answered common questions. Use this guide to create a soup that warms you up and delights your taste buds. Enjoy cooking and experimenting with flavors!

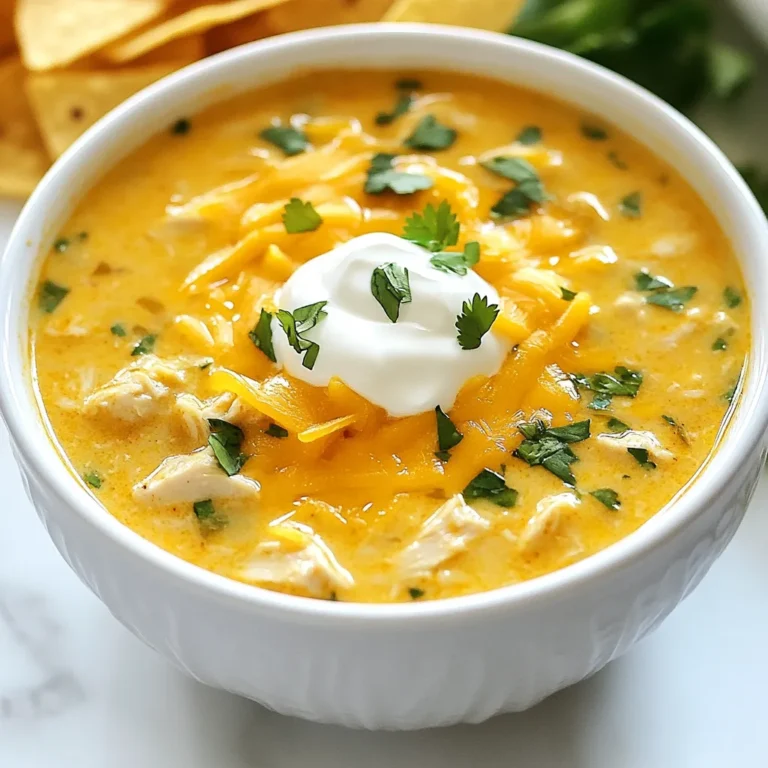
Chicken Enchilada Soup Flavorful Comfort in a Bowl

- 400g fettuccine or spaghetti - 200ml heavy cream (or coconut cream for a vegan option) - 4 cloves garlic, minced - 1 can (400g) diced tomatoes - 1 teaspoon sugar - 1 teaspoon dried basil - Salt and pepper to taste The main ingredients are key to the rich flavor of this dish. I love using fettuccine or spaghetti, as they hold the sauce well. Heavy cream gives it a nice, creamy texture. If you want a vegan option, coconut cream works beautifully, adding a subtle sweetness. - 50g grated Parmesan cheese - Fresh basil leaves for garnish Parmesan cheese adds depth to the flavor. It melts nicely into the sauce, making it extra delicious. Fresh basil gives a bright touch and looks great on the plate. You can skip these if you want a lighter dish. - 2 tablespoons olive oil - Salt and pepper Olive oil is perfect for sautéing garlic and adds richness to the sauce. Always season with salt and pepper to enhance the dish. Don't be shy with the salt, but taste as you go! These ingredients come together to create a dish that is both simple and packed with flavor. You can easily find them at your local store, making this recipe perfect for a quick weeknight meal. {{ingredient_image_1}} Start by filling a large pot with water and add a good amount of salt. You want it to taste like the sea. Bring the water to a rolling boil. Once boiling, add 400g of fettuccine or spaghetti. Cook according to the package instructions, usually around 8-10 minutes. Check for doneness by tasting a strand. It should be firm yet tender, known as al dente. After cooking, drain the pasta but keep a cup of the water for later. Garlic is the star of this dish. It gives a rich flavor that makes everything better. Heat 2 tablespoons of olive oil in a large skillet over medium heat. Add 4 cloves of minced garlic. Sauté for about 1 minute until fragrant. Watch closely to avoid burning it, as burnt garlic can taste bitter. If it starts to brown too fast, lower the heat. Next, add a can of diced tomatoes, including juices, to your skillet. Stir in 1 teaspoon of sugar to balance the acidity. Season with salt and pepper to taste. Let it simmer for 5-7 minutes. This helps the flavors mix well. Then, reduce the heat and pour in 200ml of heavy cream. You can also use coconut cream for a vegan option. Add 1 teaspoon of dried basil and stir well. Add your drained pasta to the creamy sauce. Toss gently to coat each strand. If the sauce seems too thick, slowly mix in some reserved pasta water until it reaches the desired creaminess. This step makes the dish delightful and smooth. If you want, you can stir in 50g of grated Parmesan cheese at this stage for extra flavor. To serve, divide the creamy garlic tomato pasta onto plates. Garnish with fresh basil leaves for a pop of color and flavor. You can also add a sprinkle of extra cheese if you like. Enjoy the beautiful presentation and the delicious taste! To enhance the creaminess of your creamy garlic tomato pasta, use heavy cream. If you want a lighter option, coconut cream works too. You can also add more cheese for a richer taste. For spice levels, start with a small pinch of crushed red pepper. Taste as you go to find the right heat for you. One common mistake is overcooking the pasta. Always cook it until al dente, so it has a slight bite. Another mistake is not simmering long enough after adding the tomatoes. This step is key for blending flavors. Let it simmer for at least 5 to 7 minutes to make sure everything tastes great. For garnishing, fresh basil leaves add a pop of color and flavor. You can also sprinkle some grated Parmesan on top for a nice touch. Serve the pasta in a shallow bowl for a lovely presentation. A drizzle of olive oil on top also adds a nice shine. Pro Tips Add Depth of Flavor: To enhance the flavors, try adding a splash of balsamic vinegar or a pinch of red pepper flakes for a bit of heat. Perfect Pasta Texture: Always cook your pasta to al dente, as it will continue to cook slightly when combined with the sauce. Make it Vegan: Substitute heavy cream with coconut cream or a cashew cream for a delicious vegan option without sacrificing creaminess. Fresh Herbs: For a burst of freshness, add chopped fresh basil or parsley right before serving instead of dried herbs. {{image_2}} You can make this dish vegan with a few easy swaps. Instead of heavy cream, use coconut cream. It gives a rich flavor without dairy. For cheese, skip the Parmesan or use a vegan version. You might want to add a bit of nutritional yeast for a cheesy taste. Make sure to taste as you go. Adjust the salt and spices to keep the flavors bright and fresh. Adding protein makes this dish heartier. You can use chicken, shrimp, or tofu. For chicken, cut it into bite-sized pieces. Sauté it in olive oil until golden and cooked through. For shrimp, cook until pink and opaque. If using tofu, press it first, then pan-fry until crispy. After cooking your protein, mix it into the creamy sauce before adding the pasta. Adding veggies makes the dish colorful and healthy. Good choices include spinach, zucchini, or bell peppers. For spinach, toss it in during the last minute of cooking. Zucchini should be sliced thin and sautéed for about 3-4 minutes. Bell peppers take about 5-7 minutes to cook until tender. Feel free to mix and match based on what you have on hand! To store leftovers, let the pasta cool first. Place it in an airtight container. This keeps the pasta fresh for up to three days. Make sure to seal it tightly to avoid any odors from your fridge. When you heat it up, I prefer the stovetop for the best taste. Just add a splash of water or cream in a pan. Stir it over low heat until warm. The microwave works too, but it can dry out the pasta. If you use the microwave, heat it in short bursts. Stir in between to keep it moist. Yes, you can freeze this dish! To freeze, let it cool completely. Then, transfer it to a freezer-safe container. It can last up to three months in the freezer. When you're ready to eat, thaw it in the fridge overnight. Then reheat it on the stovetop for the best flavor and texture. You can store Creamy Garlic Tomato Pasta in the fridge for about three days. Keep it in an airtight container to keep it fresh. When you reheat it, add a splash of water or broth. This will help restore its creamy texture. Yes, you can use any pasta you like! Fettuccine or spaghetti works well, but penne or rotini are great alternatives. Just remember to adjust the cooking time based on the pasta you choose. Absolutely! This recipe is great for meal prep. You can cook a big batch and portion it out for the week. Just store it in airtight containers. Reheat it when you are ready to eat. If you want a lighter option, you can use coconut cream instead of heavy cream. Other good substitutes include unsweetened almond milk or cashew cream. Just remember that these options may change the flavor a bit. This recipe is not spicy at all. If you like heat, you can add red pepper flakes or fresh chili. Start with a small amount and taste as you go. Adjust it based on your heat preference. We explored the steps to create a creamy garlic tomato pasta. You learned about key ingredients like pasta type, dairy options, and spices. I shared tips for cooking pasta perfectly and avoiding common mistakes. You also discovered variations, storage info, and answers to frequent questions. Remember, making it your own adds joy to cooking. Enjoy experimenting with flavors and ingredients. With practice, you'll create a dish that impresses every time. Happy cooking!

Creamy Garlic Tomato Pasta Simple and Flavorful Dish

- 1 pound ground beef - 4 large potatoes, thinly sliced - 1 large onion, sliced - 1 bell pepper, diced (any color) - 2 cups cheddar cheese, shredded - 1 can (10.5 oz) cream of mushroom soup - 1 cup beef broth - 2 teaspoons garlic powder - 1 teaspoon paprika - Salt and pepper to taste - Olive oil for cooking - Fresh parsley for garnish (optional) When I make Hobo Beef Potato Casserole, I love using fresh ingredients. Each item adds a unique taste. Ground beef gives a rich flavor. The potatoes create a hearty base. I like to use large potatoes. They hold up well in the oven. Slicing the onion adds sweetness. A bell pepper brightens the dish. I often choose green or red peppers. The colors make the casserole look nice. Adding cheese gives it a creamy texture. Cheddar cheese melts beautifully and adds richness. I use cream of mushroom soup for depth. It blends well with the beef. The beef broth makes the dish juicy. Garlic powder and paprika add a nice kick. Salt and pepper help to balance the flavors. A drizzle of olive oil prevents sticking. I finish it off with fresh parsley. It adds color and a fresh taste. This dish is easy to make and fun to share. {{ingredient_image_1}} First, preheat your oven to 350°F (175°C). This step is key for even cooking. While the oven heats, gather all your ingredients. This will make the process smooth. Next, heat a drizzle of olive oil in a large skillet over medium heat. Add 1 pound of ground beef. Cook until it turns brown. Use a spatula to break up the meat. After browning, drain any excess fat. Season the beef with 2 teaspoons of garlic powder, 1 teaspoon of paprika, and salt and pepper to taste. Stir in 1 can of cream of mushroom soup and 1 cup of beef broth. Mix until everything is well combined. Remove from heat. Now, take a greased 9x13 inch baking dish. Layer half of the sliced potatoes at the bottom. Next, spread half of the cooked beef mixture over the potatoes. Add half of the sliced onion and diced bell pepper on top of the beef. Repeat these layers with the remaining potatoes, beef mixture, onions, and bell peppers. Finally, sprinkle 2 cups of shredded cheddar cheese on the top layer. Cover the dish with aluminum foil. Bake in your preheated oven for 45 minutes. After that time, remove the foil. Bake for an additional 15 to 20 minutes. You want the cheese to be bubbly and the potatoes tender. Let the casserole cool for a few minutes before serving. If you like, garnish with fresh parsley. Enjoy your tasty family meal! To brown the ground beef well, use a large skillet. Heat a little olive oil over medium heat. Add the beef in small batches. This helps it cook evenly. Break it apart with a spatula as it cooks. Drain off extra fat when done. Season with garlic powder and paprika for flavor. Layering is key to great flavor in this casserole. Start with a layer of sliced potatoes. This helps soak up the juices. Then, add half of the seasoned beef mixture. Sprinkle on some onions and bell peppers. Repeat the layers to build flavor. Finish with a generous layer of cheddar cheese. You can change this recipe in fun ways. Try using ground turkey instead of beef for a lighter dish. Swap the cheddar cheese for pepper jack for some heat. For a veggie twist, add mushrooms or zucchini. You can even use different spices like cumin or chili powder for a unique taste. Pro Tips Enhance Flavor: Add a dash of Worcestershire sauce to the beef mixture for an extra layer of savory flavor. Potato Variations: Experiment with different types of potatoes, such as sweet potatoes or Yukon gold, for a unique twist on the dish. Cheese Options: Feel free to mix cheeses; mozzarella or pepper jack can add a delightful creaminess or a bit of spice. Make Ahead: Prepare the casserole in advance and store it in the fridge overnight. Just add a few extra minutes to the baking time. {{image_2}} You can make this dish vegetarian by swapping ground beef with plant-based protein. Popular choices include lentils or crumbled tofu. Both options give you great texture and flavor. If you use lentils, cook them first until tender. For tofu, drain and crumble it before cooking. Season with garlic powder and paprika to match the original recipe. This way, you keep the rich taste without meat. If you need a gluten-free version, use gluten-free cream of mushroom soup. Many brands offer this option, and they taste great. You can also make your own soup from scratch using gluten-free flour. Just ensure all your ingredients are gluten-free, including the broth. This change keeps everyone happy at the table. Want some heat? Adding jalapeños or other spices can change your dish. Slice fresh jalapeños and spread them between layers. Or, sprinkle in some crushed red pepper flakes for a milder kick. Adjust the spice level based on your family's taste. This twist makes the casserole fun and exciting! To keep your Hobo Beef Potato Casserole fresh, store it in the fridge. Use an airtight container to prevent moisture loss. This helps keep the flavors intact. Leftovers can last for up to three days. If you plan to eat it later, label the container with the date for easy tracking. Freezing is a great option for longer storage. First, let the casserole cool completely. Then, cover it tightly with aluminum foil or plastic wrap. Place it in a freezer-safe container. It can last up to three months in the freezer. When you’re ready to eat, thaw it overnight in the fridge. To reheat, preheat your oven to 350°F (175°C). Remove the foil and place the casserole in the oven. Bake for about 25–30 minutes until heated through. If it seems dry, add a splash of beef broth or water before reheating. This helps restore moisture. Enjoy your meal just as delicious as the first time! Yes, you can use other cheeses. Some great options are: - Monterey Jack - Colby cheese - Gouda - Mozzarella These cheeses melt well and add nice flavors. Feel free to mix! Look for these signs to check doneness: - The cheese should be bubbly and golden. - The potatoes should be tender when pierced with a fork. - A nice aroma should fill your kitchen. If all these signs are present, your casserole is ready! Yes, you can prep this casserole ahead of time. Here are some tips: - Assemble the casserole but do not bake it. - Cover it tightly and store in the fridge for up to 24 hours. - When ready to cook, just add 10-15 more minutes to the baking time. This makes dinner easy and quick on busy days! This blog post covers everything you need for a tasty casserole. We started with the ingredients, moving on to easy steps for cooking. I shared helpful tips to make each layer packed with flavor. Variations let you customize this dish for your taste or needs. Plus, you learned how to store and reheat leftovers well. Now you can enjoy a warm, hearty meal that's simple to make and full of flavor.

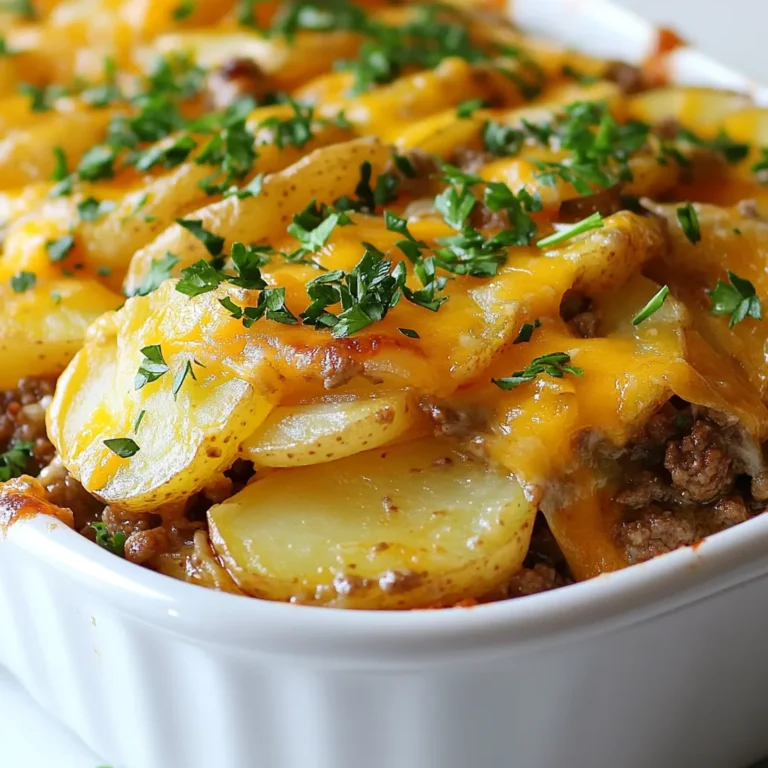
Hobo Beef Potato Casserole Tasty Family Meal Idea

PREV 1 … 43 44 45 … 56 NEXT
secrets pice kitchen

explore

DessertsDinnerAppetizersDrinks

Our Policies

  • Cookie Policy
  • Copyright Policy
  • Disclaimer
  • GDPR Policy
  • Terms Of Use
Back to Top
  • About
  • Contact Us
  • Privacy Policy
© 2025 secrets pice kitchen