FREE DINNER EBOOK! Get your copy!
  • Cookie Policy
  • GDPR Policy
  • Disclaimer
  • Terms Of Use
  • Visit my other site: Fun Cookie Recipes
secrets pice kitchen
  • Home
  • Dinner
  • Desserts
  • Drinks
  • Appetizers
  • Contact
  • About
  • Privacy Policy
  • Home
  • Dinner
  • Desserts
  • Drinks
  • Appetizers
  • Contact
  • About
  • Privacy Policy
  • Cookie Policy
  • GDPR Policy
  • Disclaimer
  • Terms Of Use
Visit my other site: Fun Cookie Recipes

HOME / CATEGORIES /

Latest

- 1 lb ground turkey or beef - 1 cup elbow macaroni - 1 can (15 oz) black beans, drained and rinsed - 1 can (10 oz) diced tomatoes with green chilies Taco Mac Skillet starts with hearty main ingredients. You can use ground turkey or beef as your protein. I prefer ground turkey for a lighter touch. Elbow macaroni gives a nice bite, making it a cozy dish. Black beans add protein and fiber, while diced tomatoes with green chilies bring zest and color. - 1 packet taco seasoning (about 1 oz) - 2 tablespoons olive oil - Salt and pepper to taste Seasonings are key for flavor. Taco seasoning packs a punch with spices that make this dish special. Use olive oil to sauté the veggies, enhancing their taste. Salt and pepper are simple, but they make a big difference in the overall flavor. - 2 cups shredded cheddar cheese - Fresh cilantro for garnish (optional) Garnishes elevate your dish. Shredded cheddar cheese melts beautifully on top, adding creaminess. Fresh cilantro offers a bright finish if you like a fresh taste. You can skip it if you prefer, but it adds a nice touch. {{ingredient_image_1}} To start, grab a large skillet. Heat 2 tablespoons of olive oil over medium heat. Add 1 small diced onion and 1 diced bell pepper. Sauté them for 3-4 minutes. You want them tender and fragrant. Next, add 1 pound of ground turkey or beef. Season with salt, pepper, and 1 packet of taco seasoning. Cook until the meat is browned and fully cooked, which takes about 5-7 minutes. Make sure to break up the meat as it cooks. Now it’s time to bring in some flavor. Stir in 1 can of diced tomatoes with green chilies, 1 can of black beans (drained and rinsed), and 1 cup of corn. Pour in 2 cups of beef or chicken broth. Bring this mixture to a gentle boil. Once boiling, add 1 cup of elbow macaroni. Stir well, cover the skillet, and reduce the heat to a simmer. Cook for 8-10 minutes, or until the pasta is al dente. Stir occasionally to prevent sticking. After cooking the pasta, take the skillet off the heat. Stir in 1 ½ cups of shredded cheddar cheese. Mix until the cheese melts into the dish, creating a creamy texture. For the final touch, sprinkle the remaining cheese on top. Cover the skillet again and let it sit for about 2-3 minutes. This allows the cheese to melt and become bubbly. If you like, add fresh cilantro for a pop of color and flavor. - To make sure your pasta is just right, cook it until al dente. This means it should be firm but not hard. Follow the package directions for timing. Stir the pasta often. This keeps it from sticking together. - To prevent sticking, use enough water when cooking the pasta. Add a pinch of salt to the water for flavor. Once the pasta is done, drain it quickly. Rinse with cold water if needed. This stops it from cooking more. - You can make this dish even better by adding spices. A pinch of chili powder or cayenne can add heat. A few drops of hot sauce can also give it a kick. Taste as you go to find your perfect level of spice. - Try different cheeses to change the flavor. Monterey Jack adds creaminess. Pepper Jack gives a nice spicy twist. You can mix cheeses for a unique taste that you will love. - For side dishes, pair this meal with a fresh salad. A simple green salad with lime dressing works well. You could also serve it with tortilla chips for some crunch. - When serving, bowls are great for this dish. It helps keep the cheese and sauce in one place. Plates work too, but bowls add a fun twist. Consider using deep bowls for a cozy feel. Pro Tips Choose the Right Protein: Ground turkey is a leaner option, while beef offers a richer flavor. Choose based on your health goals and taste preferences. Add Extra Veggies: For added nutrition and flavor, consider including additional vegetables like zucchini or mushrooms to the mix. Cook Pasta Separately: For a firmer texture, you can cook the elbow macaroni separately and mix it in at the end instead of during the simmering process. Experiment with Cheese: While cheddar is classic, try other cheeses like pepper jack for a spicy kick or mozzarella for a gooey texture. {{image_2}} You can switch the ground turkey or beef in this dish. Ground chicken works well too. For a meat-free option, try using lentils or a meat substitute. These choices give you great flavor while meeting your needs. Feel free to change up the macaroni shapes. Shells or rotini can add fun textures. You can also toss in other veggies like zucchini or spinach. They add nutrients and color. If you need gluten-free options, use gluten-free macaroni. They cook similarly and taste great. For low-carb diets, swap macaroni for cauliflower rice or zucchini noodles. These swaps keep the dish hearty without the carbs. To store leftovers, let the Taco Mac Skillet cool down. Then, transfer it to an airtight container. This keeps it fresh and tasty. You can store it in the fridge for about 3 to 4 days. If you want to enjoy it later, make sure to label the container with the date. You can freeze the Taco Mac Skillet for longer storage. First, let it cool completely. Then, place it in a freezer-safe container or bag. Squeeze out as much air as possible to prevent freezer burn. It will stay good for about 2 to 3 months. When you are ready to eat it, move it to the fridge to thaw overnight. To reheat without losing texture, the stove is best. Heat a little olive oil in a skillet over medium heat. Add the Taco Mac Skillet and stir until hot. If you use a microwave, place it in a bowl and cover it. Heat in short bursts, stirring in between to warm evenly. Enjoy your hearty meal again! Yes, you can swap the meat for other options. Ground chicken works well. You can also use plant-based meat for a vegetarian dish. Each choice will change the flavor slightly but still taste great. Just ensure you cook it fully for safety. To add more heat, try these tips. You can mix in diced jalapeños or add a splash of hot sauce. Another option is to use spicy taco seasoning. Adjust the heat based on your taste. Remember, you can always add more but can’t take it out! Absolutely! This dish is great for meal prep. Cook it and let it cool. Store it in an airtight container in the fridge for up to three days. You can also freeze it for up to a month. Just reheat it on the stove or microwave when you’re ready to enjoy! This blog post covered how to make a tasty Taco Mac Skillet. We discussed the main ingredients, like ground turkey, macaroni, and black beans. I shared step-by-step instructions for cooking and tips for extra flavor. You can customize it with different proteins and veggies to fit your needs. Remember, storing leftovers right helps keep the dish fresh. With these tips, you can enjoy a meal that fits your taste and lifestyle. Dive into this recipe and make it your own!

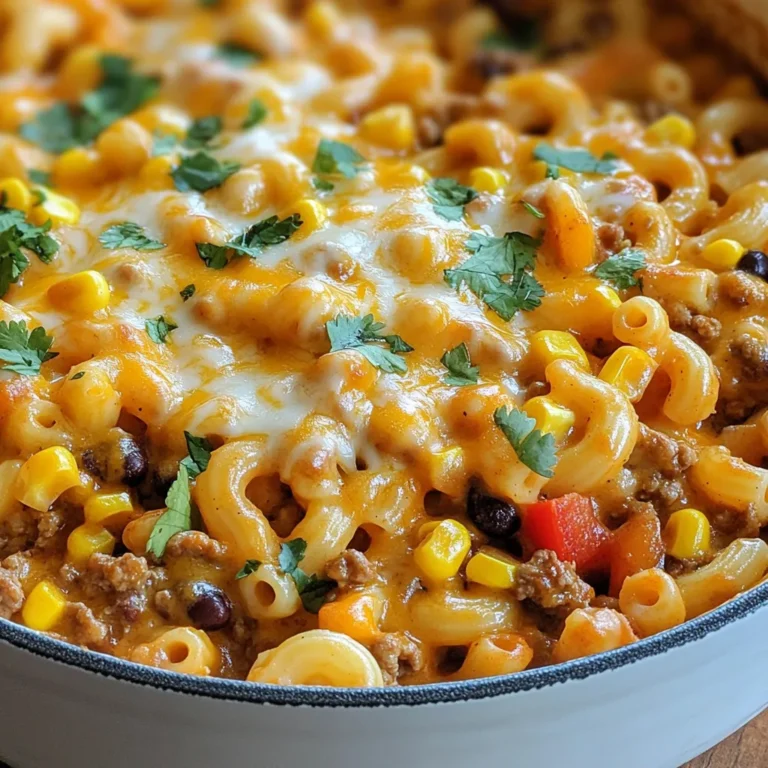
Taco Mac Skillet Hearty and Flavorful Comfort Dish

To make the Cottage Cheese Veggie Bake, you will need a few simple ingredients. Each item adds flavor and nutrition to the dish. Here’s the list of ingredients you will gather: - 2 cups cottage cheese - 1 cup chopped spinach (fresh or frozen) - 1 cup diced bell peppers (red, yellow, and green) - 1 cup chopped zucchini - 1 cup cherry tomatoes, halved - 3 large eggs - 1 cup shredded cheese (mozzarella or cheddar) - 1 teaspoon garlic powder - 1 teaspoon onion powder - 1 teaspoon dried Italian herbs (oregano, basil, thyme) - Salt and pepper to taste - Olive oil spray or butter for greasing Each ingredient plays an important role. Cottage cheese adds creaminess and protein. Spinach brings vitamins, while bell peppers and zucchini add crunch and color. Cherry tomatoes give a sweet burst. Eggs help bind everything together. Shredded cheese melts beautifully on top for a tasty finish. The seasonings enhance the flavors, making each bite delightful. Remember to grease your baking dish to prevent sticking. {{ingredient_image_1}} 1. Preheat your oven to 375°F (190°C). Grease a 9x13-inch baking dish lightly with olive oil spray or butter. 2. In a large bowl, mix 2 cups of cottage cheese with 1 cup of chopped spinach, 1 cup of diced bell peppers, 1 cup of chopped zucchini, and 1 cup of halved cherry tomatoes. Stir until well blended. 3. Crack 3 large eggs into the bowl. Gently beat them into the mixture. Add 1 teaspoon of garlic powder, 1 teaspoon of onion powder, and 1 teaspoon of dried Italian herbs. Season with salt and pepper to taste. Mix until the vegetables are coated evenly. 1. Pour the veggie and cottage cheese mixture into the greased baking dish. Spread it out evenly for even cooking. 2. Top the mixture with 1 cup of shredded cheese, either mozzarella or cheddar. Make sure to cover the top well. 3. Place the dish in the oven and bake for 30-35 minutes. Look for a golden top and bubbling edges to know it’s done. - Bake your Cottage Cheese Veggie Bake at 375°F (190°C). - Check the bake after 30 minutes. It should be golden brown and bubbling. - If you like it crispier, leave it in for a few more minutes. - To chop vegetables fast, use a food processor. It saves time and effort. - You can swap any veggie you like. Broccoli or carrots add great taste. - Try different cheeses, like feta or gouda, to change the flavor. - If you want less fat, use low-fat cottage cheese. It still tastes great! Pro Tips Use Fresh Ingredients: Opt for fresh vegetables whenever possible to enhance the flavor and nutrition of the bake. Customize Your Cheese: Experiment with different types of cheese like feta or goat cheese for a unique flavor profile. Make It Ahead: Prepare the mixture a day in advance and refrigerate. Just bake it when you’re ready to serve. Check for Doneness: Ensure the center is firm and the edges are bubbling to know it's perfectly baked. {{image_2}} You can easily change the veggies in this bake. Try adding broccoli or carrots for a new taste. You can also mix in mushrooms for added depth. Colorful veggies make this dish fun and appealing. Using different cheeses adds variety too. Try feta for a tangy kick or goat cheese for creaminess. If you prefer dairy-free, opt for almond or soy cheese. These changes can make the dish fit your taste or diet. If you need a gluten-free option, this dish is already suitable. Just ensure your cheese and other ingredients are gluten-free. For a vegan twist, swap cottage cheese with tofu or cashew cream. You can use flax eggs instead of real eggs. This keeps the bake together and adds protein. These adaptations make the Cottage Cheese Veggie Bake fit many diets while keeping it tasty. To keep your Cottage Cheese Veggie Bake fresh, store leftovers in an airtight container. This helps prevent moisture loss and keeps flavors intact. Place the container in the fridge right after it cools. Your dish will stay good for about 3 to 4 days. Before serving, check for any signs of spoilage, like off smells or colors. If you want to save your veggie bake for later, freezing is a great option. Cut the bake into portions before freezing. Wrap each piece in plastic wrap, then place them in a freezer-safe bag or container. This helps prevent freezer burn. Your Cottage Cheese Veggie Bake can be frozen for up to 2 months. To reheat, take a portion out of the freezer and let it thaw overnight in the fridge. For a quick method, you can use the microwave. Heat on medium power for 3 to 5 minutes, checking often to avoid overheating. The bake should be warm throughout before serving. Enjoy your meal! Can I make this in advance? Yes, you can prepare this dish a day ahead. Just follow all steps up to baking. Cover it well and store it in the fridge. On baking day, just pop it in the oven. This makes life easier for busy days! What can I serve with Cottage Cheese Veggie Bake? This veggie bake pairs well with a fresh side salad. You can also add whole grain bread for a hearty meal. Roasted veggies or a light soup work great too. It’s all about what you enjoy! Can I use low-fat cottage cheese? Absolutely! Low-fat cottage cheese works well in this recipe. It still gives you that creamy texture without the extra calories. Your bake will still taste delicious! How do I make it spicier? To add some heat, try including red pepper flakes. You can also add diced jalapeños for a kick. Spicy cheese or hot sauce can spice things up too! Overview of nutritional benefits This dish is packed with protein due to the cottage cheese and eggs. It’s also rich in vitamins from the veggies. Spinach, bell peppers, and zucchini boost your health. This bake is low in carbs and full of flavor! Portion sizes and calories per serving This recipe serves six. Each serving has about 230 calories. It gives you a good balance of protein and healthy fats. Enjoy this dish guilt-free while staying full and satisfied! You now have all the tools to make a tasty Cottage Cheese Veggie Bake. We explored the key ingredients, from cottage cheese to colorful veggies, and went through easy steps to prepare it. I shared tips to help you get the best bake and ideas for fun variations. Remember to store leftovers properly to keep them fresh. With these insights, you can enjoy a healthy, quick meal anytime. Get ready to impress with your cooking skills!

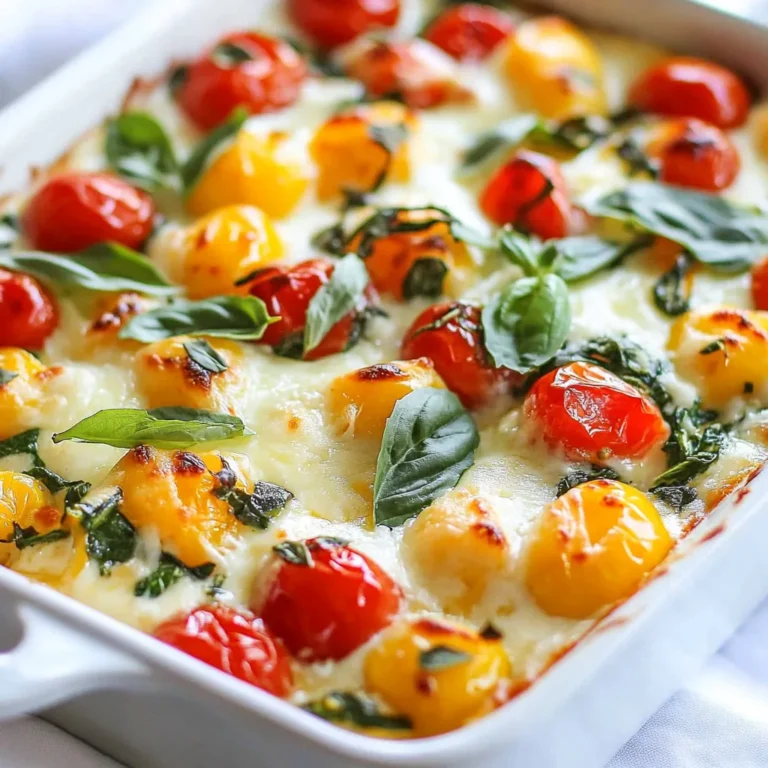
Cottage Cheese Veggie Bake Nutritious and Easy Dish

- 1 cup orzo pasta - 2 boneless, skinless chicken breasts, diced - 1 tablespoon olive oil - 1 cup cherry tomatoes, halved - 1 cup baby spinach - 1/2 cup feta cheese, crumbled - 2 garlic cloves, minced - 1 teaspoon dried oregano - 1 teaspoon paprika - Salt and pepper to taste - Fresh parsley, chopped (for garnish) - 2 1/2 cups low-sodium chicken broth High Protein Chicken Orzo uses simple yet fresh ingredients. Each gives flavor and nutrition. High Protein Chicken Orzo is packed with protein. Chicken breasts offer lean protein. One serving has about 30 grams of protein. Orzo adds carbs for energy. This dish has about 400 calories per serving. It includes healthy fats from olive oil and feta. The spinach and tomatoes add vitamins and minerals. Eating this dish supports muscle health and gives energy. The fresh veggies boost your immune system. Each ingredient helps you feel good and stay full! {{ingredient_image_1}} To make High Protein Chicken Orzo, start by preparing your ingredients. Gather: - 1 cup orzo pasta - 2 boneless, skinless chicken breasts, diced - 1 tablespoon olive oil - 1 cup cherry tomatoes, halved - 1 cup baby spinach - 1/2 cup feta cheese, crumbled - 2 garlic cloves, minced - 1 teaspoon dried oregano - 1 teaspoon paprika - Salt and pepper to taste - Fresh parsley, chopped (for garnish) - 2 1/2 cups low-sodium chicken broth Next, cook the chicken. In a large pot, heat the olive oil over medium heat. Add the diced chicken, and season it with salt, pepper, paprika, and oregano. Sauté the chicken for about 5 to 7 minutes until it is golden brown and cooked through. Once done, remove the chicken from the pot and set it aside. Now, let’s sauté the garlic and add broth. In the same pot, add the minced garlic. Cook it for about 1 minute until it smells good. Be careful not to let it burn. After that, pour in the chicken broth and bring it to a boil. Once boiling, it's time to add the orzo pasta. Cook it according to the package instructions, which usually takes around 8 to 10 minutes. Check for al dente texture. When the orzo has about 2 minutes left, stir in the cherry tomatoes and baby spinach. Keep cooking until the spinach wilts and the tomatoes soften. Now, return the cooked chicken to the pot. Mix everything together well. Taste and adjust the seasoning with more salt or pepper if you like. Remove the pot from heat. Fold in the crumbled feta cheese, letting it melt slightly into the dish. This adds a creamy texture and great flavor. Serve hot and garnish with fresh chopped parsley. Enjoy this tasty and easy meal! - Cook chicken until golden brown for great flavor. This takes about 5-7 minutes. - Avoid overcrowding the pot when cooking chicken. This helps it cook evenly. - To get orzo just right, check it a minute early. You want it slightly firm or al dente. - Stir the orzo during cooking. This keeps it from sticking together. - Add fresh herbs like basil or thyme for a bright taste. - To kick up the flavor, try adding crushed red pepper or lemon zest. - Adjust seasoning with salt and pepper to match your taste. Always taste before serving. - Mix in garlic powder or onion powder for an extra flavor boost. - Pair this dish with a light salad. A simple green salad works well. - Serve with crusty bread for a hearty meal. - Enjoy with a glass of white wine. A Sauvignon Blanc complements the flavors nicely. - For non-alcoholic options, try sparkling water with a slice of lemon. Pro Tips Perfectly Cooked Chicken: Ensure your chicken pieces are evenly sized for consistent cooking. This prevents some pieces from being overcooked while others remain undercooked. Flavor Boost: To enhance the depth of flavor, consider marinating the chicken in olive oil, garlic, and herbs for at least 30 minutes before cooking. Orzo Cooking Tip: Stir the orzo occasionally while it cooks to prevent it from sticking together. This ensures a light and fluffy texture. Feta Melting: For a creamier texture, add the feta cheese at the very end of cooking and let it sit covered for a few minutes to melt slightly into the dish. {{image_2}} Here are some great ways to change up the protein in your dish. You can use turkey or even shrimp instead of chicken. They both cook quickly and taste delicious. For a vegetarian option, try using chickpeas or lentils. They add great protein and fiber to the meal. Cheese can change the whole taste of your dish. Try goat cheese or mozzarella instead of feta. Each cheese brings its own flavor. You can also add spices for a unique twist. Try cumin, coriander, or even a pinch of chili powder. These spices can really change the flavor profile. Using fresh, seasonal vegetables makes this dish even better. In spring, add asparagus or peas. In summer, zucchini or bell peppers work well. In fall, consider adding squash or kale. Each season offers different flavors that can enhance your meal. Adjust the recipe to match what’s fresh and available. To store leftovers, let the dish cool to room temperature. Then, place it in an airtight container. Make sure to seal it well to keep it fresh. In the fridge, the High Protein Chicken Orzo lasts about 3 to 4 days. Always check for any off odors or changes in color before eating. For freezing, divide the orzo into smaller portions. Use freezer-safe containers or bags to prevent freezer burn. Squeeze out as much air as possible to help keep the food safe. You can freeze it for up to 3 months. When you're ready to eat, thaw it overnight in the fridge. Reheat it gently on the stove or in the microwave. Add a splash of chicken broth if it seems dry. You can prepare this dish in advance for easy meals. Cook a large batch and portion it into single servings. This makes it easy to grab and go during busy days. You can store these portions in the fridge or freezer. Try to label each container with the date so you know when to use it. Can I make this dish gluten-free? Yes! You can use gluten-free orzo or any gluten-free pasta. Rice or quinoa also works well. Just cook it according to the package instructions. How can I increase the protein content further? You can add more chicken or include beans like chickpeas. Tofu or lentils are great options too. Also, using Greek yogurt as a topping adds protein. What can I substitute for orzo? You can use any small pasta like ditalini or acini di pepe. If you want a grain, try couscous or farro for a different texture. How long does it take to cook chicken? It takes about 5-7 minutes to cook diced chicken. Ensure it reaches an internal temperature of 165°F (75°C) to be safe. Can I serve this dish cold? Yes, you can. It makes a great cold salad too. Just let it cool and mix in some extra veggies. What are some good toppings? Fresh herbs like basil or cilantro add flavor. You can also sprinkle more feta or add a squeeze of lemon for brightness. This article explored a delicious high-protein chicken orzo recipe. We covered key ingredients, their health benefits, and how to prepare your dish step-by-step. You learned tips to enhance flavor and explored variations for every taste. Proper storage and meal prep ideas can save you time. Remember, cooking is flexible and fun! Don’t hesitate to experiment with your favorite flavors. Enjoy making this dish and sharing it with others. Your kitchen creations can bring joy to your table.

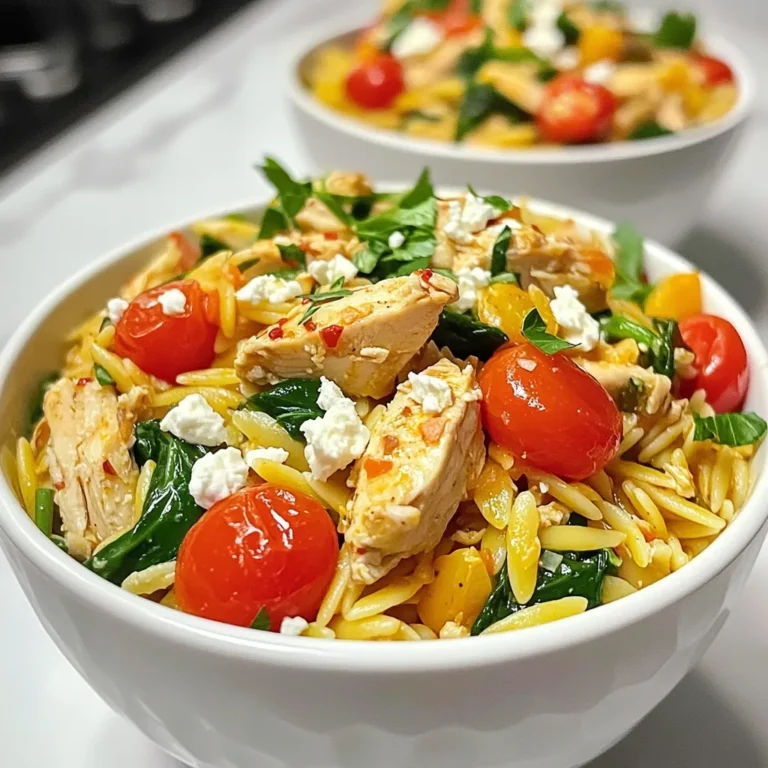
High Protein Chicken Orzo Delicious and Easy Meal

- 2 cups uncooked penne pasta - 1 pound diced chicken breast - 2 cups heavy cream The main ingredients for this dish are simple. You need uncooked penne pasta for the base. The diced chicken breast adds protein and flavor. Heavy cream gives that rich, creamy texture. - 1 packet ranch seasoning mix - 1 cup cherry tomatoes, halved - 1 cup fresh spinach, chopped For seasonings, the ranch seasoning mix is key. It adds a burst of flavor with every bite. Cherry tomatoes bring sweetness and color. Fresh spinach adds a nice touch of green and nutrition. - 1 cup shredded mozzarella cheese - 1/2 cup grated Parmesan cheese - Fresh parsley, chopped Cheese is where the magic happens! Shredded mozzarella melts beautifully. Grated Parmesan adds a nice salty kick. Fresh parsley makes the dish pop and looks great. {{ingredient_image_1}} First, fill a large pot with water and add salt. Bring the water to a boil. Once boiling, add 2 cups of uncooked penne pasta. Cook it according to the package directions until it is al dente. This means the pasta should be firm when you bite into it. After cooking, drain the pasta and set it aside. In a large skillet, heat 1 tablespoon of olive oil over medium heat. When the oil is hot, add 1 pound of diced chicken breast. Season the chicken with salt and pepper to taste. Cook the chicken for about 5 to 7 minutes. Stir it occasionally until the chicken turns golden brown and is no longer pink inside. Now, reduce the heat to low. Pour in 2 cups of heavy cream into the skillet with the cooked chicken. Stir in 1 packet of ranch seasoning mix. Make sure the seasoning blends well with the cream. Let the sauce simmer gently for about 3 to 4 minutes. This helps it thicken slightly. Next, add 1 cup of halved cherry tomatoes and 1 cup of chopped fresh spinach to the skillet. Stir them in gently. Cook for an additional 2 to 3 minutes. This will let the spinach wilt and the tomatoes soften. Once the vegetables are ready, add the drained penne pasta to the skillet. Toss everything gently together. Make sure the pasta is well coated with the creamy ranch sauce. Finally, stir in 1 cup of shredded mozzarella cheese and 1/2 cup of grated Parmesan cheese. Let the cheeses melt into the sauce. Taste the dish and adjust the seasoning with more salt and pepper if needed. Your creamy chicken ranch pasta is now ready to be served! To adjust creaminess levels, start with less cream. You can always add more later. If you want a lighter sauce, try using half-and-half. For alternative seasonings, add garlic powder or onion powder. You can even mix in some Italian herbs for a twist. To avoid overcooked chicken, check the chicken often while it cooks. It should be golden brown and not dry. To make sure the pasta and sauce stick together, toss the pasta with the sauce right after draining it. This helps the flavors blend well. For garnishing ideas, sprinkle fresh parsley on top before serving. You can also add extra grated Parmesan for a cheesy touch. As for side dishes, a simple green salad pairs nicely. Garlic bread also makes a great side to soak up the creamy sauce. Pro Tips Perfect Pasta Texture: Always cook the pasta al dente for the best texture. It will continue to cook slightly when mixed with the sauce. Chicken Cooking Tips: Ensure the chicken is cut into uniform pieces for even cooking. Use a meat thermometer to check that it reaches 165°F (75°C). Ranch Flavor Boost: For an extra flavor punch, consider adding a splash of buttermilk or Greek yogurt to the sauce for a tangy twist. Vegetable Variations: Feel free to add other vegetables like bell peppers or zucchini for more color and nutrition, just make sure to adjust cooking times accordingly. {{image_2}} You can switch up the protein in this dish. Shrimp is a great choice. Just cook it in the skillet until pink. Beef also works well. Use ground beef for a heartier taste. If you want a vegetarian meal, try chickpeas or tofu. Both options add protein and texture. For a dairy-free option, use coconut cream instead of heavy cream. It adds a nice flavor. You can also mix in a spicy ranch seasoning. This will give your pasta a kick. Add a bit of hot sauce for extra heat. Want to add more veggies? Bell peppers are a great choice. Chop them up and toss them in with the chicken. You can also use zucchini or broccoli for more color and crunch. Different cheeses can also enhance the flavor. Try adding feta for a tangy twist or pepper jack for some spice. To keep your creamy chicken ranch pasta fresh, store it in an airtight container. Let the pasta cool down before sealing it. This helps avoid moisture buildup. Place the container in the fridge. It can stay fresh for about 3 to 4 days. When you want to eat it again, check if it smells good and looks fine. When reheating, you want to keep that creamy texture. The best method is to use the stovetop. Place the pasta in a skillet over low heat. Add a splash of milk or cream to help it stay creamy. Stir it often until warmed. You can also use the microwave. Heat it in short bursts, about 30 seconds each time. Stir in between to make sure it heats evenly. If you want to save creamy chicken ranch pasta for later, freezing is a good choice. First, let the pasta cool completely. Then, portion it into freezer-safe bags or containers. Squeeze out as much air as possible. Label the bags with the date. It can last up to 2 months in the freezer. To thaw, leave it in the fridge overnight. Reheat it as mentioned earlier. If you don’t have ranch seasoning, try using Italian seasoning. You can mix dried herbs like basil, oregano, and parsley. Another option is to blend garlic powder, onion powder, and dill. These substitutes will still give your dish great flavor. You can also use Greek yogurt mixed with lemon juice for a creamy taste. Yes, you can make this dish ahead of time. Cook the pasta and chicken, then mix them with the sauce. Store the pasta in an airtight container in the fridge. It stays good for up to three days. When you are ready to eat, reheat it on low heat. Add a splash of cream to keep it creamy. To keep the sauce smooth, avoid high heat when cooking. Add the cream slowly and stir well. Make sure to let the sauce simmer gently. If the sauce thickens too much, add a little pasta water. This keeps it creamy and prevents separation. Yes, you can make a lighter version of this dish. Use low-fat milk or a mix of milk and Greek yogurt instead of heavy cream. You can also use less cheese. Adding more vegetables can help keep the dish filling without extra calories. Absolutely! You can use any pasta shape you like. Bowtie, fusilli, or even spaghetti work well. Just adjust the cooking time based on the pasta you choose. Each type will give a different twist to the dish while keeping the flavor the same. This blog gives you a clear path to making creamy chicken ranch pasta. You learned about the key ingredients, helpful tips, and various ways to enjoy this dish. Each step guides you through cooking, making it simple to follow. My final thoughts? Have fun customizing your meals. Add different proteins, cheeses, or veggies to fit your tastes. With a few adjustments, this dish can be perfect every time. Enjoy your cooking journey!

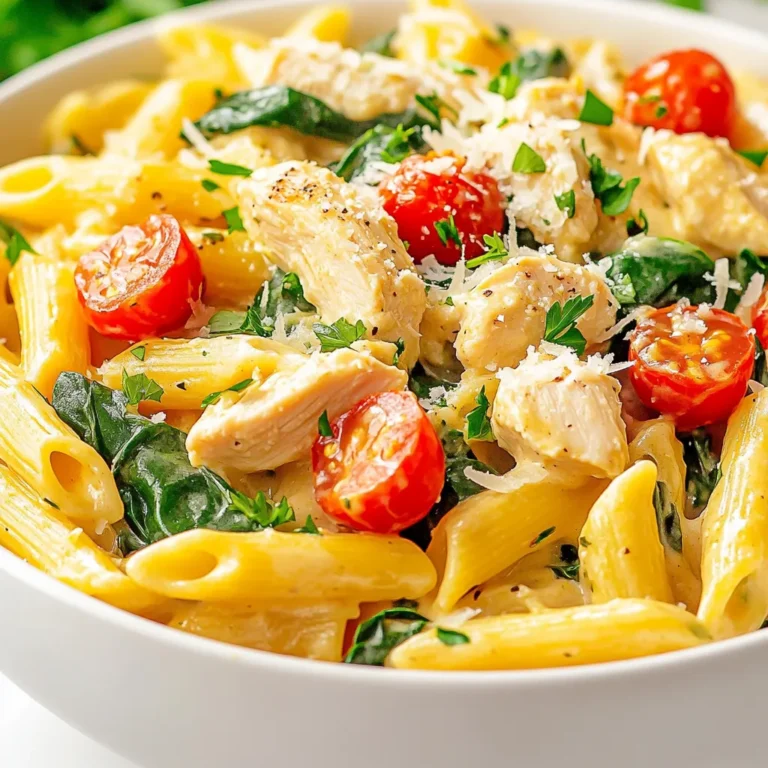
Creamy Chicken Ranch Pasta Quick and Flavorful Meal

To make Jamie Oliver's pumpkin muffins, gather these simple ingredients: - 2 cups all-purpose flour - 1 teaspoon baking powder - 1 teaspoon baking soda - 1 teaspoon ground cinnamon - 1/2 teaspoon ground nutmeg - 1/2 teaspoon ground ginger - 1/2 teaspoon salt - 1 cup granulated sugar - 1/2 cup brown sugar, packed - 1/2 cup vegetable oil - 2 large eggs - 1 cup canned pumpkin puree - 1 teaspoon vanilla extract - 1/2 cup chopped walnuts or pecans (optional) - 1/2 cup chocolate chips (optional) This list gives you everything you need for a tasty treat. If you lack an ingredient, don’t worry! Here are some easy swaps: - Use whole wheat flour for a healthier option. - Swap vegetable oil with melted coconut oil for a new flavor. - Brown sugar can be replaced with coconut sugar for a unique twist. - Try flax eggs for a vegan version. Mix 1 tablespoon of flaxseed meal with 2.5 tablespoons of water per egg. These substitutions keep your muffins tasty and fun. Want to add even more flavor? You can include nuts or chocolate chips! - Chopped walnuts or pecans add crunch and a nutty taste. - Chocolate chips bring sweetness and richness. Feel free to mix in either or both to enhance your muffins. Enjoy experimenting! {{ingredient_image_1}} To start, preheat your oven to 350°F (175°C). This step is key for even baking. Next, prepare your muffin tin. You can line it with paper liners or use non-stick spray. This helps the muffins release easily after baking. In a large bowl, whisk together the dry ingredients. Combine 2 cups of flour, 1 teaspoon of baking powder, 1 teaspoon of baking soda, 1 teaspoon of cinnamon, 1/2 teaspoon of nutmeg, 1/2 teaspoon of ginger, and 1/2 teaspoon of salt. This mix builds the flavor and structure of the muffins. In another bowl, blend the sugars and oil. Use 1 cup of granulated sugar, 1/2 cup of brown sugar, and 1/2 cup of vegetable oil. Add 2 eggs one at a time, beating well after each. Then, mix in 1 cup of canned pumpkin puree and 1 teaspoon of vanilla extract. Stir the wet mix until smooth and creamy. Now, it's time to combine the wet and dry mixes. Gradually add the dry ingredients to the wet mix. Stir gently until just combined. It's okay to have a few lumps. If you want to add nuts or chocolate chips, fold them in now. Spoon the batter into your prepared muffin tin, filling each cup about 2/3 full. Bake in the oven for 18 to 22 minutes. Check with a toothpick; it should come out clean. Once baked, let the muffins cool in the tin for 5 minutes. Then, transfer them to a wire rack to cool completely. Enjoy your delicious pumpkin muffins! For perfect muffins, keep your ingredients at room temperature. This helps them mix better. Mix the dry and wet ingredients separately first. When you combine them, stir gently. Overmixing makes muffins dense, and nobody wants that. If you see lumps in the batter, that's okay! It means you’ll get a fluffy texture. One big mistake is not measuring flour correctly. Too much flour makes muffins dry. Always spoon flour into the cup and level it off. Another mistake is skipping the cooling step. Letting muffins cool in the pan for a few minutes keeps them moist. Lastly, don’t open the oven door too soon. This can cause muffins to sink. Wait until they are nearly done before taking a peek. These muffins are delicious on their own, but you can dress them up! Try serving them warm with butter or cream cheese. For a fun twist, add a drizzle of maple syrup or honey on top. You can also pair them with coffee or tea for a cozy snack. If you have guests, serve them at brunch with fruits. They will love the flavors and warmth! Pro Tips Use Fresh Spices: For the best flavor, use freshly ground spices instead of pre-ground. This enhances the aroma and taste of your muffins. Check Doneness: To avoid overbaking, check your muffins a couple of minutes before the suggested baking time. They should spring back when lightly pressed. Cool Completely: Allow muffins to cool completely on a wire rack to maintain their texture. This prevents them from becoming soggy. Storage Tips: Store muffins in an airtight container at room temperature for up to 3 days, or freeze them for longer storage. Reheat in the microwave for a few seconds for a fresh taste. {{image_2}} You can tweak the basic recipe for fun flavors. Try adding a pinch of allspice for warmth. You can swap some flour for oat flour for a nuttier taste. How about adding some dried cranberries or raisins for sweetness? If you love chocolate, mix in dark chocolate chips with your batter. These small changes can make a big difference in flavor. For those who need gluten-free muffins, use gluten-free all-purpose flour. Make sure it has a binding agent like xanthan gum. This helps give the muffins a nice texture. You can also use almond flour or coconut flour. They add a unique taste and are still delicious. Mini muffins are a fun twist on the classic recipe. Simply fill the mini muffin tin with the batter. Bake them for about 10-15 minutes. Keep an eye on them, as they bake faster than regular muffins. Kids love these bite-sized treats, and they are perfect for snacks or parties. To keep your pumpkin muffins fresh, store them in an airtight container. Place them at room temperature for up to three days. If you want to keep them longer, the fridge is a great option. Just remember, cold air can dry them out. So, wrap them in plastic wrap or foil first. Freezing pumpkin muffins is simple. Let the muffins cool completely first. Then, wrap each muffin in plastic wrap. Place them in a freezer bag or container. Label the bag with the date. You can freeze them for up to three months. When you're ready to eat, just remove one from the freezer. To reheat frozen muffins, let them thaw in the fridge overnight. You can also heat them in the microwave for about 15 to 20 seconds. If you prefer a warm muffin, bake them in the oven at 350°F (175°C) for 5 to 10 minutes. This gives them a nice, warm texture. Enjoy your delicious pumpkin muffins! Yes, you can use fresh pumpkin. First, cook and puree the pumpkin. Use about one cup. It gives a lovely flavor, but can change the texture slightly. Canned pumpkin is easier and saves time, but fresh adds extra freshness. These muffins stay fresh for about three days at room temperature. Keep them in an airtight container. If you want them to last longer, store them in the fridge. They can last up to a week that way. These muffins have a good mix of flavors and nutrition. They use whole ingredients like pumpkin and nuts. The sugars can add some calories, but you can substitute them. Overall, they can be part of a balanced diet when enjoyed in moderation. Yes, you can replace eggs with applesauce or mashed bananas. Use about a quarter cup for each egg. This makes the muffins moist and adds flavor. It’s a great option for those who avoid eggs. This blog covered all you need to know about making pumpkin muffins. We discussed the key ingredients and substitutions, plus ways to add nuts or chocolate. You learned step-by-step instructions to mix and bake perfectly. Tips helped you avoid common mistakes and achieve great texture. I offered variations for different flavors and storage best practices. Remember, these muffins are fun to make and share. Enjoy exploring new flavors and baking with friends. You have the tools to create tasty treats!

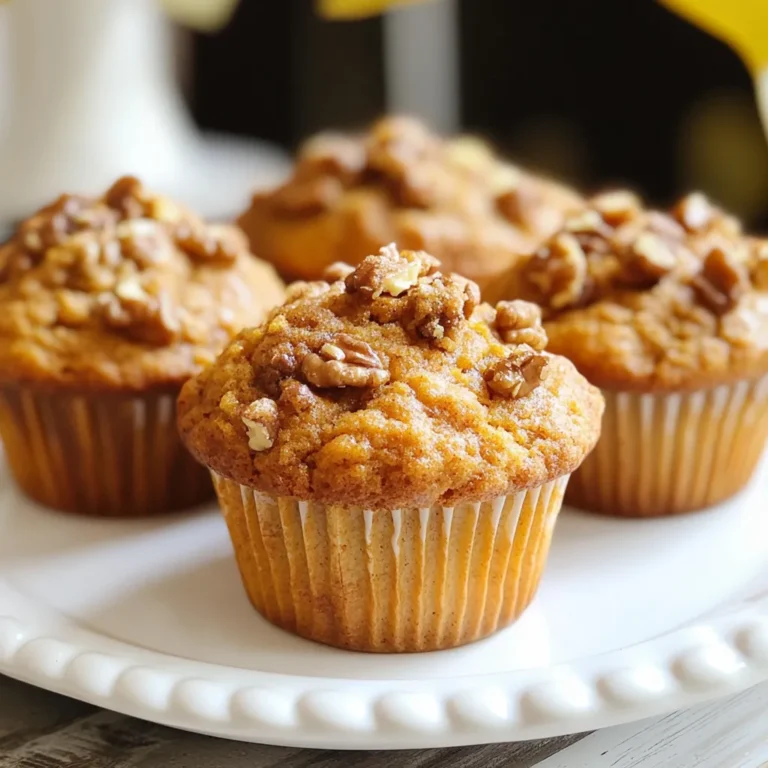
Jamie Oliver Pumpkin Muffins Easy and Tasty Recipe

- 12 oz rigatoni pasta - 1 lb Italian sausage (mild or spicy) - 2 tablespoons olive oil - 3 cloves garlic, minced - 1 medium onion, chopped - 4 cups fresh spinach - 1 can (14 oz) diced tomatoes (with juices) - 1 teaspoon red pepper flakes - ½ teaspoon dried oregano - ½ teaspoon salt - ¼ teaspoon black pepper - ½ cup grated Parmesan cheese - Fresh basil leaves for garnish (optional) The key to a great sausage rigatoni is in the ingredients. Each one plays a role in flavor and texture. Rigatoni, with its ridges, holds sauce well. I love using Italian sausage for its bold taste. You can choose mild or spicy, depending on how much heat you want. Olive oil adds richness and helps cook the sausage. Fresh garlic and onion give depth to the dish. Spinach adds a nice pop of color and nutrition. Diced tomatoes bring juiciness and acidity, balancing the flavors. Don't forget the red pepper flakes! They add a kick. Oregano, salt, and black pepper round out the seasoning. Lastly, the Parmesan cheese brings creaminess and umami, making everything come together. Feel free to add fresh basil as a garnish. It adds a lovely aroma and bright flavor. These ingredients create a simple yet delicious meal that you’ll want to make again. {{ingredient_image_1}} First, boil a large pot of water. Add salt to the water for flavor. Cook the rigatoni according to package instructions until it is al dente. This usually takes around 10-12 minutes. Once cooked, drain the pasta and set it aside. This step is key for a great texture. In a large skillet, heat 2 tablespoons of olive oil over medium heat. Once the oil is hot, crumble 1 pound of Italian sausage into the skillet. Use a spoon to break it apart. Cook the sausage until it is browned, about 5-7 minutes. Make sure it is cooked through, with no pink left. This gives the dish its rich flavor. Now, add the chopped onion and minced garlic to the skillet with the sausage. Sauté them for about 2-3 minutes. You want the onion to become soft and clear. Next, stir in 4 cups of fresh spinach. Cook until it wilts down. Then, add a can of diced tomatoes, red pepper flakes, oregano, salt, and black pepper. Mix everything well and let it simmer for 5 minutes. This allows the flavors to blend nicely. It's time to bring it all together! Toss the drained rigatoni into the skillet. Make sure to coat the pasta well with the sausage and vegetable mixture. If the sauce seems too thick, add a splash of water or chicken broth. This will help reach your desired sauce consistency. For the final step, stir in ½ cup of grated Parmesan cheese. Mix until the cheese melts and creates a creamy texture. Always taste to check if you need to adjust the seasoning. This small step can elevate the dish. Serve the sausage rigatoni on plates and top with more Parmesan and fresh basil leaves if you like. Enjoy your flavorful dinner delight! - Ideal sausage choices for flavor: I recommend using Italian sausage. You can choose mild or spicy based on your taste. Mild sausage gives a nice balance, while spicy adds a kick. Try to find fresh sausage from a local butcher for the best flavor. - Adjusting spice levels to taste: If you enjoy heat, add more red pepper flakes. Start with a little and taste as you go. You can also add fresh chili peppers for more heat. If you prefer less spice, skip the red pepper flakes altogether. - Best practices for sautéing: Use medium heat when sautéing sausage. This helps it brown evenly and stay juicy. Make sure to crumble the sausage well while cooking. This ensures even cooking and better flavor distribution. - Ways to enhance the sauce flavor: To boost the sauce flavor, let the mixture simmer for a full five minutes. This step allows the spices to mix well. You can also add a splash of white wine for depth. Just let it cook off before adding the pasta. - Ideal accompaniments and pairings: Pair your sausage rigatoni with a simple green salad or garlic bread. A light salad balances the rich flavors. Garlic bread adds a tasty crunch on the side. - Presentation tips for a gourmet look: Serve your rigatoni in shallow bowls for a nice touch. Garnish with extra Parmesan cheese and fresh basil leaves for color. A sprinkle of black pepper adds a pop of flavor and looks great! Pro Tips Perfect Pasta: Always cook pasta in well-salted water to enhance its flavor. Aim for a saltiness similar to the sea! Custom Heat: Adjust the amount of red pepper flakes based on your heat preference. Start with less and add more if needed! Fresh Spinach: For a vibrant color and maximum nutrition, add the spinach just before serving to keep it fresh and bright. Cheesy Finish: For extra creaminess, reserve a bit of pasta water to mix in with the sauce before serving—it helps bind everything together! {{image_2}} You can easily make this dish fit your needs. If you want gluten-free rigatoni, choose a brand made from rice or corn. Many stores offer these options now. For a vegetarian twist, swap the sausage with plant-based sausage. This keeps the flavor while making it meat-free. Want to make your rigatoni more fun? Add colorful vegetables like bell peppers or mushrooms. They bring a great taste and extra nutrients. You can also try different cheeses. Goat cheese or feta can add a tangy taste that pairs well with the dish. For a creamier sauce, mix in heavy cream or a light cream. This makes the dish richer and more decadent. You can also explore using different tomato sauces. A spicy arrabbiata or a smooth marinara can change the whole meal. Adjust based on what you like best! To store leftovers, let the dish cool first. Place the sausage rigatoni in an airtight container. This keeps the flavors fresh. You can store it in the fridge for up to three days. When you reheat, make sure it’s hot all the way through. If you want to freeze the dish, portion it first. Use freezer-safe containers or bags. Remove as much air as possible to prevent freezer burn. You can freeze it for up to three months. When you're ready to enjoy it, thaw it in the fridge overnight. Reheat it in a skillet over low heat. Add a splash of water or broth for moisture. Can I make sausage rigatoni ahead of time? Yes, you can make sausage rigatoni ahead of time. Prepare the dish as usual, then cool it completely. Store it in an airtight container in the fridge for up to three days. When ready to eat, reheat it in a skillet or microwave. You may want to add a splash of water to keep it moist. What can I substitute for Italian sausage? You can swap Italian sausage with ground turkey or chicken for a lighter option. Use spices like fennel seeds and red pepper flakes to mimic the flavor. For a vegetarian choice, try plant-based sausage or lentils. Both options keep the dish tasty and satisfying. Caloric details and macronutrient breakdown This dish serves four and has about 500 calories per serving. It contains around 25 grams of protein, 20 grams of fat, and 60 grams of carbs. Nutritional values can vary based on the type of sausage and cheese used. Healthier ingredient swaps for a lighter dish To make this dish lighter, consider using whole grain rigatoni. You can also use less cheese or a lower-fat version. Adding more spinach or other vegetables boosts fiber and nutrients without adding many calories. Recommended kitchen tools for simplicity For making sausage rigatoni, you need a large pot for boiling pasta and a large skillet for the sauce. A wooden spoon helps to stir the sausage and veggies easily. A colander is useful for draining the rigatoni once cooked. Tips on selecting quality kitchenware for this recipe Choose a heavy-bottomed skillet to ensure even cooking. Non-stick options make clean-up easy. Invest in a high-quality pot for boiling pasta. A reliable colander with small holes prevents pasta from slipping through. Good tools help you cook efficiently and enjoy the process. This blog post covered how to make a tasty sausage rigatoni. We explored each ingredient, cooking steps, and tips for the best flavor. You learned how to adjust for dietary needs and enhance the dish with variations. Proper storage methods keep your leftovers fresh. With these tips and techniques, you can create a delicious meal. Enjoy experimenting and sharing this dish with friends and family. Your kitchen is ready for a tasty adventure!

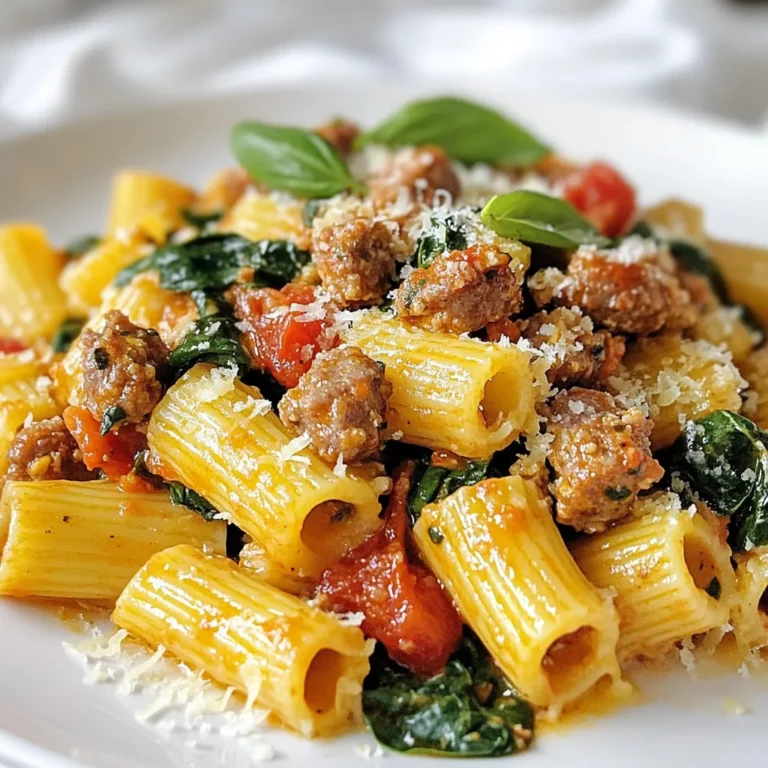
Sausage Rigatoni with Spinach Flavorful Dinner Delight

Here’s what you need for your surf and turf tacos: - 8 small corn tortillas - 1 lb shrimp, peeled and deveined - 1 lb flank steak - 1 tablespoon olive oil - 1 teaspoon chili powder - 1 teaspoon garlic powder - 1 teaspoon cumin - Salt and pepper to taste - 1 avocado, sliced - 1 cup shredded cabbage (green or purple) - ½ cup fresh cilantro, chopped - 1 lime, cut into wedges - ½ cup sour cream (optional) This mix of fresh ingredients brings the dish to life. The shrimp and flank steak provide great flavors. The spices add warmth and depth. Don't skip the lime juice; it brightens everything. The avocado adds creaminess, while the cabbage gives crunch. This combination makes each bite exciting and enjoyable. {{ingredient_image_1}} To start, you need to mix the marinade. In a small bowl, blend one tablespoon of olive oil, one teaspoon of chili powder, one teaspoon of garlic powder, and one teaspoon of cumin. Add salt and pepper to taste. Rub this mixture all over the flank steak. Let it marinate for at least 30 minutes. This step makes the meat juicy and packed with flavor. Next, preheat your grill or grill pan to medium-high heat. Grill the flank steak for about 5 to 7 minutes on each side. You want it cooked to your liking. Once done, let the steak rest for 5 minutes. Resting helps keep the juices inside the meat. After resting, slice the steak thinly against the grain for the best texture. Now, let’s cook the shrimp. Heat a dash of olive oil in a skillet over medium heat. Season the shrimp with salt and pepper. Sauté them for about 3 to 4 minutes. You know they are done when they turn pink and opaque. Once cooked, remove them from heat and set aside. Warming the tortillas is easy. You can use a dry skillet or place them directly on the grill. Warm each tortilla for about 30 seconds on each side. This will make them soft and easy to fold. Now it's time to build your tacos. Take a warmed tortilla and layer it with slices of flank steak. Next, add the sautéed shrimp. Top it off with avocado slices and shredded cabbage. Finally, sprinkle fresh cilantro over the top for a burst of flavor. When serving, squeeze some lime juice over the tacos. This adds a nice zing. You can also drizzle sour cream on top if you like. This creamy touch enhances the flavors and makes the dish even more enjoyable. Marinating makes meat and seafood taste better. It adds flavor and tenderizes the meat. For surf and turf tacos, use a blend of olive oil, chili powder, garlic powder, cumin, salt, and pepper. This marinade takes just 30 minutes. To get perfect grill marks, preheat your grill. Cook flank steak for 5-7 minutes on each side. Let it rest for 5 minutes after cooking. This keeps it juicy. For shrimp, cook in a skillet. Avoid overcooking them. They should turn pink and opaque in about 3-4 minutes. You can add more flavor with toppings. Try avocado slices for creaminess. Shredded cabbage adds crunch. Fresh cilantro gives a bright taste. Lime juice enhances all the flavors. If you like, drizzle sour cream on top for extra richness. Pro Tips Marinate the Steak Longer: For even more flavor, consider marinating the flank steak for a few hours or overnight. This will enhance its tenderness and taste. Use Fresh Shrimp: Opt for fresh shrimp instead of frozen if possible. Fresh shrimp has a better texture and flavor, elevating your tacos. Warm Tortillas Properly: Ensure your tortillas are warm and soft before assembling. This makes them pliable and prevents tearing when filled. Customize Your Toppings: Feel free to add additional toppings such as diced tomatoes, jalapeños, or a drizzle of your favorite hot sauce for an extra kick. {{image_2}} You can swap shrimp for other seafood like fish or scallops. Fish like tilapia or mahi-mahi work well. They add a mild taste that pairs nicely with steak. Scallops bring a sweet, tender flavor to the mix. If you prefer meat, chicken or pork are great options too. Marinate chicken thighs or pork tenderloin just like the flank steak for great flavor. Think about the type of taco you want. Soft corn tortillas are classic, but hard shells add crunch. You can use flour tortillas for a different bite. They hold fillings well and make for a soft taco. Experiment with different shapes and sizes to find what you love best. Spice up your tacos with seasonings based on what you enjoy. Besides chili powder, try paprika for smokiness. Cumin adds earthiness, while lime zest brings brightness. If you like heat, add cayenne pepper or hot sauce. Fresh herbs like cilantro or parsley boost flavor and freshness. Each option lets you create a unique taste just for you. To keep your cooked meat and shrimp fresh, store them in airtight containers. This will help seal in moisture and flavor. Make sure to cool them to room temperature before sealing. You can keep cooked shrimp in the fridge for up to three days. The flank steak can last for four days if stored properly. When reheating tacos, I recommend using an oven or a skillet. Preheat your oven to 350°F. Place the tacos on a baking sheet for about ten minutes. If using a skillet, heat it on medium. Add a few drops of oil, then place the tacos in the skillet. Heat for about three minutes on each side. This method keeps the tortillas soft and the filling warm. You can freeze assembled tacos, but it’s best to freeze the meat and shrimp separately. Wrap them in plastic wrap and place them in a freezer bag. They can last up to three months. When ready to eat, thaw them overnight in the fridge. Reheat as mentioned above, then assemble your tacos fresh! Surf and Turf Tacos are a fun mix of land and sea flavors. They combine juicy flank steak and tender shrimp, wrapped in corn tortillas. You add fresh toppings like avocado and cabbage for extra crunch. This dish offers a great balance of savory meat and sweet seafood. It's perfect for taco night or any casual meal. To kick up the heat, add sliced jalapeños or a hot sauce of your choice. You can use a spicy marinade with more chili powder or paprika. Another option is to mix diced chipotle peppers in adobo sauce into the sour cream. These simple changes will give your tacos a delicious kick. Yes, you can prep some parts ahead of time. Marinate the steak and store it in the fridge for up to 24 hours. Cook the shrimp and steak the day before, then keep them in the fridge. Warm them up before serving. You can also slice the avocado and store it in lemon juice to keep it fresh. Great sides include Mexican rice or refried beans for a filling meal. You can also serve chips with fresh salsa or guacamole. A light salad with lime vinaigrette adds a fresh touch. Don't forget some corn on the cob for a fun, summery vibe! In this blog post, we explored how to make delicious surf and turf tacos. We covered all the key ingredients, from shrimp to flank steak. I shared step-by-step instructions to ensure each component tastes great. Additionally, I offered helpful tips for marinating and cooking. You can also transform this recipe with variations and toppings to suit your taste. Overall, these tacos are a fun way to enjoy seafood and meat together. Try making them for your next meal and impress your family or friends with these tasty flavors!

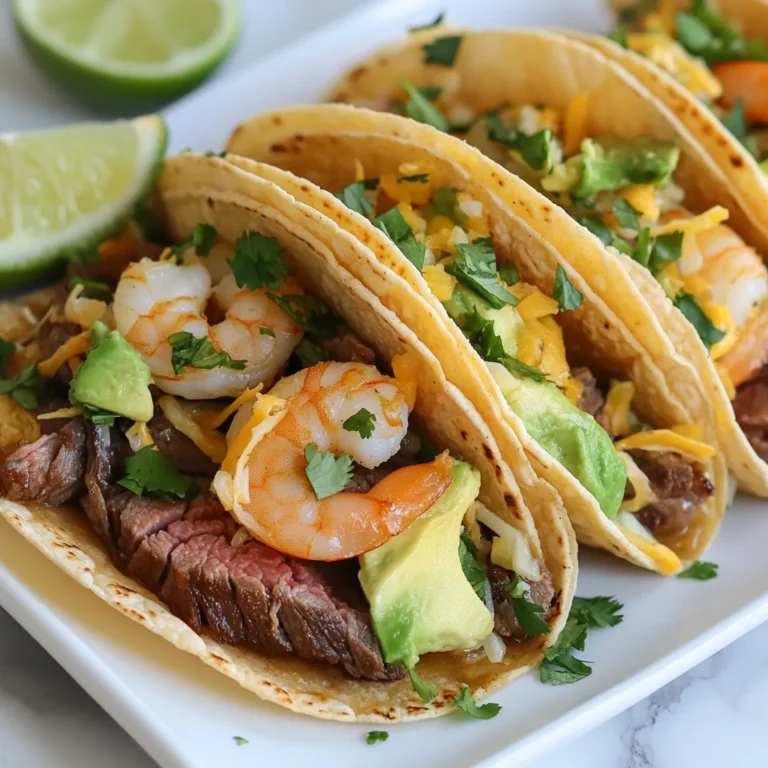
Savory Surf and Turf Tacos Perfectly Made Dish

To make your Cinnamon Crunch Banana Bread, you will need the following ingredients: - 3 ripe bananas, mashed - 1/3 cup melted coconut oil (or unsalted butter) - 1/2 cup brown sugar - 1 large egg, beaten - 1 teaspoon vanilla extract - 1 teaspoon baking soda - Pinch of salt - 1 teaspoon ground cinnamon - 1 1/2 cups all-purpose flour - 1/2 cup walnuts, chopped (optional) - 1/4 cup cinnamon sugar (for the topping) Each ingredient plays an important role. The ripe bananas give the bread its sweet flavor and moist texture. Coconut oil or butter adds richness and helps bind the bread. Brown sugar adds depth with its caramel notes. The egg acts as a binder and gives structure. Vanilla extract enhances the overall flavor. Baking soda helps the bread rise while the salt balances the sweetness. Ground cinnamon infuses warm spice, making every bite comforting. All-purpose flour provides the base, while walnuts add a nice crunch if you choose to include them. The cinnamon sugar topping gives that delightful crunch and extra sweetness on top. Gather these ingredients, and you are ready to create a delicious treat that fills your kitchen with warmth and aroma. {{ingredient_image_1}} - Preheat your oven to 350°F (175°C). Grease a 9x5 inch loaf pan. - In a mixing bowl, mash the ripe bananas. Add the melted coconut oil and mix well. - Stir in the brown sugar, beaten egg, and vanilla extract until combined. - Add baking soda, salt, and cinnamon. Mix thoroughly to blend the flavors. - Gradually fold in the all-purpose flour until just combined. Be careful not to overmix! - Pour the batter into the prepared loaf pan. Smooth the top for even baking. - In a small bowl, mix 1/4 cup sugar with 1 teaspoon cinnamon. Sprinkle this mixture over the batter. - Bake for 55-60 minutes. Check doneness with a toothpick in the center. It should come out clean. To get the best texture in your banana bread, avoid overmixing the batter. When you mix too much, the bread can turn out tough. Stir until just combined for a soft loaf. It’s also key to cool the bread properly before slicing. Let it rest in the pan for 10 minutes, then move it to a wire rack. This helps the flavors settle and makes for cleaner slices. You can boost the flavor with some tasty add-ins. Try adding nuts like walnuts or pecans for a nice crunch. Chocolate chips are also a fun choice. If you want to switch it up, use different oils or butters. Coconut oil gives a light taste, while unsalted butter adds a rich flavor. Both options work well! For a lovely presentation, slice the banana bread with a sharp knife. Serve it warm for the best taste. Adding a dollop of butter or cream cheese on the side makes it special. You can also sprinkle some extra cinnamon sugar on top for a beautiful finish. A simple garnish can turn your banana bread into a showstopper! Pro Tips Choose Ripe Bananas: The riper the bananas, the sweeter and more flavorful your banana bread will be. Look for bananas with plenty of brown spots for optimal sweetness. Don’t Overmix: When incorporating the flour, mix just until combined to ensure a tender, moist bread. Overmixing can lead to a dense texture. Adjusting Sweetness: Taste your batter before baking and adjust the sugar if you prefer a sweeter bread. You can add an extra tablespoon of brown sugar if desired. Storage Tips: Store leftover banana bread in an airtight container at room temperature for up to three days, or freeze slices for up to three months for a quick treat later. {{image_2}} You can make this banana bread healthier in two main ways. First, substitute whole wheat flour for all-purpose flour. Whole wheat flour adds fiber and nutrients. This change gives the bread a nuttier taste and a denser texture. Second, reduce the sugar content. You can cut the brown sugar by 1/4 cup. The ripe bananas add natural sweetness, so you won’t miss much sugar. This makes the bread lighter without losing flavor. To add more depth to your banana bread, try adding spices. Nutmeg and cloves work well with cinnamon. Just a pinch of each can elevate the flavor. You can also incorporate fruits like blueberries. Add around 1 cup of fresh or frozen blueberries. They create a nice contrast and add a juicy burst in every bite. If you need a gluten-free option, use gluten-free flour blends. Look for blends that include rice flour and tapioca flour. These will mimic all-purpose flour well. Baking time may change slightly. Keep an eye on your bread. It may take a few extra minutes, but check for doneness with a toothpick. The texture will be similar, but it can be a bit more crumbly. You can keep your cinnamon crunch banana bread on the counter. It lasts about 3 to 4 days. Make sure to wrap it in plastic wrap or foil to keep it fresh. This way, it won’t dry out or get stale. If you want to store it longer, put it in the fridge. Wrap it tightly in plastic wrap, then place it in a zip-top bag. This helps prevent it from absorbing fridge odors. It can last up to a week in the fridge. Just remember to let it warm up a bit before eating, so it’s soft and tasty. Freezing banana bread is a great option. First, let it cool completely. Then, slice it into pieces for easy thawing. Wrap each slice in plastic wrap. Place the wrapped slices in a freezer bag. You can freeze them for up to 3 months. To thaw, just leave it at room temperature for a few hours or microwave it for a few seconds. Enjoy your delicious cinnamon crunch banana bread whenever you want! Yes, you can use frozen bananas. They work well in banana bread. Start by thawing them first. Once thawed, drain any extra liquid. Mash them until smooth. The flavor stays rich and sweet. Frozen bananas make the bread very moist. Adding walnuts brings great texture. They add a nice crunch to each bite. The nuts also give a rich, nutty flavor. If you like a softer bread, skip the walnuts. If you enjoy crunch, chop them up and fold them in. Yes, you can make it vegan! Substitute the egg with 1/4 cup of applesauce. Use a plant-based oil instead of coconut oil. You can also use a vegan butter if you want. Make sure to use vegan sugar for the topping. This way, you keep all the great flavor while staying plant-based. This blog post shared a simple recipe for banana bread with helpful details. You learned about key ingredients, step-by-step instructions, and useful tips for the best results. We discussed variations for different diets and storage advice to keep your bread fresh. Making banana bread is easy and fun. You can adapt it to your taste and share it with friends. Enjoy baking and experimenting with new flavors!

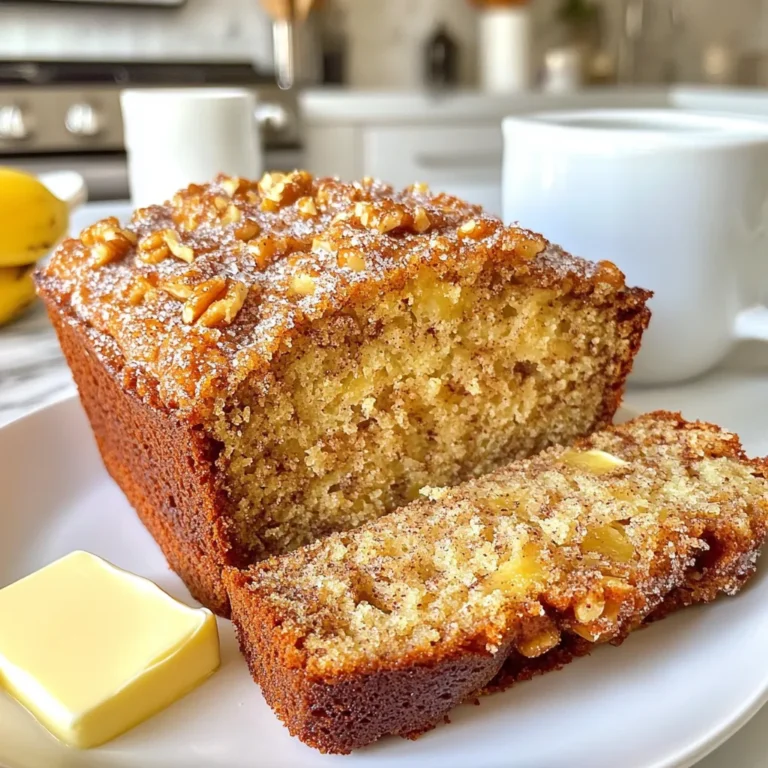
Cinnamon Crunch Banana Bread Tasty and Easy Recipe

- 1 pound large shrimp, peeled and deveined - 3 tablespoons olive oil - 4 cloves garlic, minced Large shrimp are the star of this dish. They provide a sweet and tender bite. I recommend peeling and deveining them for a clean taste and easy eating. Olive oil adds flavor and helps cook the shrimp. Garlic brings a warm, rich aroma that makes your kitchen smell amazing. - 1 cup heavy cream - 1/2 cup chicken broth - 1 teaspoon paprika - 1/2 teaspoon red pepper flakes (optional) - Salt and pepper to taste Heavy cream makes the sauce rich and smooth. Chicken broth adds depth to the flavor. Paprika gives a subtle smokiness, while red pepper flakes can add a kick. Salt and pepper balance the dish, enhancing all the flavors. - 1/4 cup fresh parsley, chopped - Zest of 1 lemon Fresh parsley brightens the dish with color and freshness. Lemon zest adds a burst of citrus that cuts through the creaminess. Together, they elevate the dish, making it look and taste gourmet. {{ingredient_image_1}} First, grab your large skillet and heat the olive oil over medium heat. This oil adds flavor and helps cook the shrimp. Next, add the minced garlic. Sauté it for about 30 seconds. Watch closely! You want it fragrant but not burned. Now, it’s time to add the shrimp. Increase the heat to medium-high and cook for 2-3 minutes. Turn the shrimp halfway through. They should turn pink and opaque. This shows they’re cooked perfectly. Once done, remove the shrimp from the skillet. Set them aside on a plate. In that same skillet, pour in the chicken broth and heavy cream. Stir well to mix them. Bring this mixture to a gentle simmer. Now, add the paprika, red pepper flakes, salt, and pepper to taste. Let the sauce simmer for about 2-3 minutes. This helps it thicken slightly and allows the flavors to meld together. Return the cooked shrimp to the skillet. Stir well to coat them in the creamy sauce. Cook for an additional minute to heat the shrimp through. Now, remove the skillet from the heat. Add the lemon zest and chopped parsley. Toss everything together for a fresh finish. Serve your creamy garlic shrimp right away! Enjoy it over pasta, rice, or any side you like. - Ensuring shrimp stay tender To keep shrimp tender, cook them quickly. Use medium-high heat. When they turn pink, they are done. Overcooking makes them tough. Always check them closely! - Flavor infusion methods Infuse flavor by sautéing garlic in olive oil first. This step adds depth to the dish. You can also sprinkle spices directly onto shrimp while cooking. Try adding herbs at the end for fresh flavor. - Recommended skillet types A non-stick skillet works best for this recipe. It helps prevent sticking. A cast iron skillet can also be great. Just ensure it’s well-seasoned for even cooking. - Essential cooking tools You need a spatula for flipping shrimp and a whisk for sauces. Measuring spoons are key for spices. A sharp knife helps with chopping garlic and parsley. - Prepping ingredients in advance Chop garlic and parsley ahead of time. You can even measure out spices. This saves you time when cooking. Keep everything in small bowls for easy access. - Quick cooking strategies Use high heat for fast cooking. Cook shrimp in batches if your skillet is small. This prevents them from steaming and helps them cook evenly. Always have your sauce ready to go when the shrimp are done. Pro Tips Fresh Shrimp is Best: Always opt for fresh shrimp over frozen when possible for the best flavor and texture. Adjust the Heat: Modify the amount of red pepper flakes based on your spice preference. Start with less and add more as needed. Perfectly Cooked Shrimp: Be careful not to overcook the shrimp; they should be pink and opaque within 2-3 minutes to avoid a rubbery texture. Lemon Zest Adds Brightness: Don’t skip the lemon zest at the end; it brightens the dish and enhances the overall flavor. {{image_2}} You can switch out some ingredients to fit your needs. If you want to avoid dairy, try using coconut cream or almond milk. These options keep the dish creamy while adding a unique flavor. For proteins, you can use chicken or scallops instead of shrimp. If you prefer veggies, mix in some spinach or bell peppers for color and crunch. There are many ways to boost the flavor of this dish. Adding cheese like Parmesan or feta can make it richer and more savory. Fresh herbs, like basil or dill, can also brighten the taste. If you like heat, try adding cayenne pepper or chili powder. These spices add depth and kick to the creamy sauce. Pairing creamy garlic shrimp with pasta or rice makes for a great meal. The sauce coats the noodles or grains, making every bite delicious. You can also serve it as a side dish. It goes well with grilled meats or veggies. For a light touch, add a fresh salad on the side. This creates a balanced plate that pleases everyone. To keep your creamy garlic shrimp fresh, store leftovers in an airtight container. Place the shrimp in the fridge within two hours of cooking. This helps stop bacteria from growing. The shrimp will stay good for up to three days in the fridge. You can freeze creamy shrimp for later enjoyment. First, let it cool completely. Then, place it in a freezer-safe container or bag. Be sure to remove as much air as possible. It can last up to three months in the freezer. When you want to eat it, thaw it overnight in the fridge. To reheat, warm it gently in a skillet over low heat. Stir often to avoid burning. You can also microwave it in short bursts, checking every 30 seconds. Always check for signs of spoilage. If the shrimp smells sour or looks discolored, it’s best to throw it away. When reheating, make sure it reaches 165°F (74°C) to kill any harmful germs. This keeps your meal safe and tasty. Yes, you can use frozen shrimp. They work well in this dish. Thaw them first in cold water. This helps keep them juicy. If you do not have time to thaw, you can add them straight to the pan. Just cook them a little longer. Fresh shrimp have a firmer texture, while frozen shrimp may be softer. Both taste great in creamy garlic shrimp. You can pair this dish with many sides. Here are some great options: - Cooked pasta, like fettuccine or linguine - Steamed rice or quinoa - Garlic bread for a crunchy side - A fresh green salad with lemon dressing These sides soak up the creamy sauce. They make your meal feel complete and satisfying. To lighten up creamy garlic shrimp, you can swap some ingredients. Here are some ideas: - Use half-and-half instead of heavy cream - Replace chicken broth with vegetable broth - Cut back on olive oil to just 1 tablespoon These changes keep the flavor while making it healthier. You can still enjoy a creamy dish without all the fat! In this blog post, we explored how to make creamy garlic shrimp, focusing on key ingredients, step-by-step instructions, and handy tips. Understanding the right cooking methods and flavors can elevate your dish. You learned about ingredient swaps for variety and safe storage practices to keep your leftovers fresh. I hope these insights inspire you to create this delicious meal and feel confident in your cooking. Enjoy experimenting with flavors and techniques, and happy cooking!

Creamy Garlic Shrimp in 15 Minutes Delight

- 1 lb ground beef - 1/2 cup onion, finely chopped - 2 cloves garlic, minced - 1 teaspoon chili powder - 1 teaspoon cumin - 1/2 teaspoon paprika - Salt and pepper to taste - 4 large flour tortillas - 1 cup shredded cheddar cheese - 1 cup shredded Monterey Jack cheese - 1/2 cup sour cream - 1/2 cup guacamole - 1/4 cup fresh cilantro, chopped For this Beefy Melt Burrito, you need simple and fresh ingredients. Start with the ground beef. It brings protein and flavor. The chopped onion and minced garlic add a nice base. You will also need some spices: chili powder, cumin, and paprika. They give warmth and depth to your dish. Next, grab large flour tortillas. They hold everything together. You can't forget the cheese! Both cheddar and Monterey Jack melt nicely and create that gooey goodness. Lastly, prepare toppings. Sour cream adds creaminess. Guacamole brings a fresh touch. A sprinkle of cilantro makes everything pop. These ingredients work together to create a tasty and satisfying meal. {{ingredient_image_1}} 1. Preparing the beef mixture in a skillet Start by heating a large skillet over medium heat. Add 1 pound of ground beef. Cook it until it turns brown. Use a spatula to break the beef apart as it cooks. If there is extra fat, drain it out. 2. Incorporating onions, garlic, and spices Next, add 1/2 cup of finely chopped onion and 2 cloves of minced garlic to the skillet. Sauté them together for about 3-4 minutes. The onion should become soft and clear. Then, stir in 1 teaspoon of chili powder, 1 teaspoon of cumin, and 1/2 teaspoon of paprika. Season with salt and pepper. Mix everything well and let it cook for another 2 minutes. This builds great flavor! 3. Assembling the burrito and baking Preheat your oven to 350°F (175°C). Lay out a large flour tortilla. Spoon a generous amount of the beef mixture into the center. Add a handful of shredded cheddar cheese and Monterey Jack cheese on top. Fold the sides of the tortilla over the filling. Then, roll it up tightly from the bottom. Place the burrito seam-side down in a baking dish. Repeat this for the other tortillas. Once done, sprinkle any remaining cheese on top. Bake in the preheated oven for 15-20 minutes. The cheese should melt and bubble. After baking, let the burritos rest for a few minutes. Serve them with sour cream, guacamole, and fresh cilantro on top. Enjoy this tasty meal! - Best practices for browning beef: Start with a hot skillet. This helps the beef brown evenly and adds flavor. Break the meat into small pieces as it cooks. Drain fat if needed, but keep some for flavor. - Ensuring perfect burrito folding: Lay the tortilla flat. Add your filling in the center. Fold the sides over the filling first, then roll from the bottom up. Tuck in the sides as you roll to seal the burrito well. - Cheese melting tips: Use a mix of cheddar and Monterey Jack for great flavor. Sprinkle cheese on the burrito before baking. Bake until bubbly and golden for the best melt. - Recommended sides to accompany the burrito: Serve with chips and salsa for a crunchy bite. A fresh salad adds crunch and color to your meal. You could also pair it with Mexican rice, which complements the burrito well. - Suggested garnishes for added flavor: Top with sour cream and guacamole for creaminess. Fresh cilantro adds a burst of flavor and color. You might also sprinkle some diced tomatoes or jalapeños for extra zest. Pro Tips Use Fresh Ingredients: Fresh ingredients enhance the flavor of your burrito. Opt for fresh cilantro, ripe avocados for guacamole, and quality ground beef for the best results. Customize Your Fillings: Feel free to add extra vegetables like bell peppers or corn to the beef mixture for added texture and nutrition. Cheese Variations: Experiment with different cheese blends like pepper jack or queso fresco to give your burrito a unique twist. Rest Before Serving: Allow the burritos to rest for a few minutes after baking. This helps the cheese set and makes them easier to slice and serve. {{image_2}} You can change the protein in your Beefy Melt Burrito. Use chicken or beans if you prefer. Ground beef is tasty, but other meats work well too. For cheese, try pepper jack or a blend of cheeses. This can add a fun twist to the flavor. If you need gluten-free options, look for gluten-free tortillas. Many brands now offer them, so you won’t miss out on the fun. For vegetarian adaptations, swap the beef for black beans or lentils. This keeps the burrito filling and satisfying without meat. To keep your Beefy Melt Burrito fresh, place leftovers in an airtight container. Store them in the fridge. They stay good for about 3 to 4 days. When you want to eat them again, reheat in the microwave. Heat for one to two minutes, or until hot. You can also use an oven. Preheat it to 350°F. Bake the burritos for about 10 to 15 minutes. To freeze burritos, wrap each one tightly in plastic wrap. Then place them in a freezer bag. This keeps them fresh for up to three months. When you’re ready to eat, take a burrito out and let it thaw in the fridge overnight. To reheat, you can use the microwave or the oven. If using the microwave, heat for 2 to 3 minutes. If using the oven, preheat it to 350°F and bake for 20 to 25 minutes. Enjoy your burrito just like new! What is a Beefy Melt Burrito? A Beefy Melt Burrito is a delicious wrap filled with seasoned beef and melted cheese. It usually includes spices, onions, and garlic for great flavor. The tortillas hold everything together, making it easy to eat. Can I customize the fillings? Yes, you can customize your Beefy Melt Burrito. You can add beans, peppers, or different meats. If you prefer, you can also use different cheese types. Make it your own with what you love! How can I make this recipe healthier? To make this burrito healthier, use lean ground beef or turkey. You can add more veggies like spinach or zucchini. Choose whole-grain tortillas instead of regular ones for extra fiber. Where can I find Beefy Melt Burritos at restaurants? Many fast-casual restaurants and taco places offer Beefy Melt Burritos. Check local chains or your favorite taco truck. Some may have their own twist on this classic dish. What sides pair well with Beefy Melt Burritos? Great sides for Beefy Melt Burritos include rice, beans, or a fresh salad. You can also serve tortilla chips with salsa. These sides add variety and make the meal more filling. In this blog post, we explored how to make delicious Beefy Melt Burritos. We covered all the essential ingredients, cooking steps, tips for success, and tasty variations. Remember, you can customize the filling to suit your taste or dietary needs. Don’t forget to store leftovers properly for future meals. With this guide, you’re ready to create a satisfying meal that friends and family will love. Enjoy your cooking adventure, and savor every bite of your warm, cheesy burritos.

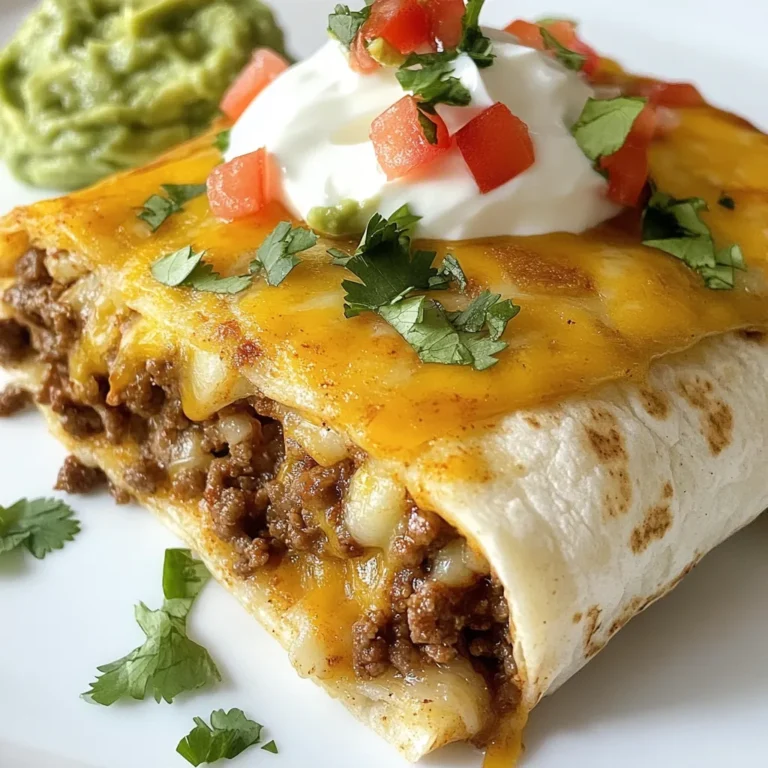
Beefy Melt Burrito Tasty and Satisfying Meal Idea

PREV 1 … 45 46 47 … 56 NEXT
secrets pice kitchen

explore

DessertsDinnerAppetizersDrinks

Our Policies

  • Cookie Policy
  • Copyright Policy
  • Disclaimer
  • GDPR Policy
  • Terms Of Use
Back to Top
  • About
  • Contact Us
  • Privacy Policy
© 2025 secrets pice kitchen