FREE DINNER EBOOK! Get your copy!
  • Cookie Policy
  • GDPR Policy
  • Disclaimer
  • Terms Of Use
  • Visit my other site: Fun Cookie Recipes
secrets pice kitchen
  • Home
  • Dinner
  • Desserts
  • Drinks
  • Appetizers
  • Contact
  • About
  • Privacy Policy
  • Home
  • Dinner
  • Desserts
  • Drinks
  • Appetizers
  • Contact
  • About
  • Privacy Policy
  • Cookie Policy
  • GDPR Policy
  • Disclaimer
  • Terms Of Use
Visit my other site: Fun Cookie Recipes

HOME / CATEGORIES /

Latest

To make Marry Me Shrimp Pasta, you will need: - 8 oz fettuccine pasta - 1 lb large shrimp, peeled and deveined - 2 tablespoons olive oil - 4 cloves garlic, minced - 1 teaspoon red pepper flakes (adjust to taste) - 1 cup unsweetened coconut milk - 1/2 cup sun-dried tomatoes, chopped - 1/2 cup freshly grated Parmesan cheese - 1 cup fresh spinach - Zest of 1 lemon - Salt and pepper to taste - Fresh basil leaves for garnish These ingredients work together to create rich flavors. The fettuccine acts as a perfect base. The shrimp gives a sweet, ocean taste. Coconut milk adds creaminess without dairy. You can use either fresh or frozen shrimp. Fresh shrimp tastes great and offers a firm texture. Look for shrimp that smells clean and briny. Frozen shrimp is convenient and often just as good. It stays fresh longer. Just thaw it before cooking, and ensure it is peeled and deveined. For both types, medium to large shrimp work best for this dish. If you're missing an ingredient, don’t worry! Here are some swaps: - Pasta: Use any pasta like spaghetti or penne. - Shrimp: Substitute with chicken or tofu for a different protein. - Coconut milk: Almond or cashew milk can work but may change the flavor. - Parmesan: Nutritional yeast is a great vegan alternative. - Spinach: Kale or arugula can add a different taste. These options let you customize the dish based on what you have at home. {{ingredient_image_1}} Start by boiling water in a large pot. Add salt to the water. Next, cook the fettuccine pasta according to the package instructions. This usually takes around 8-10 minutes. Stir it occasionally to prevent sticking. When the pasta is al dente, drain it, but save about 1/2 cup of the pasta water. This water will help adjust the sauce later. In a large skillet, heat 2 tablespoons of olive oil over medium heat. Add 4 minced garlic cloves and 1 teaspoon of red pepper flakes. Sauté for about 30 seconds until the garlic smells good. Then, add the 1 pound of shrimp to the skillet. Cook the shrimp for 2-3 minutes on each side. They should be pink and opaque when done. Remove the shrimp and set them aside. In the same skillet, pour in 1 cup of unsweetened coconut milk. Bring it to a simmer. Next, add 1/2 cup of chopped sun-dried tomatoes. Let this cook for about 5 minutes until the sauce thickens slightly. Now, it’s time to bring everything together. Add the drained fettuccine to the skillet with the sauce. Toss the pasta to coat it well. If the sauce seems too thick, add some of the reserved pasta water until it feels just right. Stir in 1/2 cup of grated Parmesan cheese, 1 cup of fresh spinach, and the zest of 1 lemon. Mix everything until the spinach wilts. Finally, return the cooked shrimp to the skillet and season with salt and pepper. Toss everything together and heat it through. Serve immediately for a delightful meal. To cook shrimp just right, start with fresh or thawed shrimp. Heat your skillet first. Add olive oil and minced garlic. Cook the garlic for about 30 seconds. Then, add the shrimp. Cook them for 2-3 minutes on each side. They should turn pink and opaque. Avoid overcooking! Overcooked shrimp can become tough and rubbery. Remember, they cook quickly, so stay close to your pan. If you love spice, add more red pepper flakes. Start with one teaspoon, then taste. You can always add more, but you can’t take it away! If you prefer a milder dish, reduce the flakes or leave them out. For a different kick, try adding black pepper or even a splash of hot sauce. Taste as you go. This way, you get a dish that fits your taste buds perfectly. To boost the flavor of your dish, use fresh ingredients. Fresh spinach, sun-dried tomatoes, and lemon zest make a big difference. You can also add herbs like basil or parsley for a fresh touch. A squeeze of lemon juice right before serving brightens the dish. Finally, make sure to season well with salt and pepper. Taste at each step to adjust the seasoning. This will help you create a dish everyone loves! Pro Tips Perfectly Cooked Shrimp: Avoid overcooking the shrimp by removing them from the skillet as soon as they turn pink and opaque. They will continue to cook slightly after being removed from heat. Thick Sauce Tip: If your sauce becomes too thick, gradually add the reserved pasta water until you achieve the desired consistency. This will help maintain the creaminess of the dish. Fresh Ingredients: Use fresh spinach and high-quality sun-dried tomatoes for the best flavor. Fresh ingredients elevate the dish and make a noticeable difference. Garnish for Flavor: Always finish your dish with a squeeze of fresh lemon juice and a sprinkle of basil. This adds brightness and enhances the overall flavor profile. {{image_2}} You can swap out fettuccine for different pasta types. Try spaghetti, penne, or even gluten-free pasta. Each type gives a unique texture. Just cook it according to its package instructions. This keeps the dish easy and fun. To make this dish vegetarian, replace the shrimp with mushrooms or zucchini. They add great texture and taste. For a vegan twist, use tofu or chickpeas. Substitute coconut milk with a plant-based cream. This keeps the flavor rich and creamy without any animal products. You can change the sauce to fit your taste. Use Alfredo or a marinara sauce if you like. You can also add more veggies like bell peppers or asparagus. Adding capers or olives brings extra flavor and depth. Mix and match to create your perfect dish. Store any leftover Marry Me Shrimp Pasta in an airtight container. This keeps the pasta fresh. Place it in the fridge within two hours of cooking. It will last for up to three days. If the pasta sits out longer, it can spoil. To reheat the pasta, use a skillet or microwave. If using a skillet, add a splash of water. Heat over medium heat while stirring gently. If using a microwave, place it in a bowl with a lid. Heat in 30-second intervals, stirring in between. This helps it heat evenly. You can freeze Marry Me Shrimp Pasta for later. Place it in a freezer-safe container. Use parchment paper to separate layers if needed. It will last for up to three months. When ready to eat, thaw it in the fridge overnight. Reheat as mentioned above. You can serve Marry Me Shrimp Pasta with a simple side salad. A fresh green salad pairs well. Add a light vinaigrette for a nice touch. Garlic bread is another great option. It helps soak up the delicious sauce. You might also enjoy a glass of white wine. A crisp Sauvignon Blanc enhances the meal. Yes, you can prepare this dish ahead of time. Cook the pasta and shrimp, but don’t mix them yet. Store them separately in the fridge. When you are ready to eat, reheat the shrimp and mix it with the pasta and sauce. This method keeps everything fresh and tasty. Just be careful not to overcook the shrimp when reheating. Yes, canned coconut milk works well in this recipe. It adds a creamy texture and great flavor. Choose unsweetened coconut milk for the best results. You can find it in most grocery stores. Just pour it into your skillet as directed. This swap saves time and still gives you a rich sauce. You learned how to make Marry Me Shrimp Pasta with fresh ingredients, step-by-step instructions, and tips. You can explore fun variations like different pastas or sauces. Don't forget storage methods for leftovers and reheating. Cooking should be fun and easy. Now, you have the tools to impress your family and friends with this tasty dish. Enjoy creating meals that bring smiles and happy moments. Your kitchen is ready for adventure!

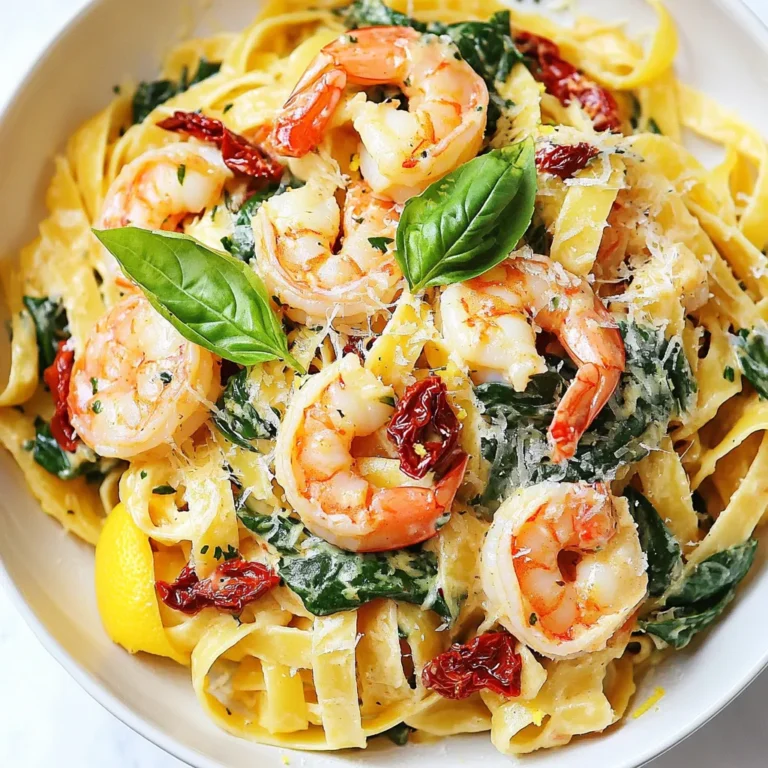
Marry Me Shrimp Pasta Irresistible Dinner Recipe

- 4 boneless, skinless chicken breasts - 1/2 cup unsalted butter, softened - 2 tablespoons fresh parsley, chopped - 1 tablespoon fresh chives, chopped - 1 tablespoon garlic, minced - 1 tablespoon lemon juice - 1 teaspoon smoked paprika - 1 teaspoon onion powder - 1 teaspoon ground cumin - 1/2 teaspoon cayenne pepper (adjust to taste) - Salt and pepper to taste The main star here is the chicken. I use boneless, skinless chicken breasts. They cook quickly and stay juicy. The butter adds richness. It also helps carry the flavors. Herbs like parsley and chives bring freshness. Garlic adds depth and a bit of bite. Lemon juice gives a nice tang. Smoked paprika gives a warm, smoky taste. Onion powder and cumin add savory notes. Cayenne pepper adds heat, but you can adjust this to your taste. If you want a dairy-free option, use olive oil instead of butter. It will still taste great. For a lower-fat option, use chicken thighs. They have more flavor and stay moist. If you're allergic to garlic, try shallots for a milder flavor. You can skip the cayenne if you prefer no spice. Just remember to season with salt and pepper! {{ingredient_image_1}} Start by gathering your ingredients. You will need: - 1/2 cup unsalted butter, softened - 2 tablespoons fresh parsley, chopped - 1 tablespoon fresh chives, chopped - 1 tablespoon garlic, minced - 1 tablespoon lemon juice - 1 teaspoon smoked paprika - 1 teaspoon onion powder - 1 teaspoon ground cumin - 1/2 teaspoon cayenne pepper (adjust to taste) - Salt and pepper to taste In a medium bowl, mix the softened butter with the herbs and spices. First, add the chopped parsley and chives. Then, stir in the minced garlic and lemon juice. Next, sprinkle in smoked paprika, onion powder, and ground cumin. Add cayenne pepper for heat and season with salt and pepper. Make sure to blend everything well. This cowboy butter adds rich flavor to your chicken. Prepare your chicken breasts by patting them dry. This step helps them sear better. Season both sides with salt and pepper. Now, get an oven-safe skillet and melt a tablespoon of cowboy butter over medium-high heat. Once the butter is hot, add the chicken breasts. Cook for about 4-5 minutes on each side until they turn golden brown. This process gives the chicken a nice crust. After the chicken is browned, take the skillet off the heat. Spoon generous portions of the remaining cowboy butter over each chicken breast. This step is key for adding flavor. Next, place the skillet in your preheated oven at 375°F (190°C). Bake for 20-25 minutes. Make sure the chicken reaches an internal temperature of 165°F (74°C) to be safe to eat. Once done, let the chicken rest for a few minutes before serving. Serve it on a plate with a drizzle of melted cowboy butter for extra goodness. Enjoy your meal! To keep your chicken tender, start by using boneless, skinless breasts. Pat them dry with paper towels. This helps them sear well. Season both sides with salt and pepper. Searing locks in juices. Cook on medium-high heat for 4-5 minutes on each side until golden brown. This step is key for tenderness. You can make this dish more exciting! Add a splash of lemon juice for brightness. Use fresh herbs like thyme or oregano for extra flavor. A pinch of cayenne gives heat. If you like a smoky taste, add more smoked paprika. These small changes can elevate your cowboy butter chicken. Avoid overcooking the chicken. Check the internal temperature. It should reach 165°F. Too much heat can dry it out. Also, make sure not to skip resting the chicken. Let it sit for a few minutes after baking. This helps the juices settle, making it juicy and delicious. Pro Tips Butter Temperature: Ensure the butter is softened but not melted to allow for easy mixing and better adherence to the chicken. Cooking Method: For a perfectly seared chicken, avoid overcrowding the skillet; cook in batches if necessary. Resting Time: Let the chicken rest after baking to allow the juices to redistribute, ensuring a moist bite. Flavor Adjustments: Feel free to adjust spices according to your preference; add more cayenne for heat or extra herbs for freshness. {{image_2}} To spice up Cowboy Butter Chicken, add more cayenne pepper. Start with one teaspoon. Taste it as you go. If you want more heat, add more. You could also use hot sauce in the cowboy butter mix. This gives it a nice kick. You can switch up the herbs in this dish. Instead of parsley and chives, try basil or cilantro. Fresh thyme also works well. Each herb adds its own unique flavor. Use what you love or what you have on hand. If you want to try something different, use fish or shrimp. Salmon or tilapia are great options. For shrimp, adjust cooking time to avoid overcooking. You can even try this recipe with tofu for a vegan option. Just make sure to press the tofu first. This helps it absorb the cowboy butter flavor. After you enjoy your cowboy butter chicken, store the leftovers right. Place the chicken in an airtight container. This keeps it fresh and tasty. Make sure to add any leftover cowboy butter on top. It adds flavor and moisture. Store the container in the fridge. It will last for about 3 to 4 days. When you are ready to eat the leftovers, reheat them carefully. You want the chicken to stay juicy. The best way is to use the oven. Preheat it to 350°F (175°C). Place the chicken in a baking dish. Cover it with foil. This keeps the moisture in. Heat for about 15-20 minutes or until warm. You can also microwave it. Just heat in short bursts to avoid drying it out. If you want to save your cowboy butter chicken for later, freezing is a good option. First, let the chicken cool completely. Then, wrap each piece tightly in plastic wrap. Place the wrapped chicken in a freezer bag. Press out as much air as possible. Label the bag with the date. You can freeze it for up to 3 months. To thaw, place it in the fridge overnight before reheating. Cowboy butter is a tasty blend of butter and herbs. It includes garlic, parsley, and chives. This mix gives the chicken a burst of flavor. The smoked paprika adds a nice warmth. You can use it on meats, veggies, or bread. It makes dishes rich and fun. Yes, you can make Cowboy Butter Chicken in advance. Prepare the cowboy butter and chicken ahead of time. Store the butter in the fridge for a few days. You can also cook the chicken, let it cool, and then refrigerate. When ready to eat, just reheat the chicken. This makes meal prep easy. Many side dishes go well with Cowboy Butter Chicken. Here are some great options: - Steamed greens like broccoli or spinach - Fluffy rice or quinoa - Mashed potatoes for comfort - A fresh garden salad for crunch These sides complement the chicken's flavor and make a complete meal. This post broke down how to make Cowboy Butter Chicken. We explored the key ingredients and their substitutes for various dietary needs. I shared step-by-step cooking methods and gave tips to ensure tasty results. I also covered delicious variations and proper storage for leftovers. Enjoy experimenting with this recipe. With practice, you'll master it in no time! Whether you make it spicy or try other proteins, there’s always room for creativity. Happy cooking!

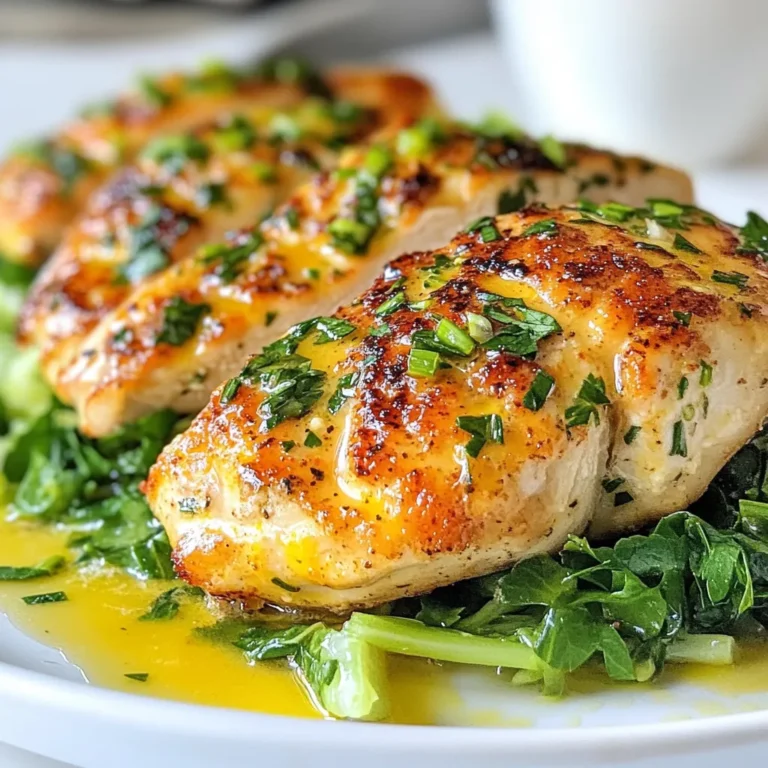
Cowboy Butter Chicken Flavorful and Easy Recipe

To create your Coconut Lime Crockpot Chicken, you need a few key ingredients. They will work together to bring out the vibrant flavors of this tropical dish. - Chicken and Marinade Components - 2 lbs boneless, skinless chicken breasts - 1 can (13.5 oz) coconut milk - Juice and zest of 2 limes - 1 tablespoon honey - 2 garlic cloves, minced - 1 teaspoon fresh ginger, grated - 1 tablespoon soy sauce (or tamari for gluten-free) - Spices and Seasonings - 1 teaspoon ground cumin - 1 teaspoon salt - ½ teaspoon black pepper - Garnishing Essentials - Fresh cilantro, for garnish Each ingredient plays a vital role. The coconut milk adds creaminess. The lime juice brings a bright, zesty kick. Ginger and garlic provide depth and warmth. Cumin, salt, and pepper enhance the overall flavor. Finally, fresh cilantro adds a touch of color and fresh taste when you serve the dish. Gather these ingredients, and you’re ready to make a meal that will impress your family and friends! {{ingredient_image_1}} Layering the Chicken in the Crockpot Start by placing the chicken breasts in the bottom of your crockpot. Lay them flat to ensure even cooking. It’s important that the chicken is not stacked. This way, all pieces soak up the flavor. Mixing the Coconut Lime Sauce In a mixing bowl, add the coconut milk, lime juice, and zest of the limes. Then, mix in the honey, minced garlic, grated ginger, soy sauce, cumin, salt, and pepper. Whisk until everything blends well. This sauce is key to giving your chicken that delicious flavor. Coating the Chicken Now, pour the coconut lime mixture over the chicken. Make sure each piece is coated well with the sauce. This step locks in the taste and keeps the chicken moist while cooking. Low and Slow Cooking Instructions Cover the crockpot and set it to cook on low for 6-8 hours. You can also cook on high for 3-4 hours if you’re short on time. The chicken will cook slowly and become very tender. Shredding and Mixing After Cooking Once the time is up, use two forks to shred the chicken right in the crockpot. Stir the shredded chicken into the sauce. This mixes all the flavors together, making every bite tasty. Adjusting Seasoning After mixing, taste the chicken. If you want more flavor, add more lime juice or salt. Adjusting the seasoning at this stage makes a big difference in taste. Garnishing for Presentation When serving, garnish with fresh cilantro. This adds a pop of color and flavor. For an appealing look, serve the chicken over jasmine rice or quinoa, and add a lime wedge on the side. Enjoy your meal! Cooking Time Variations I often adjust the cooking time based on my schedule. If you use the low setting, cook for 6-8 hours. On high, 3-4 hours works best. I find that the longer cooking time makes the chicken more tender. Keep an eye on it if you’re short on time. You want it cooked but not dry. Best Practices for Shredding Chicken Shredding chicken can be fun! After cooking, use two forks to pull the chicken apart. This method works well and helps mix the sauce. If you want it really easy, try shredding it in the crockpot itself. Just be gentle to avoid splashing the sauce everywhere. Suggested Seasoning Adjustments The basic flavors shine, but you can tweak them. Add a little more lime juice for extra zing. A pinch of salt can enhance the taste too. If you love garlic, add one more clove. Experiment and see what you enjoy most! Adding Heat with Chili Peppers If you like spice, consider adding chili peppers. Jalapeños or serranos can bring a nice kick. Just chop them finely and mix them in the sauce. Start with a small amount to find your balance. You can always add more if needed. Pro Tips Marinate for More Flavor: For an extra burst of flavor, consider marinating the chicken in the coconut lime mixture for a few hours or overnight before cooking. Use Fresh Ingredients: Whenever possible, use fresh garlic and ginger instead of powdered forms to enhance the overall flavor of the dish. Check for Doneness: Always check the chicken for doneness; it should reach an internal temperature of 165°F (75°C) before serving. Customize with Vegetables: Feel free to add vegetables like bell peppers or snap peas to the crockpot for a nutritious and colorful addition. {{image_2}} Using Different Proteins You can switch up the chicken for other proteins. Try pork or beef. Both work well with the coconut lime flavors. If you prefer fish, use salmon. Cook for less time to keep it tender. Dairy-Free Chocolate Substitutions If you want a sweeter twist, add a dairy-free chocolate option. Use cocoa powder with a bit of honey. This gives a rich flavor that matches the coconut and lime. Crunchy Toppings Add some crunch on top for fun. Try crispy fried onions or chopped nuts. These add a nice texture contrast to the tender chicken. You can also use crushed tortilla chips for a unique twist. Flavor Pairings Pair this dish with fresh fruits. Mango or pineapple adds sweetness and brightness. You can also serve it with a fresh salad. The cool greens balance the warm, rich chicken. After your meal, store any leftovers in the fridge. Put the chicken in a clean container. Make sure it is air-tight to keep it fresh. You can keep Coconut Lime Chicken in the fridge for up to three days. For best results, let the chicken cool down before sealing it. This helps prevent moisture buildup. If you want to keep it longer, consider freezing it. To freeze Coconut Lime Chicken, start with cooled leftovers. Place the chicken in a freezer-safe bag or container. Be sure to remove as much air as possible to avoid freezer burn. You can freeze it for up to three months. When you're ready to eat, take it out of the freezer. Let it thaw overnight in the fridge. You can also use the microwave for a quicker thaw. When reheating, aim for low heat. This keeps the chicken moist and tasty. You can use a skillet or microwave. If using a skillet, add a splash of coconut milk or water to keep it juicy. Stir often until heated through. If you microwave, heat it in short bursts. Stir in between to ensure even heating. Enjoy your delicious Coconut Lime Chicken again! Can I use frozen chicken breast? Yes, you can use frozen chicken breast. Just extend the cooking time. It will take about 8-10 hours on low to cook through. Always check the internal temperature to ensure it reaches 165°F. How can I make it spicier? To add spice, mix in chopped jalapeños or crushed red pepper flakes. You can also add a dash of hot sauce to the coconut lime sauce for extra heat. Adjust the amount to match your spice level. What sides pair well with this dish? Coconut lime chicken tastes great with jasmine rice or quinoa. You can also serve it with steamed veggies or a fresh salad. A side of black beans adds a nice touch too. Can I make it meal prep-friendly? Absolutely! This dish is perfect for meal prep. Cook a larger batch, shred the chicken, and store it in individual containers. It stays tasty for a few days in the fridge. Enjoy it throughout the week! In this blog post, we explored a delicious Coconut Lime Crockpot Chicken recipe. We discussed the key ingredients, preparation steps, and cooking process. I shared tips for perfecting the dish, variations to keep it exciting, and storage info for your leftovers. This recipe is simple and full of flavor. You’ll impress family and friends with minimal effort. Enjoy the cooking adventure and make this dish your own!

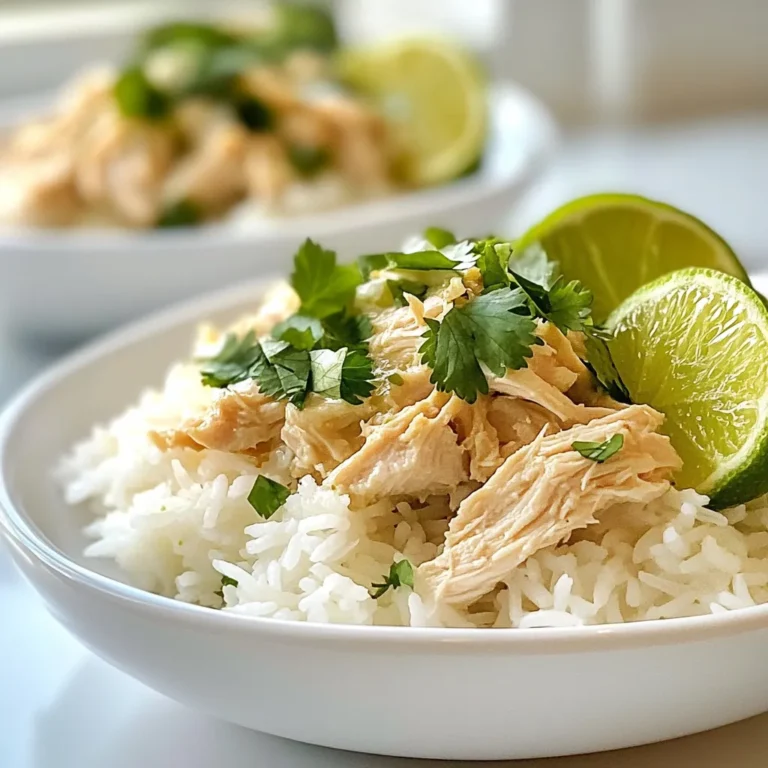
Coconut Lime Crockpot Chicken Flavorful and Easy Dish

To make stuffed bagel bombs, you need a few simple ingredients. Here’s what you will need: - 2 cups all-purpose flour - 1 teaspoon instant yeast - 1 teaspoon salt - ¾ cup warm water (about 110°F) - 1 tablespoon honey - 1 tablespoon olive oil - 1 cup shredded mozzarella cheese - ½ cup cream cheese, softened - ¼ cup finely chopped chives - 1 tablespoon garlic powder - 1 large egg (for egg wash) - Everything bagel seasoning (for topping) These ingredients combine to create soft dough and a rich filling. The flour and yeast form the base. The honey and olive oil add flavor and moisture. The cheeses, chives, and garlic powder create a delicious filling. This mix of flavors makes each bite special. When shopping, look for fresh ingredients. Fresh chives and quality cheese enhance the taste. If you want to save time, check for pre-shredded cheese. Each ingredient plays a key role in making your bagel bombs tasty and fun. You can customize your filling too, but this mix is a great start. {{ingredient_image_1}} Start by mixing warm water, honey, and instant yeast in a large bowl. Let this mixture sit for about five minutes. You will see it bubble, which shows that the yeast is active. Once bubbly, add olive oil, salt, and flour. Stir until a dough forms. Next, turn the dough onto a floured surface. Knead it for about five to seven minutes. The dough should feel smooth and elastic. Once done, place it in a lightly greased bowl. Cover it with a damp cloth and let it rise in a warm spot for about one hour. It should double in size during this time. While the dough rises, make the filling. In a medium bowl, mix together shredded mozzarella cheese, softened cream cheese, chopped chives, and garlic powder. Make sure everything is well combined. Set this filling aside for later. Once the dough has risen, punch it down gently. Turn it out onto a floured surface. Divide the dough into eight equal parts. Flatten each part into a circle. Place about two tablespoons of the cheese filling in the center. Fold the edges over the filling to form a ball. Pinch the edges tightly to seal. Preheat your oven to 425°F (220°C). In a large pot, bring water to a boil. Carefully drop in the stuffed dough balls, a few at a time. Boil them for about one to two minutes on each side. They will puff up slightly. Use a slotted spoon to remove them and place them on a parchment-lined baking tray. Now, brush the tops of each bagel bomb with the beaten egg. Sprinkle everything bagel seasoning over the top. Bake them in the preheated oven for about 15 to 18 minutes. They should turn golden brown. Let them cool slightly before serving. Enjoy them warm! Kneading the dough is key. It helps develop gluten, which gives the bagels their chewy texture. Knead for 5-7 minutes until smooth. To ensure a successful rise, keep the dough in a warm place. Cover it with a damp cloth to keep it moist. Look for the dough to double in size. This means it’s ready for the next step. You can get creative with the fillings. Try different cheeses like cheddar or pepper jack. Fresh herbs like basil or dill can add great flavor too. For a vegan option, use dairy-free cheese or a nut-based cream cheese. You can also add veggies like spinach or roasted peppers for extra taste. Serve your bagel bombs with tasty dips. Marinara sauce or ranch dressing works well. You can also pair them with a light salad for a complete meal. For a nice presentation, arrange the bagel bombs on a wooden board. Add a small bowl of dipping sauce in the center. This makes it fun for gatherings and parties. Pro Tips Perfect Dough Texture: Ensure your dough is smooth and elastic by kneading it well for at least 5-7 minutes. This will help achieve a chewy bagel-like texture. Chill the Filling: For a firmer filling, chill the cheese mixture in the refrigerator for about 15 minutes before using. This makes it easier to handle when forming the bombs. Boiling Water Tips: Make sure the water is at a rolling boil before adding the dough balls. This step is crucial for getting that classic bagel texture and shine. Season Generously: Don’t skimp on the everything bagel seasoning! A generous sprinkle on top will enhance flavor and make your bagel bombs visually appealing. {{image_2}} You can get creative with fillings for stuffed bagel bombs. One tasty option is pepperoni and mozzarella. Just mix pepperoni with mozzarella cheese for a fun twist. The pepperoni adds a nice spice, while the mozzarella gives that classic, gooey texture. Another great combination is spinach and feta. This mix is fresh and savory. The spinach brings a healthy touch, while the feta adds a salty kick. Both options are sure to please! If you want something sweet, try cinnamon sugar stuffed bagels. Mix sugar with cinnamon and fill the dough for a dessert treat. These are perfect for brunch or a snack! For an even richer option, go for chocolate cream cheese filling. Just blend cream cheese with chocolate and scoop it into the dough. These sweet bagel bombs are sure to be a hit! You can also make stuffed bagel bombs to fit different diets. For those needing gluten-free options, use gluten-free flour. This way, everyone can enjoy these bites. If you prefer low-carb alternatives, you can swap regular flour for almond flour. This keeps the flavor while cutting carbs. Enjoy these tasty snacks without worry! To keep your stuffed bagel bombs fresh, store them in the fridge. Place them in an airtight container. This helps keep them moist and tasty. They can last for 3 to 4 days in the fridge. When you're ready to enjoy them again, reheating is simple. Preheat your oven to 350°F (175°C). Place the bagel bombs on a baking sheet. Heat for about 10 minutes until warm. This keeps the outside crispy and the inside soft. If you want to keep them longer, freezing is a great option. First, let the bagel bombs cool completely. Then, wrap each one in plastic wrap. Place them in a freezer bag or container. They can stay in the freezer for up to 3 months. For thawing, take them out of the freezer and let them sit in the fridge overnight. You can also thaw them at room temperature for a few hours. Once thawed, reheat them in the oven at 350°F (175°C) for about 10 minutes. This way, they taste fresh and delicious again. The dough has risen enough when it doubles in size. You can check this by gently pressing your finger into the dough. If it springs back slowly, it is ready. If it stays down, let it rise a bit longer. A warm spot works best for rising. Yes, you can prepare stuffed bagel bombs ahead of time. Make the dough and filling, then shape the bombs. Wrap them tightly and store in the fridge for a day. For longer storage, freeze them. Just let them thaw in the fridge overnight before cooking. To reheat, you can use an oven or an air fryer. Preheat the oven to 350°F. Place the bagel bombs on a baking sheet and bake for about 10 minutes. This keeps them crispy. An air fryer works well too; reheat for 5-7 minutes at 350°F. Absolutely! You can mix things up with different seasonings. Try adding Italian herbs or spicy chili flakes to the dough. You can also top them with sesame seeds or garlic salt instead of everything bagel seasoning. Make each batch unique to your taste! You learned how to make stuffed bagel bombs from scratch. We covered the dough, filling, and cooking process. The tips can help you perfect your technique. You can customize the flavors to suit your taste. Storage options ensure enjoyment later. Try different fillings and toppings to keep it fun. With this guide, you can easily impress friends and family. Enjoy making and sharing your creations!

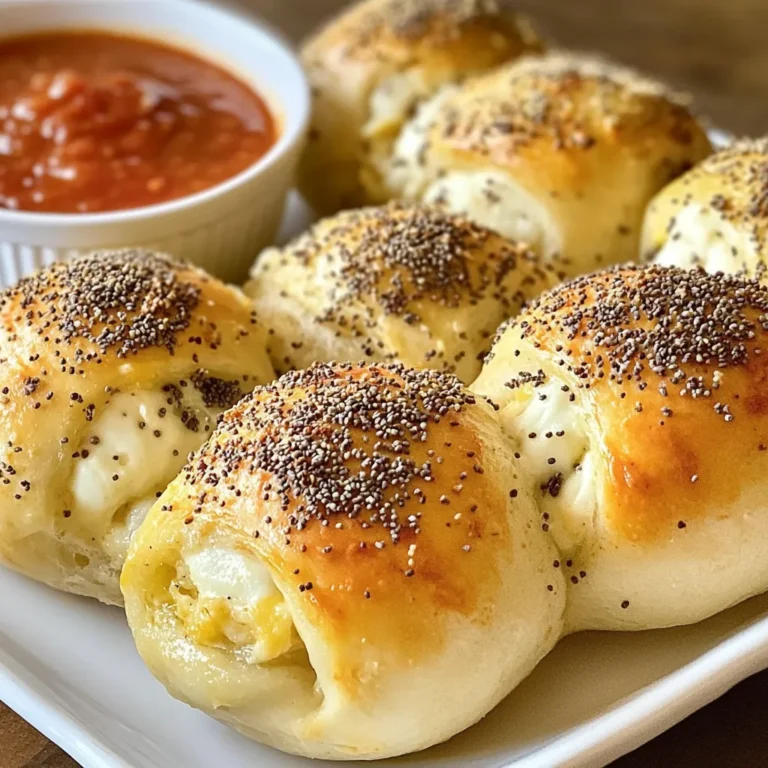
Stuffed Bagel Bombs Tasty Snack for Any Occasion

To make a tasty soy garlic chicken stir fry, you'll need these main items: - 1 lb (450g) boneless, skinless chicken thighs, sliced into strips - 3 tablespoons soy sauce - 2 tablespoons honey - 4 cloves garlic, minced - 1-inch piece ginger, grated - 2 tablespoons vegetable oil - 1 red bell pepper, sliced - 1 cup broccoli florets - 1 cup snap peas - 1 tablespoon sesame oil - 1 teaspoon cornstarch mixed with 2 tablespoons water (for thickening) - Salt and pepper to taste These ingredients blend well to create rich flavors. The chicken thighs are juicy and tender. The soy sauce adds a savory touch, while honey gives a hint of sweetness. Garlic and ginger provide warmth and depth. For extra flair, consider these garnishes and enhancements: - Sesame seeds - Sliced green onions Adding these toppings makes your dish look appealing. They also add texture and flavor. You can sprinkle sesame seeds for a nutty crunch. Green onions give a fresh bite. Not all ingredients need to be strict. Here are some easy swaps: - Chicken: You can use chicken breast or tofu for a vegetarian option. - Soy Sauce: If you're avoiding gluten, use tamari or coconut aminos. - Veggies: Swap in bell peppers, carrots, or zucchini based on your taste. These substitutions keep the dish tasty while fitting your needs. Don’t hesitate to get creative with what you have on hand. {{ingredient_image_1}} First, gather your ingredients. In a medium bowl, mix soy sauce, honey, minced garlic, and grated ginger. Whisk until well combined. Next, add the sliced chicken thighs to the bowl. Make sure each piece gets coated in the marinade. Cover the bowl and let it sit for at least 15 minutes. This step helps the chicken soak up all the good flavors. Heat vegetable oil in a large skillet or wok over medium-high heat. Once the oil is hot, carefully add the marinated chicken. Keep some marinade aside for later. Cook the chicken for about 5 to 7 minutes. Stir often until it turns golden brown and is fully cooked. Remove the chicken from the skillet and set it aside on a plate. In the same skillet, add the sliced red bell pepper, broccoli florets, and snap peas. Stir-fry the vegetables for about 4 to 5 minutes. You want them to be bright and crisp-tender. This step adds color and crunch to your dish. Keep stirring to ensure even cooking. Return the cooked chicken to the skillet with the veggies. Pour in the reserved marinade and drizzle with sesame oil. Stir everything together, making sure all the flavors blend. If you like a thicker sauce, add the cornstarch mixed with water. Stir constantly for about 1 to 2 minutes until the sauce thickens. Taste and add salt and pepper as needed. Once done, it's time to serve! To get that ideal stir fry texture, you need high heat. Heat your oil until it shimmers before adding the chicken. This sears the meat, locking in juices and flavor. Don't crowd the pan. Cook in batches if needed. This way, your chicken turns golden and crisp. Prep all your ingredients before you start cooking. Slice the chicken and veggies ahead of time. You can even marinate the chicken the night before. This cuts down on cooking time and makes dinner stress-free. Keep your workspace clean to move quickly through each step. Want to change the taste? Add fresh herbs like cilantro or basil for a twist. You can also swap honey for brown sugar if you like it sweeter. For a spicy kick, toss in red pepper flakes or sriracha. Taste as you cook to find your perfect balance. Pro Tips Marinate Longer for Flavor: For a more intense flavor, consider marinating the chicken for at least 30 minutes or even overnight in the refrigerator. Use Fresh Vegetables: For the best taste and texture, opt for fresh vegetables. They will add more vibrant colors and nutrients to your dish. Adjust Sweetness: Feel free to adjust the amount of honey based on your taste preference. If you like it sweeter, add a bit more, or reduce it for a less sweet dish. Perfect Your Stir-Frying Technique: Keep the ingredients moving in the pan to ensure even cooking and to prevent burning. A high heat is key for a good stir fry! {{image_2}} You can change the protein in this dish easily. Instead of chicken, try beef or shrimp. Thinly sliced beef cooks fast and adds a rich flavor. Shrimp gives a sweet taste that pairs well with the sauce. Use about 1 pound of either protein for the same effect. Just remember, adjust your cooking time. Shrimp cooks in just a few minutes, while beef may take a bit longer. To make a vegetarian option, swap the chicken for tofu or tempeh. Firm tofu absorbs flavors well, making it a great choice. Cut it into cubes and marinate just like the chicken. Tempeh offers a nutty taste and has a different texture. Cook it until golden before adding the veggies. This way, you still get that savory taste without any meat. Feel free to mix up the veggies based on what you have or what’s fresh. In spring, add asparagus or snap peas for a crunchy texture. In summer, zucchini and bell peppers add color and taste. Fall favors butternut squash or carrots for a sweet touch. Winter vegetables like kale or Brussels sprouts can also work well. This makes your stir fry not only colorful but also full of nutrients! To keep your soy garlic chicken stir fry fresh, let it cool first. Then, place it in an airtight container. Store it in the fridge. It can last for about three days. Make sure to keep it away from strong-smelling foods. This helps maintain its flavor. When you're ready to eat again, reheating is easy. You can use the microwave or a pan. If using a microwave, heat it for about 1-2 minutes. Stop to stir halfway through. This helps heat it evenly. If you prefer a pan, warm it on low heat. Add a splash of water or soy sauce to keep it moist. If you want to save some for later, freezing works great too. Place the cooled stir fry in a freezer-safe container. It can stay in the freezer for up to three months. When you are ready to eat, thaw it overnight in the fridge. Reheat it just like before for a tasty meal. You can serve this dish with many sides. I recommend white rice or quinoa. Both soak up the sauce well. You can also add a side of steamed vegetables. This adds more color and nutrients to your meal. If you want something crunchy, try fried spring rolls. Yes, you can use other types of chicken. Chicken breasts work well, too. Just slice them thinly like the thighs. You can also use cooked chicken if you’re short on time. Just skip the marinating step and add the cooked chicken to the stir fry. To make this dish gluten-free, use gluten-free soy sauce. Many brands offer a great taste without gluten. Check the label to be sure. You can also use coconut aminos as a substitute. It has a sweet flavor and works well in this recipe. The marinade needs to sit for at least 15 minutes. This allows the chicken to soak up the flavors. If you have more time, let it marinate for up to 1 hour. The longer it sits, the more flavor it will have. Just keep it in the fridge while it marinates. This blog post covered how to make Soy Garlic Chicken Stir Fry. We looked at key ingredients, step-by-step cooking methods, helpful tips, and different variations. Remember, you can use various proteins or vegetables. Don’t forget to store leftovers properly for later meals. Enjoy experimenting with flavors and ingredients! This dish is simple yet full of taste. With practice, your stir fry will impress everyone. Get cooking and savor each bite!

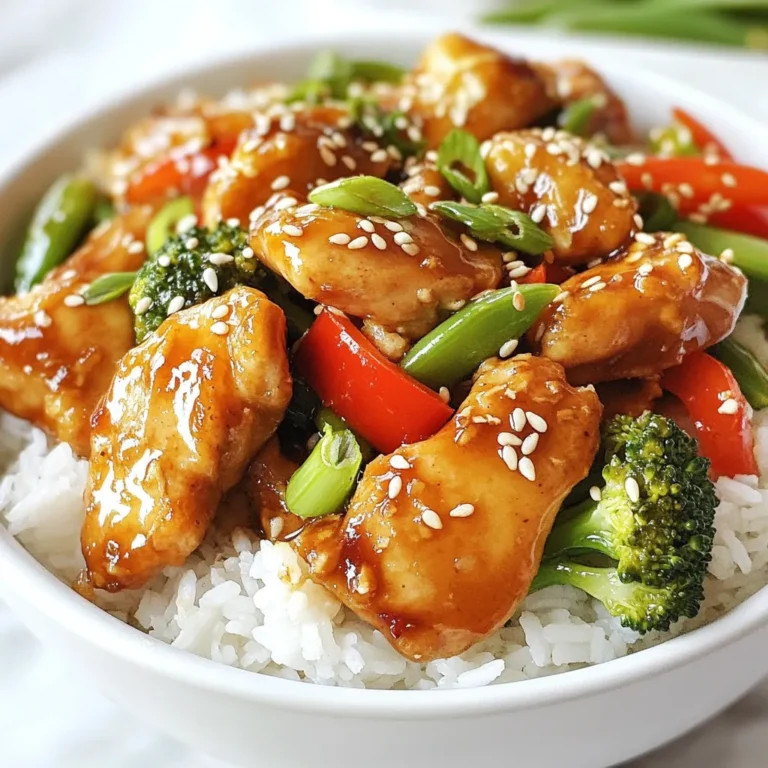
Soy Garlic Chicken Stir Fry Quick and Flavorful Meal

- 4 boneless, skinless chicken breasts - 1 cup fresh cranberries - 1 medium orange, zested and juiced To make this dish, you need fresh chicken breasts. They are tender and juicy. Fresh cranberries add a tart flavor that brightens the meal. Orange zest and juice bring a sweet and citrusy taste that works well with the chicken. - 1/4 cup honey - 2 tablespoons olive oil - 1 teaspoon garlic powder - 1/2 teaspoon salt - 1/2 teaspoon black pepper - 1 teaspoon fresh thyme leaves (or 1/2 teaspoon dried thyme) Sweet honey helps balance the tartness of the cranberries. Olive oil keeps the chicken moist while adding flavor. Garlic powder, salt, and pepper season the dish perfectly. Thyme adds an herbal note that ties everything together. - 1/2 cup sliced almonds - Fresh parsley for garnish Sliced almonds give a nice crunch and nutty taste. Fresh parsley adds color and a hint of freshness to your dish. These garnishes make the meal look even more appealing. {{ingredient_image_1}} 1. Preheat your oven to 375°F (190°C). This step is key for even cooking. 2. Lightly grease a 9x13-inch baking dish. This helps the chicken release easily later. 1. In a small bowl, whisk together the orange juice, zest, honey, and olive oil. 2. Add garlic powder, salt, pepper, and thyme. Mix until all ingredients blend well. 3. Place the chicken breasts in the baking dish. Pour the orange mixture over the chicken. Turn the chicken to coat it evenly. 1. Cover the baking dish with aluminum foil. Bake for 25 minutes. This keeps the chicken moist. 2. After 25 minutes, remove the foil. Bake for another 15-20 minutes. Check if the chicken reaches 165°F (74°C). The cranberries should pop, adding flavor. Once baked, let the chicken rest for five minutes before serving. This helps keep it juicy. Enjoy a simple, tasty meal! - Achieving the ideal chicken temperature: Aim for an internal temperature of 165°F (74°C). Use a meat thermometer to check. This ensures the chicken is safe to eat and not overcooked. - Preventing dry chicken: Marinate the chicken in the orange mixture for at least 30 minutes. This step helps keep the meat juicy and flavorful during baking. - Plating suggestions: Serve the chicken on a large platter. Drizzle the pan juices over the chicken for more flavor. Add extra cranberries around the dish for a pop of color. - Garnishing ideas: Use fresh parsley to add a bright touch. You can also sprinkle sliced almonds on top for a crunchy texture. - Cooking time adjustments: If you use larger chicken breasts, increase the baking time by 5 minutes. Always check the chicken's internal temperature. - Allowing the dish to rest: Let the chicken rest for 5 minutes after baking. This helps the juices settle, making the chicken more tender and juicy when you slice it. Pro Tips Marinate for More Flavor: For an extra depth of flavor, consider marinating the chicken in the orange mixture for at least 30 minutes before baking. This will allow the flavors to penetrate the meat. Use Fresh Ingredients: Fresh cranberries and citrus will provide the best flavor and texture. If using frozen cranberries, do not thaw them before baking to maintain their shape. Check Doneness with a Thermometer: To ensure your chicken is perfectly cooked, use a meat thermometer to check for an internal temperature of 165°F (74°C). This guarantees juicy, tender chicken. Customize with Herbs: Feel free to experiment with different herbs like rosemary or sage instead of thyme for a unique flavor profile that complements the citrus and cranberries. {{image_2}} You can make this dish your own by swapping out ingredients. - Alternative fruits: Instead of cranberries, try blueberries for a sweeter taste. Apples also add a nice crunch. - Different proteins: If you prefer turkey, it cooks well with this sauce. For a plant-based option, use tofu. Just press it to remove excess moisture. Adding different flavors can make your dish pop. - Using different herbs: Rosemary adds a woodsy note. Sage brings warmth and earthiness to the dish. - Adding spice: If you like heat, sprinkle red pepper flakes over the top. They add a nice kick to the sweet sauce. You can easily adjust the recipe to fit your diet. - Gluten-free versions: This dish is naturally gluten-free. Just ensure that your honey and any added ingredients are certified gluten-free. - Low-sugar options: Swap honey for agave syrup or use a sugar substitute. This keeps the sweetness without the extra sugar. To keep your Cranberry Orange Chicken Bake fresh, follow these tips: - Best practices for refrigeration: Store leftovers in an airtight container. This helps prevent moisture loss and keeps the flavors intact. Place the container in the fridge within two hours of cooking. Your chicken should stay fresh for up to three days. - Freezing options: If you want to save it for later, freezing is a great choice. Use a freezer-safe container or heavy-duty freezer bags. Make sure to remove as much air as possible. This dish can last in the freezer for up to three months. When ready to eat, thaw it in the fridge overnight before reheating. When it’s time to enjoy your leftovers, here are some effective ways to reheat: - Methods for reheating: The oven is best for even heating. Preheat it to 350°F (175°C). Place the chicken and sauce in a baking dish, cover it with foil, and heat for about 20 minutes. You can also use a microwave for quick reheating, but be careful not to overcook it. - Ensuring moisture retention: To keep your chicken juicy, add a splash of chicken broth or water while reheating. This helps maintain moisture and flavor. Knowing how long your dish stays fresh is key: - How long it stays fresh in the fridge/freezer: In the fridge, your Cranberry Orange Chicken Bake stays fresh for about three days. If frozen, it can last for up to three months. Just remember to check for any signs of freezer burn before cooking from frozen. Can I use frozen chicken? Yes, you can use frozen chicken. However, make sure to thaw it first. Cook time may need to be longer if the chicken is still a bit frozen. What can I serve with Cranberry Orange Chicken Bake? You can serve this dish with rice or mashed potatoes. A green salad or steamed veggies also pairs well. These sides will balance the sweet and tart flavors of the chicken. Why are my cranberries not popping? Cranberries pop when they cook. If they don’t, they may be too dry. Make sure to use fresh, plump cranberries for the best results. How to adjust the sweetness? To make it less sweet, reduce the honey. You can also add more orange juice or a pinch of salt. This will balance the flavors without making it too sweet. Can I use a different citrus? Yes, you can use lemon or lime instead of orange. Each will give a unique flavor to the dish. Make sure to adjust the amount to taste since they can be more sour. What can I replace honey with? You can replace honey with maple syrup or agave nectar. Brown sugar is another option. These will maintain the sweetness and flavor profile of the dish. This recipe for Cranberry Orange Chicken Bake combines bright flavors and simple steps. You learned about the key ingredients like chicken, cranberry, and orange. The detailed instructions guide you through preparation and baking for perfect results. I shared tips to keep your chicken moist and garnishing ideas that add flair. You can also explore variations to fit your taste or dietary needs. Follow these steps, and you’ll impress anyone at your table. Enjoy cooking and make this dish your own!

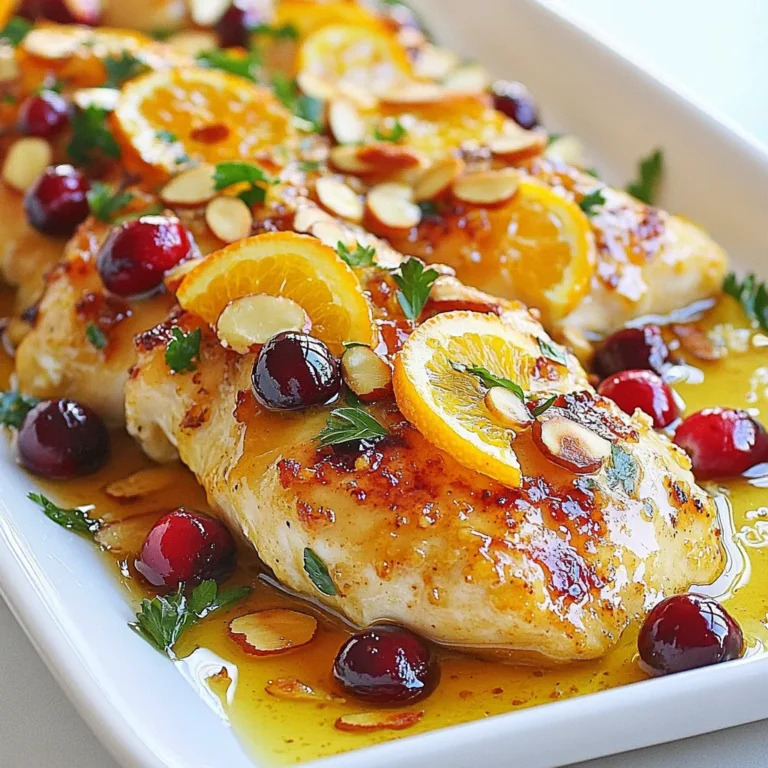
Cranberry Orange Chicken Bake Simple and Flavorful Dish

- Chicken sausages (4, sliced) - Zucchini (2 medium, diced) - Whole wheat pasta (8 oz, like penne or fusilli) - Cherry tomatoes (1 cup, halved) - Garlic (2 cloves, minced) - Red pepper flakes (1/2 teaspoon, optional) - Olive oil (1 tablespoon) - Salt and pepper (to taste) - Fresh basil leaves (for garnish) - Grated parmesan cheese (for serving, optional) When I think of comfort food, chicken sausages with zucchini and pasta come to mind. This meal is quick to prepare and full of flavor. You can enjoy it any night of the week. The main ingredients shine in this dish. Chicken sausages give it a nice savory kick. Zucchini adds a fresh crunch. Whole wheat pasta makes it hearty and fills you up. Cherry tomatoes bring a burst of sweetness. You can add garlic for depth. Red pepper flakes are great if you want some heat. Olive oil adds richness to the dish. Salt and pepper help enhance all the flavors. Fresh basil gives a nice finishing touch. Grated parmesan cheese is optional, but it adds a creamy element. Gather these ingredients before you start cooking. Having everything ready makes the process smooth and fun. You’ll be amazed at how easy it is to create a delicious meal that feels gourmet. Enjoy cooking! {{ingredient_image_1}} - Boil salted water in a large pot. - Add 8 oz of whole wheat pasta and cook until al dente. - Reserve 1/2 cup of the pasta cooking water. - Heat 1 tablespoon of olive oil in a skillet over medium heat. - Add 4 sliced chicken sausages to the skillet. - Brown the sausages for about 5-7 minutes until they are cooked through. - Incorporate 2 minced garlic cloves into the skillet. - Add 2 diced zucchinis and mix well. - Sauté until the zucchini is tender, about 4-5 minutes. - Stir in 1 cup of halved cherry tomatoes. - If you like heat, add 1/2 teaspoon of red pepper flakes. - Season with salt and pepper to taste. - Mix the cooked pasta with the sausage and vegetable mixture. - Pour in the reserved pasta cooking water. - Toss everything together and allow it to cook for 1-2 minutes to meld flavors. - Plate the dish hot for best taste. - Garnish with fresh basil leaves. - Optionally, sprinkle with grated parmesan cheese for extra flavor. When you pick your chicken sausages, go for lean options. Look for brands that keep things simple. Check for added flavors like herbs or spices. This can add a nice twist to your dish. Avoid sausages with too many fillers. They may not cook well and can affect taste. Cooking pasta is all about timing. Start with a big pot of salted water. Follow the package instructions for best results. You want your pasta to be al dente, which means firm but tender. Remember to reserve half a cup of pasta water before draining. This starchy water can help blend the sauce and pasta. Want to kick up the taste? Try adding fresh herbs like thyme or oregano. A touch of lemon zest can brighten your dish. Balance your spices carefully. If you add red pepper flakes, start with a little. You can always adjust it later. This helps keep the flavors in harmony and makes every bite enjoyable. Pro Tips Fresh Ingredients: Using fresh zucchini and tomatoes can elevate the flavors of this dish significantly. Cooking Pasta: Make sure to salt your pasta water well; it should taste like the sea to enhance the pasta's flavor. Customize the Heat: Adjust the amount of red pepper flakes to your preference for spice; you can omit it for a milder dish. Resting Time: Let the dish sit for a few minutes before serving to allow the flavors to blend beautifully. {{image_2}} You can change the veggies in this dish for fun. Try bell peppers, spinach, or broccoli. Each adds a new taste and color. For a seasonal twist, use asparagus in spring or squash in fall. These swaps keep your meals fresh and exciting. If you need gluten-free pasta, there are great choices. Brown rice, quinoa, or chickpea pasta works well. Just cook them according to the package. You may need to adjust the sauce or veggies to match the new pasta. This way, everyone can enjoy the dish. Want to swap the chicken sausages? Turkey or pork sausages are tasty options. They add a different flavor but still keep it simple. For a plant-based choice, look for veggie sausages made from soy or lentils. They offer a great taste while being meat-free. To store leftovers, place them in an airtight container. Make sure to cool the dish first. This keeps it fresh for 3 to 4 days. For best taste, eat it within two days. Avoid letting it sit out for too long. Also, make sure to mark the date on the container. When reheating, use the microwave or stovetop. If using a microwave, cover the container. Heat in short bursts to avoid overcooking. Stir often to keep everything warm. If on the stovetop, add a splash of water. This keeps the pasta from drying out. Heat gently on low to keep the texture nice. You can freeze the dish, but do it right. For best results, freeze it after cooking. Place it in a freezer-safe container. It will last about 2 to 3 months. When ready to eat, thaw it in the fridge overnight. Reheat it gently, adding water if needed. Avoid freezing uncooked ingredients, as they may not hold up well. Yes, you can use regular pasta. Whole wheat adds fiber and a nutty taste. Both will work well in this dish. You can store leftovers in the fridge for up to three days. Make sure to keep them in an airtight container. Yes, you can prepare this dish ahead. Cook the pasta and sausages, then store them separately. Combine them when ready to serve. You can use turkey sausages or pork sausages. For a vegetarian option, try plant-based sausages or beans. Yes, this recipe is great for meal prep. It stores well and reheats easily, making it perfect for quick meals. Add more red pepper flakes to the dish. You can also include diced jalapeños or a splash of hot sauce for extra heat. This recipe combines chicken sausages, zucchini, and whole wheat pasta for a tasty dish. Remember to cook your pasta just right and reserve some cooking water for better flavor. Experiment with vegetables and proteins to suit your taste. Store leftovers properly to enjoy this meal later. This dish is easy to make, fun to adapt, and perfect for any day. Make it your own and enjoy every bite.

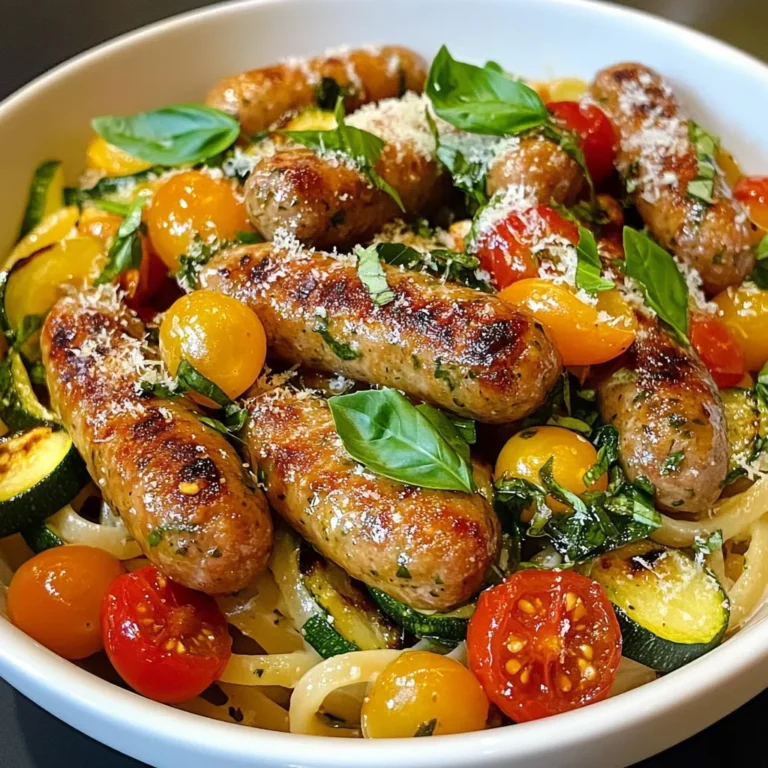
Chicken Sausages with Zucchini and Pasta Delight

- 2 large chicken breasts - 1 cup BBQ sauce (low-sugar for a healthier option) - 1 cup cooked quinoa - 1 cup cherry tomatoes, halved - 1 cup romaine lettuce, chopped - 1/2 cup shredded cheddar cheese - 1/2 cup ranch dressing (light or yogurt-based) - 1/4 cup green onions, sliced - 1 tablespoon olive oil - Salt and pepper to taste - Optional: 1 avocado, sliced for garnish Gathering your ingredients is the first step in making this tasty bowl. Start with the chicken breasts. They are the star of the show, packed with protein. I suggest using two large breasts for a filling meal. Next, pick a BBQ sauce. There are many options, but a low-sugar choice keeps it light. For the base of this bowl, I use quinoa. It adds texture and more protein. You’ll need one cup of cooked quinoa for a perfect serving. Now, let’s add some color and crunch! Cherry tomatoes and romaine lettuce brighten up the dish. Use one cup of halved tomatoes and one cup of chopped lettuce. For creaminess, we’ll need shredded cheddar cheese and ranch dressing. Half a cup of each will give you that rich flavor. Choose a light ranch or yogurt-based option to keep it healthier. Finally, we can add a pop of flavor with green onions. You’ll need a quarter cup, sliced. To enhance the taste, use a tablespoon of olive oil. Don’t forget salt and pepper for seasoning. If you want an extra treat, add sliced avocado on top. It’s not just tasty; it’s also good for you! Now you have all the ingredients ready to create this High Protein BBQ Chicken Ranch Bowl! {{ingredient_image_1}} To start, preheat your grill or grill pan over medium-high heat. This helps to get a nice sear on the chicken. While it heats, season the chicken breasts with salt and pepper on both sides. This simple step adds great flavor. Next, brush olive oil onto the grill grates. This prevents the chicken from sticking. Place the seasoned chicken on the grill. Cook for about 6-7 minutes on each side. You want the internal temperature to reach 165°F (75°C). During the last few minutes, brush BBQ sauce onto the chicken. This caramelizes the sauce and adds a rich flavor. Once done, remove the chicken from the grill. Let it rest for about 5 minutes before slicing it into strips. While the chicken rests, let's prepare the bowl base. First, cook 1 cup of quinoa according to package instructions. Quinoa is packed with protein and adds a nice texture. In a large bowl, mix cooked quinoa with chopped romaine lettuce and halved cherry tomatoes. This mix gives your bowl a fresh crunch and balances the flavors well. Now, it’s time to assemble your High Protein Bowl. Start by layering the quinoa, lettuce, and tomato mixture in each bowl. This creates a hearty base. Top each bowl with sliced grilled chicken, shredded cheddar cheese, and a drizzle of ranch dressing. This adds creaminess and flavor to your bowl. For a final touch, garnish with sliced green onions and avocado, if you like. A good serving size is about 1 cup of the base, topped with 4-5 ounces of chicken. Enjoy your tasty and nutritious meal! To grill chicken without dryness, keep these tips in mind: - Use a meat thermometer. Check the thickest part of the chicken. It should hit 165°F (75°C) for safe eating. - Let it rest. After grilling, let the chicken sit for five minutes. This helps the juices stay inside. You can easily adapt this bowl for special diets: - Low-carb options. Replace quinoa with cauliflower rice. This cuts carbs while keeping volume. - Gluten-free alternatives. Use a gluten-free BBQ sauce. Make sure other sauces are also gluten-free. Adding spices and herbs can boost taste: - Try garlic powder and paprika. These spices add depth without overpowering. - Fresh herbs are great. Cilantro or parsley brightens the dish. For sauces: - Experiment with different BBQ sauces. Sweet, spicy, or smoky options change the flavor profile. - Ranch dressing variations. Use yogurt-based ranch for a lighter twist. Pro Tips Marinate for Flavor: For even more flavor, marinate the chicken breasts in BBQ sauce for at least 30 minutes before grilling. Quinoa Alternatives: If you don’t have quinoa, feel free to substitute it with brown rice or couscous for a different texture. Cheese Variations: Try using different types of cheese like pepper jack or feta for a unique twist on the flavor profile. Fresh Herbs Boost: Add fresh herbs like cilantro or parsley to the bowl for a fresh, vibrant taste that complements the BBQ. {{image_2}} You can switch chicken for turkey or tofu. Turkey gives you a lean option. It cooks fast and stays juicy when grilled. Tofu is a great choice for a vegetarian meal. Just marinate it in BBQ sauce before grilling to add flavor. If you want a change from quinoa, try brown rice or farro. Both grains provide a nutty taste and texture. You can also use cauliflower rice for a low-carb option. It’s light and packed with nutrients, making it a smart swap. You can make your own ranch dressing at home. Combine Greek yogurt, garlic powder, and herbs for a fresh taste. Other dressings like blue cheese or balsamic vinaigrette work well, too. They add a unique twist to your bowl and keep things exciting. To keep your BBQ chicken ranch bowl fresh, start by letting it cool. Then, place it in an airtight container. This keeps moisture in while preventing any unwanted smells. Store the bowl in the fridge for up to three days. If you want to save it longer, freezing is a great option. For freezing, make sure to separate the components. Keep the chicken, quinoa, and veggies in different bags. This helps keep everything fresh. You can store them for up to three months in the freezer. Just label each bag with the date for easy tracking. When it comes to reheating, you have two main choices: the microwave or oven. The microwave is quick and easy. Just place the bowl inside and heat it for about 1-2 minutes. Stir halfway through to make sure it heats evenly. If you prefer the oven, preheat it to 350°F (175°C). Place the bowl in an oven-safe dish and cover it with foil. Heat for about 15-20 minutes. This method helps maintain the texture and flavor of the chicken. Remember, reheating slowly helps keep your meal tasty and juicy. Enjoy your BBQ chicken ranch bowl anytime! To make this BBQ Chicken Ranch Bowl gluten-free, choose a gluten-free BBQ sauce. Many brands offer tasty options. Use quinoa as your base since it is naturally gluten-free. Ensure the ranch dressing is also gluten-free. You can find gluten-free versions in stores or make your own. You can add many toppings for more protein. Here are some ideas: - Black beans for fiber and protein - Sliced hard-boiled eggs for richness - Chopped nuts like almonds for crunch - Grilled shrimp or fish for a different flavor - Hummus can be a great spread on the side Yes, you can prepare this bowl ahead of time. For meal prep, cook the chicken and quinoa in advance. Store them separately in airtight containers. Chop the veggies and keep them fresh in the fridge. - Cook the chicken and quinoa on a Sunday for the week. - Prepare the dressing and store it in a small jar. - Pack toppings in separate containers to keep them fresh. - Store the cooked chicken and quinoa in the fridge for up to 4 days. - Fresh veggies should be eaten within 2-3 days for the best taste. - You can freeze cooked chicken for up to 3 months. Just thaw it before use. This blog post covered how to create a BBQ Chicken Ranch Bowl. We discussed the needed ingredients, like chicken, quinoa, and toppings. I shared step-by-step instructions for prepping, cooking, and assembling your bowl. You learned helpful tips for grilling chicken perfectly and customizing the recipe for dietary needs. With various protein options and dressing alternatives, you can make this bowl your own. Enjoy experimenting with flavors and storage tips to keep it fresh. Happy cooking!

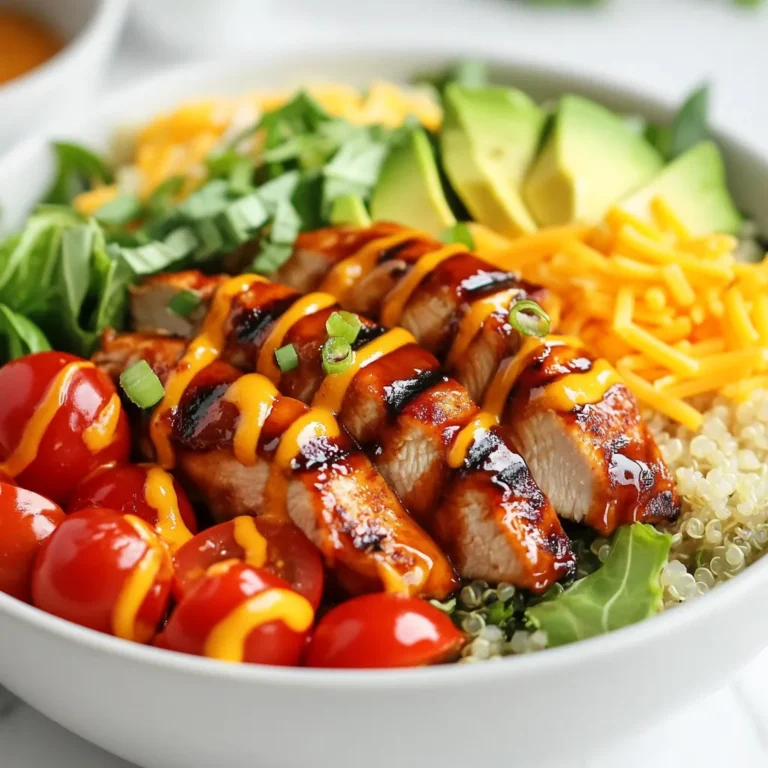
High Protein BBQ Chicken Ranch Bowl Delightful Recipe

For this dish, you need a few key items. Here’s what you’ll need: - 2 boneless, skinless chicken breasts - 1 cup whole wheat breadcrumbs - 1/2 cup grated Parmesan cheese - 1 teaspoon Italian seasoning - 1 teaspoon garlic powder - 1/2 teaspoon salt - 1/4 teaspoon black pepper - 2 eggs, beaten - 1 1/2 cups marinara sauce (low sodium) - 1 cup shredded mozzarella cheese (part-skim) These ingredients create a tasty and healthier version of chicken Parmesan. Adding vegetables makes this dish packed with nutrition. Here are some great choices: - 1 red bell pepper, diced - 1 zucchini, sliced - 1 cup cherry tomatoes, halved These veggies add color and flavor. They also help you reach your daily veggie goal. I love using healthier swaps in my recipes. Here are some alternatives you can try: - Choose whole wheat breadcrumbs for more fiber. - Use low-sodium marinara sauce to cut down on salt. - Opt for part-skim mozzarella cheese to reduce fat. These choices keep your dish light without losing taste. Enjoy making this healthy chicken Parmesan! {{ingredient_image_1}} Start by preheating your oven to 400°F (200°C). Take the chicken breasts and pat them dry with a paper towel. This removes extra moisture. Next, put the chicken in a plastic bag and gently pound it to make it even. This step helps the chicken cook evenly. Aim for about 1/2 inch thick. In a shallow dish, combine whole wheat breadcrumbs, grated Parmesan cheese, Italian seasoning, garlic powder, salt, and black pepper. Mix this well. The breadcrumbs will add crunch, while the cheese and spices give flavor. Set this mixture aside for breading later. Heat 1 tablespoon of olive oil in a large skillet over medium heat. Add diced red bell peppers, sliced zucchini, and halved cherry tomatoes. Sauté these for about 5-7 minutes. The veggies should be tender and vibrant. This adds color and nutrients to your meal. Once done, remove them from heat and set aside. Now, take each pounded chicken breast and dip it into the beaten eggs. Let any excess egg drip off. Next, coat the chicken in the breadcrumb mixture. Press gently to make sure it sticks. Place the chicken on a baking sheet lined with parchment paper. Bake for about 20 minutes until golden brown and cooked through. After 20 minutes, spoon marinara sauce over each chicken piece. Then sprinkle shredded mozzarella cheese on top. Bake for another 5-7 minutes until the cheese melts. To serve, put a portion of the sautéed vegetables on each plate. Place the cheesy chicken next to the veggies. Garnish with fresh basil leaves for a burst of flavor and color. This dish looks and tastes amazing! To get that great crunch, use whole wheat breadcrumbs. They add texture and flavor. Make sure to press the crumbs onto the chicken well. This helps them stick. Bake the chicken at 400°F for the best crisp. Don't overcrowd the pan; give each piece space. This allows hot air to circulate. If you want an extra crunch, broil the chicken for the last minute. Add some spice to your chicken! Try mixing in red pepper flakes or paprika with your breadcrumbs. You can also use fresh herbs like thyme or oregano. They bring a fresh taste. For a zesty kick, squeeze some lemon juice over the chicken after baking. This brightens up the dish and adds a nice touch. You can prep this meal ahead of time. Bread the chicken and store it in the fridge for up to a day. This way, you can cook it quickly when you need it. You can also sauté the veggies in advance. Just warm them up when you bake the chicken. This makes dinner a breeze on busy nights. Pro Tips Butterfly the Chicken: For more even cooking, consider butterflying the chicken breasts. This will help them cook faster and more uniformly. Make Your Own Breadcrumbs: For a fresher taste and better texture, use stale whole wheat bread to make your own breadcrumbs. Just pulse in a food processor until finely ground. Customize the Veggies: Feel free to swap in your favorite vegetables or whatever you have on hand. Spinach, mushrooms, or eggplant also work wonderfully. Extra Crispy Chicken: If you prefer a crunchier coating, spray the breaded chicken with a little cooking spray before baking to help it brown nicely. {{image_2}} You can change the protein in this dish. Turkey is a great option. It has less fat and is still tasty. Just use turkey cutlets instead of chicken. Eggplant is a fun choice too. Slice the eggplant into rounds and bread it like chicken. Bake until golden. You will enjoy a healthy twist on this classic meal. Feel free to mix in other veggies. Broccoli, spinach, and mushrooms work well. You can toss them in during the sauté step. They add color and flavor. Carrots or asparagus also taste great with this dish. Pick what you like best. This way, you make the meal more fun and colorful. If you need a gluten-free option, swap the breadcrumbs. Use ground almonds or gluten-free breadcrumbs. These options still give a nice crunch. You can also use crushed rice cereal for a lighter texture. Just make sure to check the labels for gluten. This way, everyone can enjoy a tasty chicken parmesan. To keep your Healthy Chicken Parmesan fresh, follow these steps: - Let the dish cool completely. - Place it in an airtight container. - Store it in the fridge for up to three days. If you want to keep it longer, consider freezing it. Just make sure to separate the chicken from the veggies for best results. When it’s time to eat your leftovers, reheat them carefully: - Preheat your oven to 350°F (175°C). - Place the chicken and veggies on a baking sheet. - Cover with foil to keep moisture in. - Heat for about 15-20 minutes until warm. This method helps maintain the crispiness of the chicken and the freshness of the veggies. Freezing is a great way to save this dish for later. Here’s how to do it right: - First, wrap each chicken breast tightly in plastic wrap. - Then, place the wrapped chicken in a freezer bag. - Add the sautéed vegetables in a separate bag or container. You can freeze them for up to three months. To eat, thaw in the fridge overnight and reheat as described above. This way, you can enjoy your Healthy Chicken Parmesan on busy days! Yes, you can use regular breadcrumbs. Whole wheat adds more fiber and nutrients. If you want a healthier option, stick to whole wheat. Try using low-fat cheese or a dairy-free cheese. Both options melt well and taste great. You can also use ricotta or goat cheese for a twist. To make it dairy-free, skip the cheese and use dairy-free cheese instead. You can also add more veggies for flavor. Nutritional yeast can add a cheesy taste without dairy. Absolutely! Grilling gives the chicken a nice smoky flavor. Just season the chicken and grill until cooked through. Keep an eye on it to avoid drying out. To sum up, we've explored how to make a healthy chicken Parmesan. We covered key ingredients, like lean chicken, tasty vegetables, and smart substitutes. The step-by-step guide ensures a perfect dish you can bake with ease. I shared tips for a nice crunch and flavor boosts, plus variations for different diets. Remember to store leftovers properly and reheating can keep the meal fresh. I hope you feel ready to try this healthy spin on a classic dish. Enjoy your cooking!

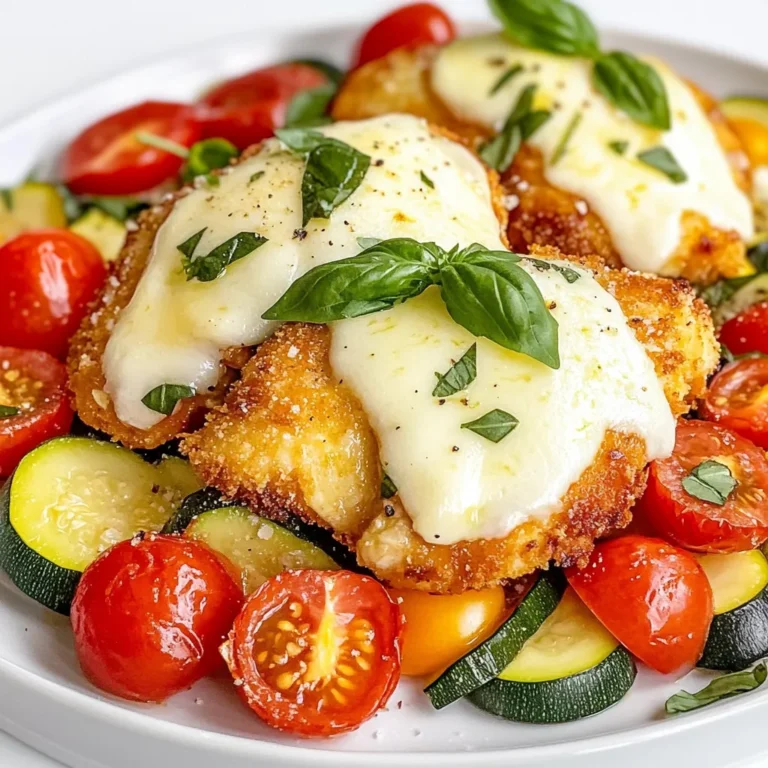
Healthy Chicken Parmesan with Vegetables Recipe Idea

- 500g ground chicken - 1 cup fresh Thai basil leaves - 4 cloves garlic, minced - 3-4 Thai bird’s eye chilies, finely chopped - 2 tablespoons vegetable oil - 1 tablespoon soy sauce - 1 tablespoon oyster sauce - 1 teaspoon sugar - 1 tablespoon fish sauce - 1 bell pepper, sliced (optional) - 1 onion, sliced (optional) - Cooked jasmine rice (for serving) - Fried egg (optional) To make Pad Kra Pao Thai Basil Chicken, gather these fresh ingredients. First, the ground chicken forms the base. I recommend using high-quality chicken for the best taste. The Thai basil leaves add a unique aroma and flavor. You can find them at Asian markets or specialty stores. Next, minced garlic and bird’s eye chilies bring a spicy kick. Adjust the chilies based on your spice preference. The vegetable oil is essential for sautéing and helps blend the flavors. Sauces like soy and oyster provide depth. Sugar balances the saltiness. Fish sauce, a key ingredient, adds umami. You can also throw in bell pepper and onion for color and crunch. Lastly, serve your dish with jasmine rice. A fried egg on top makes it even better. This combination creates a satisfying and flavorful meal. {{ingredient_image_1}} - Heat the Oil In a large skillet or wok, heat 2 tablespoons of vegetable oil over medium-high heat. Wait until it shimmers. - Sauté Aromatics Add 4 minced garlic cloves and 3-4 finely chopped Thai bird’s eye chilies. Stir for about 30 seconds until fragrant. - Cook the Chicken Add 500g of ground chicken to the pan. Break it apart with a spatula. Cook for 5-7 minutes until fully cooked and caramelized. - Add Vegetables If you like, stir in 1 sliced bell pepper and 1 sliced onion. Cook for an additional 2-3 minutes until the vegetables are tender. - Season the Mixture Stir in 1 tablespoon of soy sauce, 1 tablespoon of oyster sauce, 1 teaspoon of sugar, and 1 tablespoon of fish sauce. Mix well and cook for another 2 minutes. - Add Basil Turn off the heat and add 1 cup of fresh Thai basil leaves. Toss quickly until the basil is wilted and fragrant. - Serve Serve the chicken mixture over bowls of hot jasmine rice. Top with a fried egg if you wish. Importance of Fresh Ingredients Using fresh ingredients is key. Fresh Thai basil adds a bright taste. Fresh garlic gives a strong aroma. Always use quality chicken for the best texture. Adjusting Spice Levels You control the heat! For a milder dish, use fewer chilies. Remove seeds to lower the spice. For more heat, add more Thai bird’s eye chilies. Taste as you go to find your perfect balance. Cooking Techniques for Best Results Use a hot skillet or wok. This helps the chicken sear nicely. Stir-fry quickly to keep the chicken juicy. Add the basil at the end to preserve its flavor. Best Side Dishes Serve Pad Kra Pao with jasmine rice. It soaks up the sauce well. You can also pair it with a simple cucumber salad. This adds a refreshing crunch. Garnishes and Toppings Top your dish with a fried egg. This adds richness to the meal. Fresh lime wedges also bring brightness. You can sprinkle extra basil for a pop of color. Pro Tips Use Fresh Ingredients: Always opt for fresh Thai basil and vegetables to enhance the flavor and aroma of your dish. Adjust Spice Level: Feel free to add more or fewer bird's eye chilies based on your preference for heat. You can also deseed them for a milder taste. Perfectly Cooked Chicken: Make sure to break the ground chicken into small pieces while cooking to ensure even browning and flavor absorption. Fried Egg Addition: A fried egg on top adds richness and flavor; ensure the yolk is runny to create a delicious sauce when mixed with the chicken. {{image_2}} Alternatives for Chicken If you want a different flavor, use ground turkey or pork instead of chicken. These meats absorb the sauce well and still keep the dish tasty. You can also try diced chicken breast or thighs for a chunkier texture. Vegetarian Options For a plant-based meal, substitute the ground chicken with crumbled tofu or tempeh. Both options soak up the sauce nicely and add a good dose of protein. You can even use mushrooms for a chewy texture and umami flavor. Pad Kra Pao with Different Proteins In Thailand, you might find Pad Kra Pao made with beef or duck. These proteins can add a rich taste. Just make sure to adjust cooking times based on the protein you choose. Additions like Shrimp or Tofu Try adding shrimp for a seafood twist! Just sauté them until pink before adding the sauces. For a vegetarian option, firm tofu works great. Just press it to remove excess water and then cube it before cooking. Add it in during the last few minutes to warm through. - Refrigeration Guidelines: First, let the Pad Kra Pao cool down. Once it’s cool, place it in an airtight container. Store it in the fridge for up to three days. This keeps the flavors fresh and safe to eat. - Freezing Instructions: If you want to keep it longer, freeze the leftovers. Use a freezer-safe container or bag. Make sure to remove as much air as possible. It can last up to two months in the freezer. When you're ready to eat, thaw it in the fridge overnight. - Best Methods to Reheat: To reheat, you can use the stove or microwave. For the stove, heat a little oil in a pan. Add the leftover Pad Kra Pao and stir until hot. This helps keep it tasty. If using a microwave, place the dish in a microwave-safe bowl. Cover it and heat in short bursts, stirring in between. This ensures even heating without drying it out. Pad Kra Pao is a popular Thai stir-fry dish. It features ground meat, often chicken, cooked with holy basil. The dish is known for its bold flavors and aromatic ingredients. It is typically served over rice with a fried egg on top. Yes, you can prepare Pad Kra Pao ahead of time. Cook the chicken mixture and store it in the fridge. When ready to eat, just reheat it and serve over fresh rice. This makes meal prep easy and quick. Pad Kra Pao can be spicy, depending on the chilies used. Thai bird’s eye chilies add heat. You can adjust the spice level by using fewer chilies. If you prefer no spice, leave them out completely. Pad Kra Pao pairs well with jasmine rice. You can also serve it with a fried egg on top. For a complete meal, add a side of stir-fried vegetables or a simple salad. Fresh basil gives the best flavor in Pad Kra Pao. Dried basil lacks the same vibrant taste. If you must use dried, reduce the amount. Use about one-third of what the recipe calls for. This post guides you through making Pad Kra Pao. We looked at ingredients, cooking steps, and tips for great flavor. Remember, fresh ingredients make a big difference. Adjust spice levels to fit your taste. Try different proteins or vegetarian options for variety. Store leftovers in the fridge or freezer, and reheat properly. I hope you enjoy this simple, delicious dish that can easily be a family favorite!

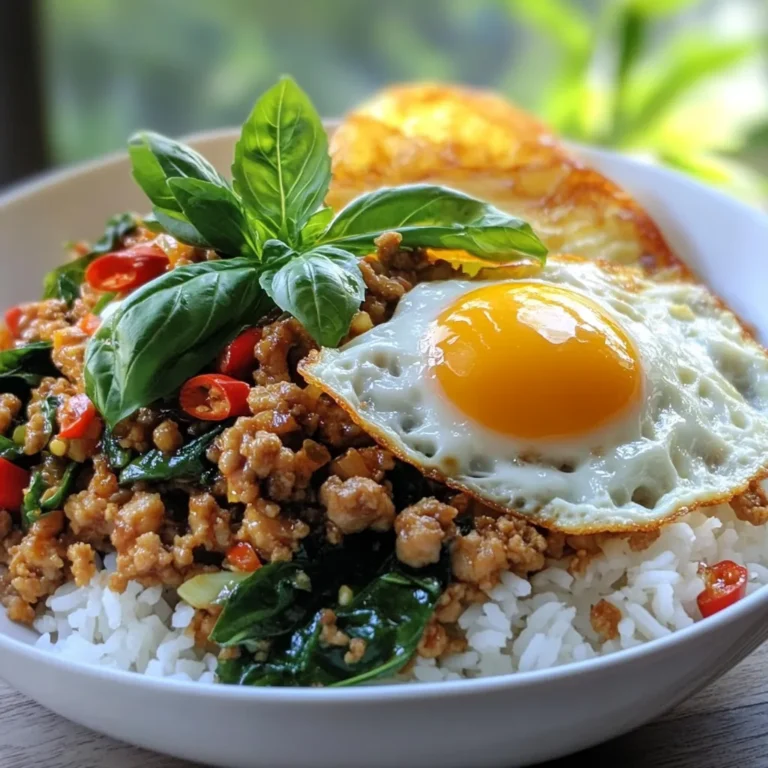
Pad Kra Pao Thai Basil Chicken Flavorful Recipe

PREV 1 … 46 47 48 … 56 NEXT
secrets pice kitchen

explore

DessertsDinnerAppetizersDrinks

Our Policies

  • Cookie Policy
  • Copyright Policy
  • Disclaimer
  • GDPR Policy
  • Terms Of Use
Back to Top
  • About
  • Contact Us
  • Privacy Policy
© 2025 secrets pice kitchen