FREE DINNER EBOOK! Get your copy!
  • Cookie Policy
  • GDPR Policy
  • Disclaimer
  • Terms Of Use
  • Visit my other site: Fun Cookie Recipes
secrets pice kitchen
  • Home
  • Dinner
  • Desserts
  • Drinks
  • Appetizers
  • Contact
  • About
  • Privacy Policy
  • Home
  • Dinner
  • Desserts
  • Drinks
  • Appetizers
  • Contact
  • About
  • Privacy Policy
  • Cookie Policy
  • GDPR Policy
  • Disclaimer
  • Terms Of Use
Visit my other site: Fun Cookie Recipes

HOME / CATEGORIES /

Latest

- 12 oz. pasta (penne or fusilli) - 1 lb. smoked sausage, sliced - 1 cup BBQ sauce (sweet and tangy variety) - 1 cup cherry tomatoes, halved - 1 bell pepper (any color), diced - 1 medium onion, chopped - 2 cloves garlic, minced - 1 tablespoon olive oil - 1 teaspoon paprika - 1 teaspoon dried oregano - Salt and pepper to taste - ¼ cup fresh parsley, chopped (for garnish) - Grated Parmesan cheese (optional, for serving) When you gather your ingredients, focus on quality. Use fresh vegetables and high-quality sausage. The BBQ sauce is key; choose one that’s sweet and tangy for the best flavor. The right pasta shape matters, too. Penne or fusilli holds the sauce well. For the veggies, cherry tomatoes add sweetness. They burst with flavor as they cook. A colorful bell pepper not only looks nice but also adds crunch. Onions bring sweetness and depth. Don't skip the garlic; it adds a lovely aroma. Seasonings like paprika and oregano boost the taste. They make this dish more than just pasta and sausage. Salt and pepper help balance the flavors. Fresh parsley on top gives a bright finish. Grated Parmesan cheese is optional, but it adds creaminess. Gather all these ingredients, and you’re ready to create a tasty meal! {{ingredient_image_1}} - Boil salted water in a large pot. - Add the pasta and cook until al dente. - Drain the pasta and set it aside. - Heat olive oil in a large skillet over medium heat. - Add the sliced smoked sausage and cook until browned. - Remove the sausage from the skillet and set it aside. - In the same skillet, add the chopped onion and diced bell pepper. - Sauté for about 3-4 minutes until they soften. - Add minced garlic and cook for one more minute. - Return the browned sausage to the skillet. - Mix in halved cherry tomatoes and BBQ sauce. - Season with paprika, dried oregano, salt, and pepper. - Stir well and let the mixture cook for 5-7 minutes. - Add the cooked pasta to the sausage mixture in the skillet. - Toss gently to coat the pasta with the sauce. - Heat through for another 2-3 minutes to combine flavors. - Remove from heat and garnish with fresh parsley. - Optionally sprinkle grated Parmesan cheese before serving. To make your BBQ sauce perfect, adjust the sweetness and tanginess. You can add honey for more sweetness or apple cider vinegar for tang. Mixing in spices like cumin or chili powder brings out more depth in flavor. This small change can make a big impact. Always ensure your water is boiling before adding the pasta. This helps it cook evenly and prevents sticking. Don’t forget to add salt to the water; it enhances the pasta's flavor. A good rule is about one tablespoon of salt for every four quarts of water. Garnishing makes your dish look special. Use fresh parsley for a pop of color. You can also serve the pasta in a large bowl. This family-style serving makes it look inviting and encourages sharing. Pro Tips Cook Pasta Al Dente: To achieve the perfect texture, cook the pasta just until it's al dente. It will continue to cook slightly when mixed with the sauce. Choose Your Sausage Wisely: Opt for a good quality smoked sausage for the best flavor. Turkey or chicken sausages are great lighter alternatives. Customize the BBQ Sauce: Feel free to adjust the sweetness and tanginess of the BBQ sauce to your taste. Adding a splash of vinegar or some honey can enhance the flavor. Garnish for Freshness: Always finish with fresh herbs like parsley or basil. They add a pop of color and a burst of freshness that complements the dish beautifully. {{image_2}} You can change the smoked sausage to chicken or turkey sausage. This swap keeps it light but full of flavor. If you want a different bite, try ground beef or pork. Both give a hearty texture that works well in the dish. For a meatless meal, use plant-based sausage or skip the meat altogether. You can also add more veggies like zucchini or spinach. These options not only add color but also boost nutrition. Feel free to play with BBQ sauce. You can go spicy or smoky based on your taste. If you want a creamy twist, add cheese sauce. This will change the dish into a decadent experience while keeping it quick and easy. Store leftovers in an airtight container for up to 3 days. This keeps the meal fresh. Make sure to cool the pasta down first. This helps avoid sogginess. To save this dish for later, freeze it before adding pasta. This gives you a longer shelf life. When you want to eat it, just thaw it gently. You can then cook fresh pasta to mix in. For the best texture, reheat on the stovetop. This warms the dish evenly. When reheating, add a splash of water or extra BBQ sauce. This keeps the pasta moist and tasty. Yes, you can use different pasta shapes. I like penne or fusilli. Both hold sauce well. They trap the BBQ sauce and sausage bits in every bite. You could also try rotini or farfalle for fun shapes. Just make sure the pasta cooks until al dente, so it stays firm. To make this dish gluten-free, choose gluten-free pasta. Many brands offer good options made from rice or corn. You can also swap the sausage for gluten-free sausage. Check the BBQ sauce label to ensure it’s gluten-free. That way, everyone can enjoy this tasty meal! This dish pairs well with many sides. A fresh green salad adds crunch and balance. Garlic bread is also a great choice for soaking up extra sauce. You might serve some steamed veggies, too, like broccoli or green beans, for color and nutrients. Yes, you can prepare this dish ahead of time. Cook everything and let it cool. Store it in the fridge for up to two days. When you’re ready to eat, reheat it on the stovetop. Add a splash of water or extra BBQ sauce to keep it moist. This blog post covered a simple and tasty BBQ sausage pasta recipe. We gathered key ingredients, from pasta and sausage to fresh veggies and spices. I shared easy step-by-step instructions for cooking, sautéing, and combining everything. We also explored variations, storage tips, and answers to common questions. Now, you can enjoy a delicious meal that’s fun to prepare. Don’t hesitate to make it your own! Exploring flavor changes or trying different proteins will keep it fresh and exciting.

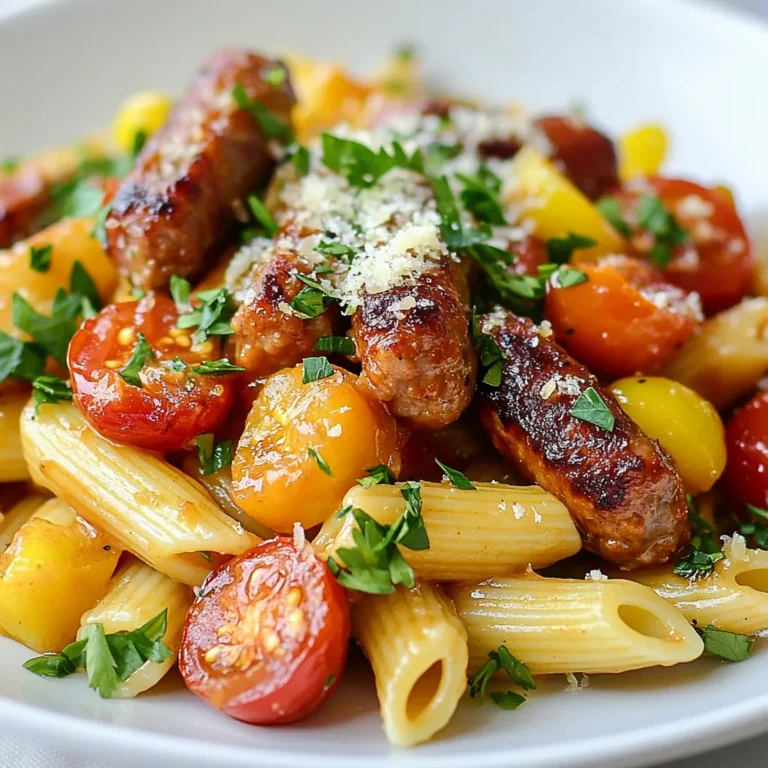
Sweet Tangy BBQ Sausage Pasta zesty and quick meal

- 2 cups fresh or frozen cherries, pitted and halved - 1 cup all-purpose flour - 1 cup rolled oats - 1/2 cup brown sugar - 1/2 cup granulated sugar - 1/2 cup unsalted butter, melted - 1 teaspoon vanilla extract - 1/2 teaspoon almond extract - 1 teaspoon baking powder - 1/4 teaspoon salt - 1 teaspoon corn starch You can swap fresh cherries for frozen ones if needed. Just remember to thaw and drain them first. If you want a healthier twist, use whole wheat flour instead of all-purpose flour. Maple syrup can replace brown sugar for a different flavor. You can also use coconut oil in place of the butter for a dairy-free option. When picking fresh cherries, look for firm, shiny ones. Avoid those with blemishes or soft spots. If you choose frozen cherries, ensure they are unsweetened and without added sauces. Frozen cherries save time and are great when fresh ones are out of season. Both options work well in these crumble bars. {{ingredient_image_1}} First, preheat your oven to 350°F (175°C). This step is key for even baking. Next, take an 8x8 inch baking pan and grease it well. Line it with parchment paper, leaving some paper hanging over the edges. This makes it easy to lift out the bars later. Now, let’s prepare the cherries. In a medium bowl, mix 2 cups of pitted cherries with 1/2 cup of granulated sugar and 1 teaspoon of corn starch. Stir gently to coat all the cherries. Set this aside and let it marinate for about 10 minutes. This helps the cherries release their juices, making them super tasty. In a large bowl, combine 1 cup of all-purpose flour, 1 cup of rolled oats, 1/2 cup of brown sugar, 1 teaspoon of baking powder, and 1/4 teaspoon of salt. Mix these dry ingredients together well. Next, pour in 1/2 cup of melted unsalted butter, 1 teaspoon of vanilla extract, and 1/2 teaspoon of almond extract. Stir until you get a crumbly mixture that holds together. Take about two-thirds of the crumble mixture and press it firmly into the bottom of your prepared pan. This will be your crust. Make sure it’s even and compact. Now, spread the marinated cherries evenly over the crust. Don’t forget to include all those yummy juices! Sprinkle the remaining crumble mixture on top of the cherries. Make sure the cherries are partially covered. This will create a nice, crunchy topping. Bake your creation in the preheated oven for about 30-35 minutes. You want the top to be golden brown and the cherries to bubble. Your kitchen will smell amazing during this time! Once baked, remove the pan from the oven and let it cool for at least 20 minutes. Use the parchment paper overhang to lift the bars out of the pan. This makes serving so much easier. Cut the bars into squares. You can serve them warm for a soft, gooey treat or refrigerate them for a firmer texture. They taste great either way! Enjoy your cherry crumble bars with a scoop of vanilla ice cream or a dollop of whipped cream for an extra special treat. To get the best crumble, use cold butter. Cut it into small cubes. This helps the crust stay flaky. Mix the butter into the dry ingredients with your fingers. Stop when the mix looks like wet sand. This will create a nice crunch. One big mistake is overmixing. When you combine the wet and dry ingredients, mix just until combined. If you mix too much, the bars become tough. Another mistake is using too much sugar. The cherries are sweet, so adjust sugar to taste. Lastly, don’t skip the corn starch. It thickens the cherry filling and keeps it from being runny. To make your bars even better, try adding nuts. Chopped almonds or walnuts add a nice crunch. You can also add spices like cinnamon for warmth. For a twist, use lemon zest. It brightens the cherry flavor. If you want a different taste, swap cherries for other fruits, like blueberries or peaches. Pro Tips Tip Title: Use Fresh Cherries for Best Flavor: While frozen cherries work, fresh cherries offer a brighter flavor and better texture in these crumble bars. Tip Title: Let Them Cool Completely: Allowing the bars to cool completely in the pan will help them set properly and make cutting easier. Tip Title: Experiment with Spices: Add a pinch of cinnamon or nutmeg to the crumble mixture for an extra layer of flavor that complements the cherries beautifully. Tip Title: Store for Later: These bars can be stored in the fridge for up to a week, making them a great make-ahead dessert for gatherings. {{image_2}} You can easily make vegan cherry crumble bars. Replace the butter with coconut oil. Use a plant-based sugar, like coconut sugar. You can also swap the almond extract with more vanilla if you like. The cherries will still shine through. Just follow the same recipe steps. To make gluten-free cherry crumble bars, use gluten-free flour. Almond flour or oat flour works well. Make sure your oats are gluten-free too. This way, the bars will still taste great and be safe for those with gluten issues. They will be just as tasty and crumbly. Get creative with toppings! You can add nuts like walnuts or pecans for crunch. Sprinkle some cinnamon for extra flavor. Shredded coconut can give a tropical twist. For a fun touch, try drizzling melted chocolate on top. These small changes can make your bars unique and exciting! To keep your cherry crumble bars fresh, store them in an airtight container. Layer parchment paper between the bars to prevent sticking. This method helps maintain their crumbly texture. You can keep them at room temperature for up to two days. If you want them to last longer, refrigerate them. They will stay good for about a week in the fridge. Freezing is a great way to save your cherry crumble bars. First, let them cool completely. Then, cut them into squares. Wrap each square in plastic wrap, then place them in a freezer bag. This method prevents freezer burn. You can freeze them for up to three months. When you want to enjoy a bar, just take one out. Let it thaw in the fridge overnight or at room temperature for a few hours. Cherry crumble bars taste best fresh but last well for a week in the fridge. If you freeze them, they keep their flavor and texture. To reheat, place a bar in the microwave for about 15 to 20 seconds. This warms it up nicely. You can also reheat them in the oven. Set the oven to 300°F (150°C) and heat for about 10 minutes. This method keeps them crispy on top. Enjoy your cherry crumble bars warm! Yes, you can use other fruits. Berries like blueberries, raspberries, or strawberries work well. You can also try peaches or apples for a different flavor. Just remember to adjust the sugar based on the fruit's sweetness. You want to keep the balance right in your dessert. Look for a golden brown top. The cherries should be bubbling around the edges. This usually takes about 30 to 35 minutes at 350°F. You can also check the center with a toothpick. If it comes out clean, your bars are ready. These bars are tasty on their own, but you can enhance them. Serve them with vanilla ice cream or whipped cream for a special treat. You can also add some fresh mint for a pop of color and flavor. Enjoy them warm or chilled! This blog post covered how to make cherry crumble bars. We discussed ingredient choices, baking steps, and cooling tips. I shared best practices to achieve the perfect texture and common mistakes to avoid. You can also try vegan or gluten-free versions, and consider creative toppings for variety. Remember how to store, freeze, and reheat your bars. With these insights, you're now ready to create delicious cherry crumble bars any time! Enjoy experimenting in your kitchen!

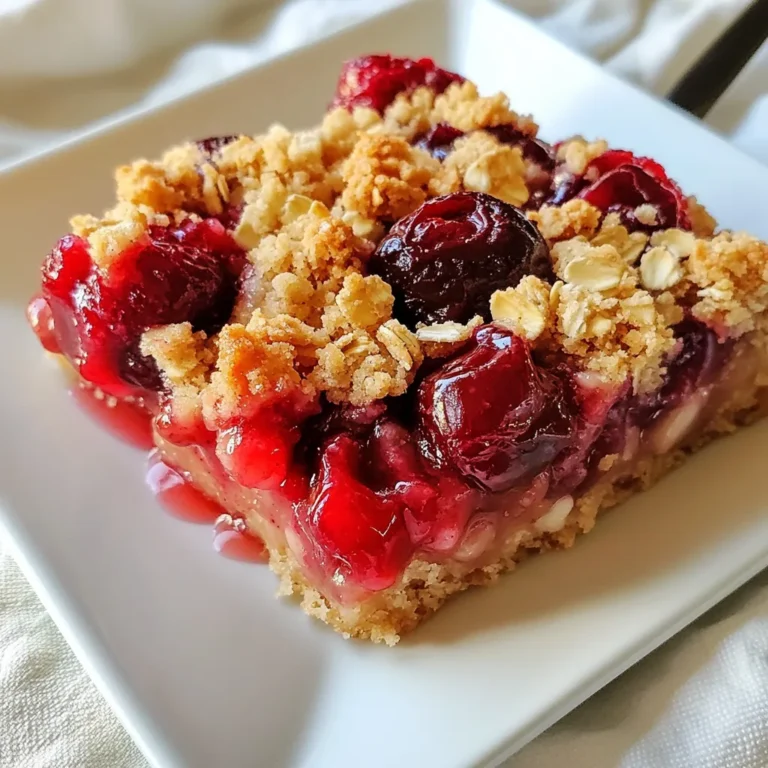
Cherry Crumble Bars Delightfully Simple Dessert Recipe

To make ground chicken stuffed peppers, you need a few simple items. Here’s what you’ll need: - 4 large bell peppers (any color) - 1 pound ground chicken - 1 cup cooked quinoa (or rice) - 1 small onion, finely chopped - 2 cloves garlic, minced - 1 can (14 oz) diced tomatoes, drained - 1 cup black beans, rinsed and drained - 1 teaspoon cumin - 1 teaspoon chili powder - ½ teaspoon smoked paprika - Salt and pepper to taste - 1 cup shredded cheese (cheddar or Monterey Jack) - Fresh cilantro, for garnish - Olive oil for sautéing These ingredients create a flavorful filling. Ground chicken gives the dish a lean protein base. The quinoa or rice adds texture and heartiness. The bell peppers hold everything together and add a sweet crunch. Onions and garlic bring depth and aroma to the mix. Diced tomatoes add moisture and a bit of acidity. Black beans boost the protein and fiber content. The spices, like cumin and chili powder, give the filling a nice kick. Lastly, cheese on top melts beautifully, creating a delicious layer. With these ingredients, you can craft a meal that is both simple and satisfying. Feel free to mix and match based on your taste. Enjoy the process of preparing your stuffed peppers! {{ingredient_image_1}} First, you need to preheat your oven. Set it to 375°F (190°C). This step is key for cooking the peppers evenly. Next, take four large bell peppers. You can use any color you like. Cut the tops off and remove the seeds and membranes. Lightly brush the outside with olive oil. This adds flavor and helps them roast well. Place the peppers upright in a baking dish. Now, it’s time to make the filling. In a large skillet, heat a drizzle of olive oil over medium heat. Add one small chopped onion and sauté for about 3 to 4 minutes until it becomes soft. Then, add two cloves of minced garlic and one pound of ground chicken. Cook the chicken for about 5 to 7 minutes until it is browned and no longer pink. Use a spatula to break the chicken into small pieces while cooking. Next, stir in one can of drained diced tomatoes, one cup of cooked quinoa or rice, and one cup of rinsed black beans. Add one teaspoon of cumin, one teaspoon of chili powder, and half a teaspoon of smoked paprika. Season with salt and pepper to taste. Mix everything well and heat for another 2 to 3 minutes. Remove the skillet from the heat. Stir in half of one cup of shredded cheese until it melts into the mixture. Now, it’s time to stuff the peppers! Scoop the ground chicken mixture into each pepper. Press down gently to pack it in. Top each pepper with the rest of the cheese. Cover the baking dish with foil and place it in the preheated oven. Bake for 25 minutes. After that, take off the foil and bake for another 10 to 15 minutes. The peppers should be tender, and the cheese should be bubbly and golden. Once done, remove them from the oven and let them cool for a bit before serving. Garnish with fresh cilantro for a pop of flavor! Pick large bell peppers for this dish. They hold the filling well. Any color works, but I like red or yellow for their sweetness. Look for firm peppers with no soft spots. This helps them roast evenly. Cook ground chicken over medium heat. This gives it time to brown. Use a wooden spoon to break it up into small bits. Make sure it is fully cooked, with no pink parts left. Add spices while cooking to infuse the meat with flavor. Shredded cheese melts best. I recommend cheddar or Monterey Jack for this recipe. Both add great flavor and texture. You can mix cheeses for a more complex taste. Just sprinkle it on top before baking for a bubbly finish. Bake the peppers covered with foil at first. This keeps moisture in and helps them cook. After about 25 minutes, remove the foil. This step browns the cheese and makes it nice and bubbly. Check the peppers with a fork; they should be tender but not mushy. Pro Tips Use Colorful Peppers: Choosing a variety of colored bell peppers not only makes the dish visually appealing but also adds subtle differences in flavor. Make Ahead: Prepare the filling in advance and store it in the fridge. You can stuff the peppers and bake them right before serving for a quick meal. Spice It Up: Adjust the level of spice by adding diced jalapeños or a dash of hot sauce to the filling, catering to your heat preference. Cheese Variations: Experiment with different types of cheese like feta or pepper jack for unique flavors that complement the spicy filling. {{image_2}} You can easily make these stuffed peppers vegetarian. Just swap out the ground chicken. Use a mix of lentils or chickpeas instead. These will add protein and flavor. You can also add mushrooms for a meaty texture. Feel free to sneak in more veggies. Chopped zucchini, spinach, or corn works well. Just sauté them with the onion and garlic. This gives you more nutrients and flavor. You can choose rice or quinoa for the filling. Quinoa adds more protein and has a nutty taste. Rice is softer and more familiar. Both options are great, so pick what you like best. Want more heat? Add chopped jalapeños or cayenne pepper to the mix. For less spice, use milder spices like paprika. Taste as you go to find the right balance for your family. Store leftover stuffed peppers in an airtight container. They can stay fresh for 3 to 4 days. If you want to keep them longer, make sure they cool off first. This helps avoid extra moisture, which can make them soggy. You can freeze stuffed peppers for later meals. First, let them cool completely. Then, wrap each pepper in plastic wrap. Place them in a freezer-safe bag or container. They can last in the freezer for up to 3 months. When you're ready to eat, just thaw in the fridge overnight. To reheat, place the stuffed peppers in the oven. Preheat it to 350°F (175°C). Cover with foil to keep moisture in. Heat for about 20-25 minutes or until warmed through. You can also microwave them for a quicker option. Just be careful, as they can get hot spots. Enjoy your tasty meal again! Yes, you can use other meats. Ground turkey works great as a substitute. You can also try ground beef or pork. Each option will bring its own flavor. Just make sure to cook the meat fully before stuffing. Stuffed peppers are done when the peppers are tender. You can check by piercing them with a fork. The cheese should also be bubbly and golden on top. If the peppers look soft and the cheese is melted, they are ready. Yes, you can prepare the stuffed peppers ahead of time. You can stuff the peppers and store them in the fridge for up to 24 hours. Just cover them tightly with plastic wrap. When you’re ready to eat, just bake them as usual. These stuffed peppers pair well with many sides. A fresh salad adds a nice crunch. Rice or quinoa on the side complements the meal well. You can also serve them with a dollop of sour cream or guacamole for extra flavor. Stuffed peppers are simple and tasty. We covered the key ingredients, like bell peppers and ground chicken. I shared step-by-step instructions for easy cooking. You can also find helpful tips for perfecting your dish. Remember, variations like a vegetarian option can please everyone. In the end, stuffed peppers are fun to make and eat. Try different ingredients, spices, and grains to make it your own. Enjoy every bite!

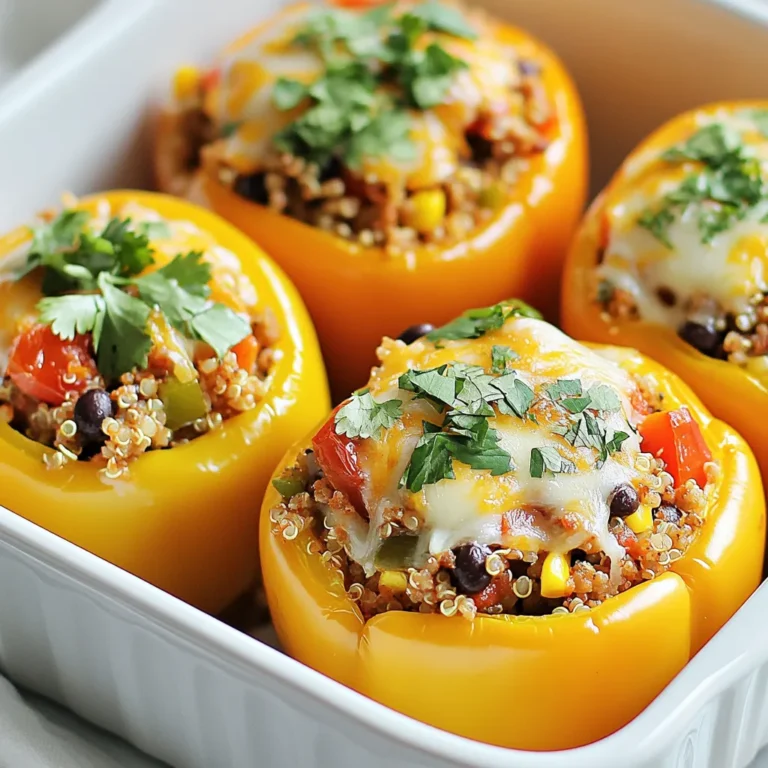
Ground Chicken Stuffed Peppers Flavorful and Simple

- 20 jumbo pasta shells - 2 cups cooked chicken, shredded - 1 cup cream cheese, softened - 1/2 cup buffalo sauce (adjust for heat preference) - 1 cup shredded mozzarella cheese, plus extra for topping - 1/2 cup grated Parmesan cheese - 1/4 cup green onions, chopped - 1 teaspoon garlic powder - 1 teaspoon onion powder - Salt and pepper to taste - 1/2 cup heavy cream When selecting your ingredients, freshness is key. Always use fresh chicken for the best flavor. Look for cream cheese that is soft. This will help it mix well with other ingredients. For buffalo sauce, choose a brand that matches your heat level. If you love spice, go for a hotter sauce. If you prefer mild, pick a milder option. Opt for high-quality mozzarella cheese. It melts better and gives a nice stretch. Fresh green onions can add a nice crunch and flavor. Check that they are bright and firm for the best taste. If you have allergies, there are great swaps you can make. For gluten-free options, use gluten-free pasta shells. If dairy is a concern, try vegan cream cheese and a non-dairy cheese blend. You can also use shredded rotisserie chicken to save time. For those avoiding spicy foods, replace buffalo sauce with a mild barbecue sauce. This will still give you a tasty filling, without the heat. {{ingredient_image_1}} First, I preheat my oven to 350°F (175°C). This step warms the oven for baking later. Next, I boil a large pot of salted water. I cook the jumbo pasta shells until they are al dente. This usually takes about 9 to 11 minutes. After cooking, I drain the shells and rinse them with cold water. This stops the cooking process and helps them cool down. I set the shells aside to prepare the filling. In a large mixing bowl, I combine the shredded chicken, softened cream cheese, and buffalo sauce. I add one cup of mozzarella cheese, Parmesan cheese, garlic powder, onion powder, salt, and pepper. I mix everything until it is creamy and well combined. The mixture should be thick and flavorful. Then, I take a spoon and fill each pasta shell with the buffalo chicken mixture. I place the stuffed shells in a greased 9x13-inch baking dish. Next, I make the creamy sauce by mixing heavy cream with a couple of tablespoons of buffalo sauce. I pour this sauce over the stuffed shells to coat them well. Before baking, I sprinkle more mozzarella cheese on top for that cheesy goodness. I cover the dish with foil and bake for 25 minutes. Then, I remove the foil and bake for an extra 10 to 15 minutes. I watch for the cheese to bubble and turn golden. When stuffing the shells, I use a spoon to pack the filling in well. This helps keep the filling from falling out while baking. If you want, you can use a piping bag for easier stuffing. I also recommend not overcooking the shells. They should be firm enough to hold the filling. If you have extra filling, use it as a topping on the shells. This adds more flavor and creaminess. To make the best creamy filling, use softened cream cheese. It blends well with the chicken and other ingredients. Mix the shredded chicken and cream cheese together first. Then, add the buffalo sauce and cheeses. Stir until the mixture is smooth and creamy. This adds great flavor and texture to your stuffed shells. If you love heat, add more buffalo sauce. Start with half a cup and taste as you go. You can also mix in some diced jalapeños for extra kick. If you prefer mild flavors, cut back on the buffalo sauce. Use only a few tablespoons and add more cream cheese to balance the heat. This way, you can make the dish fit your taste. Creamy buffalo chicken stuffed shells are great on their own. For a complete meal, serve them with a fresh salad. A simple green salad with a light vinaigrette works well. You can also pair them with garlic bread for a cozy touch. To make it fun, serve with extra buffalo sauce and ranch on the side. This adds more flavor for those who want it. Pro Tips Adjust the Heat: Modify the amount of buffalo sauce based on your heat preference. Start with less for a milder flavor and add more for extra kick. Use Leftover Chicken: This recipe is perfect for using up leftover rotisserie or grilled chicken, making it a quick and easy option for weeknight dinners. Cheese Variations: Experiment with different cheese types like cheddar or pepper jack for a unique twist on flavor. Make Ahead: Prepare the stuffed shells in advance, cover, and refrigerate. Just add a few extra minutes to the baking time when you're ready to bake. {{image_2}} You can make creamy buffalo stuffed shells vegetarian. Just swap the chicken for veggies. Try using mushrooms, spinach, or artichokes. Mix these veggies with cream cheese and buffalo sauce. You can add beans for protein. This way, you keep the flavor but make it meat-free. Chicken is great, but you can use other meats too. Shredded turkey works well. If you like beef, use ground beef or shredded beef. For a twist, try pulled pork with buffalo sauce. Each protein gives a new taste to the dish. Adjust the sauce to match the meat you choose. Want to boost the flavor? Add extra spices to the filling. A dash of smoked paprika can add depth. You can also mix in some ranch seasoning for a creamy twist. For a kick, add jalapeños or hot sauce. These small changes can make your dish stand out. Try different cheese blends for extra creaminess. To keep your creamy buffalo chicken stuffed shells fresh, let them cool first. Once cool, place them in an airtight container. You can store them in the fridge for up to three days. Make sure the lid seals tightly to keep out air and moisture. To reheat the stuffed shells, preheat your oven to 350°F (175°C). Place the shells in a baking dish. Add a splash of heavy cream or buffalo sauce on top. Cover with foil to keep them moist. Bake for about 20 minutes or until they are heated through. You can also use a microwave. Just heat in short bursts, checking often to avoid drying them out. If you want to freeze your stuffed shells, do this before baking. Arrange the stuffed shells in a single layer in a baking dish. Cover tightly with plastic wrap and then foil. They can stay in the freezer for up to three months. When ready to eat, thaw them in the fridge overnight. Bake as directed, adding extra time if needed. If you need a cream cheese substitute, try using Greek yogurt or ricotta cheese. Both options work great. Greek yogurt adds a tangy taste, while ricotta gives a creamy texture. You can also use a dairy-free cream cheese. This option is perfect for a vegan dish. Just make sure it has a similar texture to cream cheese. Yes, you can prepare these stuffed shells ahead of time. Just follow the recipe up to the baking step. After stuffing the shells, cover the dish and store it in the fridge. You can bake it later, but allow extra time for cooking. If you freeze them, thaw them overnight before baking. Check the stuffed shells after baking for about 35 minutes. The cheese should be bubbly and slightly golden. You can also insert a fork into a shell to make sure it’s hot inside. If it’s warm and the cheese is melted, they are ready to enjoy! You learned about the key ingredients, their importance, and substitutions for allergens. I shared step-by-step instructions to make cooking easy and fun. You now have tips for a creamy filling and how to serve your dish. I also covered variations for more options. Finally, you got storage tips for leftovers and answers to common questions. Remember, cooking should be enjoyable. Use these insights to create your perfect dish. Enjoy your time in the kitchen!

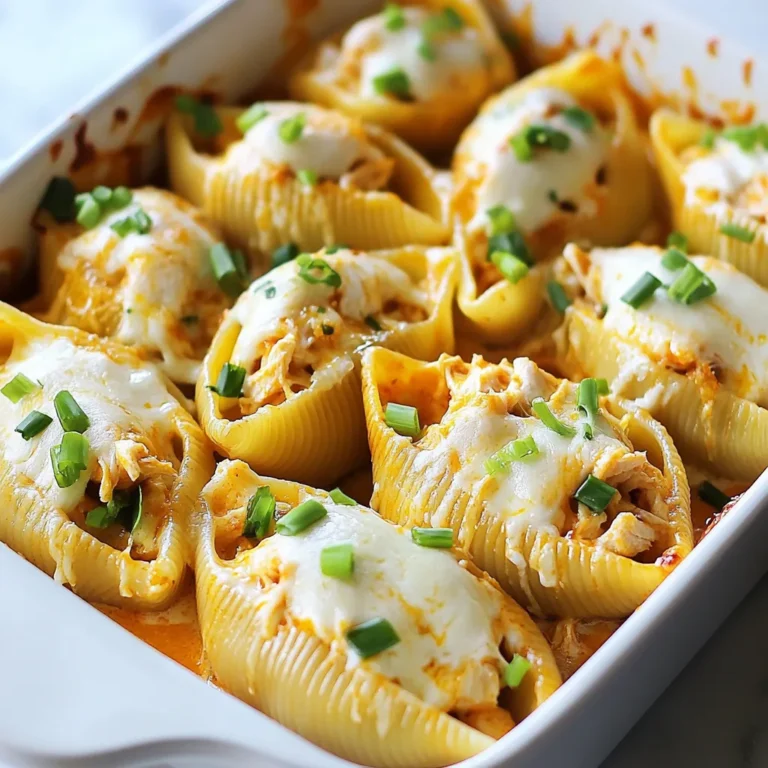
Creamy Buffalo Chicken Stuffed Shells Flavorful Feast

To make beef stuffed shells, gather these key ingredients: - 12 large pasta shells - 1 pound ground beef - 1 cup ricotta cheese - 1 cup shredded mozzarella cheese, divided - 1/2 cup grated Parmesan cheese - 1 large egg - 2 cups marinara sauce - 1 teaspoon garlic powder - 1 teaspoon onion powder - Salt and pepper to taste - Fresh basil leaves (for garnish) These ingredients work together to create a tasty and filling dish. The beef and cheese mix brings great flavor to every bite. You can add or swap ingredients to fit your taste. Here are some great options: - Spinach or kale for a veggie boost - Italian seasoning for more flavor - Red pepper flakes for heat - Different types of cheese like cheddar or gouda - Sautéed mushrooms for an earthy touch Feel free to explore and find what you love! If you don’t have something on hand, here are some swaps: - Ground turkey or chicken instead of beef - Cottage cheese for ricotta - Tomato sauce if you lack marinara - Egg substitute like flaxseed meal for a vegan option These substitutions keep your dish delicious. Cooking is all about experimenting, so don’t be afraid to try new things! {{ingredient_image_1}} Start by boiling a large pot of salted water. This helps flavor the pasta. Cook the large pasta shells for about 8-10 minutes. You want them al dente, which means they should still be firm. Once done, drain the shells and let them cool a bit. This step is key. If they are too hot, you might burn your fingers when stuffing them. In a large skillet, heat your stove to medium. Add the pound of ground beef to the skillet. Cook it until it turns brown and is no longer pink. Make sure to break it up into smaller pieces as it cooks. Once cooked, drain any extra grease. This helps keep your dish from being too oily. In a bowl, mix the cooked beef with ricotta cheese, half the mozzarella cheese, and grated Parmesan cheese. Add the egg, garlic powder, onion powder, salt, and pepper. Mix everything well until it looks creamy and delicious. Grab a baking dish and spread a thin layer of marinara sauce on the bottom. Now, take your stuffed shells and place them seam-side up in the dish. Pour the rest of the marinara sauce over the shells. Finally, sprinkle the remaining mozzarella cheese on top. Cover the dish with aluminum foil. This stops the cheese from burning. Bake in the oven at 375°F (190°C) for 25 minutes. After that, remove the foil and bake for another 10 minutes. You want the cheese to be bubbly and golden. Once done, let it cool for a few minutes. You can garnish with fresh basil leaves to add color and flavor. Enjoy! When you stuff your shells, use a small spoon. This helps control how much filling goes in. Make sure to pack the filling gently but firmly. If you overfill, the shells can break. Use a tray to hold the shells while you fill them. This keeps them steady and makes cleanup easier. Always preheat your oven to 375°F (190°C). This ensures even cooking. Cover your dish with foil for the first part of baking. This keeps the shells moist. Remove the foil towards the end to let the cheese brown. Keep an eye on the cheese; you want it bubbly and golden, not burnt. Serve the shells on a large platter. Drizzle some extra marinara sauce around the dish for color. Sprinkle grated Parmesan on top for a nice finish. Add fresh basil leaves as a garnish. This adds a pop of color and fresh flavor. Pair with a light salad or garlic bread for a complete meal. Pro Tips Perfectly Cooked Pasta: Make sure to cook the pasta shells al dente; they will continue to cook in the oven and avoid being mushy. Flavor Boost: For an extra layer of flavor, sauté some chopped onions and garlic in the beef before mixing in the cheese. Cheese Variations: Feel free to experiment with different cheeses like cheddar or gouda for a unique twist on the classic flavor. Make Ahead: You can prepare the stuffed shells a day in advance. Just cover and refrigerate them before baking; add a few extra minutes to the bake time. {{image_2}} If you want a meat-free option, you can change the filling. Use cooked spinach, mushrooms, or zucchini instead of beef. You can also add beans for protein. A mix of ricotta and cottage cheese gives a creamy texture. Be sure to season it well. Adding garlic, onion, and herbs enhances the flavor. You can still use marinara sauce on top for a tasty finish. For those who love heat, try adding spices to the beef. Mix in red pepper flakes or diced jalapeños to the ground beef while cooking. You can also use spicy sausage instead of beef for a different kick. Topping the shells with pepper jack cheese gives a spicy twist. Serve with a side of hot sauce for extra spice. Cheese can change the taste of your stuffed shells. While mozzarella is classic, you can mix it up. Try adding gouda or fontina for a rich flavor. For a sharper taste, use aged cheddar or blue cheese. Mixing different cheeses can create a unique taste. Don't forget to sprinkle some cheese on top before baking for a golden crust. After you make your beef stuffed shells, let them cool. Cooling helps keep the taste fresh. Place them in a shallow dish. Cover the dish tightly with plastic wrap or foil. This keeps moisture in and prevents odors from other foods. Store the dish in the fridge. You can keep them there for up to three days. If you plan to eat them later, freeze them instead. To reheat your beef stuffed shells, preheat your oven to 350°F (175°C). Take the shells out of the fridge. Place them in an oven-safe dish. Add a little marinara sauce on top to keep them moist. Cover the dish with foil to trap the heat. Bake for about 20-25 minutes. If you want the cheese extra gooey, remove the foil for the last five minutes. Freezing is great for meal prep. First, let the stuffed shells cool completely. Then, place them in a single layer on a baking sheet. Put the baking sheet in the freezer for about an hour. This makes sure they freeze without sticking together. After that, transfer the shells to a freezer-safe bag or container. Label the bag with the date. You can freeze them for up to three months. When you're ready to eat, thaw them in the fridge overnight before reheating. To make stuffed shells from scratch, follow these steps: 1. Cook the Pasta: Boil salted water and cook 12 large pasta shells until tender. Drain and cool. 2. Prepare the Filling: Brown 1 pound of ground beef in a skillet. Drain any fat. 3. Mix Ingredients: In a bowl, combine the cooked beef, 1 cup of ricotta cheese, half of the shredded mozzarella, 1/2 cup of grated Parmesan, 1 large egg, 1 teaspoon of garlic powder, and 1 teaspoon of onion powder. Add salt and pepper to taste. Mix well. 4. Stuff the Shells: Use a spoon to fill each shell with the beef mixture. 5. Assemble: Spread marinara sauce in a baking dish. Place the stuffed shells in the dish, seam-side up. Pour more marinara sauce over the top and sprinkle the remaining mozzarella cheese. 6. Bake: Cover with foil and bake at 375°F for 25 minutes. Remove the foil and bake for 10 more minutes until bubbly. Yes, you can use other meats. Ground turkey, chicken, or pork work well. Each meat adds a unique flavor. You can also mix meats for a richer taste. Just make sure to cook the meat fully before mixing it with the cheese. Beef stuffed shells pair great with many sides. Here are some ideas: - A simple green salad with a light dressing. - Garlic bread for dipping into the sauce. - Steamed vegetables like broccoli or green beans. - A side of marinara sauce for extra flavor. These sides balance the meal and add freshness. Enjoy! This article covered how to make beef stuffed shells. We explored essential ingredients, step-by-step cooking, and tips for success. You learned about variations, storage, and answers to common questions. Perfecting stuffed shells gives you delicious meals and smiles. Happy cooking! Enjoy your tasty creations and share with loved ones.

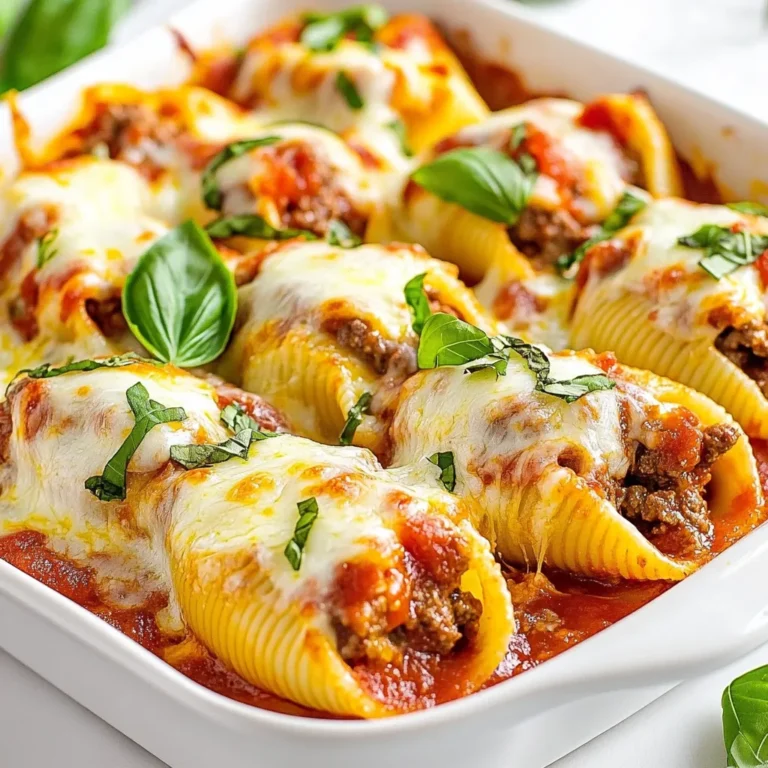
Beef Stuffed Shells Flavorful and Easy Recipe Guide

- 4 boneless, skinless chicken breasts - 1 cup fresh pineapple chunks - 1/2 cup brown sugar - 1/3 cup soy sauce - 2 tablespoons rice vinegar - 2 cloves garlic, minced - 1 teaspoon fresh ginger, grated - 1 tablespoon olive oil - Salt and pepper to taste - Fresh cilantro, for garnish Let’s break down these ingredients. The chicken breasts are the star of this dish. They need to be boneless and skinless for a quick grill. The marinade makes this dish special. Brown sugar gives it sweetness, while soy sauce adds a savory touch. Rice vinegar brightens the flavor. Garlic and ginger give it a nice kick. Olive oil helps prevent sticking on the grill. Fresh pineapple adds a fruity and tangy layer. Grilling pineapple caramelizes its sugars, making it even sweeter. Finally, cilantro gives it a fresh look and flavor. When I cook this dish, I like to set everything out first. This way, I can easily grab what I need. You can also prepare more pineapple if you want extra to serve on the side. Enjoying this dish with friends and family makes it even better! {{ingredient_image_1}} Combining Ingredients Start by mixing the marinade. In a medium bowl, add: - 1/2 cup brown sugar - 1/3 cup soy sauce - 2 tablespoons rice vinegar - 2 cloves garlic, minced - 1 teaspoon fresh ginger, grated Stir these ingredients well. The brown sugar gives sweetness, while soy sauce adds saltiness. Tips for Flavor Absorption For the best flavor, marinate the chicken longer. I suggest at least 30 minutes. If you can, let it sit overnight. This way, the chicken absorbs all the great flavors. Marinating Process Take the chicken breasts and place them in a large resealable plastic bag. Pour the marinade over the chicken. Seal the bag tightly and gently massage it. This helps the marinade coat every piece of chicken. Grilling Instructions Preheat your grill to medium heat. Add a little olive oil to prevent sticking. Remove the chicken from the marinade, letting excess sauce drip off. Grill the chicken for about 6-7 minutes on each side. Cook until the internal temperature reaches 165°F (75°C). Grilling Techniques While the chicken cooks, it’s time for the pineapple! Add fresh pineapple chunks to the grill in the last few minutes. This adds a sweet and tangy flavor to your dish. Timing and Caramelization Tips Grill the pineapple for about 2-3 minutes. Look for a golden brown color. This means they are caramelized and ready. The heat brings out their natural sugars, making them extra tasty! Substitutions for Additional Flavor You can swap soy sauce with coconut aminos for a lighter taste. Instead of brown sugar, try honey or maple syrup for a natural sweetness. Add a pinch of red pepper flakes for some heat. Fresh herbs like basil or mint can also add a unique twist. Alternative Cooking Methods If you don’t have a grill, you can bake or pan-sear the chicken. Bake it at 375°F (190°C) for about 25-30 minutes. For pan-searing, heat oil in a skillet over medium heat, then cook for 6-7 minutes on each side. Importance of Internal Temperature Always check the chicken’s internal temperature. It should reach 165°F (75°C) to be safe. Use a meat thermometer for accuracy. This step ensures your chicken is juicy and safe to eat. Artistic Serving Suggestions Serve the chicken on a colorful platter. Arrange the grilled pineapple on top for a vibrant look. Drizzle the thickened marinade over the chicken for added shine and flavor. Garnishing Ideas Top with fresh cilantro to give a pop of green. Lime wedges on the side add a zesty touch. You can also sprinkle sesame seeds for extra crunch and visual appeal. Pro Tips Marinate Longer: For the best flavor, marinate the chicken overnight. This allows the flavors to penetrate deeply into the meat. Use Fresh Ingredients: Fresh pineapple and ginger will enhance the dish's flavor significantly compared to canned or dried alternatives. Check Temperature: Use a meat thermometer to ensure the chicken reaches an internal temperature of 165°F (75°C) for safe consumption. Grill Pineapple Last: Add the pineapple to the grill during the last few minutes to prevent it from becoming too soft and losing its shape. {{image_2}} Gluten-Free Options To make this dish gluten-free, substitute soy sauce with tamari. Tamari is a great option that keeps the flavor but removes gluten. Always check labels to ensure no hidden gluten is present. Low-Sugar Alternatives For a lower sugar version, use coconut sugar or a sugar substitute. These options lower the sugar content without losing sweetness. Adjust to taste, as some substitutes may be sweeter than brown sugar. Adding Spices for Extra Kick Spice it up by adding red pepper flakes or cayenne pepper to the marinade. This gives your chicken a nice heat that balances with the sweetness of pineapple. Start with a small amount and adjust based on your heat preference. Using Different Proteins You can switch chicken for pork or shrimp. Both proteins pair well with the marinade and pineapple. For pork, use pork chops, and for shrimp, adjust grilling time to ensure they cook through. Suggested Side Dishes Serve your Pineapple Brown Sugar Chicken with coconut rice or a fresh green salad. The rice absorbs the flavors well, and the salad adds a refreshing crunch. You can also try grilled vegetables for added color and nutrition. Beverage Pairings Pair this dish with a light white wine or iced tea. A fruity wine complements the sweetness of the dish. For a non-alcoholic option, try a tropical fruit juice or sparkling water with lime. For the best storage of your Pineapple Brown Sugar Chicken, follow these tips: - Refrigeration Guidelines: Cool the chicken to room temperature after cooking. Place it in an airtight container. This keeps it fresh for up to 3 days. If you have leftover marinade, store it in a separate container. It can also last for 3 days in the fridge. - Freezing Instructions: If you want to keep it longer, freeze the chicken. Wrap each piece in plastic wrap, then place them in a freezer bag. This helps prevent freezer burn. The chicken stays good for about 3 months in the freezer. To use, thaw it in the fridge overnight before reheating. To enjoy your chicken again, reheat it properly: - Methods for Best Results: The oven is a great way to reheat chicken. Preheat it to 350°F (175°C). Place the chicken on a baking sheet and cover it with foil. Heat for about 15-20 minutes, or until warm. You can also use a microwave. Just cover the chicken with a damp paper towel. Heat in 30-second intervals until it’s warm, but be careful not to overcook it. Knowing how long your chicken lasts is key: - How Long Does it Last?: When stored in the fridge, Pineapple Brown Sugar Chicken is best eaten within 3 days. If frozen, it can last for about 3 months. After that, it may lose flavor or quality. Always check for off smells or changes in color before eating. If you need a soy sauce substitute, try tamari or coconut aminos. Both give a rich flavor. You can also mix water with miso paste for a similar taste. Each option keeps the dish tasty without the soy sauce. Yes, you can use canned pineapple. However, fresh pineapple adds a bright flavor. Canned pineapple is softer and sweeter. Drain it well before adding to the grill. This helps prevent extra moisture. To check if the chicken is done, use a meat thermometer. The safe internal temperature is 165°F (75°C). When the chicken is cooked, it will also look white on the inside and juices will run clear. You can prepare the chicken and marinade a day before. Just marinate the chicken overnight for more flavor. Keep it in the fridge until you’re ready to grill. This tip saves you time and enhances taste! This blog post covered all you need for a tasty chicken and pineapple dish. We looked at ingredients, step-by-step prep, and cooking tips. You learned how to enhance flavor and explore variations to fit your needs. Don't forget about storage and reheating methods to enjoy leftovers. Cooking should be fun, so try new things and find your favorite versions. Enjoy your meal and share with friends for a great time together!

Pineapple Brown Sugar Chicken Flavorful Grilling Guide

- Chicken and Seasoning Ingredients - 2 boneless, skinless chicken breasts, thinly sliced - 2 tablespoons soy sauce - 1 tablespoon oyster sauce - 1 tablespoon sesame oil - Salt and pepper to taste - Vegetables and Noodles - 2 cups chow mein noodles (fresh or dried) - 1 cup bean sprouts - 1 cup shredded carrots - 1 bell pepper (red or yellow), sliced - 1 small onion, thinly sliced - 2 cloves garlic, minced - 1 teaspoon ginger, grated - Optional Garnishes - 2 scallions, chopped (for garnish) - Additional vegetables or herbs as desired Gather these ingredients before you start cooking. This will help you stay organized. The chicken adds protein and flavor. The sauces give it depth. The vegetables add crunch and color. Chow mein noodles create a base for the dish. You can customize with your favorite veggies or herbs. Cooking is about making it your own. Enjoy the process! {{ingredient_image_1}} Start by slicing the chicken breasts thinly. Place them in a bowl. Add the soy sauce, oyster sauce, and sesame oil. Mix well so the chicken is coated. Let it sit for at least 15 minutes. This helps the chicken soak up the flavors. If you have dried chow mein noodles, cook them as the package says. Aim for al dente, which means they should be firm. Drain the noodles and set them aside. If you use fresh noodles, just toss them with a bit of oil to stop them from sticking. Heat a large wok or skillet. Add one tablespoon of vegetable oil and make it hot over high heat. Put the marinated chicken in the pan. Stir-fry it until it turns golden brown. This should take about 5 to 7 minutes. When done, take the chicken out and set it aside. In the same pan, add another tablespoon of vegetable oil. Next, add the sliced onion, bell pepper, garlic, and grated ginger. Stir-fry these for 2 to 3 minutes. You want the veggies to be tender but still crisp. Now, put the cooked chicken back into the pan. Add the bean sprouts and shredded carrots next. Toss everything together for another 2 minutes. This heats everything through nicely. Gently fold in the cooked chow mein noodles. Mix until everything is well combined. Season with salt and pepper to your taste. Stir-fry for an extra 2 to 3 minutes. This ensures all the flavors mix well. Finally, remove from heat and garnish with chopped scallions. Serve hot and enjoy your meal! To make your Chicken Chow Mein pop, marinate the chicken well. Mix soy sauce, oyster sauce, and sesame oil. Let the chicken soak for at least 15 minutes. This step helps develop rich flavors. You can also add a dash of pepper for extra taste. When cooking, use high heat. This ensures a nice sear on the chicken. A good sear adds depth and color to your dish. Noodles are key in Chicken Chow Mein. If you use dried noodles, cook them just until they are al dente. This keeps them firm. Follow the package instructions carefully. Once cooked, drain and set aside. For fresh noodles, toss them with a little oil. This prevents sticking. If you want more flavor, you can add a splash of soy sauce while cooking. Crunchy veggies make your Chow Mein exciting. To keep them crisp, stir-fry them quickly. Add onion, bell pepper, garlic, and ginger to the hot pan. Cook for only 2-3 minutes. You want them tender but still vibrant. After adding bean sprouts and carrots, stir-fry for another 2 minutes. This will heat them up without losing their crunch. Remember, quick cooking is the secret! Pro Tips Marination Matters: Allowing the chicken to marinate for at least 15 minutes helps enhance the flavor and tenderness of the meat. Veggie Crunch: To maintain the crispness of the vegetables, stir-fry them for just a few minutes until they are tender but still vibrant. Noodle Technique: If using dried noodles, ensure they are cooked al dente to prevent them from becoming mushy when stir-frying. Garnish for Flavor: Don't skip the scallions! They add a fresh flavor and beautiful color to the finished dish. {{image_2}} To make a vegetarian chow mein, you can swap chicken for tofu. Use firm tofu for the best texture. Cut it into small cubes and marinate it in soy sauce and sesame oil. Stir-fry the tofu until golden brown. You can also add more vegetables like mushrooms and zucchini for extra flavor. Chicken isn't the only choice. You can use shrimp, beef, or pork as well. For shrimp, choose medium-sized ones. Cook them until they turn pink and firm. For beef, use flank steak or sirloin, thinly sliced. Marinate it just like the chicken. This way, you add variety to your meals. Want to boost the taste? Add some heat with crushed red pepper flakes or sriracha. Fresh herbs like cilantro or basil can also add freshness. If you like a richer flavor, toss in some shiitake mushrooms or a splash of hoisin sauce. These small changes make a big difference in taste. To keep your Chicken Chow Mein fresh, let it cool first. Then, place it in an airtight container. Store it in the fridge for up to three days. This will help keep the flavors intact. When you are ready to eat, use the stove or microwave. For the stove, add a splash of water in a pan. Heat over low until warm. Stir often to prevent sticking. In the microwave, cover with a lid and heat in intervals of 30 seconds. Stir between each interval for even heating. You can freeze Chicken Chow Mein for later! Use a freezer-safe container or a heavy-duty freezer bag. Remove as much air as possible before sealing. It can last for up to three months. When ready to eat, thaw it in the fridge overnight. Reheat as mentioned above. Chicken Chow Mein is a Chinese dish made with chicken, vegetables, and noodles. It is quick to prepare and packed with flavor. You stir-fry chicken and veggies, then add chow mein noodles. The dish often uses soy sauce and sesame oil for taste. You can serve it hot in bowls. Yes, you can use many vegetables for Chicken Chow Mein. Try broccoli, snap peas, or mushrooms. Bell peppers and carrots add color and crunch, but feel free to mix in what you love. Use what’s fresh or what you have on hand. The dish will still taste great. To make Chicken Chow Mein gluten-free, choose gluten-free soy sauce. Look for brands that are labeled as such. Also, use rice noodles instead of chow mein noodles. These swaps keep the dish tasty for those who avoid gluten. Always check labels to be sure. Common side dishes include spring rolls, dumplings, or fried rice. You can also serve a simple cucumber salad or steamed broccoli. These sides complement the flavors of Chicken Chow Mein well. They make a complete meal that everyone will enjoy. This blog post covered how to make Chicken Chow Mein from scratch. You learned about the key ingredients, simple steps, and helpful tips. We explored fun variations and storage ideas too. Chicken Chow Mein can be customized for any taste. It's a dish that suits everyone, using fresh flavors and quick cooking methods. With this guide, you can now create a delicious meal that friends and family will love. Enjoy making this tasty dish, and don’t forget to share your experience!

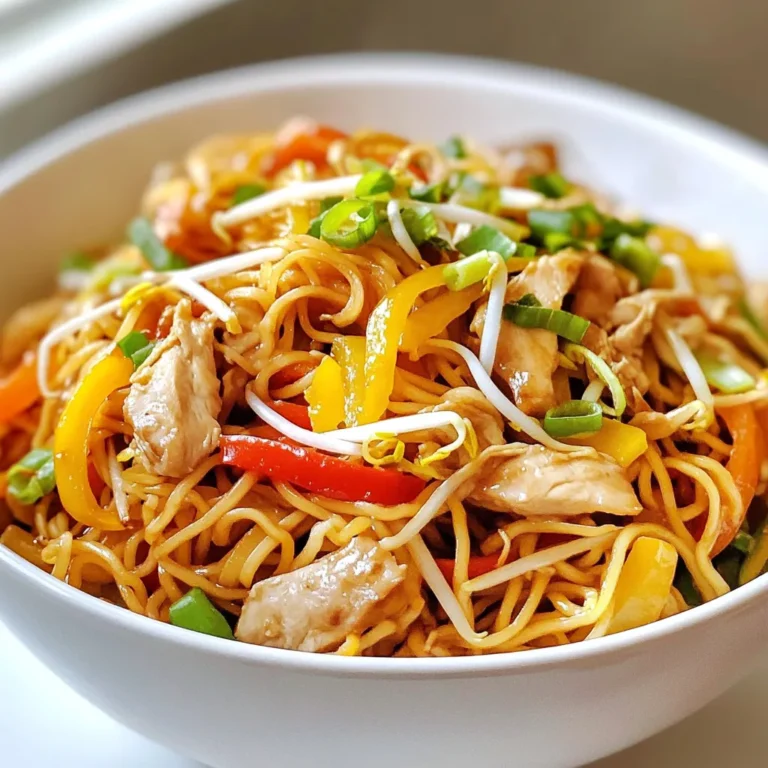
Chicken Chow Mein Flavorful and Easy Home Meal

To make Cajun Steak Rigatoni, gather these items: - 12 oz rigatoni pasta - 1 lb sirloin steak, cut into thin strips - 2 tablespoons Cajun seasoning - 1 tablespoon olive oil - 1 red bell pepper, sliced - 1 green bell pepper, sliced - 1 small onion, chopped - 2 cloves garlic, minced - 1 cup heavy cream - 1 cup Parmesan cheese, grated - Salt and pepper to taste - Fresh parsley, chopped (for garnish) You can switch some ingredients for different flavors: - Use chicken or shrimp instead of steak. - Swap heavy cream for half-and-half or coconut cream for a lighter sauce. - Choose zucchini noodles or gluten-free pasta for a twist. - Try different bell pepper colors for added brightness. Accurate measurements help your dish shine. Here are my tips: - Use a kitchen scale for meat for precise weight. - For liquids, use a clear measuring cup for accuracy. - When measuring dry ingredients, spoon them into a measuring cup, then level off. - Use a scale for cheese to ensure the right amount. These tips will help you create a tasty Cajun Steak Rigatoni. Enjoy the rich flavors and creamy texture! {{ingredient_image_1}} Boil salted water in a large pot. Add 12 ounces of rigatoni pasta. Cook until al dente, about 10-12 minutes. Drain the pasta and set it aside. Take 1 pound of sirloin steak and cut it into thin strips. Place the steak in a bowl. Toss the steak with 2 tablespoons of Cajun seasoning. Make sure each piece is well coated. Use the same skillet that you will cook the steak in. Heat 1 tablespoon of olive oil over medium-high heat. Add the chopped onion, 1 sliced red bell pepper, and 1 sliced green bell pepper. Cook for about 5 minutes until the veggies soften. Then, add 2 cloves of minced garlic. Sauté for another 1-2 minutes until fragrant. Lower the heat to medium. Pour in 1 cup of heavy cream into the skillet. Stir to mix well. Gradually add in 1 cup of grated Parmesan cheese. Stir until the cheese melts and the sauce becomes smooth. Now, add the drained rigatoni and seared steak back into the skillet. Toss everything together. Make sure the pasta and steak coat well with the creamy sauce. Season with salt and pepper to taste. Remove the skillet from heat. Transfer the Cajun steak rigatoni to serving plates. Garnish each plate with chopped parsley for a fresh look. Enjoy this flavorful meal with friends or family! To get the best flavor, use fresh Cajun seasoning. You can make your own by mixing paprika, cayenne, garlic powder, onion powder, and oregano. Adjust the spice level to suit your taste. If you want more heat, add a pinch of cayenne. Toss the steak strips well, so every piece gets coated. This ensures a bold flavor in every bite. Cook the steak to your favorite doneness. For medium-rare, aim for 3-4 minutes per side. Adjust the time for well-done steak, cooking it a bit longer. Use a meat thermometer for accuracy. Aim for 130°F for medium-rare and 160°F for well-done. Let the steak rest after cooking. This helps keep it juicy and tender. Add more veggies for extra taste and color. Consider mushrooms, zucchini, or cherry tomatoes. These will add depth to your dish. You can also sprinkle in some crushed red pepper for an extra kick. For a touch of freshness, squeeze some lemon juice over the finished dish. This brightens the flavors and balances the richness of the sauce. Pro Tips Choose the Right Cut: For the best flavor and tenderness, use sirloin steak or ribeye, which are perfect for quick cooking and absorb the Cajun seasoning beautifully. Don't Overcook the Pasta: Cook the rigatoni until just al dente, as it will continue to cook slightly when combined with the sauce, ensuring a perfect texture. Customize the Heat: Adjust the amount of Cajun seasoning according to your spice preference. You can also add a pinch of cayenne pepper for extra kick. Fresh Ingredients Matter: Use fresh vegetables and high-quality Parmesan cheese for the best flavor in your creamy sauce; it makes a noticeable difference in the dish. {{image_2}} You can make a tasty vegetarian version. Swap the sirloin steak for hearty mushrooms. Portobello or cremini mushrooms work great. Toss them with Cajun seasoning just like the steak. Sauté until tender and add them to the creamy sauce. You can also add spinach or zucchini for extra veggies. If steak isn't your thing, try chicken or shrimp. Cut chicken breasts into thin strips and follow the same steps as the steak. For shrimp, cook them for just 2-3 minutes until pink. You can also use plant-based proteins like tofu. Just make sure to season them well for flavor. You can change the sauce too! For a spicy kick, add diced tomatoes or a splash of hot sauce. For a lighter sauce, try using half-and-half instead of heavy cream. You can also mix in some sun-dried tomatoes or artichoke hearts for a flavor boost. Don't forget to top it with fresh herbs like basil or cilantro for extra freshness! Store leftover Cajun steak rigatoni in an airtight container. Let it cool first. Place it in the fridge for up to three days. Make sure it is sealed tightly to keep it fresh. Reheat the dish gently. Use a skillet on low heat. Add a splash of cream or water to keep it moist. Stir often until it is heated through. You can also use a microwave. Heat in short bursts to avoid overcooking. Stir between bursts for even heating. You can freeze Cajun steak rigatoni for later. Use a freezer-safe container. Make sure to leave some space for expansion. It will stay good for up to three months. To enjoy, thaw it in the fridge overnight. Reheat it as mentioned above. Yes, you can use other pasta types. Penne, fusilli, or farfalle work well. Choose what you like. Just remember to cook it to al dente. Cajun seasoning can be spicy. It blends flavors like paprika, cayenne, and garlic. You can adjust the spice level to fit your taste. If you want less heat, use less seasoning. You can use half-and-half or whole milk as a lighter option. For a dairy-free choice, try coconut cream or cashew cream. Each option changes the flavor a bit, so choose what you like best. To make Cajun Steak Rigatoni gluten-free, use gluten-free pasta. Many brands offer good options. Ensure all other ingredients are gluten-free, too. Yes, you can make this dish ahead. Cook it, then cool it down. Store it in the fridge for up to three days. Reheat it gently on the stove for best results. This blog post covered how to make Cajun Steak Rigatoni from start to finish. You learned about the key ingredients and useful measuring tips. The step-by-step instructions guide you in cooking the pasta, steak, and vegetables, along with making a creamy sauce. Don’t forget the tips on perfecting flavors and storage options. In the end, you can mix ingredients or try variations to fit your taste. Enjoy making this dish your own!

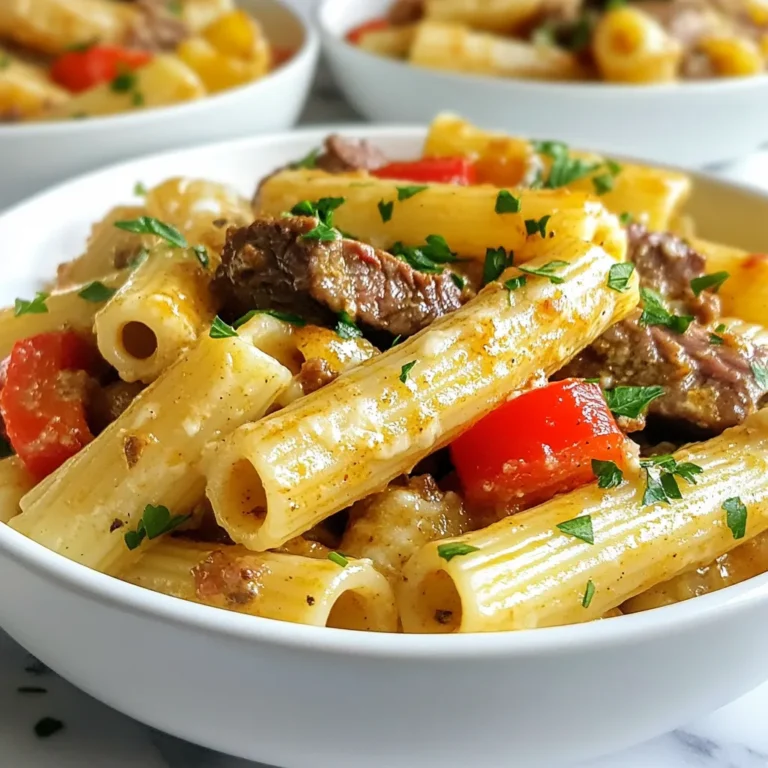
Cajun Steak Rigatoni Flavorful and Savory Meal Idea

- 2 cups penne pasta - 2 tablespoons olive oil - 1 onion, chopped - 2 cloves garlic, minced - 2 cups cooked chicken, shredded (rotisserie chicken works great) - 1 cup broccoli florets (fresh or frozen) - 1 cup cherry tomatoes, halved - 1 teaspoon Italian seasoning - 1 cup shredded mozzarella cheese - 1 cup ricotta cheese - ½ cup grated parmesan cheese - Salt and pepper to taste - Fresh basil leaves for garnish To start, I choose penne pasta for its great shape. It holds the sauce well. I use olive oil to add flavor and help cook the onions and garlic. Chopping one onion and mincing two cloves of garlic brings a nice aroma to the dish. Next, I add shredded chicken. I often use rotisserie chicken for quick prep. It saves time and adds rich flavor. I mix in fresh or frozen broccoli florets for color and nutrition. Halved cherry tomatoes bring sweetness and a burst of freshness. Seasonings matter too. I add one teaspoon of Italian seasoning, plus salt and pepper for taste. For creamy goodness, I use two types of cheese. One cup of shredded mozzarella melts beautifully. One cup of ricotta cheese adds a rich, creamy texture. I finish with half a cup of grated parmesan cheese for a salty kick. Finally, I garnish with fresh basil leaves for a pop of color and flavor. This mix creates a comforting and hearty dish that the whole family will enjoy. Each ingredient plays a role in making this cheesy chicken pasta bake both tasty and satisfying. {{ingredient_image_1}} Cooking the Penne Pasta Start by boiling water in a large pot. Add a pinch of salt to the water. Once it boils, add 2 cups of penne pasta. Cook the pasta until it is al dente, usually around 8-10 minutes. This gives your dish the right texture. Draining and Setting Aside When the pasta is done, carefully drain it in a colander. Make sure to shake off any excess water. Set the pasta aside while you prepare the other ingredients. Sautéing the Onion and Garlic In a large skillet, heat 2 tablespoons of olive oil over medium heat. Add one chopped onion. Sauté it for about 3-4 minutes until it turns soft and clear. Next, add 2 cloves of minced garlic and cook for another minute. The garlic should smell amazing! Adding Chicken, Broccoli, and Tomatoes Now it’s time to add the good stuff. Toss in 2 cups of shredded cooked chicken, 1 cup of broccoli florets, and 1 cup of halved cherry tomatoes. Add 1 teaspoon of Italian seasoning, and sprinkle in some salt and pepper. Cook all of this for 5-7 minutes. You want the broccoli to be tender but still bright green. Mixing Ingredients in a Bowl In a large bowl, combine the cooked penne pasta with your chicken and veggie mix. Stir in 1 cup of ricotta cheese and half of the 1 cup of shredded mozzarella cheese. Make sure everything is well coated. Transferring to Baking Dish Grease a baking dish well. Pour the pasta mixture into the dish. Spread it out evenly. Now, sprinkle the rest of the mozzarella cheese and ½ cup of grated parmesan cheese on top. Baking Process Preheat your oven to 375°F (190°C). Place the baking dish in the oven. Bake for 25-30 minutes, or until the cheese is bubbly and golden. Once done, take it out and let it sit for 5 minutes before serving. Enjoy your cheesy chicken pasta bake! Achieving Al Dente Pasta To get the best texture, cook the penne pasta just until it is al dente. This means the pasta should be firm but not hard. Follow the package instructions closely. Usually, it takes about 8-10 minutes. Remember to check it a minute or two before the time is up. Drain the pasta right after it cooks to stop the cooking process. Cooking Broccoli to Perfection For the broccoli, you want it tender but still green and bright. If you use fresh broccoli, cut it into small florets. Add it to the skillet with the chicken and cook for about 5-7 minutes. If you use frozen broccoli, add it straight to the skillet without thawing. This keeps it crisp and delicious. Suggested Seasonings To make your dish pop, use Italian seasoning. It adds a nice herbal flavor. You can also sprinkle a bit of salt and pepper to taste. If you like heat, try adding some red pepper flakes. This will give your pasta bake a fun kick. Cheese Melting Techniques For the best cheesy topping, use a mix of mozzarella and parmesan. Sprinkle half of the mozzarella in the mixture and save the rest for the top. Baking it at 375°F helps the cheese melt evenly and get nice and bubbly. For a golden finish, broil it for the last few minutes. Serving Ideas Serve the Cheesy Chicken Pasta Bake in individual bowls for a warm and cozy meal. This makes it easy for family and friends to enjoy. You can also add a side salad for a nice balance. Garnishing Tips with Basil and Parmesan To make your dish look fresh and colorful, add chopped fresh basil on top. A sprinkle of extra parmesan gives it a nice touch. These simple additions will impress your guests and make the dish look gourmet. Pro Tips Cook Pasta Al Dente: Ensure your penne pasta is cooked al dente before mixing it with the other ingredients; it will absorb some sauce while baking and prevent it from becoming mushy. Use Rotisserie Chicken: For a quick and flavorful option, use store-bought rotisserie chicken. It saves time and adds a delicious seasoning to the dish. Variations with Veggies: Feel free to add or substitute other vegetables like bell peppers, spinach, or zucchini to customize the bake to your liking. Let It Rest: Allow the dish to rest for about 5 minutes after baking. This helps the cheese set and makes serving easier. {{image_2}} Different Pasta Types You can swap penne for any pasta you like. Fusilli, rotini, or even gluten-free pasta works great. Each type gives a new look and texture to your bake. Chicken Alternatives If you want a change from chicken, try shredded beef or tofu. Both options add a unique flavor. You can also use turkey or even ground meat for a tasty twist. Adding Spices or Heat Want to spice things up? Add red pepper flakes for some heat. You can also try smoked paprika or Italian herbs for extra flavor. These spices can take your dish to a new level. Incorporating Other Vegetables Feel free to mix in other veggies. Spinach adds color and nutrition. Bell peppers give a nice crunch and sweetness. You can use whatever veggies you have at home. Using Different Cheese Blends Not a fan of mozzarella? Try cheddar or gouda instead. Mixing different cheeses can create exciting flavors. Experiment with cream cheese for a rich, creamy texture. Non-Dairy Cheese Options For dairy-free diets, look for non-dairy cheese. Many options melt well and taste great. You can find almond, soy, or cashew-based cheeses at most stores. To keep your Cheesy Chicken Pasta Bake fresh, use airtight containers. Glass or plastic containers work well. Store it in the fridge within two hours of cooking. It can stay fresh for up to three days. Make sure to let it cool before sealing. For reheating, I suggest using the oven. Preheat it to 350°F (175°C). Place the pasta bake in a safe dish, cover it with foil, and heat for about 20 minutes. This method keeps the cheese gooey and the pasta moist. Avoid using the microwave, as it can dry out the dish. If you must use the microwave, add a splash of water to keep it moist. You can freeze the pasta bake before or after baking. If freezing before baking, cover it tightly with foil. It will last for up to three months. If you bake it first, let it cool before freezing. To thaw, place it in the fridge overnight. For a quicker option, use the microwave on defrost. After thawing, reheat it in the oven for the best texture. How long does it take to bake? It takes about 25 to 30 minutes to bake this dish. Preheat your oven to 375°F (190°C). You want the cheese to be bubbly and golden. Can I make it ahead of time? Yes, you can prepare this dish a day before. Just cover it and put it in the fridge. When ready to bake, add a few extra minutes to the cooking time. What can I substitute for chicken? You can use shredded beef, turkey, or even tofu. Just make sure to cook it well. This way, you can fit different diets or tastes. How many calories per serving? Each serving has about 400 to 500 calories. This can change based on your choice of cheese and chicken. Is this dish gluten-free? No, this dish is not gluten-free as it uses penne pasta. You can swap the pasta for a gluten-free version to make it suitable. Can I use uncooked chicken? Using uncooked chicken is not recommended. It needs to cook through. Always use cooked chicken for the best flavor and safety. What if my pasta is overcooked? If your pasta is overcooked, it may become mushy. Try to cook it al dente next time. This gives it a better texture in the bake. This blog post shared steps to make a delicious Cheesy Chicken Pasta Bake. We covered key ingredients, from pasta to cheeses, and how to cook chicken and veggies. You also learned tips for perfect texture and great flavor. We explored tasty variations and provided storage info. This dish is easy and fun to make. Enjoy it fresh or as leftovers. With simple swaps and enhancements, you can make it your own! I hope you feel inspired to try this recipe and create your own tasty version.

Cheesy Chicken Pasta Bake Simple Family Dinner Dish

To make this hearty stew, gather these main ingredients: - 2 lbs lamb shoulder, cut into 2-inch cubes - 2 tablespoons olive oil - Salt and black pepper to taste - 1 large onion, diced - 3 cloves garlic, minced - 4 medium carrots, peeled and sliced - 3 stalks celery, chopped - 2 cups beef broth - 1 cup diced tomatoes (canned or fresh) - 2 teaspoons dried rosemary - 1 teaspoon dried thyme - 1 bay leaf - 1 cup green peas (fresh or frozen) - 2 medium potatoes, peeled and cut into chunks These ingredients create a rich base for the stew. The lamb shoulder is ideal because it becomes tender and flavorful when cooked low and slow. You can enhance the flavor with some optional ingredients: - 1 tablespoon cornstarch (for thickening) - Fresh parsley, chopped (for garnish) Cornstarch helps make the stew thicker if you like a heartier texture. Parsley adds a fresh touch when you serve the dish. Use these seasonings to boost the taste: - Salt and black pepper to taste - Dried rosemary - Dried thyme - Bay leaf These seasonings are key to making the stew flavorful. Rosemary and thyme bring warmth, while the bay leaf adds depth to the overall dish. {{ingredient_image_1}} To start, I heat the olive oil in a large Dutch oven. It’s best to use medium-high heat. I season the lamb cubes with salt and black pepper. Then, I sear the lamb in batches. Each batch takes about 5 to 7 minutes. I want the lamb to be brown on all sides. This step adds a lot of flavor. After browning, I remove the lamb from the pot and set it aside. Next, I add the diced onion into the same pot. I sauté it for about 5 minutes. When the onion softens, I stir in the minced garlic. I let it cook for one more minute. The garlic will smell great! After that, I add the sliced carrots and chopped celery. I sauté these for another 5 minutes. This helps build a rich base for the stew. Now it’s time to return the lamb to the pot. I pour in the beef broth and diced tomatoes. I add dried rosemary, thyme, and a bay leaf. Then, I mix in the potato chunks and more salt and pepper. I stir everything well. I bring the stew to a simmer. Once it simmers, I lower the heat and cover the pot. I let it cook for 1.5 to 2 hours. The lamb should be tender and shred easily. About 10 minutes before serving, I stir in the green peas. If I want a thicker stew, I mix cornstarch with cold water. I add this to the stew and cook for another 5 minutes. Finally, I remove the bay leaf and adjust the seasoning. Garnishing with fresh parsley adds a nice touch! To make the best fall-apart lamb stew, choose lamb shoulder. This cut has good fat and connective tissue. It gets tender as it cooks. Avoid lean cuts; they won't break down well. Look for marbling, which adds flavor and moisture. Ask your butcher for help if needed. If you like a thicker stew, use cornstarch. Mix one tablespoon of cornstarch with two tablespoons of cold water. Stir this mixture into your stew about ten minutes before it's done. Cook it for five more minutes. This method gives a nice, rich texture without altering the flavor. Seasoning is key for flavor. Use salt and black pepper to taste. Dried herbs like rosemary and thyme add depth. Don’t forget the bay leaf; it boosts the stew's aroma. Taste as you go. Adjust seasoning near the end. This way, you ensure a balanced, delicious stew every time. Pro Tips Choose the Right Cut: Using lamb shoulder is ideal due to its rich flavor and tenderness when slow-cooked, ensuring a fall-apart texture. Layer Flavors: Don’t rush the sautéing steps; properly browning the lamb and softening the vegetables enhances the stew's depth of flavor. Thickening the Stew: If you prefer a thicker stew, make a cornstarch slurry and add it towards the end of cooking for a velvety consistency. Resting Time: Allow the stew to sit for about 10-15 minutes after cooking; this helps the flavors meld together for an even richer taste. {{image_2}} You can change the stew by adding seasonal veggies. Think about using root vegetables like parsnips or turnips. They add a nice flavor and texture. You could also toss in squash or sweet potatoes for a hint of sweetness. If you want freshness, consider adding green beans or zucchini. Just cut them into bite-sized pieces. Add them in the last 30 minutes of cooking to keep them tender-crisp. For those who love spice, it's easy to kick up the heat. You can add chili flakes or diced jalapeños. Start with a small amount, then taste and adjust. If you want a deeper flavor, try using smoked paprika. It adds heat and a smoky taste. Adding a dash of hot sauce before serving can also give it a nice kick. Make sure to balance the heat with the stew's rich flavors. If you prefer a different meat, lamb is not your only choice. Beef or pork works well in this stew. For beef, use chuck roast cut into cubes. It becomes tender just like lamb. If you want pork, try shoulder or loin. Both cuts are great for slow cooking. Just remember to adjust the cooking time. Beef may need a little longer, while pork cooks faster. The key is to make sure the meat is fork-tender. To keep your leftover stew fresh, use an airtight container. Let it cool to room temp before sealing. This helps prevent sogginess. Store it in the fridge for up to three days. For longer storage, freezing is best. Pour the cooled stew into freezer-safe bags. Squeeze out air before sealing. Label with the date. The stew can last up to three months in the freezer. Reheat the stew on the stove for best results. Use low heat to avoid burning. Stir often to heat evenly. You can add a splash of broth if it looks thick. Enjoy the rich flavors just like the first day! You can store Fall-Apart Lamb Stew in the fridge for up to three days. Make sure to cool it completely before putting it in an airtight container. This helps keep the flavors fresh. If you want to enjoy it later, just reheat it gently on the stove or in the microwave. Yes, you can use other cuts of lamb. Cuts like lamb shank or leg can work well. Just remember to adjust cooking times, as some cuts may need longer to become tender. The key is to choose meat that has enough fat. This helps the stew stay rich and flavorful. For a complete meal, serve lamb stew with crusty bread or warm rolls. This bread is great for dipping. You can also add a side salad for some fresh crunch. A simple green salad with a light vinaigrette pairs nicely. Enjoy your meal with a glass of red wine for an extra touch! This blog post shared a simple way to make fall-apart lamb stew. I covered key ingredients and step-by-step instructions to enhance flavors and textures. You learned tips for selecting the best lamb, thickening the stew, and adding variations for fun. Storing leftovers and reheating were also explained. Cook this stew with love, and it will surely delight. Enjoy your culinary journey!

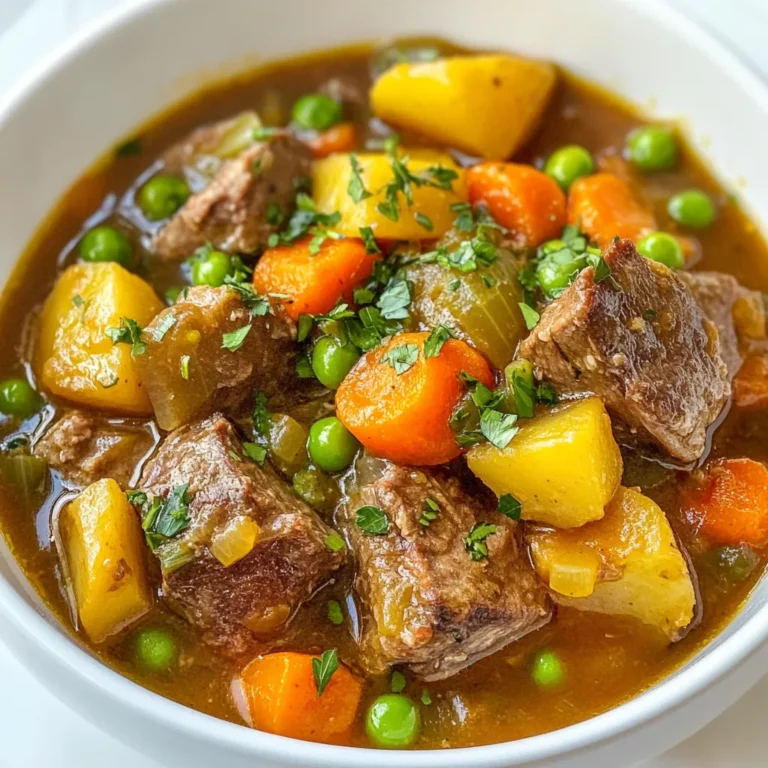
Fall-Apart Lamb Stew Hearty and Comforting Delight

PREV 1 … 48 49 50 … 56 NEXT
secrets pice kitchen

explore

DessertsDinnerAppetizersDrinks

Our Policies

  • Cookie Policy
  • Copyright Policy
  • Disclaimer
  • GDPR Policy
  • Terms Of Use
Back to Top
  • About
  • Contact Us
  • Privacy Policy
© 2025 secrets pice kitchen