FREE DINNER EBOOK! Get your copy!
  • Cookie Policy
  • GDPR Policy
  • Disclaimer
  • Terms Of Use
  • Visit my other site: Fun Cookie Recipes
secrets pice kitchen
  • Home
  • Dinner
  • Desserts
  • Drinks
  • Appetizers
  • Contact
  • About
  • Privacy Policy
  • Home
  • Dinner
  • Desserts
  • Drinks
  • Appetizers
  • Contact
  • About
  • Privacy Policy
  • Cookie Policy
  • GDPR Policy
  • Disclaimer
  • Terms Of Use
Visit my other site: Fun Cookie Recipes

HOME / CATEGORIES /

Latest

- 8 oz udon noodles - 1 lb beef sirloin, thinly sliced - 2 tablespoons black pepper, freshly ground - 3 tablespoons soy sauce - 1 tablespoon oyster sauce - 1 tablespoon sesame oil - 1 tablespoon vegetable oil - 2 cloves garlic, minced - 1-inch piece ginger, grated - 1 red bell pepper, sliced - 1 cup broccoli florets - 2 green onions, sliced (for garnish) - Sesame seeds (for garnish) Gather these ingredients before you start cooking. Udon noodles are thick wheat noodles that are chewy and satisfying. Choose a good quality beef sirloin for the best flavor. Freshly ground black pepper adds a spicy kick. Soy sauce and oyster sauce provide depth and umami to the dish. Sesame oil adds a nutty flavor that makes everything pop. Don't forget garlic and ginger for their aromatic qualities, and colorful veggies like red bell pepper and broccoli for texture and nutrition. The green onions and sesame seeds are for garnish, giving your dish a beautiful finish. Each ingredient plays a key role in making your Beef Black Pepper Udon flavorful and fun to eat. {{ingredient_image_1}} To cook the udon noodles, start by boiling water in a large pot. Add the noodles and follow the package instructions. This usually takes about 8 to 10 minutes. Cook until they are tender but still firm. After cooking, drain the noodles and set them aside. This helps keep them from getting sticky. Next, prepare the beef marinade. In a mixing bowl, combine the sliced beef, one tablespoon of soy sauce, one tablespoon of black pepper, minced garlic, and grated ginger. Mix well to coat the beef. Let it marinate for about 10 minutes. This step adds great flavor to the meat. Heat vegetable oil in a large wok or frying pan over high heat. When the oil is hot, add the marinated beef. Stir-fry for about 3 to 4 minutes. Cook until the beef is browned and cooked through. Remove the beef from the pan and set it aside. This keeps the beef juicy and flavorful. In the same pan, add the broccoli florets and sliced red bell pepper. Stir-fry for about 3 to 5 minutes. You want the vegetables to be tender yet still crisp. This helps keep their bright colors and fresh taste. Return the cooked beef to the pan with the vegetables. Add the cooked udon noodles, the rest of the soy sauce, oyster sauce, sesame oil, and remaining black pepper. Toss everything together. Make sure everything mixes evenly and heats through. Serve it hot for the best flavor. When serving the Beef Black Pepper Udon, garnish with sliced green onions and a sprinkle of sesame seeds. This adds a nice touch to your dish. Serve it in large bowls for a great presentation. Pair it with chopsticks or a fork for easy eating. Enjoy your delicious meal! Freshly ground black pepper is key for great taste. It adds a strong, spicy kick. You can easily grind black pepper at home. Just use a pepper mill or a mortar and pestle. This step makes a big difference. Choosing high-quality sauces also matters. Look for good soy and oyster sauces. They should have rich flavors. A premium sauce can elevate your dish a lot. Always check the label for quality ingredients. Timing is essential when cooking udon noodles. Follow the package instructions closely. Usually, they cook in about 8-10 minutes. You want them tender but firm. Overcooking leads to mushy noodles, which nobody wants. To avoid mushiness, drain the noodles right away. Rinse them under cold water. This stops the cooking process. It also helps keep them separate when you mix them later. Storing leftovers properly is crucial. Let the dish cool down first. Then place it in an airtight container. It can stay in the fridge for up to three days. When reheating, use a pan on low heat. Add a little water to keep it moist. Stir often to heat evenly. This method helps keep the flavors fresh and tasty. Pro Tips Use Fresh Ingredients: Fresh vegetables and high-quality beef will enhance the flavor and nutritional value of your dish. Control the Heat: When stir-frying, make sure your pan is hot enough to sear the beef quickly, locking in juices and flavor. Customize Your Spice Level: Adjust the amount of black pepper to suit your taste; you can start with less and add more as needed. Perfectly Cooked Udon: Be careful not to overcook the udon noodles; they should be tender but still have a slight bite to them (al dente). {{image_2}} You can easily make Beef Black Pepper Udon vegetarian. Just swap the beef for tofu or tempeh. Both options soak up flavor well and add protein. If you choose tofu, use firm or extra-firm varieties. Press it to remove excess water for better texture. For veggies, get creative! Add mushrooms, snap peas, or carrots. Feel free to mix your favorites. Adjust the cooking time as needed to keep them tender yet crisp. This way, you keep the dish colorful and tasty. If you want to spice things up, add chili flakes or sriracha. You can also use fresh chili peppers for a bold kick. Try adding a sliced jalapeño or Thai bird chili during cooking. For warmth, consider using spices like cayenne pepper or smoked paprika. These spices not only add heat but also depth to the flavor. Just remember to taste as you go to find your perfect level of spice! You can explore different cuisines by adding unique ingredients. Try using hoisin sauce for sweetness or fish sauce for umami. These swaps can give your udon a new twist. You can also add Asian greens like bok choy or Napa cabbage for a fresh crunch. If you want a fusion dish, toss in some Italian herbs like basil or oregano. This makes your Beef Black Pepper Udon truly your own! To keep your Beef Black Pepper Udon fresh, cool it down first. Place it in an airtight container. Store it in the fridge. Your leftovers will stay good for about 3-4 days. Check for any odd smells or changes in texture before eating. You can freeze this dish for longer storage. Divide the udon into portions. Place them in freezer-safe bags or containers. Make sure to squeeze out any air. This will help prevent freezer burn. For the best taste, use it within 2-3 months. When you’re ready to eat, thaw it overnight in the fridge. When reheating, avoid the microwave if you can. It can make the noodles mushy. Instead, use a pan on low heat. Add a splash of water or soy sauce to keep it moist. Stir often to heat evenly. It should take about 5-7 minutes. If you use a microwave, heat on low for 1-2 minutes, stirring halfway through. You can use several noodles if you can't find udon. Here are some options: - Soba noodles: These are buckwheat noodles. They cook fast and have a nutty taste. - Rice noodles: These are great for a gluten-free option. They cook quickly too. - Spaghetti or fettuccine: If you're in a pinch, regular pasta works well. Cooking times may vary. Soba noodles usually take 4-6 minutes. Rice noodles can take about 5 minutes. Spaghetti typically cooks in 8-10 minutes. Yes, you can prep this dish in advance. Here are some tips: - Cook the noodles: You can cook the udon noodles a day before. Store them in the fridge. - Marinate the beef: You can marinate the beef overnight. This makes it tastier. Storing the dish may affect the flavor and texture. The noodles can become soft. The beef may lose some of its freshness. If the dish is too spicy for you, try these suggestions: - Reduce black pepper: Use less black pepper in the recipe. Start with 1 tablespoon instead of 2. - Add sugar: A pinch of sugar can balance the heat. For alternative seasonings, consider using garlic powder or sweet soy sauce. These can add flavor without the spice. This recipe works well for meal prep. Here are some considerations: - Portion sizes: Divide the dish into single servings. This makes it easy to grab and go. - Storage: Use airtight containers to keep the food fresh. Best practices for storing meals include labeling containers with dates. This helps you keep track of freshness. Store in the fridge for up to 3 days. Beef Black Pepper Udon brings bold flavors and satisfying textures. You learned how to cook udon, marinate beef, and stir-fry fresh veggies. You now have tips for best taste and storage. You can make this dish your own with fun options like spicy or vegetarian twists. Embrace this recipe in your meal plans, and impress everyone at the table. Enjoy crafting this tasty dish that fits any occasion.

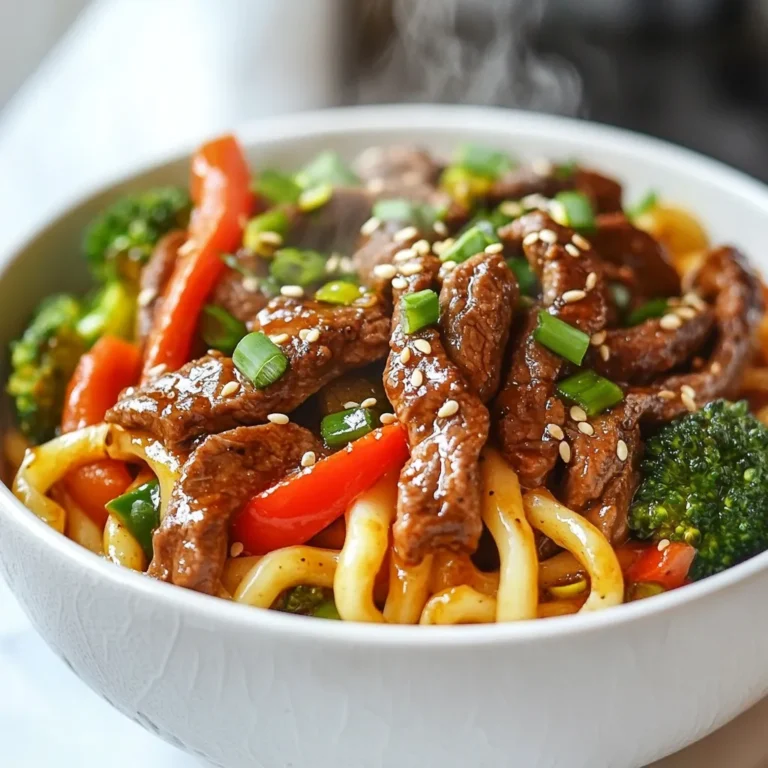
Beef Black Pepper Udon Flavorful and Easy Recipe

To make Honey BBQ Chicken Rice, gather these key ingredients: - 2 cups long-grain rice, rinsed - 1 lb chicken thighs, boneless and skinless, cut into bite-sized pieces - 1 cup BBQ sauce (homemade or store-bought) - 1/4 cup honey - 1 onion, diced - 2 cloves garlic, minced - 2 cups chicken broth - 1 cup bell peppers, chopped (mix of colors for vibrancy) - 1 teaspoon smoked paprika - 1/2 teaspoon black pepper - 2 tablespoons olive oil - Salt to taste - Chopped green onions and sesame seeds for garnish You can swap some ingredients if needed. - Instead of chicken thighs, use chicken breast for a leaner option. - Maple syrup works well in place of honey for a different sweet touch. - Any type of rice can work, but long-grain gives the best texture. - If you don't have BBQ sauce, try teriyaki sauce for a unique flavor. - Use vegetable broth if you want a vegetarian version. Choose fresh ingredients for the best taste. - Look for chicken thighs that are pink and firm, with no odor. - Select bright bell peppers without any blemishes or soft spots. - Check the BBQ sauce label for quality ingredients; less sugar is better. - When buying honey, go for raw or organic for a richer flavor. - Fresh garlic and onions should feel firm and have strong scents. {{ingredient_image_1}} To start, heat 2 tablespoons of olive oil in a large skillet over medium heat. Add 1 pound of cut chicken thighs. Season the chicken with salt, black pepper, and smoked paprika. Cook the chicken for about 6 to 8 minutes. It should be browned and cooked through. Once done, remove the chicken and set it aside. This step builds a great flavor base for the dish. In the same pan, add 1 diced onion. Cook it for about 3 minutes until it turns translucent. Then, add 2 minced garlic cloves. Stir them for 1 more minute. Be careful not to let the garlic burn. This adds a lovely depth to your dish and enhances the overall aroma. Now, return the chicken to the pan. Pour in 2 cups of rinsed long-grain rice. Stir to coat it with the oil and flavors from the chicken and onion. Next, in a bowl, mix 1 cup of BBQ sauce with 1/4 cup of honey. Pour this mixture into the pan, along with 2 cups of chicken broth. Stir well to make sure the rice is covered in liquid. Add 1 cup of chopped bell peppers for color and crunch. Bring the mix to a gentle boil, then reduce the heat to low. Cover the pan and let it simmer for about 18 to 20 minutes. This will cook the rice and let it absorb all the tasty flavors. After that, remove the pan from heat and let it sit, covered, for another 5 minutes. Finally, fluff the rice with a fork. This makes it light and fluffy, ready to serve! To make perfect rice, always rinse it first. Rinsing removes extra starch, which helps prevent stickiness. Use long-grain rice for a fluffy texture. Measure your liquid well. You want two cups of chicken broth for every cup of rice. This balance helps the rice cook evenly. Keep the lid on while it simmers. This traps steam and keeps moisture in. After cooking, let it sit for five minutes. This resting time allows the rice to firm up and absorb any remaining liquid. For tender chicken, start with boneless, skinless thighs. They stay juicy and cook evenly. Cut the chicken into bite-sized pieces. This helps it cook faster and allows for more flavor. Season the chicken with salt and black pepper before cooking. I use smoked paprika for a hint of smokiness. Sauté the chicken until it’s browned, about six to eight minutes. Don’t overcrowd the pan; this ensures even cooking. If the chicken looks golden, it’s ready. Remember to let it rest before mixing it back in. To boost flavor, I love using fresh herbs like parsley or basil. Just a sprinkle at the end makes the dish pop. You can also try adding a bay leaf while cooking the rice. It gives a subtle earthiness. If you want more heat, add a pinch of cayenne pepper or chili flakes. These spices can really elevate the dish. Lastly, don't forget the garlic! It adds depth and richness. Just sauté it until fragrant, but watch carefully to avoid burning. Pro Tips Use Quality BBQ Sauce: Opt for a BBQ sauce that you enjoy eating on its own, as it will significantly impact the flavor of the dish. Let Rice Rest: Allowing the rice to sit covered for a few minutes after cooking helps in achieving a fluffier texture. Customize Your Veggies: Feel free to mix in other vegetables like corn or zucchini for added flavor and nutrition. Store Leftovers Properly: Keep any leftovers in an airtight container in the fridge for up to 3 days. Reheat thoroughly before serving. {{image_2}} You can easily make this dish vegetarian. Swap out the chicken for hearty tofu. Use firm tofu and press it to remove water. Cut it into bite-sized cubes. Sauté it until golden brown. Add the same spices to keep the flavor strong. Replace chicken broth with vegetable broth for a rich taste. You can also add beans for protein. Black beans or chickpeas work well. If you want to change the protein, feel free to use pork or beef. Cut the meat into small pieces, just like the chicken. Cook them in the same way. Seafood like shrimp is another fun option. Cook shrimp quickly, as they don't take long. Just add them in the last few minutes of cooking. Each protein brings its own taste to the dish. Switching up the sauce can make a big difference. Try teriyaki sauce instead of BBQ for a sweet, salty kick. You can mix in sriracha for heat if you like spice. A honey mustard blend also adds a tangy twist. Experiment with different sauces to find your favorite flavor. Each sauce can change the whole meal, keeping it exciting. To keep your Honey BBQ Chicken Rice fresh, let it cool first. Then, transfer any leftovers to an airtight container. Store in the fridge for up to three days. This way, the flavors stay intact, and the rice remains tasty. When you're ready to enjoy your leftovers, reheat them on the stove. Place the rice in a skillet with a splash of water or chicken broth. Heat over medium-low until warm. Stir occasionally to avoid sticking. You can also use a microwave. Cover the dish and heat for one to two minutes. If you want to save the dish for later, freezing is a great option. Scoop the cooled rice into freezer-safe bags. Remove as much air as possible before sealing. You can freeze this meal for up to three months. When you're ready to eat, thaw it in the fridge overnight before reheating. Yes, you can use brown rice. It will change the cooking time. Brown rice takes longer to cook, about 40-50 minutes. You need to add more liquid, too. Use about 2.5 cups of chicken broth instead of 2 cups. This will help the rice cook well. Just make sure to check it often to avoid burning. Honey BBQ Chicken Rice is a full meal, but you can add sides. Here are some ideas: - Steamed broccoli for a healthy crunch - A fresh garden salad for lightness - Corn on the cob for sweetness - Garlic bread for a tasty touch These sides balance the meal well and add more flavors. To add spice, try these options: - Add 1 teaspoon of red pepper flakes for heat. - Mix in diced jalapeños or green chilies. - Use a spicier BBQ sauce to boost the flavor. Start with small amounts, then taste. You can always add more spice if needed! This blog post covered essential ingredients, step-by-step cooking, and useful tips for making Honey BBQ Chicken Rice. I shared ingredient substitutions and how to pick quality items. You learned cooking techniques for chicken and rice, plus how to add flavor. I also explored variations for vegans or those wanting new sauces. Remember to store leftovers correctly, freeze them, and feel free to experiment with spice levels. Now you can create your own tasty meals with confidence. Enjoy your cooking journey!

Honey BBQ Chicken Rice One-Pan Flavorful Delight

- 1 lb ground beef (preferably lean) - 3 tablespoons soy sauce (low sodium) - 1 tablespoon brown sugar - 2 teaspoons sesame oil - 3 cloves garlic, minced - 1 teaspoon fresh ginger, minced - 2 green onions, chopped (plus extra for garnish) - 1 cup shredded carrots - 1 cup cooked rice (white or brown) - 1 teaspoon sesame seeds (for garnish) - Additional green onions for garnish For this dish, I love using lean ground beef. It keeps each bite light and tasty. Using low-sodium soy sauce helps control the saltiness, making it a healthier choice. Adding brown sugar gives it a sweet touch that balances the savory flavors. Garlic and ginger are key to this recipe. They add a deep, rich flavor that makes every bite exciting. Fresh green onions bring a nice crunch and bright color, while shredded carrots add sweetness and texture. Serve your Korean ground beef bowls over cooked rice. It soaks up the delicious sauce. For a final touch, sprinkle sesame seeds and extra green onions on top. This not only looks great but also adds extra flavor. {{ingredient_image_1}} - In a medium bowl, combine: - 1 lb ground beef - 3 tablespoons soy sauce - 1 tablespoon brown sugar - 2 teaspoons sesame oil - 3 cloves garlic, minced - 1 teaspoon fresh ginger, minced - 1 tablespoon rice vinegar Mix all the ingredients well. This mix gives the beef a rich flavor. Let it sit for about 10-15 minutes. This marination makes the beef tender and tasty. - Heat a large skillet over medium-high heat. - Add the marinated ground beef to the skillet. Break it up with a spatula. Cook the beef for about 7-10 minutes. Stir it occasionally. You want it to be fully cooked and browned. Make sure any extra liquid evaporates. Season with salt and pepper to taste. This step is key for flavor. - Add 1 cup of shredded carrots to the skillet. Stir-fry for 2-3 minutes. You want the carrots to soften slightly. This adds a nice crunch and sweetness. Next, remove the skillet from heat. - Stir in the chopped green onions. Save some for garnish. These steps make your dish colorful and fresh. To enhance the taste of your Korean ground beef bowls, the right soy sauce makes a big difference. I recommend using low-sodium soy sauce. It adds flavor without making the dish too salty. You can also try different types like tamari or even coconut aminos for a gluten-free option. For sweetness, brown sugar works wonders. If you want it sweeter, add more sugar until you get your desired taste. You can also use honey or maple syrup if you prefer natural sweeteners. Browning the beef well is key to flavor. Start with a hot skillet. This helps create a nice sear on the meat. Don't overcrowd the pan; cook in batches if needed. This way, you avoid steaming the beef, which keeps it juicy and flavorful. When adding vegetables, like carrots, stir-fry them quickly. This keeps them crisp and colorful. If you cook them too long, they become mushy and lose their bright look. Garnishing your bowls makes them look tempting. I love adding extra chopped green onions and a sprinkle of sesame seeds for crunch. You can also add sliced radishes or cucumber for freshness. Pair your bowls with sides like kimchi or pickled vegetables. These add contrast and bring extra flavor to the meal. You can even serve it with a fried egg on top for a protein boost and a rich taste. Pro Tips Choose the Right Beef: For a healthier option, use lean ground beef to reduce fat, or substitute with ground turkey or chicken for a lighter dish. Marinating Time: Allowing the beef to marinate for at least 15 minutes enhances the flavor. For deeper flavor, marinate it in the fridge for up to an hour. Customize Your Veggies: Feel free to add other vegetables such as bell peppers or snap peas for extra color and nutrition in your bowls. Rice Options: You can use any type of rice, but consider brown rice for added fiber or cauliflower rice for a low-carb alternative. {{image_2}} You can swap ground beef for turkey or chicken. This change gives a lighter taste. Turkey has less fat, making your meal healthier. Chicken provides a different flavor that pairs well with the sauce. For a vegetarian option, try using tofu. Firm tofu works best. Crumble it and marinate it like you would the beef. Cook it until golden for a nice texture. This version is just as tasty! Want more spice? Add chili flakes to your beef mix. Start with a little and taste it. You can always add more if you like heat. It gives the dish a nice kick. You can also try different vegetables. Add bell peppers, snap peas, or mushrooms. They add color and crunch. Feel free to use what you have on hand. The mix of flavors will keep things exciting! If you want a lower carb option, use cauliflower rice. It cooks quickly and soaks up flavors well. Just sauté it lightly before serving. Quinoa is another great substitute. It adds protein and a nutty taste. You can also try other grains like farro or barley. Each adds unique flavor and texture to your bowl. To keep your Korean ground beef bowls fresh, use airtight containers. Glass or plastic containers work well. Store leftovers in the fridge. They will stay good for about 3 to 4 days. For reheating, the best method is using a skillet. Heat it on medium-low and add a splash of water. This helps keep the beef moist. Stir often to heat evenly. You can also use the microwave. Place the beef in a bowl with a damp paper towel. Heat in short bursts to prevent dryness. To freeze the Korean ground beef mixture, let it cool first. Then, place it in freezer-safe bags or containers. Remove as much air as possible. This helps prevent freezer burn. It can last for up to 3 months in the freezer. To thaw, move it to the fridge overnight. Reheat in the skillet or microwave as mentioned before. Enjoy your meal, even after freezing! Yes, you can prepare these bowls in advance. Here are some tips: - Cook the beef: Make the ground beef mixture and let it cool. - Store properly: Place the beef in an airtight container. - Refrigerate: Keep it in the fridge for up to 3 days. - Reheat before serving: Warm it in a skillet or microwave. - Cook rice separately: Prepare fresh rice when ready to serve for best taste. I recommend using lean ground beef. Here’s why: - Less fat: Lean beef has less grease, making the dish lighter. - Flavor: It still has enough flavor to blend well with the sauce. - Healthier option: Lean beef is a better choice for health-conscious eaters. - Fatty beef: If you prefer more flavor, you can use 80/20 ground beef, but drain excess fat after cooking. Adjusting the spice level is easy and fun. Here’s how: - Add chili flakes: Stir in some red pepper flakes for heat. - Hot sauce: Drizzle your favorite hot sauce over the bowl before serving. - Taste as you go: Start with a little, then add more if you want it spicier. - Mild option: If you want no heat, skip spicy ingredients altogether and enjoy the sweet flavors. This dish combines simple ingredients like ground beef, soy sauce, and garlic for rich flavors. You learned how to marinate and cook the beef while adding fresh veggies. I also shared tips for perfecting the taste and ideas for variations. Remember, cooking can be fun and easy. Play with flavors and spices to make it your own. Enjoy your meal and share it with others!

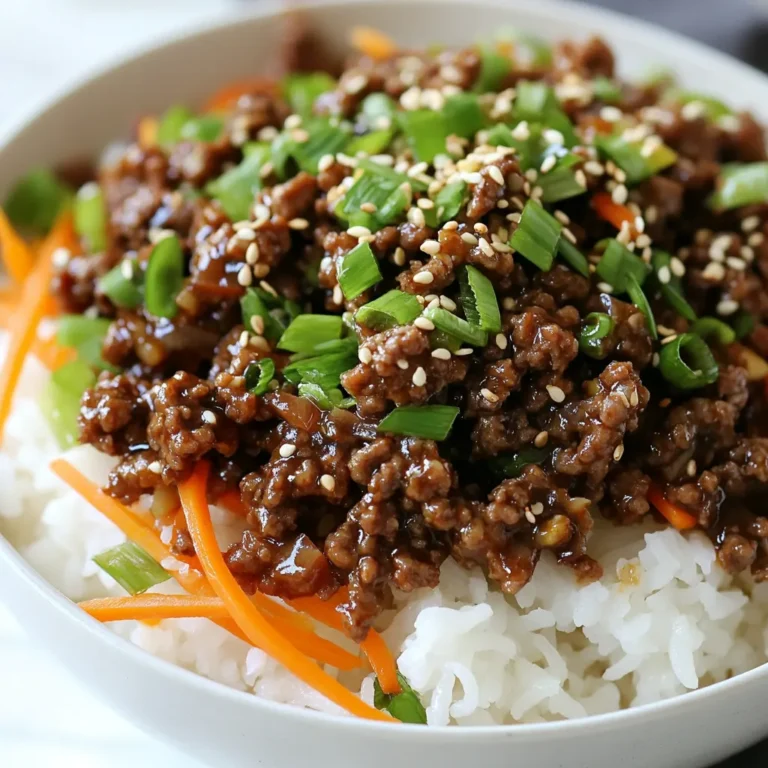
Korean Ground Beef Bowls Flavorful and Easy Recipe

To make crispy fish taco bowls, you will need: - 2 large fillets of white fish (like cod or tilapia) - 1 cup all-purpose flour - 1 teaspoon paprika - 1/2 teaspoon garlic powder - 1/2 teaspoon cumin - Salt and pepper, to taste - 1 cup buttermilk (or regular milk) - 1 cup cornmeal - Vegetable oil, for frying - 2 cups cooked rice (white or brown) - 1 cup shredded green cabbage - 1 avocado, sliced - 1/2 cup cherry tomatoes, halved - 1/4 cup fresh cilantro, chopped - 1 lime, cut into wedges - Spicy mayo (2 tablespoons mayonnaise mixed with sriracha, adjust to taste) For the best outcome, I recommend using: - Fresh cod or tilapia fillets for a mild flavor. - King Arthur flour for a fine texture in the coating. - McCormick spices for consistent flavor in paprika and cumin. - Buttermilk from a local dairy for creaminess. - Stone-ground cornmeal for extra crunch in the coating. If you need to swap some items, consider these options: - Use another white fish like haddock or even shrimp for variety. - Almond flour can replace all-purpose flour for a gluten-free option. - Greek yogurt mixed with water can substitute for buttermilk. - For a lighter meal, replace rice with quinoa or lettuce wraps. - Use a mix of chopped bell peppers instead of cabbage for crunch. {{ingredient_image_1}} Start by slicing the fish fillets into strips. Aim for strips about 1 inch wide. This size helps them cook evenly and makes them easy to eat. In a shallow bowl, mix together the flour, paprika, garlic powder, cumin, salt, and pepper. This blend adds flavor to the fish. In a second bowl, pour the buttermilk. The buttermilk helps the coating stick. In a third bowl, add the cornmeal. You will coat each fish strip in three steps: first, dip it in the seasoned flour, then the buttermilk, and finally, coat it with cornmeal. Press gently to make sure the cornmeal sticks well. Heat about 1/2 inch of vegetable oil in a large skillet over medium-high heat. The oil should be hot enough to sizzle when you add the fish. Fry the strips in batches, making sure not to crowd the pan. Cook each strip for about 3-4 minutes per side, until they turn golden and crispy. Remove them and drain on paper towels to get rid of extra oil. Now, your crispy fish is ready for the taco bowls! To get that perfect crunch, the coating matters a lot. Start with fresh fish. Cut the fish into strips about 1 inch wide. This helps them cook evenly. Use a mix of flour, cornmeal, and spices for a great crust. The cornmeal gives extra crunch. The buttermilk helps the coating stick. This creates a moist inside and crispy outside. Use enough oil for frying. Heat about half an inch of vegetable oil in a skillet. The oil should be hot but not smoking. You can test it by dropping a small piece of fish in the oil. If it sizzles, you are ready to fry. Do not overcrowd the pan. Fry them in batches to keep the heat steady. This way, each piece gets crispy and golden. Seasoning is key for tasty fish taco bowls. Use a blend of paprika, garlic powder, and cumin. These spices add warmth and depth. Adjust salt and pepper to your taste. You can also add lime juice to brighten the flavors. Don't forget the spicy mayo! Mix mayonnaise with sriracha for a kick. Drizzle it on top of the fish for extra zing. Pro Tips Keep the Oil Hot: Ensure the oil is at the right temperature before frying. If it’s not hot enough, the fish will absorb too much oil and become greasy. Use Fresh Ingredients: Fresh fish and produce will enhance the flavor and presentation of your taco bowls, making every bite more delicious. Customize Your Toppings: Feel free to add other toppings like diced red onions, jalapeños, or a sprinkle of feta cheese for added flavor and texture. Make Ahead: You can prep the fish and toppings in advance. Just fry the fish right before serving to keep it crispy. {{image_2}} You can use many kinds of fish for taco bowls. Cod and tilapia are great choices. They stay flaky and tender when cooked. You could also try mahi-mahi or halibut for a richer taste. If you like a stronger flavor, use salmon. It works well in tacos, too. Just make sure to cut the fish into strips for easy frying. Toppings can change your taco bowl game. Shredded cabbage adds crunch and color. You can use purple cabbage for a vibrant twist. Sliced radishes bring a spicy kick, while pickled onions offer a tangy flavor. Try adding mango salsa for a sweet touch. You can also use black beans for extra protein. The lime juice brightens everything up, making each bite refreshing. Crispy fish taco bowls can be made plant-based. Use firm tofu or tempeh instead of fish. Coat it in the same flour mix and fry until golden. Cauliflower also works well. Just break it into florets, season, and fry. For toppings, use avocado, fresh veggies, and a vegan mayo mix. This way, you get a tasty bowl, even without fish! To store leftover fish taco bowls, place the fish and toppings in separate containers. This keeps the fish crispy and the toppings fresh. Use an airtight container for the fish and a salad container for the veggies. Refrigerate within two hours after cooking. The fish will stay good for up to two days. When reheating, keep the fish crispy. Preheat your oven to 375°F (190°C). Place the fish on a baking sheet. Heat for about 10-12 minutes. This helps the fish regain its crunch. Avoid using the microwave, as it may make the fish soggy. You can reheat the rice and toppings separately in the microwave. You can freeze the fish before cooking. Coat the fish and place it on a baking sheet. Freeze until solid, then transfer to a freezer bag. This keeps the fish fresh for up to three months. For already cooked fish taco bowls, freezing is not recommended. The texture may change, and the fish may not taste as good after thawing. To make the fish extra crispy, follow these steps: - Use cold buttermilk for dipping. This helps create a nice crust. - Make sure your oil is hot enough before frying. Test it with a small piece of fish. - Coat the fish in flour, buttermilk, and cornmeal, pressing firmly. This helps the crust stick. - Fry in small batches. Too much fish at once cools the oil, making it soggy. Crispy fish stays crispy when served right away. If you let it sit, it may lose its crunch. Serve it hot for the best taste! Yes, you can make the spicy mayo ahead of time. Mix 2 tablespoons of mayonnaise with sriracha. Adjust the sriracha to your taste. - Store it in an airtight container in the fridge. - Let it chill for at least 30 minutes before serving. This helps the flavors blend well. Making it early saves time on busy days. Plus, it adds a nice kick to your bowls! Fish taco bowls pair well with several sides. Here are my favorites: - Black beans: They add protein and a nice texture. - Corn salad: Sweet corn complements the fish well. - Chips and guacamole: This gives a crunchy contrast to the soft fish. - Grilled vegetables: They provide a healthy, colorful touch. Choose sides that balance the flavors of your fish taco bowls. Enjoy your meal! In this article, we explored delicious fish taco bowls. We discussed essential ingredients, step-by-step cooking, tips for crispiness, and exciting variations. We also covered proper storage for leftovers. Fish taco bowls can impress anyone. With simple steps, you can enjoy tasty meals anytime. Don’t hesitate to try different fish or toppings. Cooking can be fun and rewarding. Enjoy your culinary adventure!

Crispy Fish Taco Bowls Delightful and Flavorful Meal

To make a tasty Turkey Taco Bowl, you need: - 1 lb ground turkey - 1 small onion, diced - 2 cloves garlic, minced - 1 red bell pepper, diced - 1 can (15 oz) black beans, rinsed and drained - 1 cup corn (fresh or frozen) - 1 teaspoon ground cumin - 1 teaspoon chili powder - 1 teaspoon paprika - Salt and pepper to taste - 2 cups cooked brown rice (or quinoa) These ingredients bring a mix of protein, fiber, and vibrant flavors. You can add extra fun with these toppings: - Avocado slices - Cherry tomatoes, halved - ½ cup shredded cheddar cheese - ¼ cup fresh cilantro, chopped These toppings add color, texture, and a fresh taste to your bowl. For the base of your bowl, choose: - Brown rice - Quinoa Both options provide a hearty foundation for your meal. Quinoa is a great choice if you want more protein. Brown rice gives a nice, nutty flavor. {{ingredient_image_1}} 1. Sauté onion and garlic: Start by heating olive oil in a large skillet over medium heat. Add diced onion and cook for about 3-4 minutes. Stir until the onion is soft and fragrant. Then, add minced garlic and diced red bell pepper. Cook for another 2-3 minutes until the pepper is tender. 2. Cook ground turkey until browned: Now it’s time to add 1 pound of ground turkey. Break it apart with a spatula as it cooks. Stir the turkey until it turns brown, which takes about 5-7 minutes. Make sure to cook it well for a safe and tasty meal. 1. Mix in black beans, corn, and spices: Once the turkey is browned, stir in 1 can of rinsed and drained black beans and 1 cup of corn. Add 1 teaspoon each of ground cumin, chili powder, and paprika. Season with salt and pepper to taste. Cook everything together for about 3-4 minutes. This step makes the flavors blend nicely. 2. Layering the bowl with base and toppings: For serving, take 2 cups of cooked brown rice or quinoa as the base in each bowl. Then, add the turkey mixture on top. Finish off with sliced avocado, halved cherry tomatoes, shredded cheddar cheese, and chopped cilantro for a colorful and tasty meal. 1. Ideal presentation tips: To make your taco bowl look great, layer the ingredients carefully. Use bright colors from the veggies and toppings. This makes the meal inviting. 2. Best practices for serving with lime: Don’t forget to serve lime wedges on the side. Squeeze fresh lime juice over the bowl just before eating. This adds a zesty flavor that brightens up the dish. To speed up prep time, gather all your ingredients first. Chop the onion, garlic, and bell pepper before you start cooking. This way, you can work fast and keep the flow going. Use a sharp knife for quick cuts. For the ideal skillet temperature, heat your olive oil over medium heat. This allows the onion to soften without burning. A hot skillet helps the turkey brown nicely, which adds flavor. For a flavor boost, try adding spices like oregano or cayenne. Mix in a pinch of salt and pepper for a better taste. You can also marinate the turkey before cooking. A simple mix of lime juice, salt, and cumin will add great flavor. To make your bowl look great, layer the ingredients neatly. Start with the brown rice, then add the turkey mix. Top with avocado slices and cherry tomatoes. Finally, sprinkle cheese and cilantro on top. Drizzle fresh lime juice over the bowl before serving. This adds a zesty kick and brightens the dish. A colorful, well-presented meal makes each bite more enjoyable. Pro Tips Use Lean Turkey: Opt for lean ground turkey to reduce fat content while still enjoying a hearty meal. Add More Veggies: Feel free to include additional vegetables like zucchini or spinach for extra nutrients and color. Customize the Spice Level: Adjust the amount of chili powder and cumin according to your taste preferences for a milder or spicier dish. Make Ahead: Prepare the turkey mixture in advance and store it in the refrigerator for easy assembly on busy nights. {{image_2}} For a low-carb meal, try using lettuce wraps instead of rice. Just take large lettuce leaves and fill them with the turkey mix. This gives you a fresh crunch and cuts carbs. You can also swap brown rice for cauliflower rice. Cauliflower rice is light and still adds a nice texture to your bowl. If you want a vegetarian option, use plant-based ground meat. This works well and keeps the flavor. You can also try other protein options like lentils or chickpeas. These choices add fiber and protein, making your meal hearty. To add some heat, consider adding hot sauces or salsa on top. This gives your bowl a spicy kick. You can also change up the spices. Try using taco seasoning or smoked paprika for a different flavor. Each change can bring a new taste to your turkey taco bowl! To store leftovers of your turkey taco bowl, let it cool first. Place the food in an airtight container. This keeps it fresh and tasty. You can store it in the fridge for up to three days. If you want to enjoy it later, keep it sealed well. When reheating, make sure it’s hot all the way through. You can freeze your turkey taco bowl, too. Start by storing each part separately. Put the turkey mix in one container and the rice or quinoa in another. Use freezer bags for veggies and toppings. This method helps keep the flavors intact. You can freeze these items for up to three months. When it’s time to eat, take them out of the freezer. Let them thaw in the fridge overnight. To reheat, warm the turkey mix in a skillet. Heat the rice or quinoa in the microwave or on the stove. Enjoy your meal just as fresh as the first time! You can use other meats or plant-based options. Here are some ideas: - Ground chicken: A leaner option, similar in texture. - Ground beef: Adds rich flavor but is higher in fat. - Ground pork: Offers a unique taste and moisture. - Tofu: Crumbled tofu can mimic turkey’s texture. - Lentils: Cooked lentils provide protein and fiber. These options work well in the turkey taco bowl. Choose what you like best! This turkey taco bowl recipe serves four people. If you need more, simply double the ingredients. For fewer servings, cut the recipe in half. It’s easy to adjust based on your needs! Yes, you can prepare the turkey taco bowl in advance. Here are some tips: - Cook the turkey mixture: Make it a day ahead and store it in the fridge. - Prep the toppings: Slice avocado and chop cilantro just before serving to keep them fresh. - Assemble before serving: Layer everything in bowls right before you eat. This keeps the rice warm and the toppings crisp. Meal prepping helps save time and makes for quick, healthy meals! You now know how to make a delicious turkey taco bowl. We covered the main ingredients like ground turkey and fresh veggies, plus tasty toppings. I shared steps for preparation and ways to make it look great. With quick tips and variations, you can change this dish to fit your needs. Enjoy experimenting with flavors and storage methods for easy meals. Get cooking and make this your new favorite!

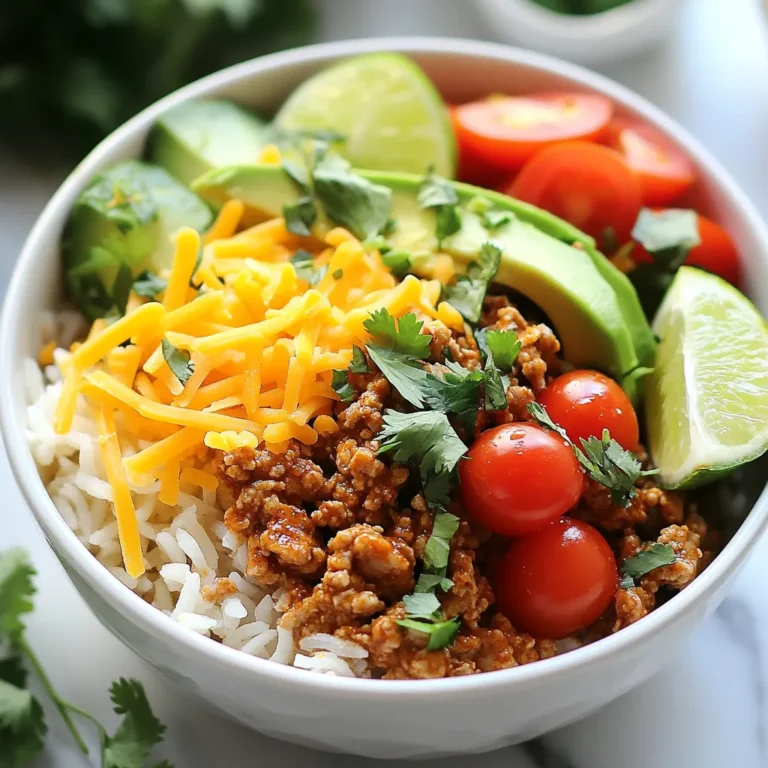
Savory Turkey Taco Bowl Flavorful and Healthy Meal

- 1 lb Italian sausage (mild or spicy, your choice) - 4 medium-sized potatoes, sliced thinly (Yukon Gold or Russet work well) - 1 medium onion, chopped - 3 cloves garlic, minced - 2 cups kale, chopped (stems removed) For Zuppa Toscana, the main ingredients create a warm and tasty soup. The Italian sausage gives it great flavor. You can choose mild or spicy sausage based on your taste. Potatoes add heartiness, while onion and garlic bring depth. Kale adds a pop of color and nutrition. - 6 cups chicken broth Chicken broth is key for this soup. It forms the base and adds richness. Using a good-quality broth makes a big difference. You can also use homemade broth if you prefer. It will give your soup a fresh taste that’s hard to beat. - 1 cup heavy cream or coconut cream for a dairy-free option Heavy cream makes the soup rich and smooth. It adds a lovely creaminess that everyone enjoys. If you want a dairy-free option, try coconut cream. It still gives a rich texture, but with a hint of sweetness. Both options work well, so choose what fits your needs. {{ingredient_image_1}} Start by heating 2 tablespoons of olive oil in a large pot over medium heat. Once hot, add 1 chopped onion. Sauté until it turns translucent, which takes about 3 to 4 minutes. Next, add 3 minced garlic cloves. Stir for another minute until the garlic smells great. This blend gives your soup a warm base. Now, take 1 pound of Italian sausage. Remove the casings and crumble the sausage into the pot. Use a wooden spoon to break it apart. Cook it until it's browned and fully cooked, about 5 to 7 minutes. This step adds a rich flavor to your soup. Once the sausage is ready, add 4 thinly sliced potatoes and 6 cups of chicken broth. Raise the heat to bring the pot to a boil. Then, lower the heat to let it simmer for 15 to 20 minutes. You want the potatoes to be tender. After that, stir in 2 cups of chopped kale, 1 cup of heavy cream (or coconut cream), 1 teaspoon of oregano, and red pepper flakes if you want some spice. Season with salt and pepper to taste. Let it simmer for another 5 minutes until the kale wilts. Your soup is now ready to enjoy! To make your Zuppa Toscana even better, adjust the seasonings. I love adding more garlic for a bold taste. You can also mix in fresh herbs like thyme or basil. If you like heat, add more red pepper flakes. Taste your soup while cooking. This lets you find the right balance of salt and pepper. Small changes can make a big difference. For the right consistency, keep an eye on the potatoes. Slice them thinly so they cook fast and become creamy. Stir the soup often to prevent sticking. When you add the kale, let it wilt but stay bright green. This keeps the soup fresh and tasty. If the soup is too thick, add more chicken broth or cream. Prep can be quick with a few easy tricks. Chop the onion and garlic ahead of time. You can even slice the potatoes the night before. Store them in water to stop browning. Use pre-washed kale to save time. If you have a busy day, make the soup in a slow cooker. Just set it and forget it! Pro Tips Use Fresh Ingredients: Always opt for fresh vegetables and herbs to enhance the flavor of your zuppa. Fresh kale and high-quality sausage can make a significant difference. Adjust the Creaminess: If you prefer a lighter soup, reduce the amount of cream or use a dairy-free alternative like coconut cream. You can always add more later for richness. Customize the Spice Level: Feel free to adjust the red pepper flakes according to your spice tolerance. You can also experiment with adding a splash of hot sauce for an extra kick! Perfect Potato Texture: For best results, slice the potatoes uniformly to ensure they cook evenly. Yukon Golds provide a creamy texture, while Russets are more starchy. {{image_2}} You can change up the key ingredients in Zuppa Toscana to suit your taste. For the sausage, try ground turkey or chicken. These options provide a leaner choice without losing flavor. If you're looking for a plant-based option, use crumbled tempeh or lentils. For the cream, heavy cream gives richness, but coconut cream is a great dairy-free swap. It adds creaminess and a subtle sweetness. To make a meat-free Zuppa Toscana, omit the sausage and add more veggies. Use mushrooms for a savory taste. You can also add lentils for protein and texture. Replace chicken broth with vegetable broth for a vegan option. Adding extra spices, like smoked paprika, can enhance the flavor profile. This way, you still enjoy a hearty soup without the meat. You can make this soup even heartier by adding extras. Beans, like cannellini or chickpeas, add protein and fiber. Different greens, such as spinach or Swiss chard, complement the kale well. Try adding carrots for a touch of sweetness and color. For a unique twist, toss in some corn or bell peppers. These add-ins not only boost nutrition but also enhance the flavor and texture. To keep your Zuppa Toscana fresh, store leftovers in an airtight container. Let the soup cool down first. This prevents steam from building up, which can lead to sogginess. You can keep it in the fridge for up to three days. If you want to save it longer, consider freezing it instead. When it’s time to enjoy leftovers, reheat the soup gently. Use a pot on the stove over low heat. Stir often to stop it from sticking. You can also use the microwave. Just heat in short bursts, stirring in between. This helps warm it evenly. Avoid boiling the soup, as it can change the texture. To freeze Zuppa Toscana, place it in a freezer-safe container. Leave some space at the top for expansion. This soup can last up to three months in the freezer. To thaw, move it to the fridge overnight. You can also use a microwave for quicker thawing. After thawing, reheat as mentioned above. Enjoy your cozy soup even on cold days! Zuppa Toscana is a tasty Italian soup. It hails from the Tuscany region. This soup combines sausage, potatoes, and kale. It’s warm and hearty, perfect for chilly days. The dish showcases the comfort of home cooking. Many families enjoy it as a cozy meal. Yes, you can make Zuppa Toscana dairy-free. Just swap heavy cream for coconut cream. This gives the soup a creamy texture without dairy. You can also use almond milk or oat milk for a lighter option. Adjust the flavors to keep it rich and satisfying. Zuppa Toscana can have a bit of spice. The red pepper flakes add heat. You can control the spice level by using less or more. If you prefer no heat, skip the flakes altogether. The soup remains hearty and delicious without them. This post covered all you need to make Zuppa Toscana. You learned about key ingredients like sausage, veggies, and broth options. We discussed cooking steps, tips, and even variations for your taste. You can store leftovers and reheat them with ease. In conclusion, Zuppa Toscana is simple to make and enjoy. You can customize it with your favorite flavors. Try different cream and veggie options for variety. Whether for a cozy dinner or meal prep, this soup fits every need. Enjoy making it your own!

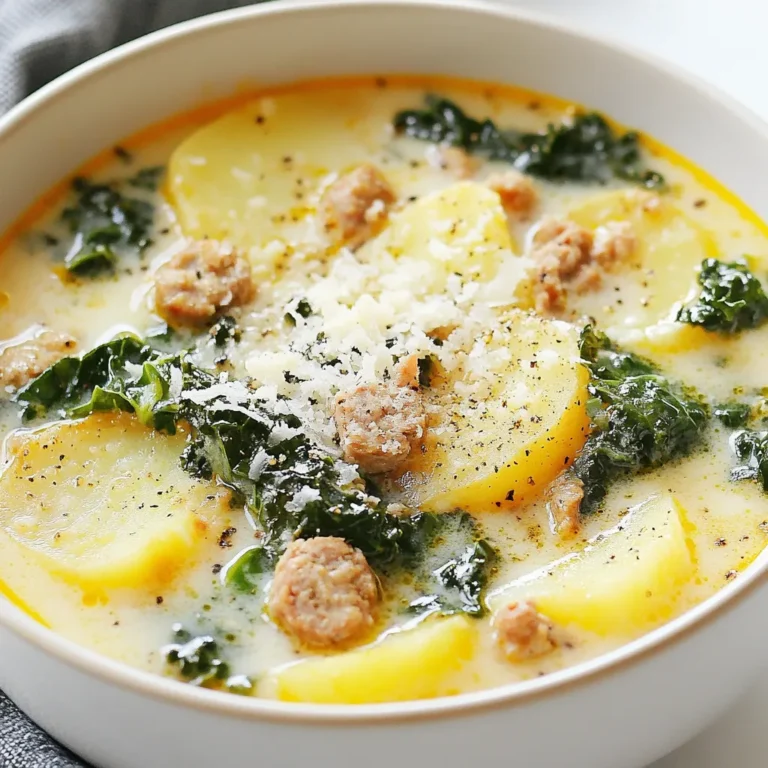
Italian Comfort Zuppa Toscana Hearty and Simple Recipe

For this recipe, you need 2 cups of fresh strawberries. Make sure they are hulled and sliced. Fresh strawberries bring sweetness and a bright flavor to the dish. They also add a beautiful color. The dry ingredients include: - 2 cups all-purpose flour - 1 tablespoon baking powder - 1/2 teaspoon salt These ingredients form the base of the shortcake. The flour gives structure, while baking powder helps it rise. Salt enhances the sweetness of the cake. For the wet ingredients, gather: - 1/4 cup unsalted butter, chilled and cubed - 3/4 cup heavy cream (plus extra for topping) - 1 teaspoon vanilla extract The butter adds richness and flavor. Heavy cream makes the dough tender and moist. Vanilla extract elevates the taste, bringing warmth to every bite. {{ingredient_image_1}} Start by hulling and slicing the fresh strawberries. Use about 2 cups for this recipe. Place the sliced strawberries in a medium bowl. Add 1/4 cup of granulated sugar to the bowl. Gently toss the strawberries and sugar together. This helps to release the juices from the strawberries. Let them sit for about 30 minutes. This process is called maceration. It makes the strawberries sweet and juicy. Preheat your oven to 425°F (220°C). Line a baking sheet with parchment paper. In a large bowl, mix together 2 cups of all-purpose flour, 1 tablespoon of baking powder, and 1/2 teaspoon of salt. Next, add 1/4 cup of chilled and cubed unsalted butter. Use your fingers or a pastry cutter to blend until it looks like coarse crumbs. Pour in 3/4 cup of heavy cream and 1 teaspoon of vanilla extract. Stir gently until the dough just comes together. Turn the dough onto a floured surface. Knead it a few times until it forms a soft ball. Pat it into a rectangle about 1-inch thick. Use a round cutter to cut out shortcake rounds. Place them on the prepared baking sheet. Bake the shortcakes in your preheated oven for 12-15 minutes. They should turn golden brown. Once baked, remove them from the oven and let them cool slightly. Slice each shortcake in half horizontally. Take the bottom half and layer it with some of the macerated strawberries along with their juices. Add a dollop of whipped cream on top. Place the top half of the shortcake over the cream and strawberries. You can add more strawberries and whipped cream if desired. Before serving, dust the top with powdered sugar. Enjoy your classic strawberry shortcake! The right temperature is key for great shortcakes. Always start with cold butter. This keeps the shortcakes flaky. Use chilled heavy cream too. It helps form soft peaks when whipped. Preheat your oven to 425°F (220°C). This hot oven gives the shortcakes a nice rise. Bake until they turn golden brown, about 12 to 15 minutes. Whipping cream is a real treat in this recipe. To get fluffy cream, chill your bowl and beaters first. Cold tools help the cream whip faster. Pour in the heavy cream and beat on medium speed. Stop when soft peaks form. You want it airy, not too stiff. Add a touch of vanilla for flavor. Sweeten with powdered sugar if you like. Presentation makes your dish shine. Serve each shortcake on a plate. Cut them in half and layer with strawberries and cream. Add more strawberries on top for a pop of color. Dust with powdered sugar for a fancy touch. You can also drizzle some heavy cream around the plate. This adds a nice flair and looks great! Pro Tips Use Fresh Strawberries: For the best flavor and texture, always opt for ripe, in-season strawberries. They will offer natural sweetness and vibrant color to your shortcake. Chill Your Ingredients: Keeping your butter and heavy cream cold will help create a flaky texture in your shortcakes. This is key to achieving that light and airy bite. Don't Overmix the Dough: When combining the wet and dry ingredients, mix just until combined. Overmixing can lead to tough shortcakes, so handle the dough gently. Layering is Key: For the perfect presentation, layer your shortcake with strawberries and whipped cream evenly. This ensures every bite is balanced and delicious! {{image_2}} You can swap strawberries for other fruits. Try blueberries, raspberries, or peaches. Each fruit brings a unique flavor. Blueberries add a nice burst of sweetness. Raspberries offer a tart contrast. Peaches bring a juicy, fragrant taste. Mix and match for fun combinations. You can even create a mixed berry shortcake for extra delight. For a gluten-free version, use a gluten-free flour blend. Many brands offer one-to-one substitutes. Make sure it includes xanthan gum for structure. Follow the same steps in the recipe. The texture may differ a bit, but the taste will still please. This option helps everyone enjoy the treat. Want to add more flavor? Consider mixing in citrus zest, like lemon or orange. A teaspoon of almond extract can also enhance taste. You can sprinkle in some cinnamon or nutmeg for warmth. These small tweaks can make your shortcake special. Experiment with flavors to find your favorite combination. To keep your strawberry shortcake fresh, wrap it tightly in plastic wrap. Store it in the fridge for up to two days. If you have leftover strawberries, store those in a separate container. This keeps the shortcake from getting soggy. If you want to enjoy warm shortcakes, preheat your oven to 350°F (175°C). Place the shortcakes on a baking sheet. Heat them for about 5 to 10 minutes. This makes them soft and nice without drying them out. You can freeze shortcakes for later use. First, let them cool completely. Wrap each shortcake in plastic wrap and then in foil. Store them in the freezer for up to three months. When ready to eat, thaw them in the fridge overnight and reheat as mentioned above. You can make the shortcake dough and freeze it. Shape the dough into rounds. Wrap each round tightly in plastic wrap. Place them in a freezer bag. When you want to bake, simply thaw them overnight in the fridge. Bake as usual, and they will taste fresh! Yes, you can use frozen strawberries. They will not be as firm. Thaw them and drain excess liquid. Mix them with sugar as you would with fresh strawberries. This will still give you a tasty treat. You can use yogurt or cool whip as a substitute. Both work well in this recipe. Greek yogurt adds protein and tang. Cool whip gives a light, sweet flavor. Choose what you like best for your dessert! In this blog post, we explored how to make delicious shortcake with fresh strawberries. We covered key ingredients, step-by-step instructions, and helpful tips for perfect results. We also shared variations like gluten-free options and storage tips. Remember, shortcake is adaptable and fun to make! Use these insights to create your favorite version. Enjoy your baking and treat yourself with a delightful dessert!

Classic Strawberry Shortcake Delightful and Easy Recipe

- 1 pound boneless, skinless chicken breasts, cut into 1-inch pieces - 1 tablespoon olive oil - 1 teaspoon garlic powder - 1 teaspoon paprika - 1 teaspoon onion powder - 1 teaspoon dried oregano - Salt and pepper, to taste - 1 cup cherry tomatoes, halved - 1 bell pepper, sliced (any color) - 1 red onion, sliced - 4 whole wheat pita breads - ½ cup ranch dressing - Fresh parsley, chopped for garnish The main ingredients in this recipe create a tasty meal. The chicken provides protein and a satisfying texture. The spices like garlic powder and paprika add warmth and flavor. The fresh vegetables, such as cherry tomatoes and bell peppers, bring brightness and crunch. Whole wheat pita breads give a hearty base for the filling. Finally, ranch dressing ties everything together with creaminess. - Baking Sheet - Mixing Bowl - Measuring Spoons You need some simple tools for this recipe. A baking sheet helps cook the chicken and veggies evenly. A mixing bowl is needed to combine the marinade and coat the chicken. Measuring spoons ensure you use the right amount of spices for perfect flavor. With these tools, you can create a great meal with ease! {{ingredient_image_1}} Mixing the spices Start by gathering your spices. In a large bowl, mix 1 tablespoon of olive oil, 1 teaspoon of garlic powder, 1 teaspoon of paprika, 1 teaspoon of onion powder, and 1 teaspoon of dried oregano. Add salt and pepper to taste. This blend gives the chicken a rich flavor. Marinating the chicken Cut 1 pound of boneless, skinless chicken breasts into 1-inch pieces. Place them in the bowl with your spice mix. Toss the chicken well until every piece is coated. Let it sit for a few minutes. This helps the flavors soak in. Arrangement on the baking sheet Preheat your oven to 425°F (220°C). Take a baking sheet and spread the marinated chicken pieces evenly. Add 1 cup of halved cherry tomatoes, 1 sliced bell pepper, and 1 sliced red onion. Make sure everything lays flat. This helps it cook evenly. Cooking time and temperature Bake the pan in the preheated oven for 20-25 minutes. Stir the mixture halfway through. This ensures all pieces cook well. You’ll know it’s done when the chicken is fully cooked and the veggies are tender. Warming the pita breads While the chicken and veggies bake, warm 4 whole wheat pita breads. You can use a toaster or microwave for a few seconds. Warm pitas are soft and easy to fill. Adding the chicken and vegetables Once out of the oven, let the chicken and veggies cool for a couple of minutes. Open each pita and fill it with a generous amount of the chicken and vegetable mixture. Drizzle with ranch dressing and sprinkle fresh chopped parsley on top. Enjoy every bite of your savory delight! For the best flavor, marinate your chicken for at least 30 minutes. If you have time, a few hours works even better. The longer it sits, the richer the taste. You can also change the spices to match your taste. If you like heat, add some cayenne pepper or chili powder. If you prefer milder flavors, skip the heat. Set your oven to 425°F (220°C) for perfect baking. This heat crisps the chicken and softens the veggies. Place everything in a single layer on the baking sheet. This step helps everything cook evenly. Stir the mixture halfway through baking. This ensures even cooking and browning for all the ingredients. These pitas pair well with a simple side salad or some crunchy carrot sticks. You can also add a side of Greek yogurt for a cool dip. For garnishing, sprinkle some fresh parsley on top for color and flavor. A squeeze of lemon adds brightness, too. Enjoy your meal with friends or family for a delightful experience! Pro Tips Use Fresh Herbs: Fresh parsley can elevate the flavors; consider adding other herbs like cilantro or dill for extra freshness. Marinate Longer: For deeper flavor, let the chicken marinate for at least 30 minutes or even overnight in the refrigerator. Customize Vegetables: You can swap out the cherry tomatoes, bell pepper, and red onion for other seasonal vegetables like zucchini or asparagus. Serve with Sides: Pair these pitas with a simple side salad or roasted potatoes for a complete meal. {{image_2}} You can switch the chicken for turkey or tofu. Turkey offers a lean option. It keeps the dish light and tasty. Tofu is great for a plant-based meal. Use firm tofu for the best texture. Marinate it just like you would chicken. This adds flavor and helps it absorb the spices. Feel free to add more veggies to your pitas. Zucchini, mushrooms, or broccoli work well. You can even toss in some spinach for added green. Just remember to cut them small. This way, they cook well with the chicken and save time. Try different dressings instead of ranch. A yogurt-based sauce can add creaminess without extra calories. You can also use hummus for a Mediterranean twist. Don't shy away from experimenting with spices! Add cumin or chili powder for a kick. These small changes can make a big difference in taste. To keep your sheet pan chicken pitas fresh, store them properly. First, let the leftovers cool down. Then, place them in an airtight container. You can keep them in the fridge for up to three days. If you want to save them longer, freezing is a good option. Wrap each pita separately in plastic wrap or foil. Then, place them in a freezer-safe bag. They can last up to three months in the freezer without losing flavor. Reheating your chicken pitas can be easy. To keep the texture nice, I suggest using the oven. Preheat your oven to 350°F (175°C). Place the pitas on a baking sheet and cover them with foil. Heat for about 10-15 minutes. This method helps keep the pita soft and the chicken juicy. If you're in a hurry, the microwave works too. Place a pita on a microwave-safe plate. Heat it for about 30 seconds to 1 minute. However, be careful; microwaving can make the pita chewy. For the best taste, the oven is always my top choice. Yes, you can use frozen chicken. However, you must thaw it first. To thaw, place the chicken in the fridge overnight. If you're short on time, submerge it in cold water for about an hour. After thawing, cut the chicken into 1-inch pieces. Then, follow the marinade and baking steps as usual. This method keeps your chicken tender and juicy. These chicken pitas pair well with many sides. Consider serving them with a fresh salad. A simple cucumber and tomato salad works great. You can also add crispy sweet potato fries or roasted veggies. For a fun twist, try a side of hummus and pita chips. These options will complete your meal and add different textures. To make these pitas gluten-free, choose gluten-free pita bread. Many brands offer tasty options. Check the label to ensure they are certified gluten-free. You can also serve the chicken and veggies in lettuce wraps. This swap gives you a crunchy, fresh alternative. Just make sure your ranch dressing is gluten-free as well. This blog post covered a tasty sheet pan chicken pita recipe. You learned about the main ingredients, recommended tools, and step-by-step instructions. I shared tips to perfect your marinade and cooking. Variations let you swap proteins and add veggies. Storing leftovers and reheating methods can keep your meal fresh. Cooking can be fun and easy. Enjoy making these pitas and happy cooking!

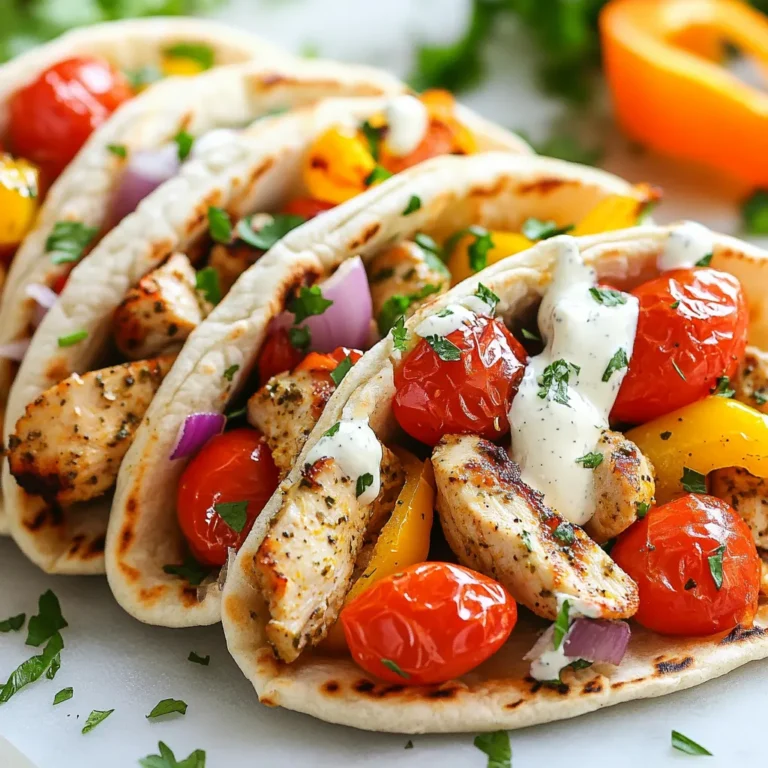
Sheet Pan Chicken Pitas with Ranch Savory Delight

To make a great Philly cheesesteak, gather these key ingredients: - 1 lb ribeye steak, thinly sliced - 1 large onion, thinly sliced - 1 large green bell pepper, sliced - 4 hoagie rolls - 8 slices provolone cheese Ribeye steak is perfect because it is juicy and tender. Thin slices cook fast and absorb flavors well. Onions and bell peppers add sweetness and crunch. Provolone cheese melts nicely, creating the classic cheesesteak experience. You can add more flavor with these optional ingredients: - 2 cloves garlic, minced - Hot sauce, for garnish - Suggested seasonings: Try adding your favorite spices. Black pepper and paprika work well. Garlic gives depth to the dish, while hot sauce adds a spicy kick. Seasonings can enhance the taste and make it your own. Feel free to adjust based on what you enjoy! {{ingredient_image_1}} To start, take 1 pound of ribeye steak and slice it thinly. I like to use a sharp knife for this. Next, place the steak in a bowl. Add salt, pepper, and half of the minced garlic. Mix it well to ensure every piece gets coated. Let this marinate for about 15 minutes. This helps the flavors soak in and makes the steak tasty. While the steak marinates, heat 1 tablespoon of olive oil in a large skillet over medium heat. Add one large onion, thinly sliced, and one green bell pepper, also sliced. Sauté these for about 8 to 10 minutes. The goal is to get them soft and slightly caramelized. This step is important because caramelization adds sweetness and depth to your dish. After that, add the remaining garlic and cook for one more minute. Once done, transfer the veggies to a plate and set them aside. Now, use the same skillet to cook the steak. Add the second tablespoon of olive oil and increase the heat to medium-high. Add the marinated steak to the skillet. Cook for 3 to 4 minutes, stirring occasionally. It is crucial not to overcrowd the pan. This gives the steak a nice sear. When the steak is browned, return the sautéed vegetables to the skillet. Mix all ingredients together and cook for another 1 to 2 minutes to heat everything through. Next, reduce the heat to low. Divide the steak and vegetable mixture into four portions in the skillet. Place 2 slices of provolone cheese on top of each portion. Cover the skillet for 2 to 3 minutes. This helps the cheese melt nicely. Once melted, you are ready to assemble your sandwiches. To get the best sear, start with a hot skillet. Heat your pan over medium-high heat. This helps lock in the juices and gives flavor. Do not overcrowd the pan. If you add too much steak at once, it steams instead of sears. Cook in batches if needed. This way, each piece gets that nice brown crust. Cover the skillet when melting cheese. This traps heat and helps the cheese melt evenly. Place two slices of provolone on each portion of steak. If you want to switch things up, try different cheeses like mozzarella or cheddar. Each cheese brings a unique flavor to your sandwich. For an authentic look, wrap your sandwiches in parchment paper. This gives a casual street-food vibe. Serve them with crispy fries or a fresh salad on the side. A little garnish of chopped parsley can add color and freshness. This makes your meal feel complete and appealing. Pro Tips Slice the Steak Thinly: Ensure the ribeye is sliced as thinly as possible to allow it to cook quickly and remain tender. Use High Heat for Searing: Cooking the steak on high heat helps achieve that beautiful caramelization and enhances the flavor. Experiment with Cheese: While provolone is traditional, feel free to mix in mozzarella or cheddar for a different flavor profile. Rest the Sandwiches: Let the assembled sandwiches rest for a minute before serving to allow the cheese to set and prevent sogginess. {{image_2}} Philly cheesesteak sandwiches change from place to place. Different regions use different types of cheese. Provolone cheese rules in Philly, but some places use Cheez Whiz or American cheese. Each cheese gives its own taste and texture. You can also add fun ingredients. Mushrooms and different peppers are popular choices. Some people love spicy banana peppers or sweet bell peppers. Others like to add sautéed mushrooms for a rich flavor. These add-ins make each sandwich unique. If you want a lighter option, choose leaner cuts of meat. Sirloin or chicken can work well. These choices reduce fat but still taste great. You can also try low-carb wraps instead of hoagie rolls. Lettuce wraps can make a fresh and crunchy base. For plant-based eaters, there are tasty swaps. Use mushrooms or seitan instead of steak. These options give a meaty bite. For cheese, try vegan cheese or cashew cream. These replacements melt nicely and taste good. You can also add beans or lentils for protein. With these swaps, everyone can enjoy a delicious cheesesteak! To store leftovers, place them in an airtight container. Make sure to cool the sandwich first. You can refrigerate it for up to three days. If you want to keep it fresh longer, consider freezing. Reheat the Philly cheesesteak in a skillet over low heat. This keeps the bread crispy and the filling warm. Cover the skillet to help the cheese melt. You can also use a microwave, but it may make the bread soggy. To avoid this, heat in short bursts, checking often. Yes, you can freeze a Philly cheesesteak. First, let it cool completely. Wrap each sandwich tightly in plastic wrap, then place them in a freezer bag. To thaw, move it to the fridge overnight. For best results, reheat in a skillet after thawing. This keeps the texture and flavor intact. The Philly cheesesteak started in the 1930s in Philadelphia. It came from a hot dog vendor. Pat Olivieri, the vendor, put beef on bread. A cab driver loved it. Soon, others wanted to try it. Pat opened a shop, and the cheesesteak grew famous. It became a part of Philly culture and pride. People now enjoy it worldwide, but it still holds roots in its hometown. Yes, you can make this recipe ahead of time. Cook the steak and veggies, then store them. Place them in an airtight container in the fridge. They will stay fresh for up to three days. When you are ready to eat, reheat them in a skillet. Add cheese to melt before serving on hoagie rolls. This makes meal prep easy and fast! If you visit Philadelphia, try Pat's King of Steaks or Geno's Steaks. Both are famous for their classic cheesesteaks. You can also check out Jim's Steaks and Steve's Prince of Steaks. Each place has its style, and you can taste the love in every bite. Don't forget to order with or without onions, depending on your taste! In this blog post, we explored how to make a classic Philly cheesesteak. You learned about essential ingredients like ribeye steak, onions, and provolone cheese. I shared step-by-step instructions for preparing the steak and sautéing vegetables. We discussed tips for perfecting the dish and even variations for different tastes and diets. Remember, whether you're a meat lover or need vegetarian options, there's a cheesesteak for everyone. Enjoy creating this dish that brings friends and family together. Now, roll up your sleeves and get cooking!

Philly Cheesesteak Sandwich Savory and Simple Recipe

To make a tasty pesto chicken flatbread, you need these simple ingredients: - Flatbreads (store-bought or homemade) - Cooked chicken breast - Pesto sauce (store-bought or homemade) - Cherry tomatoes - Mozzarella cheese - Grated Parmesan cheese - Fresh basil leaves - Seasoning (salt and pepper) - Olive oil for drizzling Each ingredient plays a role in this dish. The flatbread serves as the base, providing a soft and crispy texture. The cooked chicken adds protein and flavor, while the pesto sauce gives a fresh herb taste. Cherry tomatoes add sweetness and color, and the cheeses melt beautifully, creating a rich topping. Fresh basil enhances the flavor and adds a pop of green. You can use store-bought ingredients to save time or make your own for a personal touch. This flexibility makes the recipe easy and fun for everyone. You can mix and match flavors to suit your taste, making each flatbread unique. Enjoy the process of gathering these ingredients and preparing a meal that everyone will love! {{ingredient_image_1}} First, set your oven to 400°F (200°C). This temperature helps the cheese melt perfectly. Next, take your flatbreads and place them on a baking sheet. Drizzle a bit of olive oil on each flatbread. Use a brush or your fingers to spread the oil evenly. This step adds flavor and helps the flatbread crisp up. Now it’s time to assemble! Spread the pesto sauce generously over each flatbread. Make sure to cover the base well. In a bowl, mix the shredded chicken with salt and pepper. Then, evenly distribute the chicken on top of the pesto. Next, scatter the halved cherry tomatoes over the chicken. Finally, sprinkle mozzarella cheese on top, followed by the grated Parmesan cheese. Place the baking sheet in the oven and bake for about 12 to 15 minutes. Keep an eye on your flatbreads. They’re ready when the cheese is bubbly and slightly golden. When done, remove them from the oven and let them cool for a couple of minutes. Before serving, top with torn basil leaves for extra flavor. Enjoy your tasty creation! To make the best pesto chicken flatbread, you need to focus on two key areas: cheese melt and pesto amount. - Achieving the right cheese melt: Use fresh mozzarella for a gooey texture. Shred it yourself for better melting. Spread it evenly on top of the chicken and tomatoes. This helps it melt perfectly and form a lovely, golden layer. - Using the perfect amount of pesto: Don’t skimp on the pesto. Spread about 1/4 cup on each flatbread. This gives a strong flavor base. Too little, and your flatbread may taste bland. If you love pesto, add more after baking for a fresh kick. Serving your flatbread well makes it even more inviting. Here’s how to present it beautifully. - Presentation tips for a beautiful serving: Use a wooden board or a large plate. Drizzle some extra pesto over the top. Add torn basil leaves for color. This not only looks nice, but it also enhances flavor. - Suggested side dishes to complement the meal: A simple side salad works great. Try a mix of greens with a light vinaigrette. You can also serve some crunchy carrot sticks or a bowl of olives on the side. These add texture and freshness to your meal. Pro Tips Tip Title: Use Fresh Ingredients: For the best flavor, opt for fresh basil and high-quality mozzarella. Fresh ingredients elevate the dish. Tip Title: Customize Your Toppings: Feel free to add other toppings like olives, red onions, or even arugula for extra flavor and texture. Tip Title: Perfect Baking Time: Keep a close eye on the flatbreads while baking. Remove them when the cheese is bubbly and golden to avoid burning. Tip Title: Serve Immediately: These flatbreads are best enjoyed fresh out of the oven. Serve them right away to appreciate the melted cheese and fresh toppings. {{image_2}} You can easily change the protein in this recipe. Instead of chicken, try turkey or shrimp. Both options will bring great flavor. If you want a vegan or vegetarian flatbread, use chickpeas or tofu instead of chicken. You can also use a plant-based pesto. This swap keeps it fresh and tasty. Add more toppings to make your flatbread exciting. Consider sliced olives, spinach, or artichokes for extra taste. You can sprinkle some red pepper flakes for a little heat. If you want a different sauce, try BBQ or a garlic sauce. These options will change the flavor and give you new ideas to explore. To keep your pesto chicken flatbread fresh, follow these steps: - Let the flatbread cool to room temperature. - Wrap each piece in plastic wrap or foil. - Place it in an airtight container. - Keep it in the fridge for up to three days. If you want to freeze it, here’s what to do: - Wrap the cooled flatbread tightly in plastic wrap. - Place it in a freezer-safe bag or container. - It can stay in the freezer for up to three months. Reheating flatbread is easy, and you want it to taste great. Here are some methods: - Oven: Preheat to 350°F (175°C). Place flatbread on a baking sheet. Heat for about 10 minutes. This keeps it crispy. - Skillet: Heat a non-stick skillet over medium heat. Place the flatbread in the skillet. Cook for about 3-4 minutes on each side. To keep the flatbread crispy: - Avoid the microwave if you can. It makes the flatbread soggy. - If using the skillet, cover it with a lid for even warmth. Enjoy your tasty leftovers! To make great homemade pesto, you need simple ingredients. Here’s what you need: - 2 cups fresh basil leaves - 1/2 cup olive oil - 1/2 cup grated Parmesan cheese - 1/3 cup pine nuts or walnuts - 2 cloves garlic - Salt and pepper to taste Start by adding the basil, nuts, and garlic to a food processor. Pulse until finely chopped. Then, with the processor running, slowly pour in the olive oil until it blends well. Finally, mix in the cheese and season with salt and pepper. This fresh pesto adds a bright flavor to your flatbread. Yes, you can switch up the cheese in your flatbread. If you want, try: - Feta cheese for a tangy twist - Gouda cheese for a smoky flavor - Vegan cheese for a plant-based option Each cheese brings a unique taste, and you can mix them too! Be creative and find what you like best. Absolutely, this pesto chicken flatbread is great for meal prep! Here are some tips: - Prepare the flatbreads in advance and store them in the fridge. - Keep the toppings separate to maintain freshness. - Use airtight containers for storage. You can assemble and bake them when you're ready to eat. This makes it easy to enjoy a tasty meal any day! This blog post covered how to make delicious chicken flatbreads. We discussed the key ingredients, like flatbreads and pesto. I shared step-by-step instructions to guide you through prepping, assembling, and baking. You also learned tips for perfecting the dish and tasty variations to try. Finally, we explored how to store leftovers and reheat them for the best taste. Making chicken flatbreads is simple and fun, allowing you to impress friends or enjoy a tasty meal anytime. Enjoy creating your flatbreads!

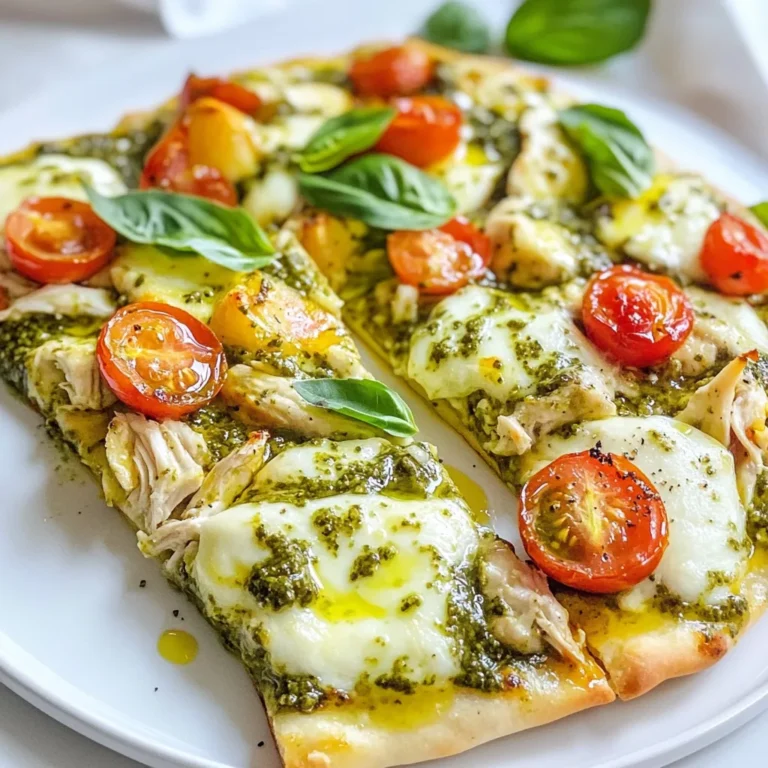
Pesto Chicken Flatbread Simple and Tasty Recipe

PREV 1 … 49 50 51 … 56 NEXT
secrets pice kitchen

explore

DessertsDinnerAppetizersDrinks

Our Policies

  • Cookie Policy
  • Copyright Policy
  • Disclaimer
  • GDPR Policy
  • Terms Of Use
Back to Top
  • About
  • Contact Us
  • Privacy Policy
© 2025 secrets pice kitchen