FREE DINNER EBOOK! Get your copy!
  • Cookie Policy
  • GDPR Policy
  • Disclaimer
  • Terms Of Use
  • Visit my other site: Fun Cookie Recipes
secrets pice kitchen
  • Home
  • Dinner
  • Desserts
  • Drinks
  • Appetizers
  • Contact
  • About
  • Privacy Policy
  • Home
  • Dinner
  • Desserts
  • Drinks
  • Appetizers
  • Contact
  • About
  • Privacy Policy
  • Cookie Policy
  • GDPR Policy
  • Disclaimer
  • Terms Of Use
Visit my other site: Fun Cookie Recipes

HOME / CATEGORIES /

Latest

- 1 medium head of cauliflower - 2 cups shredded cooked chicken - 1 cup buffalo sauce - 1 cup cream cheese - 1 cup shredded cheddar cheese - 1 cup Greek yogurt - 1 teaspoon garlic powder - 1 teaspoon onion powder - Salt and pepper - 2 green onions (for garnish) - Fresh parsley (for garnish) To make Buffalo Chicken Cauliflower Casserole, you need fresh ingredients. First, pick a medium head of cauliflower. This veggie is the base of the dish. You will chop it into florets. Next, use 2 cups of cooked chicken. Shredded chicken works best for mixing. Buffalo sauce adds heat. Use 1 cup but feel free to adjust it. If you like it spicy, add a bit more. Cream cheese gives a creamy texture. You will need 1 cup, softened for easy mixing. Next, grab 1 cup of shredded cheddar cheese. This will top the casserole. It melts beautifully. Greek yogurt adds tang and creaminess, so don’t skip it. Use 1 cup for the best results. For seasoning, add 1 teaspoon of garlic powder and 1 teaspoon of onion powder. These spices enhance the flavor. Don't forget salt and pepper to taste. Finally, for a fresh touch, use two green onions and some fresh parsley to garnish. They add color and flavor to your dish. All these ingredients come together to create a delicious casserole that is sure to please everyone. {{ingredient_image_1}} First, preheat your oven to 350°F (175°C). This step is key for getting a nice, bubbly cheese. Next, grease a 9x13 inch casserole dish. This will help the casserole not stick. In a large pot, bring water to a boil. Add the cauliflower florets and cook for 5-7 minutes. You want them tender but not mushy. Drain the cauliflower and set it aside. In a mixing bowl, combine the cream cheese, Greek yogurt, buffalo sauce, garlic powder, onion powder, salt, and pepper. Whisk these ingredients until the mixture is smooth. This is where the magic starts! After that, add the shredded chicken to the bowl. Mix it well, ensuring the chicken is fully coated with the buffalo sauce mixture. Now, gently fold in the steamed cauliflower. Make sure it's evenly distributed in the mixture. Transfer this to the prepared casserole dish. Spread it out evenly. Finally, top the mixture with shredded cheddar cheese. Bake the casserole in the preheated oven for 25-30 minutes. You'll know it's ready when the cheese is bubbly and slightly golden. Remove it from the oven and let it cool for a few minutes. Garnish with sliced green onions and chopped parsley before serving. Enjoy! To ensure the cauliflower is tender but not mushy, boil it for just 5-7 minutes. This gives it the right softness while keeping some bite. After boiling, drain it well. You want to avoid excess water in the casserole, as it can make it soggy. Adjusting heat levels in the buffalo sauce is easy. If you like it spicy, stick with regular buffalo sauce. For a milder taste, use a mix of buffalo sauce and Greek yogurt. This way, you can enjoy the flavor without the intense heat. Pairing sides with your casserole can elevate the meal. A fresh green salad works great. It adds crunch and balances the richness of the casserole. You can also serve it with whole-grain bread. This helps soak up the delicious sauce. For garnishes, sliced green onions add a nice crunch and color. Chopped parsley brings freshness and a pop of green. You can also sprinkle some extra cheddar on top right before serving for extra cheese lovers! Pro Tips Choose the Right Cauliflower: Opt for a fresh, firm head of cauliflower without brown spots to ensure the best texture and flavor. Adjust the Heat: If you prefer a milder dish, start with less buffalo sauce and add more gradually until you reach your desired spice level. Use Leftover Chicken: This recipe is a great way to use up leftover roasted or rotisserie chicken, making it quick and convenient. Cheese Variations: Feel free to mix different types of cheese, like Monterey Jack or pepper jack, for added flavor and creaminess. {{image_2}} You can make this dish lighter without losing flavor. Here are some options: - Low-fat cream cheese or Greek yogurt: Swap regular cream cheese for low-fat. This change cuts calories and keeps it creamy. You can also use Greek yogurt instead of cream cheese. It adds protein and tang. - Substituting chicken: For a leaner meal, use turkey instead of chicken. If you want a plant-based option, try shredded jackfruit or chickpeas. Both options work well in this dish. Want to make your casserole unique? Here are some fun ideas: - Experimenting with different cheese varieties: While cheddar is great, feel free to mix in mozzarella, pepper jack, or gouda. Each cheese brings its own taste. - Adding vegetables: Toss in some bell peppers or spinach. They add color and nutrients. You can add them right into the mix before baking. Each bite will be even more delicious! To keep your Buffalo Chicken Cauliflower Casserole fresh, store it in an airtight container. Make sure to let it cool down first. Place it in the fridge within two hours of cooking. This helps keep harmful bacteria away. Your casserole will last for about 3 to 4 days in the fridge. When you’re ready to eat, just reheat it in the oven or microwave. If you want to save some for later, freezing is a great option. First, let the casserole cool completely. Then, cut it into serving-sized pieces. Wrap each piece tightly in plastic wrap. Place the wrapped pieces in a freezer-safe bag or container. This will help prevent freezer burn. Your casserole can stay good for up to 3 months in the freezer. When you're ready to enjoy it again, take it out of the freezer. Let it thaw in the fridge overnight. For reheating, you can pop it in the oven at 350°F (175°C) for about 20-25 minutes. This will warm it through and keep the cheese nice and melty. Enjoy your delicious meal even after a few weeks! To make your Buffalo Chicken Cauliflower Casserole spicier, you can add more buffalo sauce. Start by mixing in an extra tablespoon or two. You can also add some hot sauce for a kick. Try using your favorite brand to adjust the heat to your liking. If you love heat, don't hold back! Yes, you can make this casserole ahead of time. To do this, prepare it as normal but do not bake it. Once you have mixed everything, cover the dish tightly with plastic wrap or foil. You can store it in the fridge for up to 24 hours. When you are ready to bake, simply remove the cover and bake as instructed. If you prefer not to use cauliflower, you have other options. Broccoli works well as a substitute. It has a similar texture and flavor. You can also try using a mix of vegetables like zucchini or bell peppers. These will give your casserole a unique twist while keeping it tasty! Buffalo Chicken Cauliflower Casserole combines tasty spices and creamy cheese for a delicious dish. You learned how to prep the ingredients, bake, and add your favorite garnishes. We also explored ways to customize this recipe for your taste and storage tips for leftovers. Enjoy this casserole as a fun meal any day. Try new flavors and adjust it to what you like. With these steps, you can make a quick and yummy dish everyone will love. Cook with confidence and have fun in the kitchen!

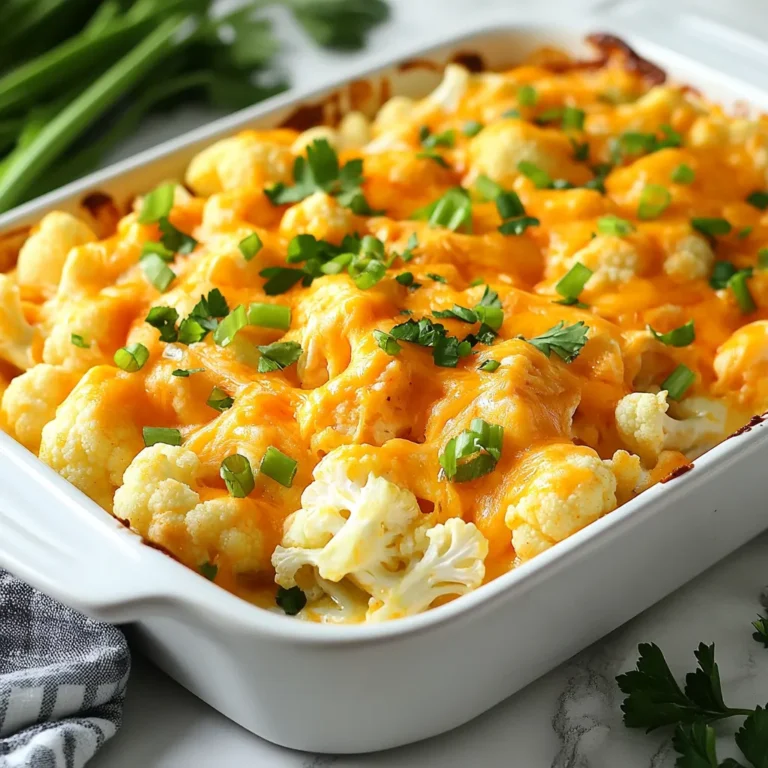
Buffalo Chicken Cauliflower Casserole Easy and Delicious

To make a Taco Zucchini Skillet, gather these fresh ingredients. - 3 medium zucchinis, diced - 1 bell pepper (any color), chopped - 1 small red onion, diced - 1 can (15 oz) black beans, rinsed and drained - 1 cup corn kernels (fresh or frozen) - 2 tablespoons olive oil - 2 tablespoons taco seasoning - 1 teaspoon garlic powder - Salt and pepper to taste - 1 cup cherry tomatoes, halved - 1 avocado, diced - Fresh cilantro, chopped (for garnish) - Lime wedges (for serving) This dish serves four people and is packed with flavor. Each serving contains a good mix of protein, fiber, and vitamins. The black beans and corn add protein, while the zucchinis and bell pepper bring vital nutrients. If you want to make it even tastier, try adding toppings like shredded cheese or a dollop of sour cream. These can enhance the dish’s creaminess and flavor. Enjoy this colorful meal that is not only healthy but also a feast for the eyes! {{ingredient_image_1}} To start, gather your tools. You need a sharp knife and a cutting board. First, wash the zucchinis. Dice them into small pieces, about half an inch each. Next, chop the bell pepper. You can use any color you like. Then, dice the red onion. This adds great flavor to the dish. Once your veggies are ready, it’s time to heat things up. Grab a large skillet and set it on medium heat. Pour in two tablespoons of olive oil. Let it warm for a minute. Now, add the diced red onion and bell pepper to the skillet. Sauté these for about 3-4 minutes. They should start to soften and smell great. After your onion and pepper are cooked, it’s time for the zucchinis. Add the diced zucchinis to the skillet. Cook them for 5-7 minutes. Stir them often. This helps them cook evenly and not stick to the pan. Now, it's time to add the fun stuff! Pour in the rinsed black beans and corn. Sprinkle in the taco seasoning and garlic powder. Don't forget to add salt and pepper to taste. Mix everything well. Ensure all the veggies and beans are coated with the spices. Cook this mix for another 3-4 minutes. This will bring all those flavors together. Next, it's time for the cherry tomatoes. Gently fold them into the skillet. Allow them to warm for just a minute. This keeps them fresh and juicy. Once everything is heated through, remove the skillet from the heat. Now for the best part—serving! Grab a plate and spoon the taco zucchini mix onto it. Top it with diced avocado and fresh cilantro. This adds color and flavor. For an extra kick, add lime wedges on the side. You can serve this dish on its own or with tortilla chips for crunch. It also pairs well with rice or a fresh salad. Enjoy your colorful, tasty meal! To get the best texture for zucchini, choose fresh ones. Look for firm zucchinis with shiny skin. Cut them into small, even pieces. This helps them cook evenly. Cook them until they are tender but not mushy. This takes about 5-7 minutes in the skillet. If you want to adjust the spice level, add more or less taco seasoning. For a milder dish, use half the amount. You can also add a pinch of sugar. It helps balance out the heat. If you love spice, add chopped jalapeños or a dash of hot sauce. If you need alternatives for black beans, try kidney beans or pinto beans. Both work well in this dish. For corn, you can use frozen peas or diced bell pepper. They add a nice texture and flavor, too. For non-vegan options, consider adding cooked ground beef or shredded chicken. These meats can add heartiness to your skillet. You can also sprinkle some cheese on top. Cheddar or Monterey Jack melts nicely and adds flavor. Pro Tips Use Fresh Ingredients: For the best flavor and texture, use fresh zucchinis and bell peppers. If using frozen corn, make sure to thaw it before adding it to the skillet. Customize Your Spice Level: Adjust the amount of taco seasoning based on your heat preference. You can also add diced jalapeños for an extra kick! Make It a Meal: To make this skillet dish more filling, serve it over cooked quinoa or brown rice. It adds protein and fiber to your meal. Store Leftovers Properly: Store any leftovers in an airtight container in the refrigerator for up to 3 days. Reheat on the stove for the best texture. {{image_2}} You can easily change the flavor of your Taco Zucchini Skillet. Try adding different spices. Cumin or chili powder adds depth. You can also use salsa instead of taco seasoning for a fresh twist. For a smoky flavor, try smoked paprika. You can also mix in extra veggies. Spinach, kale, or mushrooms blend well. Add chopped carrots for a sweet crunch. Bell peppers can be swapped for different colors or types. Each change brings a new taste to this dish. To make this dish gluten-free, check your taco seasoning. Some brands may have gluten. Use gluten-free blends if needed. This recipe is also easy to make vegan. Just keep it as is! The black beans and veggies provide plenty of protein. If you want to cut calories, reduce the olive oil to one tablespoon. You can also skip the avocado or use less. Replace corn with extra zucchini for a lighter meal. These small changes keep the dish tasty while lowering calories. To store leftovers, let the Taco Zucchini Skillet cool. Place it in an airtight container. This helps keep it fresh and tasty. You can store it in the fridge for up to three days. Make sure to label the container with the date. This way, you’ll know when to eat it. To freeze the dish, let it cool completely. Then, scoop it into freezer-safe bags or containers. Remove as much air as possible before sealing. This helps prevent freezer burn. You can freeze it for up to three months. When you want to eat it, thaw it in the fridge overnight. Reheat in a skillet over medium heat. Stir often to warm it evenly. You can also microwave it, but be sure to stir it halfway through. Enjoy your tasty Taco Zucchini Skillet, even after freezing! Can I add meat to the Taco Zucchini Skillet? Yes, adding meat is easy! Ground beef, turkey, or chicken works well. Brown the meat first. Cook it in the skillet before adding the veggies. You can use the same taco seasoning for flavor. How do I make this dish spicier? To heat things up, add jalapeños or red pepper flakes. You can also use spicy taco seasoning. If you want more heat, add hot sauce when serving. Adjust the spice to fit your taste. What can I serve with this meal? This dish pairs well with rice or tortillas. You can also serve it with a side salad. For a fresh touch, add lime wedges and extra cilantro on top. Enjoy the mix of flavors! This blog post covered how to make a fun Taco Zucchini Skillet. You learned which ingredients to use, from zucchinis to black beans. We discussed step-by-step cooking instructions for perfect flavor and texture. You got tips on variations and substitutions to suit your taste. Finally, we talked about storing leftovers to keep your dish fresh. Try out this recipe, and enjoy a tasty meal that fits your needs. You’ll impress your friends and family!

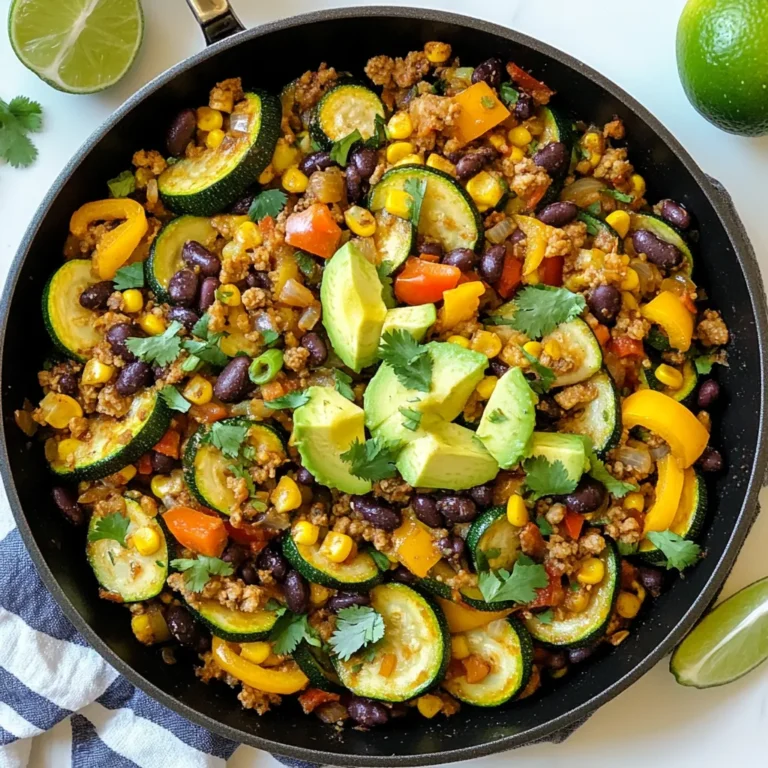
Taco Zucchini Skillet Flavorful One-Pan Delight

Marry Me Chicken Soup is both hearty and simple. To make this dish, you need a few key ingredients. Here’s the list: - Chicken - 2 skinless, boneless chicken breasts, cut into bite-sized pieces - Vegetables - 1 tablespoon olive oil - 1 medium onion, diced - 2 cloves garlic, minced - 3 medium carrots, sliced - 2 celery stalks, diced - 1 can (14.5 oz) diced tomatoes, drained - 1 cup frozen peas - Fresh parsley, chopped for garnish - Seasonings - 1 teaspoon dried thyme - 1 teaspoon dried oregano - 1 bay leaf - Salt and pepper to taste - Broth and Cream - 6 cups chicken broth - 1 cup heavy cream These ingredients come together to create a warm, comforting soup. The chicken adds protein, while the vegetables bring color and flavor. The broth and cream create a rich base, making every bite satisfying. Don't forget the fresh parsley on top for a nice touch! {{ingredient_image_1}} 1. Sautéing the aromatics Start by heating 1 tablespoon of olive oil in a large pot over medium heat. Add the diced onion and cook until it looks clear, about 5 minutes. The onion adds a nice base to the soup. Next, stir in 2 cloves of minced garlic. Cook for another minute. The garlic will smell great! 2. Adding the chicken and vegetables Now, add 3 sliced carrots and 2 diced celery stalks to the pot. Cook these veggies for about 3-4 minutes. They should start to get soft. Then, raise the heat to medium-high. Add 2 cut chicken breasts to the pot. Season with salt and pepper. Cook until the chicken is light brown, about 5-7 minutes. 3. Combining the broth and seasonings Pour in 6 cups of chicken broth and add a can of drained diced tomatoes. Then mix in 1 teaspoon of dried thyme, 1 teaspoon of dried oregano, and 1 bay leaf. Stir everything well. Bring the pot to a boil. This helps all the flavors blend. 4. Simmering the soup Once it boils, turn the heat down low. Let it simmer for 15-20 minutes. This makes the soup rich and tasty. Afterward, remove the bay leaf. Stir in 1 cup of heavy cream and 1 cup of frozen peas. Heat for another 5 minutes. Taste the soup and add more salt or pepper if you want. Enjoy your warm and comforting Marry Me Chicken Soup! - How to achieve the best flavor: Start by sautéing onions in olive oil. This builds a strong base for your soup. Add garlic after the onions soften. The aroma will fill your kitchen and excite your taste buds. Use fresh herbs like thyme and oregano for a bright punch. They help elevate the dish's taste. - Tips for chicken doneness: Cook the chicken until it turns light brown and no longer pink inside. This usually takes about 5-7 minutes. To check doneness, cut a piece in half. It should be white and juicy. If you have a meat thermometer, aim for 165°F (75°C). - Adjusting the thickness of the soup: If your soup is too thick, add more chicken broth or water. Stir well and let it simmer for a few minutes. For a thicker soup, let it cook longer without a lid. The liquid will reduce and concentrate the flavors. - Garnishing ideas: Fresh parsley adds color and freshness. Chop it finely and sprinkle it on top before serving. You can also drizzle a little cream on top for a lovely swirl. Consider adding a dash of paprika for a pop of color. - Serving suggestions: Serve the soup in warm bowls to keep it hot. Pair it with crusty bread or a side salad. This makes for a comforting meal. You can also offer grated cheese on the side for those who love extra flavor. Pro Tips Use Fresh Herbs: Fresh herbs can elevate the flavor of your soup. Consider adding fresh thyme or oregano towards the end of cooking for a vibrant taste. Adjust Creaminess: For a lighter soup, you can substitute half the heavy cream with milk or a dairy-free alternative, adjusting the richness to your liking. Perfectly Cooked Chicken: To ensure the chicken remains tender, avoid overcooking it. Cook just until it's no longer pink in the center. Flavorful Broth: Enhance the broth by using homemade chicken stock if available, or add a splash of white wine to deglaze the pot before simmering. {{image_2}} You can change the proteins in Marry Me Chicken Soup. If you want to use turkey, it works well too. Just make sure to cut it into small pieces. For a different flavor, try shrimp. Cook it until it turns pink. If you prefer a vegetarian option, swap the chicken with chickpeas or tofu. These options add protein without meat. Make sure to add them at the end to keep them nice. To make this soup even tastier, add spices. A dash of cayenne pepper gives it a kick. You can also try smoked paprika for a rich flavor. If you love herbs, add fresh basil or dill. They add a fresh taste. Adding more vegetables is a great idea, too. Spinach or kale adds color and nutrients. You can also try zucchini or bell peppers for a crunchy texture. Just chop them small and toss them in while cooking. To keep your Marry Me Chicken Soup fresh, store it in an airtight container. Make sure the soup cools to room temperature before sealing it. This helps prevent moisture buildup. The soup lasts in the fridge for about 3 to 4 days. If you want to enjoy it later, freezing is a great option. To freeze Marry Me Chicken Soup, let it cool completely. Pour the soup into freezer-safe bags or containers. Leave some space at the top, as the soup will expand. It can stay frozen for up to 3 months. When you’re ready to eat, take the soup out of the freezer. Thaw it in the fridge overnight for best results. To reheat, warm it on the stove over medium heat. Stir it often until it's hot. You can also use a microwave, but be sure to stir occasionally for even heating. Enjoy this cozy dish at your convenience! Can I use rotisserie chicken? Yes, rotisserie chicken works great! Just shred it and add it to the soup. This saves time and adds flavor. You can skip the step of cooking the chicken in the pot. Is it possible to make this soup in a slow cooker? Absolutely! You can use a slow cooker to make this soup. Just add all the ingredients except the cream and peas. Cook on low for 6-8 hours. Add the cream and peas in the last 30 minutes. How can I make it dairy-free? To make it dairy-free, use coconut milk or almond milk instead of heavy cream. You can also add nutritional yeast for a cheesy flavor. This will keep the soup creamy and delicious without dairy. This blog post covered how to make delicious Marry Me Chicken Soup. You learned the key ingredients, step-by-step instructions, and expert tips for great flavor. We explored variations and how to store your soup properly. In conclusion, this recipe is flexible and easy. You can customize it to suit your taste. Keep experimenting with flavors and ingredients. You'll enjoy making this soup over and over!

Marry Me Chicken Soup Tasty and Comforting Dish

To make Cajun Chicken Spaghetti, you need the following ingredients: - 8 oz spaghetti - 2 chicken breasts, diced - 2 tablespoons Cajun seasoning - 1 tablespoon olive oil - 1 bell pepper (any color), chopped - 1 small onion, chopped - 3 cloves garlic, minced - 1 can (14 oz) diced tomatoes with green chilies - 1 cup chicken broth - 1 cup heavy cream - 1 cup shredded cheddar cheese - Salt and pepper to taste - Fresh parsley, chopped (for garnish) Accurate measurements matter in cooking. They help achieve the right taste and texture. Use measuring cups and spoons for dry and liquid ingredients. For pasta, weigh it if you can. This ensures you get the right amount for your sauce. If you do not have a scale, a cup measurement works too. For liquids, always use clear measuring cups. This helps you see the amount easily. Fresh ingredients make a big difference. They enhance flavor and nutrition. Use fresh chicken for tenderness and taste. Choose ripe bell peppers and onions for sweetness. Fresh garlic brings a strong aroma, while canned tomatoes add richness. Always check the expiration dates on your ingredients. Good quality products lead to a great dish. {{ingredient_image_1}} First, grab a large pot. Fill it with water and bring it to a boil. Add 8 oz of spaghetti to the pot. Cook according to the package instructions until it is al dente. This usually takes about 8-10 minutes. Once done, drain the spaghetti and set it aside. Now, take 2 diced chicken breasts and put them in a bowl. Sprinkle 2 tablespoons of Cajun seasoning over the chicken. Toss the chicken until all pieces are well coated with the seasoning. This adds great flavor to your dish. In a large skillet, heat 1 tablespoon of olive oil over medium-high heat. Once hot, add the seasoned chicken. Cook for about 5-7 minutes until the chicken is browned and fully cooked. Remove the chicken from the skillet and set it aside. In the same skillet, add 1 chopped bell pepper and 1 small chopped onion. Sauté for about 3-4 minutes until they soften. Then, add 3 minced garlic cloves and cook for another minute. Now, pour in 1 can of diced tomatoes with green chilies and 1 cup of chicken broth. Bring this mixture to a simmer, allowing it to cook for about 5 minutes. This lets all the flavors mix well. Next, lower the heat and stir in 1 cup of heavy cream. Gradually add 1 cup of shredded cheddar cheese, stirring until it melts and the sauce becomes creamy. Return the cooked chicken to the skillet. Toss it in the creamy sauce. Add the cooked spaghetti to the skillet, mixing everything together until well combined. Taste the dish and adjust seasoning with salt and pepper if needed. Finally, remove from heat and garnish with freshly chopped parsley. Enjoy your meal! To get a creamy sauce, use heavy cream. This cream makes the sauce rich and smooth. After adding the cream, lower the heat. Stir in the cheddar cheese slowly. This step helps it melt evenly. If the sauce seems too thick, add more chicken broth. Keep stirring until it looks perfect. Store any leftover Cajun chicken spaghetti in an airtight container. This keeps it fresh for up to three days. Before storing, let it cool down to room temperature. To reheat, use the microwave or stove. Add a splash of chicken broth if it seems dry. This keeps your dish creamy and tasty. Cajun seasoning can be spicy. If you want less heat, use half the amount. You can also add some sugar to balance the spice. For extra flavor, consider adding more vegetables. Bell peppers and onions add sweetness and color. This way, you can make it milder while still being delicious. Pro Tips Perfectly Cooked Pasta: Always cook your spaghetti al dente to ensure it maintains a slight bite and doesn't become mushy when combined with the sauce. Spice it Up: Adjust the amount of Cajun seasoning based on your spice tolerance; start with less and add more if desired for a kick! Mixing Cheese: For a richer flavor, consider mixing different types of cheese, such as pepper jack or gouda, with the cheddar. Garnishing: Fresh herbs like cilantro or basil can add a surprising twist to the dish; don't hesitate to experiment with different garnishes! {{image_2}} If you want a vegetarian dish, you can swap chicken for tofu or veggies. Use firm tofu for the best texture. Cut the tofu into cubes and sauté it just like the chicken. You can also add more vegetables like zucchini, mushrooms, or spinach. They will soak up the Cajun flavors and make it tasty. For those who need a gluten-free meal, there are great pasta choices. Use gluten-free spaghetti made from rice, corn, or quinoa. These options cook well and hold the sauce nicely. Make sure to check the package for cooking times, as they may vary. To boost the flavor, try adding more spices. You can mix in smoked paprika for a smoky taste. A dash of cayenne pepper gives extra heat if you like it spicy. Fresh herbs like thyme or oregano can also enhance the dish. Adding these spices can make your Cajun chicken spaghetti even more delicious. Keep experimenting until you find your perfect blend! Cajun chicken spaghetti is best kept in the fridge. Store it in an airtight container. Make sure it cools down to room temperature before sealing it. This helps keep the flavors fresh. It can last for up to three days in the fridge. Always check for any signs of spoilage before eating. You can freeze cajun chicken spaghetti if you want to save some for later. Use a freezer-safe container or a heavy-duty freezer bag. Make sure to remove as much air as possible. The dish can last up to three months in the freezer. When ready to eat, thaw it overnight in the fridge before reheating. Reheat cajun chicken spaghetti gently. You can use the microwave or a skillet. If using the microwave, cover it to keep moisture in. Heat in 30-second intervals, stirring often. If using a skillet, add a splash of chicken broth to keep it creamy. Heat over low until warm. Enjoy it as if it were freshly made! Cajun Chicken Spaghetti is a tasty pasta dish. It blends spicy Cajun flavors with creamy sauce. You start with cooked spaghetti and add seasoned chicken. Bell peppers, onions, and garlic add great flavor. The dish uses diced tomatoes and chicken broth to make a rich sauce. Finally, heavy cream and cheese make it creamy and delicious. To make Cajun Chicken Spaghetti less spicy, use mild Cajun seasoning. You can also skip the diced tomatoes with green chilies. Instead, use plain diced tomatoes. Adding more cream and cheese can help tone down the heat. Serve with a side of sour cream to cool down each bite. Cajun Chicken Spaghetti pairs well with a fresh salad. A simple green salad with a light dressing works great. Garlic bread is also a nice side. You could even serve it with roasted vegetables for a healthy touch. These sides balance the spicy flavors of the dish. Yes, you can substitute heavy cream in this recipe. Use half-and-half for a lighter option. Coconut milk gives a dairy-free alternative. Greek yogurt can also work but use it sparingly. Adjust the cooking time if you use a thinner liquid to keep the sauce creamy. This post covered how to make Cajun Chicken Spaghetti. We explored the right ingredients and the best cooking steps. I shared tips for a creamy sauce and adjusting spice levels. You can even try vegetarian and gluten-free options. Finally, I discussed proper storage and reheating methods. Making this dish can be fun and easy. Enjoy your cooking and share your tasty results. Remember, great food brings joy and smiles.

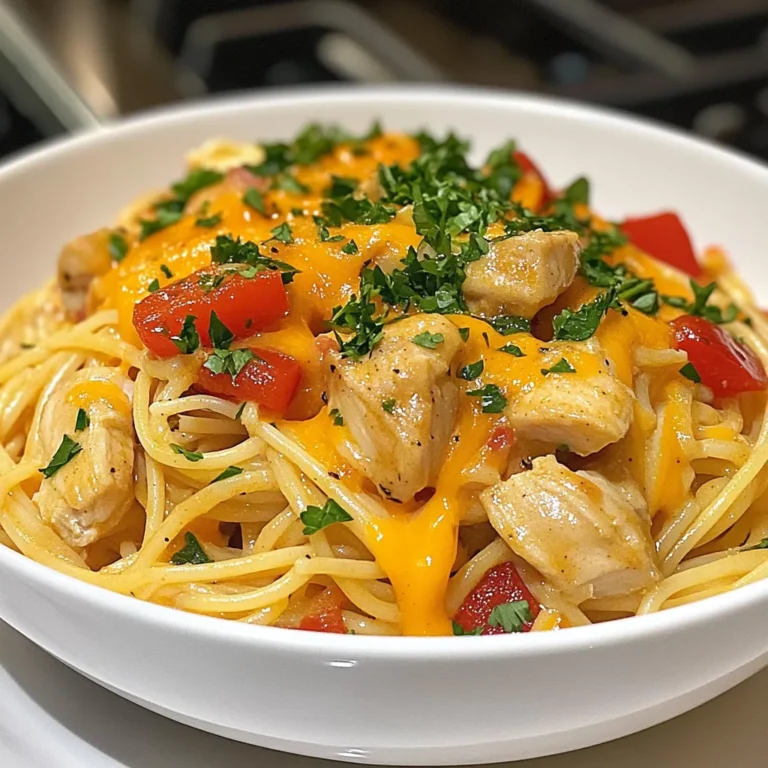
Cajun Chicken Spaghetti Flavorful and Easy Recipe

To make Brownie Crinkle Cookies, you need these key ingredients: - 1 cup semisweet chocolate chips - 1/4 cup unsweetened cocoa powder - 1/2 cup unsalted butter, softened - 1 cup granulated sugar - 2 large eggs - 1 teaspoon vanilla extract - 1/2 teaspoon baking powder - 1/4 teaspoon salt - 1 cup all-purpose flour - 1/2 cup powdered sugar (for dusting) These ingredients work together to create that rich, chewy texture. The chocolate chips and cocoa powder give the cookies a deep chocolate flavor. The butter adds that buttery richness, while the sugar helps with sweetness and texture. You can customize your Brownie Crinkle Cookies with a few optional ingredients. Here are some ideas: - Chopped nuts (like walnuts or pecans) for crunch - A pinch of espresso powder for a coffee kick - A splash of flavored extract, like almond or mint These additions can enhance flavor and texture. Feel free to play around with these options! If you need to swap some ingredients, here are some substitutes: - For semisweet chocolate chips, use dark chocolate chips or milk chocolate. - Coconut oil can replace unsalted butter in equal amounts. - For the eggs, try using a flaxseed meal mixture for a vegan option. These substitutes will still give you great cookies, so don't worry if you run out of something! Just remember to keep the ratios similar for best results. {{ingredient_image_1}} Start by preheating your oven to 350°F (175°C). This step is key to getting the right texture. While the oven heats, take a large baking sheet and line it with parchment paper. This paper keeps the cookies from sticking and makes cleanup easy. Make sure to set this aside while you mix your dough. Grab a microwave-safe bowl. Put in 1 cup of semisweet chocolate chips and 1/2 cup of unsalted butter, softened. Microwave this mixture in 30-second bursts. Stir it each time until it is melted and smooth. Let this mix cool for a bit. In a large mixing bowl, whisk together 1 cup of granulated sugar and 2 large eggs. You want this to be light and fluffy. Next, pour in the slightly cooled chocolate and add 1 teaspoon of vanilla extract. Stir until everything is well mixed. In a separate bowl, sift together 1/4 cup of unsweetened cocoa powder, 1/2 teaspoon of baking powder, 1/4 teaspoon of salt, and 1 cup of all-purpose flour. Slowly mix this dry blend into the chocolate mixture. Remember, you should mix just until combined; don’t overdo it! Once mixed, cover the dough with plastic wrap and chill it in the fridge for about 30 minutes. This will help the dough firm up. After chilling, scoop tablespoon-sized portions and roll them into balls. Roll each ball in powdered sugar until fully coated. Now, space the cookie balls on the lined baking sheet. Keep them about 2 inches apart. Bake these in the preheated oven for 10-12 minutes. Look for edges that are set but centers that feel soft. Once done, let the cookies cool on the baking sheet for a few minutes. Afterward, transfer them to a wire rack to cool completely. Enjoy the rich, chewy goodness! To get those lovely cracks on your cookies, you need to chill the dough. After mixing, cover it and pop it in the fridge for about 30 minutes. This step helps the dough firm up. When you roll the dough balls in powdered sugar, make sure you coat them well. The sugar will create that beautiful crinkle effect as they bake. Bake your cookies at 350°F for just 10-12 minutes. The edges should set while the centers stay soft. This balance is key to a chewy cookie! One common mistake is overmixing the dough. It can make your cookies tough. Mix just until combined to keep them soft and chewy. Another mistake is not chilling the dough. If you skip this step, the cookies may spread too much while baking. Also, keep an eye on your baking time. If you leave them in too long, they will turn hard. Trust the baking time and check them regularly towards the end. To keep your cookies fresh, store them in an airtight container. Place a piece of bread in the container to help keep them soft. If you have many cookies, you can freeze them. Just place them in a single layer on a baking sheet and freeze until solid. Then, transfer them to a freezer bag. They will stay fresh for up to three months. When you're ready to enjoy, thaw them at room temperature. Pro Tips Chill the Dough: Chilling the cookie dough for at least 30 minutes helps to firm it up, making it easier to roll into balls and preventing the cookies from spreading too much while baking. Use Quality Chocolate: For the best flavor, opt for high-quality semisweet chocolate chips. The better the chocolate, the richer your cookies will taste! Don’t Overbake: To achieve that perfect fudgy center, keep an eye on the cookies and remove them from the oven when the edges are set but the centers still look slightly soft. Experiment with Mix-Ins: Feel free to customize your brownie crinkle cookies by adding chopped nuts, or white chocolate chips for a fun twist! {{image_2}} You can add nuts to your cookie dough for extra crunch. Chopped walnuts or pecans work well. Mix in about 1/2 cup of nuts after combining the wet and dry ingredients. You can also use chocolate chunks or a mix of both. This adds texture and flavor. If you like a little saltiness, sprinkle in some sea salt with the nuts. This balance makes each bite exciting and tasty. To make gluten-free cookies, swap the all-purpose flour for gluten-free flour. Use a blend that measures cup-for-cup. This keeps the dough the same and gives you a chewy cookie. Be sure to check your baking powder too; some brands contain gluten. You can use gluten-free baking powder for best results. These cookies will still taste amazing and satisfy everyone. For a fun twist, try adding flavors. A teaspoon of peppermint extract gives a fresh minty taste. If you like coffee, mix in 1 tablespoon of espresso powder. This enhances the chocolate flavor. For a citrusy zing, add a bit of orange zest. Zest from one orange is enough. These flavor infusions make your cookies stand out and offer something new each time you bake. To keep your Brownie Crinkle Cookies fresh, store them in an airtight container. This will lock in moisture and flavor. You can place a slice of bread in the container to help keep the cookies soft. Just make sure the bread does not touch the cookies. You can freeze these cookies for later enjoyment. First, let them cool completely. Then, place them in a single layer on a baking sheet. Freeze them for about an hour. Once firm, transfer the cookies to a freezer-safe bag. This method helps prevent sticking and keeps them fresh. Brownie Crinkle Cookies last about one week at room temperature. If stored properly in the fridge, they can last up to two weeks. In the freezer, they can stay fresh for up to three months. Just thaw them in the fridge overnight before enjoying. Brownie Crinkle Cookies are unique because they have a chewy texture and a crispy top. Unlike regular brownies, these cookies have a puffed-up look with cracks that form during baking. This crinkle effect gives them a fun appearance and a different bite. The dough is also rolled in powdered sugar, which adds sweetness and a pretty finish. Yes, you can use dark chocolate instead of semisweet chocolate chips. Dark chocolate will give your cookies a richer flavor. Just remember, dark chocolate is less sweet. You might need to adjust the sugar in your recipe if you want them sweeter. Experimenting can lead to tasty results! You can tell the cookies are done when the edges look set but the centers are still soft. They will continue to bake a little after you take them out. It usually takes about 10 to 12 minutes in the oven. If you see cracks on top, that's a good sign too! Absolutely! Doubling the recipe is easy. Just multiply each ingredient by two. Make sure you have enough space on your baking sheets. You might need to bake them in batches. Enjoy sharing your cookies with friends and family! In this post, we explored the essentials for making brownie crinkle cookies. You learned about key ingredients and helpful substitutes to suit your taste. I shared step-by-step instructions for a perfect bake, and tips for those crinkle patterns. We also discussed variations for more flavor. Finally, I covered the best storage methods to keep your cookies fresh. Remember, with a little practice, you can master these treats and enjoy them for days! Happy baking!

Brownie Crinkle Cookies Perfectly Chewy and Delicious

For quick and easy chicken enchiladas, gather these main ingredients: - 2 cups cooked chicken, shredded - 1 cup black beans, rinsed and drained - 1 cup corn kernels (fresh or frozen) - 1 cup enchilada sauce (store-bought or homemade) - 1 teaspoon cumin - 1 teaspoon chili powder - 8 small flour or corn tortillas - 1 cup shredded cheese (cheddar or Monterey Jack) - 1/2 cup diced red onion - 1/4 cup fresh cilantro, chopped (for garnish) - Sour cream (for serving, optional) These ingredients create a tasty mix that everyone loves. You can make your enchiladas your own with these optional ingredients: - Bell peppers, diced - Jalapeños, sliced for heat - Avocado, for creaminess - Olives, for a briny flavor - Different cheese types, like pepper jack Feel free to add or swap items based on your taste. Using fresh ingredients often gives the best flavor. Fresh corn and beans have a crunch that frozen ones lack. However, frozen corn and beans are perfect for convenience and save time. They are just as tasty when cooked. If you're in a rush, frozen ingredients work great. Just remember to thaw them before mixing! {{ingredient_image_1}} First, set your oven to 375°F (190°C). This step is key for cooking the enchiladas just right. While the oven preheats, gather your ingredients. You will need cooked chicken, black beans, corn, enchilada sauce, and spices. Having everything ready makes cooking smooth and easy. In a large bowl, mix together the shredded chicken, black beans, corn, half of the enchilada sauce, cumin, chili powder, and half of the diced red onion. Stir well until all the ingredients blend together. This filling is the heart of your enchiladas, so mix until it looks good. Grab a tortilla and place a scoop of the chicken filling in the center. Roll the tortilla tightly around the filling, then place it seam-side down in a greased baking dish. Repeat this step with the rest of the tortillas and filling. It’s fun to see them come together! After placing all enchiladas in the dish, pour the remaining enchilada sauce over them. Sprinkle the shredded cheese on top. Cover the dish with aluminum foil and bake for 20 minutes. Then, remove the foil and bake for another 10 minutes. The cheese should be bubbly and slightly golden. Once done, let them cool for a few minutes. Top with the remaining diced red onion and chopped cilantro before serving. Enjoy your delicious chicken enchiladas! To keep your tortillas crisp, warm them first. Heat each tortilla in a dry pan for about 30 seconds. This makes them flexible and less prone to tearing. You can also lightly fry them in oil. This adds flavor and keeps them from getting soggy when you add the filling. Layer them with parchment paper if you stack them. Cheese adds creaminess and flavor. I suggest using cheddar or Monterey Jack cheese. Cheddar gives a sharp taste, while Monterey Jack melts well. For a twist, mix cheeses. You can also try pepper jack for some heat. Just choose a good-quality cheese for the best results. Meal prep can save time. You can make the filling a day ahead and store it in the fridge. This lets the flavors meld together. When you are ready, just assemble and bake your enchiladas. You can also freeze the filled enchiladas before baking. Just cover them well. When you’re ready to eat, bake them straight from the freezer. Just add a little more time in the oven. Pro Tips Use Rotisserie Chicken: For even quicker prep, use store-bought rotisserie chicken instead of cooking your own. This saves time without sacrificing flavor. Customize Your Fillings: Feel free to add other vegetables like spinach, bell peppers, or zucchini to the filling for extra nutrition and flavor variety. Make Ahead: Prepare the enchiladas in advance and store them in the fridge. Just cover them with foil and bake them when you're ready to serve. Cheese Variations: Experiment with different types of cheese such as pepper jack for added spice or mozzarella for a milder flavor. {{image_2}} You can easily make vegetarian enchiladas. Simply swap the chicken for veggies. Use black beans, zucchini, or bell peppers. Add more corn for sweetness. You can also use mushrooms for a hearty texture. Replace the chicken with tofu for protein. These changes keep the dish tasty and filling. Want to spice things up? Use diced jalapeños in the filling. Add them to the chicken mixture before rolling. You can also mix hot sauce into the enchilada sauce. For extra heat, sprinkle red pepper flakes on top. Be careful; a little goes a long way. Adjust the spice level to fit your taste. Try different sauces to give your enchiladas a twist. Use green enchilada sauce for a tangy flavor. You can also use mole sauce for a rich, complex taste. If you like creaminess, try a white sauce made from sour cream or cheese. Each sauce adds a new layer to your meal. Get creative and find your favorite! After you enjoy your meal, store any leftover enchiladas in an airtight container. Let them cool to room temperature first. This keeps them fresh and tasty for later. You can store them in the fridge for up to three days. Make sure to cover them well to prevent drying out. To reheat, you can use an oven or microwave. If using an oven, preheat to 350°F (175°C). Place the enchiladas in a baking dish. Cover with foil to keep them moist. Heat for about 15-20 minutes. If using a microwave, place one or two enchiladas on a plate. Heat for 1-2 minutes, checking often. Add a splash of enchilada sauce to keep them juicy. Freezing enchiladas is a great way to save time. Assemble the enchiladas as usual but do not bake them. Instead, place them in a freezer-safe container. Add a layer of plastic wrap, then foil, to protect against freezer burn. They can last up to three months in the freezer. When you want to eat them, thaw in the fridge overnight and bake as directed. Yes, you can use rotisserie chicken. It saves time and adds great flavor. Just shred the chicken and mix it with other ingredients. This makes the recipe even quicker and easier. If you don't have cumin or chili powder, use paprika or taco seasoning. These spices give a nice taste without changing the dish too much. You can also skip them if you want a milder flavor. To spice up your enchiladas, add jalapeños or hot sauce to the filling. You can also use spicy enchilada sauce. A pinch of cayenne pepper in the filling adds heat too. Adjust to your taste. Yes, you can make the filling and assemble the enchiladas ahead. Just cover them and keep them in the fridge for a day. Bake them when you're ready to eat. This makes dinner super easy! Serve chicken enchiladas warm, topped with fresh cilantro and diced red onion. Add a dollop of sour cream for creaminess. You can also serve them with rice, beans, or a side salad for a full meal. In this blog post, we covered all you need for making delicious enchiladas. We discussed main and optional ingredients for your dish, along with tips for using fresh or frozen options. You learned step-by-step instructions from prepping the oven to baking. We shared tricks to avoid soggy tortillas and explored various enchilada options. Lastly, we addressed storage and reheating for leftovers. Enjoy personalizing your enchiladas and impress everyone with your cooking skills!

Quick Easy Chicken Enchiladas Tasty Family Meal

To make Pesto Chicken Flatbread, you need fresh and simple ingredients. Here’s what you will need: - Flatbreads or naan - Cooked chicken - Basil pesto - Cherry tomatoes - Mozzarella cheese - Parmesan cheese - Baby spinach - Olive oil - Salt and pepper - Optional red pepper flakes These ingredients come together to create a dish full of flavor. Using flatbreads or naan gives a nice texture. Shredded chicken adds protein and heartiness. Basil pesto brings a fresh taste, while cherry tomatoes add a hint of sweetness. Mozzarella cheese melts perfectly, creating a gooey layer. Parmesan cheese offers a sharp finish that balances the dish. Baby spinach adds color and nutrition. Olive oil enhances flavors and helps with browning. Always season with salt and pepper to taste. If you like a little heat, sprinkle some red pepper flakes on top. Having these ingredients ready makes it easy to whip up a tasty meal any night of the week. {{ingredient_image_1}} Preheating the Oven First, set your oven to 400°F (200°C). This temperature cooks the flatbreads just right. Preparing the Flatbreads Place two flatbreads or naan on a baking sheet. Use parchment paper to keep them from sticking. This step makes clean-up easy. Combining Chicken and Pesto In a bowl, mix one cup of shredded chicken with half a cup of basil pesto. Stir well until the chicken is coated with the pesto. This gives the chicken a fresh taste. Spreading the Chicken Mixture Take the chicken mixture and spread it evenly over each flatbread. Make sure to cover the whole surface. Adding Toppings Next, scatter one cup of halved cherry tomatoes and one cup of baby spinach on top. Then, sprinkle one cup of shredded mozzarella cheese and a quarter cup of grated Parmesan cheese over everything. Drizzle a tablespoon of olive oil on top. Season with salt, pepper, and red pepper flakes if you like some heat. Baking Time and Temperature Slide the baking sheet into the oven. Bake for about 12 to 15 minutes. Look for the cheese to melt and bubble, and the flatbread to turn golden brown. Cooling Before Serving Once done, take the flatbreads out of the oven. Let them cool for a couple of minutes. This makes slicing easier. Then, cut into wedges and enjoy! Choosing the Right Flatbread When picking flatbread, look for fresh options. You can use naan, pita, or any flatbread you enjoy. The thickness matters. Thinner breads crisp up nicely. Thicker breads hold more toppings. Ensuring Even Cooking To cook your flatbreads evenly, place them on a baking sheet. Use parchment paper to stop sticking. Preheat your oven to 400°F (200°C) for the best results. Bake until the cheese is bubbly and the bread is golden. Rotate the baking sheet halfway for even heat. Presentation Tips Serve your flatbreads warm on a colorful platter. Use fresh basil leaves to add a pop of color. A sprinkle of extra Parmesan makes it look fancy. Slice them into wedges for easy sharing. Suggested Pairings Pair this dish with a light salad. A simple mix of greens and a lemon vinaigrette works well. For drinks, try a crisp white wine. A Pinot Grigio or Sauvignon Blanc complements the flavors nicely. Pro Tips Use Fresh Pesto: For the best flavor, opt for fresh basil pesto instead of store-bought. You can make your own by blending fresh basil, garlic, pine nuts, Parmesan cheese, and olive oil. Customize the Toppings: Feel free to add other toppings such as sliced bell peppers, olives, or artichokes to enhance the flavor and texture of your flatbreads. Experiment with Cheeses: Try using different types of cheese such as feta or goat cheese for a unique twist on the classic mozzarella and Parmesan combo. Make It Ahead: Prepare the flatbreads ahead of time by assembling them without baking. Cover and refrigerate, then bake when ready to serve for a quick and easy meal. {{image_2}} You can easily change this recipe to fit different diets. For a vegetarian option, swap out the chicken for plant-based chicken. Many brands offer tasty options that mimic the texture and flavor of chicken. This way, you still enjoy a hearty meal without meat. If gluten is a concern, you can select gluten-free flatbreads or naan. Many stores sell gluten-free options that taste great. Just check the labels to ensure they fit your needs. Adding more toppings can make your flatbread even more exciting. Consider adding olives for a briny kick. They pair well with the pesto and cheese. Artichokes also make a great choice. Their unique taste adds depth to your flatbread. You can use marinated artichokes for extra flavor. Feel free to mix and match toppings based on what you love! The beauty of this dish is its versatility. Refrigeration Guidelines After making Pesto Chicken Flatbread, let it cool. Store leftovers in an airtight container. Keep them in the fridge for up to three days. If you want to keep it longer, freezing is a great option. Freezing Instructions To freeze, wrap the flatbread in plastic wrap. Then, place it in a freezer bag. This helps prevent freezer burn. You can freeze the flatbread for up to three months for the best taste. When you are ready to eat, thaw it in the fridge overnight. Best Methods for Reheating Flatbread To reheat leftover flatbread, the oven works best. Preheat the oven to 350°F (175°C). Place the flatbread on a baking sheet. Heat for about 10 minutes until warm and crispy. You can also reheat it in a skillet. Use medium heat and cover it to keep the moisture. This method helps the cheese melt nicely. How can I make Pesto Chicken Flatbread ahead of time? You can prep the flatbread in advance. Mix the chicken with pesto and store it. Keep the toppings separate until you are ready to bake. This way, the flatbread stays crisp. Can I use store-bought pesto? Yes, store-bought pesto works great! It saves time and still gives a nice flavor. Just be sure to choose a quality brand for the best taste. What are good side dishes to serve with this flatbread? I love serving a fresh salad with this flatbread. A simple green salad or a caprese salad pairs well. You might also enjoy some roasted veggies or a light soup. How long does Pesto Chicken Flatbread last in the fridge? It lasts about 3 days in the fridge. Make sure to cover it well to keep it fresh. Can I substitute chicken with another protein? Absolutely! You can use turkey, shrimp, or even tofu for a vegetarian option. Just make sure any protein is cooked before adding it to the flatbread. In this post, we explored how to make delicious Pesto Chicken Flatbread. We covered all the ingredients, step-by-step instructions, tips for perfection, and variations for dietary needs. You can easily customize this recipe to suit your taste. Keep these methods in mind for quick meals. Whether serving guests or enjoying a quiet night, this dish satisfies. Enjoy cooking and sharing your flatbread creations!

Pesto Chicken Flatbread Flavorful Weeknight Meal

- 3 cups cooked and shredded chicken breast - 9 lasagna noodles (whole wheat or gluten-free if desired) - 2 cups low-fat ricotta cheese - 1 cup grated Parmesan cheese - 2 cups mozzarella cheese, shredded - 2 cups Alfredo sauce (store-bought or homemade) - 1 cup baby spinach, chopped - 1 teaspoon garlic powder - 1 teaspoon Italian seasoning - Salt and pepper to taste - Fresh basil for garnish (optional) - Chicken breast: This meat is high in protein. It helps build strong muscles. It is low in fat, making it a healthy choice. - Ricotta cheese: This cheese offers calcium and protein. It adds creaminess without too many calories. - Spinach: This leafy green is packed with vitamins and minerals. It has iron and antioxidants for good health. - Whole wheat noodles: These noodles have more fiber than regular noodles. They keep you fuller for longer and support digestion. - Alfredo sauce: While rich, it gives flavor and creaminess. You can find lighter options that taste great. - If you need gluten-free noodles, use rice or gluten-free lasagna sheets. They work well in this dish. - For a dairy-free option, try cashew cheese or tofu instead of ricotta. Nutritional yeast can add a cheesy flavor. - Use cooked turkey instead of chicken for a different protein. It can be just as tasty and is often leaner. - To lower calories, replace Alfredo sauce with a homemade blend of broth and cashew cream. It can taste just as rich. {{ingredient_image_1}} First, gather your ingredients. You will need three cups of cooked chicken, nine lasagna noodles, and two cups each of ricotta and mozzarella cheese. Don't forget the Alfredo sauce, baby spinach, garlic powder, and Italian seasoning. Next, preheat your oven to 375°F (190°C). In a big bowl, mix the shredded chicken, ricotta cheese, garlic powder, Italian seasoning, salt, and pepper. Make sure everything combines well. Now, take an oven-safe baking dish. Spread a thin layer of Alfredo sauce on the bottom. Place three lasagna noodles over the sauce. Then, add half of the chicken mixture. On top of the chicken, sprinkle a layer of chopped spinach and a third of the mozzarella cheese. Repeat this layering process: sauce, noodles, chicken, spinach, and cheese. Keep going until all ingredients are used. Finish with a layer of noodles topped with the rest of the Alfredo sauce. Sprinkle the remaining mozzarella and Parmesan cheese on top. Cover the dish with aluminum foil and bake for 25 to 30 minutes. After this, remove the foil. Bake for another 15 minutes or until the cheese is bubbly and golden. Let it cool for about 10 minutes before slicing. If you like, garnish with fresh basil. For a great lasagna, be sure to spread the sauce evenly. This helps keep the noodles moist. When layering, use enough filling but not too much. Each layer should be thin for best results. Use a mix of cheeses for more flavor. You can also add vegetables like zucchini or mushrooms. This adds nutrition and taste. Be creative with your layers! To make great Alfredo sauce, you need simple, fresh ingredients. Start with butter and garlic. Melt the butter in a pan over medium heat. Add minced garlic and cook for one minute. This brings out the garlic's flavor. Next, pour in heavy cream and let it simmer. Slowly whisk in grated Parmesan cheese until it melts. Season with salt and pepper to taste. If you want more flavor, add Italian seasoning. This sauce will be rich and creamy, perfect for your lasagna. Cook your lasagna noodles in salted water. This adds flavor. Boil them until they are al dente, about 8-10 minutes. You want them firm but not hard. Drain the noodles and rinse them with cold water. This stops the cooking and keeps them from sticking. You can also use no-boil noodles if you prefer. They save time and work well in the dish. One common mistake is not layering correctly. Start with sauce on the bottom. This helps keep the noodles from sticking. Another mistake is overcooking the noodles. They should be firm, as they will cook more in the oven. Avoid too much cheese on the first layer. This can make it too rich. Lastly, don’t skip letting the lasagna rest after baking. It helps the layers set and makes serving easier. Pro Tips Use Fresh Ingredients: Fresh spinach and high-quality cheeses will enhance the flavor and nutrition of your lasagna. Layer Strategically: Ensure even distribution of ingredients and flavors by layering carefully, starting with sauce and ending with cheese. Let it Rest: Allow the lasagna to cool for about 10 minutes before slicing to help retain its shape and make serving easier. Customize Your Sauce: Feel free to add herbs or spices to your Alfredo sauce for a personal touch that suits your taste. {{image_2}} You can swap chicken for turkey. Turkey is lean and just as tasty. It adds a new twist to the dish. You might also try plant-based protein, like lentils or chickpeas. These options make the dish vegetarian. They pack in good nutrients and stay filling. For a gluten-free option, use gluten-free lasagna noodles. They work well and taste great. You can even make a low-carb version. Instead of noodles, use thinly sliced zucchini or eggplant. This keeps the dish light and healthy. Add veggies for extra flavor and nutrition. Spinach is great, but you can use mushrooms, bell peppers, or broccoli. Fresh herbs like basil or oregano brighten the dish. Just sprinkle them in between layers for a burst of flavor. To keep your High Protein Chicken Alfredo Lasagna fresh, let it cool first. Place leftovers in an airtight container. This helps prevent moisture loss and keeps flavors intact. Store in the fridge for up to four days. If you want to enjoy it later, freezing is a great option. For freezing, slice the lasagna into pieces. Wrap each slice in plastic wrap, then place them in a freezer-safe bag. This way, you can grab one slice at a time. Your lasagna can stay frozen for up to three months. When you’re ready to eat, just thaw it in the fridge overnight. When reheating, use the oven for the best results. Preheat your oven to 350°F (175°C). Place the lasagna in a baking dish, cover it with foil, and heat for about 20 minutes. You can also use a microwave. Heat individual slices for about 2-3 minutes, but they may not be as crispy. Enjoy your delicious lasagna just like the first time! You can prepare this dish a day earlier. Start by cooking the chicken and making the filling. Layer everything in your baking dish, but don’t bake it yet. Cover it tightly with plastic wrap and put it in the fridge. When you are ready to eat, bake it straight from the fridge. Just add an extra 10-15 minutes to the cooking time. This way, you save time and still enjoy a fresh meal. Yes, you can use store-bought Alfredo sauce. It makes the process quicker and easier. Just check the label for low-fat options if you want to keep it healthy. Homemade sauce can taste great too, but store-bought is perfect for busy days. Whichever you choose, it will blend well with the chicken and cheese in this dish. For side dishes, I recommend a fresh salad to balance the creamy lasagna. A simple green salad with lemon vinaigrette works well. Garlic bread is another great side. It adds crunch and flavor. Roasted vegetables can also be a nice touch. They enhance the meal with extra nutrients and color. Enjoy your meal with these sides for a complete experience! This blog post covered how to make a tasty high-protein chicken Alfredo lasagna. You learned about the key ingredients and their health benefits. I shared tips for perfect cooking and layering. We explored various protein options and offered storage tips for meal prep. Lastly, I answered common questions to make your cooking easier. Remember, with a few simple changes, you can enjoy this dish your way. Get cooking and enjoy every bite!

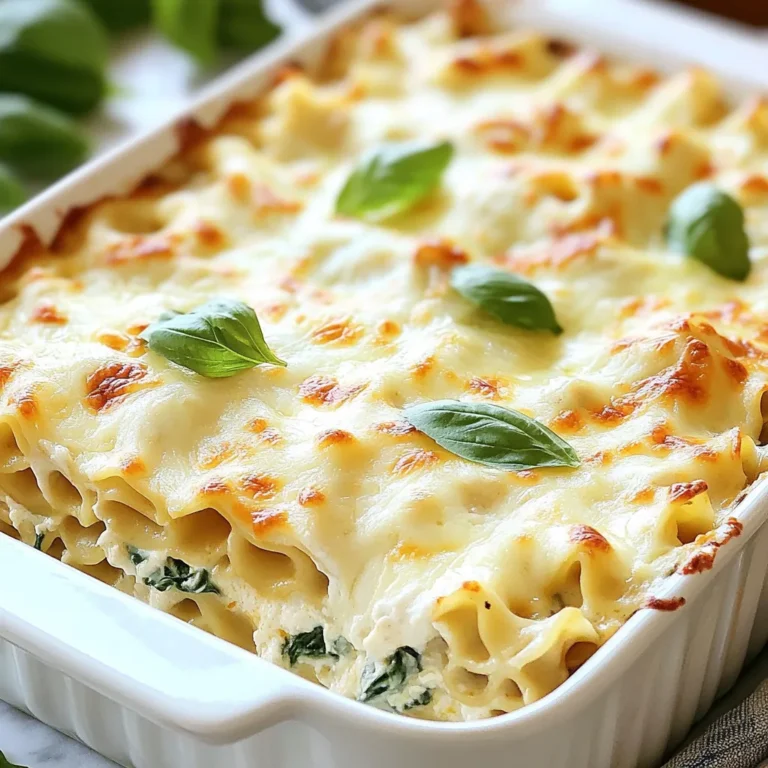
High Protein Chicken Alfredo Lasagna Delightful Dish

To create a bowl of zesty lemon chicken soup, gather the following ingredients: - 2 boneless, skinless chicken breasts - 4 cups chicken broth - 1 medium onion, diced - 2 cloves garlic, minced - 2 medium carrots, diced - 2 stalks celery, diced - 1 lemon (juice and zest) - 1/2 cup cooked rice or quinoa - 1 tablespoon olive oil - 1 teaspoon dried thyme - 1 teaspoon dried oregano - Salt and pepper to taste - Fresh parsley, for garnish Each ingredient adds its own layer of flavor, making the soup vibrant and comforting. You can enhance your lemon chicken soup with some tasty add-ins. Here are a few ideas: - Fresh spinach: Add a handful just before serving for color and nutrients. - Mushrooms: Sauté some sliced mushrooms with the onion for a rich taste. - Peas: Stir in frozen peas for sweetness and extra texture. - Chickpeas: Add canned chickpeas for a protein boost and heartiness. Feel free to mix and match these options to suit your taste! If you or someone you know has dietary restrictions, here are some easy swaps: - Chicken breast: Use tofu or tempeh for a vegetarian version. - Chicken broth: Swap with vegetable broth for a plant-based soup. - Rice or quinoa: Use gluten-free pasta or cauliflower rice for a low-carb option. - Olive oil: Canola or avocado oil works well as a substitute. These options keep the soup flavorful while catering to different dietary needs. {{ingredient_image_1}} Start by gathering all your ingredients. You need: - 2 boneless, skinless chicken breasts - 4 cups chicken broth - 1 medium onion, diced - 2 cloves garlic, minced - 2 medium carrots, diced - 2 stalks celery, diced - 1 lemon (juice and zest) - 1/2 cup cooked rice or quinoa - 1 tablespoon olive oil - 1 teaspoon dried thyme - 1 teaspoon dried oregano - Salt and pepper to taste - Fresh parsley, for garnish Next, prepare your vegetables. Dice the onion, carrots, and celery. Mince the garlic. This makes your cooking easier. In a large pot, heat the olive oil over medium heat. Add the diced onion and sauté for 3-4 minutes until it softens. Stir in the minced garlic and cook for 1 more minute. You want that garlic smell! Now, add the diced carrots and celery. Sauté them for 5 minutes until they start to soften. This builds great flavor in your soup. Pour in the chicken broth. Add the thyme, oregano, and season with salt and pepper. Bring everything to a boil. Once it boils, carefully add the chicken breasts. Lower the heat to medium-low and let it simmer for 15-20 minutes. Make sure the chicken is cooked through. After the chicken cooks, remove it from the pot. Let it cool for a bit. Use two forks to shred the chicken. It should pull apart easily. Add the shredded chicken back to the pot. Finally, mix in the cooked rice or quinoa along with the lemon juice and zest. Stir everything well and let it simmer for 5 more minutes. This is when the flavors blend together. Taste your soup and adjust seasoning if needed. Serve hot, and don’t forget to garnish with fresh parsley. Enjoy your cozy bowl of lemon chicken soup! To get the best flavor in your lemon chicken soup, start with fresh ingredients. Use good-quality chicken broth. This makes a big difference. The zest from the lemon adds a bright taste. Don’t skip this step! Add the lemon juice at the end for a fresh burst. It helps lift the flavors and makes the soup feel light. If you love herbs, add fresh parsley when serving. It adds color and taste. One common mistake is overcooking the chicken. If you cook it too long, it becomes dry. Keep an eye on the timer and check for doneness. Another mistake is not seasoning enough. Taste your soup before serving. Adjust the salt and pepper to your liking. Also, don’t add the lemon juice too early. It can lose its zing if cooked too long. Serve your soup hot in a bowl. A sprinkle of fresh parsley on top makes it look nice. You can pair it with crusty bread for a complete meal. If you want, add a side salad for more crunch. This soup also goes well with a light white wine. It makes for a fancy touch when hosting friends. Enjoy your bowl of comfort! Pro Tips Use Fresh Ingredients: Fresh vegetables and herbs will enhance the flavor of your soup significantly compared to dried or canned options. Customize Your Protein: Feel free to replace chicken with turkey or even tofu for a vegetarian version. Just ensure proper cooking times. Enhance the Flavor: Adding a splash of white wine to the broth can add depth to the soup’s flavor profile. Just let it cook off before adding the chicken. Make it Ahead: This soup stores well in the fridge for up to 3 days or freezes beautifully. Just add fresh herbs before serving for a vibrant touch. {{image_2}} You can easily make this soup gluten-free. Start with gluten-free chicken broth. Use rice or quinoa as your grain. Both options are naturally gluten-free. This way, everyone can enjoy a warm bowl without worry. Adding spinach gives your soup a fresh twist. Simply toss in a few handfuls of fresh spinach just before serving. The spinach wilts quickly and adds a pop of color. It also boosts the nutrition in your bowl. Noodles can change the feel of this soup. Choose egg noodles or rice noodles for a fun texture. If you prefer, add grains like barley or farro. Cook them separately and stir them in before serving. This makes the soup hearty and filling. To keep your lemon chicken soup fresh, let it cool first. Pour the soup into an airtight container. Seal it tight and place it in the fridge. It stays good for about 3-4 days. If you want to keep it longer, freezing is a great option. To freeze lemon chicken soup, make sure it is completely cool. Use freezer-safe containers or bags. Leave some space at the top because liquids expand when frozen. The soup can last for 2-3 months in the freezer. Label the container with the date to track freshness. When you’re ready to enjoy your soup, reheat it gently. Pour it into a pot over medium heat. Stir occasionally until it warms through. If the soup is too thick, add a splash of broth or water. You can also use a microwave for quick reheating. Just cover it to prevent splatters and heat in short bursts. Yes, you can use rotisserie chicken. It saves time and adds flavor. Just shred the chicken and add it to the soup. You can skip the step of cooking raw chicken. This makes the process faster and easier. If you want a substitute for chicken broth, try vegetable broth. It adds a nice flavor while keeping it light. You can also use water with herbs for taste. This way, you still get a tasty soup without chicken broth. To spice up the soup, add red pepper flakes. Start with a pinch and taste it. You can also add diced jalapeños for more heat. Another option is to splash in hot sauce. Adjust to your heat level for a nice kick! This article shared key details on making lemon chicken soup. You learned about the right ingredients, helpful tips, and several variations. Remember, using rotisserie chicken can save time. Be sure to store leftovers properly for later enjoyment. This dish is flexible, allowing for many tasty tweaks. Enjoy your cooking journey and the joy of sharing great meals!

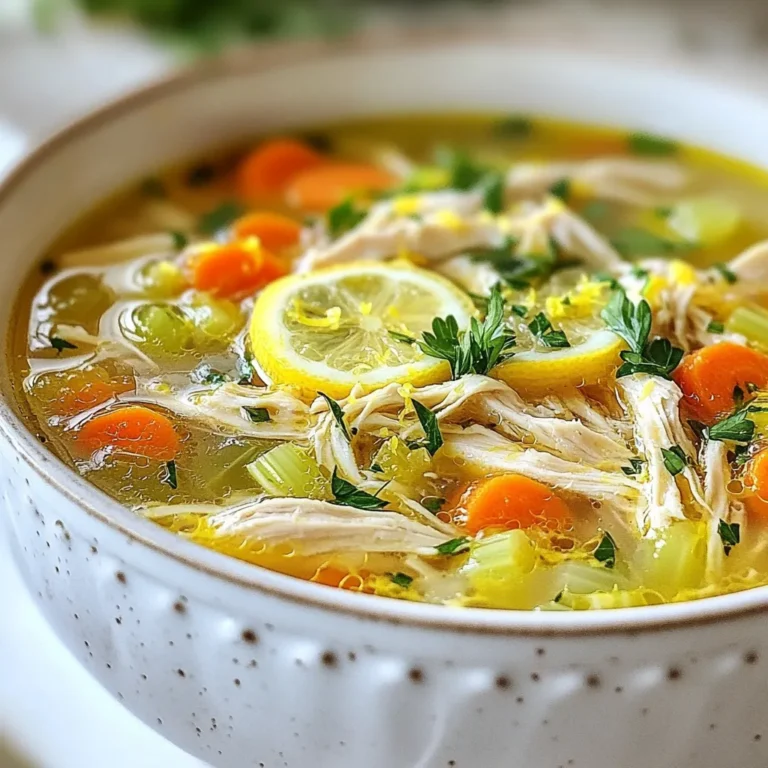
Lemon Chicken Soup Flavorful Comfort in a Bowl

To make the Strawberry Earthquake Cake, you will need a few key items. Here is a simple list of what you'll need: - 1 box strawberry cake mix - 1/2 cup vegetable oil - 3 large eggs - 1 cup water - 1 cup fresh strawberries, chopped - 1 cup cream cheese, softened - 2 cups powdered sugar - 1 teaspoon vanilla extract - 1/2 cup unsweetened cocoa powder - 1/4 cup milk - 2 cups whipped cream (for topping) - Fresh strawberries for garnishing Each ingredient plays a big role in flavor and texture. The strawberry cake mix gives the cake its sweet base and lovely pink color. The eggs and oil add moisture and richness. Fresh strawberries add bursts of fruity goodness. Cream cheese mixed with sugar and cocoa gives a delicious swirl that makes this cake special. Whipped cream on top adds a light finish. You can find all these ingredients at your local grocery store. Choose fresh strawberries that are bright and firm for the best flavor. As you gather your items, get ready for a fun and tasty baking adventure! {{ingredient_image_1}} 1. Preheat your oven and prepare the baking pan. Start by setting your oven to 350°F (175°C). While it warms up, grease and flour a 9x13-inch baking pan. This helps the cake slide out easily once it's baked. 2. Mix the main batter and fold in strawberries. In a large mixing bowl, combine the strawberry cake mix, 1/2 cup of vegetable oil, 3 large eggs, and 1 cup of water. Mix these on medium speed for about 2-3 minutes. You want the batter to be smooth and well blended. Once mixed, gently fold in 1 cup of chopped fresh strawberries. This adds great flavor and texture to your cake. 3. Prepare the cream cheese mixture. In another bowl, beat 1 cup of softened cream cheese until it's smooth. Gradually add in 2 cups of powdered sugar, 1 teaspoon of vanilla extract, and 1/2 cup of unsweetened cocoa powder. Mix until everything is well combined. This cream cheese layer will add a rich taste to your cake. These steps set the foundation for a delicious Strawberry Earthquake Cake. Enjoy the process and the delightful smells that fill your kitchen! Ensuring the batter is smooth Start with the right tools. Use a good mixer to blend the cake mix. Mix at medium speed for about 2-3 minutes. This helps create a nice, smooth batter. If you see lumps, keep mixing. Make sure the batter is evenly blended before adding strawberries. Tips for swirling the cream cheese mixture After you make the cream cheese mix, use a spoon to add it to the batter. Place dollops of this mixture on the first layer of batter. Use a toothpick or knife to gently swirl it. Don’t swirl too much; you want to see the two layers. This creates a pretty pattern when baked. Achieving the ideal whipped cream consistency When you make the whipped cream, start with cold milk and cream. Use a whisk or mixer to beat them together. Stop when you see soft peaks. This means it’s fluffy but not too stiff. Spread it over the cooled cake for a light, airy topping. Pro Tips Use Fresh Strawberries: Fresh strawberries not only enhance the flavor but also add a beautiful texture to the cake. Opt for ripe, juicy strawberries for the best results. Swirling Technique: When swirling the cream cheese mixture, use a gentle hand to create beautiful marbled patterns without fully mixing it into the batter. Cool Completely: Allow the cake to cool completely before adding the whipped cream topping. This ensures the whipped cream stays fluffy and doesn't melt into the cake. Garnish Just Before Serving: Add fresh strawberries as a garnish right before serving to maintain their freshness and vibrant color. {{image_2}} You can easily change this recipe to suit your taste. Here are some fun ideas: - Substituting other fruits: Instead of strawberries, you can use blueberries, raspberries, or peaches. Each fruit adds a new flavor. Just chop them up like you do with strawberries. - Making a gluten-free version: To make this cake gluten-free, use a gluten-free cake mix. Many brands offer great options. Just follow the box instructions. The rest of the recipe stays the same. - Adding different flavor extracts: Try using almond or lemon extract instead of vanilla. A few drops can change the whole cake. It adds a new twist while keeping the cake light and tasty. Feel free to experiment with these ideas. Each variation brings something new to your Strawberry Earthquake Cake. To keep your Strawberry Earthquake Cake fresh, follow these tips: - Wrap the cake tightly: Use plastic wrap or aluminum foil. This helps keep moisture in. - Use an airtight container: You can place slices in a container. This keeps the cake from drying out. - Store in the fridge: The cake stays fresh for up to five days when refrigerated. If you want to enjoy the cake later, freezing is a great option: - Freeze whole or in slices: Wrap each slice or the whole cake in plastic wrap. Then place it in a freezer-safe bag. - Label it: Write the date on the bag. This helps you remember when you froze it. - Thaw before serving: When ready to eat, take the cake out and let it sit in the fridge overnight. This keeps it moist. This cake can last up to three months in the freezer. Enjoy your delicious creation whenever you want! Can I use frozen strawberries? Yes, you can use frozen strawberries. Just make sure to thaw and drain them first. This step keeps the cake from getting too wet. Frozen strawberries may not taste as fresh, but they work well in a pinch. How long does the cake last in the fridge? The cake lasts about 3 to 5 days in the fridge. To keep it fresh, cover it tightly with plastic wrap or foil. This helps keep the cake moist and tasty. Can I make this cake in advance? You can make this cake a day ahead. Just bake and cool it, then store it in the fridge. Add the whipped cream topping before serving for the best taste and look. This way, you can enjoy the cake without rushing! You learned how to make a delicious Strawberry Earthquake Cake. We covered the key ingredients you need, the easy steps to prepare it, and tips to perfect the cake. You also discovered fun variations to try and how to store your cake properly. Making this treat can bring joy and flavor to any occasion. Enjoy your baking and share this yummy cake with family and friends!

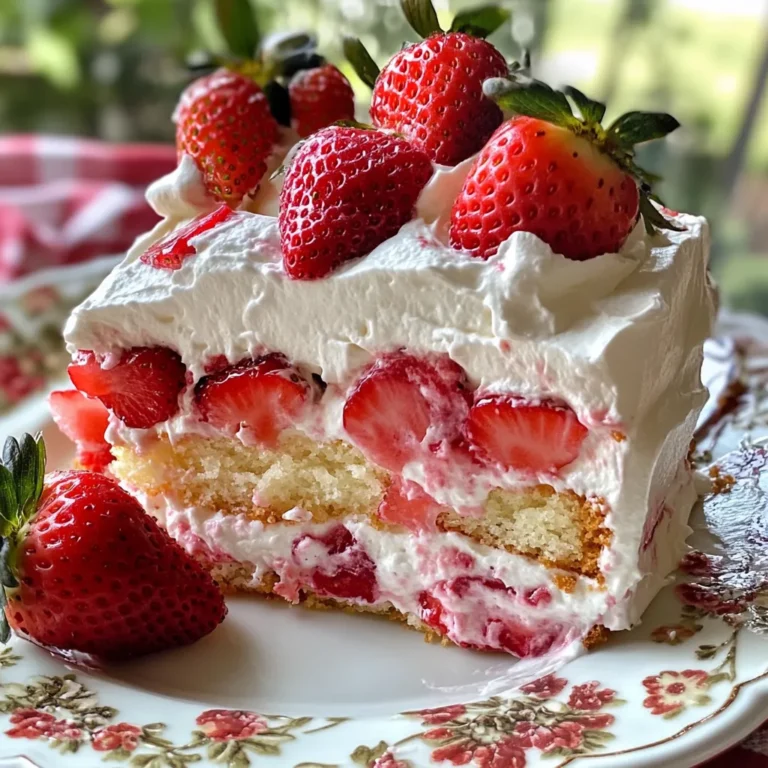
Strawberry Earthquake Cake Delightful and Easy Recipe

PREV 1 … 51 52 53 … 56 NEXT
secrets pice kitchen

explore

DessertsDinnerAppetizersDrinks

Our Policies

  • Cookie Policy
  • Copyright Policy
  • Disclaimer
  • GDPR Policy
  • Terms Of Use
Back to Top
  • About
  • Contact Us
  • Privacy Policy
© 2025 secrets pice kitchen