FREE DINNER EBOOK! Get your copy!
  • Cookie Policy
  • GDPR Policy
  • Disclaimer
  • Terms Of Use
  • Visit my other site: Fun Cookie Recipes
secrets pice kitchen
  • Home
  • Dinner
  • Desserts
  • Drinks
  • Appetizers
  • Contact
  • About
  • Privacy Policy
  • Home
  • Dinner
  • Desserts
  • Drinks
  • Appetizers
  • Contact
  • About
  • Privacy Policy
  • Cookie Policy
  • GDPR Policy
  • Disclaimer
  • Terms Of Use
Visit my other site: Fun Cookie Recipes

HOME / CATEGORIES /

Latest

- 1 large flatbread or naan - 1 cup cooked chicken breast, shredded - 1/2 cup basil pesto - 1 cup cherry tomatoes, halved - 1 cup fresh spinach leaves - 1/2 cup mozzarella cheese, shredded - 1/4 cup feta cheese, crumbled - 1 tablespoon olive oil - Salt and black pepper to taste - Fresh basil leaves for garnish When choosing your ingredients, freshness is key. Look for flatbreads that are soft and pliable. Check for the chicken; it should be cooked and moist, not dry. For basil pesto, buy a brand that uses real basil. Cherry tomatoes should be firm and vibrant. The spinach should look fresh and green. Cheese should be fresh too; avoid anything that looks dried out or has an off smell. You can add more flavor with different toppings. Try adding bell peppers for crunch or red onions for a bit of spice. If you love heat, sliced jalapeños work well too. You can swap mozzarella for provolone or gouda for a unique taste. For a vegetarian option, replace chicken with roasted veggies or chickpeas. Customize it to fit your taste! {{ingredient_image_1}} Start by preheating your oven to 400°F (200°C). This gets the heat ready for your flatbread. While the oven warms up, grab a baking sheet. Lay your flatbread or naan flat on it. Brush the top lightly with olive oil. This helps the flatbread get golden and crisp. In a bowl, mix 1 cup of shredded cooked chicken with 1/2 cup of basil pesto. Stir until the chicken is well coated. Next, sprinkle salt and black pepper to taste. Spread this pesto chicken mix evenly over the flatbread. Now, scatter 1 cup of halved cherry tomatoes and 1 cup of fresh spinach leaves on top. Finish by sprinkling 1/2 cup of shredded mozzarella and 1/4 cup of crumbled feta cheese all over. Place the flatbread in your preheated oven. Bake for about 10-12 minutes. Look for bubbly cheese and a slightly golden top. Once it’s done, take it out and let it cool for a minute. Slice it up and add fresh basil leaves for a nice touch. Enjoy your tasty pesto chicken flatbread! When you cook chicken for this flatbread, use cooked chicken breast. Shredded chicken works best. You can use leftover chicken or rotisserie chicken. It saves you time and adds great flavor. Always ensure your chicken is moist. Dry chicken can ruin your flatbread. To boost your pesto flavor, add garlic or lemon juice. These simple ingredients brighten up the taste. You can also mix in some grated Parmesan cheese. This adds creaminess and depth. If you like heat, a pinch of red pepper flakes is great. Fresh basil leaves as a topping add even more flavor. For the best cheese melt, use a mix of mozzarella and feta. Mozzarella offers stretchiness, while feta adds a salty kick. Spread the cheese evenly over the toppings. Don't pack it too thick. Bake until the cheese is bubbly and golden. This takes about 10-12 minutes at 400°F (200°C). Let it cool for a minute before slicing. Pro Tips Choose the Right Flatbread: Opt for a thicker flatbread or naan to hold the toppings without getting soggy. Add Texture: Consider adding nuts or seeds like pine nuts or sunflower seeds for an extra crunch. Freshness Matters: Use fresh basil pesto for a more vibrant flavor; store-bought can be convenient but may lack depth. Customize Your Toppings: Feel free to experiment with additional toppings like bell peppers, olives, or artichokes for a unique twist. {{image_2}} If you don't have flatbread or naan, use these options: - Pita bread - Tortillas - English muffins - Pizza crust Each of these will give a different taste and texture. Pita bread is soft and chewy. Tortillas add a nice crisp. English muffins bring a fun crunch, while pizza crust can offer a classic pizza vibe. Feel free to mix it up with toppings! Try these: - Roasted bell peppers - Sliced olives - Artichoke hearts - Grilled zucchini You can also add different cheeses, like goat cheese or cheddar. For a spicy kick, sprinkle red pepper flakes on top. Each addition adds new flavors and fun to your flatbread. For a vegetarian version, skip the chicken. Use beans or chickpeas for protein. Swap the flatbread for a gluten-free option, like gluten-free tortillas or cauliflower crust. These changes keep the dish tasty and satisfying. You can also load it with extra veggies, like mushrooms or broccoli. Enjoy the fresh taste and health benefits! To keep your leftover pesto chicken flatbread fresh, wrap it well. Use plastic wrap or aluminum foil. You can also place it in an airtight container. This helps keep it from drying out. Store it in the fridge. It will stay good for about 2-3 days. To reheat your flatbread, preheat your oven to 350°F (175°C). Place the flatbread on a baking sheet. Heat for about 10 minutes. This warms it up and keeps the crust crisp. You can also use a microwave for a faster option. Just heat it for about 30 seconds. However, this may make the crust soft. You can freeze pesto chicken flatbread for later. Cut it into slices for easy serving. Wrap each slice in plastic wrap. Then, place them in a freezer bag. Be sure to remove as much air as possible. It will last about 2-3 months in the freezer. To eat, thaw it in the fridge overnight. Then, reheat it in the oven for the best taste. Yes, you can use store-bought pesto. It saves time and still tastes great. Look for a brand with fresh ingredients. This choice makes your life easier and your flatbread delicious. Pesto chicken flatbread lasts about 2-3 days in the fridge. Store it in an airtight container to keep it fresh. You can enjoy leftovers for a quick meal or snack! Yes, you can prepare it in advance. You can make the flatbread and toppings separately. Assemble them when ready to bake. This way, you can enjoy fresh flatbread without a lot of work. Some good side dishes include a fresh salad or roasted veggies. A light soup also pairs well. These options balance the meal and add flavor. You can mix and match based on your taste! This post covered all you need for a tasty pesto chicken flatbread. We reviewed fresh ingredients and how to choose them. You learned easy steps to prepare and bake your flatbread. I shared tips for cooking chicken and enhancing your pesto. You also explored different variations and how to store leftovers. Remember, cooking is fun and allows for creativity. Enjoy trying new toppings and flavors. Happy cooking!

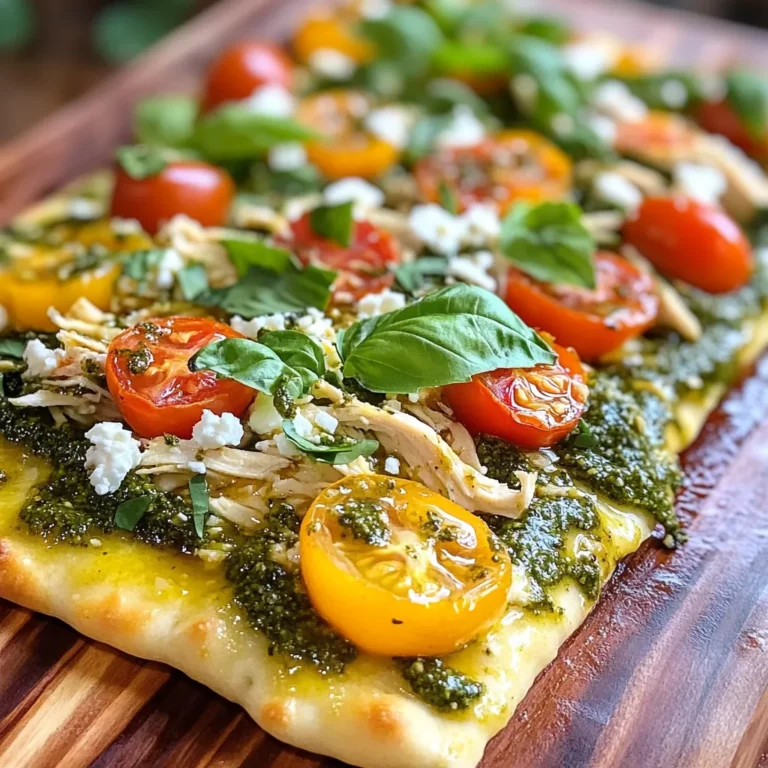
Pesto Chicken Flatbread Flavorful and Easy Recipe

- 4 medium potatoes, peeled and diced - 1 tablespoon olive oil - 1 cup chopped green onions (green tops only) - 2 cups vegetable broth (low FODMAP) - 1 cup unsweetened almond milk - 1 teaspoon dried thyme - Salt and pepper to taste - 2 tablespoons fresh parsley, chopped (for garnish) Each ingredient plays a key role. Potatoes give the soup its creamy base. They are rich in fiber and nutrients. Olive oil adds a smooth texture and healthy fats. Green onion tops bring a mild onion flavor without high FODMAPs. Vegetable broth provides a savory depth while keeping it low FODMAP. Unsweetened almond milk adds creaminess without dairy. Dried thyme offers a lovely herb note. Lastly, salt and pepper enhance all the flavors. If you want to change things up, you can use different ingredients. Instead of potatoes, try using parsnips for a different taste. You can swap almond milk for coconut milk if you prefer. For broth, make sure you choose one with low FODMAP levels. Always check labels to avoid hidden FODMAPs. {{ingredient_image_1}} First, gather all your ingredients. You need 4 medium potatoes, 1 tablespoon olive oil, and 1 cup chopped green onions (only the green tops). Also, grab 2 cups of low FODMAP vegetable broth, 1 cup unsweetened almond milk, 1 teaspoon dried thyme, and salt and pepper. Lastly, have 2 tablespoons of fresh parsley ready for garnish. Now, peel and dice the potatoes. Dice them into small cubes for even cooking. Chop the green onion tops finely. This will add flavor to your soup. In a large pot, heat the olive oil over medium heat. Once hot, add the chopped green onion tops. Sauté them for 2-3 minutes until they smell great. Next, add the diced potatoes to the pot. Stir well, coating them with the oil and green onions. This step helps build flavor. Pour in the vegetable broth, making sure the potatoes are fully submerged. Bring the mixture to a boil. Then, reduce the heat and let it simmer for 15-20 minutes. Cook until the potatoes are tender. You can check this by piercing them with a fork. After cooking, remove the pot from the heat. Use an immersion blender to puree the soup until it is smooth. If you don’t have one, carefully transfer the hot soup to a blender in batches. Be cautious to avoid spills and burns. Once blended, return the soup to the pot. Stir in the almond milk and dried thyme. Cook on low heat for an extra 5 minutes. This step warms the soup and blends all the flavors together. Finally, season with salt and pepper to taste. Serve the soup hot, garnished with fresh parsley. Enjoy this creamy, comforting dish! To boost flavor, use fresh herbs. Thyme adds a lovely touch. You can also try adding a squeeze of lemon juice. This gives your soup a bright taste. Always taste as you go. Adjust the salt and pepper to suit your liking. One mistake is not sautéing the green onion tops long enough. This step builds flavor. Another mistake is not blending the soup well. Ensure you blend until smooth. Lumps can ruin the creamy texture. Lastly, don’t skip the almond milk. It makes the soup rich and creamy. To achieve the best texture, use an immersion blender. It’s easy to control and reduces mess. If you use a regular blender, let the soup cool first. Hot soup can cause splatters. Blend in small batches for safety. If the soup is too thick, add more almond milk. This will help you reach your desired creaminess. Pro Tips Use Yukon Gold Potatoes: Their creamy texture makes for a richer soup. Blend to Your Desired Consistency: For a chunkier soup, blend only half of it and mix it back in. Add a Splash of Lemon: A little acidity can enhance the flavors and brighten the soup. Store Properly: Refrigerate in an airtight container for up to 3 days; reheat gently to avoid curdling the almond milk. {{image_2}} You can boost the protein in your creamy potato soup. Try adding cooked chicken, turkey, or firm tofu. These options are low FODMAP and fit well with the soup's creamy texture. Simply shred or cube the protein and stir it in during the last few minutes of cooking. This adds flavor and makes the soup more filling. Herbs and spices can change the taste of your soup. You can use fresh herbs like basil or chives for a bright flavor. You can also add spices like paprika for warmth. If you like a kick, try adding a pinch of cayenne pepper. Just be careful not to add too much; a little goes a long way. Mix in any herbs or spices after blending for the best flavor. If you want a dairy-free option, almond milk works great in this soup. You can also use coconut milk for a creamier texture. Just make sure it’s unsweetened to keep it low FODMAP. If you want to thicken the soup, blend in some cooked cauliflower or use a low FODMAP cream substitute. This keeps the soup rich and flavorful without dairy. To store your creamy potato soup, let it cool first. Use an airtight container for best results. This keeps the soup fresh and tasty. Place the soup in the fridge. It can stay good for up to three days. Make sure to label the container with the date. If you want to freeze the soup, use freezer-safe containers. Leave some space at the top. This allows the soup to expand as it freezes. The soup can last for about three months in the freezer. For best taste, avoid freezing if you added almond milk, as it may change the texture. When you're ready to enjoy the soup again, thaw it overnight in the fridge. Heat it slowly on the stove over medium heat. Stir often to avoid burning. If it’s too thick, add a splash of almond milk or broth. You can also microwave it in a safe bowl. Heat in short bursts and stir in between. Enjoy your comforting soup! A Low FODMAP diet helps people with gut issues. FODMAP stands for fermentable oligosaccharides, disaccharides, monosaccharides, and polyols. These are carbs that some people struggle to digest. This diet cuts out high FODMAP foods for a while. It helps to reduce gas, bloating, and pain. You can slowly add foods back to see what works for you. Yes, you can use different potatoes in this soup. For example, red or yellow potatoes work well. Just make sure they are low FODMAP. Avoid using high FODMAP potatoes like sweet potatoes. The taste may change a bit, but the soup will stay creamy. Stick to the amount of potatoes in the recipe for best results. The soup lasts about 3 to 4 days in the fridge. Store it in an airtight container to keep it fresh. If you want it to last longer, you can freeze it. Just remember to let it cool before freezing. This way, you can enjoy a warm bowl of soup anytime you like! This blog post covers the key ingredients for making a great soup. Each ingredient plays a crucial role in flavor and nutrition. I shared helpful alternatives for a Low FODMAP diet, along with clear steps for making the soup. You learned tips to enhance flavor and avoid common mistakes. I also discussed how to store leftovers effectively. In closing, remember that good soup combines the right ingredients with skillful preparation. Enjoy your cooking journey with tasty, gut-friendly options!

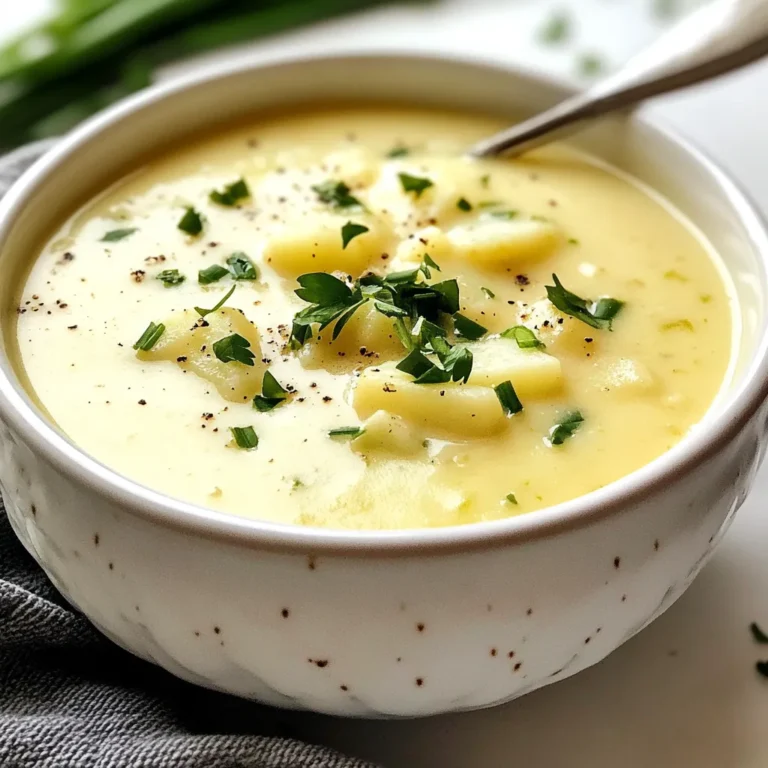
Low FODMAP Creamy Potato Soup Tasty and Comforting

- 1 pound ground turkey - 2 medium zucchinis, diced - 1 bell pepper, chopped (your choice of color) - 1 small onion, finely chopped - 2 cloves garlic, minced - 1 teaspoon Italian seasoning - ½ teaspoon smoked paprika - Salt and pepper to taste - 1 cup cherry tomatoes, halved - 1 cup fresh spinach - Grated Parmesan cheese for serving (optional) When making this Turkey Zucchini Skillet, you need fresh, simple ingredients. Ground turkey gives a lean protein base. Zucchini adds a nice texture and flavor. Choose a bell pepper that you love. The onion brings sweetness and depth. Garlic is a must for that aromatic touch. For seasoning, I like to keep it simple. Italian seasoning mixes well with the turkey and veggies. Smoked paprika adds a hint of smokiness. Salt and pepper bring everything together. If you want to take it up a notch, add optional ingredients. Cherry tomatoes burst with flavor when cooked. Fresh spinach wilts beautifully and adds color. A sprinkle of grated Parmesan gives a rich finish. Feel free to mix in your favorites! {{ingredient_image_1}} Start by heating 1 tablespoon of olive oil in a large skillet over medium heat. Add the finely chopped onion and bell pepper to the pan. Cook these for about 4-5 minutes until they soften and turn a little sweet. Next, stir in the minced garlic, Italian seasoning, and smoked paprika. Let this cook for another minute until you smell the great aroma. Now, it's time to add the ground turkey. Break it apart with a spatula as you add it to the skillet. Cook until it turns brown and is no longer pink, about 6-8 minutes. Season with salt and pepper to taste. This will help bring out the flavor of the turkey. Once the turkey is cooked, it's time to add the diced zucchinis. Stir them in and cook for about 4-5 minutes. You want them to soften but not get mushy. After that, add the halved cherry tomatoes and fresh spinach to the skillet. Cook for another 2-3 minutes until the spinach wilts and the tomatoes soften. This mix of colors and flavors makes the dish pop. To make your turkey and zucchini tender, use medium heat while cooking. This keeps the meat juicy and the veggies soft. Start by sautéing the onion and bell pepper in olive oil. This step builds a strong flavor base. Always use fresh veggies for the best taste. Look for zucchinis that are firm and bright in color. Avoid those with soft spots or wrinkles. Fresh bell peppers should have smooth skin and a nice crunch. Adding spices can take your dish to the next level. Italian seasoning is a great start, but feel free to mix in some dried oregano or thyme. A pinch of red pepper flakes can add some heat if you like spice. For a twist, try adding a splash of lemon juice before serving. It brightens the flavors beautifully. Toppings can also enhance your meal. Grated Parmesan cheese is a classic choice. It adds a rich, savory flavor. You might also consider a dollop of sour cream or a sprinkle of fresh herbs like basil or parsley. These will give your dish a fresh touch. Pro Tips Choose Lean Turkey: Opt for lean ground turkey to reduce fat content while still keeping the meal hearty. Pre-sauté Zucchini: For a firmer texture, sauté zucchini separately before adding to the skillet. Season Gradually: Taste as you go! Adjust seasonings throughout the cooking process for the best flavor. Customize Veggies: Feel free to add or substitute other vegetables like mushrooms or spinach for added nutrition. {{image_2}} You can switch ground turkey for other meats. Try ground chicken or beef. For a plant-based option, use lentils or tofu. This gives you new flavors and textures. You can add more vegetables too. Carrots add sweetness, while broccoli gives a nice crunch. Bell peppers can be any color, which looks great and adds taste. Feel free to mix and match your favorite veggies. Want to make it low-carb or keto-friendly? Skip the tomatoes and use more zucchini. This keeps it filling without extra carbs. If you need gluten-free options, you’re in luck! The recipe is already gluten-free. Just check any added sauces or toppings. Always read labels to ensure they fit your needs. After enjoying your Turkey Zucchini Skillet, store any leftovers for later. First, let the dish cool down to room temperature. This helps prevent moisture build-up. Next, place the leftovers in an airtight container. I suggest using glass containers. They keep food fresh and are easy to clean. Label the container with the date. This way, you know when to eat it by. When you’re ready to enjoy your leftover skillet, use gentle heat. The best way is to reheat it in a skillet over medium heat. Stir it often. This keeps the turkey and veggies from getting tough. If you want to microwave it, use a microwave-safe bowl. Cover it with a lid or a damp paper towel to keep moisture in. If you freeze it, make sure to use a freezer-safe container. This keeps the food fresh for up to three months. When you want to eat it, thaw it overnight in the fridge before reheating. Enjoy your tasty meals! Can I use frozen zucchini for this recipe? Yes, you can use frozen zucchini. Just remember to thaw and drain it first. Frozen zucchini can be softer than fresh. This may change the texture of your dish. How many calories are in a serving of Turkey Zucchini Skillet? A serving has around 300 calories. This is an estimate and can vary based on the exact ingredients you use. Can I make this recipe in the oven? Yes, you can! Spread the mixture in a baking dish. Bake at 400°F for about 20-25 minutes. This method can give a nice roasted flavor. What's the best way to adjust servings for a larger group? To adjust servings, simply double or triple the ingredients. Ensure your skillet is large enough. You may need to cook in batches to avoid overcrowding. Can I add beans to this dish? Definitely! Beans add protein and fiber. Black beans or kidney beans work well. Just rinse and drain before adding them to the skillet. How do I ensure the turkey stays moist when cooking? To keep turkey moist, don’t overcook it. Use medium heat and stir often. Adding some broth or sauce can also help maintain moisture. This blog shared a simple recipe for a delicious Turkey Zucchini Skillet. You learned how to sauté fresh veggies, cook ground turkey, and add seasonings for flavor. Remember, you can customize this dish with swaps and extras that fit your taste. Storage tips help keep leftovers fresh and tasty. Try making this meal for a quick and healthy dinner. Enjoy the ease and great flavor that come with this recipe!

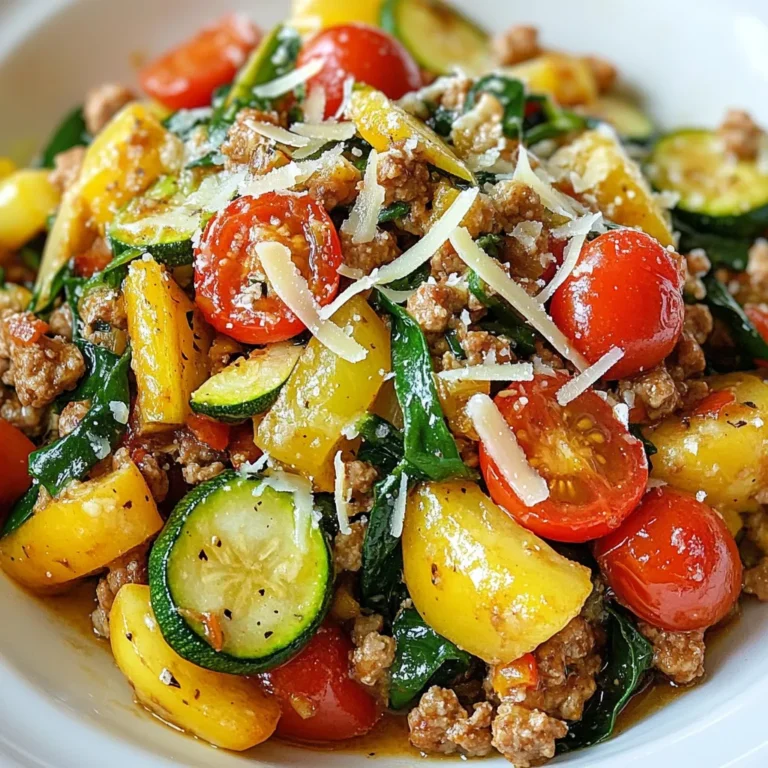
Turkey Zucchini Skillet Simple and Flavorful Meal

- 3 lbs beef chuck roast - 1 onion, sliced - 4 cloves garlic, minced - 4 cups beef broth - 1 tablespoon Worcestershire sauce - 2 teaspoons dried thyme - 2 teaspoons dried rosemary - Salt and pepper to taste - 6 hoagie rolls - 2 cups shredded provolone cheese - Fresh parsley, chopped (for garnish) When I make these sandwiches, I love to focus on the main ingredients. The beef chuck roast is key. It gives depth and richness to the dish. I slice an onion and mince garlic to add flavor. The broth is the heart of the dish. It keeps the beef moist and makes a great dip. I also add some seasonings. Worcestershire sauce brings a savory kick. Dried thyme and rosemary add warmth and aroma. Don’t forget salt and pepper. They enhance all the flavors. For the bun, I use hoagie rolls. They hold up well against the juicy beef. I top the sandwiches with provolone cheese. It melts nicely and adds creaminess. A sprinkle of fresh parsley gives a nice finish and color. These ingredients come together to create a warm, hearty meal. Each bite is a blend of rich beef, savory broth, and melted cheese. It's comfort food at its best! {{ingredient_image_1}} - Prepare the Roast: Season the beef chuck roast generously with salt and pepper. Make sure to coat all sides well. This adds flavor to the meat. - Sear the Meat: Heat olive oil in a large skillet over medium-high heat. Brown the roast for about 4-5 minutes on each side. This step is key for adding rich flavor. - Combine Ingredients: Transfer the seared roast to the slow cooker. Add sliced onion, minced garlic, beef broth, Worcestershire sauce, thyme, and rosemary. Stir everything together well. - Cook: Cover the slow cooker and set it to low. Cook for 8 hours until the beef is tender. It should shred easily with a fork when done. - Shred the Beef: Once the roast is cooked, remove it from the slow cooker. Use two forks to shred the beef. Return the shredded meat to the broth and mix it well. - Assemble the Sandwiches: Preheat your oven to broil. Place hoagie rolls on a baking sheet. Open each roll and fill them with the shredded beef mixture. Top with shredded provolone cheese. - Melt Cheese: Broil the sandwiches for about 2-3 minutes. Keep an eye on them until the cheese is melted and bubbly. Enjoy this savory delight with a side of broth for dipping! To season beef for optimal taste, use salt and pepper first. Generously coat all sides of the roast. This simple step brings out the beef's natural flavors. Next, add dried thyme and rosemary. They add depth and aroma. Also, consider using fresh herbs if you have them. Fresh herbs can enhance the dish even more. To enhance the broth flavor, add Worcestershire sauce to the slow cooker. This sauce brings a savory kick to the dish. You can also add more garlic for extra richness. If you want a deeper taste, try adding a splash of red wine. It can create a lovely balance in the broth. Slow cookers can vary in heat levels. If you have a higher wattage cooker, you may need less time. For most slow cookers, cook on low for 8 hours. If your cooker runs hot, check the meat after 6 hours. The beef should be tender and easy to shred. If it’s not, let it cook longer. Always trust your cooker and adjust the time as needed. For melting cheese, place the hoagie rolls under the broiler. This step gives the cheese a nice melt and bubbly texture. Keep the sandwiches on a baking sheet for easy handling. When broiling, watch the cheese closely. The broiler can burn the cheese quickly. Check it every minute or so. Once the cheese melts and gets golden, remove the sandwiches. Enjoy the deliciously gooey bites that follow! Pro Tips Choose the Right Cut: For the best flavor and texture, use a well-marbled beef chuck roast. It becomes tender and juicy after slow cooking. Enhance the Broth: Add a splash of red wine to the broth for a deeper flavor profile that complements the beef beautifully. Let It Rest: Allow the cooked roast to rest for 10-15 minutes before shredding. This helps retain moisture and improves the overall texture. Optimal Cheese Melting: For perfectly melted cheese, place the hoagie rolls under the broiler for just a couple of minutes, watching closely to prevent burning. {{image_2}} You can switch up the beef for a new taste. Beef chuck is great, but consider using brisket or round roast. These cuts can also work well in the slow cooker. If you want a twist, try pork shoulder. It gives a sweet flavor that pairs nicely with the broth. You can even use turkey breast for a lighter option. Just make sure to adjust the cooking time for leaner meats. While provolone is classic, other cheeses can change the game. Swiss cheese melts well and has a mild taste. Cheddar adds a sharp flavor that many people love. If you want something creamy, try mozzarella. For a bold kick, consider pepper jack cheese. Each cheese brings its own flair to the sandwich. The hoagie rolls are perfect, but you can explore other types of bread too. A crusty baguette holds up well and adds texture. If you like a softer bite, consider using brioche or ciabatta. For a whole grain option, look for whole wheat rolls. Each type of bread can give your sandwich a new feel and taste. After you enjoy your savory slow cooker French dip sandwiches, store the leftovers in an airtight container. Make sure to separate the meat from the buns to keep them fresh. You can keep the shredded beef in the fridge for up to four days. If you want to store the sandwiches as a whole, they will last about two days. When it’s time to enjoy your leftovers, reheat the beef in a pot over low heat. This method helps keep the meat moist. If you prefer the oven, wrap the sandwich in foil and heat it at 350°F for about 10-15 minutes. This will keep the bread soft while warming the beef. Yes, you can freeze French dip beef! Store it in a freezer-safe container. It can last for up to three months in the freezer. When you’re ready to eat, let it thaw in the fridge overnight. To reheat, warm it gently on the stove or in the microwave. This way, you’ll keep that great taste and texture. Slow Cooker French Dip Sandwiches are tasty sandwiches made with tender beef. The beef simmers in a savory broth. This method makes the meat juicy and full of flavor. The dish comes from French cuisine and has roots in the United States. People love these sandwiches for their rich taste and ease of preparation. Yes, you can! To prepare ahead, cook the beef the day before. Let it cool and then store it in the fridge. The next day, shred the beef and reheat it in the broth. This method keeps the meat moist and tasty. You can also prepare the hoagie rolls and cheese in advance. Just assemble the sandwiches right before serving. These sandwiches pair well with many sides. Here are some great options: - Crispy French fries - Fresh coleslaw - Steamed green beans - Potato chips - A simple garden salad Each side adds a nice touch to the meal and balances the flavors. You can get creative with toppings and condiments. Here are some fun ideas: - Add sliced jalapeños for heat. - Top with sautéed mushrooms for extra flavor. - Use horseradish sauce for a kick. - Try different cheeses like cheddar or Swiss. - Sprinkle fresh herbs like basil or oregano for a fresh taste. Use your favorite flavors to make the sandwich your own! This recipe for Slow Cooker French Dip Sandwiches blends rich flavors with easy steps. You learned about key ingredients, cooking methods, and how to customize your meal. You can choose different meats, cheeses, and bread to make it your own. These sandwiches are perfect for any occasion, and they store well too. Try making them ahead for a hassle-free meal. Enjoy sharing this tasty treat with friends and family. Happy cooking!

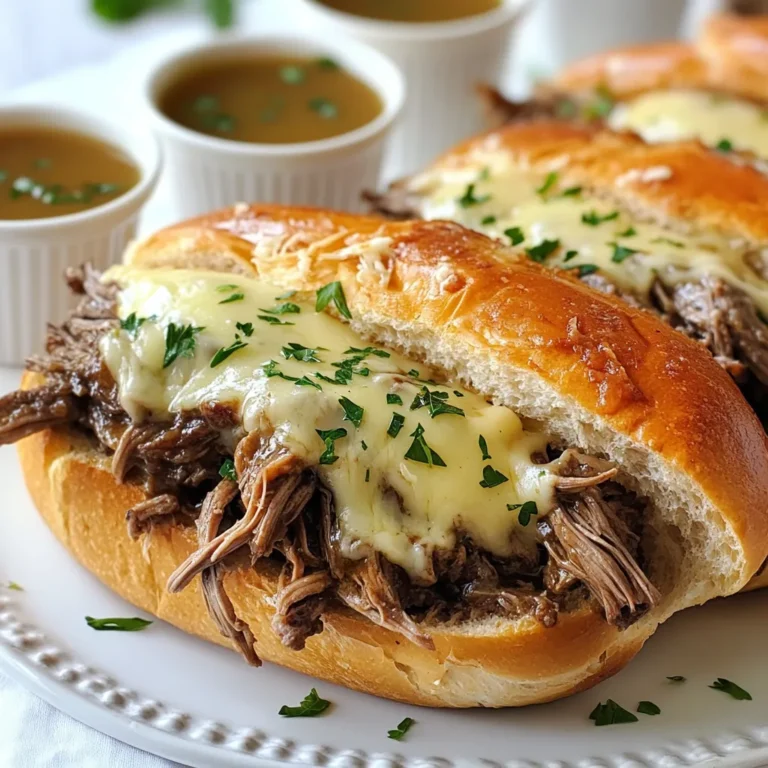
Savory Slow Cooker French Dip Sandwiches Recipe

To make this tasty Sausage Orzo Soup, you will need: - 1 lb Italian chicken sausage, casing removed - 1 cup orzo pasta - 1 medium onion, diced - 2 cloves garlic, minced - 2 medium carrots, diced - 2 stalks celery, diced - 1 can (14 oz) diced tomatoes - 6 cups chicken broth - 1 cup baby spinach - 1 teaspoon dried oregano - 1 teaspoon Italian seasoning - Salt and pepper to taste - 2 tablespoons olive oil - Fresh parsley, chopped (for garnish) Most of these ingredients are easy to find. If you can't get Italian chicken sausage, use any ground sausage you like. For orzo, you can swap in other small pasta shapes like ditalini or even quinoa for a gluten-free option. Fresh tomatoes work well instead of canned if you prefer. Feel free to mix in other veggies, such as bell peppers or zucchini, to suit your taste. Using fresh ingredients makes a big difference in flavor. Fresh vegetables bring brightness and crunch to the soup. Fresh herbs, like parsley, add a pop of color and taste. The chicken broth should be good quality for a rich base. When you use fresh ingredients, your soup will taste more vibrant and delicious. You can really taste the love you put into your cooking! {{ingredient_image_1}} Start by gathering your veggies. You will need one medium onion, two carrots, and two stalks of celery. Dice the onion and carrots into small pieces. Cut the celery into similar-sized bits. This helps all the veggies cook evenly. You can also mince two cloves of garlic. Minced garlic gives the soup a great flavor. Heat two tablespoons of olive oil in a large pot over medium heat. Once the oil is hot, add the diced onion, carrots, and celery. Sauté them for about five to seven minutes. You want them to soften up. Stir often to prevent burning. After they are soft, add the minced garlic. Cook for one more minute until you smell that yummy garlic aroma. Next, it’s time for the sausage. You will use one pound of Italian chicken sausage. Remove the casing from the sausage. Then, break it up and add it to the pot with the veggies. Use a wooden spoon to stir and cook the sausage. You need to cook it for about eight to ten minutes. The sausage should turn brown and be cooked through. This step adds a rich, savory flavor to the soup. Now it’s time to bring everything together. Pour in one can of diced tomatoes with their juices and six cups of chicken broth. Stir well and bring the mixture to a simmer. This base creates a hearty soup. Once it’s simmering, add one cup of orzo pasta. Sprinkle in one teaspoon of dried oregano and one teaspoon of Italian seasoning. These herbs add depth to the flavor. Cook the orzo according to the package instructions, which is about eight to ten minutes. Stir occasionally to keep the pasta from sticking. When the orzo is tender, stir in one cup of baby spinach. Cook for one to two minutes until the spinach wilts. Finally, season the soup with salt and pepper to taste. Your Sausage Orzo Soup is now ready! Serve it hot, garnished with fresh parsley for a burst of color and flavor. Start by heating the olive oil in a large pot. Use medium heat to avoid burning. Add diced onion, carrots, and celery. Sauté these veggies for about 5-7 minutes. You want them soft but not mushy. After that, add minced garlic and cook for one more minute. This brings out its great taste. When you add the Italian sausage, break it apart with a wooden spoon. This helps it cook evenly. Brown it well for about 8-10 minutes. This step adds a lot of flavor to your soup. To make your soup pop, use fresh herbs. Fresh parsley on top gives a nice touch. You can also sprinkle some red pepper flakes for heat. If you want a richer taste, add a splash of white wine when you cook the sausage. Let it simmer for a minute before adding broth. This step creates a deeper flavor. Don’t forget to taste your soup as it cooks. Adjust salt and pepper to your liking. The right seasonings make all the difference. If you have leftover soup, let it cool first. Then, store it in an airtight container. It can last in the fridge for up to three days. For longer storage, you can freeze it. Make sure to use freezer-safe containers. Label them with dates so you know when to use them. When you reheat, do it on low heat. Stir it well to heat evenly. This way, your soup stays tasty and safe to eat. Pro Tips Use Fresh Ingredients: Fresh vegetables and herbs can significantly enhance the flavor of your soup, making it more vibrant and delicious. Adjusting Thickness: If you prefer a thicker soup, reduce the amount of broth or add more orzo to achieve your desired consistency. Spice It Up: For an extra kick, consider adding red pepper flakes to the soup while cooking for some heat. Meal Prep Friendly: This soup can be made ahead of time and stored in the refrigerator for up to 3 days or frozen for longer storage, making it a great meal prep option. {{image_2}} You can boost this soup with extra veggies. Try adding zucchini or bell peppers for more color and flavor. Mushrooms also work well, adding depth to the taste. For some crunch, throw in some green beans or peas. They cook quickly and add nice texture. You can also add greens like kale or Swiss chard instead of baby spinach. If you want a lighter option, you can swap the Italian sausage for ground turkey or chicken. This keeps the soup healthy but still tasty. For a vegetarian version, use plant-based sausage or skip the meat entirely. You can replace orzo with quinoa or rice for gluten-free options. Just adjust the cooking time as needed. To spice things up, add red pepper flakes or diced jalapeños while cooking. This adds a nice kick to the soup. You can also add a splash of hot sauce just before serving. For extra flavor, try adding a squeeze of lemon juice. It brightens the dish and balances the richness of the sausage. Fresh herbs like basil or thyme can also elevate the taste. To keep your Sausage Orzo Soup fresh, let it cool first. Then, pour it into an airtight container. This method helps prevent spills and keeps flavors locked in. You can store it in the fridge for up to three days. If you plan to eat it later, freezing is a great option. Freezing your soup is easy. Use freezer-safe containers or bags. Leave some space at the top for expansion. Label the container with the date. Sausage Orzo Soup can last in the freezer for up to three months. When you’re ready to enjoy it, just thaw it in the fridge overnight. Reheating Sausage Orzo Soup is simple. You can use a pot on the stove or a microwave. If using the stove, heat over medium until hot. Stir often to avoid sticking. If using the microwave, heat in short bursts, stirring in between. Make sure it’s hot all the way through before serving. Enjoy your warm, comforting soup! Yes, you can use various sausages in this soup. Choose spicy sausage for heat or turkey sausage for a lighter option. Each type will change the taste but still keep it delicious. I love using Italian chicken sausage for its great flavor. Feel free to experiment with your favorites! Orzo is not gluten-free. It is made from wheat, which contains gluten. If you need a gluten-free option, use rice or gluten-free pasta. These alternatives fit well in the soup and provide a similar texture. Just watch the cooking times, as they may vary. This soup lasts about three to four days in the fridge. Store it in an airtight container to keep it fresh. Before serving, check for any changes in smell or color. If you want it to last longer, you can freeze it for up to three months. This blog covered key aspects of Sausage Orzo Soup. We looked at essential ingredients and their importance. You learned preparation and cooking tips to ensure great flavors. We also explored ingredient variations and how to store leftovers safely. In closing, embrace these tips and use fresh ingredients. Your soup will taste even better. Enjoy making this dish and share it with friends and family. They’ll love it!

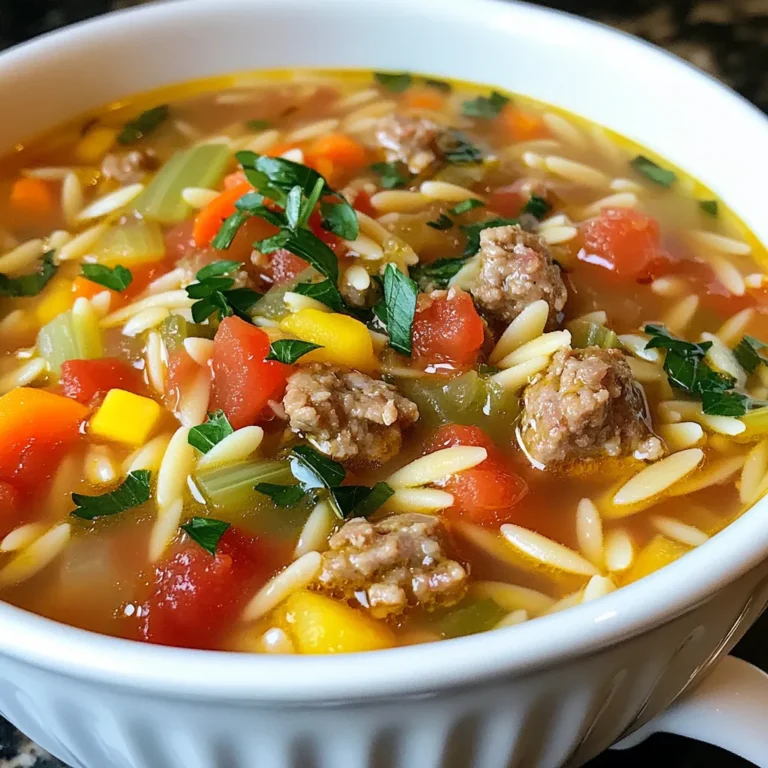
Sausage Orzo Soup Flavorful and Easy Comfort Dish

- 1 lb ground turkey or beef - 1 can (15 oz) black beans, drained and rinsed - 1 can (15 oz) corn, drained - 1 can (10 oz) diced tomatoes with green chilies - 1 packet taco seasoning - 2 cups tortilla chips, slightly crushed - 2 cups shredded cheese (cheddar or Mexican blend) - 1 bell pepper, diced (any color) - 1 small onion, finely chopped - 1 cup salsa - Optional toppings: sour cream, avocado, sliced jalapeños, chopped cilantro The first main ingredient is ground turkey or beef. This meat gives a nice base for flavor. I prefer turkey for a leaner choice. Next, we use black beans. They add protein and fiber, making the dish filling. Corn brings sweetness and texture. The diced tomatoes with green chilies add a spicy kick and juiciness. Taco seasoning brings all those bold flavors together in one packet. Tortilla chips add crunch, while cheese makes everything creamy and rich. The bell pepper and onion add fresh taste and color. Finally, salsa ties the whole dish with zest and tang. Each ingredient plays a part in making this casserole both tasty and hearty. You can customize your taco casserole with toppings. I suggest sour cream for creaminess. Avocado adds a smooth texture and healthy fats. Sliced jalapeños bring heat for those who love spice. Chopped cilantro gives a fresh finish. These toppings make each bowl special and personal. {{ingredient_image_1}} 1. Start by dicing one small onion and one bell pepper. You can use any color bell pepper you like. 2. Heat a skillet over medium heat. Add the onion and bell pepper. Cook until they are soft, about 5 minutes. 3. Next, add 1 pound of ground turkey or beef to the skillet. Cook until the meat is browned. Break it up with a spoon as it cooks. 4. Drain any fat from the meat if needed. 5. Once cooked, transfer the meat and veggies to your crockpot. 1. In the crockpot, add the following: - 1 can (15 oz) black beans, drained and rinsed - 1 can (15 oz) corn, drained - 1 can (10 oz) diced tomatoes with green chilies - 1 packet taco seasoning - 1 cup salsa 2. Stir everything well until mixed. 3. Layer half of the crushed tortilla chips (2 cups, slightly crushed) over the mixture. 4. Add half of the shredded cheese (2 cups, cheddar or Mexican blend) on top. 5. Pour the rest of the meat mixture on top. 6. Finish with the remaining tortilla chips and cheese. 7. Cover the crockpot and cook: - On low for 4-5 hours - On high for 2-3 hours 8. When it’s done, the cheese should be melted and bubbly. 1. Use a ladle to serve portions in individual bowls. 2. Top each serving with optional toppings like: - Sour cream - Avocado - Sliced jalapeños - Chopped cilantro 3. For a nice look, add a fresh sprig of cilantro on top of each bowl. Enjoy! To make the best taco casserole, start with good meat. I like ground turkey or beef. Brown it well with onion and bell pepper. This helps add more flavor. Use a wooden spoon to break up the meat. Drain any fat to keep it light. Mix in all the other ingredients well. Layering is key! Alternate the chips and cheese for a great texture. You can change this recipe to fit your taste. Want it spicier? Add jalapeños or hot salsa. Prefer veggies? Swap the meat for mushrooms or zucchini. Use different beans like pinto or kidney beans. You can also try new cheese, like pepper jack or feta. This recipe is flexible, so have fun with it! Prep ahead to save time later. Chop the onion and bell pepper the night before. You can also cook the meat in advance. Just store it in the fridge. When it’s time to cook, everything will be ready. Use canned ingredients like beans and tomatoes for quick meals. This makes the prep easy and fast! Pro Tips Ingredient Substitutions: If you're looking for a healthier option, you can replace ground turkey with lean ground chicken or use plant-based meat alternatives for a vegetarian version. Layering Technique: For an extra cheesy layer, consider adding some cheese in between the layers of meat and tortilla chips for a gooey texture throughout the casserole. Spice It Up: If you love heat, add some diced jalapeños or a dash of hot sauce to the meat mixture for an additional kick of flavor. Make-Ahead Meal: This casserole can be prepped the night before. Simply assemble all the ingredients in the crockpot and refrigerate. Cook it the next day for a hassle-free dinner. {{image_2}} You can easily make this dish vegetarian. Use lentils or black beans instead of meat. Tofu crumbles also work well. These options give you protein without meat. You can still follow the same steps for cooking. Just add your meat alternative when you mix the other ingredients. To make a low-carb or keto taco casserole, skip the tortilla chips. Instead, use cauliflower rice. This keeps the dish tasty while lowering carbs. You can also add more veggies, like zucchini or spinach, for extra nutrition. These changes keep the flavors bold without the extra carbs. You can adjust the heat level easily. For a milder dish, use regular diced tomatoes. Choose mild salsa and skip the jalapeños. If you like it spicy, add chopped fresh jalapeños or a dash of hot sauce. You can also use spicy taco seasoning for more heat. This lets you control the flavor to fit your taste. Store leftover Crockpot Taco Casserole in an airtight container. Let it cool first. This keeps it fresh. Use glass or plastic containers. Label them with the date. You can keep it in the fridge for up to four days. To reheat, place the casserole in a microwave-safe dish. Heat it on high for about two minutes. Stir halfway through to ensure even heating. You can also reheat it in the oven. Set the oven to 350°F and cover the dish. Bake for about 15 to 20 minutes. Check that it is hot all the way through. You can freeze this dish for later. Put it in a freezer-safe container. It lasts up to three months. When ready to eat, move it to the fridge overnight to thaw. Reheat it as described above. Enjoy your easy meal anytime! Yes, you can use other meats. Ground chicken, pork, or even shredded beef work well. Each option adds a different flavor. Just make sure to cook the meat before adding it to the crockpot. This helps with taste and texture. If you like spicy food, try chorizo for a kick! To spice things up, you can add jalapeños or hot salsa. You can also use spicy taco seasoning. Another great idea is to mix in diced green chilies. If you like heat, slice fresh chili peppers on top when serving. This adds flavor and a nice crunch. Yes, you can cook this dish on the stovetop. Start by cooking the meat and veggies in a large pot. After that, mix in the beans, corn, and tomatoes. Let it simmer for about 20 minutes. Add the tortilla chips and cheese, then cover until the cheese melts. This method is quicker than using a crockpot. This blog post covered how to make a tasty taco casserole. We explored ingredients, step-by-step instructions, and helpful tips. You learned how to customize your dish and store leftovers safely. Remember, you can easily adjust flavors to fit your taste. Whether you want a vegetarian version or a low-carb option, the choices are endless. Now, you’re ready to make a delicious taco casserole that suits your needs. Enjoy your cooking adventure!

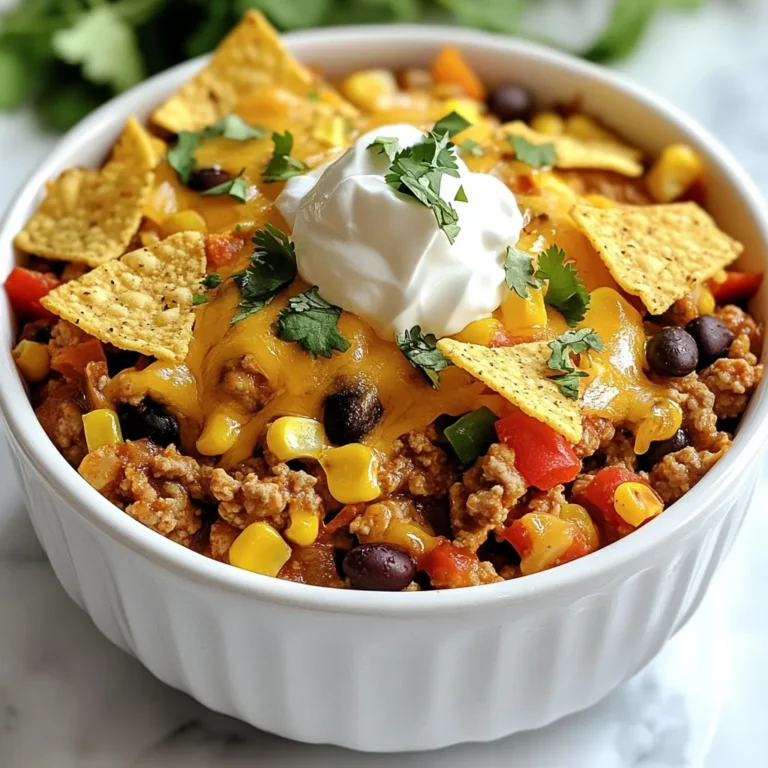
Crockpot Taco Casserole Flavorful and Easy Dinner

- Beef Chuck: You need 2 pounds of beef chuck. Cut it into chunks. This meat gives great flavor. - Dried Chilies: Use 3 dried guajillo chilies and 2 dried ancho chilies. Remove the seeds for less heat. These add depth to the dish. - Seasonings and Spices: Gather 1 onion, 4 cloves garlic, 1 teaspoon cumin, 1 teaspoon paprika, 1 teaspoon oregano, and 1 bay leaf. Don’t forget salt and pepper to taste. They create a rich flavor. - Corn Tortillas: Use fresh corn tortillas to hold the tasty filling. They add a nice texture. - Fresh Cilantro: Chopped cilantro adds a fresh touch. It brightens the flavors of the tacos. - Chopped Onions: Add chopped onions for crunch. They complement the meat well. - Lime Wedges: Serve lime wedges on the side. A squeeze of lime adds a zesty kick. {{ingredient_image_1}} Toasting and Soaking Methods First, we need to toast the dried chilies. I heat a dry skillet over medium heat. I place the guajillo and ancho chilies in the skillet. I toast them for about 2-3 minutes until they smell great. Be careful not to burn them. Once toasted, I remove them from heat. I then add the chilies to a bowl and cover them with hot water. I let them soak for 15 minutes until soft. Importance of Dried Chilies in Flavor Dried chilies bring deep flavor to birria tacos. They add heat, sweetness, and a rich color. Soaking helps release their taste. This step is key for a great birria. Blending Techniques and Consistency Tips I drain the soaked chilies and add them to a blender. I also add minced garlic, chopped onion, cumin, paprika, oregano, and a pinch of salt and pepper. I blend everything until smooth. If it’s too thick, I add a bit of beef broth. The marinade should be creamy and easy to pour. Searing for Optimal Flavor For cooking, I heat a bit of oil in a large pot. I add the beef chunks and sear them until they are brown on all sides. This step gives the meat a nice flavor. After browning, I remove the beef and set it aside. Simmering Process Explained In the same pot, I pour in the chili mixture and return the beef. I add a bay leaf and the remaining beef broth. I bring this to a boil, then lower the heat. I cover the pot and let it simmer for about 2-3 hours. The beef should become tender and easy to shred. Tips for Perfectly Shredded Meat After cooking, I take the beef out of the pot. I use two forks to shred it. I want to make sure it is in small, bite-sized pieces. Once shredded, I return the meat to the pot with the broth to keep it moist. Instructions for Heating Tortillas Next, I heat corn tortillas in a skillet until they are warm and slightly crispy. This step adds a nice texture to the tacos. Garnishing for Presentation On each tortilla, I add a generous scoop of the beef mixture. I top them with chopped onions and cilantro. I serve the tacos with lime wedges on the side. This adds fresh flavor and a pop of color. Using a slow cooker is great for busy days. It gently cooks the beef. You set it and forget it! Just add all the ingredients and let it simmer for hours. The meat becomes very tender and flavorful. A Dutch oven also works well. It heats evenly and retains heat well. You can sear your beef directly in it, adding depth to the flavor. Then, you add your chili mixture and broth. Cover it and let it simmer on the stove. Both methods yield juicy, tasty birria. Want to make your birria even better? Try adding extra spices! A pinch of cinnamon can add warmth. Chipotle powder brings a smoky flavor. If you like heat, add cayenne pepper or jalapeños. Just remember, balance is key. Add spices little by little and taste as you go. This way, you get a flavor that suits you best. Birria tacos shine with the right sides and drinks. You can serve them with rice and beans. These add heartiness to your meal. Don’t forget about fresh salsa or guacamole for extra flavor! For drinks, try a light beer or agua fresca. Limeade or hibiscus tea pairs well too. These drinks complement the spices in the tacos nicely. Enjoy your feast! Pro Tips Chili Selection: Use a mix of guajillo and ancho chilies for a perfect balance of flavor and mild heat. Marinating Time: If possible, let the beef marinate in the chili mixture overnight for deeper flavor. Shredding Technique: Use two forks to shred the beef, ensuring the pieces are bite-sized for easy taco assembly. Taco Assembly: Warm the tortillas just before serving to keep them pliable and enhance the overall texture of your tacos. {{image_2}} For those who want a meat-free option, you can use jackfruit or mushrooms. Jackfruit shreds easily and soaks up flavors well. Mushrooms add a rich, earthy taste. You can also use lentils for a hearty texture. You can make Birria tacos with chicken or pork too. Chicken thighs work best for tender meat. Just cook them the same way as beef. Pork shoulder is another great choice. It has a nice balance of fat and flavor. You can adjust the spice level to suit your taste. If you like it mild, reduce the dried chilies. Use just one guajillo chili instead of three. For more heat, add a few jalapeños to the marinade. You can also serve hot sauce on the side for those who want extra kick. To keep your Birria tacos fresh, store them in the fridge. Place the beef and broth in an airtight container. Make sure it cools first before sealing it. The tacos can last up to three days in the fridge. Keep tortillas separate to avoid sogginess. Want to save some for later? You can freeze Birria. First, cool the beef and broth completely. Then, place them in a freezer-safe container. You can also use freezer bags for easy storage. Label the bag with the date. It will stay good for about three months. When you're ready to eat, reheating is easy. Thaw the Birria in the fridge overnight if frozen. You can heat it on the stove over low heat. Add a splash of broth to keep it moist. For the tortillas, warm them in a skillet until they’re hot and crispy. Enjoy your delicious tacos again! Birria tacos are a tasty Mexican dish made with slow-cooked beef. The meat is often seasoned with dried chilies and spices, giving it a rich flavor. Originating from the state of Jalisco, birria is traditionally made for special occasions. You can enjoy birria as a stew or in tacos, which add a fun twist. Yes, you can make birria tacos ahead of time. I recommend cooking the beef a day before. Once cooked, let the beef cool and store it in the fridge. When you are ready to serve, just reheat the beef and prepare the tacos. This makes serving time easier and keeps the flavors strong. Birria tacos pair well with many sides. You can serve them with: - Mexican rice - Refried beans - Grilled corn - A fresh salsa - A side of pickled onions These sides enhance the meal and add more flavor. To make birria tacos more authentic, use traditional ingredients. Ensure you use dried guajillo and ancho chilies. These chilies give the dish its unique taste. Also, consider adding fresh herbs like thyme or bay leaves for depth. Finally, serve the tacos with a small bowl of the cooking broth for dipping. This adds a special touch to your meal. In this post, we explored the essentials for making delicious Birria Tacos. We covered key ingredients like beef chuck and dried chilies, as well as optional garnishes for added flavor. I shared step-by-step instructions, cooking methods, and storage tips to ensure your tacos are tasty and satisfying. Whether you stick to the classic recipe or try vegetarian options, these tacos are a crowd-pleaser. Take these tips and enjoy your cooking journey with Birria Tacos!

Mexican Birria Tacos Flavorful and Simple Recipe

To make a warm bowl of gyoza dumpling soup, you need a few key items: - 20 gyoza dumplings (store-bought or homemade) - 4 cups chicken or vegetable broth - 1 cup water - 1 tablespoon soy sauce - 1 teaspoon sesame oil - 1 inch ginger, thinly sliced - 3 green onions, chopped - 1 cup bok choy, roughly chopped - 1 carrot, julienned - Salt and pepper to taste These ingredients create a comforting base for your soup. The gyoza add texture, while the broth gives rich flavor. You can add a few garnishes to make your soup shine: - Fresh cilantro for garnish - Chili oil (optional) Cilantro adds a fresh taste. Chili oil gives a nice kick, if you like spice. If you don’t have some ingredients, don’t worry! Here are some swaps you can make: - Use frozen gyoza if fresh ones are not available. - Swap bok choy for spinach or kale. - Replace chicken broth with vegetable broth for a vegetarian option. These changes keep your soup tasty and easy to prepare. Feel free to mix and match based on what you have! {{ingredient_image_1}} Start by grabbing a large pot. Combine four cups of chicken or vegetable broth and one cup of water. Add one tablespoon of soy sauce and one inch of sliced ginger. Bring this mix to a gentle boil over medium heat. The ginger adds a nice touch of warmth. Once your broth is boiling, it’s time for the gyoza dumplings. Add twenty dumplings to the pot. Lower the heat to a simmer. Cook the dumplings for about six to eight minutes. While they cook, chop one cup of bok choy and julienne one carrot. Add these to the pot after the dumplings have simmered for a bit. Let them cook for two to three minutes until they're tender. Now, stir in one teaspoon of sesame oil and three chopped green onions. Season with salt and pepper to your taste. Carefully remove the pot from heat and toss out the ginger slices. Serve the soup hot in deep bowls. Garnish with fresh cilantro and add chili oil for a kick, if you like. For a fun touch, serve with chopsticks or a spoon. Enjoy! To get the best taste from your gyoza dumpling soup, focus on the broth. Use high-quality chicken or vegetable broth as your base. This will give your soup a rich and savory flavor. Adding soy sauce enhances the umami taste. Don't skip the sesame oil; it adds a nutty aroma. Always taste your soup as you go, adjusting with salt and pepper for balance. A few common mistakes can ruin your soup. First, don't overcrowd the pot with too many dumplings. This can make them stick together. Second, avoid boiling the soup too hard. A gentle simmer helps keep the dumplings intact. Lastly, remember to remove the ginger slices before serving. They can be too strong if left in. Making gyoza dumpling soup ahead of time is easy. You can prepare the broth and chop the veggies in advance. Store them in the fridge for up to two days. When you’re ready to eat, just heat the broth, add the dumplings, and cook as usual. This saves time on busy nights. You can also freeze the soup. Just leave out the dumplings and add them fresh when reheating. Pro Tips Use Fresh Ingredients: Fresh vegetables like bok choy and carrots enhance the flavor and texture of the soup. Opt for seasonal produce for the best taste. Customize the Broth: Experiment with different broths or add spices like star anise or garlic for a unique flavor profile that suits your taste. Gyoza Cooking Tip: Avoid overcrowding the pot when cooking gyoza. This ensures even cooking and prevents them from sticking together. Garnish for Flavor: Fresh cilantro and a drizzle of chili oil not only add a beautiful touch but also elevate the overall flavor of the soup. {{image_2}} You can use many types of gyoza in this soup. Store-bought gyoza saves time. You can find pork, chicken, or shrimp flavors. They all work great in the broth. If you want to try something special, make your own. Homemade gyoza allows you to mix your favorite fillings. Just remember to seal them well. This keeps the flavor inside while cooking. Making a vegetarian or vegan version is easy. Just swap the meat gyoza for vegetable ones. Many brands offer tasty vegetable gyoza. You can also make your own using tofu and veggies. For the broth, use vegetable broth instead of chicken. This keeps the soup rich in flavor. Add mushrooms for an earthy taste. You can also use more greens like spinach or kale. These options make the soup light yet satisfying. If you love spice, add some heat! You can use chili oil for a kick. Just drizzle it on top before serving. You might also add sliced fresh chili peppers to the broth. This gives a nice warmth. For even more flavor, include sriracha or a spicy sauce. Just remember to adjust the amount to your taste. Enjoy the warmth of this spicy twist! To store leftover Gyoza Dumpling Soup, let it cool first. Pour the soup into an airtight container. Make sure to keep the dumplings and broth together for best taste. Store it in the fridge for up to three days. Label the container with the date so you know when to use it. When you’re ready to eat, take the soup out of the fridge. Pour it into a pot and heat over medium heat. Stir it gently to ensure even heating. If it seems too thick, add a splash of water or broth. Heat until it’s hot, but do not let it boil. You can also use the microwave. Just cover it loosely and heat in short bursts. Stir in between to avoid hot spots. If you want to freeze the soup, it’s best to do it before adding the dumplings. Freeze the broth and vegetables in a freezer-safe container. This way, the texture stays nice. You can store it for up to three months. When you’re ready to enjoy it, thaw it in the fridge overnight. Then, add fresh gyoza dumplings and cook as usual. This gives you a fresh taste every time! Yes, you can use frozen gyoza dumplings. They are a great time saver. Just add them directly to your broth. Follow the package instructions for cooking time. This way, you get a quick meal without losing flavor. Gyoza dumpling soup comes from Japan. Gyoza itself is inspired by Chinese potstickers. The soup combines rich broth with tender dumplings. It became popular for its comforting taste. Many families enjoy it on cold days or when sick. Making homemade gyoza is fun and simple. Here’s how: - Dough: Mix flour and water to form a dough. - Filling: Use ground meat, vegetables, and soy sauce. - Shape: Roll out dough and cut circles. Add filling, then fold and pinch edges. - Cook: Steam, pan-fry, or boil the dumplings until done. You can customize the filling to fit your taste. Experiment with different flavors for a unique twist! Gyoza dumpling soup is a comforting dish packed with flavor. We covered the main ingredients, optional garnishes, and helpful substitutions. You learned step-by-step how to make the broth, cook the gyoza, and serve it up. Tips shared help you avoid mistakes and enhance flavor. Variations let you customize the soup to your taste, whether you want it spicy, vegetarian, or with different gyoza. With storage and reheating tips, you can enjoy leftovers easily. Remember, this soup is simple and fun to make, bringing warmth to any meal.

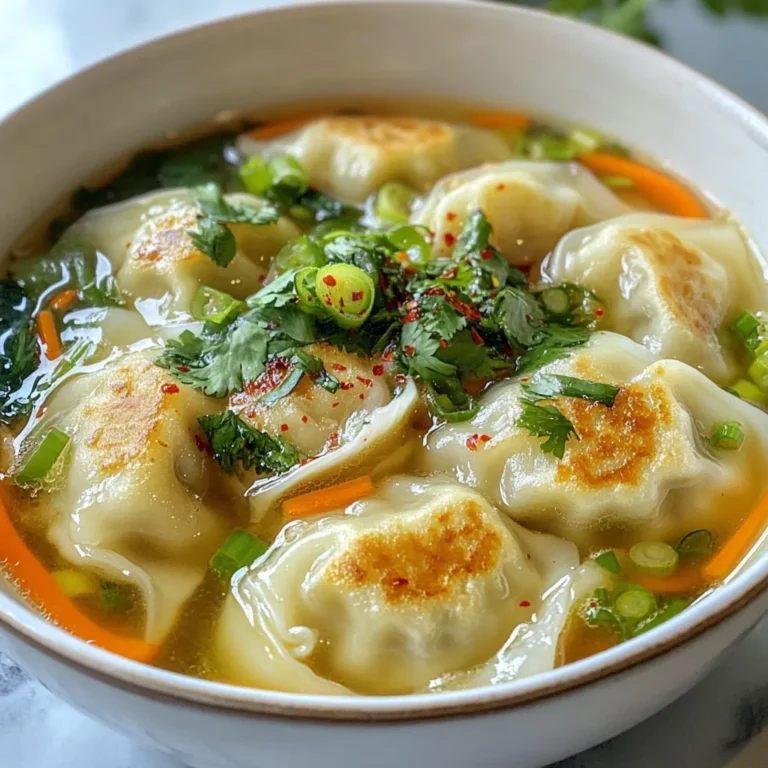
Gyoza Dumpling Soup Delicious and Simple Comfort Food

- 2 lbs chicken thighs, boneless and skinless - 1 cup all-purpose flour - 1/2 cup cornstarch - 1 teaspoon baking powder - 1 teaspoon salt - 1/2 teaspoon black pepper - 2 large eggs, beaten - 1 cup vegetable oil (for frying) For the Honey Sauce: - 1/2 cup honey - 2 tablespoons soy sauce - 1 tablespoon apple cider vinegar - 1 teaspoon grated fresh ginger - 1 teaspoon minced garlic - 1/2 teaspoon sesame oil - 1 teaspoon chili flakes (optional, for heat) Each ingredient plays a key role in this dish. Use 2 lbs of chicken thighs for juicy meat. The flour and cornstarch combo gives a crunchy coating. You can swap chicken thighs for breasts if you prefer. For the honey sauce, feel free to adjust the amount of honey for sweetness. If you want more heat, add extra chili flakes. You can also use rice vinegar instead of apple cider vinegar. {{ingredient_image_1}} To start, cut the chicken thighs into bite-sized pieces. Use a sharp knife for clean cuts. This helps the chicken cook evenly. After cutting, set the pieces aside in a bowl. This will keep them ready for coating. Next, make the coating mixture. In a large bowl, combine: - 1 cup all-purpose flour - 1/2 cup cornstarch - 1 teaspoon baking powder - 1 teaspoon salt - 1/2 teaspoon black pepper Mix these ingredients well. For coating, dip each piece of chicken in beaten eggs. Then, coat it evenly with the flour mixture. Shake off any extra flour. This step is key for that crispy texture. Now, heat the vegetable oil in a large frying pan. Keep the heat at medium-high. Once the oil shimmers, add the chicken in batches. Don't overcrowd the pan or the chicken won't cook right. Fry for about 5-7 minutes, or until golden brown. Then, remove the chicken and drain it on paper towels. While the chicken fries, prepare the honey sauce. In a small saucepan, combine: - 1/2 cup honey - 2 tablespoons soy sauce - 1 tablespoon apple cider vinegar - 1 teaspoon grated fresh ginger - 1 teaspoon minced garlic - 1/2 teaspoon sesame oil - 1 teaspoon chili flakes (optional) Heat this mixture over low to medium heat. Stir frequently until it bubbles gently. This helps blend the flavors. Once ready, remove it from heat. After frying, place the crispy chicken in a large mixing bowl. Drizzle the warm honey sauce over the chicken. Toss gently to coat each piece evenly. For serving, plate the chicken on a platter. Drizzle any leftover sauce on top. Optionally, sprinkle sesame seeds and sliced green onions for a nice touch. Enjoy your delicious crispy honey chicken! To get that extra crunch on your crispy honey chicken, follow these tips: - Recommended frying techniques: Fry in small batches. This helps the chicken cook evenly. A deep pan or wok works best. It allows for even heat and more oil. - Oil temperature tips: Heat your oil to about 350°F (175°C). Use a thermometer for accuracy. If the oil is too cool, the chicken will soak up oil and become soggy. If it's too hot, it will burn. Once your chicken is crispy, let’s make it shine on the plate: - Ideas for pairing with sides: Serve your chicken with steamed rice or sautéed veggies. It balances the sweet sauce. You can also add a fresh salad for crunch. - Presentation tips for a beautiful dish: Drizzle any extra honey sauce over the chicken. Top with sesame seeds and sliced green onions. This adds color and a nice touch. Avoid these common errors to ensure your dish turns out perfectly: - Overcrowding the pan: This can lower the oil temperature. Fry in batches to keep the heat steady. - Not heating oil adequately: Always test your oil before frying by dropping in a small piece of chicken. If it sizzles, you’re ready to fry! If it doesn’t, wait a bit longer. Pro Tips Use a Thermometer: Ensure the oil is at the right temperature (around 350°F) for perfectly crispy chicken without absorbing too much oil. Let it Rest: Allow the fried chicken to rest on paper towels for a few minutes to maintain its crunch before tossing in the sauce. Adjust the Heat: Tailor the chili flakes in your honey sauce to your preferred spice level, adding more for an extra kick. Fresh Ingredients Matter: Use fresh ginger and garlic for the sauce to enhance the flavor and aroma of your crispy honey chicken. {{image_2}} You can change the flavor of crispy honey chicken easily. If you like heat, add chili flakes. A teaspoon gives a nice kick. You can mix them into the honey sauce for warmth. If you want something different, try teriyaki or sesame sauce. These sauces will give a new twist. Just swap them for the honey sauce and coat your chicken. You do not need to stick to thighs. You can use chicken breasts or drumsticks instead. Each cut has its own taste and texture. If you prefer plant-based meals, try tofu or tempeh. Cut them into bite-sized pieces and follow the same steps. You can still enjoy that crispy texture and sweet sauce. To keep your crispy honey chicken fresh, place it in an airtight container. Make sure it cools before sealing. This method helps maintain its taste and texture. Store it in the fridge for up to three days. If you want to keep it longer, freeze it for up to three months. Just remember, freezing may change the texture a bit. For the best texture, reheating in the oven works great. Preheat the oven to 350°F (175°C). Place the chicken on a baking sheet and heat for about 15 minutes. This keeps the chicken crispy. If you're short on time, you can use the microwave. But note, it may make the chicken softer. Heat in short bursts of 30 seconds. Check often to avoid overcooking. You can pair crispy honey chicken with many tasty sides. Here are some ideas: - Steamed rice - Sautéed vegetables - Fried rice - Garlic bread - Asian-style coleslaw - Mashed potatoes These sides add great flavor and texture to your meal. They also help balance the sweetness of the honey sauce. Yes, you can prepare parts of this dish ahead of time. Here are some tips: - Cut the chicken and coat it a few hours before cooking. - Store the coated chicken in the fridge. This keeps it fresh. - Make the honey sauce early and keep it in the fridge. When you are ready to eat, just fry the chicken and toss it in the sauce. Yes, you can bake crispy honey chicken for a healthier option. Here are the steps: - Preheat your oven to 400°F (200°C). - Place the coated chicken on a baking sheet lined with parchment paper. - Spray the chicken lightly with cooking spray. - Bake for 20-25 minutes, flipping halfway through. This method will give you a crispy finish with less oil. Enjoy a lighter version of this tasty dish! This blog explained how to make crispy honey chicken, from ingredients to serving. I shared tips for achieving the right texture and suggested variations for flavor. Remember not to overcrowd the pan when frying. Storing and reheating properly keeps your meal fresh and tasty. Enjoy experimenting with ingredients and flavors to make this dish your own!

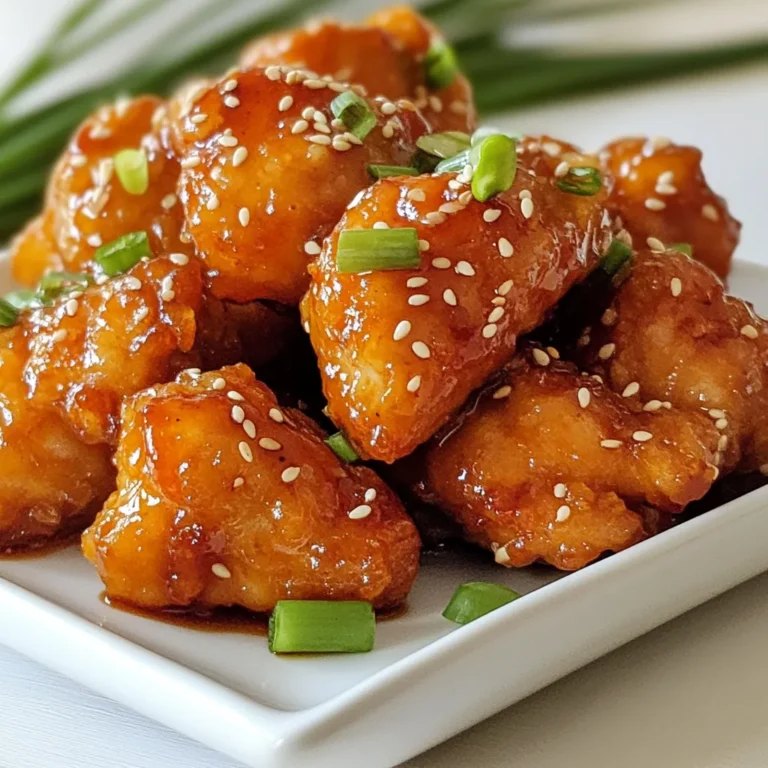
Crispy Honey Chicken Irresistible Recipe Guide

To make this tasty dessert, you will need: - 12 sheets of chocolate graham crackers - 2 cups milk - 1 1/2 cups heavy cream - 1 cup powdered sugar - 1/2 cup unsweetened cocoa powder - 1/4 cup marshmallow fluff - 1 teaspoon vanilla extract - 1 cup semi-sweet chocolate chips - 1/2 cup crushed candy canes (optional, for topping) - Mini marshmallows (for garnish) If you want to change things up, here are some ideas: - Instead of milk, use almond or oat milk for a dairy-free option. - You can swap heavy cream with coconut cream for a vegan twist. - Try using dark chocolate chips instead of semi-sweet for a richer taste. - For a lighter option, use a sugar substitute in place of powdered sugar. Add fun toppings to make your dessert even better: - Sprinkle crushed candy canes on top for a minty crunch. - Use mini marshmallows for a classic hot chocolate feel. - Drizzle chocolate syrup over the top for extra sweetness. - Add whipped cream for a fluffy finish. Each ingredient and topping brings its own flavor. Feel free to mix and match to make it your own! {{ingredient_image_1}} To start, gather your ingredients. You need 2 cups of milk, 1 1/2 cups of heavy cream, 1/2 cup of cocoa powder, and 1 cup of powdered sugar. Heat the milk and heavy cream in a medium saucepan over medium heat. Stir it often. You want it warm, not boiling. When it is warm, take it off the heat. Now, whisk in the cocoa powder, powdered sugar, and 1 teaspoon of vanilla extract. Mix well until smooth. Add in your 1 cup of semi-sweet chocolate chips. Stir until they melt completely. This chocolate layer is rich and creamy, making it the star of the dish. Next, we will make the cream layer. In a separate bowl, whip the remaining 1/2 cup of heavy cream. Use a hand mixer or whisk until you see soft peaks. This means it holds its shape but is still light. Then, gently fold in 1/4 cup of marshmallow fluff. This will give the layer a fluffy texture. Mix carefully so you keep the air in the whipped cream. This layer will be sweet and light, balancing the rich chocolate. Now, it's time to build your lasagna. Grab a rectangular glass dish. Start by laying down 4 sheets of chocolate graham crackers. This forms the base. Next, pour half of the chocolate mixture over the crackers. Spread it evenly. Now, add another layer of 4 graham crackers. Spread half of the cream mixture on top of this layer. Repeat the process. Add another 4 sheets of graham crackers, then the last half of the chocolate mixture, and finish with the remaining cream layer. Spread it evenly on top. Cover the dish with plastic wrap or foil. Chill it in the fridge for at least 4 hours, or overnight. This step helps the layers set nicely. To melt chocolate well, use a double boiler. Place a heat-safe bowl on a pot of simmering water. Stir the chocolate chips gently until they melt. This keeps the chocolate smooth. If you do not have a double boiler, you can use the microwave. Heat the chocolate in short bursts of 20 seconds. Stir between each burst to avoid burning the chocolate. To make light and fluffy whipped cream, start with cold tools. Chill your mixing bowl and whisk in the fridge for a few minutes. Use heavy cream for best results. Whip the cream on medium speed until soft peaks form. Do not overwhip, or it will turn grainy. Gently fold in marshmallow fluff for a sweet twist. When layering, use a spatula to spread evenly. Start with chocolate graham crackers for a sturdy base. Pour half of the chocolate mixture evenly over the crackers. Repeat this process, ensuring each layer is flat. This helps the dessert hold its shape. After the last layer, chill it well. The longer it sits, the better the flavors meld. Pro Tips Use Fresh Ingredients: For the best flavor, use fresh heavy cream and high-quality chocolate chips. This will enhance the overall taste of your lasagna. Chill Overnight: Allowing your lasagna to chill overnight in the refrigerator lets the layers set properly, improving the texture and flavor. Customize Toppings: Feel free to get creative with your toppings! Consider adding crushed nuts, chocolate shavings, or even whipped cream for extra flair. Serve Cold: This dessert is best served chilled. Make sure to keep it in the fridge until you're ready to serve for optimal taste and texture. {{image_2}} You can switch up the flavors in Hot Chocolate Lasagna. For a minty touch, add peppermint extract. Just a teaspoon will do! This gives the dessert a fresh taste. If you love coffee, try adding mocha flavor. Mix in some espresso powder with the chocolate layer. The rich coffee taste pairs nicely with chocolate. If you need a gluten-free version, no problem! Use gluten-free chocolate graham crackers. Many brands offer great choices. You can even use almond flour crackers for a unique twist. The key is to ensure the crackers are gluten-free. This way, everyone can enjoy this tasty treat. You can make a vegan Hot Chocolate Lasagna too! Use almond or oat milk instead of regular milk. For the cream layer, try coconut whipped cream. It gives a nice, creamy texture. Swap the chocolate chips for dairy-free ones. Also, look for vegan marshmallow fluff. These changes keep the dessert tasty and friendly for vegan diets. To keep your Hot Chocolate Lasagna fresh, store it in the fridge. Use a tight lid or cover the dish with plastic wrap. This helps keep moisture in and prevents it from drying out. Make sure to keep it chilled until you are ready to serve. If you want to freeze your Hot Chocolate Lasagna, it’s simple. First, cut it into squares. Wrap each piece tightly in plastic wrap, then place them in a freezer bag. This way, you can enjoy a slice whenever you want! It can last in the freezer for up to three months. In the fridge, your Hot Chocolate Lasagna stays fresh for about five days. After that, the texture and taste may change. If you see any signs of spoilage, it’s best to throw it out. Enjoy your sweet treat while it’s at its best! Yes, you can make Hot Chocolate Lasagna ahead of time. In fact, it tastes better when chilled for a while. I recommend making it the night before. This gives the layers time to set and mix their flavors. Just cover it well with plastic wrap or foil. This keeps it fresh in the fridge until you are ready to serve. The best way to serve Hot Chocolate Lasagna is chilled. You can cut it into squares for easy serving. I love adding mini marshmallows on top for fun. Sprinkling crushed candy canes adds a nice crunch too. You can serve it on a plate or in a bowl. It pairs well with a warm drink, like hot cocoa or coffee. Absolutely! You can use any type of chocolate chips you like. Dark chocolate chips give a rich taste. Milk chocolate chips offer a sweeter flavor. You can also try white chocolate for a twist. Mixing different types can create fun new flavors. Just remember to keep the total amount the same—1 cup in total. This blog post covers how to make a delicious Hot Chocolate Lasagna. We explored the key ingredients, including tasty substitutions and optional toppings. I shared step-by-step instructions for preparing each layer. Tips for melting chocolate and whipped cream ensure your dessert turns out great. We also looked at fun variations, storage options, and answered common questions about this treat. In the end, this dessert can delight anyone. Try it out and enjoy the chocolatey goodness!

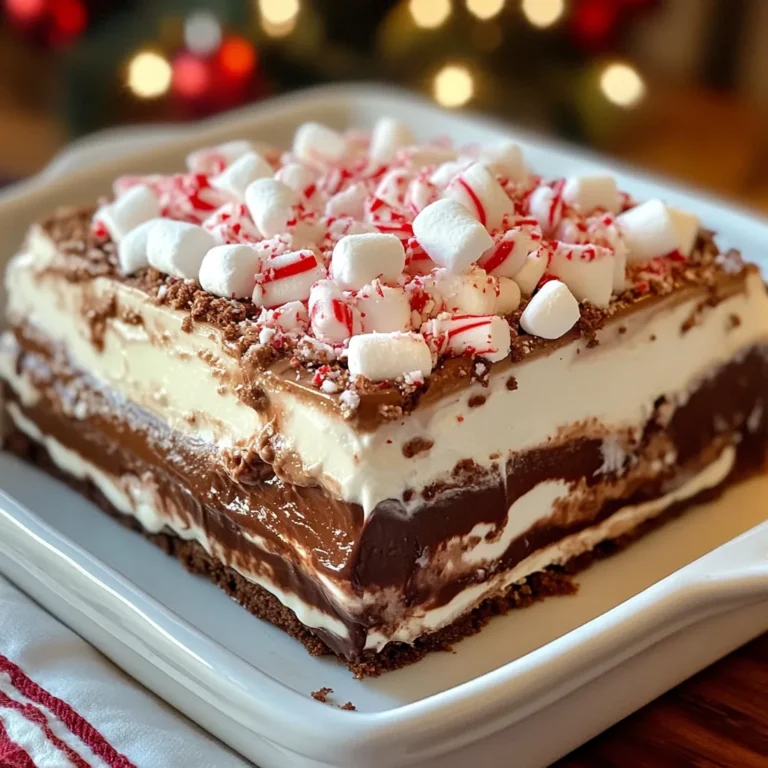
Hot Chocolate Lasagna Delightful Layered Dessert Recipe

PREV 1 … 52 53 54 … 56 NEXT
secrets pice kitchen

explore

DessertsDinnerAppetizersDrinks

Our Policies

  • Cookie Policy
  • Copyright Policy
  • Disclaimer
  • GDPR Policy
  • Terms Of Use
Back to Top
  • About
  • Contact Us
  • Privacy Policy
© 2025 secrets pice kitchen