FREE DINNER EBOOK! Get your copy!
  • Cookie Policy
  • GDPR Policy
  • Disclaimer
  • Terms Of Use
  • Visit my other site: Fun Cookie Recipes
secrets pice kitchen
  • Home
  • Dinner
  • Desserts
  • Drinks
  • Appetizers
  • Contact
  • About
  • Privacy Policy
  • Home
  • Dinner
  • Desserts
  • Drinks
  • Appetizers
  • Contact
  • About
  • Privacy Policy
  • Cookie Policy
  • GDPR Policy
  • Disclaimer
  • Terms Of Use
Visit my other site: Fun Cookie Recipes

HOME / CATEGORIES /

Latest

- 3 lbs beef chuck roast - 1 onion, sliced - 4 cloves garlic, minced - 4 cups beef broth - 1 tablespoon Worcestershire sauce - 2 teaspoons dried thyme - 2 teaspoons dried rosemary - Salt and pepper to taste - 6 hoagie rolls - 2 cups shredded provolone cheese - Fresh parsley, chopped (for garnish) When I make these sandwiches, I love to focus on the main ingredients. The beef chuck roast is key. It gives depth and richness to the dish. I slice an onion and mince garlic to add flavor. The broth is the heart of the dish. It keeps the beef moist and makes a great dip. I also add some seasonings. Worcestershire sauce brings a savory kick. Dried thyme and rosemary add warmth and aroma. Don’t forget salt and pepper. They enhance all the flavors. For the bun, I use hoagie rolls. They hold up well against the juicy beef. I top the sandwiches with provolone cheese. It melts nicely and adds creaminess. A sprinkle of fresh parsley gives a nice finish and color. These ingredients come together to create a warm, hearty meal. Each bite is a blend of rich beef, savory broth, and melted cheese. It's comfort food at its best! {{ingredient_image_1}} - Prepare the Roast: Season the beef chuck roast generously with salt and pepper. Make sure to coat all sides well. This adds flavor to the meat. - Sear the Meat: Heat olive oil in a large skillet over medium-high heat. Brown the roast for about 4-5 minutes on each side. This step is key for adding rich flavor. - Combine Ingredients: Transfer the seared roast to the slow cooker. Add sliced onion, minced garlic, beef broth, Worcestershire sauce, thyme, and rosemary. Stir everything together well. - Cook: Cover the slow cooker and set it to low. Cook for 8 hours until the beef is tender. It should shred easily with a fork when done. - Shred the Beef: Once the roast is cooked, remove it from the slow cooker. Use two forks to shred the beef. Return the shredded meat to the broth and mix it well. - Assemble the Sandwiches: Preheat your oven to broil. Place hoagie rolls on a baking sheet. Open each roll and fill them with the shredded beef mixture. Top with shredded provolone cheese. - Melt Cheese: Broil the sandwiches for about 2-3 minutes. Keep an eye on them until the cheese is melted and bubbly. Enjoy this savory delight with a side of broth for dipping! To season beef for optimal taste, use salt and pepper first. Generously coat all sides of the roast. This simple step brings out the beef's natural flavors. Next, add dried thyme and rosemary. They add depth and aroma. Also, consider using fresh herbs if you have them. Fresh herbs can enhance the dish even more. To enhance the broth flavor, add Worcestershire sauce to the slow cooker. This sauce brings a savory kick to the dish. You can also add more garlic for extra richness. If you want a deeper taste, try adding a splash of red wine. It can create a lovely balance in the broth. Slow cookers can vary in heat levels. If you have a higher wattage cooker, you may need less time. For most slow cookers, cook on low for 8 hours. If your cooker runs hot, check the meat after 6 hours. The beef should be tender and easy to shred. If it’s not, let it cook longer. Always trust your cooker and adjust the time as needed. For melting cheese, place the hoagie rolls under the broiler. This step gives the cheese a nice melt and bubbly texture. Keep the sandwiches on a baking sheet for easy handling. When broiling, watch the cheese closely. The broiler can burn the cheese quickly. Check it every minute or so. Once the cheese melts and gets golden, remove the sandwiches. Enjoy the deliciously gooey bites that follow! Pro Tips Choose the Right Cut: For the best flavor and texture, use a well-marbled beef chuck roast. It becomes tender and juicy after slow cooking. Enhance the Broth: Add a splash of red wine to the broth for a deeper flavor profile that complements the beef beautifully. Let It Rest: Allow the cooked roast to rest for 10-15 minutes before shredding. This helps retain moisture and improves the overall texture. Optimal Cheese Melting: For perfectly melted cheese, place the hoagie rolls under the broiler for just a couple of minutes, watching closely to prevent burning. {{image_2}} You can switch up the beef for a new taste. Beef chuck is great, but consider using brisket or round roast. These cuts can also work well in the slow cooker. If you want a twist, try pork shoulder. It gives a sweet flavor that pairs nicely with the broth. You can even use turkey breast for a lighter option. Just make sure to adjust the cooking time for leaner meats. While provolone is classic, other cheeses can change the game. Swiss cheese melts well and has a mild taste. Cheddar adds a sharp flavor that many people love. If you want something creamy, try mozzarella. For a bold kick, consider pepper jack cheese. Each cheese brings its own flair to the sandwich. The hoagie rolls are perfect, but you can explore other types of bread too. A crusty baguette holds up well and adds texture. If you like a softer bite, consider using brioche or ciabatta. For a whole grain option, look for whole wheat rolls. Each type of bread can give your sandwich a new feel and taste. After you enjoy your savory slow cooker French dip sandwiches, store the leftovers in an airtight container. Make sure to separate the meat from the buns to keep them fresh. You can keep the shredded beef in the fridge for up to four days. If you want to store the sandwiches as a whole, they will last about two days. When it’s time to enjoy your leftovers, reheat the beef in a pot over low heat. This method helps keep the meat moist. If you prefer the oven, wrap the sandwich in foil and heat it at 350°F for about 10-15 minutes. This will keep the bread soft while warming the beef. Yes, you can freeze French dip beef! Store it in a freezer-safe container. It can last for up to three months in the freezer. When you’re ready to eat, let it thaw in the fridge overnight. To reheat, warm it gently on the stove or in the microwave. This way, you’ll keep that great taste and texture. Slow Cooker French Dip Sandwiches are tasty sandwiches made with tender beef. The beef simmers in a savory broth. This method makes the meat juicy and full of flavor. The dish comes from French cuisine and has roots in the United States. People love these sandwiches for their rich taste and ease of preparation. Yes, you can! To prepare ahead, cook the beef the day before. Let it cool and then store it in the fridge. The next day, shred the beef and reheat it in the broth. This method keeps the meat moist and tasty. You can also prepare the hoagie rolls and cheese in advance. Just assemble the sandwiches right before serving. These sandwiches pair well with many sides. Here are some great options: - Crispy French fries - Fresh coleslaw - Steamed green beans - Potato chips - A simple garden salad Each side adds a nice touch to the meal and balances the flavors. You can get creative with toppings and condiments. Here are some fun ideas: - Add sliced jalapeños for heat. - Top with sautéed mushrooms for extra flavor. - Use horseradish sauce for a kick. - Try different cheeses like cheddar or Swiss. - Sprinkle fresh herbs like basil or oregano for a fresh taste. Use your favorite flavors to make the sandwich your own! This recipe for Slow Cooker French Dip Sandwiches blends rich flavors with easy steps. You learned about key ingredients, cooking methods, and how to customize your meal. You can choose different meats, cheeses, and bread to make it your own. These sandwiches are perfect for any occasion, and they store well too. Try making them ahead for a hassle-free meal. Enjoy sharing this tasty treat with friends and family. Happy cooking!

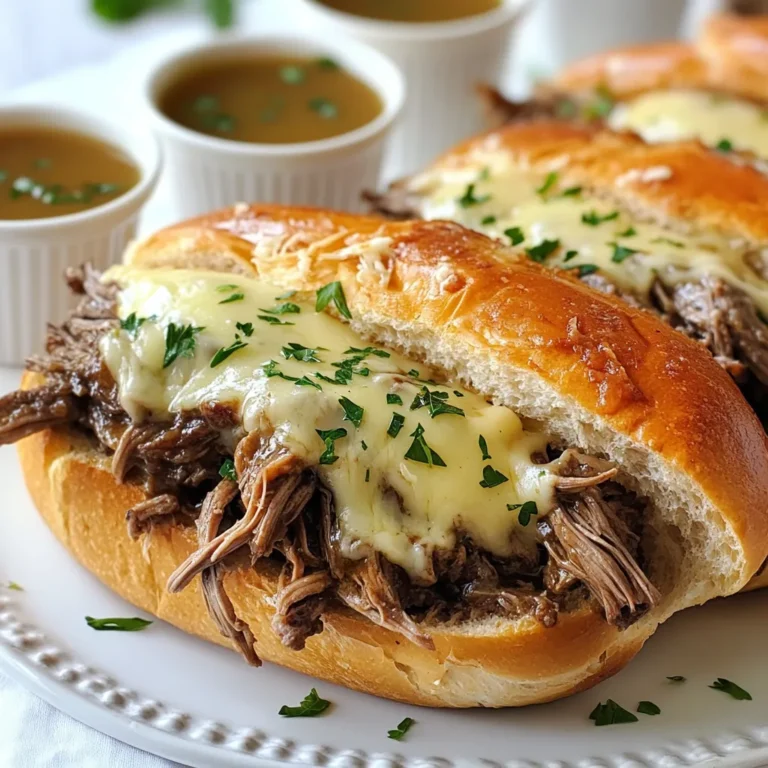
Savory Slow Cooker French Dip Sandwiches Recipe

- 2 ripe bananas, frozen - 1 cup unsweetened almond milk (or any milk of choice) - 2 tablespoons natural peanut butter - 1 tablespoon honey or maple syrup (optional) - 1/2 teaspoon vanilla extract - 1/4 teaspoon ground cinnamon When making a Peanut Butter Banana Smoothie Bowl, the main ingredients are key. You start with two ripe bananas, frozen. Frozen bananas give the bowl that creamy texture you want. Next, grab one cup of unsweetened almond milk. You can use any milk you like. It helps blend everything smoothly. Add two tablespoons of natural peanut butter for richness. This is the star of the show! For a touch of sweetness, consider one tablespoon of honey or maple syrup. This is optional but nice if you like sweeter flavors. Add a half teaspoon of vanilla extract for a pleasant aroma. Lastly, a quarter teaspoon of ground cinnamon adds warmth and flavor. - Sliced bananas - Granola - Chia seeds - Chopped nuts - Shredded coconut - Extra peanut butter drizzle Toppings make your smoothie bowl fun and tasty. You can slice more bananas for a fresh touch on top. Granola adds a nice crunch. Chia seeds are a great source of fiber and omega-3s. Chopped nuts bring added protein and texture. Shredded coconut adds a tropical vibe. A drizzle of extra peanut butter is always a good idea! Mix and match these toppings. Get creative! Each bite can be different, making your Peanut Butter Banana Smoothie Bowl an exciting treat. {{ingredient_image_1}} - Step 1: Combine the frozen bananas, almond milk, peanut butter, honey (if using), vanilla extract, and ground cinnamon in a blender. - Step 2: Blend until smooth. It should be creamy and thick. - Step 3: If it's too thick, add a splash more almond milk to adjust the consistency. - Step 4: Pour the smoothie into a bowl. - Step 5: Top with your choice of toppings. Try sliced bananas, granola, chia seeds, or chopped nuts. - Step 6: Enjoy with a spoon. Each bite is a delight! To make a great Peanut Butter Banana Smoothie Bowl, start with frozen bananas. These give your bowl a thick, creamy texture. Fresh bananas won’t blend as well and will make it runny. When you add milk, do it slowly. This lets you control how thick or thin your smoothie is. If it feels too thick, just add a splash more milk. If you want your smoothie sweeter, use honey or maple syrup. Both work well and add nice flavor. Remember to taste as you blend! This helps you find the right sweetness for your bowl. You can always add more if needed. For blending, I recommend a high-speed blender. This will give you the smoothest results. But if you don’t have one, you can use a food processor. Just make sure to chop the bananas into smaller pieces first. If you have neither, try a hand mixer. While it takes more time, it can still get the job done. Pro Tips Use Very Ripe Bananas: The riper the bananas, the sweeter and creamier your bliss bowl will be. Look for bananas with lots of brown spots for optimum flavor. Customize Your Milk: Feel free to experiment with different types of milk such as coconut milk or oat milk for a unique flavor profile that complements the peanut butter. Layer Toppings Creatively: Instead of just sprinkling toppings on top, consider layering them within the bowl for a delightful texture and visual appeal. Make It a Meal: Add protein-rich toppings like Greek yogurt or hemp seeds to turn this bliss bowl into a more filling meal option, perfect for breakfast or post-workout fuel. {{image_2}} You can add some fun flavors to your Peanut Butter Banana Smoothie Bowl. One great option is cocoa powder. It gives a rich, chocolate taste. Just use one tablespoon of cocoa powder when blending. You can also mix in protein powder. This adds protein and makes your bowl more filling. Choose a flavor you enjoy, like vanilla or chocolate. If you want a dairy-free option, you have many choices. Unsweetened almond milk works well, but you can try oat milk or coconut milk too. Each milk brings a unique flavor. For toppings, consider vegan options like coconut yogurt or fresh berries. These add sweetness without dairy. Using seasonal fruits makes your bowl exciting. In summer, add fresh berries or peaches. In fall, try pumpkin puree or apples. You can also switch nut butters to match the seasons. Almond butter or cashew butter can be fun to explore. Each nut butter brings a different taste and texture. To keep your Peanut Butter Banana Smoothie Bowl fresh, store it in the fridge. Place the leftover smoothie in a clean container. Use a glass jar or a plastic container with a lid. These containers stop air from getting in and spoiling your food. Make sure to eat it within one day for best taste. You can freeze the smoothie for later use. Pour the leftover smoothie into ice cube trays or freezer-safe bags. This way, you can enjoy it again. When you're ready to eat, thaw it in the fridge overnight. Alternatively, you can blend it again with a splash of almond milk for a creamier texture. Yes, you can use fresh bananas. However, your smoothie bowl will not be as thick. Frozen bananas give a creamy texture. If you use fresh ones, add ice to chill it. You can use almond butter or sunflower seed butter. Both add creaminess and flavor. Choose a nut-free option if you need to avoid nuts. Add oats or protein powder for extra bulk. You can also top with more nuts or seeds. A scoop of Greek yogurt adds protein and creaminess. Yes, this smoothie bowl is healthy. It has natural sugars, healthy fats, and fiber. It’s a great choice for breakfast or a snack. You can prepare the base ahead of time. Store it in the fridge for up to a day. Add toppings fresh before serving for the best taste. This blog post walked you through making a tasty peanut butter banana smoothie bowl. You learned about key ingredients, step-by-step instructions, and helpful tips. You also found fun ways to mix it up and store leftovers. Now, you can enjoy a nutritious and delicious treat. Experiment with flavors and toppings that excite you. This smoothie bowl is sure to please at any time of day. Enjoy creating your perfect bowl!

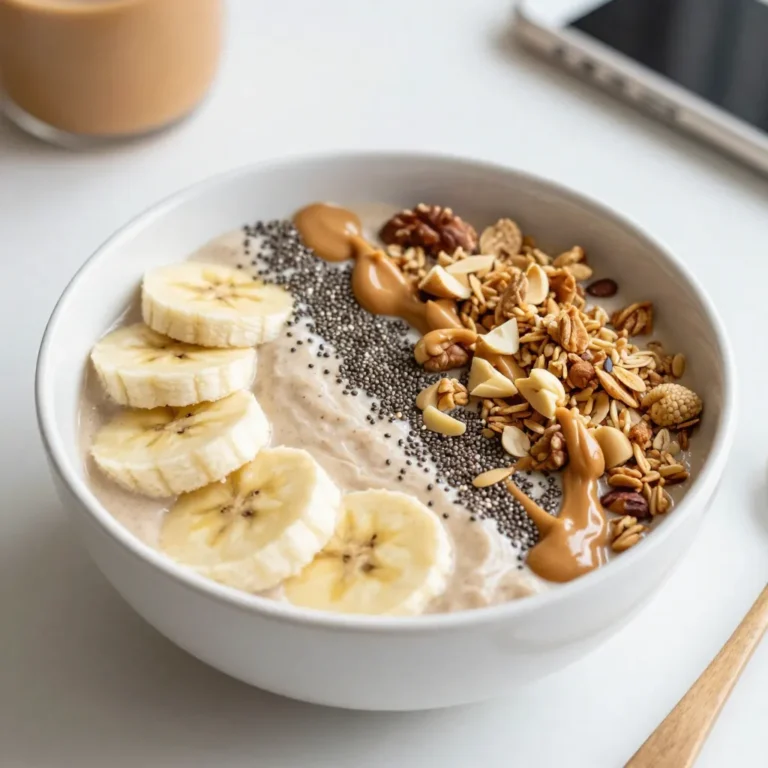
Peanut Butter Banana Smoothie Bowl Energizing Delight

- 1 pound ground beef (or turkey for a lighter option) - 1 cup breadcrumbs (preferably whole wheat) - 1 small onion, finely chopped - 2 cloves garlic, minced - 1 large egg - 1 tablespoon Worcestershire sauce - 1 teaspoon dried oregano - ½ teaspoon smoked paprika - Salt and pepper to taste - ½ cup grated Parmesan cheese In my meatloaf, I love to use ground beef for its rich flavor. If you prefer turkey, it works great too. Breadcrumbs help bind everything together. I prefer whole wheat for added texture. The onion and garlic bring a nice aroma and taste. The egg acts as a binding agent, helping the meatloaf hold its form. Don't forget Worcestershire sauce; it adds a lovely umami note. Dried oregano and smoked paprika give depth and warmth. Salt and pepper balance all the flavors. Lastly, the Parmesan cheese adds a touch of creaminess. - ½ cup ketchup - 2 tablespoons brown sugar - 2 tablespoons apple cider vinegar - 1 teaspoon mustard powder The glaze is the star of the show. Ketchup is the base, bringing sweetness and tang. Brown sugar adds a caramel-like depth. Apple cider vinegar gives it that tangy kick. Mustard powder rounds out the flavor with a hint of spice. You can adjust these ingredients to suit your taste. Love it sweeter? Add more sugar. Want it tangier? Increase the vinegar. The glaze makes each bite even more delicious. {{ingredient_image_1}} Start by getting your oven ready. Preheat it to 350°F (175°C). While the oven heats, grab a loaf pan. Lightly grease it with non-stick spray or a drizzle of olive oil. This helps the meatloaf slide right out later. In a large bowl, mix the ground beef or turkey with the breadcrumbs. Add the finely chopped onion and minced garlic. Crack in one large egg. Pour in the Worcestershire sauce, dried oregano, and smoked paprika. Add half of the Parmesan cheese and sprinkle in salt and pepper. Use your hands to mix this all together. Be gentle! You want to combine the ingredients well, but don’t overwork the meat. This keeps the meatloaf tender. In a separate bowl, mix together the ketchup, brown sugar, apple cider vinegar, and mustard powder. Stir until everything is well blended. This glaze will give your meatloaf a sweet and tangy kick. Once mixed, set half of the glaze aside for later. Spread the other half evenly over the top of your shaped meatloaf. Place the meatloaf in the oven and bake for 45 minutes. After this time, take it out and add the rest of the glaze on top. Return it to the oven for another 15 minutes. The meatloaf is done when it reaches an internal temperature of 160°F (70°C). Let it rest for about 10 minutes before slicing. This step keeps it juicy and flavorful. - Avoiding overmixing: Mix your meatloaf just enough. If you mix too much, the meatloaf can turn tough. Use your hands or a spoon and combine until it's just mixed. - Importance of resting the meatloaf: Let your meatloaf rest for about ten minutes after baking. This resting time helps the juices stay inside. You will get a juicier slice every time. - Suggestions for additional spices or ingredients: Want to spice things up? Try adding a bit of chili powder or fresh herbs. You can also mix in finely chopped bell peppers for extra flavor. - Personalizing the ketchup glaze: The glaze can be your canvas. Add a splash of hot sauce for heat or a bit of honey for sweetness. You can also switch up the ketchup for BBQ sauce if you wish. - How to serve and garnish for best visual appeal: Serve slices on a colorful plate. Drizzle some extra ketchup glaze over the meatloaf. Garnish with fresh parsley for a pop of color. Pair it with creamy mashed potatoes and bright green beans for a lovely meal. Pro Tips Use Lean Meat: Opt for lean ground beef or turkey to reduce the fat content while still achieving a juicy meatloaf. Don't Overmix: Combine the ingredients just until incorporated to keep the meatloaf tender. Overmixing can lead to a dense texture. Let It Rest: Allow the meatloaf to rest for 10 minutes before slicing. This step helps retain the juices and improves the overall flavor. Customize Your Glaze: Feel free to experiment with the glaze by adding spices like chili powder or herbs for a personalized touch. {{image_2}} You can switch up the meat in this recipe. Using ground turkey or chicken makes a lighter meatloaf. These options still taste great and cut down on fat. Instead of breadcrumbs, try using oats. You can also use gluten-free breadcrumbs if you need a gluten-free option. Both choices keep the meatloaf moist and add a nice texture. Want to jazz up your meatloaf? Add some finely chopped vegetables like bell peppers or carrots. These add taste and nutrients. You can also mix in some grated cheese for extra creaminess. Herbs and spices are great too. Consider adding fresh parsley or thyme for a burst of flavor. A dash of hot sauce could give it a kick! While the tangy ketchup glaze is a classic, feel free to explore other options. BBQ sauce adds a sweet and smoky flavor. You can also try a mustard glaze for a tangy twist. Experimenting with different glazes can change the entire taste of your meatloaf. Don't be afraid to mix and match! To keep your meatloaf fresh, store leftovers in an airtight container. Let the meatloaf cool to room temperature first. Place it in the fridge for up to three days. If you want to enjoy it later, follow the freezing instructions below. Freezing meatloaf is easy and great for meal prep. Wrap the meatloaf tightly in plastic wrap, then place it in a freezer-safe bag. Label it with the date. You can freeze it for up to three months. To thaw, move it to the fridge overnight. This keeps it safe and tasty. When reheating meatloaf, keep it moist. Preheat your oven to 350°F (175°C). Place the meatloaf in a baking dish. Add a splash of broth or water to keep it juicy. Cover it with foil to trap steam. Heat for about 20-30 minutes or until warmed through. You can also use the microwave, but be careful not to dry it out. Enjoy your meatloaf just like when it was fresh! Bake the meatloaf for 45 minutes at 350°F (175°C). After this, spread the remaining glaze on top. Then, bake for an extra 15 minutes. This gives the meatloaf a nice crust. Check that it reaches 160°F (70°C) inside using a meat thermometer. If you use a convection oven, reduce the time by about 10%. Yes, you can prepare meatloaf a day or two before. Mix the ingredients and shape the loaf, then cover it tightly. Store it in the fridge. When ready to cook, let it sit at room temperature for 30 minutes. This helps it cook evenly. You can also freeze it. Wrap it well and store it for up to three months. Thaw it overnight in the fridge before cooking. Meatloaf pairs well with many sides. Here are a few ideas: - Mashed potatoes - Steamed green beans - Roasted carrots - Creamy coleslaw - Cornbread These sides balance the meatloaf's flavors and textures nicely. You can also serve it with extra ketchup glaze for added taste. Enjoy! In summary, this guide covers how to make a great meatloaf from scratch, focusing on key ingredients like ground meat, breadcrumbs, and fresh veggies. You learned to create a tangy ketchup glaze to give it extra flavor. We also shared tips for perfect texture, presentation, and storage. Whether you prefer healthier options or different glazes, there are endless ways to customize your meatloaf. Enjoy experimenting with your recipe and impressing your family and friends with a home-cooked meal.

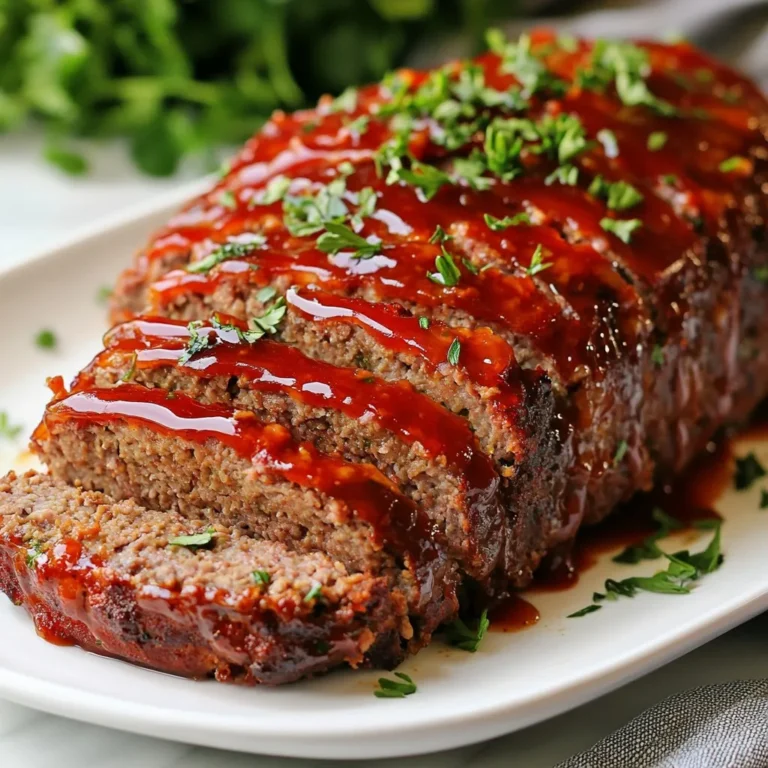
Mouthwatering Meatloaf with Tangy Ketchup Glaze

To make this tasty Sausage Orzo Soup, you will need: - 1 lb Italian chicken sausage, casing removed - 1 cup orzo pasta - 1 medium onion, diced - 2 cloves garlic, minced - 2 medium carrots, diced - 2 stalks celery, diced - 1 can (14 oz) diced tomatoes - 6 cups chicken broth - 1 cup baby spinach - 1 teaspoon dried oregano - 1 teaspoon Italian seasoning - Salt and pepper to taste - 2 tablespoons olive oil - Fresh parsley, chopped (for garnish) Most of these ingredients are easy to find. If you can't get Italian chicken sausage, use any ground sausage you like. For orzo, you can swap in other small pasta shapes like ditalini or even quinoa for a gluten-free option. Fresh tomatoes work well instead of canned if you prefer. Feel free to mix in other veggies, such as bell peppers or zucchini, to suit your taste. Using fresh ingredients makes a big difference in flavor. Fresh vegetables bring brightness and crunch to the soup. Fresh herbs, like parsley, add a pop of color and taste. The chicken broth should be good quality for a rich base. When you use fresh ingredients, your soup will taste more vibrant and delicious. You can really taste the love you put into your cooking! {{ingredient_image_1}} Start by gathering your veggies. You will need one medium onion, two carrots, and two stalks of celery. Dice the onion and carrots into small pieces. Cut the celery into similar-sized bits. This helps all the veggies cook evenly. You can also mince two cloves of garlic. Minced garlic gives the soup a great flavor. Heat two tablespoons of olive oil in a large pot over medium heat. Once the oil is hot, add the diced onion, carrots, and celery. Sauté them for about five to seven minutes. You want them to soften up. Stir often to prevent burning. After they are soft, add the minced garlic. Cook for one more minute until you smell that yummy garlic aroma. Next, it’s time for the sausage. You will use one pound of Italian chicken sausage. Remove the casing from the sausage. Then, break it up and add it to the pot with the veggies. Use a wooden spoon to stir and cook the sausage. You need to cook it for about eight to ten minutes. The sausage should turn brown and be cooked through. This step adds a rich, savory flavor to the soup. Now it’s time to bring everything together. Pour in one can of diced tomatoes with their juices and six cups of chicken broth. Stir well and bring the mixture to a simmer. This base creates a hearty soup. Once it’s simmering, add one cup of orzo pasta. Sprinkle in one teaspoon of dried oregano and one teaspoon of Italian seasoning. These herbs add depth to the flavor. Cook the orzo according to the package instructions, which is about eight to ten minutes. Stir occasionally to keep the pasta from sticking. When the orzo is tender, stir in one cup of baby spinach. Cook for one to two minutes until the spinach wilts. Finally, season the soup with salt and pepper to taste. Your Sausage Orzo Soup is now ready! Serve it hot, garnished with fresh parsley for a burst of color and flavor. Start by heating the olive oil in a large pot. Use medium heat to avoid burning. Add diced onion, carrots, and celery. Sauté these veggies for about 5-7 minutes. You want them soft but not mushy. After that, add minced garlic and cook for one more minute. This brings out its great taste. When you add the Italian sausage, break it apart with a wooden spoon. This helps it cook evenly. Brown it well for about 8-10 minutes. This step adds a lot of flavor to your soup. To make your soup pop, use fresh herbs. Fresh parsley on top gives a nice touch. You can also sprinkle some red pepper flakes for heat. If you want a richer taste, add a splash of white wine when you cook the sausage. Let it simmer for a minute before adding broth. This step creates a deeper flavor. Don’t forget to taste your soup as it cooks. Adjust salt and pepper to your liking. The right seasonings make all the difference. If you have leftover soup, let it cool first. Then, store it in an airtight container. It can last in the fridge for up to three days. For longer storage, you can freeze it. Make sure to use freezer-safe containers. Label them with dates so you know when to use them. When you reheat, do it on low heat. Stir it well to heat evenly. This way, your soup stays tasty and safe to eat. Pro Tips Use Fresh Ingredients: Fresh vegetables and herbs can significantly enhance the flavor of your soup, making it more vibrant and delicious. Adjusting Thickness: If you prefer a thicker soup, reduce the amount of broth or add more orzo to achieve your desired consistency. Spice It Up: For an extra kick, consider adding red pepper flakes to the soup while cooking for some heat. Meal Prep Friendly: This soup can be made ahead of time and stored in the refrigerator for up to 3 days or frozen for longer storage, making it a great meal prep option. {{image_2}} You can boost this soup with extra veggies. Try adding zucchini or bell peppers for more color and flavor. Mushrooms also work well, adding depth to the taste. For some crunch, throw in some green beans or peas. They cook quickly and add nice texture. You can also add greens like kale or Swiss chard instead of baby spinach. If you want a lighter option, you can swap the Italian sausage for ground turkey or chicken. This keeps the soup healthy but still tasty. For a vegetarian version, use plant-based sausage or skip the meat entirely. You can replace orzo with quinoa or rice for gluten-free options. Just adjust the cooking time as needed. To spice things up, add red pepper flakes or diced jalapeños while cooking. This adds a nice kick to the soup. You can also add a splash of hot sauce just before serving. For extra flavor, try adding a squeeze of lemon juice. It brightens the dish and balances the richness of the sausage. Fresh herbs like basil or thyme can also elevate the taste. To keep your Sausage Orzo Soup fresh, let it cool first. Then, pour it into an airtight container. This method helps prevent spills and keeps flavors locked in. You can store it in the fridge for up to three days. If you plan to eat it later, freezing is a great option. Freezing your soup is easy. Use freezer-safe containers or bags. Leave some space at the top for expansion. Label the container with the date. Sausage Orzo Soup can last in the freezer for up to three months. When you’re ready to enjoy it, just thaw it in the fridge overnight. Reheating Sausage Orzo Soup is simple. You can use a pot on the stove or a microwave. If using the stove, heat over medium until hot. Stir often to avoid sticking. If using the microwave, heat in short bursts, stirring in between. Make sure it’s hot all the way through before serving. Enjoy your warm, comforting soup! Yes, you can use various sausages in this soup. Choose spicy sausage for heat or turkey sausage for a lighter option. Each type will change the taste but still keep it delicious. I love using Italian chicken sausage for its great flavor. Feel free to experiment with your favorites! Orzo is not gluten-free. It is made from wheat, which contains gluten. If you need a gluten-free option, use rice or gluten-free pasta. These alternatives fit well in the soup and provide a similar texture. Just watch the cooking times, as they may vary. This soup lasts about three to four days in the fridge. Store it in an airtight container to keep it fresh. Before serving, check for any changes in smell or color. If you want it to last longer, you can freeze it for up to three months. This blog covered key aspects of Sausage Orzo Soup. We looked at essential ingredients and their importance. You learned preparation and cooking tips to ensure great flavors. We also explored ingredient variations and how to store leftovers safely. In closing, embrace these tips and use fresh ingredients. Your soup will taste even better. Enjoy making this dish and share it with friends and family. They’ll love it!

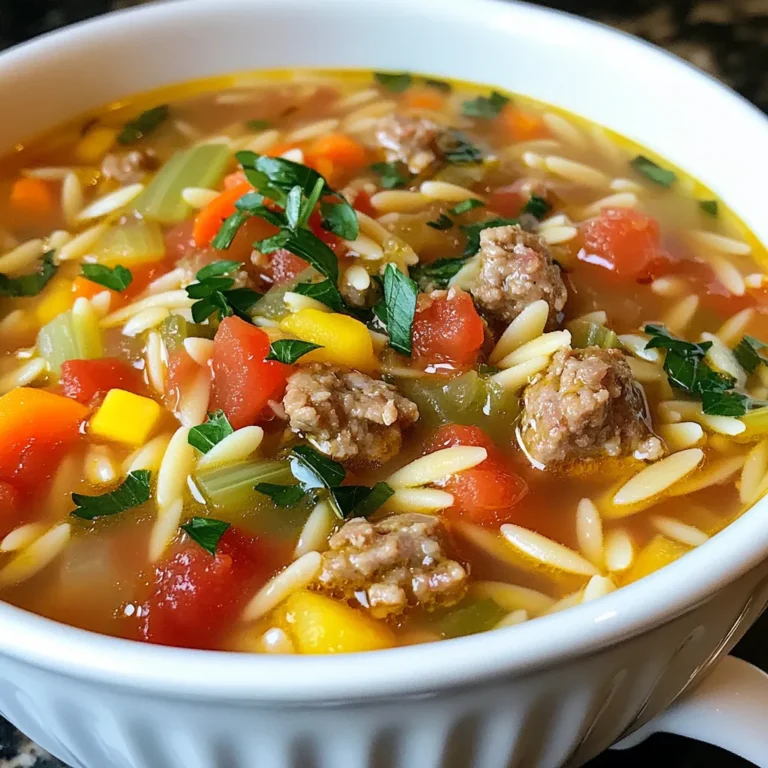
Sausage Orzo Soup Flavorful and Easy Comfort Dish

- 1 lb ground turkey or beef - 1 can (15 oz) black beans, drained and rinsed - 1 can (15 oz) corn, drained - 1 can (10 oz) diced tomatoes with green chilies - 1 packet taco seasoning - 2 cups tortilla chips, slightly crushed - 2 cups shredded cheese (cheddar or Mexican blend) - 1 bell pepper, diced (any color) - 1 small onion, finely chopped - 1 cup salsa - Optional toppings: sour cream, avocado, sliced jalapeños, chopped cilantro The first main ingredient is ground turkey or beef. This meat gives a nice base for flavor. I prefer turkey for a leaner choice. Next, we use black beans. They add protein and fiber, making the dish filling. Corn brings sweetness and texture. The diced tomatoes with green chilies add a spicy kick and juiciness. Taco seasoning brings all those bold flavors together in one packet. Tortilla chips add crunch, while cheese makes everything creamy and rich. The bell pepper and onion add fresh taste and color. Finally, salsa ties the whole dish with zest and tang. Each ingredient plays a part in making this casserole both tasty and hearty. You can customize your taco casserole with toppings. I suggest sour cream for creaminess. Avocado adds a smooth texture and healthy fats. Sliced jalapeños bring heat for those who love spice. Chopped cilantro gives a fresh finish. These toppings make each bowl special and personal. {{ingredient_image_1}} 1. Start by dicing one small onion and one bell pepper. You can use any color bell pepper you like. 2. Heat a skillet over medium heat. Add the onion and bell pepper. Cook until they are soft, about 5 minutes. 3. Next, add 1 pound of ground turkey or beef to the skillet. Cook until the meat is browned. Break it up with a spoon as it cooks. 4. Drain any fat from the meat if needed. 5. Once cooked, transfer the meat and veggies to your crockpot. 1. In the crockpot, add the following: - 1 can (15 oz) black beans, drained and rinsed - 1 can (15 oz) corn, drained - 1 can (10 oz) diced tomatoes with green chilies - 1 packet taco seasoning - 1 cup salsa 2. Stir everything well until mixed. 3. Layer half of the crushed tortilla chips (2 cups, slightly crushed) over the mixture. 4. Add half of the shredded cheese (2 cups, cheddar or Mexican blend) on top. 5. Pour the rest of the meat mixture on top. 6. Finish with the remaining tortilla chips and cheese. 7. Cover the crockpot and cook: - On low for 4-5 hours - On high for 2-3 hours 8. When it’s done, the cheese should be melted and bubbly. 1. Use a ladle to serve portions in individual bowls. 2. Top each serving with optional toppings like: - Sour cream - Avocado - Sliced jalapeños - Chopped cilantro 3. For a nice look, add a fresh sprig of cilantro on top of each bowl. Enjoy! To make the best taco casserole, start with good meat. I like ground turkey or beef. Brown it well with onion and bell pepper. This helps add more flavor. Use a wooden spoon to break up the meat. Drain any fat to keep it light. Mix in all the other ingredients well. Layering is key! Alternate the chips and cheese for a great texture. You can change this recipe to fit your taste. Want it spicier? Add jalapeños or hot salsa. Prefer veggies? Swap the meat for mushrooms or zucchini. Use different beans like pinto or kidney beans. You can also try new cheese, like pepper jack or feta. This recipe is flexible, so have fun with it! Prep ahead to save time later. Chop the onion and bell pepper the night before. You can also cook the meat in advance. Just store it in the fridge. When it’s time to cook, everything will be ready. Use canned ingredients like beans and tomatoes for quick meals. This makes the prep easy and fast! Pro Tips Ingredient Substitutions: If you're looking for a healthier option, you can replace ground turkey with lean ground chicken or use plant-based meat alternatives for a vegetarian version. Layering Technique: For an extra cheesy layer, consider adding some cheese in between the layers of meat and tortilla chips for a gooey texture throughout the casserole. Spice It Up: If you love heat, add some diced jalapeños or a dash of hot sauce to the meat mixture for an additional kick of flavor. Make-Ahead Meal: This casserole can be prepped the night before. Simply assemble all the ingredients in the crockpot and refrigerate. Cook it the next day for a hassle-free dinner. {{image_2}} You can easily make this dish vegetarian. Use lentils or black beans instead of meat. Tofu crumbles also work well. These options give you protein without meat. You can still follow the same steps for cooking. Just add your meat alternative when you mix the other ingredients. To make a low-carb or keto taco casserole, skip the tortilla chips. Instead, use cauliflower rice. This keeps the dish tasty while lowering carbs. You can also add more veggies, like zucchini or spinach, for extra nutrition. These changes keep the flavors bold without the extra carbs. You can adjust the heat level easily. For a milder dish, use regular diced tomatoes. Choose mild salsa and skip the jalapeños. If you like it spicy, add chopped fresh jalapeños or a dash of hot sauce. You can also use spicy taco seasoning for more heat. This lets you control the flavor to fit your taste. Store leftover Crockpot Taco Casserole in an airtight container. Let it cool first. This keeps it fresh. Use glass or plastic containers. Label them with the date. You can keep it in the fridge for up to four days. To reheat, place the casserole in a microwave-safe dish. Heat it on high for about two minutes. Stir halfway through to ensure even heating. You can also reheat it in the oven. Set the oven to 350°F and cover the dish. Bake for about 15 to 20 minutes. Check that it is hot all the way through. You can freeze this dish for later. Put it in a freezer-safe container. It lasts up to three months. When ready to eat, move it to the fridge overnight to thaw. Reheat it as described above. Enjoy your easy meal anytime! Yes, you can use other meats. Ground chicken, pork, or even shredded beef work well. Each option adds a different flavor. Just make sure to cook the meat before adding it to the crockpot. This helps with taste and texture. If you like spicy food, try chorizo for a kick! To spice things up, you can add jalapeños or hot salsa. You can also use spicy taco seasoning. Another great idea is to mix in diced green chilies. If you like heat, slice fresh chili peppers on top when serving. This adds flavor and a nice crunch. Yes, you can cook this dish on the stovetop. Start by cooking the meat and veggies in a large pot. After that, mix in the beans, corn, and tomatoes. Let it simmer for about 20 minutes. Add the tortilla chips and cheese, then cover until the cheese melts. This method is quicker than using a crockpot. This blog post covered how to make a tasty taco casserole. We explored ingredients, step-by-step instructions, and helpful tips. You learned how to customize your dish and store leftovers safely. Remember, you can easily adjust flavors to fit your taste. Whether you want a vegetarian version or a low-carb option, the choices are endless. Now, you’re ready to make a delicious taco casserole that suits your needs. Enjoy your cooking adventure!

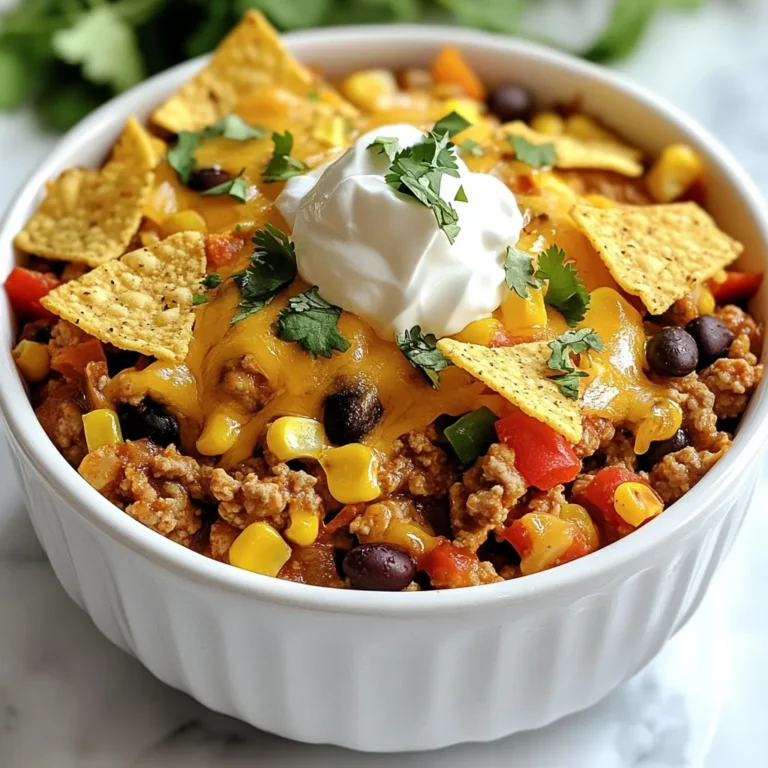
Crockpot Taco Casserole Flavorful and Easy Dinner

- 250g unsalted butter, softened - 200g granulated sugar - 1 large egg - 1 teaspoon pure vanilla extract - 300g all-purpose flour - 1 teaspoon baking powder - ½ teaspoon sea salt (plus extra for topping) Making French salted butter cookies is simple. You need just a few key ingredients. First, you need butter. Use 250 grams of unsalted butter. It must be softened to mix well. This butter adds richness and flavor. Next, grab 200 grams of granulated sugar. This sugar makes the cookies sweet and gives them a nice texture. You also need one large egg. This helps bind the ingredients together. Don’t forget the vanilla! You need one teaspoon of pure vanilla extract. It adds a lovely aroma and flavor. Now, for the dry ingredients, you will use 300 grams of all-purpose flour. It gives the cookies their structure. You also need one teaspoon of baking powder. This helps the cookies rise. Finally, you must add ½ teaspoon of sea salt. This salt balances the sweetness. You will sprinkle extra salt on top later for a nice touch. These ingredients come together to create a delightful treat. Each bite of these cookies will melt in your mouth. {{ingredient_image_1}} First, take a large mixing bowl. Add the softened butter and granulated sugar. Cream these together until the mix is light and fluffy. This should take about 3 to 5 minutes. Next, crack one large egg into the bowl. Pour in one teaspoon of pure vanilla extract. Beat this mixture well until it is fully combined. In a separate bowl, whisk together the dry ingredients. You need 300 grams of all-purpose flour, one teaspoon of baking powder, and half a teaspoon of sea salt. Once mixed, gradually add the dry ingredients to the wet mixture. Stir until just combined. Be careful not to overmix, as this can change the texture of your cookies. Now, divide the dough into two equal portions. Roll each portion into a log about 4 to 5 inches in diameter. Wrap these logs in plastic wrap. Chill them in the refrigerator for at least 2 hours. This step is key for the dough to firm up. After chilling, preheat your oven to 350°F (180°C). Line two baking sheets with parchment paper. Remove the dough logs from the fridge. Slice each log into ½ inch rounds. Place them on the prepared baking sheets, leaving space between each cookie. Finish by sprinkling a small pinch of sea salt on top of each cookie. Bake in your preheated oven for 12 to 15 minutes. The edges should be lightly golden when done. Let the cookies cool on the baking sheets for 5 minutes before moving them to a wire rack to cool completely. To get the best cookies, you should avoid overmixing. When you mix too much, the cookies can turn out tough. Mix just until the flour blends in. This keeps them light and crumbly. Chilling the dough is also key. After you form your dough into logs, wrap them tightly and chill for at least two hours. This step makes the dough firm. It helps the cookies hold their shape while baking. Using high-quality vanilla makes a big difference. Pure vanilla extract gives a rich taste that artificial flavors can’t match. You can also try different salts for topping. Sea salt adds a nice crunch and contrast to the sweet cookie. To keep your cookies fresh, store them in an airtight container. This helps maintain their texture and flavor. If you want to save some for later, freezing is a great option. Wrap each cookie in plastic wrap and place them in a freezer bag. When you’re ready to eat, simply thaw them at room temperature. Pro Tips Chill the Dough: Make sure to refrigerate the dough for at least 2 hours. This helps the cookies maintain their shape while baking. Use Quality Butter: For the best flavor, opt for high-quality unsalted butter. It makes a noticeable difference in the taste of your cookies. Adjust Baking Time: Keep an eye on the cookies while baking; ovens can vary. Remove them when the edges are golden to avoid overbaking. Experiment with Flavors: Feel free to add citrus zest or almond extract for a unique twist on the classic salted butter flavor. {{image_2}} You can easily change the taste of these cookies. For a fun twist, add chocolate chips. Use dark, milk, or even white chocolate. Each choice gives a unique flavor. If you love nuts, try almonds or walnuts. Chopped pistachios also add a great crunch. Mix and match to find your favorite! If you need a gluten-free option, you can swap out all-purpose flour. Use almond flour or a gluten-free blend. These work well but may need a little more care. Keep an eye on baking time. Cookies may bake faster, so check them a few minutes early. Make these cookies special for the holidays. Add festive spices like cinnamon or nutmeg. For a Christmas touch, use red and green sprinkles. You can also dip the cookies in chocolate. Drizzle with melted chocolate for a fun look. These ideas make your cookies perfect for sharing! To keep your French salted butter cookies fresh, use an airtight container. A tin or glass jar works well. Make sure the cookies are completely cool before you store them. This helps prevent moisture. When stored properly, these cookies last about one week. - Use an airtight container. - Ensure cookies are cool before storage. - Best shelf life: up to one week. Freezing cookies is a great way to enjoy them later. First, place the cooled cookies in a single layer on a baking sheet. Freeze for about one hour. Once frozen, transfer them to a freezer bag. Remove as much air as you can to prevent freezer burn. - Freeze cookies in a single layer first. - Use a freezer bag for storage. - Best for up to three months. To thaw, take out the cookies and let them sit at room temperature for about 15 minutes. Enjoy them fresh, just like when you first baked them! French salted butter cookies stand out because of the use of salted butter. Salted butter adds a rich flavor that balances the sweetness of the sugar. This small change makes a big difference in taste. The salt enhances the other flavors in the cookie, making each bite delightful. When baking, using high-quality salted butter can elevate your cookies from good to great. The unique taste comes from the traditional methods used in France to make this butter. It's a simple twist that gives these cookies their signature flavor. Yes, you can make these cookies ahead of time! I suggest prepping the dough in advance. After mixing your dough, form it into logs and wrap them well. You can store the wrapped logs in the fridge for up to three days. This way, you can bake fresh cookies whenever you want. If you need to store the dough longer, freeze it! Just make sure to wrap it tightly in plastic. When ready to bake, let the dough thaw in the fridge before slicing and baking. You can find authentic French salted butter at specialty grocery stores or online. Look for brands like Président or Echiré, which are well-known for quality. Many large supermarkets also have a gourmet section where you can find imported butter. Online, websites like Amazon and gourmet food shops often stock these brands. If you want the best flavor for your cookies, using real French salted butter is worth the search. This blog post shared a simple guide for making French salted butter cookies. You learned about the key ingredients and steps for mixing and baking. I also offered tips to enhance texture and flavor. You can explore different variations and storage methods to keep your cookies fresh. With the right ingredients and techniques, you can enjoy these tasty treats at home. Baking these cookies is fun and rewarding, so start your baking adventure today!

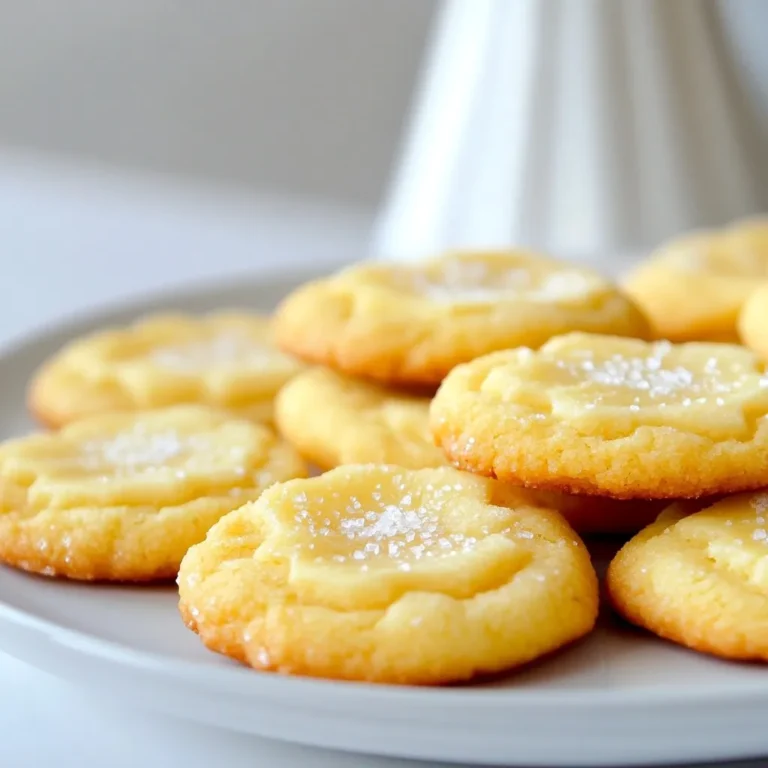
French Salted Butter Cookies Delightful and Easy Recipe

Chicken and Marinade Components - 2 boneless, skinless chicken breasts - 1 tablespoon olive oil - 1 teaspoon smoked paprika - 1 teaspoon garlic powder - 1 teaspoon onion powder - ½ teaspoon cumin - ½ teaspoon salt - ¼ teaspoon black pepper - ¼ cup chipotle ranch dressing To make the chicken juicy and tasty, we need a good marinade. First, mix the olive oil, smoked paprika, garlic powder, onion powder, cumin, salt, and black pepper in a bowl. This blend gives the chicken a smoky, spicy kick. Coat the chicken breasts well and let them sit for 15 minutes. This time allows the flavors to soak in. Tortilla and Filling Ingredients - 4 large flour tortillas - 1 cup cooked brown rice - 1 cup black beans, rinsed and drained - 1 cup corn (fresh, frozen, or canned) - 1 cup shredded cheddar cheese The tortillas are the base for our burrito. Choose large flour tortillas for easy wrapping. Layer cooked brown rice, black beans, and corn inside. These ingredients add texture and nutrition. The shredded cheddar cheese adds creaminess and flavor. Toppings and Garnishes - ½ cup fresh cilantro, chopped - 1 avocado, sliced (for serving) - Lime wedges (for garnish) Fresh cilantro brings a burst of color and freshness. Sliced avocado adds creaminess. Lime wedges are perfect for squeezing on top. They brighten the flavors and make each bite more delicious. By using these fresh ingredients, you create a tasty and satisfying meal. Each part plays a key role in making the Chipotle Ranch Grilled Chicken Burritos a hit! {{ingredient_image_1}} To start, mix olive oil, smoked paprika, garlic powder, onion powder, cumin, salt, and black pepper in a bowl. This blend gives the chicken a smoky and spicy kick. Coat the chicken breasts well and let them sit for 15 minutes. This helps the flavors soak in. Next, preheat your grill to medium-high heat. Place the marinated chicken on the grill. Cook each side for about 6-7 minutes. Make sure the chicken reaches an internal temperature of 165°F. Once cooked, take it off the grill and let it rest for a few minutes. This keeps the chicken juicy. After resting, slice the chicken into thin strips for easy layering. Now, lay a tortilla flat on a clean surface. In the center, add a scoop of brown rice, black beans, corn, and the sliced grilled chicken. Drizzle chipotle ranch dressing over the chicken. Top it with shredded cheddar cheese and a sprinkle of fresh cilantro. This creates a tasty mix of flavors and textures. To wrap the burrito, fold in the sides of the tortilla. Then, roll it up from the bottom while tucking in the filling. Keep rolling until you have a tightly sealed burrito. This step is key to holding all those delicious ingredients inside. For a crispy finish, grill the wrapped burritos on the grill or in a non-stick skillet. Heat them for about 2-3 minutes on each side. This adds a nice crunch. Once done, cut the burritos in half and serve with sliced avocado and lime wedges on the side. These additions brighten up the dish and enhance the flavors. To make your chicken juicy and full of flavor, marinate it well. Use olive oil, smoked paprika, garlic powder, onion powder, cumin, salt, and black pepper. Mix these in a bowl and coat the chicken breasts evenly. Let them sit for 15 minutes. This short wait helps the flavors get deep inside the meat. Grill the chicken on medium-high heat for about 6-7 minutes per side. Make sure it reaches 165°F inside. Let it rest for a few minutes before slicing. This keeps the juices locked in. Wrapping your burrito tightly is key to keeping the filling inside. Start with a large flour tortilla. Place your ingredients in the center. Fold in the sides first, then roll it up from the bottom. Tuck the filling in as you go. This method makes sure nothing spills out. If you want, grill the wrapped burrito for a few minutes on each side. This adds a nice crunch and keeps everything together. To take your burrito to the next level, serve it with tasty sides. Sliced avocado adds creaminess. Lime wedges bring a bright zing. You can also try chips and salsa or a fresh salad. Each of these pairs well with your burrito and boosts overall flavor. Feel free to mix and match to suit your taste! Pro Tips Marinate Longer: For even more flavor, marinate the chicken for at least 30 minutes or up to 2 hours in the refrigerator. Use Fresh Herbs: Fresh cilantro adds vibrant flavor; consider adding other herbs like parsley or chives for a unique twist. Customize Fillings: Feel free to add or substitute ingredients such as sautéed peppers, onions, or your favorite hot sauce for extra kick. Perfect Wrapping Technique: Ensure your tortilla is warm before wrapping to prevent tearing, and tightly tuck the filling to secure it well. {{image_2}} You can easily switch the chicken for steak, tofu, or shrimp. Steak adds a rich, juicy bite. Use flank steak or sirloin for the best flavor. Just season it like the chicken and grill until tender. Tofu is a great vegetarian choice. Press it to remove excess water, then marinate and grill it. Shrimp cooks quickly and adds a nice texture. Grill them for just a few minutes until they turn pink. If you need a vegetarian version, skip the meat and add more beans or grilled veggies. Sweet peppers and zucchini work well. For gluten-free burritos, use corn tortillas instead of flour. Always check the labels to ensure they meet your dietary needs. This way, everyone can enjoy this tasty meal without worry. To change the spice level, adjust the chipotle ranch dressing. If you like it mild, use less dressing or choose a milder sauce. For more heat, add jalapeños or hot sauce to the mix. You can also sprinkle some red pepper flakes inside the burrito for an extra kick. These small tweaks can make a big difference in your burrito’s flavor. To store leftover burritos, wrap each one in plastic wrap. Place them in an airtight container. This keeps them fresh and prevents drying out. Make sure to store them in the fridge. They last for up to three days. If you want to eat them later, don’t forget to reheat them well. For freezing burritos, wrap each burrito tightly in foil. Place them in a freezer bag or container. Label the bag with the date. They will stay fresh for about three months. When you’re ready to eat, thaw them in the fridge overnight. Then, reheat them in the oven or microwave until hot. The shelf life of your burritos depends on how you store them. In the fridge, they last up to three days. In the freezer, they can last up to three months. Always check for signs of spoilage before eating. If they smell off or look strange, it’s best to toss them. Enjoy your burritos fresh for the best taste! Marinate the chicken for at least 15 minutes. This time allows the spices to soak in. For deeper flavor, you can marinate it for up to 2 hours. Just keep it in the fridge. Yes, you can use other dressings. Creamy avocado dressing or spicy sriracha ranch work well. Just match the dressing to your taste. It can change the flavor of your burrito. You can serve several tasty side dishes with your burritos. Here are a few great options: - Mexican street corn - Fresh guacamole and tortilla chips - Simple green salad - Spanish rice - Black bean soup These sides will add color and flavor to your meal. Yes, these burritos are excellent for meal prep. You can make them ahead and store them in the fridge. They taste great reheated. Just wrap them tightly in foil or plastic wrap. Enjoy them throughout the week! In this post, we explored how to make Chipotle Ranch Grilled Chicken Burritos. We discussed ingredients, including chicken, tortillas, and tasty toppings. You learned to marinate and grill the chicken, assemble perfect burritos, and add optional touches. I shared tips for juicy chicken and burrito wrapping, along with variations and storage info. Enjoy making this burrito at home. With these steps, you’ll impress yourself and others. Create flavors that fit your taste and have fun in the kitchen!

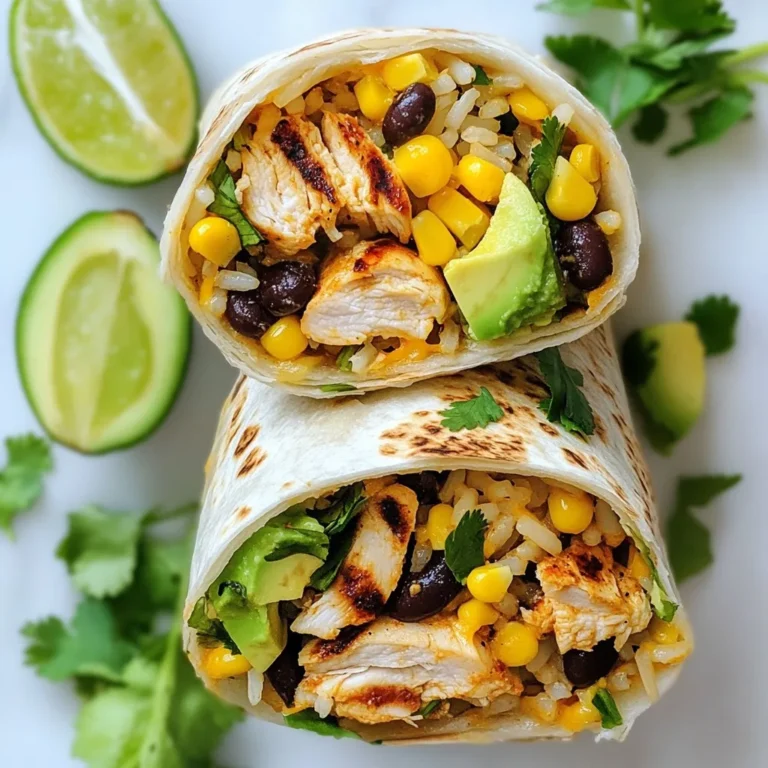
Chipotle Ranch Grilled Chicken Burritos Flavor Boost

- Beef Chuck: You need 2 pounds of beef chuck. Cut it into chunks. This meat gives great flavor. - Dried Chilies: Use 3 dried guajillo chilies and 2 dried ancho chilies. Remove the seeds for less heat. These add depth to the dish. - Seasonings and Spices: Gather 1 onion, 4 cloves garlic, 1 teaspoon cumin, 1 teaspoon paprika, 1 teaspoon oregano, and 1 bay leaf. Don’t forget salt and pepper to taste. They create a rich flavor. - Corn Tortillas: Use fresh corn tortillas to hold the tasty filling. They add a nice texture. - Fresh Cilantro: Chopped cilantro adds a fresh touch. It brightens the flavors of the tacos. - Chopped Onions: Add chopped onions for crunch. They complement the meat well. - Lime Wedges: Serve lime wedges on the side. A squeeze of lime adds a zesty kick. {{ingredient_image_1}} Toasting and Soaking Methods First, we need to toast the dried chilies. I heat a dry skillet over medium heat. I place the guajillo and ancho chilies in the skillet. I toast them for about 2-3 minutes until they smell great. Be careful not to burn them. Once toasted, I remove them from heat. I then add the chilies to a bowl and cover them with hot water. I let them soak for 15 minutes until soft. Importance of Dried Chilies in Flavor Dried chilies bring deep flavor to birria tacos. They add heat, sweetness, and a rich color. Soaking helps release their taste. This step is key for a great birria. Blending Techniques and Consistency Tips I drain the soaked chilies and add them to a blender. I also add minced garlic, chopped onion, cumin, paprika, oregano, and a pinch of salt and pepper. I blend everything until smooth. If it’s too thick, I add a bit of beef broth. The marinade should be creamy and easy to pour. Searing for Optimal Flavor For cooking, I heat a bit of oil in a large pot. I add the beef chunks and sear them until they are brown on all sides. This step gives the meat a nice flavor. After browning, I remove the beef and set it aside. Simmering Process Explained In the same pot, I pour in the chili mixture and return the beef. I add a bay leaf and the remaining beef broth. I bring this to a boil, then lower the heat. I cover the pot and let it simmer for about 2-3 hours. The beef should become tender and easy to shred. Tips for Perfectly Shredded Meat After cooking, I take the beef out of the pot. I use two forks to shred it. I want to make sure it is in small, bite-sized pieces. Once shredded, I return the meat to the pot with the broth to keep it moist. Instructions for Heating Tortillas Next, I heat corn tortillas in a skillet until they are warm and slightly crispy. This step adds a nice texture to the tacos. Garnishing for Presentation On each tortilla, I add a generous scoop of the beef mixture. I top them with chopped onions and cilantro. I serve the tacos with lime wedges on the side. This adds fresh flavor and a pop of color. Using a slow cooker is great for busy days. It gently cooks the beef. You set it and forget it! Just add all the ingredients and let it simmer for hours. The meat becomes very tender and flavorful. A Dutch oven also works well. It heats evenly and retains heat well. You can sear your beef directly in it, adding depth to the flavor. Then, you add your chili mixture and broth. Cover it and let it simmer on the stove. Both methods yield juicy, tasty birria. Want to make your birria even better? Try adding extra spices! A pinch of cinnamon can add warmth. Chipotle powder brings a smoky flavor. If you like heat, add cayenne pepper or jalapeños. Just remember, balance is key. Add spices little by little and taste as you go. This way, you get a flavor that suits you best. Birria tacos shine with the right sides and drinks. You can serve them with rice and beans. These add heartiness to your meal. Don’t forget about fresh salsa or guacamole for extra flavor! For drinks, try a light beer or agua fresca. Limeade or hibiscus tea pairs well too. These drinks complement the spices in the tacos nicely. Enjoy your feast! Pro Tips Chili Selection: Use a mix of guajillo and ancho chilies for a perfect balance of flavor and mild heat. Marinating Time: If possible, let the beef marinate in the chili mixture overnight for deeper flavor. Shredding Technique: Use two forks to shred the beef, ensuring the pieces are bite-sized for easy taco assembly. Taco Assembly: Warm the tortillas just before serving to keep them pliable and enhance the overall texture of your tacos. {{image_2}} For those who want a meat-free option, you can use jackfruit or mushrooms. Jackfruit shreds easily and soaks up flavors well. Mushrooms add a rich, earthy taste. You can also use lentils for a hearty texture. You can make Birria tacos with chicken or pork too. Chicken thighs work best for tender meat. Just cook them the same way as beef. Pork shoulder is another great choice. It has a nice balance of fat and flavor. You can adjust the spice level to suit your taste. If you like it mild, reduce the dried chilies. Use just one guajillo chili instead of three. For more heat, add a few jalapeños to the marinade. You can also serve hot sauce on the side for those who want extra kick. To keep your Birria tacos fresh, store them in the fridge. Place the beef and broth in an airtight container. Make sure it cools first before sealing it. The tacos can last up to three days in the fridge. Keep tortillas separate to avoid sogginess. Want to save some for later? You can freeze Birria. First, cool the beef and broth completely. Then, place them in a freezer-safe container. You can also use freezer bags for easy storage. Label the bag with the date. It will stay good for about three months. When you're ready to eat, reheating is easy. Thaw the Birria in the fridge overnight if frozen. You can heat it on the stove over low heat. Add a splash of broth to keep it moist. For the tortillas, warm them in a skillet until they’re hot and crispy. Enjoy your delicious tacos again! Birria tacos are a tasty Mexican dish made with slow-cooked beef. The meat is often seasoned with dried chilies and spices, giving it a rich flavor. Originating from the state of Jalisco, birria is traditionally made for special occasions. You can enjoy birria as a stew or in tacos, which add a fun twist. Yes, you can make birria tacos ahead of time. I recommend cooking the beef a day before. Once cooked, let the beef cool and store it in the fridge. When you are ready to serve, just reheat the beef and prepare the tacos. This makes serving time easier and keeps the flavors strong. Birria tacos pair well with many sides. You can serve them with: - Mexican rice - Refried beans - Grilled corn - A fresh salsa - A side of pickled onions These sides enhance the meal and add more flavor. To make birria tacos more authentic, use traditional ingredients. Ensure you use dried guajillo and ancho chilies. These chilies give the dish its unique taste. Also, consider adding fresh herbs like thyme or bay leaves for depth. Finally, serve the tacos with a small bowl of the cooking broth for dipping. This adds a special touch to your meal. In this post, we explored the essentials for making delicious Birria Tacos. We covered key ingredients like beef chuck and dried chilies, as well as optional garnishes for added flavor. I shared step-by-step instructions, cooking methods, and storage tips to ensure your tacos are tasty and satisfying. Whether you stick to the classic recipe or try vegetarian options, these tacos are a crowd-pleaser. Take these tips and enjoy your cooking journey with Birria Tacos!

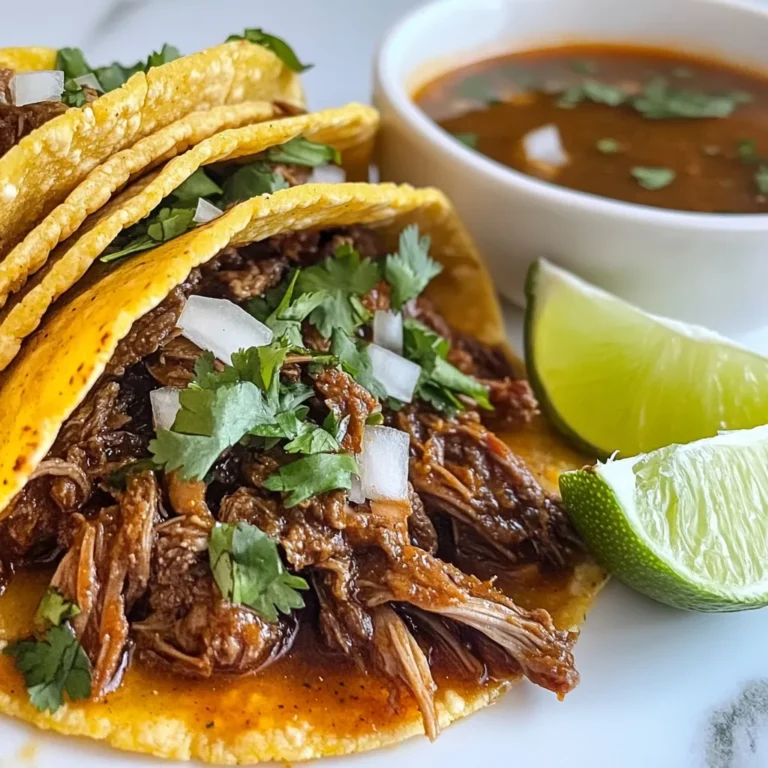
Mexican Birria Tacos Flavorful and Simple Recipe

To make the Blueberry Cheesecake French Toast Bake, you'll need the following items: - 8 slices of thick-cut bread (Brioche or Challah) - 8 oz cream cheese, softened - 1 cup fresh blueberries (or frozen) - 4 large eggs - 1 cup whole milk - 1/4 cup granulated sugar - 1 teaspoon vanilla extract - 1 teaspoon ground cinnamon - 1 tablespoon lemon juice - Optional toppings: powdered sugar, maple syrup Each ingredient plays a key role in creating a rich and flavorful dish. The bread gives it structure, while the cream cheese adds a creamy layer. Fresh blueberries burst with juice, offering a bright contrast to the sweet cream. Eggs and milk form a custard base that binds everything together, making each bite soft and delicious. Sugar, vanilla, cinnamon, and lemon juice enhance the dish, adding depth and warmth. Feel free to use frozen blueberries if fresh ones are not available. They work well, too! Just make sure to thaw and drain them before adding to the cream cheese mix. With these ingredients, you can create a delightful breakfast or brunch that everyone will love. {{ingredient_image_1}} - Preheat your oven to 350°F (175°C). Grease a 9x13 inch baking dish with butter or cooking spray. - Cut 8 slices of thick-cut bread into cubes. Spread half of the cubes evenly in the dish. - In a bowl, beat 8 ounces of softened cream cheese until it's smooth. - Add 1/4 cup of granulated sugar, 1 tablespoon of lemon juice, and 1 teaspoon of vanilla extract. Mix until well combined. - Gently fold in 1 cup of fresh blueberries or thawed frozen blueberries. - Spoon the cream cheese mixture over the bread cubes. Spread it evenly. - Top with the remaining bread cubes. - In another bowl, whisk together 4 large eggs, 1 cup of whole milk, 1 teaspoon of ground cinnamon, and a pinch of salt. - Pour the egg mixture over the layers of bread and cream cheese. Press down gently to soak the bread. - Cover the dish with aluminum foil. Let it sit for about 20 minutes to soak up the mixture. You can also refrigerate it overnight. - Bake covered for 30 minutes. Then uncover and bake for an additional 15-20 minutes. The top should be golden brown and the center set. - Remove from the oven and cool slightly. Dust with powdered sugar if you like. Serve warm with maple syrup on top. Choosing the right bread is key. Brioche and challah both work great. Brioche is soft and rich. Challah is slightly sweet and fluffy. You can’t go wrong with either choice! Ensure even soaking for the best texture. After pouring the egg mixture, gently press the bread down. This helps each piece soak up the creamy goodness. Let it sit for 20 minutes. You can also refrigerate it overnight for a richer flavor. Presentation matters! Serve the bake warm on a nice platter. Drizzle with maple syrup for added sweetness. You can also garnish with extra blueberries. A dusting of powdered sugar adds a lovely touch, too. This makes it look fancy and inviting. Want to take it up a notch? Consider adding spices. A pinch of nutmeg can add warmth. You can also add a splash of almond extract for a unique twist. For fruit variations, try raspberries or strawberries. Mixing different berries brings color and flavor. You can even make a mixed fruit version for more fun! Pro Tips Use Stale Bread: Using slightly stale bread will yield a better texture, as it absorbs the egg mixture without becoming too mushy. Chill Overnight: For the best flavor and texture, prepare the dish the night before and let it soak in the refrigerator overnight. Mix-In Variations: Feel free to experiment with different fruits like strawberries or peaches, or add chocolate chips for a decadent twist! Serve Warm: This dish is best served warm, so make sure to let it cool slightly before serving, and drizzle with warm maple syrup. {{image_2}} You can switch up the fruit in this recipe. Try raspberries, strawberries, or blackberries. Each fruit will add its own unique taste. If you want a fun mix, use a variety of berries together. A mixed fruit version gives you more flavors. Just remember to keep the same amount of fruit. You can take this bake to the next level with some add-ins. Adding nuts, like walnuts or pecans, gives a nice crunch. You can also toss in chocolate chips for a sweet twist. To warm up the flavors, add spices like nutmeg or ginger. These little changes make your dish stand out. If you need gluten-free options, use gluten-free bread. Many brands offer great choices that taste good too. For a dairy-free option, swap the cream cheese with a dairy-free alternative. You can find many cream cheese substitutes that work well. Don't be afraid to get creative to fit your dietary needs! After you enjoy your Blueberry Cheesecake French Toast Bake, store leftovers in the fridge. Use an airtight container for best results. This will keep your bake fresh for about three days. When you want to reheat, place a slice in the microwave. Heat for 30 seconds at a time until warm. Check to make sure it doesn’t get too hot. You can freeze this bake if you have extra. First, let it cool completely. Wrap individual slices in plastic wrap, then place them in a freezer bag. This helps to prevent freezer burn and keeps it fresh. When you're ready to eat, take a slice out and thaw it in the fridge overnight. Reheat in the oven at 350°F for about 10-15 minutes. Enjoy the great taste again! If you want a cream cheese substitute, you can use Greek yogurt. It has a nice tangy flavor. You might also try mascarpone for a richer taste. Softened ricotta can work too. Just ensure whatever you choose is smooth for easy mixing. You can refrigerate the soaked mixture for up to 24 hours. This makes it easy to prep ahead. Just remember to cover it tightly to keep it fresh. Yes, you can make this recipe the night before. Prepare everything and let it soak in the fridge. This saves time in the morning, and the flavors meld nicely overnight. To reheat, place the bake in an oven at 350°F (175°C) for about 15-20 minutes. Cover it with foil to prevent burning. If you want to microwave it, heat in short bursts, checking often to avoid overheating. Enjoy it warm for the best taste! This blog post covered how to make a delicious Blueberry Cheesecake French Toast Bake. We discussed the key ingredients, easy steps for preparation, and tips for perfecting each bite. You learned about serving ideas, variations, and how to store leftovers for later. In conclusion, this dish is great for brunch or dessert. Try out the options to suit your taste. Enjoy creating and sharing this treat with your loved ones!

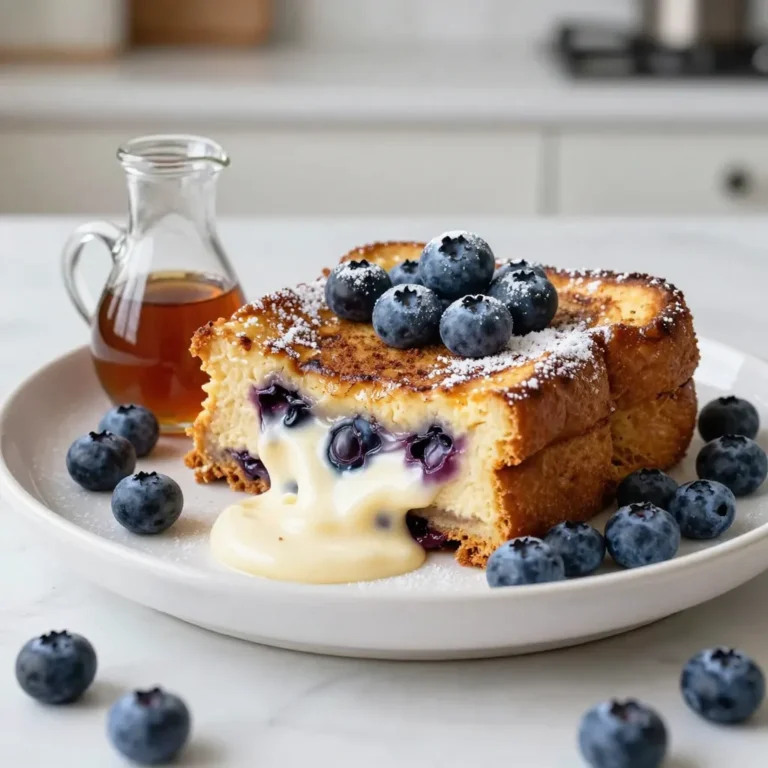
Blueberry Cheesecake French Toast Bake Delight

- 1 ½ cups graham cracker crumbs - ½ cup unsalted butter, melted - 2 (8-ounce) packages cream cheese, softened - 1 cup sugar - 1 teaspoon vanilla extract - 3 large eggs - 1 tablespoon all-purpose flour - 1 teaspoon ground cinnamon - 1 teaspoon cream of tartar - 1 cup sour cream - 2 tablespoons brown sugar To measure ingredients accurately, use dry measuring cups for dry ingredients. For sticky items like butter, use a liquid measuring cup. Always level off dry ingredients with a straight edge. If you need substitutes, use Greek yogurt for sour cream or a dairy-free cream cheese. You can swap eggs with flaxseed meal or applesauce for a vegan option. These tips ensure your cheesecake stays creamy and delicious. {{ingredient_image_1}} 1. Preheat your oven to 325°F (160°C). This step is key for a great bake. 2. In a mixing bowl, combine 1 ½ cups graham cracker crumbs, ¼ cup sugar, and ½ cup melted butter. Stir until the mix feels like wet sand. 3. Press this mixture firmly into the bottom of a 9-inch springform pan. This creates a strong base. 4. Bake the crust for 10 minutes. Then, take it out and let it cool. 1. In a large bowl, beat 2 packages (8 ounces each) of softened cream cheese until it’s smooth. 2. Gradually mix in 1 cup of sugar and 1 teaspoon of vanilla extract. Keep blending until it is fully combined. 3. Add the 3 large eggs one at a time. Mix well after each egg. 4. Then, stir in 1 tablespoon of all-purpose flour, 1 teaspoon of ground cinnamon, and 1 teaspoon of cream of tartar. Make sure everything blends well. 5. Lastly, add 1 cup of sour cream and mix until smooth. 1. Pour the cheesecake batter over the cooled crust in the springform pan. 2. In a small bowl, mix 2 tablespoons of brown sugar with 1 teaspoon of cinnamon. Sprinkle this mix over the cheesecake batter. 3. Bake for 55-60 minutes. The edges should be lightly golden. The center can still jiggle a bit. 4. Turn off the oven. Leave the cheesecake inside with the door slightly open for 1 hour. This helps it cool slowly. 5. After that, refrigerate for at least 4 hours or overnight. 6. For serving, top with whipped cream and a sprinkle of cinnamon for that extra touch. To ensure a smooth batter, start with softened cream cheese. Cold cream cheese will not mix well. Beat it until it is creamy and free of lumps. Add sugar gradually to help it blend better. When you mix in the eggs, do it one at a time. This helps to keep a smooth texture. To prevent cracks in your cheesecake, avoid overbaking. The edges should look set, but the center should still jiggle slightly. After baking, turn off the oven and leave the cheesecake inside. Let it cool slowly for one hour with the door slightly open. This helps prevent a sudden temperature change that can cause cracks. When serving your cheesecake, whipped cream is a great topping. A sprinkle of cinnamon adds extra flavor. You can also drizzle caramel or chocolate sauce for a fun twist. For drinks, pair your cheesecake with a hot cup of coffee or a sweet dessert wine. Both balance the rich flavors of the cheesecake. One common mistake is overmixing the batter. This can add too much air, leading to cracks. Mix just until combined, especially after adding eggs. Another mistake is improper cooling. If you cool your cheesecake too fast, it can crack. Always follow the cooling steps to keep it smooth and beautiful. Pro Tips Use Room Temperature Ingredients: Allow your cream cheese and eggs to come to room temperature before mixing. This will ensure a smoother batter and better incorporation of ingredients. Don’t Overmix: When adding the eggs, mix just until combined. Overmixing can introduce air into the batter, which may cause the cheesecake to crack during baking. Water Bath Technique: For an ultra-creamy texture, consider baking your cheesecake in a water bath. Wrap the springform pan in aluminum foil and place it in a larger pan filled with water before baking. Chill Overnight: For the best flavor and texture, refrigerate your cheesecake overnight. This allows the flavors to meld and results in a firmer slice when served. {{image_2}} You can make your snickerdoodle cheesecake even more fun. Adding chocolate chips gives a sweet twist. Just fold in a cup of chips after mixing your batter. You can also add caramel for a rich flavor. Drizzle caramel sauce on top before serving. Another great idea is to add pumpkin for fall. Mix in half a cup of pumpkin puree into the batter. This adds a lovely taste and a seasonal touch. If you need a gluten-free choice, use gluten-free graham crackers. They work just as well as regular ones. For the crust, you can also try almond flour or ground oats. These options give a nice texture and flavor. Make sure to check labels to avoid gluten. Mini cheesecakes are perfect for parties or gifts. Use a muffin tin instead of a springform pan. Place cupcake liners in each cup. Fill them with the cheesecake batter, about two-thirds full. Bake for 20-25 minutes at the same temperature. Check for a slight jiggle in the center. Let them cool in the pan before moving them. This way, you get delightful individual servings. To store your leftover cheesecake, place it in an airtight container. This keeps it fresh and avoids odors from other foods. The cheesecake lasts up to five days in the fridge. Enjoy it cold or let it sit at room temperature for a few minutes before serving. You can freeze the cheesecake for longer storage. Wrap it tightly in plastic wrap, then place it in a freezer-safe container. This helps prevent freezer burn. The cheesecake can stay frozen for up to three months. When you're ready to enjoy it, transfer it to the fridge to thaw overnight. For the best texture, let it thaw slowly. If you want to warm the cheesecake, preheat your oven to 300°F (150°C). Place the cheesecake on a baking sheet and cover it with foil. Heat it for about 15 minutes. This helps it warm evenly without drying out. Enjoy your cheesecake warm, topped with whipped cream or a sprinkle of cinnamon! Yes, you can! This cheesecake is perfect for making ahead. I suggest making it one day prior to serving. Let it cool completely, then refrigerate it. Cover it well with plastic wrap. This keeps it fresh and tasty. To check if your cheesecake is done, look for a few signs. The edges should look set while the center jiggles slightly. It will firm up as it cools. A light golden edge shows it is ready. You can use low-fat ingredients, but it may affect the cheesecake. Low-fat cream cheese can make it less creamy. The texture might be lighter and not as rich. For the best flavor, I recommend sticking with full-fat ingredients. This cheesecake recipe combines simple ingredients and straightforward steps. You learned how to make a smooth batter, bake it perfectly, and avoid common mistakes. Remember, a little care goes a long way. Use the tips for storage and serving to enjoy your cheesecake longer. With a few variations, like adding chocolate or making mini versions, there’s a cheesecake for everyone. Embrace your skills and share this treat. You’ll impress your friends and family with your delicious results. Enjoy making this classic dessert!

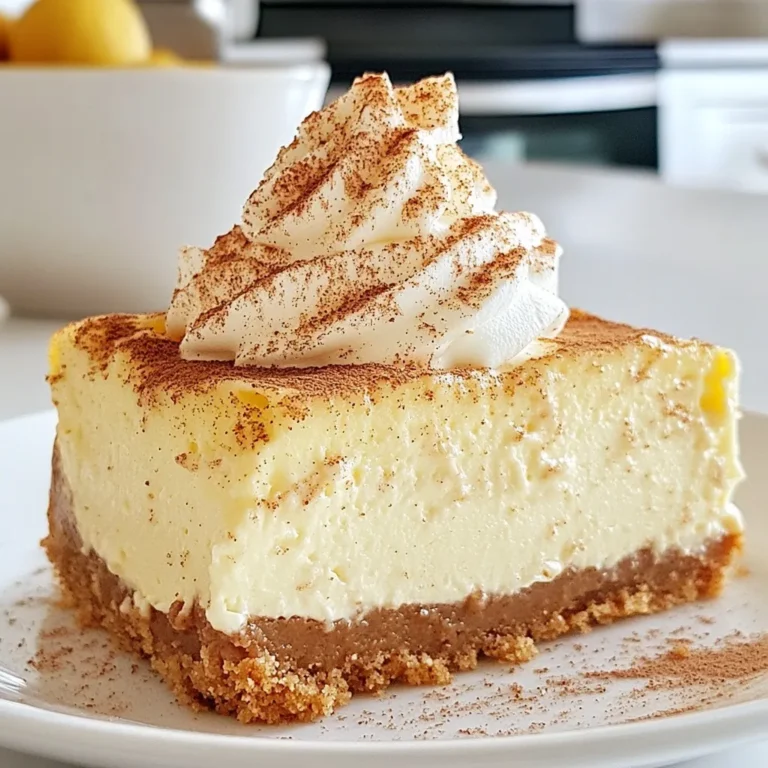
Decadent Snickerdoodle Cheesecake Delight Recipe

PREV 1 … 81 82 83 … 86 NEXT
secrets pice kitchen

explore

DessertsDinnerAppetizersDrinks

Our Policies

  • Cookie Policy
  • Copyright Policy
  • Disclaimer
  • GDPR Policy
  • Terms Of Use
Back to Top
  • About
  • Contact Us
  • Privacy Policy
© 2026 secrets pice kitchen