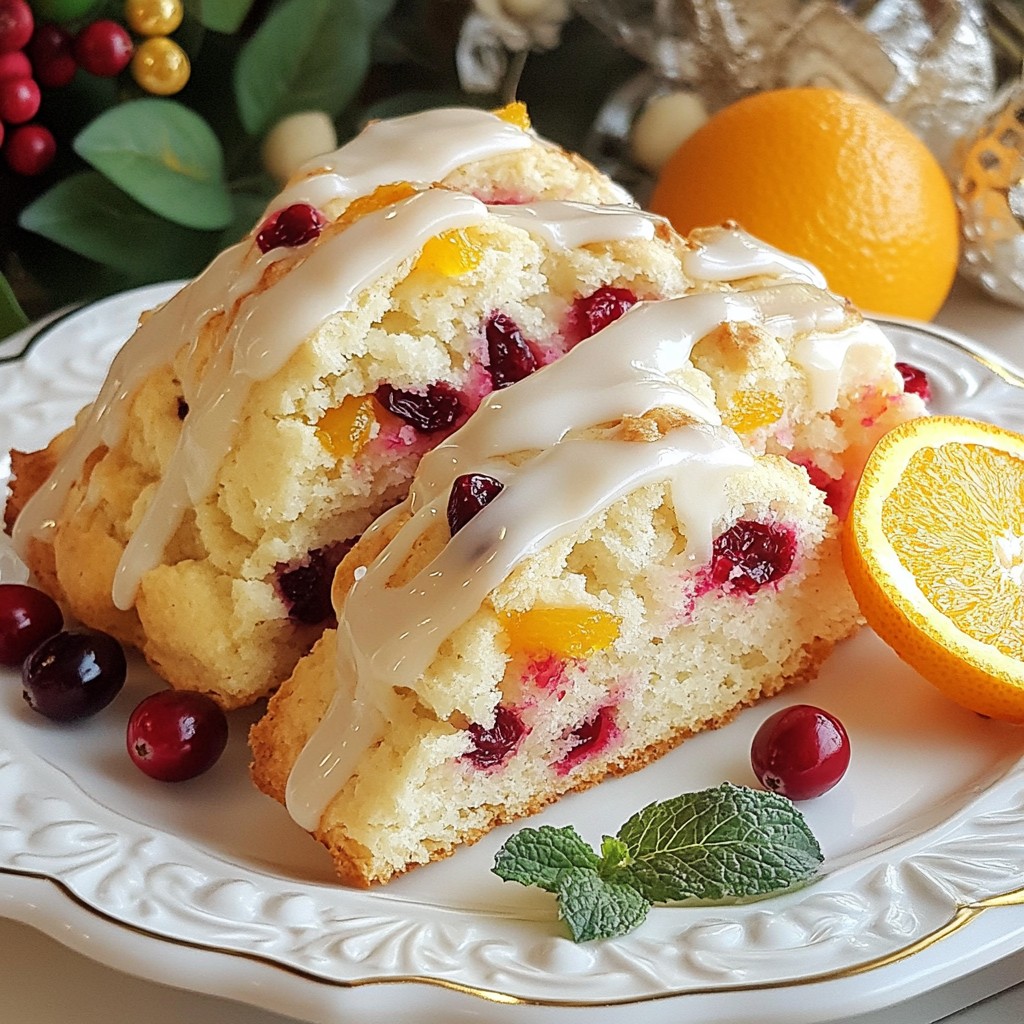
Cranberry Orange Scones are easy to make and bursting with flavor! In this post, I’ll share my simple recipe that will impress your family and friends. Whether you're a baking pro or a novice, you'll find it fun to whip up these scones. I’ll guide you through each step with tips to make them light and fluffy. Let’s dive in and create these delightful treats together!
Why I Love This Recipe
- Delicious Flavor Combination: The tartness of cranberries paired with the bright citrus notes from orange zest creates a delightful flavor explosion in each bite.
- Easy to Make: This recipe is straightforward and requires minimal steps, making it perfect for both novice and experienced bakers.
- Perfect for Any Occasion: Whether it's a holiday gathering, brunch with friends, or a cozy afternoon treat, these scones are versatile and always a hit.
- Customizable: You can easily switch up the ingredients by using different fruits or adding spices, allowing you to make this recipe your own.
Ingredients
List of Ingredients Required
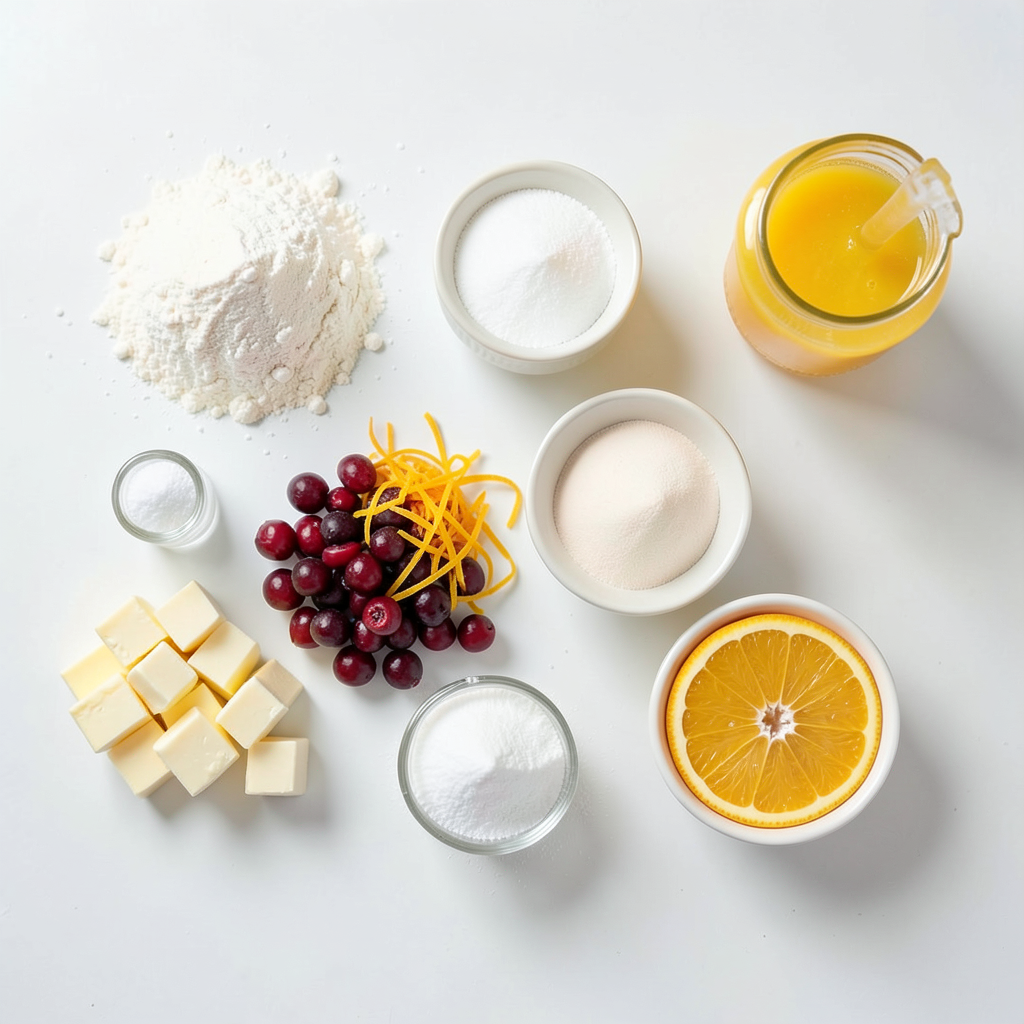
To make cranberry orange scones, you will need:
- 2 cups all-purpose flour
- 1/4 cup granulated sugar
- 1 tablespoon baking powder
- 1/2 teaspoon baking soda
- 1/2 teaspoon salt
- 1/2 cup unsalted butter, chilled and cubed
- 1/2 cup fresh cranberries, chopped (or dried cranberries)
- Zest of 1 orange
- 1/2 cup buttermilk
- 1 large egg
- 1 teaspoon vanilla extract
Alternate Ingredients for Allergies
If you have allergies, here are some swaps:
- Use gluten-free flour for a gluten-free option.
- Substitute coconut oil for butter if dairy-free.
- Swap buttermilk with almond milk plus a splash of vinegar.
Optional Ingredients for Glazing
You can add a glaze for extra flavor:
- 1 cup powdered sugar
- 2 tablespoons fresh orange juice
Each ingredient plays a key role in flavor and texture. Enjoy experimenting with these options!
Step-by-Step Instructions
Prepping the Dough
First, preheat your oven to 400°F (200°C). Line a baking sheet with parchment paper. In a large bowl, mix 2 cups of all-purpose flour, 1/4 cup of granulated sugar, 1 tablespoon of baking powder, 1/2 teaspoon of baking soda, and 1/2 teaspoon of salt. Whisk these ingredients together until they blend well. Next, add 1/2 cup of chilled and cubed unsalted butter. Use your fingers or a pastry cutter to blend the butter into the flour mix. You want it to look like coarse crumbs. Now, fold in 1/2 cup of chopped cranberries and the zest of 1 orange. Make sure they are mixed evenly throughout the dough.
Shaping and Cutting the Scones
In a separate bowl, whisk together 1/2 cup of buttermilk, 1 large egg, and 1 teaspoon of vanilla extract. Pour this wet mix into your dry mix. Stir gently until just combined. Do not over-mix; a few lumps are okay. Next, turn the dough out onto a lightly floured surface. Shape it into a disc about 1 inch thick. Cut the dough into 8 wedges or use a round cutter for circular scones. Place the scones onto the prepared baking sheet, leaving about 2 inches between each.
Baking and Final Touches
Bake the scones for 15 to 20 minutes. They should be golden brown on the edges. To check if they are done, insert a toothpick into the center. If it comes out clean, they are ready. While the scones bake, you can prepare the glaze if you want. Mix 1 cup of powdered sugar with 2 tablespoons of orange juice until smooth. After baking, let the scones cool for about 5 minutes. Drizzle the glaze over the warm scones before serving. Enjoy your delicious cranberry orange scones!
Tips & Tricks
How to Ensure Fluffy Scones
To make your scones fluffy, keep the butter cold. Cold butter helps create steam while baking. This steam makes the scones rise and stay light. Also, avoid over-mixing the dough. Over-mixing makes the scones dense. Gently mix until just combined. Use a light touch when shaping the dough.
Best Practices for Mixing Ingredients
Start by whisking your dry ingredients well. This ensures even distribution of the baking powder and soda. When adding butter, use a pastry cutter or your fingers. Blend until it looks like coarse crumbs. Then, fold in the cranberries and orange zest carefully. This keeps the fruit intact and flavorful. When mixing wet and dry ingredients, do it gently. A few lumps are okay!
Recommended Tools and Equipment
For this recipe, you’ll need a few key tools:
- Large mixing bowl
- Whisk for dry ingredients
- Pastry cutter or your hands
- Lightly floured surface for shaping
- Baking sheet lined with parchment paper
- Toothpick to test doneness
- Optional: a small bowl for the glaze
Using the right tools makes the process easier and more fun!
Pro Tips
- Use Chilled Butter: Ensure your butter is very cold and cubed to create flaky layers in the scones.
- Don't Overmix: Mix the dough just until combined to keep the scones tender and fluffy.
- Fresh Ingredients: Use fresh cranberries and high-quality buttermilk for the best flavor and texture.
- Customize the Glaze: Experiment with adding lemon juice or zest to the glaze for a different citrus twist.
Variations
Sweet Add-Ins and Flavor Enhancements
You can mix in other sweet treats for more flavor. Try adding chocolate chips or nuts. Chopped walnuts and pecans work great. You can also use dried fruits like apricots or cherries. This will add sweetness and texture. For a boost in zest, add lemon or lime zest. It brightens the taste and makes the scones pop.
Gluten-Free Adaptations
For gluten-free scones, swap the all-purpose flour for a gluten-free blend. Look for a blend that includes xanthan gum. This helps keep the scones fluffy. You may need to adjust the liquid slightly. Add a bit more buttermilk if the dough feels too dry. Enjoy the same delicious flavors without gluten!
Seasonal Variations (e.g., holiday flavors)
You can change the scone recipe based on the season. For fall, add spices like cinnamon or nutmeg. This gives a warm, cozy flavor. In winter, mix in peppermint extract for a festive twist. You can also use cranberry sauce instead of fresh cranberries during the holidays. Each season brings a chance for new flavors!
Storage Info
How to Store Leftover Scones
To keep your scones fresh, store them in an airtight container. This keeps moisture in and prevents them from drying out. You can also wrap them in plastic wrap before placing them in the container. Store them at room temperature for up to two days. If you need to keep them longer, refrigeration may dry them out.
Freezing Instructions
If you want to save scones for later, freezing is a great option. Allow the scones to cool completely. Then, wrap each scone in plastic wrap. Place the wrapped scones in a freezer bag or airtight container. They can last in the freezer for up to three months. When you're ready to eat them, you can thaw them at room temperature or heat them straight from the freezer.
Reheating Instructions for Freshness
To enjoy your scones warm, reheating is easy. Preheat your oven to 350°F (175°C). Place the scones on a baking sheet. Heat them for about 10 minutes. This will revive their texture and warmth. If you prefer, you can also microwave them for about 15-20 seconds. Just be careful not to overheat them, or they may become tough. Enjoy your fresh-tasting scones!
FAQs
How can I make scones ahead of time?
You can make scones ahead of time by preparing the dough and shaping it. After shaping, wrap the scones tightly in plastic wrap. Store them in the fridge for up to 24 hours. When ready to bake, just preheat the oven and bake them directly from the fridge. This saves time and still gives you fresh scones.
What can I serve with Cranberry Orange Scones?
Cranberry orange scones pair well with many things. You can serve them with clotted cream or butter for a rich taste. A dollop of homemade jam adds sweetness. For drinks, tea and coffee complement them nicely. Fresh fruit or yogurt can also add a refreshing touch.
Can I use dried cranberries instead of fresh?
Yes, you can use dried cranberries instead of fresh. Dried cranberries will add a sweeter flavor. Just chop them into smaller pieces before adding to the dough. Keep in mind that dried fruit may change the texture slightly, making scones a bit denser. But they will still taste delicious!
Making scones is simple and fun. You learned the key ingredients and steps to bake them perfectly. We also covered tips to ensure they are fluffy and tasty. There are many ways to add flavors and adapt for dietary needs. Lastly, I shared storage tips to keep your scones fresh. Enjoy your baking journey and share your delicious creations! You can impress friends and family with your new skills.