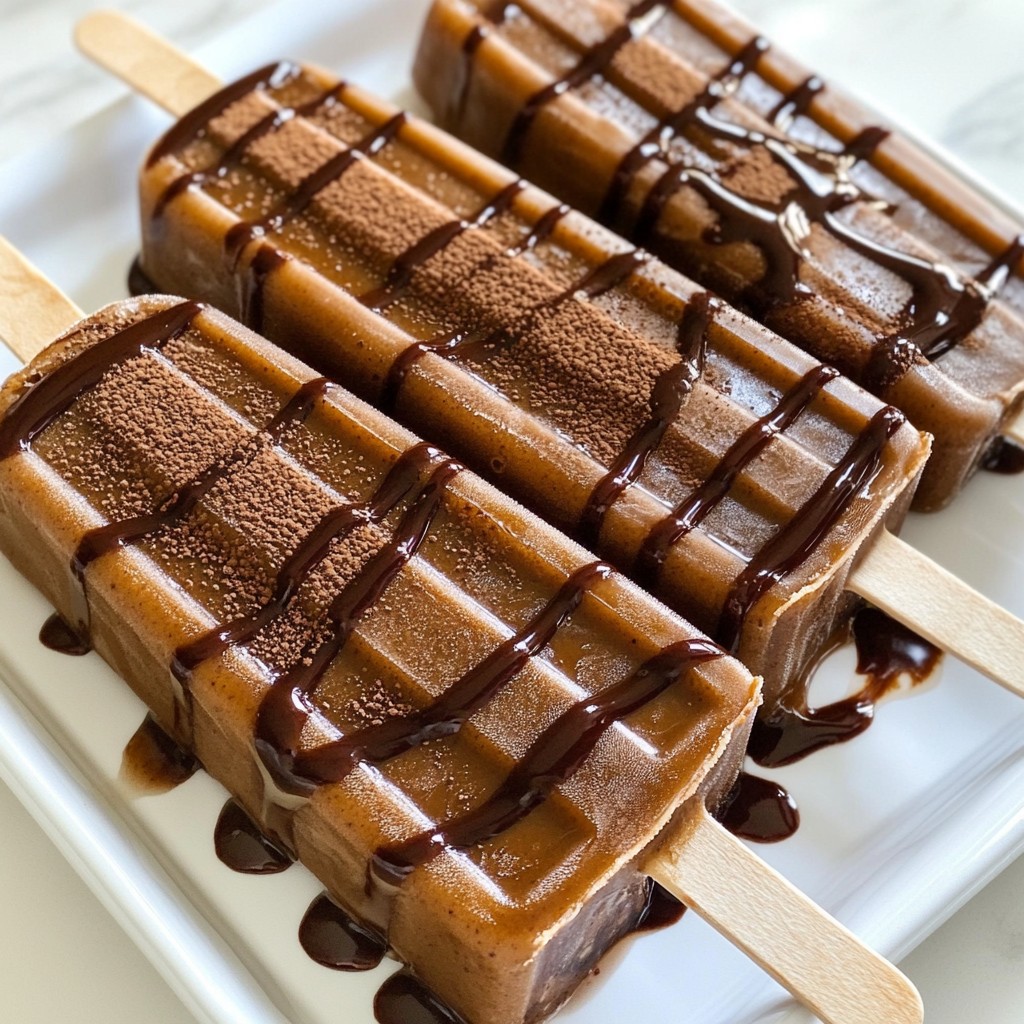
Ready to beat the summer heat with a sweet treat? Mocha Cold Brew Popsicles are the perfect way to cool down. They blend rich coffee flavor with creamy goodness, offering a refreshing twist on your favorite drinks. In this guide, I’ll show you how to make these easy pops at home, using simple ingredients and a few fun variations. Let’s jump into the steps for your new favorite summer snack!
Why I Love This Recipe
- Delicious Flavor Combination: The rich mocha flavor combined with the refreshing cold brew makes these popsicles a perfect treat for coffee lovers.
- Easy to Make: With just a few simple ingredients and minimal prep time, you can whip up these delightful popsicles in no time.
- Customizable: You can easily adjust the sweetness or use different milk alternatives to cater to your dietary preferences.
- Perfect for Hot Days: These popsicles are a fantastic way to cool down on a warm day while still enjoying your favorite coffee flavor.
Ingredients
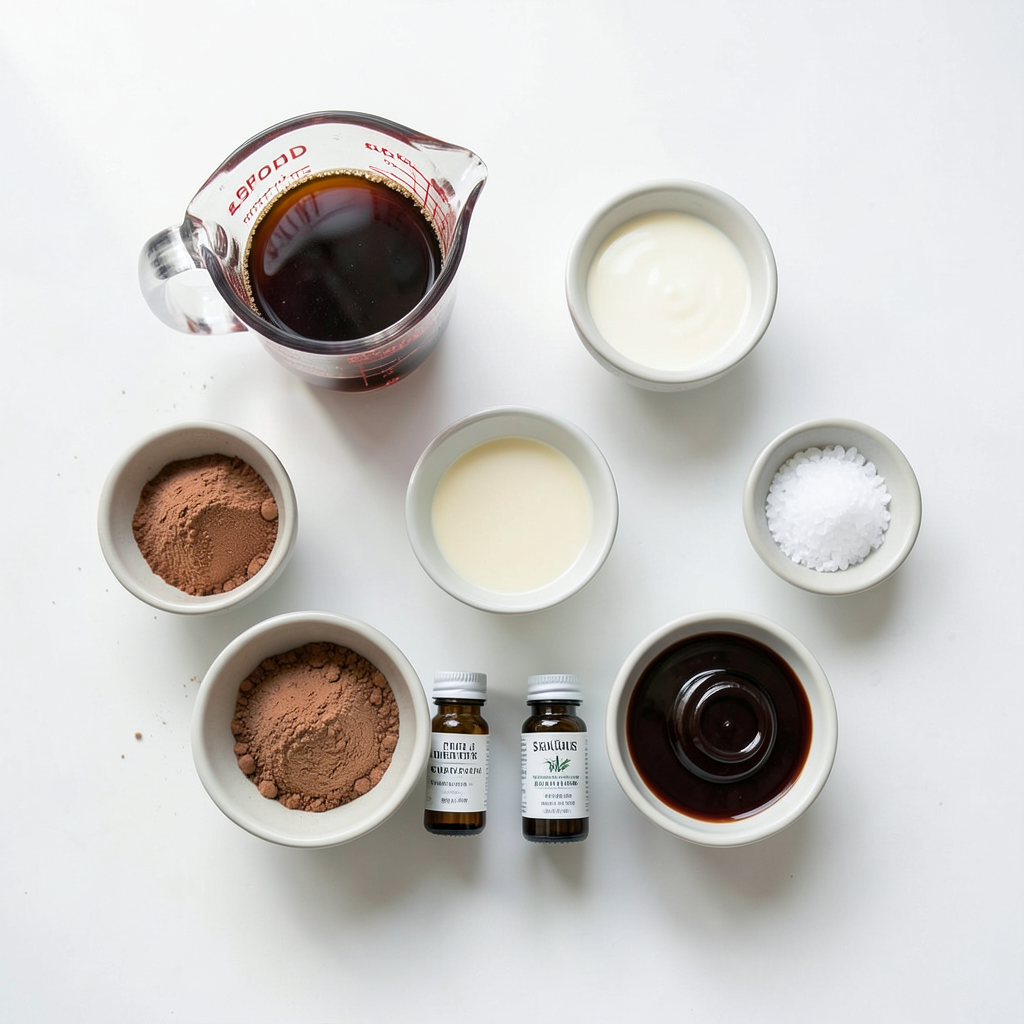
List of Ingredients
- 2 cups cold brew coffee
- 1 cup milk (or dairy-free alternative such as almond or oat milk)
- 1/4 cup cocoa powder
- 1/4 cup sweetened condensed milk (or maple syrup for a vegan option)
- 2 tablespoons vanilla extract
- 1 tablespoon chocolate syrup (for drizzling)
- A pinch of sea salt
Substitutions for Dairy and Sweeteners
You can easily swap the milk for a dairy-free option. Almond milk and oat milk work well. For sweeteners, use maple syrup instead of sweetened condensed milk. This keeps the popsicles vegan and still tasty. Try different nut or seed milks to find your favorite flavor.
Optional Add-ins
Feel free to add a few extras to make your popsicles unique. You can mix in mini chocolate chips for a fun bite. You might also add a splash of coffee liqueur for an adult version. Or, try adding a hint of cinnamon for warmth. Each add-in brings a new twist to this cool treat!
Step-by-Step Instructions
Preparation Steps
To make Mocha Cold Brew Popsicles, start by gathering your ingredients. You need:
- 2 cups cold brew coffee
- 1 cup milk (or a dairy-free option)
- 1/4 cup cocoa powder
- 1/4 cup sweetened condensed milk (or maple syrup)
- 2 tablespoons vanilla extract
- A pinch of sea salt
In a mixing bowl, combine the cold brew coffee, milk, cocoa powder, sweetened condensed milk, vanilla extract, and sea salt. Whisk everything until the mixture is smooth. It should smell amazing! Taste it and adjust the sweetness if needed. You can add more sweetened condensed milk or syrup to make it sweeter.
Once you are happy with the flavor, pour the mixture into popsicle molds. Leave a little space at the top. This helps the popsicles expand as they freeze. For a fun twist, drizzle some chocolate syrup into the mix. Use a skewer to swirl it around gently.
Freezing Process
Now it’s time to freeze the popsicles. Insert popsicle sticks into the molds. Carefully transfer the molds to the freezer. Freeze them for at least 6 to 8 hours. This makes sure they are completely solid.
How to Remove Popsicles from Molds
When the popsicles are ready, it’s time to enjoy them. To remove the popsicles from the molds, run warm water over the outside for a few seconds. This helps loosen them. Then, gently pull the popsicles out. If they stick, try twisting the mold a little.
Now, you have delicious Mocha Cold Brew Popsicles to cool you down this summer!
Tips & Tricks
Sweetness Adjustment Recommendations
You can adjust the sweetness to fit your taste. After mixing, take a quick taste. If it seems too bitter, add more sweetened condensed milk or maple syrup. Start with a teaspoon. Mix again and taste. You can repeat this until it’s just right. Remember, sweetness can change after freezing.
Presentation Tips for Serving
For a stunning look, drizzle chocolate syrup over the popsicles before serving. Place them on a nice platter. A sprinkle of cocoa powder or a few coffee beans adds flair. You could also add fresh mint leaves for color. This makes your treat look extra special.
Best Practices for Smooth Mixture
To ensure a smooth mix, use room-temperature ingredients. This helps the cocoa powder dissolve better. Whisk all the ingredients together well. If you see lumps, keep whisking until it’s smooth. If needed, use a blender for the best results. A smooth mixture means creamy popsicles.
Pro Tips
- Use Quality Cold Brew: The flavor of your popsicles will significantly depend on the quality of cold brew coffee you use. Opt for freshly brewed or high-quality store-bought cold brew for the best results.
- Experiment with Sweetness: Don’t hesitate to adjust the sweetness of your mixture. Depending on your taste preferences or the type of milk you use, you might want to add more sweetened condensed milk or syrup.
- Customize Flavors: Feel free to add other flavors to the mixture such as a dash of cinnamon or a splash of hazelnut extract for an extra twist on the classic mocha flavor.
- Perfectly Release Popsicles: To easily remove the popsicles from the molds, run warm water over the outside of the molds for a few seconds. This helps loosen them without compromising their shape.
Variations
Vegan Option for Mocha Popsicles
You can easily make these popsicles vegan. Instead of regular milk, use almond or oat milk. For sweetening, swap sweetened condensed milk with maple syrup. This change keeps the rich flavor while making it plant-based. The cocoa powder remains the same, giving you that deep chocolate taste. You won't miss out on anything with this option.
Alternative Flavor Combinations
If you want to mix things up, try adding different flavors. Consider using flavored coffee, like hazelnut or vanilla. You can also add spices, like cinnamon or nutmeg, for a warm touch. For a fruity twist, blend in a bit of banana or almond extract. These options create unique popsicles that surprise your taste buds.
Adding Alcohol for an Adult Treat
For a grown-up version, add a splash of coffee liqueur or whiskey. This makes the popsicles a fun treat for summer parties. Mix the alcohol in before pouring into molds. Just remember, these popsicles will be a bit softer due to the alcohol. They’ll still freeze well, but you may need to adjust the freezing time. Enjoy responsibly!
Storage Info
How to Store Popsicles
After you make your mocha cold brew popsicles, store them in the freezer. Use airtight containers or freezer bags. This keeps them fresh and prevents ice crystals. If you use molds, make sure they are sealed well. You want to avoid freezer burn.
Best Freezer Practices
To keep your popsicles tasting great, follow these tips:
- Label your containers: Write the date and name on each one.
- Keep the freezer cold: Set your freezer to 0°F (-18°C) or lower.
- Avoid opening the door often: This helps keep the temperature steady.
Shelf Life of Mocha Cold Brew Popsicles
Mocha cold brew popsicles last about two months in the freezer. After that, they might lose flavor or texture. For the best taste, eat them within four weeks. Enjoy your frozen treat while it’s fresh!
FAQs
Can I use regular coffee instead of cold brew?
Yes, you can use regular coffee. However, cold brew is less bitter. It gives a smoother taste. You can brew regular coffee strong and then cool it down. The flavor will differ, but it can still be good. If you like sweet drinks, cold brew works best.
How long do these popsicles take to freeze?
These popsicles take about 6 to 8 hours to freeze. For the best results, leave them overnight. This time ensures they become firm and easy to eat. If you check them too soon, they may be soft. Make sure to give them enough time to freeze fully.
Where can I buy pre-made mocha cold brew popsicles?
You can find pre-made mocha cold brew popsicles at some grocery stores. Look in the frozen section. Brands like GoodPop or Whole Foods may carry them. You can also find them online. Check local delivery services for more options.
Making mocha cold brew popsicles is fun and simple. We covered the key ingredients and their substitutes, so you can get creative. I shared step-by-step instructions for making, freezing, and serving these treats with tips to enhance sweetness and presentation. You learned about variations, including vegan options and adult flavors. Finally, I explained how to store your popsicles and their shelf life. Enjoy making these delicious popsicles, and feel free to experiment with flavors to make them your own!