No-Bake Key Lime Cheesecake Jars Easy Dessert Delight

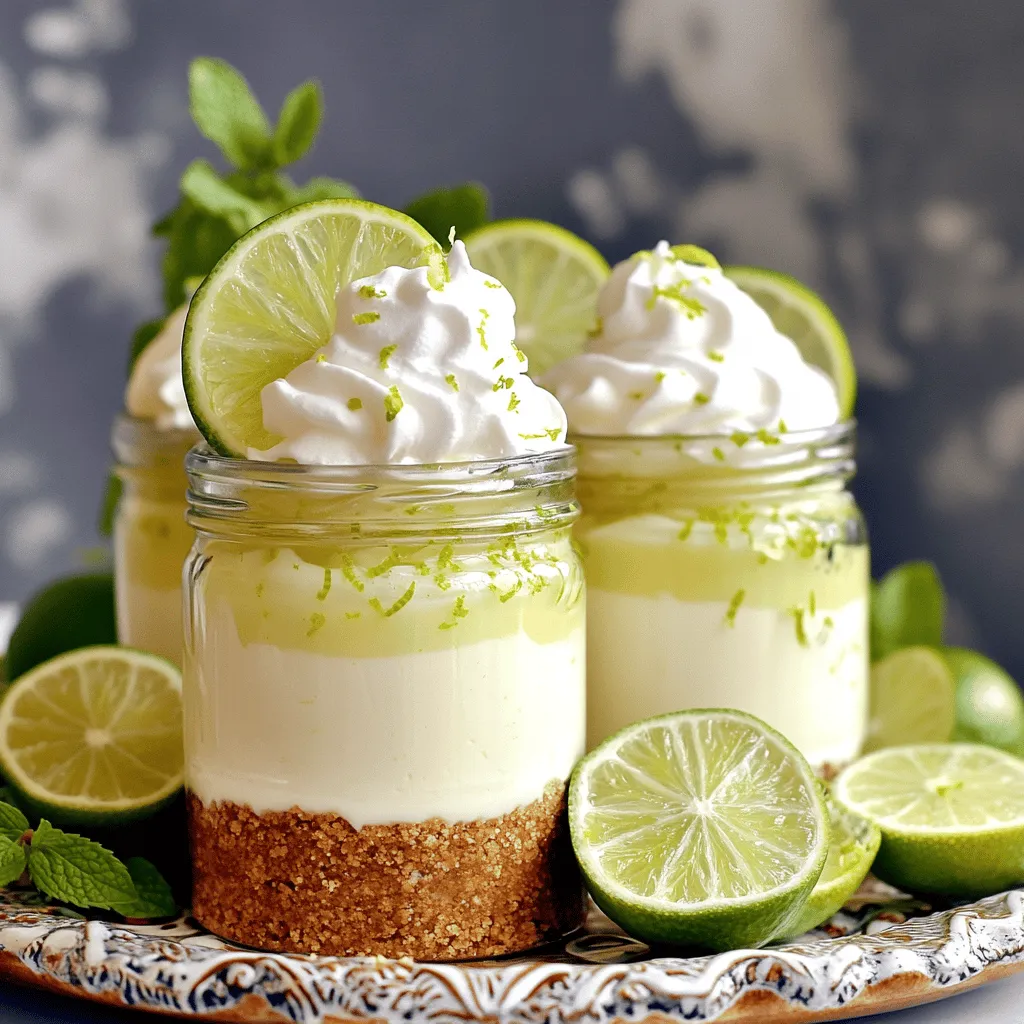
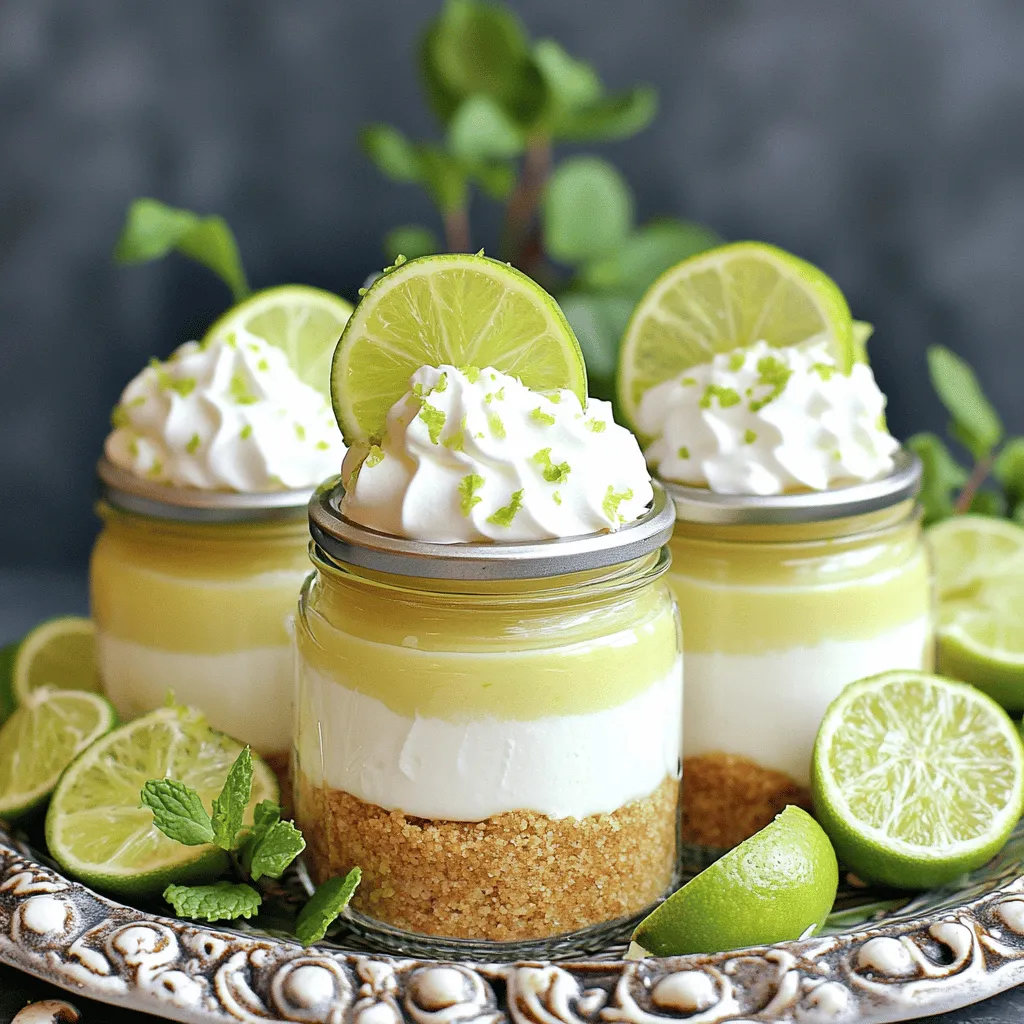
Looking for a quick, tasty dessert? Let me show you how to make No-Bake Key Lime Cheesecake Jars! This easy recipe combines zesty lime, cream cheese, and a crunchy crust—all in a fun jar. Perfect for parties or a simple treat at home, these jars are sure to impress. Stick around as I guide you through each step, tip, and variation to make this dessert your new favorite!

- 1 cup graham cracker crumbs - 1/4 cup unsalted butter, melted - 2 (8 oz) packages cream cheese, softened - 1 cup powdered sugar - 1/2 cup sour cream - 1/4 cup fresh lime juice (about 2-3 limes) - Zest of 2 limes - 1 teaspoon vanilla extract - Whipped cream, for topping - Lime slices, for garnish You can swap graham crackers for crushed cookies or oats. For butter, use coconut oil or margarine. If you want a dairy-free option, try vegan cream cheese. You can use maple syrup instead of powdered sugar for a different sweet taste. Greek yogurt can replace sour cream for a tangy twist. If fresh limes are not available, use bottled lime juice, but fresh juice tastes best. You can skip vanilla extract, but it adds great flavor. For toppings, use any fruit instead of lime slices. Using fresh ingredients is key to a tasty cheesecake. Fresh limes give a bright and bold flavor that bottled juice can’t match. Cream cheese should be fresh for the best texture and taste. Quality ingredients make your dessert shine. They enhance flavors and create a rich, creamy filling. Freshness also improves the look of your dessert. A beautiful, tasty treat is sure to impress your friends and family. To make the crust, gather your graham cracker crumbs and melted butter. In a medium bowl, mix the crumbs and butter. Stir until the crumbs look like wet sand. This step is key to a great base. Next, take your jars and place about 2 tablespoons of the crumb mixture into each one. Press down gently to form a nice crust. This helps keep everything together later. Now, let's move to the filling. In a large mixing bowl, add the softened cream cheese. Beat it with an electric mixer until it is smooth. This makes it easier to mix in other ingredients. Gradually add the powdered sugar while mixing. This will sweeten the filling just right. Then, mix in sour cream, fresh lime juice, lime zest, and vanilla extract. Beat it all together until it is fluffy and smooth. This should take about 2 minutes. After making the filling, it's time to assemble the jars. Spoon or pipe the cheesecake filling over the crust in each jar. Fill them about 3/4 full. This gives you a nice layer of cheesecake. Use a spatula to smooth the tops. Now, place the jars in the refrigerator. Chill them for at least 4 hours or until set. This helps the flavors blend and the filling firm up. Before serving, add a dollop of whipped cream on top and a slice of lime for a fresh touch. Enjoy your delicious no-bake key lime cheesecake jars! To get a smooth and creamy cheesecake, start with soft cream cheese. Let it sit out for about 30 minutes. Beat it well with a mixer until it’s fluffy. Add the powdered sugar slowly to avoid lumps. When you mix in the sour cream and lime juice, do it gently. This helps keep the mix nice and airy. Want to save time? Use a food processor for the graham cracker crust. It makes quick work of crushing the crackers. You can also prep the jars a day ahead. Just chill them overnight. This gives the flavors time to blend and taste even better. For this recipe, I recommend having a few key tools on hand. You need a medium bowl for the crust and a large bowl for the filling. An electric mixer is great for smooth results. Use a spatula to help layer the cheesecake into the jars. Finally, a piping bag makes filling the jars neat and easy. {{image_2}} You can easily change the flavor of your cheesecake jars. For a tropical twist, add shredded coconut to the filling. Just mix in 1/2 cup of unsweetened shredded coconut with the cream cheese. Another idea is to use lemon juice instead of lime juice for a lemon cheesecake. You can also add a touch of coconut extract for more coconut flavor. This keeps it fun and fresh! Garnishing your jars can make a big difference. Instead of lime slices, try using fresh berries. Strawberries or blueberries add a lovely color. You can also sprinkle some toasted coconut on top for crunch. For a chocolate lover, drizzle melted dark chocolate over the whipped cream. These small touches can wow your guests and make the dessert look stunning. These cheesecake jars are great for parties! You can set them on a table for a fun dessert bar. Use different jars to create a colorful display. Consider adding mini spoons for easy serving. You can even pair them with coffee or tea. This adds a nice touch to your gathering and lets everyone enjoy their own little treat. To keep your no-bake key lime cheesecake jars fresh, store them in the fridge. Use an airtight container to prevent any smells from getting in. If you stack the jars, place parchment paper between them to avoid sticking. Keep them away from strong-smelling foods, as cheesecake can absorb odors easily. These cheesecake jars can last for about 5 days in the fridge. After that, the crust might get soggy, and the filling may lose its freshness. Always check for any off smells or changes in texture before serving. If you notice anything odd, it’s best to toss them out. You can freeze these cheesecake jars, but it’s best to do this before adding the whipped cream. Wrap each jar tightly in plastic wrap and then in foil. They can last up to 3 months in the freezer. When you are ready to eat, let them thaw in the fridge overnight. Add whipped cream and lime slices just before serving for the best taste. Yes, you can make these jars a day or two ahead. Just chill them in the fridge. The flavors will deepen and taste even better. Make sure to cover the jars tightly. This keeps them fresh and tasty. If you need a swap for cream cheese, try using Greek yogurt. It gives a nice tang. Another option is mascarpone cheese. It is rich and creamy, just like cream cheese. Both choices work well in this recipe. To keep the crust crunchy, use fresh graham cracker crumbs. Mix them with melted butter well. Press them firmly into the bottom of the jars. Avoid adding the filling too soon. Let the crust chill for a bit before adding the cheesecake layer. This helps keep it firm. This blog post gave you a clear guide on making cheesecake jars. We covered essential ingredients, substitutions, and the importance of freshness. You learned how to prepare the crust, make the filling, and assemble the jars. I shared tips for the right texture and time-saving tricks. We explored flavor variations and garnishing ideas for your parties. Lastly, I provided storage tips to keep your treats fresh. Enjoy making these delicious desserts, and don’t hesitate to experiment with your flavors!

Ingredients

List of Ingredients

– 1 cup graham cracker crumbs

– 1/4 cup unsalted butter, melted

– 2 (8 oz) packages cream cheese, softened

– 1 cup powdered sugar

– 1/2 cup sour cream

– 1/4 cup fresh lime juice (about 2-3 limes)

– Zest of 2 limes

– 1 teaspoon vanilla extract

– Whipped cream, for topping

– Lime slices, for garnish

Substitutions for Each Ingredient

You can swap graham crackers for crushed cookies or oats. For butter, use coconut oil or margarine. If you want a dairy-free option, try vegan cream cheese. You can use maple syrup instead of powdered sugar for a different sweet taste. Greek yogurt can replace sour cream for a tangy twist. If fresh limes are not available, use bottled lime juice, but fresh juice tastes best. You can skip vanilla extract, but it adds great flavor. For toppings, use any fruit instead of lime slices.

Importance of Fresh Ingredients

Using fresh ingredients is key to a tasty cheesecake. Fresh limes give a bright and bold flavor that bottled juice can’t match. Cream cheese should be fresh for the best texture and taste. Quality ingredients make your dessert shine. They enhance flavors and create a rich, creamy filling. Freshness also improves the look of your dessert. A beautiful, tasty treat is sure to impress your friends and family.

Step-by-Step Instructions

Preparation of the Graham Cracker Crust

To make the crust, gather your graham cracker crumbs and melted butter. In a medium bowl, mix the crumbs and butter. Stir until the crumbs look like wet sand. This step is key to a great base. Next, take your jars and place about 2 tablespoons of the crumb mixture into each one. Press down gently to form a nice crust. This helps keep everything together later.

Making the Cheesecake Filling

Now, let’s move to the filling. In a large mixing bowl, add the softened cream cheese. Beat it with an electric mixer until it is smooth. This makes it easier to mix in other ingredients. Gradually add the powdered sugar while mixing. This will sweeten the filling just right. Then, mix in sour cream, fresh lime juice, lime zest, and vanilla extract. Beat it all together until it is fluffy and smooth. This should take about 2 minutes.

Assembling the Jars

After making the filling, it’s time to assemble the jars. Spoon or pipe the cheesecake filling over the crust in each jar. Fill them about 3/4 full. This gives you a nice layer of cheesecake. Use a spatula to smooth the tops. Now, place the jars in the refrigerator. Chill them for at least 4 hours or until set. This helps the flavors blend and the filling firm up. Before serving, add a dollop of whipped cream on top and a slice of lime for a fresh touch. Enjoy your delicious no-bake key lime cheesecake jars!

Tips & Tricks

How to Achieve the Perfect Consistency

To get a smooth and creamy cheesecake, start with soft cream cheese. Let it sit out for about 30 minutes. Beat it well with a mixer until it’s fluffy. Add the powdered sugar slowly to avoid lumps. When you mix in the sour cream and lime juice, do it gently. This helps keep the mix nice and airy.

Time-Saving Techniques

Want to save time? Use a food processor for the graham cracker crust. It makes quick work of crushing the crackers. You can also prep the jars a day ahead. Just chill them overnight. This gives the flavors time to blend and taste even better.

Best Tools and Equipment to Use

For this recipe, I recommend having a few key tools on hand. You need a medium bowl for the crust and a large bowl for the filling. An electric mixer is great for smooth results. Use a spatula to help layer the cheesecake into the jars. Finally, a piping bag makes filling the jars neat and easy.

Variations

Flavor Variations (e.g., Key Lime Coconut)

You can easily change the flavor of your cheesecake jars. For a tropical twist, add shredded coconut to the filling. Just mix in 1/2 cup of unsweetened shredded coconut with the cream cheese. Another idea is to use lemon juice instead of lime juice for a lemon cheesecake. You can also add a touch of coconut extract for more coconut flavor. This keeps it fun and fresh!

Different Garnishing Ideas

Garnishing your jars can make a big difference. Instead of lime slices, try using fresh berries. Strawberries or blueberries add a lovely color. You can also sprinkle some toasted coconut on top for crunch. For a chocolate lover, drizzle melted dark chocolate over the whipped cream. These small touches can wow your guests and make the dessert look stunning.

Serving Suggestions for Parties

These cheesecake jars are great for parties! You can set them on a table for a fun dessert bar. Use different jars to create a colorful display. Consider adding mini spoons for easy serving. You can even pair them with coffee or tea. This adds a nice touch to your gathering and lets everyone enjoy their own little treat.

Storage Info

Best Practices for Storing Cheesecake Jars

To keep your no-bake key lime cheesecake jars fresh, store them in the fridge. Use an airtight container to prevent any smells from getting in. If you stack the jars, place parchment paper between them to avoid sticking. Keep them away from strong-smelling foods, as cheesecake can absorb odors easily.

How Long Do They Last?

These cheesecake jars can last for about 5 days in the fridge. After that, the crust might get soggy, and the filling may lose its freshness. Always check for any off smells or changes in texture before serving. If you notice anything odd, it’s best to toss them out.

Freezing Instructions

You can freeze these cheesecake jars, but it’s best to do this before adding the whipped cream. Wrap each jar tightly in plastic wrap and then in foil. They can last up to 3 months in the freezer. When you are ready to eat, let them thaw in the fridge overnight. Add whipped cream and lime slices just before serving for the best taste.

FAQs

Can I make this recipe ahead of time?

Yes, you can make these jars a day or two ahead. Just chill them in the fridge. The flavors will deepen and taste even better. Make sure to cover the jars tightly. This keeps them fresh and tasty.

What can I substitute for cream cheese?

If you need a swap for cream cheese, try using Greek yogurt. It gives a nice tang. Another option is mascarpone cheese. It is rich and creamy, just like cream cheese. Both choices work well in this recipe.

How do I prevent the crust from getting soggy?

To keep the crust crunchy, use fresh graham cracker crumbs. Mix them with melted butter well. Press them firmly into the bottom of the jars. Avoid adding the filling too soon. Let the crust chill for a bit before adding the cheesecake layer. This helps keep it firm.

This blog post gave you a clear guide on making cheesecake jars. We covered essential ingredients, substitutions, and the importance of freshness. You learned how to prepare the crust, make the filling, and assemble the jars. I shared tips for the right texture and time-saving tricks. We explored flavor variations and garnishing ideas for your parties. Lastly, I provided storage tips to keep your treats fresh. Enjoy making these delicious desserts, and don’t hesitate to experiment with your flavors!

- 1 cup graham cracker crumbs - 1/4 cup unsalted butter, melted - 2 (8 oz) packages cream cheese, softened - 1 cup powdered sugar - 1/2 cup sour cream - 1/4 cup fresh lime juice (about 2-3 limes) - Zest of 2 limes - 1 teaspoon vanilla extract - Whipped cream, for topping - Lime slices, for garnish You can swap graham crackers for crushed cookies or oats. For butter, use coconut oil or margarine. If you want a dairy-free option, try vegan cream cheese. You can use maple syrup instead of powdered sugar for a different sweet taste. Greek yogurt can replace sour cream for a tangy twist. If fresh limes are not available, use bottled lime juice, but fresh juice tastes best. You can skip vanilla extract, but it adds great flavor. For toppings, use any fruit instead of lime slices. Using fresh ingredients is key to a tasty cheesecake. Fresh limes give a bright and bold flavor that bottled juice can’t match. Cream cheese should be fresh for the best texture and taste. Quality ingredients make your dessert shine. They enhance flavors and create a rich, creamy filling. Freshness also improves the look of your dessert. A beautiful, tasty treat is sure to impress your friends and family. To make the crust, gather your graham cracker crumbs and melted butter. In a medium bowl, mix the crumbs and butter. Stir until the crumbs look like wet sand. This step is key to a great base. Next, take your jars and place about 2 tablespoons of the crumb mixture into each one. Press down gently to form a nice crust. This helps keep everything together later. Now, let's move to the filling. In a large mixing bowl, add the softened cream cheese. Beat it with an electric mixer until it is smooth. This makes it easier to mix in other ingredients. Gradually add the powdered sugar while mixing. This will sweeten the filling just right. Then, mix in sour cream, fresh lime juice, lime zest, and vanilla extract. Beat it all together until it is fluffy and smooth. This should take about 2 minutes. After making the filling, it's time to assemble the jars. Spoon or pipe the cheesecake filling over the crust in each jar. Fill them about 3/4 full. This gives you a nice layer of cheesecake. Use a spatula to smooth the tops. Now, place the jars in the refrigerator. Chill them for at least 4 hours or until set. This helps the flavors blend and the filling firm up. Before serving, add a dollop of whipped cream on top and a slice of lime for a fresh touch. Enjoy your delicious no-bake key lime cheesecake jars! To get a smooth and creamy cheesecake, start with soft cream cheese. Let it sit out for about 30 minutes. Beat it well with a mixer until it’s fluffy. Add the powdered sugar slowly to avoid lumps. When you mix in the sour cream and lime juice, do it gently. This helps keep the mix nice and airy. Want to save time? Use a food processor for the graham cracker crust. It makes quick work of crushing the crackers. You can also prep the jars a day ahead. Just chill them overnight. This gives the flavors time to blend and taste even better. For this recipe, I recommend having a few key tools on hand. You need a medium bowl for the crust and a large bowl for the filling. An electric mixer is great for smooth results. Use a spatula to help layer the cheesecake into the jars. Finally, a piping bag makes filling the jars neat and easy. {{image_2}} You can easily change the flavor of your cheesecake jars. For a tropical twist, add shredded coconut to the filling. Just mix in 1/2 cup of unsweetened shredded coconut with the cream cheese. Another idea is to use lemon juice instead of lime juice for a lemon cheesecake. You can also add a touch of coconut extract for more coconut flavor. This keeps it fun and fresh! Garnishing your jars can make a big difference. Instead of lime slices, try using fresh berries. Strawberries or blueberries add a lovely color. You can also sprinkle some toasted coconut on top for crunch. For a chocolate lover, drizzle melted dark chocolate over the whipped cream. These small touches can wow your guests and make the dessert look stunning. These cheesecake jars are great for parties! You can set them on a table for a fun dessert bar. Use different jars to create a colorful display. Consider adding mini spoons for easy serving. You can even pair them with coffee or tea. This adds a nice touch to your gathering and lets everyone enjoy their own little treat. To keep your no-bake key lime cheesecake jars fresh, store them in the fridge. Use an airtight container to prevent any smells from getting in. If you stack the jars, place parchment paper between them to avoid sticking. Keep them away from strong-smelling foods, as cheesecake can absorb odors easily. These cheesecake jars can last for about 5 days in the fridge. After that, the crust might get soggy, and the filling may lose its freshness. Always check for any off smells or changes in texture before serving. If you notice anything odd, it’s best to toss them out. You can freeze these cheesecake jars, but it’s best to do this before adding the whipped cream. Wrap each jar tightly in plastic wrap and then in foil. They can last up to 3 months in the freezer. When you are ready to eat, let them thaw in the fridge overnight. Add whipped cream and lime slices just before serving for the best taste. Yes, you can make these jars a day or two ahead. Just chill them in the fridge. The flavors will deepen and taste even better. Make sure to cover the jars tightly. This keeps them fresh and tasty. If you need a swap for cream cheese, try using Greek yogurt. It gives a nice tang. Another option is mascarpone cheese. It is rich and creamy, just like cream cheese. Both choices work well in this recipe. To keep the crust crunchy, use fresh graham cracker crumbs. Mix them with melted butter well. Press them firmly into the bottom of the jars. Avoid adding the filling too soon. Let the crust chill for a bit before adding the cheesecake layer. This helps keep it firm. This blog post gave you a clear guide on making cheesecake jars. We covered essential ingredients, substitutions, and the importance of freshness. You learned how to prepare the crust, make the filling, and assemble the jars. I shared tips for the right texture and time-saving tricks. We explored flavor variations and garnishing ideas for your parties. Lastly, I provided storage tips to keep your treats fresh. Enjoy making these delicious desserts, and don’t hesitate to experiment with your flavors!

No-Bake Key Lime Cheesecake Jars

Dive into the delicious world of No-Bake Key Lime Cheesecake Jars! This easy recipe combines creamy goodness with zesty lime for a refreshing dessert that's perfect for any occasion. With just a few ingredients like graham crackers and cream cheese, you can whip up this treat in no time. Get ready to impress your friends and family—click through to discover how to make these delightful jars and treat yourself to a taste of paradise!

Ingredients
  

1 cup graham cracker crumbs

1/4 cup unsalted butter, melted

2 (8 oz) packages cream cheese, softened

1 cup powdered sugar

1/2 cup sour cream

1/4 cup fresh lime juice (about 2-3 limes)

Zest of 2 limes

1 teaspoon vanilla extract

Whipped cream, for topping

Lime slices, for garnish

Instructions
 

In a medium bowl, combine the graham cracker crumbs and melted butter. Mix until the crumbs are evenly coated and resemble wet sand.

    In the base of each cheesecake jar, layer about 2 tablespoons of the graham cracker mixture. Press down gently to form a crust.

      In a large mixing bowl, beat the softened cream cheese with an electric mixer until smooth and creamy.

        Gradually add the powdered sugar, continuing to mix until well incorporated.

          Add the sour cream, fresh lime juice, lime zest, and vanilla extract. Beat the mixture until it is smooth and fluffy, about 2 minutes.

            Spoon or pipe the key lime cheesecake filling over the graham cracker base in each jar, filling them about 3/4 full.

              Smooth the top with a spatula and chill the jars in the refrigerator for at least 4 hours or until set.

                Before serving, top each cheesecake jar with a dollop of whipped cream and a slice of lime for garnish.

                  Prep Time: 20 minutes | Total Time: 4 hours 20 minutes | Servings: 6-8

                    - Presentation Tips: Serve the jars on a decorative platter with extra lime slices and fresh mint leaves for a pop of color.