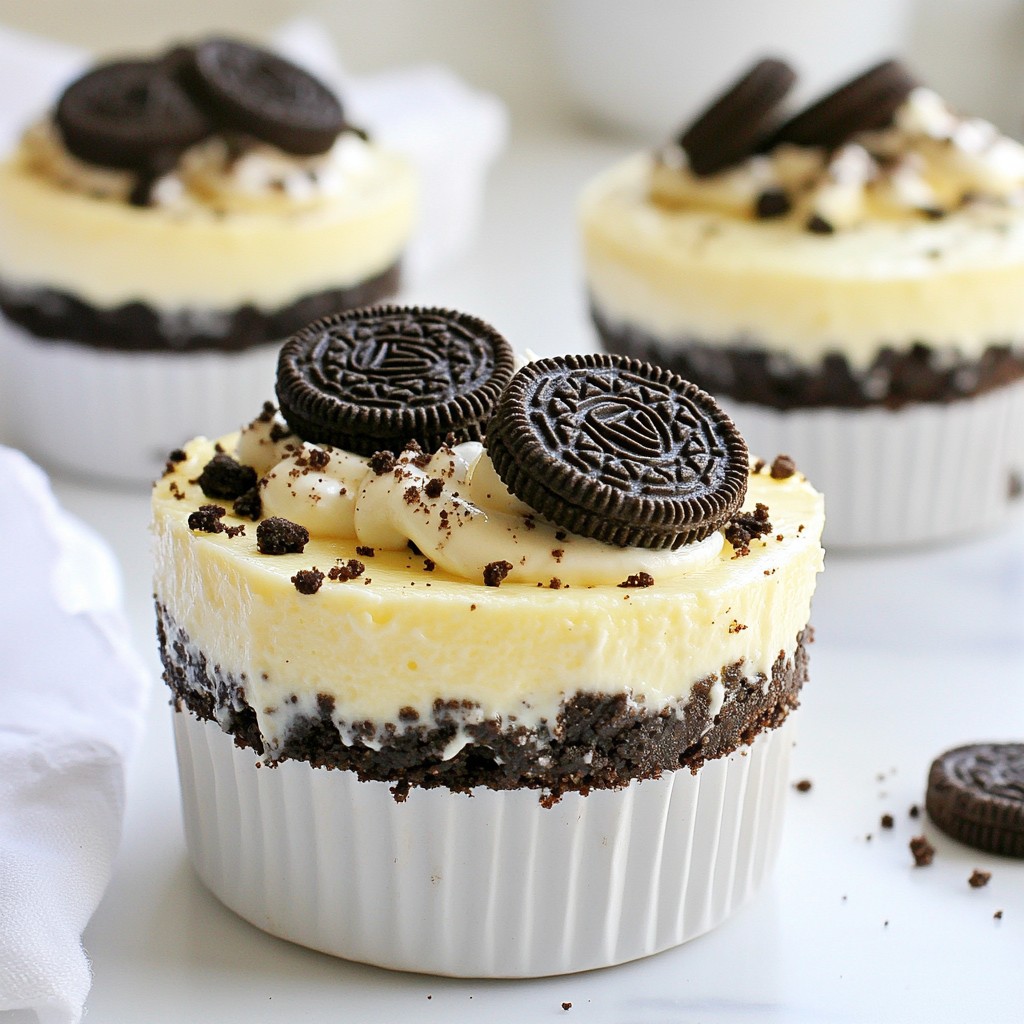
Craving a sweet treat that’s easy and quick? Let me introduce you to No-Bake Oreo Cheesecake Cups! These delicious cups combine the classic flavors of Oreo cookies and creamy cheesecake in a fun, individual serving size. They require no baking, making them a perfect treat for any occasion. Follow my simple steps to create these delightful desserts that everyone will love. Let’s dive into the sweet details!
Why I Love This Recipe
- Decadent Flavor: This cheesecake cups combine the rich taste of cream cheese with the classic chocolatey crunch of Oreo cookies, making each bite a delightful treat.
- Easy to Prepare: With just a few simple steps, you can whip up these delicious dessert cups in no time, perfect for any occasion.
- Individual Servings: These cups are perfectly portioned, making them a great choice for gatherings or a sweet treat for yourself without the guilt of a large slice.
- Customizable Toppings: Feel free to get creative with toppings, whether it's extra Oreos, chocolate sauce, or whipped cream, to make each cup uniquely yours.
Ingredients
Main Ingredients
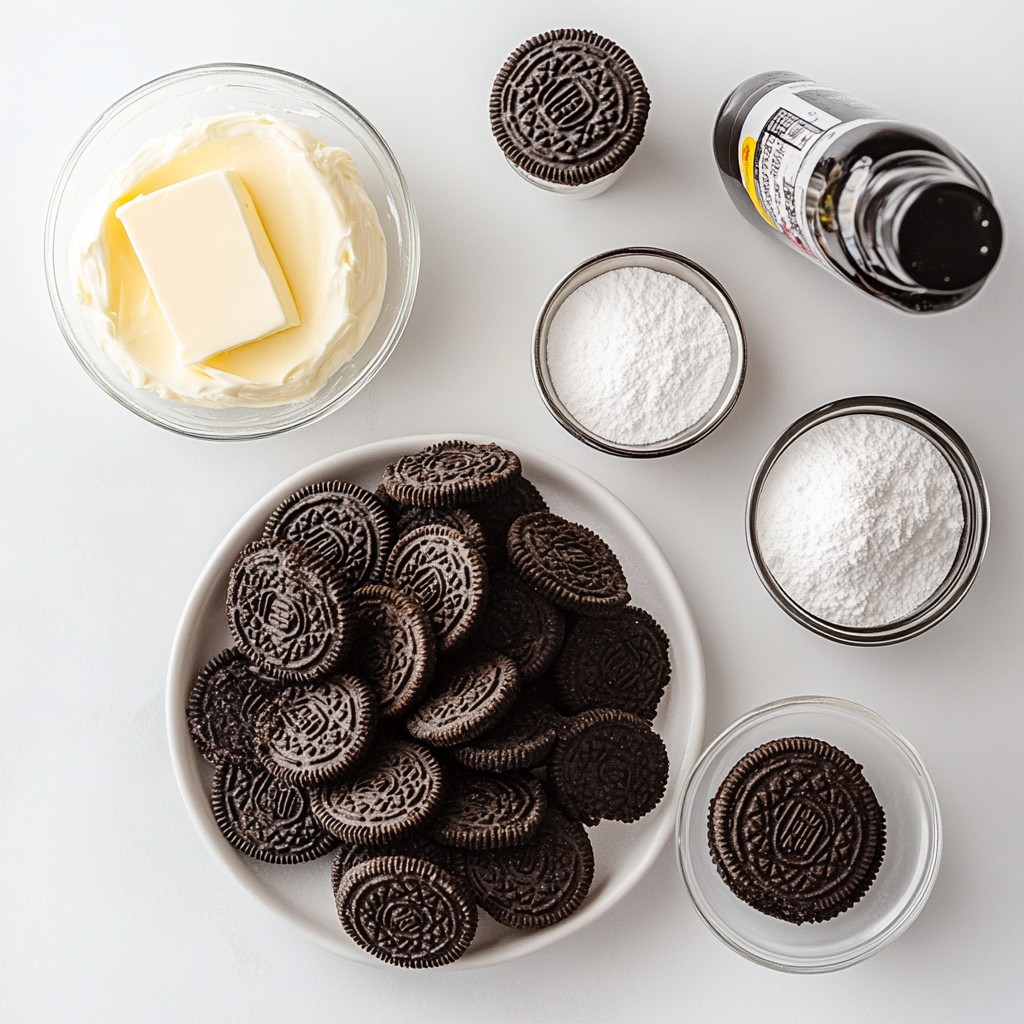
- 24 Oreo cookies, crushed
- 2 tablespoons unsalted butter, melted
- 8 oz cream cheese, softened
- 1 cup powdered sugar
- 1 teaspoon vanilla extract
- 1 cup heavy whipping cream
- Additional Oreo cookies for garnish (optional)
To make these No-Bake Oreo Cheesecake Cups, you need just a few simple ingredients. The base is Oreo cookies, giving it a tasty chocolate flavor. You crush the cookies and mix them with melted butter to form a crust.
For the creamy filling, you will use cream cheese. Make sure it is softened. This will help it mix well. You’ll also add powdered sugar and vanilla extract for sweetness and flavor.
Finally, the heavy whipping cream adds fluffiness. When whipped, it creates a light texture. If you want, you can garnish with more Oreos to make it look nice. A few whole Oreos or some crumbs on top add a fun touch.
Equipment Needed
- Mixing bowls
- Electric mixer
- Individual serving cups
You will need a few tools to make this treat. Mixing bowls help you combine the ingredients easily. An electric mixer makes it simple to beat the cream cheese and whip the cream.
Lastly, individual serving cups are perfect for layering your dessert. They help in serving and make it easy to enjoy these delicious cheesecake cups.
Step-by-Step Instructions
Preparing the Crust
To start, take 24 Oreo cookies and crush them into fine crumbs. You can use a food processor or just place them in a plastic bag and smash them with a rolling pin. Next, melt 2 tablespoons of unsalted butter. Mix the crushed Oreos with the melted butter in a medium bowl. Make sure all the crumbs are coated in butter.
Now, grab your individual serving cups. These could be small glasses or dessert cups. Evenly distribute the Oreo mixture into the bottom of each cup. Press it down firmly to create a solid crust. This step helps your cheesecake cups hold their shape.
Making the Cheesecake Filling
In a large bowl, take 8 oz of softened cream cheese. Use an electric mixer to beat it until it’s smooth and creamy. This should only take a minute or two. Then, gradually add 1 cup of powdered sugar and 1 teaspoon of vanilla extract to the bowl. Mix until everything is well combined and smooth.
Now, take another bowl and whip 1 cup of heavy whipping cream. You want to whip it until stiff peaks form. This step makes the cheesecake light and fluffy. Next, gently fold the whipped cream into the cream cheese mixture. Be careful not to deflate it. You want to keep it airy and light.
Assembling the Cups
Now comes the fun part! Start layering the cheesecake filling over your Oreo crusts. Fill each cup almost to the top, leaving a little space for garnishing later. Once you’ve filled all the cups, cover them with plastic wrap. Place them in the refrigerator to chill for at least 2 hours. This helps the cheesecake set and makes it easier to serve.
Before you enjoy your delicious treat, feel free to garnish with crushed Oreo cookies or whole Oreos on top. This adds a nice touch and looks great!
Tips & Tricks
Achieving the Perfect Texture
To make your Oreo cheesecake cups creamy, use softened cream cheese. Soft cream cheese blends easily and gives a smooth texture. If it's cold, you risk lumps. Set it out for about 30 minutes before you start.
Whipping heavy cream to stiff peaks is key for the right lightness. Start with cold heavy cream in a bowl. Use an electric mixer and beat on medium speed. Watch closely; stop when the cream holds its shape. This adds a fluffy touch to your cheesecake.
Serving Suggestions
For a fun twist, pair your cheesecake cups with chocolate sauce or a dollop of whipped cream. These add a rich layer of flavor. You can also sprinkle crushed Oreo cookies on top for extra crunch. Whole Oreos make a cute garnish too.
Consider serving the cups on a decorative platter. Drizzling chocolate sauce around them adds flair and makes them look special.
Common Mistakes to Avoid
One common mistake is over-mixing the cheesecake filling. This can make it dense. Mix just until combined for a light texture.
Another mistake is not chilling the cups long enough. They need at least 2 hours in the fridge to set properly. If you skip this step, the filling won't hold its shape when you serve.
Pro Tips
- Use Cold Ingredients: Make sure your cream cheese is fully softened and your heavy cream is chilled. This helps achieve a smooth and fluffy cheesecake filling.
- Perfect Crust Texture: Press the Oreo crust mixture firmly into the bottom of the cups to prevent it from crumbling when serving.
- Chill Time is Key: Allow the cheesecake cups to chill for a minimum of 2 hours. This helps the filling set properly and enhances the flavors.
- Garnishing Options: Get creative with toppings! Try adding chocolate shavings, whipped cream, or even a drizzle of caramel sauce for a delightful presentation.
Variations
Flavor Variations
You can easily change the flavor of your No-Bake Oreo Cheesecake Cups. One great idea is to add peanut butter to the filling. This adds a rich, nutty taste. Just mix in about 1/2 cup of creamy peanut butter with the cream cheese. It makes the dessert even more delicious and fun!
Another tasty option is to incorporate fruit. Strawberries or raspberries work well. You can fold in chopped fruit into the cheesecake filling. This adds a fresh taste and a pop of color. You can also use fruit as a topping. It looks great and adds a sweet contrast to the creamy filling.
Health-Conscious Alternatives
If you want a lighter version of this dessert, there are smart swaps you can make. First, try using reduced-fat cream cheese. It still gives you that creamy texture but cuts down on the calories.
You can also opt for low-sugar sweeteners. Things like stevia or erythritol can replace powdered sugar. This way, you enjoy a sweet treat with less sugar. It’s perfect if you are watching your sugar intake but still want to indulge in a tasty dessert.
Feel free to mix and match these ideas. Each variation can make your No-Bake Oreo Cheesecake Cups a special treat just for you!
Storage Info
Refrigeration Guidelines
No-Bake Oreo Cheesecake Cups stay fresh in the fridge for up to 5 days. To keep them at their best, cover them tightly with plastic wrap or a lid. This prevents air from drying them out and keeps them tasting great.
Freezing Instructions
Yes, you can freeze No-Bake Oreo Cheesecake Cups! They freeze well for up to 2 months. To freeze, wrap each cup in plastic wrap or place them in an airtight container. When you're ready to enjoy them, take them out and let them thaw in the fridge overnight. This way, they will be creamy and delicious when served.
FAQs
Can I make this recipe ahead of time?
Yes, you can make these cups ahead of time. I recommend chilling them for at least two hours before serving. This helps the cheesecake set properly. You can store them in the fridge for up to three days. Just keep them covered to stay fresh.
What if I don’t have cream cheese?
If you don’t have cream cheese, don’t worry! You can use Greek yogurt or mascarpone cheese as a substitute. Both options will give you a creamy texture. Just make sure they are also soft so they mix well with the other ingredients.
Can I use another type of cookie for the crust?
Absolutely! If you want to switch things up, try using graham crackers, chocolate cookies, or even vanilla cookies. Each option will give a unique flavor to your cheesecake cups. Just crush them and mix with melted butter like you do with Oreos.
You can create delicious No-Bake Oreo Cheesecake Cups with just a few simple steps. We covered the key ingredients, essential equipment, and easy methods to make them. I shared tips to avoid common mistakes and offered fun variations. Remember, the right texture is key for that perfect cheesecake experience. Feel free to customize your cups and enjoy them fresh. With these tips, you’ll impress anyone who tries them. Make your next dessert special with this treat!