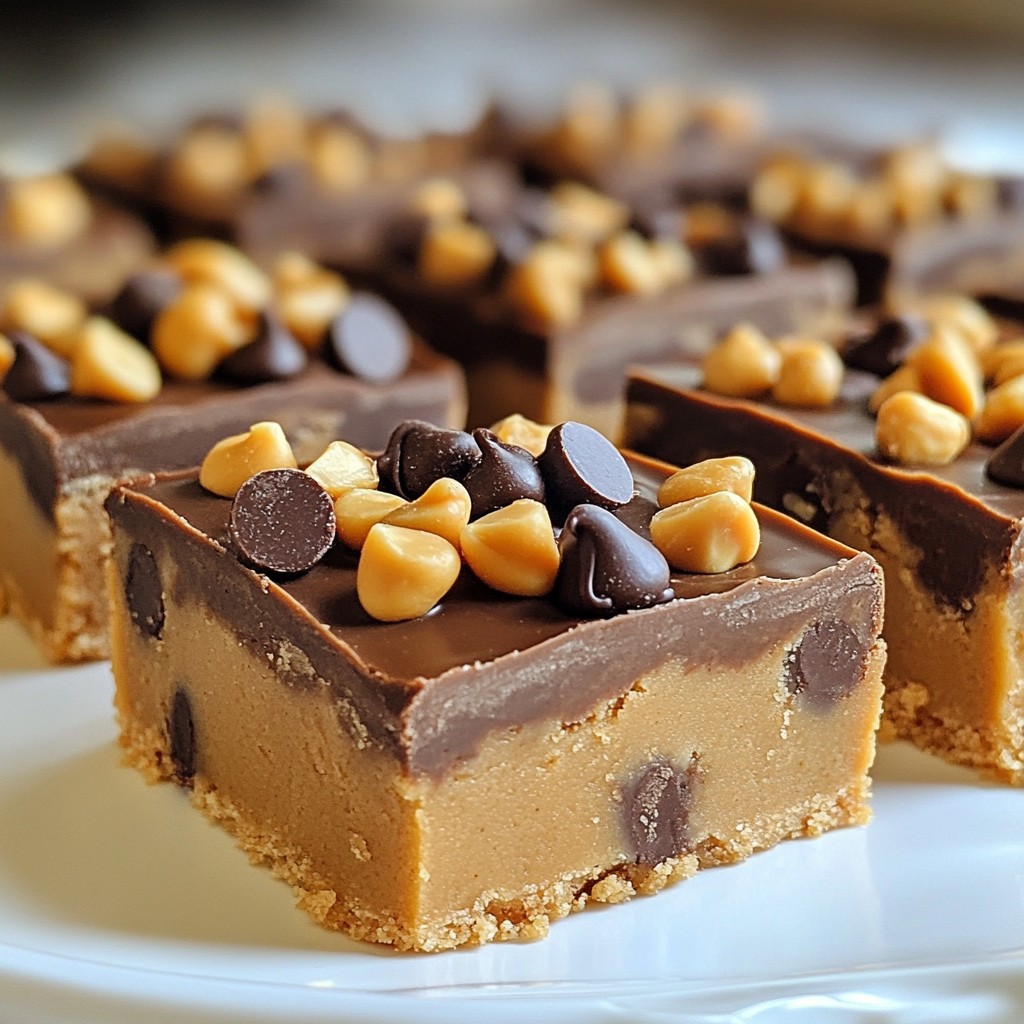
If you love peanut butter and sweet treats, you're in for a delightful surprise! These Peanut Butter Cookie Dough Bars are simple to make and pack a tasty punch. With creamy peanut butter, chocolate chips, and a mix of healthy ingredients, you'll enjoy every bite. Whether you're treating yourself or sharing with friends, these bars are bound to impress. Let’s dive into the easy steps and tips to make these yummy bars today!
Why I Love This Recipe
- Easy to Make: This recipe requires minimal ingredients and can be prepared in just 15 minutes, making it a quick and simple treat.
- Healthy Indulgence: With creamy peanut butter and coconut flour, these bars are a healthier option compared to traditional cookies.
- Customizable: You can easily modify the recipe by adding your favorite mix-ins like nuts or dried fruits for a personal touch.
- Deliciously Satisfying: The combination of peanut butter and chocolate chips creates a rich and satisfying treat that everyone will love.
Ingredients
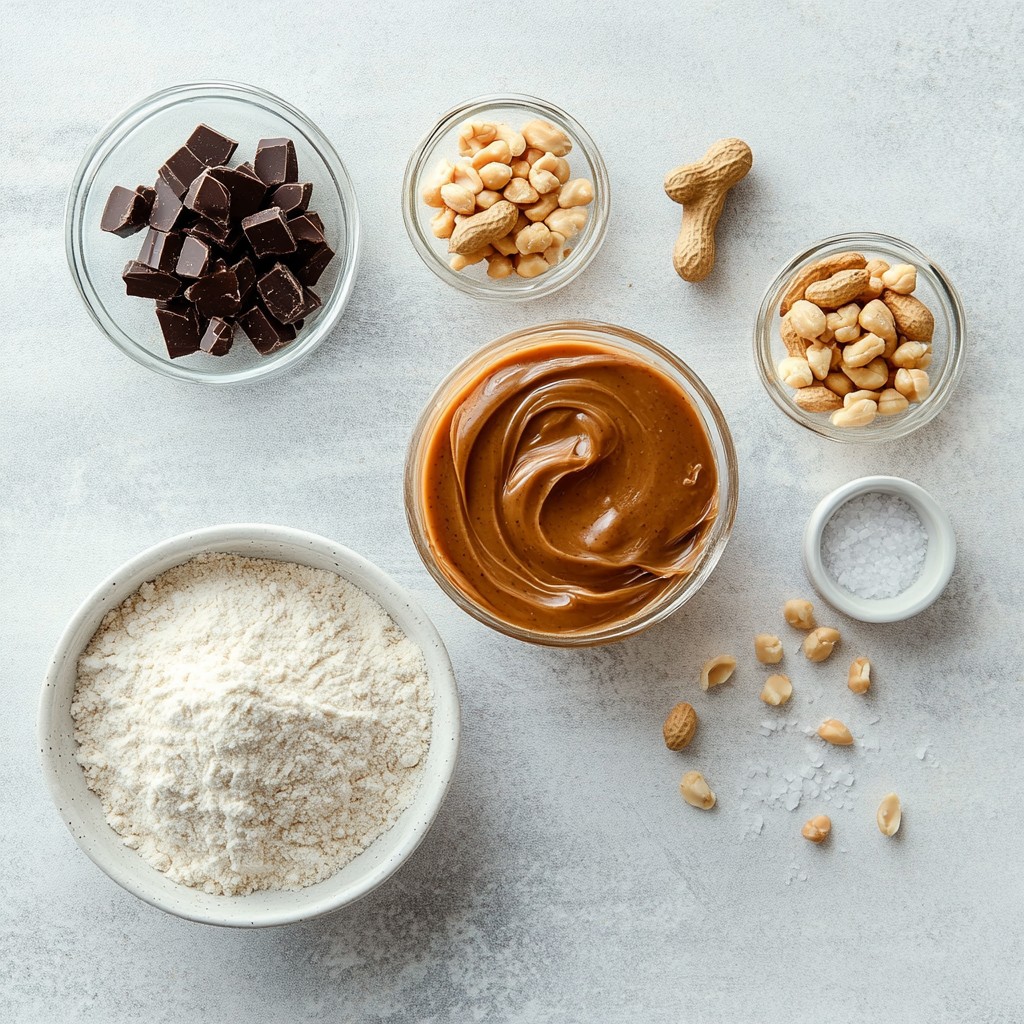
List of Ingredients
- 1 cup creamy peanut butter
- ½ cup coconut flour
- ½ cup maple syrup
- 1 teaspoon vanilla extract
- ¼ teaspoon salt
- ½ cup mini chocolate chips
- 2 tablespoons chopped peanuts (for topping)
The main ingredient here is creamy peanut butter. It gives the bars that rich, nutty flavor. Coconut flour acts as a great binder and adds a nice texture. Maple syrup sweetens the dough without refined sugars.
Vanilla extract boosts the flavor, while salt brings out the sweetness. Mini chocolate chips add a delightful bite of chocolate. Lastly, chopped peanuts on top add crunch and a fun look.
Substitutions and Variations
You can switch peanut butter for other nut butters. Almond or cashew butter work well too. For gluten-free options, stick with coconut flour. This flour is naturally gluten-free and perfect for these bars.
If you want to cut sugar, try sugar substitutes like stevia or erythritol. These can help keep the sweetness without extra calories.
Step-by-Step Instructions
Preparation Steps
1. Start by mixing the base ingredients. In a bowl, combine 1 cup of creamy peanut butter and ½ cup of maple syrup. Stir until smooth.
2. Next, add ½ cup of coconut flour, 1 teaspoon of vanilla extract, and ¼ teaspoon of salt. Mix until a thick dough forms. It should not crumble.
Assembling the Bars
1. Line an 8x8 inch baking pan with parchment paper. Leave some paper over the edges for easy removal later.
2. Press the dough evenly into the pan. Use your hands or a spatula to smooth the surface.
3. For some crunch, sprinkle 2 tablespoons of chopped peanuts on top. Gently press them into the dough.
Setting the Bars
1. Refrigerate the bars for at least 1 hour. This helps them set well.
2. After they set, lift the bars out using the parchment paper. Cut them into squares for serving.
Tips & Tricks
Achieving the Perfect Texture
To avoid crumbly dough, start with creamy peanut butter. Mix it well with maple syrup first. This makes the base smooth and sticky. Then, add the coconut flour slowly. Stir just until a dough forms. If the dough feels too dry, add a little more maple syrup.
For even ingredient distribution, fold in the chocolate chips gently. This helps keep the dough from breaking apart. Make sure every bite has chocolate. Use a spatula to press the dough evenly into the pan. This ensures a uniform thickness.
Serving Suggestions
These bars pair well with milk or coffee. The smooth peanut taste goes perfectly with cold milk. For coffee lovers, try them with a rich espresso. They also look great on a plate. Cut into squares, then stack them neatly. You can sprinkle extra chopped peanuts on top for a fun touch.
Common Mistakes to Avoid
One common mistake is overmixing the dough. This can make the bars tough. Mix just until combined for the best texture. Another mistake is not refrigerating long enough. The bars need at least one hour to set. If you cut them too soon, they might fall apart. Give them the time they need for a nice, firm shape.
Pro Tips
- Use Natural Peanut Butter: For a healthier option, choose natural peanut butter without added sugars or oils. This will make the bars even more nutritious!
- Chill for Best Texture: Ensure to chill the bars for at least an hour. This helps in firming them up, making it easier to cut into perfect squares.
- Experiment with Mix-Ins: Feel free to customize your bars by adding other mix-ins like dried fruit, shredded coconut, or different types of nuts for added flavor and texture.
- Storage Tips: Store the bars in an airtight container in the refrigerator to maintain freshness, and they can last up to a week!
Variations
Flavor Add-ins
You can change the flavor of your Peanut Butter Cookie Dough Bars with some fun add-ins.
- Using different types of chocolate: Try dark, white, or even caramel chocolate chips. Each type brings a new taste, making the bars even more special.
- Adding dried fruits or seeds: Toss in some raisins, cranberries, or sunflower seeds. These can add sweetness and crunch, giving you a tasty twist.
Dietary Adjustments
You can make these bars fit different diets with a few simple swaps.
- Vegan options: Use maple syrup as your sweetener, and make sure to choose dairy-free chocolate chips. This way, everyone can enjoy them!
- Nut-free alternatives: If you need a nut-free option, try sun butter or soy nut butter. These work well and keep the rich flavor.
Size Alterations
If you want to change the number of bars you make, it's easy to adjust.
- Adjusting for larger or smaller batches: Simply double or halve the recipe. Just remember to keep the ratios the same for the best results.
- Cooking time adjustments: If you change the size of the batch, check the bars a bit early or leave them longer. You want them firm but not too hard.
Storage Info
Best Storage Practices
To keep your Peanut Butter Cookie Dough Bars fresh, store them in the refrigerator. Place the bars in an airtight container. This will prevent them from drying out. You can also wrap them tightly in plastic wrap. For longer storage, freezing is a great option. Just cut the bars into squares first. Then, place them in a freezer-safe bag. Squeeze out the air before sealing. This helps prevent freezer burn.
Shelf Life
In the fridge, these bars last about a week. If you freeze them, they can stay fresh for up to three months. Look for signs of spoilage like a change in smell or color. If they smell off or look dry, it's best to throw them away.
Reheating Instructions
These bars are great cold, but you can warm them up if you prefer. The best method is to use the microwave. Heat them for about 10-15 seconds. This makes the chocolate chips melt a bit. Enjoy them warm for a cozy treat!
FAQs
How long do Peanut Butter Cookie Dough Bars last?
Peanut Butter Cookie Dough Bars last about one week in the fridge. Keep them in an airtight container. This helps keep them fresh and tasty. You can also freeze them for up to three months. Just thaw them in the fridge before eating.
Can I make these bars ahead of time?
Yes, you can make these bars ahead of time. They are great for meal prep. Just store them in the fridge for a quick snack or dessert later. They taste even better after chilling overnight. This gives the flavors time to blend.
What is the best way to cut these bars?
To cut these bars, first refrigerate them until firm. Use a sharp knife for clean cuts. Lift the bars out using the parchment overhang. This makes cutting easier and keeps the bars intact. You can cut them into squares or rectangles, based on your preference.
Are these bars gluten-free?
Yes, these bars are gluten-free. They use coconut flour instead of regular flour. Coconut flour is a great gluten-free option. Always check your ingredients to make sure they are gluten-free if you have dietary needs.
Can I substitute maple syrup with honey?
Yes, you can substitute maple syrup with honey. Honey adds sweetness and flavor. Keep in mind that honey may change the taste slightly. Use the same amount, one-half cup, for a perfect balance in your bars.
These peanut butter cookie dough bars are simple, tasty, and fun to make. We covered the key ingredients, with options to swap them out if needed. You learned the steps to prepare, set, and cut the bars. Plus, I shared tips to avoid common mistakes.
Experiment with flavors and adjust sizes to suit your needs. Store them well to enjoy later. Now, you’re ready to impress with these treats. Try them out and enjoy every bite!