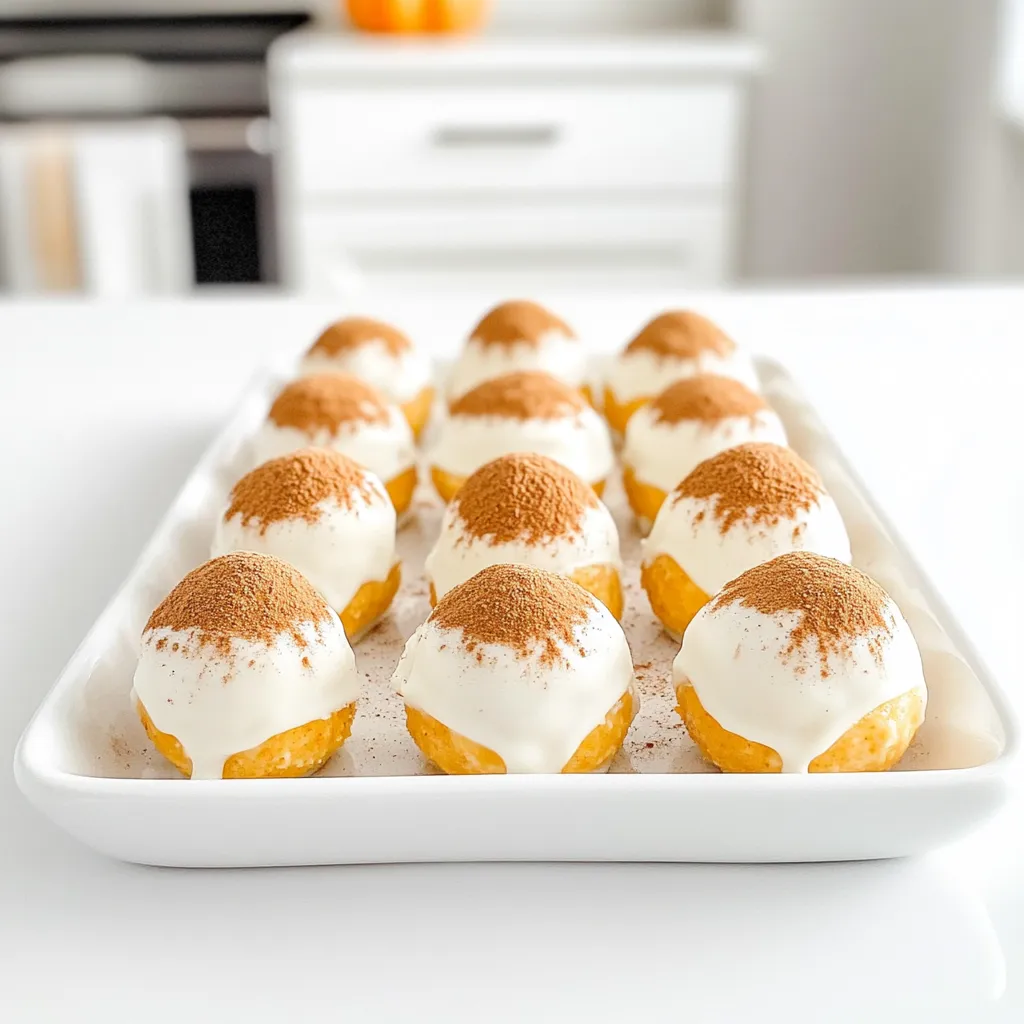
Fall is here, and that means it’s time for pumpkin treats! Today, I’m excited to share my delicious Pumpkin Cheesecake Truffles recipe. These delightful bites combine creamy pumpkin, sweet spices, and smooth chocolate, making them the perfect autumn snack. You’ll love how simple they are to make and how festive they look on any dessert table. Let’s dive into this tasty treat that captures the essence of fall!
Ingredients
Main Ingredients List
– 1 cup cream cheese
– 1 cup pumpkin puree
– 1/2 cup powdered sugar
– 1 teaspoon vanilla extract
– 1 teaspoon ground cinnamon
– 1/2 teaspoon ground nutmeg
– 1/4 teaspoon ground ginger
Additional Ingredients
– 1 cup graham cracker crumbs
– 1 cup white chocolate chips
– A pinch of sea salt
Optional Coating Ingredients
– Extra graham cracker crumbs
– Decorative toppings
The main ingredients for pumpkin cheesecake truffles create a rich and creamy treat. I use cream cheese and pumpkin puree as the base. The cream cheese gives the truffles their smooth texture. Pumpkin puree adds a warm flavor and a beautiful color.
To sweeten the mix, I add powdered sugar and a splash of vanilla extract. The spices, like cinnamon, nutmeg, and ginger, bring out that cozy fall vibe. You can adjust these spices to suit your taste.
Graham cracker crumbs add a nice crunch to the truffles. I fold them into the mixture for added texture. The white chocolate chips, when melted, coat the truffles and make them extra special. A pinch of sea salt balances the sweetness.
For an optional touch, you can use extra graham cracker crumbs to coat the truffles. Decorative toppings, like sprinkles or crushed nuts, can also add flair. These ingredients work together to make a delightful fall treat.
Step-by-Step Instructions
Mixing Ingredients
To start, I mix the softened cream cheese and pumpkin puree in a large bowl. I want this mix to be smooth and creamy. Next, I add the powdered sugar, vanilla extract, ground cinnamon, nutmeg, and ginger. It’s important to stir all these spices well into the mixture. I continue to mix until everything is fully combined and smooth. Lastly, I stir in the graham cracker crumbs until they blend in well. The mixture should feel thick and easy to mold into shapes.
Chilling the Mixture
Chilling the mixture is a key step. I cover the bowl with plastic wrap and place it in the fridge for about one hour. This helps the truffle mix firm up. A firmer mix makes it easier to shape the truffles without making a mess. Just remember, the colder the mix, the better the truffles will hold their shape.
Forming and Coating Truffles
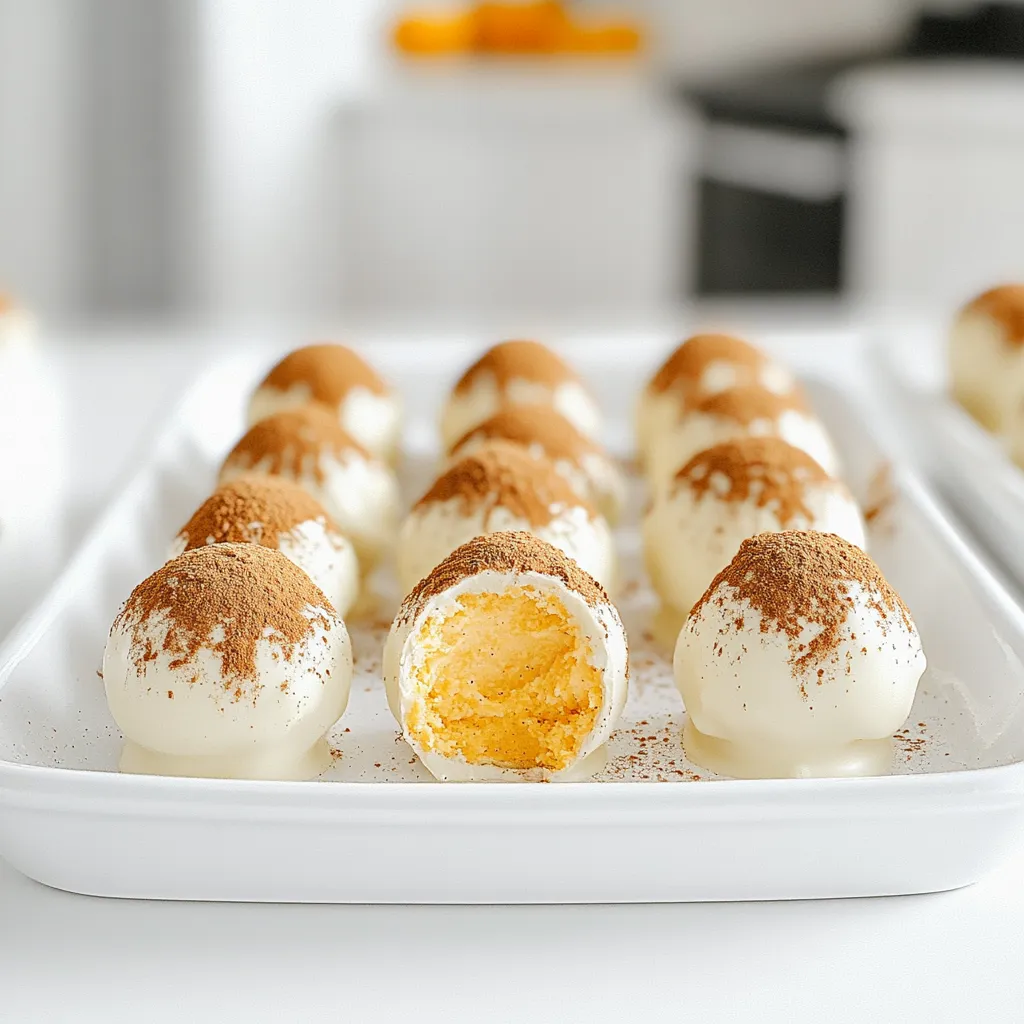
Once the mixture is chilled, I take it out of the fridge. Using a small scoop or my hands, I form small balls that are about one inch in diameter. I place these truffles on a parchment-lined baking sheet. Next, I dip each truffle into melted white chocolate. I let any extra chocolate drip off before moving on. Finally, I roll each coated truffle in extra graham cracker crumbs. This gives a nice crunch and extra flavor. I then place the truffles back on the tray and repeat this for all of them. Afterward, I refrigerate them again for about 30 minutes to let the chocolate set.
Tips & Tricks
Perfecting the Texture
To get the right texture for your truffles, start with soft cream cheese. Mix the cream cheese and pumpkin puree well. This step makes your truffle filling smooth. After adding sugar and spices, stir in the graham cracker crumbs. The mix should be thick, but not too hard. Refrigerate the mixture for an hour. This makes it easier to shape into balls.
Chocolate Dipping Techniques
Dipping the truffles in chocolate needs care. Use melted white chocolate for a sweet coat. Take each truffle and dip it into the chocolate. Let the excess chocolate drip off. This keeps the truffles from being too messy. If you want a nice finish, roll the dipped truffles in extra graham cracker crumbs right after dipping.
Presentation Tips
Making your truffles look pretty adds joy to serving. Place the truffles on a nice platter. Drizzle some melted chocolate on top for flair. A sprinkle of cinnamon gives a warm touch. You can also add whole walnuts or small pieces of pumpkin candy. This adds color and makes your truffles festive.
Variations
Flavor Variations
You can change up the taste of your pumpkin cheesecake truffles. Try adding different spices like allspice, clove, or cardamom. For a sweeter touch, use maple extract instead of vanilla. Each option gives a new twist to the classic flavor. Think about using flavored chocolate too. Dark or milk chocolate can change the experience.
Dietary Adaptations
If you need gluten-free options, use gluten-free graham cracker crumbs. These crumbs will still give a nice crunch. For vegan substitutes, replace cream cheese with a vegan cream cheese. Use coconut cream for a rich texture. You can also swap white chocolate with dairy-free chocolate chips. These changes keep the truffles tasty for everyone.
Seasonal Twists
You can make these truffles fit any holiday! For Halloween, add spooky sprinkles on top. At Thanksgiving, add chopped pecans or caramel drizzle for extra flair. For Christmas, mix in peppermint extract and roll them in crushed candy canes. These fun twists make the truffles festive and exciting.
Storage Info
Storing the Truffles
To keep your pumpkin cheesecake truffles fresh, refrigeration is key. Place the truffles in an airtight container. This helps prevent them from drying out. If you stack them, use parchment paper between layers. This will stop them from sticking together. Store them in the fridge for up to one week. They stay tasty and creamy when kept cool.
Freezing Truffles
You can also freeze the truffles for later enjoyment. First, place them on a baking sheet in a single layer. Freeze them for about an hour until solid. Then, transfer the frozen truffles to an airtight container or a freezer bag. Be sure to remove as much air as possible. When you want to enjoy them, take out the truffles and let them thaw in the fridge. This method helps keep their texture and flavor.
Shelf Life
The truffles have a good shelf life when stored properly. In the fridge, they last for about one week. If frozen, they can stay fresh for up to three months. Just remember to check for any signs of freezer burn. If they look or smell off, it’s best to discard them. Enjoy your treats while they are at their best!
FAQs
Can I use canned pumpkin for this recipe?
Yes, you can use canned pumpkin for this recipe. Canned pumpkin offers a few benefits.
– It saves time, as it is already cooked and pureed.
– It has a consistent flavor and texture.
– Canned pumpkin is often easier to find.
Using fresh pumpkin can be great too, but it needs more prep work. You must cook and puree it. Canned pumpkin makes this recipe quick and easy.
How do I know when the chocolate is melted perfectly?
To know when the chocolate is melted perfectly, look for a smooth and shiny texture.
– Use a microwave-safe bowl to melt chocolate.
– Heat in short bursts of 20 to 30 seconds.
– Stir in between each burst to avoid burning.
You want the chocolate warm but not too hot. If it feels too thick, add a tiny bit of vegetable oil. This helps it coat the truffles better.
Can these truffles be made in advance?
Yes, these truffles can be made in advance. Here are some storage tips:
– Keep them in an airtight container in the fridge.
– They stay fresh for up to one week.
– You can also freeze them for longer storage.
To freeze, place them on a tray first. After they are frozen, move them to a container. This keeps them from sticking together. Just thaw them in the fridge before serving.
In this blog post, I covered how to make delicious pumpkin cream cheese truffles. We explored key ingredients, step-by-step instructions, and tips for perfecting your truffles. Adding variations and storage tips ensures your treats remain fresh and enjoyable. Remember, experimenting with flavors and techniques can produce amazing results. Enjoy making these festive truffles for any gathering or simply for yourself. With these guidelines, you’ll create a sweet treat everyone will love!