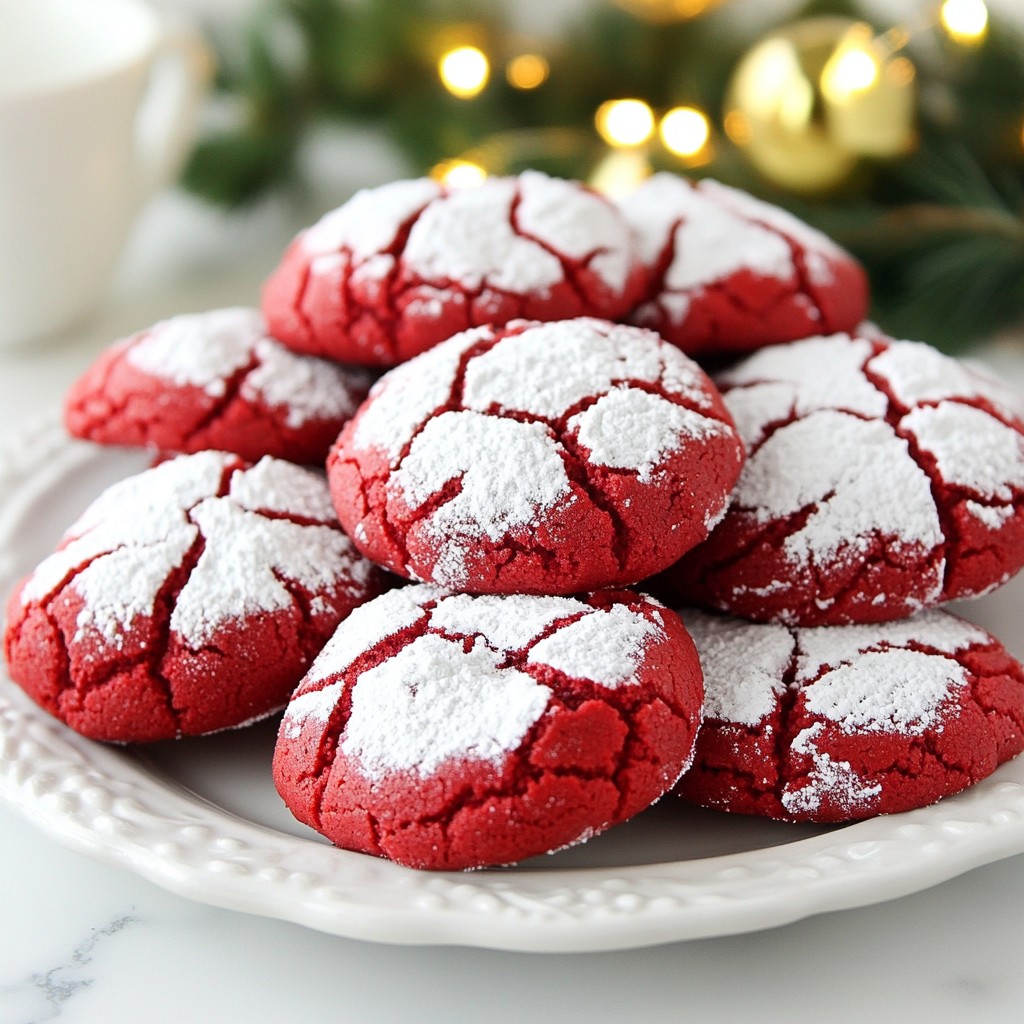
Looking for a sweet treat that’s easy to make? Red velvet crinkle cookies are your answer! With their soft texture and stunning color, they’re perfect for any occasion. In this recipe, I’ll guide you through simple steps to create these delicious cookies. You’ll learn how to get that perfect crinkle, avoid common mistakes, and enjoy variations. Get ready to impress your friends and family with these delightful cookies!
Why I Love This Recipe
- Unique Flavor: The rich cocoa and sweet vanilla create a deliciously unique flavor profile that is perfect for any occasion.
- Stunning Appearance: The vibrant red color and powdered sugar dusting make these cookies a standout dessert that impresses everyone.
- Easy to Make: This recipe is simple enough for bakers of all levels, making it a great choice for family baking sessions.
- Perfectly Chewy: The crinkle texture gives these cookies a delightful chewiness that keeps you coming back for more.
Ingredients
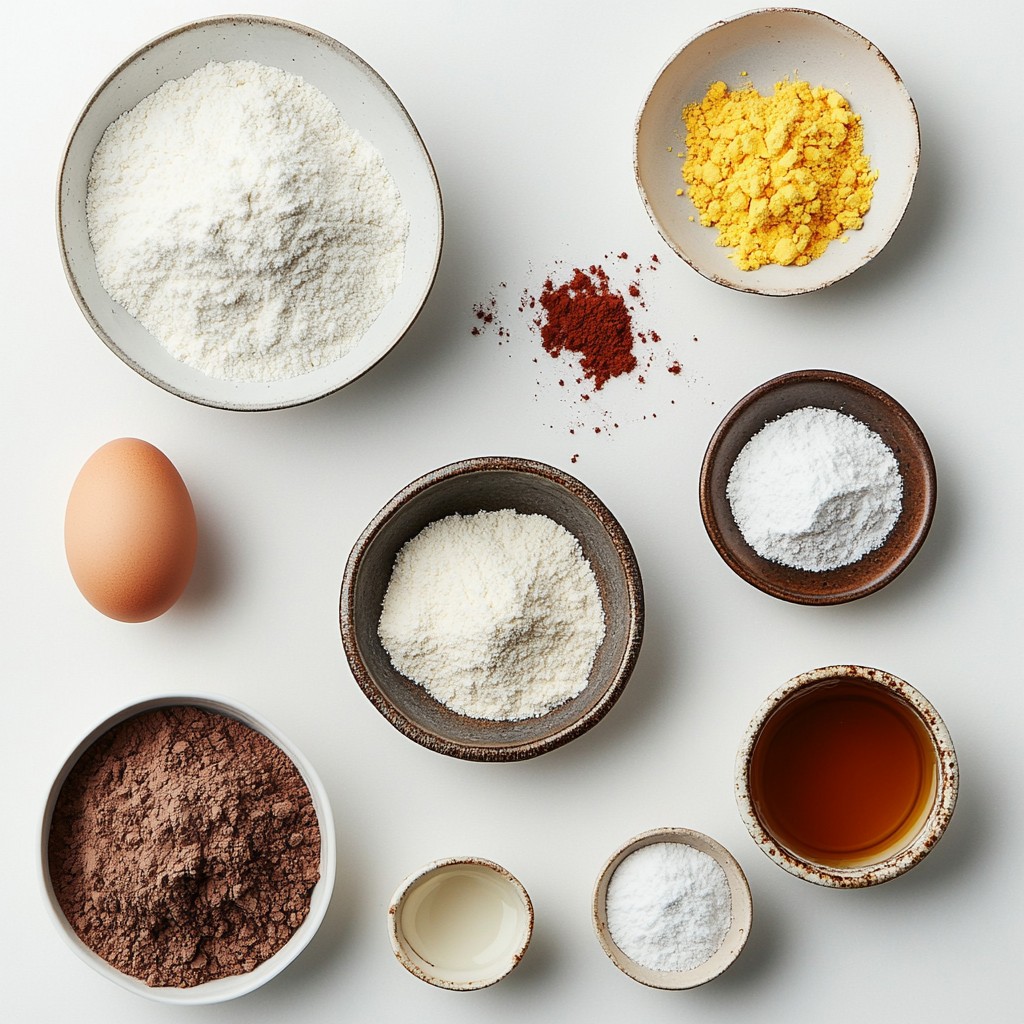
List of Ingredients
To make Red Velvet Crinkle Cookies, you need the following:
- 2 cups all-purpose flour
- 1 tablespoon cocoa powder
- 1 teaspoon baking powder
- 1/2 teaspoon salt
- 1 cup granulated sugar
- 1/2 cup vegetable oil
- 1 large egg
- 1 tablespoon buttermilk
- 2 teaspoons vanilla extract
- 2 teaspoons red food coloring
- 1/4 cup powdered sugar (for dusting)
Ingredient Substitutions
You can swap some ingredients if needed:
- Use whole wheat flour for a healthier option.
- Replace vegetable oil with melted coconut oil for a unique twist.
- If you don’t have buttermilk, mix milk with a splash of vinegar.
- Try using agave syrup instead of granulated sugar for less refined sweetness.
- For a fun flavor, use orange or yellow food coloring instead of red.
Tips for Using Fresh Ingredients
Fresh ingredients make a big difference. Here are my tips:
- Check your flour for freshness. Store it in a cool, dry place.
- Use fresh cocoa powder for the best chocolate flavor.
- Always use large, fresh eggs for the best rise.
- When you buy vanilla extract, choose pure over imitation for richer taste.
- For the best color, use gel food coloring. It gives a vibrant hue without too much liquid.
Step-by-Step Instructions
Prepping the Oven and Baking Sheet
First, you need to get your oven ready. Preheat it to 350°F (175°C). This step is key for even baking. While the oven warms up, take a baking sheet and line it with parchment paper. This helps the cookies not stick.
Mixing Dry Ingredients
Next, grab a medium bowl. In this bowl, whisk together 2 cups of all-purpose flour, 1 tablespoon of cocoa powder, 1 teaspoon of baking powder, and 1/2 teaspoon of salt. Make sure there are no lumps. This mix adds flavor and structure to your cookies.
Preparing the Wet Ingredients
Now, take a large bowl. Mix 1 cup of granulated sugar with 1/2 cup of vegetable oil. Stir until it blends well. Then, add 1 large egg, 1 tablespoon of buttermilk, 2 teaspoons of vanilla extract, and 2 teaspoons of red food coloring. Beat this mixture until it is smooth and creamy. This is where the cookies get their rich color and taste.
Combining Ingredients for Dough
Once your wet mix is ready, it’s time to combine everything. Gradually add the dry mix to the wet mix. Stir until just combined. Be careful not to overmix, or your cookies might get tough. The dough should look rich and thick.
Chilling the Dough
Cover the dough with plastic wrap and put it in the fridge. Chill for about 30 minutes. This step helps the dough firm up. Chilling makes it easier to shape the cookies later.
Shaping and Baking Cookies
After chilling, scoop tablespoon-sized portions of dough. Roll each portion into a ball. Then, roll these balls in 1/4 cup of powdered sugar until they are well-coated. Place them on the prepared baking sheet, leaving some space between each one. Bake in your preheated oven for 10 to 12 minutes. The edges should be set, and the tops will have a nice crinkle. Let them cool on the baking sheet for 5 minutes, then transfer them to a wire rack to cool completely. Enjoy your delicious red velvet crinkle cookies!
Tips & Tricks
Achieving the Perfect Crinkle Texture
To get that lovely crinkle on your cookies, follow these steps. First, chill your dough for 30 minutes. This helps the cookies keep their shape as they bake. Second, roll each dough ball in powdered sugar before baking. This sugar coating is key for the crinkle effect. Lastly, don't overbake them! Pull them out when the edges are set, and the tops look crinkled. They will firm up as they cool.
Common Mistakes to Avoid
Watch out for these common pitfalls. One mistake is overmixing the dough. This can make your cookies tough instead of soft. Always mix until just combined. Another mistake is skipping the chilling step. Chilling helps the dough firm up and improves texture. Finally, do not skip the powdered sugar coating. It not only adds sweetness but also creates that beautiful crinkle.
Recommended Baking Tools and Equipment
Use these tools for the best results. A large mixing bowl is essential for combining ingredients easily. A medium bowl works well for mixing dry items. Use a cookie scoop to get even-sized dough balls. This ensures all cookies bake evenly. Parchment paper is great for lining your baking sheet. It prevents sticking and makes cleanup easy. Lastly, a wire rack is perfect for cooling your cookies after baking.
Pro Tips
- Chill the Dough: Chilling the dough for at least 30 minutes helps the cookies hold their shape and enhances the flavor.
- Use Quality Food Coloring: For the best color and flavor, use a high-quality gel food coloring instead of liquid.
- Don’t Overbake: To keep the cookies soft and chewy, make sure to remove them from the oven when the edges are set, even if the centers look slightly underbaked.
- Decorative Dusting: For a professional touch, dust the cookies with powdered sugar just before serving to enhance their appearance.
Variations
Gluten-Free Red Velvet Crinkle Cookies
You can make these cookies gluten-free! Use a gluten-free flour blend instead of all-purpose flour. Check the blend for xanthan gum. This ingredient helps give the cookies some structure. Follow the same steps in the recipe. Your cookies will taste just as good.
Adding Chocolate Chips or Nuts
For a twist, add chocolate chips or nuts to your dough. Use about half a cup. Chocolate chips add sweetness and richness. Nuts give a nice crunch. Stir them in after you combine the wet and dry ingredients. This simple step makes your cookies even more special.
Incorporating Different Flavors (like peppermint)
Want to change the flavor? Add peppermint extract for a fresh twist. Use one teaspoon in place of vanilla. You can also add crushed peppermint candies to the dough. This makes a fun holiday treat! Be creative and try other extracts too, like almond or lemon. Each adds a unique taste!
Storage Info
Best Practices for Storing Cookies
To keep your red velvet crinkle cookies fresh, store them in an airtight container. This will help keep moisture in and prevent them from going stale. Place a piece of wax paper between layers if you stack them. This helps avoid sticking. Keep your cookies at room temperature, away from direct sunlight. They will stay soft and tasty this way.
Freezing Red Velvet Crinkle Cookies
You can freeze these cookies for later enjoyment. First, let them cool completely. Then, place them in a single layer on a baking sheet. Freeze for about an hour until firm. After that, transfer the cookies to a freezer bag or container. Make sure to label the bag with the date. You can freeze them for up to three months. When you want to eat them, just let them thaw at room temperature.
Shelf Life of Prepared Cookies
When stored properly, your red velvet crinkle cookies will last about one week at room temperature. If you freeze them, they can last much longer. The texture may change a bit after freezing, but they will still taste great. Always check for any signs of spoilage before eating. Enjoy these treats fresh or frozen!
FAQs
How do I know when Red Velvet Crinkle Cookies are done?
You can tell when your cookies are done by looking at the edges. The edges should be set and firm. The tops will have nice cracks, showing their crinkle. If the cookie tops look shiny or wet, they need more time. Bake them for 10 to 12 minutes for the best results.
Can I use liquid food coloring instead of gel?
Yes, you can use liquid food coloring. However, gel food coloring gives deeper color. It also mixes better in the dough. If using liquid, add a bit more to get the same bright shade.
Why are my cookies not crinkling?
Cookies may not crinkle for a few reasons. If the dough is too warm, they won’t crinkle well. Another reason could be not rolling them in powdered sugar enough. Chilling the dough helps with crinkling, too.
Can I make the dough ahead of time?
Yes, you can make the dough ahead of time! Just wrap it tightly in plastic wrap. Store it in the fridge for up to three days. You can also freeze the dough for up to three months. Just remember to thaw it before baking.
In this post, we covered the key ingredients, step-by-step instructions, tips for perfect cookies, and variations. You learned how to store your cookies and answered common FAQs too. Remember, fresh ingredients lead to better taste. Use the right tools and avoid common mistakes for success. Enjoy experimenting with flavors and sharing your treats! With practice, you'll bake perfect red velvet crinkle cookies every time.