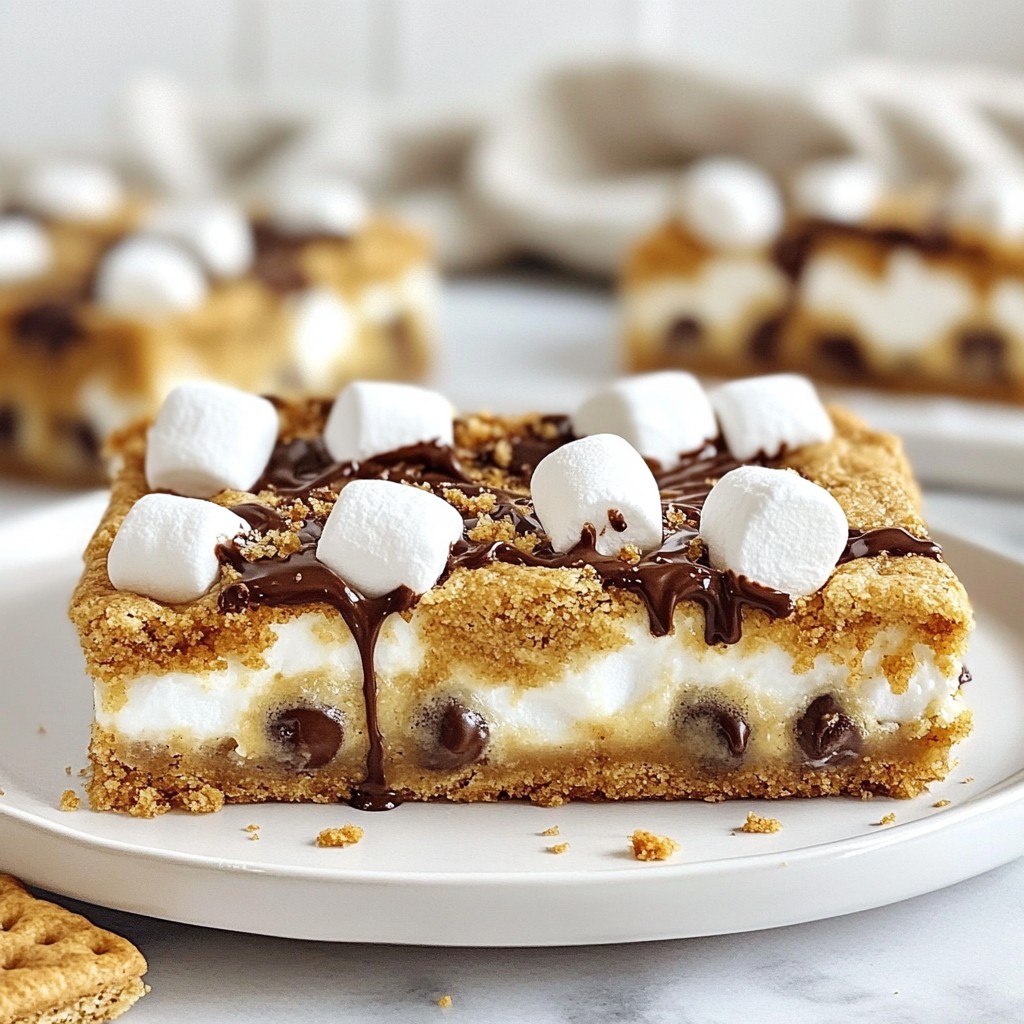
Who can resist the gooey charm of S’mores? I’m here to share an easy recipe for S’mores Cookie Bars that will become your new favorite treat. With simple steps and common ingredients, you’ll whip up this delicious dessert in no time. Whether you want a family snack or a fun party treat, these cookie bars are perfect. Let’s dive into the sweet details and start baking!
Why I Love This Recipe
- Decadent Flavor: These S’mores Cookie Bars combine the rich flavors of chocolate, marshmallows, and graham crackers, creating a delightful treat that is impossible to resist.
- Easy to Make: This recipe requires simple ingredients and straightforward steps, making it perfect for bakers of all skill levels.
- Perfect for Sharing: These cookie bars are cut into squares, making them ideal for parties, picnics, or any gathering where you want to impress your friends and family.
- Customizable: You can easily modify the ingredients by adding nuts, different types of chocolate, or even using gluten-free graham crackers to suit your preferences.
Ingredients
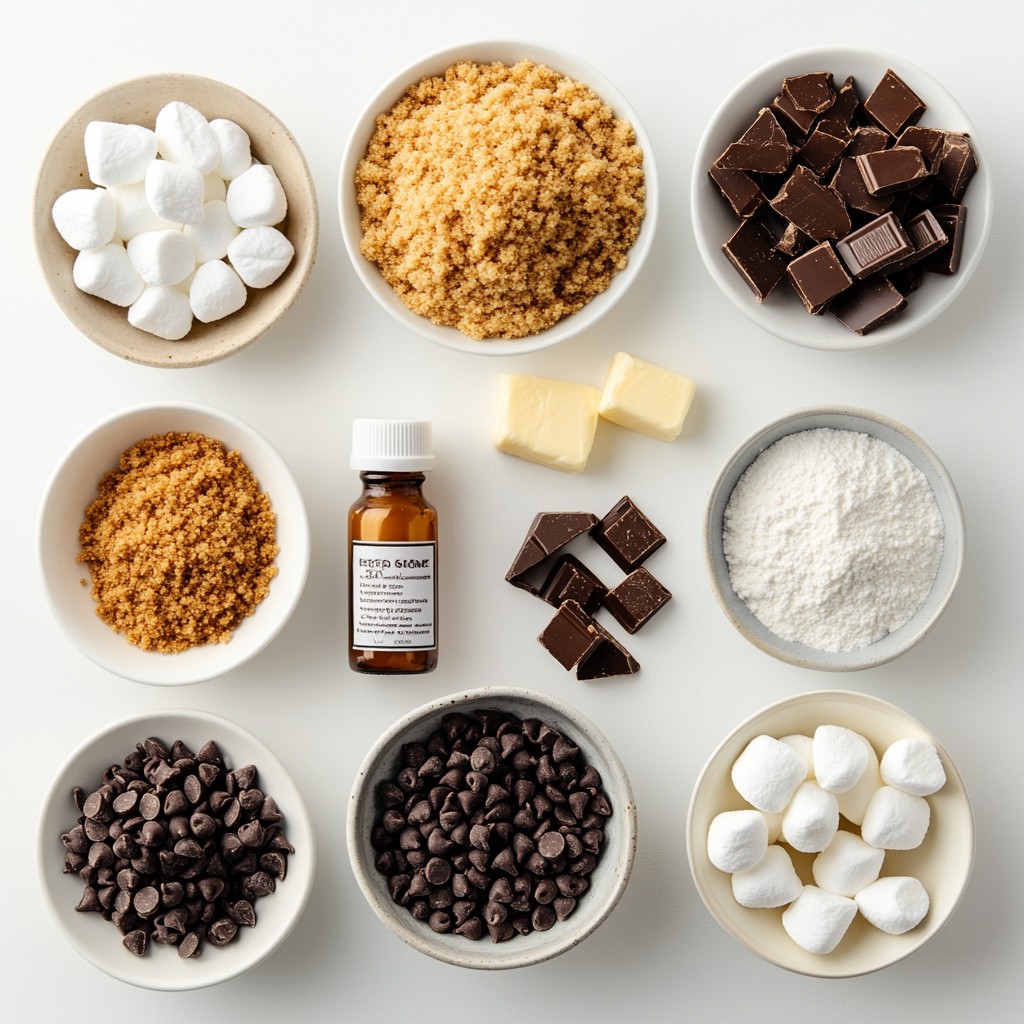
List of required ingredients
To make S’mores cookie bars, you need the following ingredients:
- 1 cup unsalted butter, softened
- 1 cup brown sugar, packed
- ½ cup granulated sugar
- 1 large egg
- 1 teaspoon vanilla extract
- 2½ cups all-purpose flour
- 1 teaspoon baking soda
- ½ teaspoon salt
- 1 cup graham cracker crumbs
- 1 cup milk chocolate chips
- 1 cup mini marshmallows
- Extra chocolate chips and marshmallows for topping
Measurements and preparations
Each ingredient plays a key role in making these cookie bars tasty. Start with softened butter for easy mixing. Use packed brown sugar for a rich flavor and granulated sugar for sweetness. The egg binds everything together. Vanilla extract adds a lovely aroma. For the dry mix, measure flour, baking soda, and salt carefully. Graham cracker crumbs give the bars that classic s’mores taste. Chocolate chips and marshmallows add gooey goodness, while the extra toppings make it even better.
Substitutions for dietary needs
If you have dietary needs, you can make some easy swaps. For a dairy-free option, use vegan butter and dairy-free chocolate chips. If you need a gluten-free version, replace all-purpose flour with a gluten-free blend. You can also use egg substitutes like applesauce or flaxseed meal mixed with water. Just remember that these changes may slightly alter the final taste or texture, but they will still be delicious!
Step-by-Step Instructions
Preparation of baking pan
First, preheat your oven to 350°F (175°C). While it warms up, grab a 9x13 inch baking pan. You can grease it with butter or line it with parchment paper. Lining it helps you take the bars out easily later.
Mixing wet ingredients
In a large mixing bowl, add 1 cup of softened unsalted butter, 1 cup of brown sugar, and ½ cup of granulated sugar. Use a mixer to cream them together. Mix until the mixture looks light and fluffy. Then, crack in 1 large egg and pour in 1 teaspoon of vanilla extract. Mix again until everything blends well.
Combining dry ingredients and mixing
Now, grab another bowl. In it, whisk together 2½ cups of all-purpose flour, 1 teaspoon of baking soda, ½ teaspoon of salt, and 1 cup of graham cracker crumbs. Once mixed, slowly add this dry mix to the wet mix. Stir until just combined. Be sure not to overmix. Finally, gently fold in 1 cup of milk chocolate chips and 1 cup of mini marshmallows. Make sure they are evenly spread throughout the dough.
Tips & Tricks
Baking time and temperature adjustments
Baking time is key for perfect cookie bars. I suggest checking them at 25 minutes. Oven temperatures can vary, so keep an eye on them. If they’re not golden brown, add a few minutes. You want the edges set and the center just firm. If you like a chewy texture, take them out a bit early.
Achieving the perfect texture
Texture makes a big difference. For soft bars, do not overmix the dough. When you combine wet and dry ingredients, mix until just blended. This keeps the bars soft and chewy. The graham cracker crumbs add a nice crunch. Make sure to fold in the chocolate chips and marshmallows gently for even distribution.
Presentation and serving suggestions
Presentation is important for any treat. Serve these bars warm for the best flavor. Drizzle melted chocolate on top for a fun touch. Sprinkle some graham cracker crumbs over the chocolate to add texture. You can cut them into squares or rectangles. Pair them with a cold glass of milk for a classic combo.
Pro Tips
- Use Fresh Ingredients: Always use fresh marshmallows and chocolate chips for the best flavor and texture in your cookie bars.
- Chill the Dough: For thicker bars, chill the dough in the refrigerator for about 30 minutes before baking. This helps them hold their shape better.
- Don’t Overmix: Mix the dough just until combined to ensure your cookie bars remain soft and chewy, rather than tough.
- Store Properly: Keep any leftovers in an airtight container at room temperature for up to a week to maintain freshness.
Variations
Vegan S’mores Cookie Bars
You can easily make vegan S’mores cookie bars. Replace the butter with coconut oil or vegan butter. Use a flax egg instead of a regular egg. To make a flax egg, mix one tablespoon of ground flaxseed with three tablespoons of water. Let it sit for five minutes. Choose dairy-free chocolate chips for a tasty treat. You will still enjoy the gooey marshmallows and graham cracker crunch. These bars are a great way to share the S’mores love with everyone.
Gluten-free alternatives
For gluten-free S’mores cookie bars, swap the all-purpose flour for a gluten-free blend. Many blends work well in baking. Just make sure it has xanthan gum for the right texture. Check your graham cracker crumbs too; choose gluten-free options to match. You can still use the same amount of chocolate chips and marshmallows. These adjustments keep your S’mores cookie bars delicious without any gluten.
Flavor variations (e.g., different chocolate types)
You can play with flavors in your S’mores cookie bars. Try dark chocolate chips for a more intense taste. Or use white chocolate chips for a sweet twist. Consider adding peanut butter chips for a nutty flavor. You can even mix in crushed nuts or toffee bits for extra crunch. These small changes make your bars exciting and unique. Let your creativity shine!
Storage Info
How to store leftovers
To keep your S’mores Cookie Bars fresh, store them in an airtight container. This helps them stay soft and chewy. Place a piece of parchment paper between layers to avoid sticking. They will last for about 3 to 5 days at room temperature. If you need them to last longer, consider freezing them.
Freezing options
You can freeze these cookie bars for later enjoyment. First, let them cool completely. Then, cut them into squares. Wrap each square in plastic wrap. Place the wrapped bars in a freezer-safe bag or container. They can stay in the freezer for up to 3 months. When you're ready to eat, just thaw them at room temperature.
Reheating instructions
To enjoy your S’mores Cookie Bars warm, you can reheat them. Place a square on a microwave-safe plate. Heat it in the microwave for about 10 to 15 seconds. This will make the chocolate gooey again. You can also warm them in the oven at 350°F for about 5 to 10 minutes. Enjoy them fresh and warm!
FAQs
Can I make these cookie bars ahead of time?
Yes, you can make these cookie bars ahead of time. Bake them and let them cool completely. Once cooled, cut them into squares and store them in an airtight container. They stay fresh for up to five days. You can also freeze them for up to three months. Just thaw them overnight in the fridge before serving.
What can I use instead of milk chocolate chips?
If you want to switch things up, you can use dark chocolate chips or white chocolate chips. You can also use peanut butter chips for a nutty twist. If you need a dairy-free option, look for dairy-free chocolate chips. They work great and still taste delicious.
How do I know when the cookie bars are done baking?
Check the edges of the cookie bars. They should be golden brown. If the center looks set and no longer shiny, it’s done. A toothpick inserted into the center should come out clean or with just a few moist crumbs. Don’t overbake them, or they will become dry.
You learned about the key ingredients and how to prepare them. I shared tips for baking time and texture. You also discovered fun variations, like vegan and gluten-free options. Storing leftovers and reheating them is easy with my guidance. Remember, cookie bars are a treat that you can adapt to your needs. Enjoy baking and sharing these delicious bars!