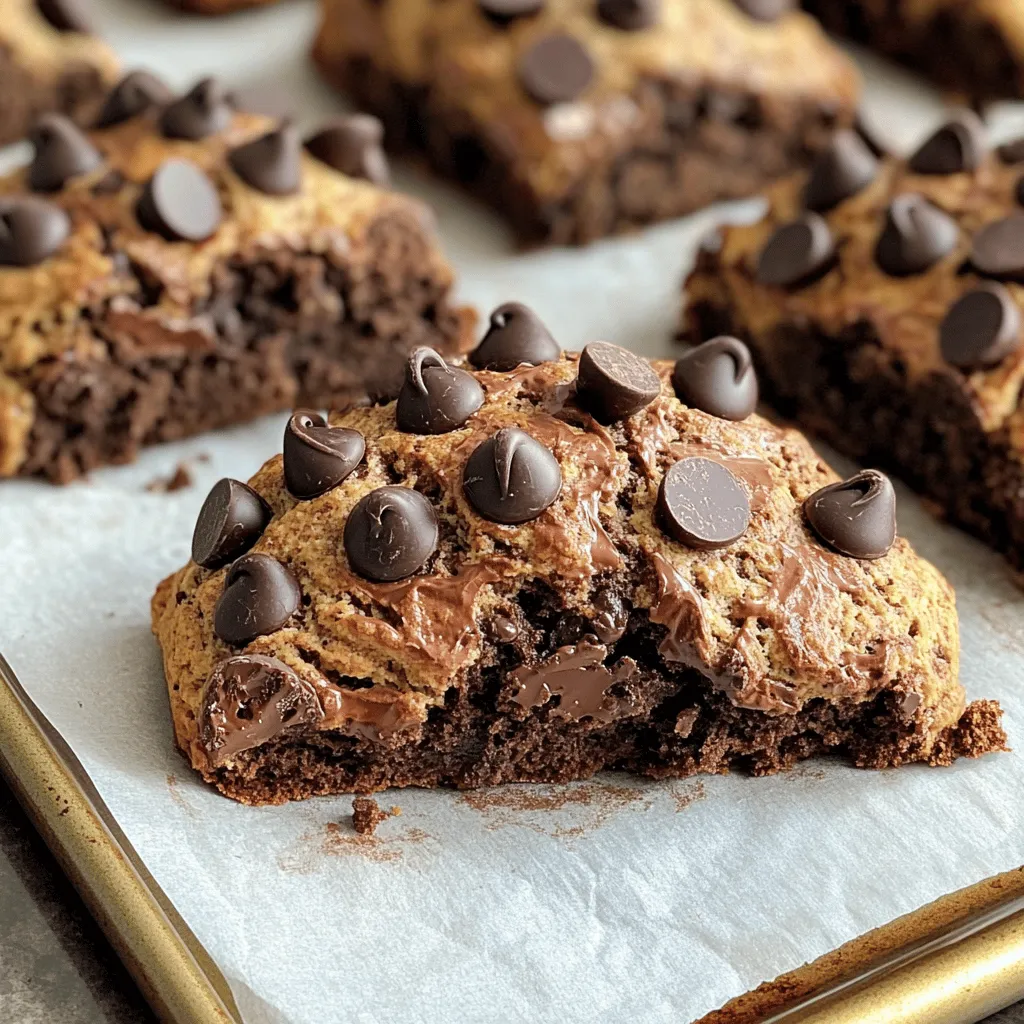
Are you ready to treat yourself to something sweet? These delicious double chocolate chip scones are the perfect blend of rich chocolate and tender crumb. I’ll walk you through simple steps to create this mouthwatering treat that you won’t be able to resist. Whether it’s a cozy breakfast or an afternoon snack, let’s dive into making the ultimate chocolate indulgence! Get your ingredients ready, and let’s get baking!

Ingredients
Dry Ingredients
– 2 cups all-purpose flour
– 1/4 cup unsweetened cocoa powder
– 1/3 cup granulated sugar
– 1 tablespoon baking powder
– 1/2 teaspoon salt
The dry ingredients create the base for our scones. The flour gives structure, while cocoa adds rich chocolate flavor. Sugar sweetens the mix, and baking powder helps them rise. Salt enhances all these flavors, making them pop.
Wet Ingredients
– 1/2 cup cold unsalted butter, cubed
– 1 large egg
– 1/2 cup heavy cream
– 1 teaspoon vanilla extract
The wet ingredients bring moisture and richness. Cold butter makes the scones flaky. The egg binds everything together. Heavy cream adds creaminess, while vanilla gives a lovely aroma and flavor.
Add-ins
– 1/2 cup chocolate chips (semi-sweet or dark)
– Additional chocolate chips for topping
Chocolate chips are the stars of this recipe. They melt slightly during baking, giving you gooey bites of chocolate. Extra chips on top make the scones even more tempting and beautiful.
These ingredients come together to create delicious double chocolate chip scones that are sure to impress.
Step-by-Step Instructions
Preparation
– Preheat the oven to 400°F (200°C).
– Prepare the baking sheet with parchment paper.
Mixing the Dry Ingredients
– In a large bowl, whisk together:
– 2 cups all-purpose flour
– 1/4 cup unsweetened cocoa powder
– 1/3 cup granulated sugar
– 1 tablespoon baking powder
– 1/2 teaspoon salt
This mix gives your scones a rich chocolate flavor. Cocoa adds depth and sweetness.
Incorporating the Butter
– Add 1/2 cup of cold unsalted butter, cubed, to the dry mix.
– Blend it using a pastry cutter or your fingertips.
– Keep mixing until you see coarse crumbs.
The cold butter creates flaky layers in your scones. This step is key for great texture.
Combining Wet and Dry Ingredients
– In a separate bowl, mix together:
– 1 large egg
– 1/2 cup heavy cream
– 1 teaspoon vanilla extract
Gently pour the wet mix into the dry ingredients. Fold carefully without overworking the dough.
Overmixing can make your scones tough. We want them light and crumbly.
Shaping and Baking
– Turn the dough out onto a floured surface.
– Shape it into a circle, about 1-inch thick.
– Cut the circle into 8 equal wedges.
Place the wedges on your prepared baking sheet.
– Sprinkle additional chocolate chips on top of each scone for more chocolatey goodness.
Bake for 15-20 minutes or until the tops feel firm. A toothpick should come out clean from the center.
These steps lead to warm, delicious scones that melt in your mouth.
Tips & Tricks
Ensuring Perfect Texture
Using cold butter is key for scones. Cold butter helps create a flaky texture. When it melts during baking, it forms steam. This steam lifts the scone, making it light and airy.
To blend the butter, use a pastry cutter or your fingertips. Stop mixing when the mixture looks like coarse crumbs. Overmixing can lead to tough scones. You want to keep some chunks of butter intact.
Baking Tips
To know when your scones are done, look for a firm top. Gently press the top; it should spring back. You can also use a toothpick. Insert it into the center. If it comes out clean, the scones are ready.
An oven thermometer is a wise choice. Ovens often show incorrect temperatures. By using a thermometer, you ensure accurate baking heat. This helps your scones rise perfectly.
Serving Suggestions
Double chocolate chip scones shine when served warm. Add a dollop of clotted cream for richness. A drizzle of chocolate ganache can elevate them further. Both make the scones feel extra special.
Pair your scones with tea or coffee. This classic combo is a delightful treat. For a beautiful presentation, arrange the scones on a fancy plate. Sprinkle some extra chocolate chips on top for a tempting look.

Variations
Flavor Variations
You can easily change the flavor of your double chocolate chip scones. Try adding nuts like walnuts or pecans for a crunch. You can also use different types of chocolate chips. Semi-sweet, dark, or even white chocolate can make a big difference.
Another fun idea is to mix in flavored extracts. A dash of mint extract gives a fresh twist. Or, use almond extract for a warm, nutty flavor. Just remember to keep the amount small so it doesn’t overpower the chocolate.
Dietary Adjustments
If you follow a gluten-free diet, you can swap the all-purpose flour with gluten-free flour blends. Many brands work well in scone recipes. Just make sure the blend contains a binding agent like xanthan gum for the best texture.
For vegan options, replace the butter with coconut oil or a vegan butter substitute. You can also use a plant-based milk in place of heavy cream. Almond or oat milk works great in this recipe.
Scone Shapes
Scones don’t have to be just wedges. You can shape them into circles or triangles for a fun look. If you want mini scones, just make smaller rounds and cut them into smaller wedges.
Drop scones are another option. Instead of shaping the dough, you can scoop it onto the baking sheet. This makes for a casual, rustic look. Plus, they bake up just as yummy!
Storage Info
Storing Scones
To keep your double chocolate chip scones fresh, store them at room temperature. Place them in an airtight container. This method keeps them soft and tasty for up to two days. If you want to keep them longer, refrigeration is a good option. Wrap each scone in plastic wrap and place them in a bag. They can stay fresh for about a week in the fridge. For even longer storage, freeze your scones. Place them in a freezer-safe bag or container. You can keep them frozen for up to three months.
Reheating Instructions
To enjoy your scones warm, reheating is key. For the best taste, preheat your oven to 350°F (175°C). Place the scones on a baking sheet. Heat them for about 5 to 10 minutes. This method revives their soft texture and rich flavor. You can also use a microwave if you’re in a hurry. Heat each scone for 15 to 20 seconds. However, this can make them a bit chewy compared to the oven method.
Shelf Life
When stored correctly, double chocolate chip scones last about two days at room temperature. In the fridge, they stay fresh for up to a week. If you freeze them, they can last for three months. Always check for any signs of spoilage before enjoying.
FAQs
What can I use instead of heavy cream?
You can use several options if you need a heavy cream substitute. Almond milk or coconut milk works well for a dairy-free version. You can also use full-fat coconut cream for a rich taste. If you want a lower-fat option, try using milk mixed with a bit of butter. This will give you some creaminess without all the fat.
Can I make these scones in advance?
Yes, you can prepare the dough ahead of time. Just mix the dry and wet ingredients as usual. Shape the dough into a circle, then cut it into wedges. Wrap the wedges in plastic wrap and freeze them. When you want fresh scones, bake them straight from the freezer. Just add a couple of extra minutes to the baking time.
How do I prevent my scones from being dry?
Dry scones often come from overmixing the dough. Mix just until combined; some lumps are okay. Also, make sure your butter is cold. This helps the scones stay flaky. Lastly, check your oven temperature. If it’s too high, scones can dry out quickly.
What is the difference between scones and biscuits?
Scones and biscuits are similar but have key differences. Scones often use cream or milk, making them richer. They are sweeter and denser than biscuits. Biscuits are lighter and fluffier, often served with savory dishes. The texture and ingredients set them apart, giving each a unique taste.
You learned how to make double chocolate chip scones with simple steps and tasty ingredients. We covered mixing dry and wet components, shaping the dough, and baking to perfection. I shared tips for the best texture and serving ideas. You also found ways to adjust the recipe for different diets and storage methods. Now, you can enjoy delicious scones at home. Try these recipes and make them your own for any occasion or just a treat for yourself.

